
7 Dash for the Bridge
My primary reason for asking for a new ASL PBeM game was to get more early scenarios done, so I has specifically asked after scenario 7, “Dash for the Bridge”, from Beyond Valor. A couple people warned of it not being very fun, but DaveH contacted me on GameSquad, willing to give it a go. Neither of us was set on sides, so I did a random roll and took the Germans. Since the record is lopsided, we’d already decided to use the Russian balance.
And… it is an unusual scenario. Two city boards representing Warsaw in September 1944 are set up end-to-end, and the Russians either have to exit three (out of six) tanks off the far end in 11 turns, or get 10 CVP while taking less than twice as much damage as they do. The Germans defend with 8 SS squads, some MGs, a roadblock and two 37mm AT Guns, all HIP, and can’t have more than half their forces on the first (eastern) board (20). The Russians have six 447 squads and six T-70s. And as an extra wrinkle, an SSR allows the Russians to exit a number of vehicles off the north or south edge roads, and make a secret dr. That many turns later, the Russians come back, a number of road entry hexes further west equal to dr. This can result in them having successfully exited while offboard, but if the ‘turn of entry’ is later than the end of the scenario, it doesn’t count. But, the Germans can hold a number squads (or manned Guns) from their opening setup, and modify the secret dr for where they come back (but not when) by one per squad/Gun. The Germans have to keep out a leader for every 2.5 squads/Guns not used, and the Russian balance says that the Germans must sacrifice their best leaders.
Figuring out how to set up the Germans drove me to distraction for a while. Not only do I have to stop the Russians, but I have to deal with the fact that they could end up in my rear at some point. The first thing was the roadblock. The only real chokepoints on these boards are at the board ends, and the far east was out of bounds, and the far west has no proper location for a roadblock. So I put it in 20B5/C5; the only place where there’s one road, and there’s buildings to connect a roadblock to. I wanted some decent long ‘shooting galleries’ for the AT Guns to fire down in the crowded terrain. One went in 21H9 as the final ‘last ditch’ defense: if the Russians re-entered on the last possible road from the south, they’d have to drive through its CA at point blank range, if from the north, they’d go through H1,where I set the Gun’s boresight. If they drove through the H5/H6 traffic circle, I’d probably have had a shot in L7 as well. I eventually put the other Gun in 21FF8, with the boresight in FF2. Other than sending all the tanks offboard, the Russians should have to go through that area sooner or later, and the only real worry was it getting outflanked by an advance along the south edge. Also, a HS was in GG7, who would help push the gun if needed.
In fact, I noticed that the road structure on board 20 naturally flows towards the south as you advance west. So the area near the roadblock turned into the major focus for my resistance, and designed to discourage an advance along the south edge. A forward HS was in V4 (I tended to set up in what woods there are, to aid PF shots), as that was the main avenue of the board, and a squad+LMG with the 8-0 was in N8. The 8-1 was with another squad and the HMG in 20E7h2, with the boresight in J7, as that was nearest cover if he went into the J8-L8 intersection. He could see most of the area, with clear terrain to the south, and with the other group, probably make the Russians decide to go around, to the north. Squads went in 21EE3 and 20A4, to try and surprise the Russians once they did go north. The 7-0 and a squad went in 21EE6 as a final reserve for the main point of resistance. A squad went in 21X0 to cover the Y1 entry, and would move back to the next couple as needed. One squad and the 9-1 were held offboard to give the re-entry dr a –1.
And if Dave exited off the south edge early (20Y10 or Q10), I could be in a lot of trouble.
To my surprise, Dave organized the radioless T-70s in to three platoons of 2, instead of two of 3, which would make it easy to exit a potentially game-winning force. He probed on a broad front, and only got to the edge of my legal set up area on the first turn.

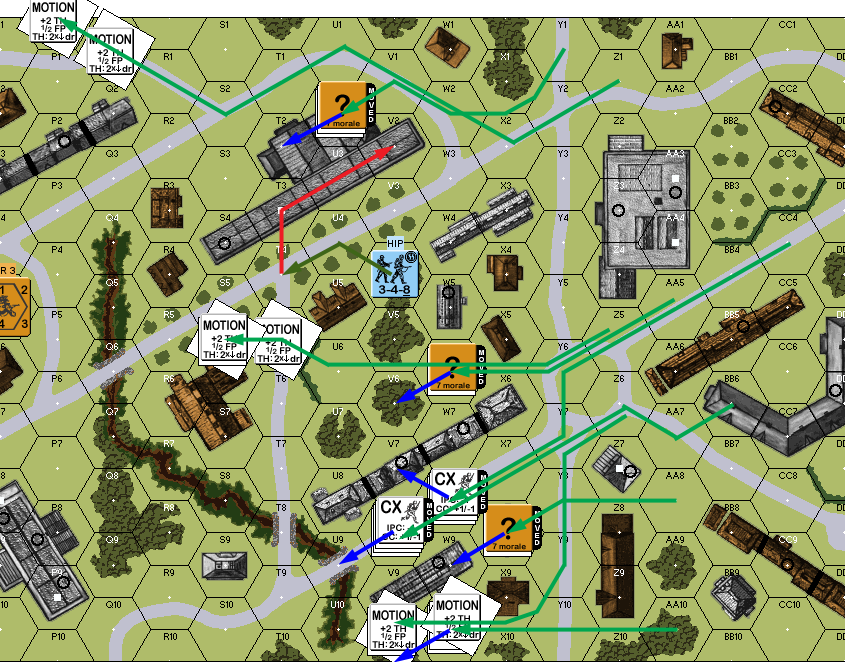
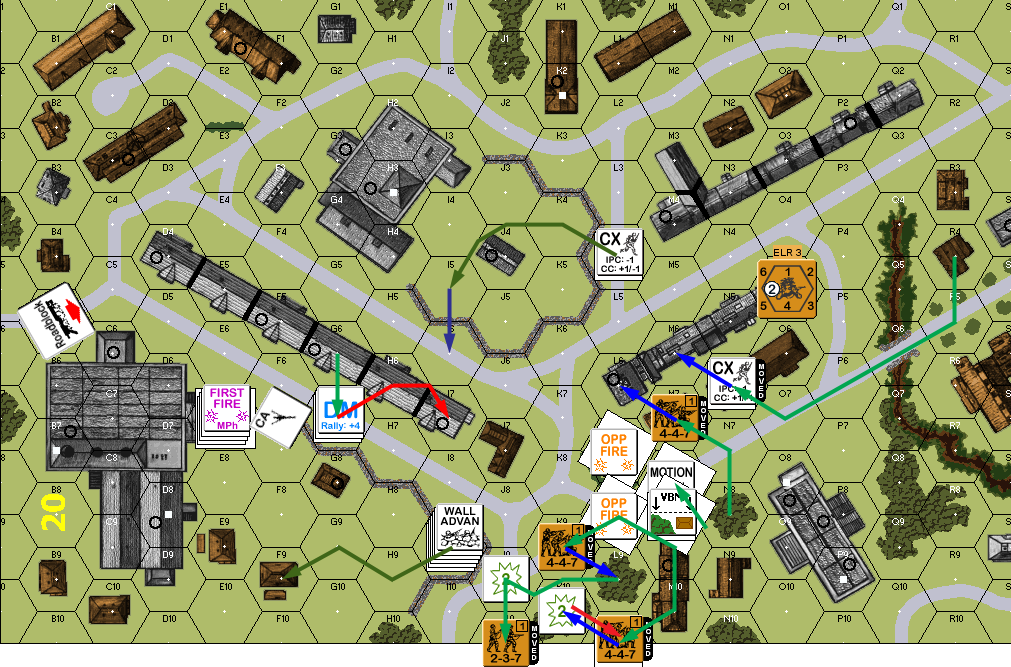
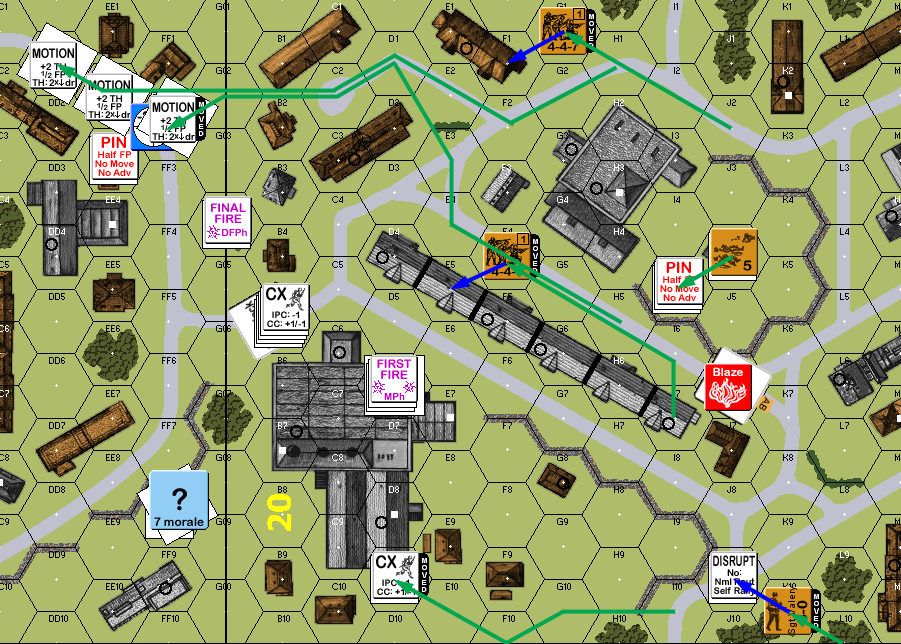
Situation, Turn 1, showing my full setup (all HIP).
Faced with no visible enemies for the second turn, Dave continued advancing, using a combination of roads and buildings, squeezing through various gaps, and sent the tanks in afterward. He picked various non-road routes, and one one platoon went by my forward HS, but didn’t give him a good shot, between motion and limited LOS. One platoon started racing ahead of the rest to the north.
My HS moved out on my turn, preparing to take a range 1 PF shot at the platoon driving by, but a good CMG shot from the rear T-70 broke him.
Situation, Russian Turn 2, showing my later movement and rout.
Pressing forward on turn 3, Dave stumbled into my southern flank outpost in N8, and gave me a range 2 shot at a squad and 8-1 in the open. All I could manage was a NMC, which broke the leader, and the squad pinned on the LLTC. The squad voluntarily broke to get out of the open before my prep, and they fled back towards the rest of his troops.
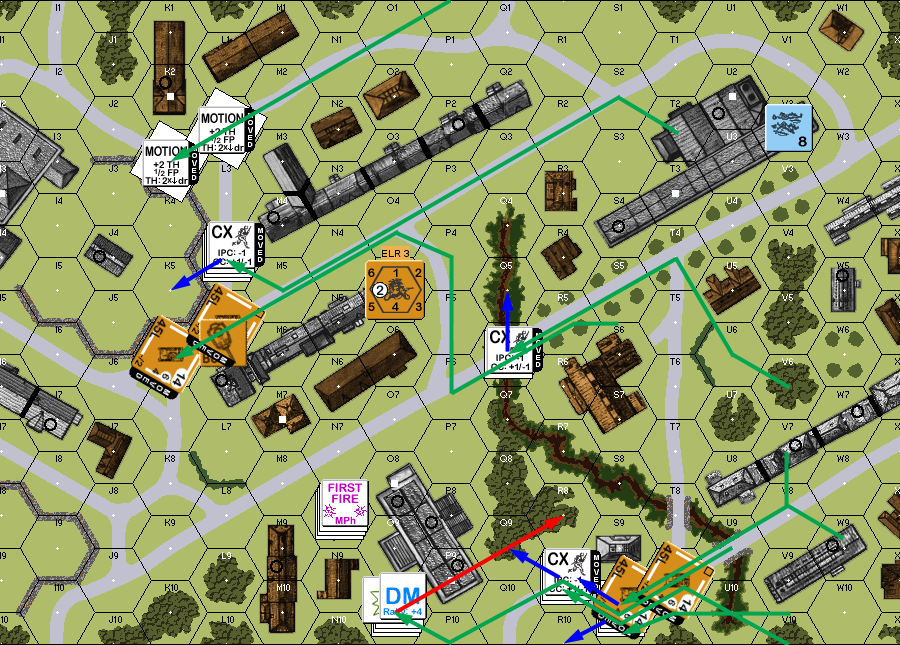
Situation, Russian Turn 3. I’m pretty sure that Q6 was on the bridge, making the Q5 gully non-ADJACENT….
My HS self-rallied for my turn 3, making them active again before everything moved too far away. It was slightly tempting to have N8 chase after the Russians, and try to get into a nice time-consuming firefight in the stone building, but that’s not their job, and I’d have no backup for him. So he moved back towards the rowhouses, braving fire from the K5 area on the way, and thankfully passing 1MC. Dave put Area Acquisition on both I7 and J7, which successfully kept me out of the rowhouse, so I went behind the wall in I9, protecting the south edge.
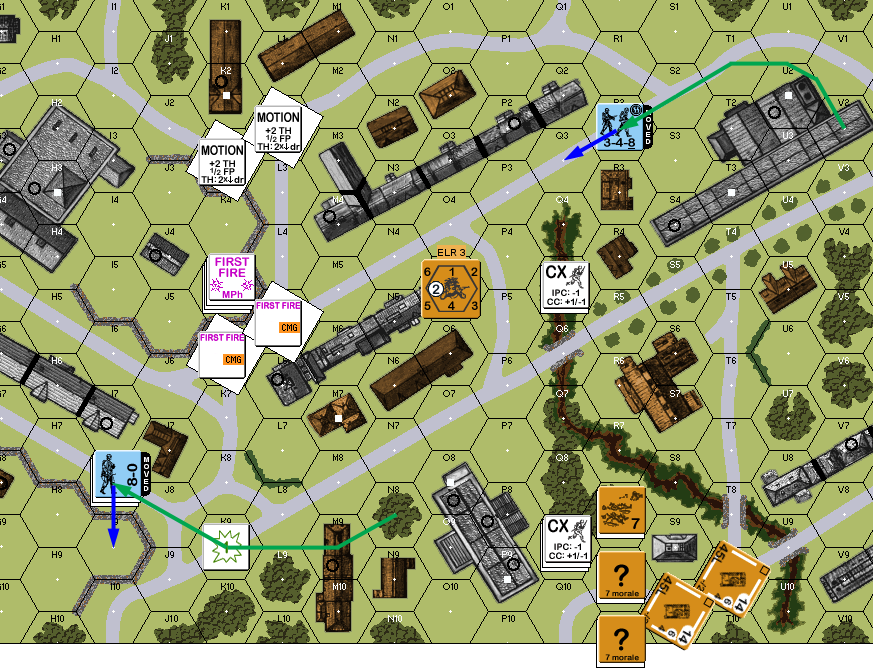
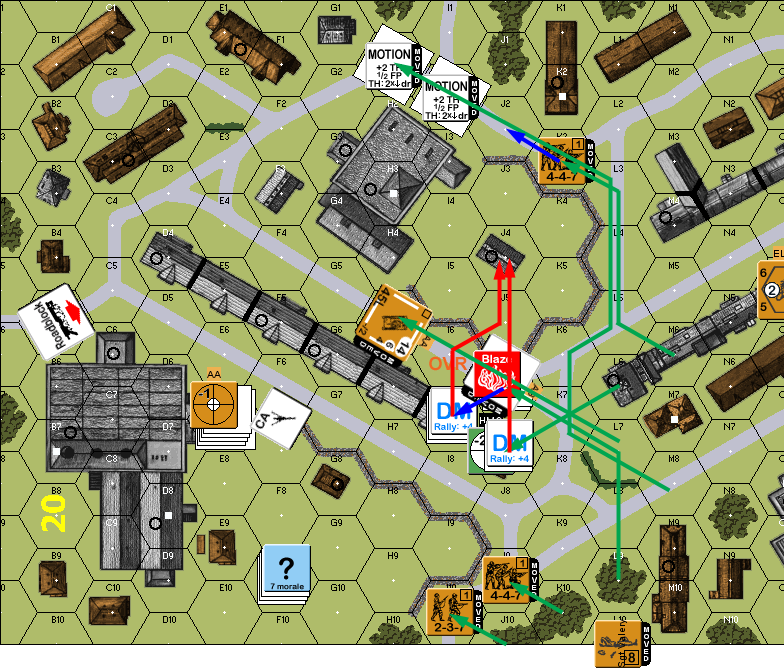
Situation, German Turn 3.
Dave rallied both his leader and squad for his turn, and immediately exited the northern platoon off 20I1 (just missing getting a glimpse of the roadblock as he left as it happens). The secret dr was a ‘3’, giving them a Turn 7 re-entry at 21Q1. Everything else gathered around the K8 intersection, without getting far enough for my HMG to see much of it. Q3 and R5 traded shots for no result, and my turn was fairly inactive, with I9 skulking, and the HS moving to get LOS of the main action from behind.
Situation, Russian Turn 4, also showing my later movement.
Dave’s platoon did not re-enter on his turn 5, so I knew that they had successfully gotten at least some distance to the west, and I had my HIP squad in place to handle the next possible entry. The middle platoon declared Opportunity Fire, obviously hoping to pound I9 once it revealed itself. He then moved his force in G6 towards G8, which would neatly surround my guys, but that was what the HMG was for, and it broke the squad and ELRed his leader to a 6+1. He then sent a squad forward to force a reveal on I9, and I reduced him to a HS with LMG shot, at which point he fell back to cover. The tanks got one hit on I9, but couldn’t get an effect.
The new 6+1 naturally did not manage to self-rally on my turn. The HMG fired at K10, and ELRed his 8-1 to an 8-0, while the squad only pinned to the LLTC. My group in I9 bugged out to F9, while the HS circled through the area around J4. I had meant to put I7 under DM with advancing fire, but realized that he just couldn’t do it with a 1FP +3 shot, so he advanced into the street to force it.
Situation, Russian Turn 5, also showing my later movement and K10’s rout.
The platoon still didn’t re-enter for turn 6, which meant that it would re-enter no closer than 21Q1, and I needed to move to cover it. Dave got nothing back for his RPh, and his first move ran straight into the HMG’s boresight in J7; the resulting 2MC ELRed the squad down to conscripts. He then moved the south edge forces up to the wall, and after that ran a squad up to my HS in I6.
Dave had decided to run for the exit, and this was obviously an attempt to get the HS to fire so the tanks could move up without fear of a PF. I held fire, and indeed the center platoon charged straight down the road at him. At one hex range, the HS pulled out a PF and reduced the lead tank to a burning wreck. The second one overran him for a K/2. The south platoon then headed north and around the J4 park.
All of this was a big relief to me. I had been worried that Dave was about to force the south edge path (well, ‘about’, over the course of the next turn or so), and might find the ATG in 21FF9 outside its CA. (I almost changed CA the previous turn, just in case, which would have revealed it….)
The HMG manged four more shots in DFPh before malfunctioning, but caused J9 to Disrupt on the first shot (HoB followed by a ’12’).
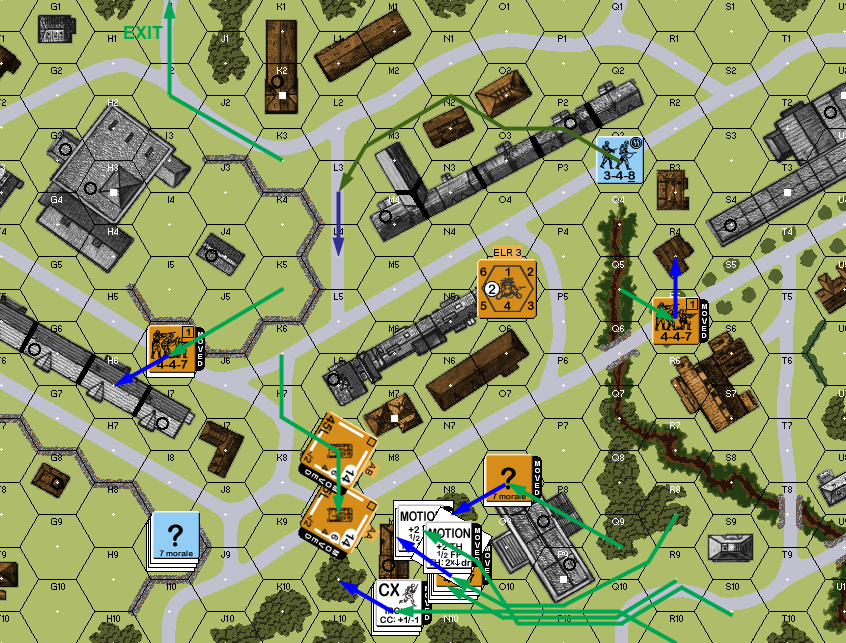
Situation, Russian Turn 6.
With the Russians finally moving to the north route, F9 hurried to swing around the C7 building, X0 revealed himself to move towards Q1. E7h2 took a last shot at the Russians in I7, but couldn’t get a result.
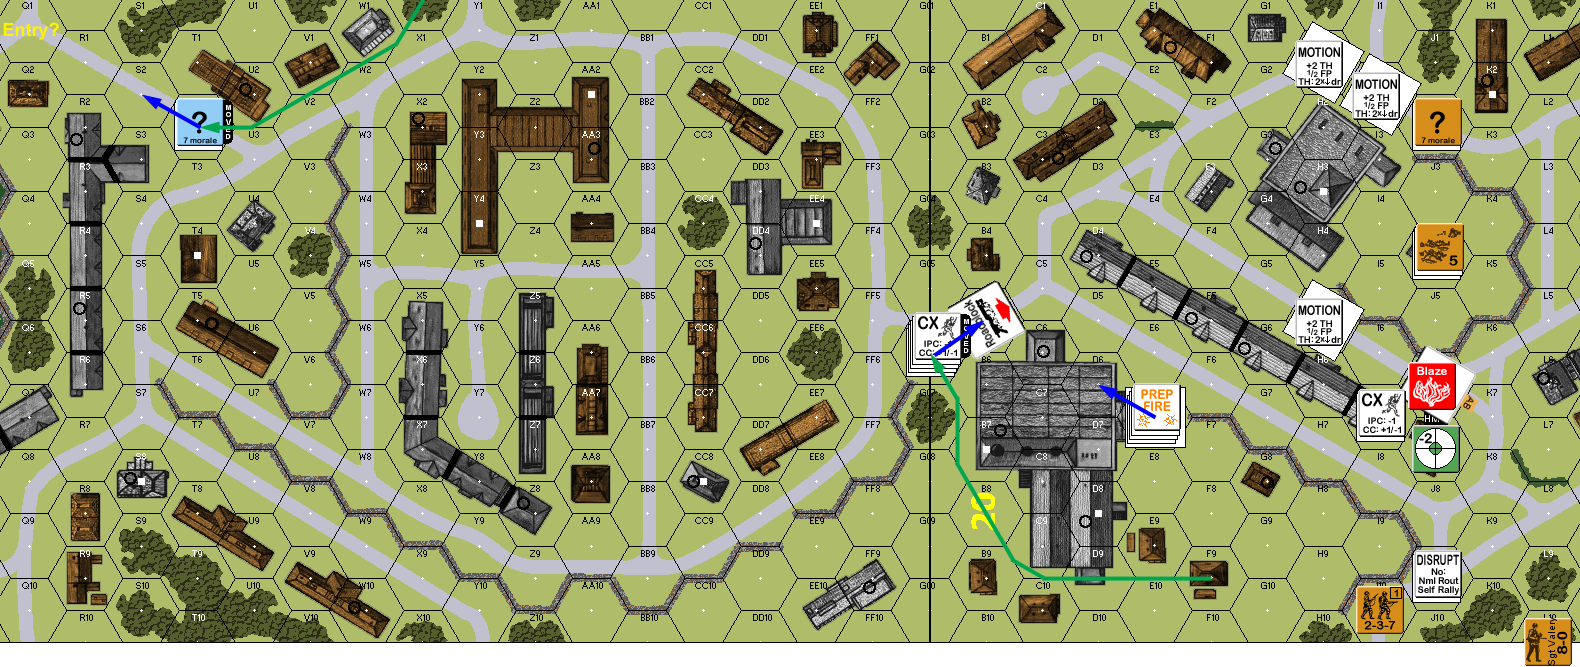
Situation, German Turn 6.
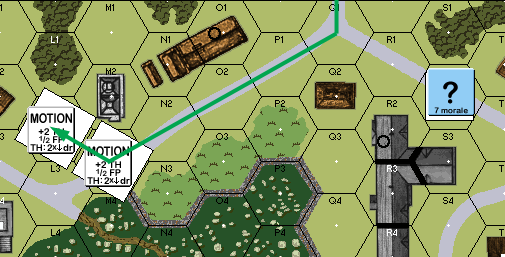
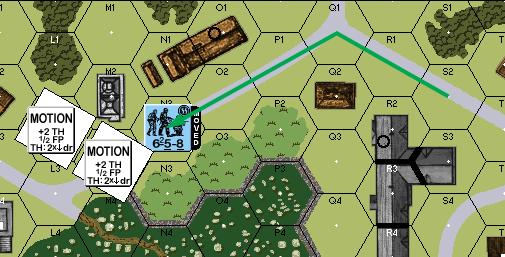
Dave’s 6+1 managed to self-rally, and he then rallied a squad with him, while my HMG went away permanently for Dave’s turn 7. The off-board platoon finally returned this turn, re-entering at Q1. Sadly, I hadn’t thought things through, and a range 2 PF shot at a moving vehicle that was only visible for one MP wasn’t going to happen (darn edge of the world).
The tanks left behind their infantry to race for the exit at the far end of the board, and left their infantry cover far behind. The lone T-70 in H5 passed its TC, squeezed through the north, and ended in Motion… on top of the AT Gun’s boresight hex. The other platoon squeezed through the same area, and I revealed A4, who took two PF shots, and missed with both. As they ended adjacent to the lone T-70 (which would allow them to be one big platoon next turn), I revealed EE3, who attempted Street Fighting against the rear one, but he failed his PAATC to pin.
The 37mm managed two hits and an IF miss, but couldn’t get close to the needed ‘5’ Final TK#. I also tried APCR and HEAT on the second shot, but found it didn’t have either.
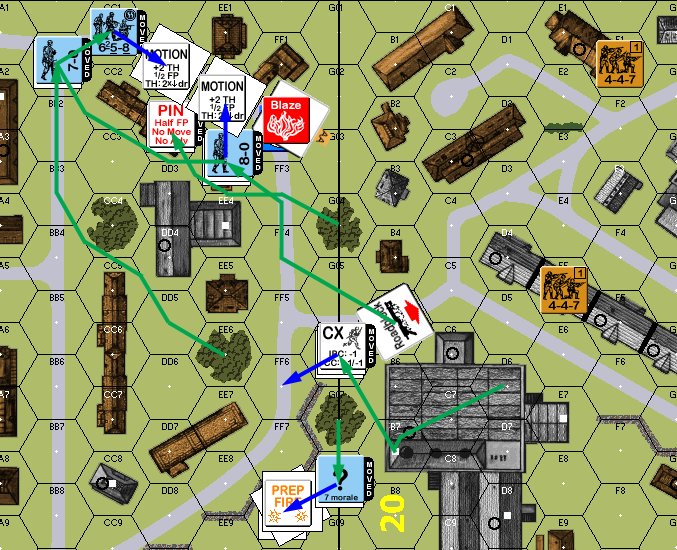
Situation, Russian Turn 7.
The only thing that Dave managed for my rally was to reduce his disrupted squad on a ’12’. The AT Gun managed another couple of hits (and a passed possible shock) before burning its target on a CH. My turn was occupied by moving up my guys to intercept his fleeing tanks. I revealed GG7 to move him into position to push the Gun should it possibly come down to that helping next turn, and EE6 moved out to be the final defense as the tanks moved out next turn. He pinned one squad as it moved up DD2, which wasn’t great for him, but it meant no CC from him that turn, and a PF shot wasn’t worth taking.
S2 sped off after the re-entered platoon, and pinned on a PF attempt at range 1, keeping him from attempting CC. CC1 found two PFs, but missed with both. However, both CC1 and EE3 passed their PAATCs to go into close combat with different tanks. CC1 went into DD1, found an ATMM and killed the lead T-70. EE3 went into EE2, pinned on an ATMM check, and missed.
Situation, German Turn 7.
This left Dave three tanks out three needed for a win. Despite having some infantry around, it was really all about the surviving T-70s. (Though his 8-0 did graduate from Commissar school by finishing off the disrupted HS on another ’12’ rally roll.) N2 fired a PF at the lead platoon as it sped away, missing. Next, they ran through the second AT Gun’s boresight hex in H1, and got overly fancy by trying for APCR, wasting a decent roll (only ‘3’ availability), to miss on the actual shot, and then missed again on the IF shot as the second tank went by, letting them exit unmolested.
The remaining tank of the rear pack passed his TC to keep going (‘2′: he was eager to get out there!). DD3 tried Street Fighting as it went by, but failed the PAATC. DD2 passed his PAATC, failed to find a ATMM, and couldn’t destroy the tank (’11’: he couldn’t have done it with the ATMM). The squad in EE2 found two PFs (with the wreck in the way, he needed to spend two MP in DD2), and missed with both. The leader with that squad failed to find a PF, and the squad in DD2 found a PF and missed.
Finally, as it went by the final squad and 7-0 in BB1, they found a PF and connected to burn the tank. German win.
Afterword:
I don’t think I’ve ever used more than one PF in a scenario before. Here, I used 9 out of 13, a record I expect I won’t break. I also expect that this is the only time I’ll see a game go so close to my plan.
Dave commented he hadn’t found the game all that fun, not liking attacking into a board of HIP defenders. I can completely understand that, as I found the same thing as the Germans in Mila 18 a while back. I imagine there’s a reason why the only two scenarios I know of with completely HIP setup are in Beyond Valor.
However, while I was initially struggling to come up with my plan, I realized that most of this game is meta-game. It’s about options that you line up before play, and you see how it does against your opponent’s plan. I can see two people playing this scenario several times in a row (once used to it, I would think this scenario could move very fast face-to-face) trying to outguess the other’s plan, and having a lot of fun with the ‘battle of wills’ part. When the system only had ten scenarios, that’s not a bad idea for a scenario concept. Now that we’re in the four digits of available scenarios, it’s not really needed.
Discussion ¬