
J1 Urban Guerillas
A little while ago, I advertised for a PBeM ASL game on the GameSquad forums, as has been usual, I got two responses within minutes of each other, and accepted both. The second game has actually (just barely) finished first. After a little discussion with Jeff Buser, I ended up with the attacking Russians in J1 “Urban Guerillas”.
It’s 1945 in Vienna, and the Russians need to take two of three buildings from some tough German opposition (10 SS squads, Pz IV H, Panther, 9-2 AL, 88 AA, and the usual toys) in 6.5 turns with 12 458 squads, with a FT, a couple DC, and three T-34/85s (with a 9-1 AL). On turn 3, five 628s and two IS-2s come in. There’s two wrinkles in this: 1) two of the victory buildings are on the far side of the board 23 canal, and other than the 88, all the Germans must set up on the near side of the canal. 2) The Russian SAN is ‘6’, and on every ‘3’ or ‘4’ sniper roll, the Russians get a Partisan unit (sadly, TI); half the time a HS, one-third a hero, and a one-sixth chance for a 7-0 leader. Also, the Partisans have limited PF use.
Jeff opted to set up as far back as he could, with three HS manning the wall around the first victory building, a “?” on the west flank, and a few more in the east, mostly in the other major building near the victory building. Everything else was on the road next to the canal, obviously ready to cross over to defend the other two buildings. Not having anything immediately in front of me, I mostly set up as far forward as I could with just a HMG firebase in level 2 of 22G6 to try interdict what I could see.
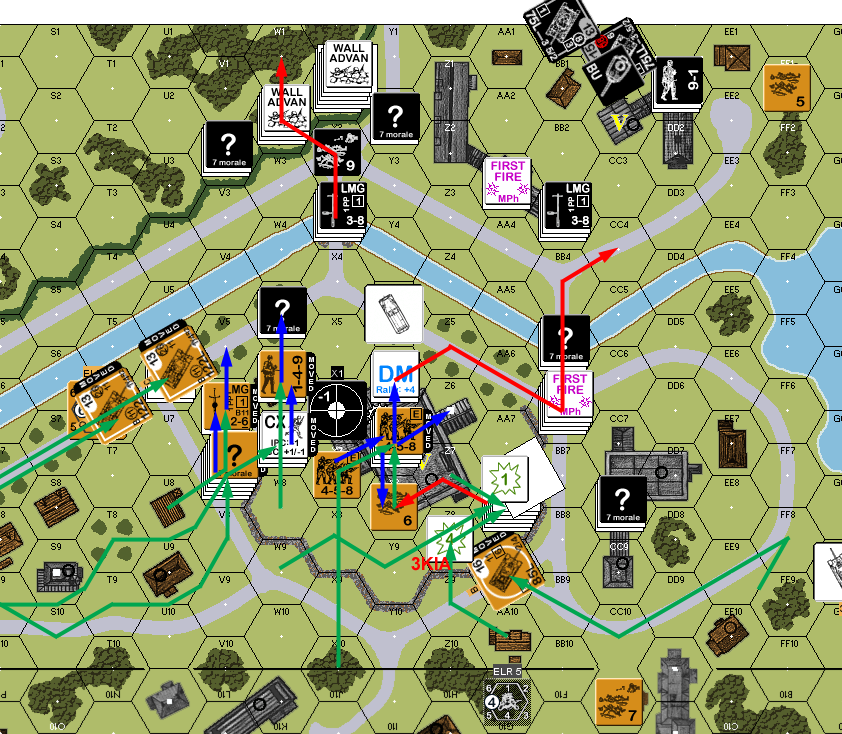
I rushed up through the mixed terrain in front of me, and mostly got into good positions. The general idea was for the main advance to be on the victory building, while a dedicated assault group with a DC, FT and my 9-2 tried to clear 22CC8. This backfired when at the end of my movement, after a lack of any reaction (including concealment stripping) from CC9 had me thinking that end was a Dummy set, I gave him a Bypass shot at the 9-2 and FT squad, and he immediately killed the lot with a 2 -3 shot.
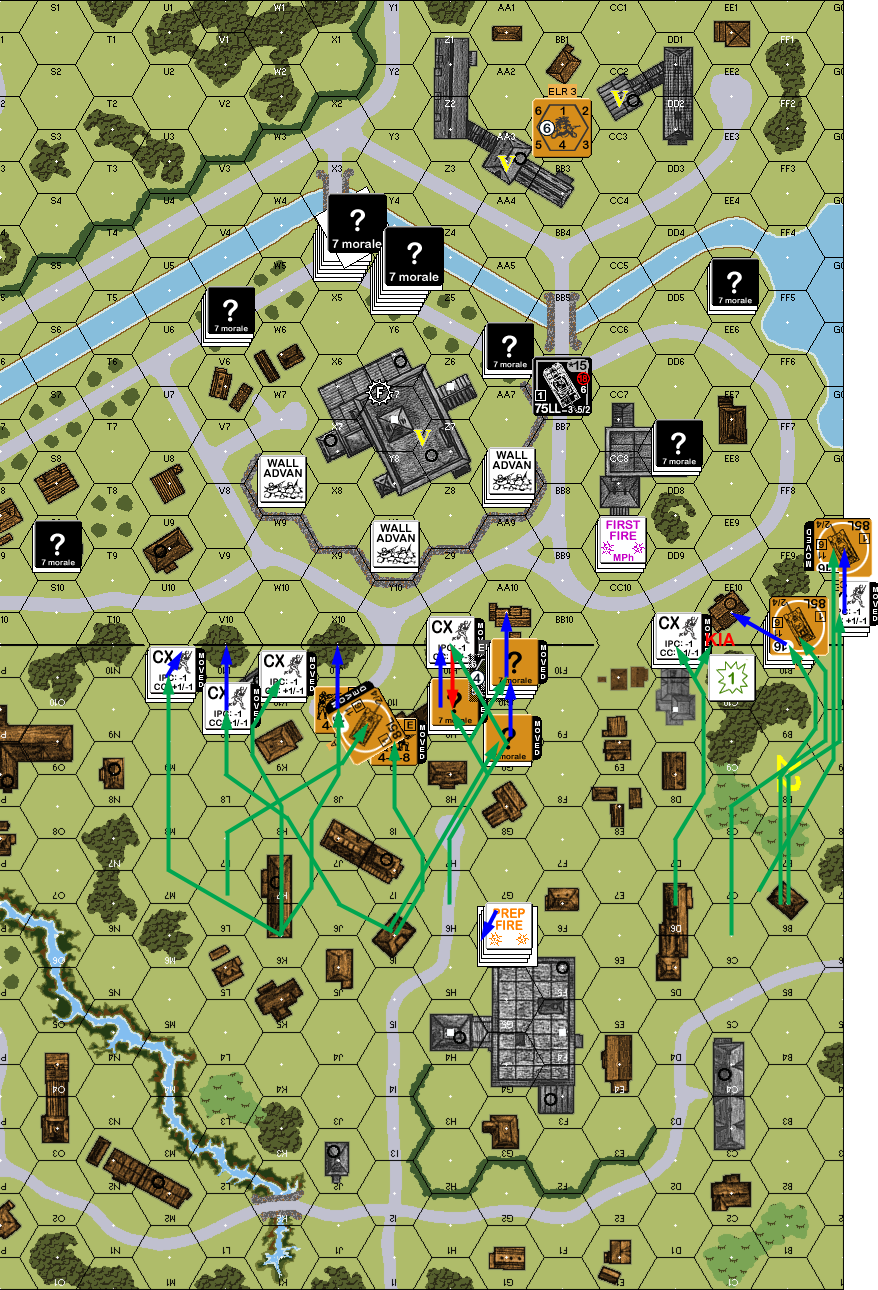
Situation, Russian Turn 1, showing the full board. Building 23Y7 is a factory. Note that the German setup area goes all the way up to hexrow 7 of board 22.
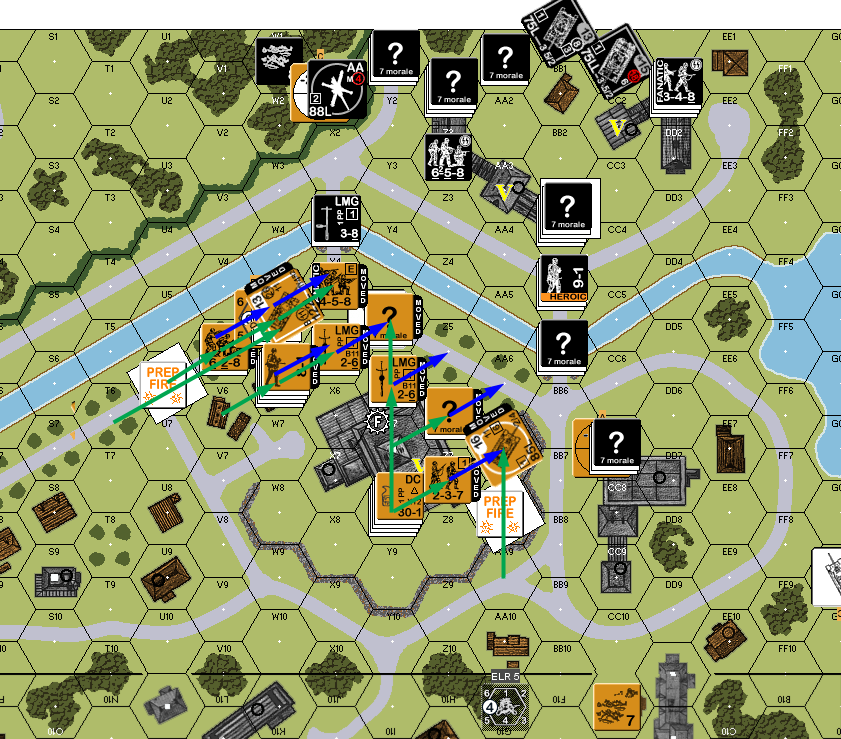
Things continued in that vein for me when I rolled a ’12’ to try to rally a squad he broke during DFPh. Jeff mostly got out of Dodge, with much of his OB crossing the X3 bridge to get at the victory buildings, and even abandoned his halftrack while the crew took out the LMG. My squad on the first level of 22M10 complicated this a bit, and forced him to go around the long way after failing to get any smoke into Z2 (…at least some of those were in error, as he was trying to put smoke into an adjacent hex after spending 3 MF without a leader or CX, but he was rolling ‘6’s anyway).
The Panther went into reverse, parked on the BB5 bridge, and squeezed a shot between EE7 and DD7 to kill a T-34, and then reversed to the north side of the bridge. I didn’t even see it coming. My only shot had been against CC9 as he pulled out, and while I pinned the HS, his 8-1 turned into a heroic 9-1.
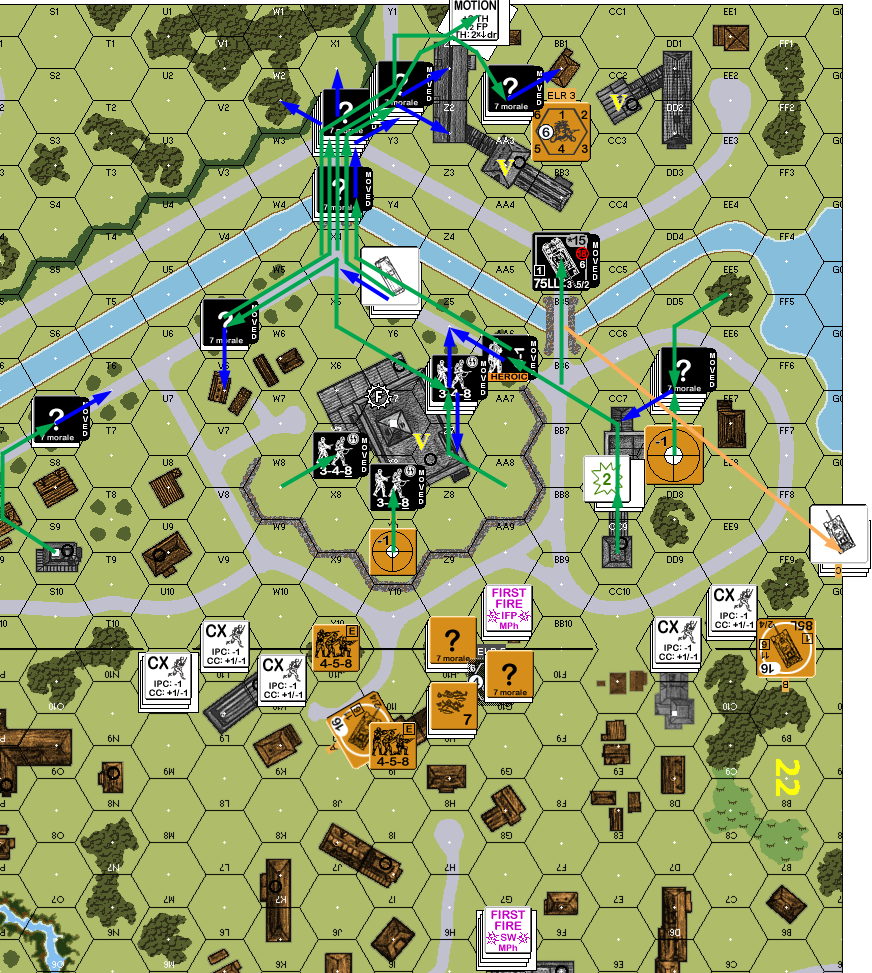
Situation, German Turn 1.
My surviving broken HS came back for my rally. The two primary goals for the turn were to get into CC8 and rush building Y7 with its three guard HS. I rushed CC8 first, getting a squad broken in the process, but also getting into CC9, which limited his fire. With careful placement across four hexes outside of building Y7, and some good rolls, Jeff was forced into several FPF shots that broke two of the HSes at a cost of one broken and one dead squad for me. We had three attacks that generated a SAN for both sides, but only my Sniper went off (twice) and broke the vehicle crew in X4, and a squad in T6; a different attack also generated a Partisan HS in EE1.
The final HS in Z7 self-broke rather than face CC alone, and a couple of the units took several Interdiction shots getting away, without taking any damage. I went into CC in CC8, which went to Melee with no losses.
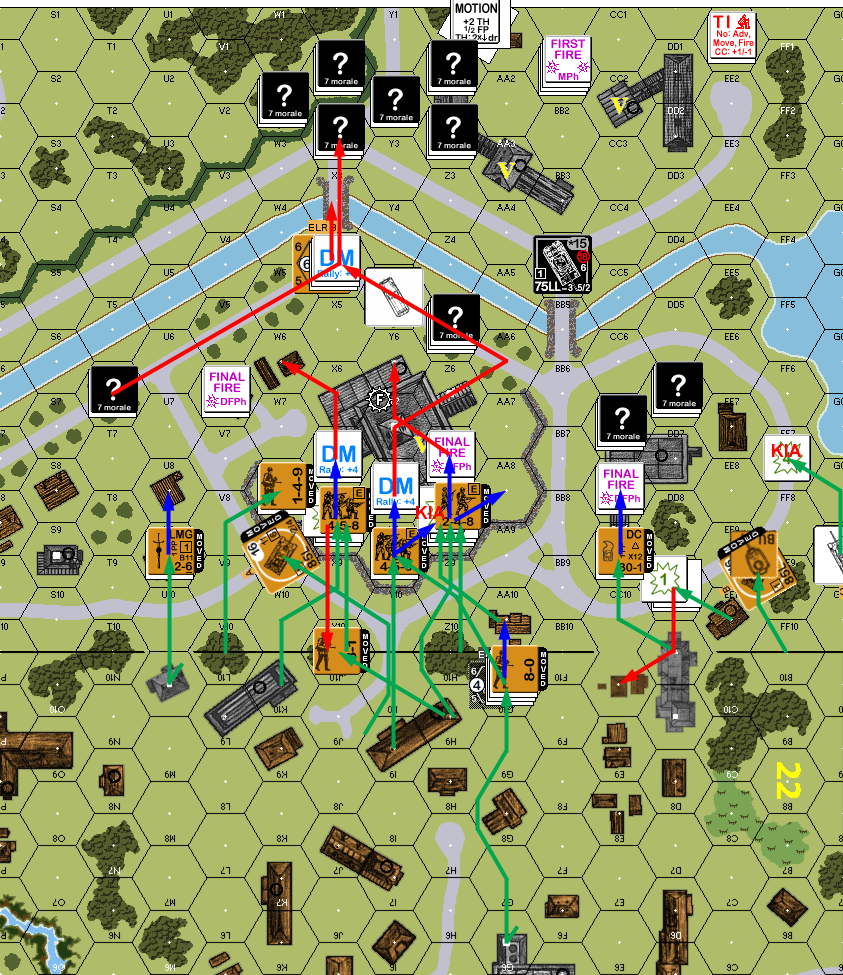
Situation, Russian Turn 2.
Neither of us got any rallies for his turn 2, but I did recover a LMG in Z8. Jeff revealed his 88 in 23X1 (one of the more likely places for it), and shot the Melee in CC8, wiping out both squads on a CH. The Pz IV continued around the back of the victory buildings and broke the Partisan HS with a BMG/CMG shot before parking to cover the buildings themselves. The Panther moved a little to one side, where there was a gap to LOS of the T-34 in FF9. I seriously considered trying a shot at the side, but between moving, limited LOS and range 7 with red TH#s, it wasn’t going to happen. So, it successfully kicked into Motion as the Panther stopped, and it went off behind the buildings with the Pz IV.
The rest of movement was reshuffling on the far side of the canal, and edging out of building CC8. I didn’t have many good shots, but managed to reveal the squad and heroic leader in AA6 without harming them, while DMing a couple of the spare brokies (I got a MC, but he passed), and he broke/ELRed a HS in AA8 during AFPh. I finally eliminated one on Interdiction, and pinned another on the bridge.
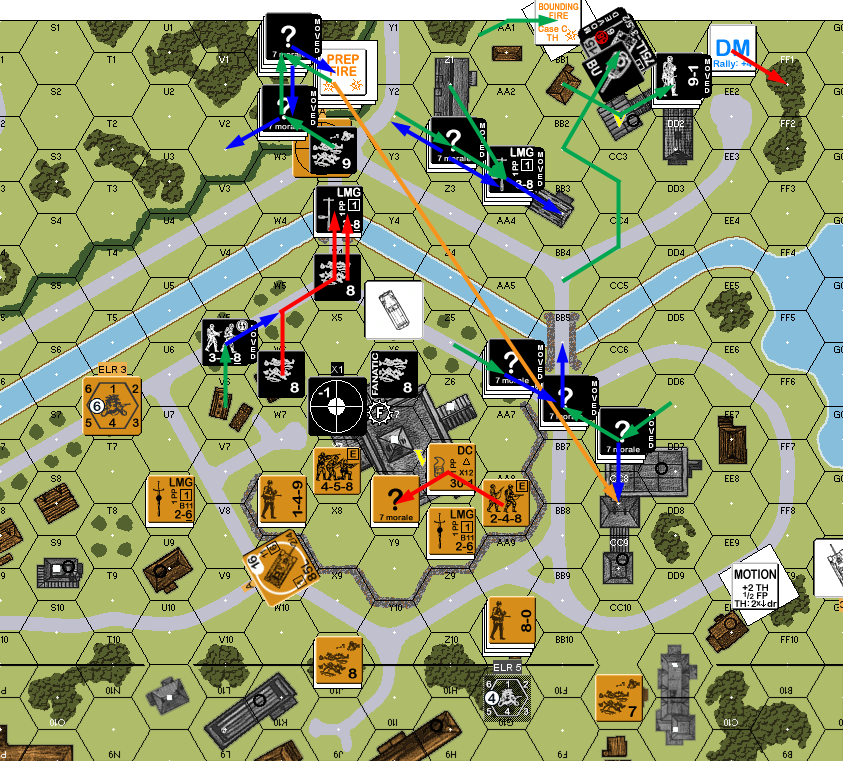
Situation, German Turn 2.
The turn three reinforcements have a slight wrinkle in that they can come in on any one board edge, as long as it’s south of the canal, so they could come in behind German positions if there’s still fighting near the first victory building. I set up on the west edge, partially along the canal, hoping to get to bridge X3 in the next two turns, giving me three turns to get a victory building. My 1st MMC rally failed, but I did get X10 back, freeing up a leader to shift to a rally point inside the Y7 building.
My major worry for the turn was that HMG still needed some work to get to the front lines. I swung the T-34 on the east flank back to try and provide covering smoke, but missed by one. The squad+leader then Dashed across the road, getting no response from CC8 (which I had gotten tunnel vision on), and lost the lot to a 3KIA from BB6. I tried covering the east flank in AA8, but two different squads broke in there. Fire at W6 also killed my hero, though my sniper went off and broke W5, the only German unit south of the canal on that side. A follow-up AFPh shot killed him, and I also eliminated a Dummy stack in V2.
Situation, Russian Turn 3.
For Jeff’s rally, he self-rallied a squad in X2, while I got a squad and a half back, losing a HS to a ’12’. He mostly pulled back and skulked in the area of the victory buildings, giving me no effective shots, though his squad+heroic leader managed a 1MC that reduced a squad on a ’12’ in Z6.

Situation, German Turn 3.
I still couldn’t self-rally the squad in 22E10, and the two HS in Y8 didn’t rally either. Jeff rallied both his HS in DD1 and the crew on X3 (I should have fired on him the previous turn…). Prep went better, with the lead JS-2 eliminating the crew of the 88 with a 2MC followed by a ’12’. Movement was mostly shifting forward under AM, with the rear JS-2 and T-34 leapfrogging into more advanced positions.
Jeff only managed one good defensive shot, but it killed my fanatic squad in X4 with a LMG shot from the adjacent crew with a K/2 and ’12’ MC. I didn’t manage anything in AFPh, despite several decent shots at X3, but my sniper went off twice because of them, pinning a PSK HS in BB5, and a HS in DD1 (I had contemplated a reposition, but it kept wandering into valuable areas on its own).
Situation, Russian Turn 4.
Jeff self-rallied a HS in W1, and I got both of my HS in Y8 back. He had a good PFPh, with a shot from DD1 breaking my concealed squad in AA6, and the HS on the BB5 bridge sending a PSK shot over the wall to burn the T-34 in AA7 (and killing my AL in the process…). The crew in X3 malfunctioned its LMG rather than risk it falling into my hands in another turn. The good news is my sniper went off again, and broke the squad on the ground floor of BB3.
Part of the reason for lining up along the canal on my turn was to be able to use the ‘blob firegroup’ to get somewhere with all the heavy terrain. I got a 2MC against BB3, and reduced the broken squad there, but didn’t touch the heroic leader or intact squad. However, my sniper went off again, breaking a squad in AA2. I also managed to double-break the crew (finally), and I got a Direct Hit on the 88 to malfunction it before the HS in W1 could try to re-man it (I assume that’s what he was hanging back for…). In return, Jeff CRed the squad in X4.
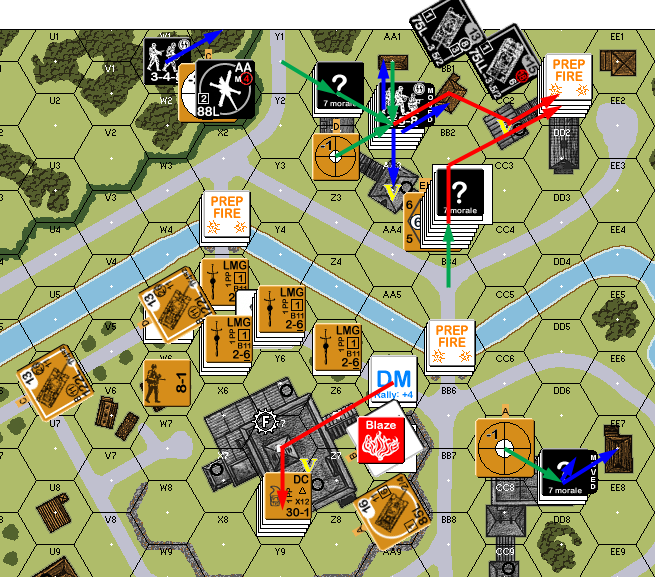
Situation, German Turn 4.
For my rally, I got two HSes back in Y8, but the squad in 22E10 reduced to a HS. The initial push across the bridge was with two 628s Armored Assaulting with the lead JS-2, unfortunately, they both pinned in X4. The next was moving the HS in X4 out from under the residual and FL, and he broke on the bridge. Next was moving a squad through all the residual, and each attack generated a SAN for me, the first creating a Partisan hero in Z0, the second pinning AA3 (and canceling the firelane), and no result on the third. However, despite the other mayhem he’d caused, he pinned on the bridge. My next attempt pinned in X4 (putting 3 pinned squads in there), with a SAN generating a Partisan 7-0 in W6.
Facing overstacking penalties in –2 terrain, I went with an idea I’d been toying with: The second JS-2 went CE and drove around the block to attempt an overrun on the HS holding the BB5 bridge. This still required an extra 3.5 MP, but I passed the ESB check, and his attempt to affect the crew from BB3 had no result, but the OVR itself rolled an ’11’, leaving the PSK HS a rear shot, which they took to kill the tank.
After that, I made one final attempt to get over the bridge, but a 2 -3 residual rolling a ‘2’ took all the wind out of my sails. I shifted forward, and moved the T-34 across the bridge to provide support for the JS-2.
The Pz IV malfunctioned the CMG trying to get the new hero, while I broke the PSK HS during AFPh, but the JS-2 gained a Low Ammo counter.
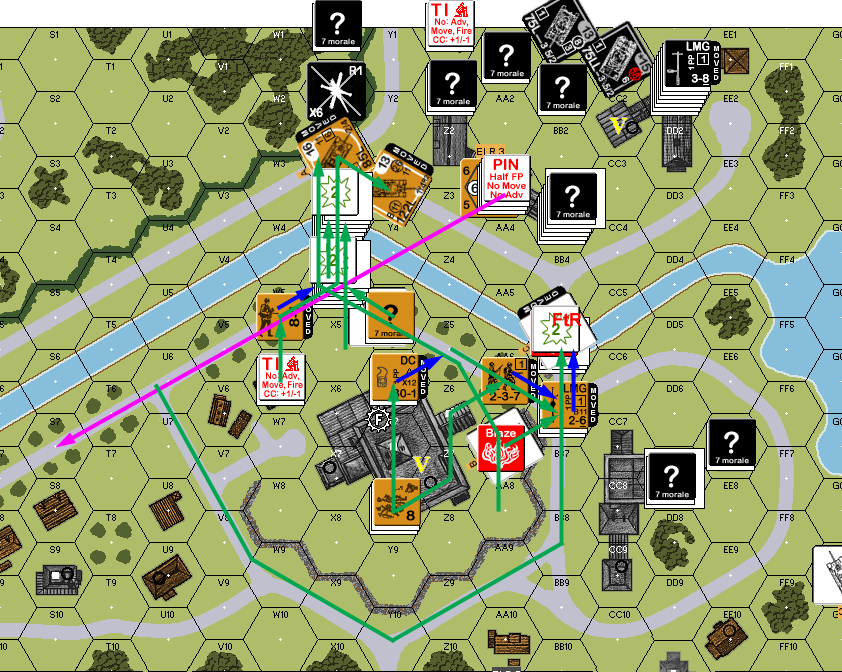
Situation, Russian Turn 5.
Jeff rallied his broken squad and a half in DD1 for his turn, and I rallied my squad in Y8, and recovered a LMG and PSK on the bridges. He took a desperation PSK shot at the T-34 and burned it while passing the 1MC from the backblast (and generated a second hero in Z0). He then spent a fair amount of effort trying to kill the two heroes, IFing both tanks, even after an early shot wounded one and killed the other.
Now, the reason for that is probably that he was planning to skulk behind building Z2, in full view of the hero. But with the wounded modifier, there was nothing he could do. In fact, the only effect my fire had was to activate Jeff’s sniper for the second time in the game, where it promptly killed the abandoned broken HS in 22E10. He spread out nicely for the next turn, and killed the remaining hero in CC.

Situation, German Turn 5.
I had been figuring all along that I needed at least two turns to clear a victory building: one to get in, and then one to chase down remaining defenders. Assuming I could survive a turn of being pounded on by 75mm guns, along with the rest of the German arsenal. This meant I had to get in now, and I still didn’t have anyone over the bridges, though I did have a squad and a half on each bridge (I self-rallied the broken HS on X3).
X3 had some cover available (wreck and JS-2), and Jeff did not immediately fire on the first group that stayed to that. I had three 628s and an 8-1 at the entrance to the bridge, and they went over one squad at a time. The first survived a shot on the bridge, and then broke in Y2 (I figured I needed to get at Z1 in CC to have a decent chance). A second attempt also made it over the bridge, but broke with a ’12’ in Y2. The third attempt broke both the squad and leader on the bridge.
I moved a HS across the other bridge into BB4, where they died to a shot from DD1, and the residual also broke the HS already the bridge when they attempted to move. I CXed the 8-1 and squad back in Y8 across the bridge and the leader pinned and the squad broke to the residual. With two squad and three HS left, I conceded.
Afterword:
First off, I have to say that I’m amazed at the amount of punishment the Russians took and still had a reasonable chance of winning. I lost at least a squad (killed) each player turn of the game, and until getting completely hung up with pinning/overstacking problems on turn 5, I was still reasonably happy about my chances. That said, losing heavy weapons and leaders early really hurt. It kept me from ever taking building CC7 (which I think had dummies for the second half, but I just didn’t have the resources to go find out), which is the only real place to get higher level Locations south of the canal.
I wasn’t exactly diced, but man there were a lot of ‘6’s flying about. In the early game, the Sniper really helped out with clearing the south bank of the canal efficiently. After that, it wasn’t so helpful, though shutting down the firelane could have been a bigger help if I didn’t need to filter through one hex anyway. The ‘Partisan Activation Number’ is a neat gimmick, but, being TI on arrival, the one hero is the only one who ever got a chance to do anything. Meanwhile, the German sniper went off twice, with about as many missed rolls. I could have used a few more ‘4’s on my attacks and MCs.
Lastly, I’m not sure about the scenario design. With the starting setup area, it looks like it’s intended to encourage the Germans to try and delay the Russians for a couple turns in a wild brawl, and then both sides scramble to cross to the north side. But there’s no way for the Russians to prevent the Germans from doing what exactly Jeff did: set up near X3, and march the bulk of the forces across and into defensive positions on turn 1. The only advantage it gives the Russians is enough time to make a measured approach on the victory buildings.
James was exactly right about me wanting to clear the backcourt of those heroes. I did not want any -2 shots against my skulking units, not anyone on my backside in general. I figured the IF shots were worth taking as his tanks were slowly being picked off one by one and time was running low.
He was also right about the dummies in the CC8 building. At first I kept them together as a stack to mislead him as to where my PSKs were, but once the two units carrying them were revealed I simply used them as potential sniper bait.
One mistake I noticed afterwards was my abandoning the halftrack. Per SSR, crews cannot abandon vehicles voluntarily. Thankfully his significance to the game was minimal as he broke early and wasn’t even an effective speed bump against the approaching Russian horde.
Credit to James to make this AAR sound fabulously interesting! In reality, this one seemed a bit less exciting during play as there was a lot of skulking on my part and just putting men in his path to try and slow him down. But it was fun game nonetheless!
Thanks for the comments Jeff! Good point: your defense got fairly static in the second half, and probably wasn’t the most exiting thing ever from that point of view. I certainly had a number of things to think about though.