
37 Khamsin
It was back to the desert for our next ASL adventure, and Patch and I decided to go for scenario 37, “Khamsin”, from West of Alamein. Having just been the attacking Soviets in Festung Budapest, I had the defending Brits for this one. There’s a Series Replay of the scenario in Annual ’90, but neither one of us got around to more than glancing at it.
The British are defending three hillocks as part of a defensive box as the Germans advance on Tobruk with a decent force of infantry with a HMG, a couple ATRs, a couple light MTRs and three LMGs, backed up by 2-pounder ATG, all in sangars and anyone in scrub HIP. The Germans attack with six squads of infantry mounted in halftracks, a Pz IV, six Pz IIIs, two Pz IIs, and a Marder III (this is mid-’42, so these are all early models—at least the IIIs have 50mm guns), with three armor leaders. On the first turn, the British get a pair of Grants, a pair of Crusaders, and a Stuart as reinforcements (with an AL of their own). The Germans have eight and a half turns to take control of all three hillock summits without taking five more CVP than the British.
Complicating all of this is a sandstorm that has blown in. This is heavy wind from the southwest with heavy dust. This adds a +1 to dice rolls for every two hexes of range (fractions round up), an additional die is rolled in every attack and divided in half to generate an additional modifier (fractions round down, so it’s from +0 to +3, with +1 or +2 most likely), and fire into the wind gets an extra +1.
One long, skinny hillock and one small one are near each other on board 28. Board 27 has a large, rounder one just a little further away (especially by distance to the summits). So I kind of figured Patch would go after the north two first, and and set up for the third to be my ‘final defense’ with the ATG in a pocket on one side of the hillock with a MTR and the HMG nearby. This put most of my ROF in a small area, with the ATRs in positions that he should have to go through earlier.
So Patch set up to crawl along the southern edge and force me to fire into the wind for the extra +1. The Germans are basically one giant sixteen-vehicle platoon until they come into LOS of a British unit (which isn’t until range 10 with all the dust).
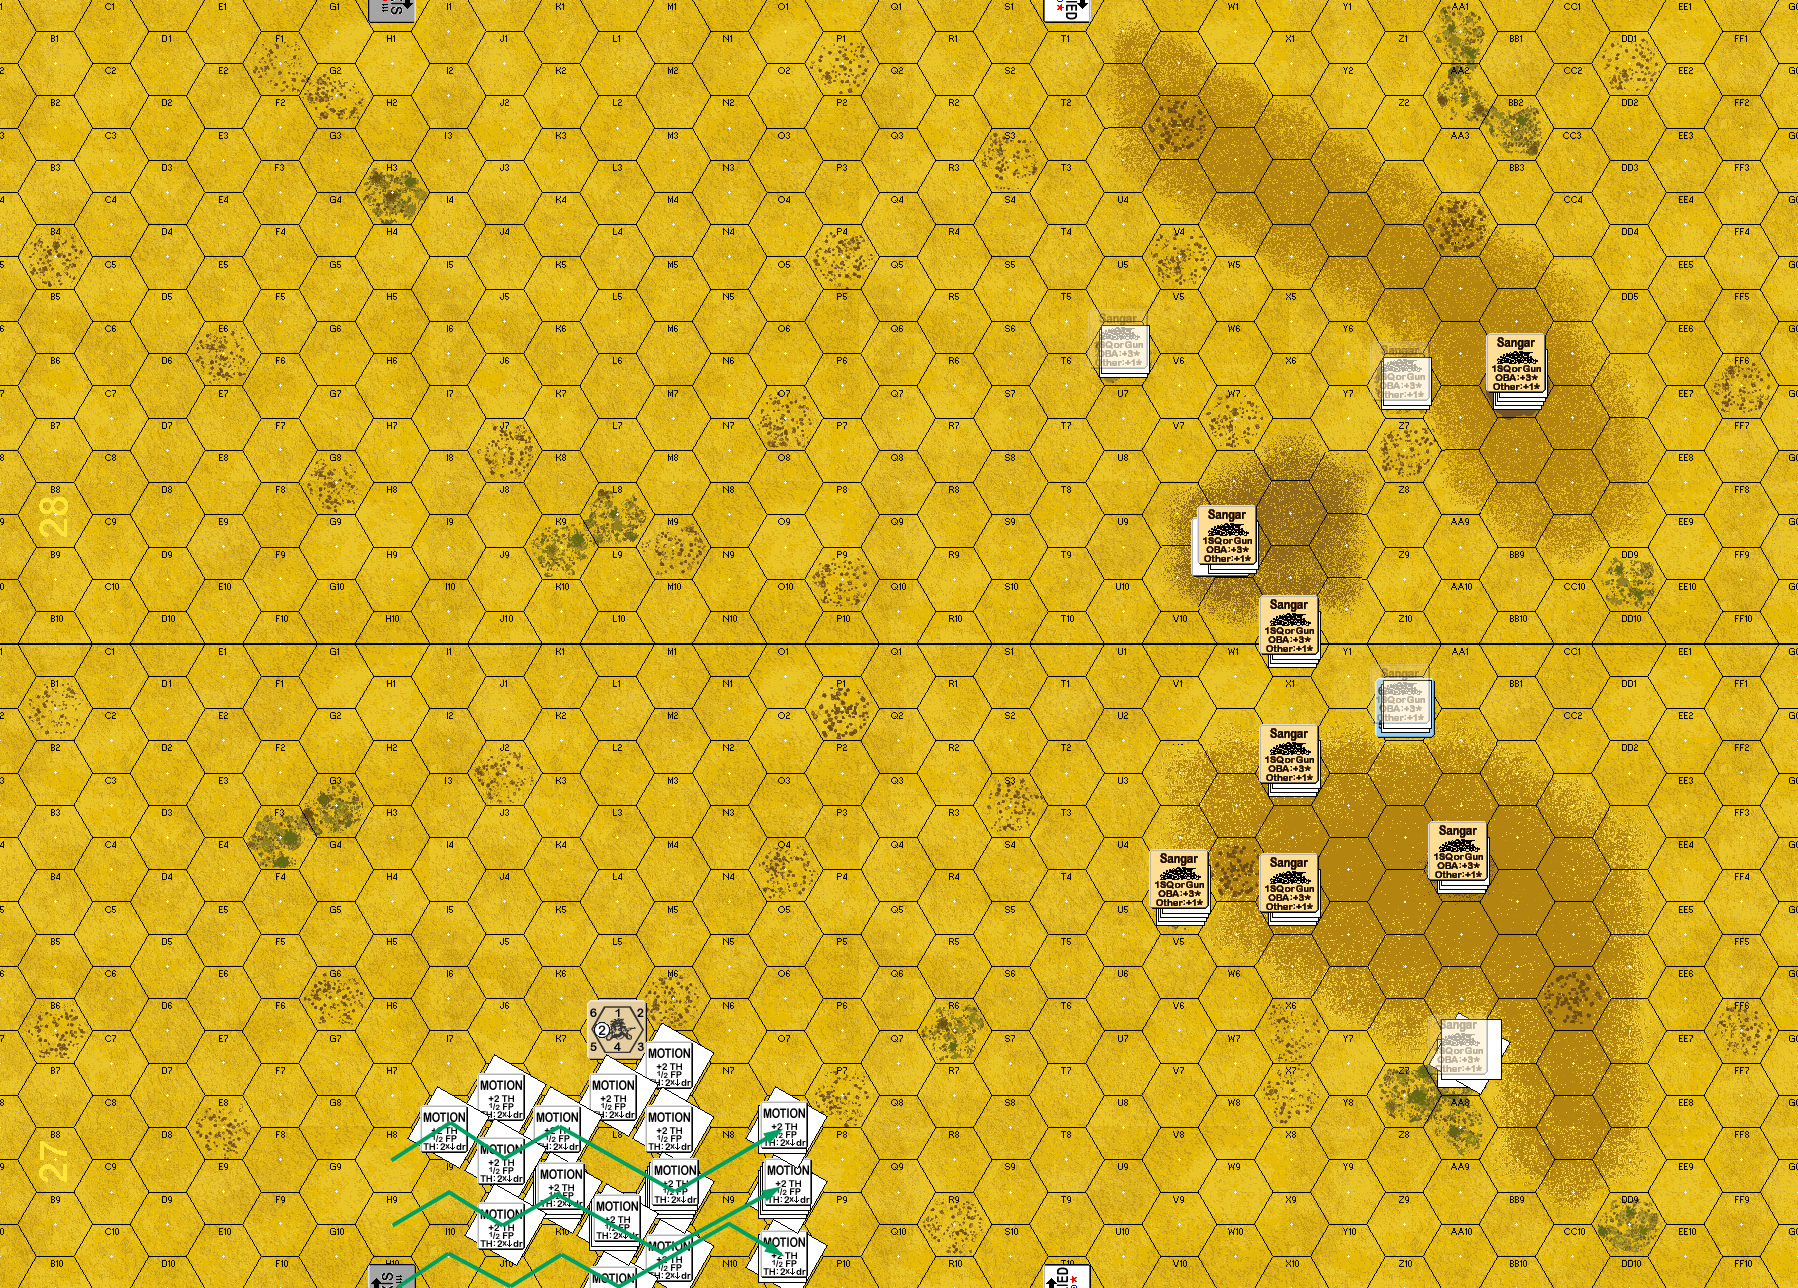
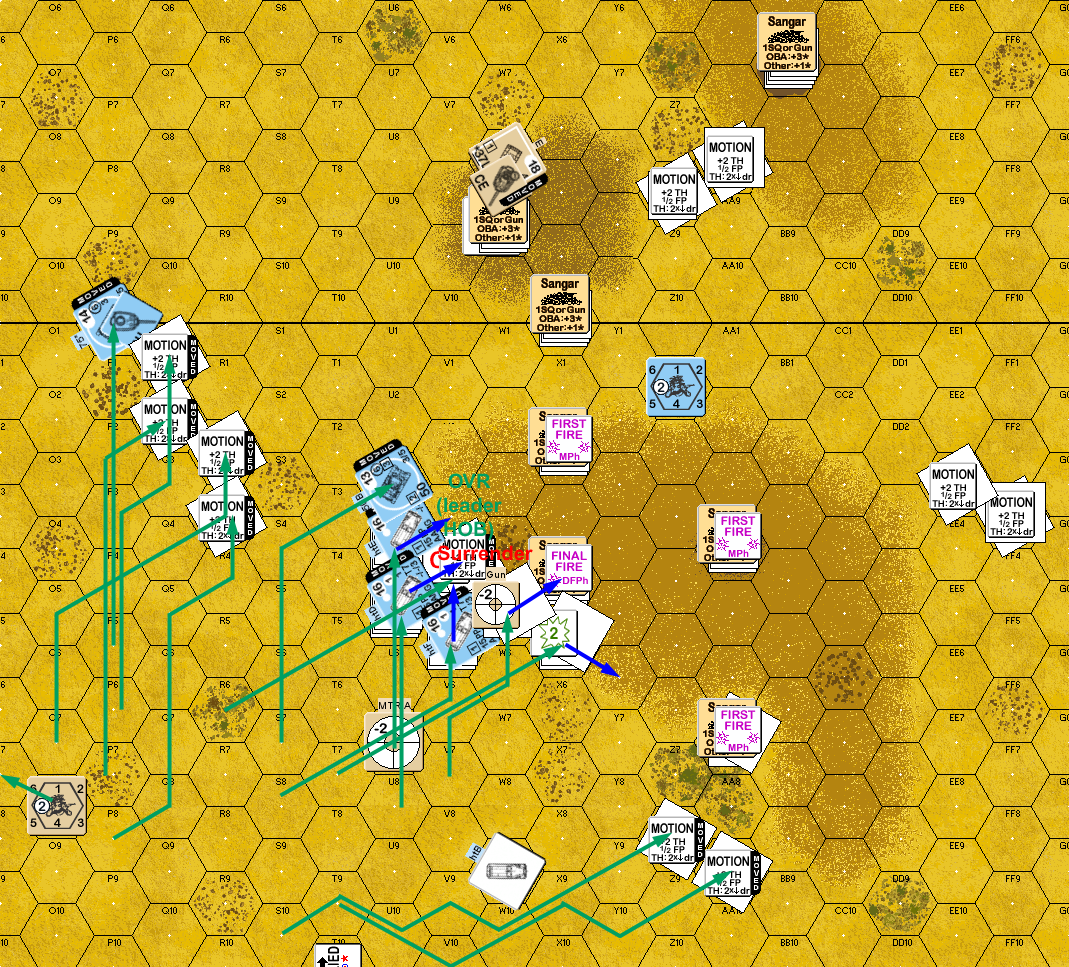
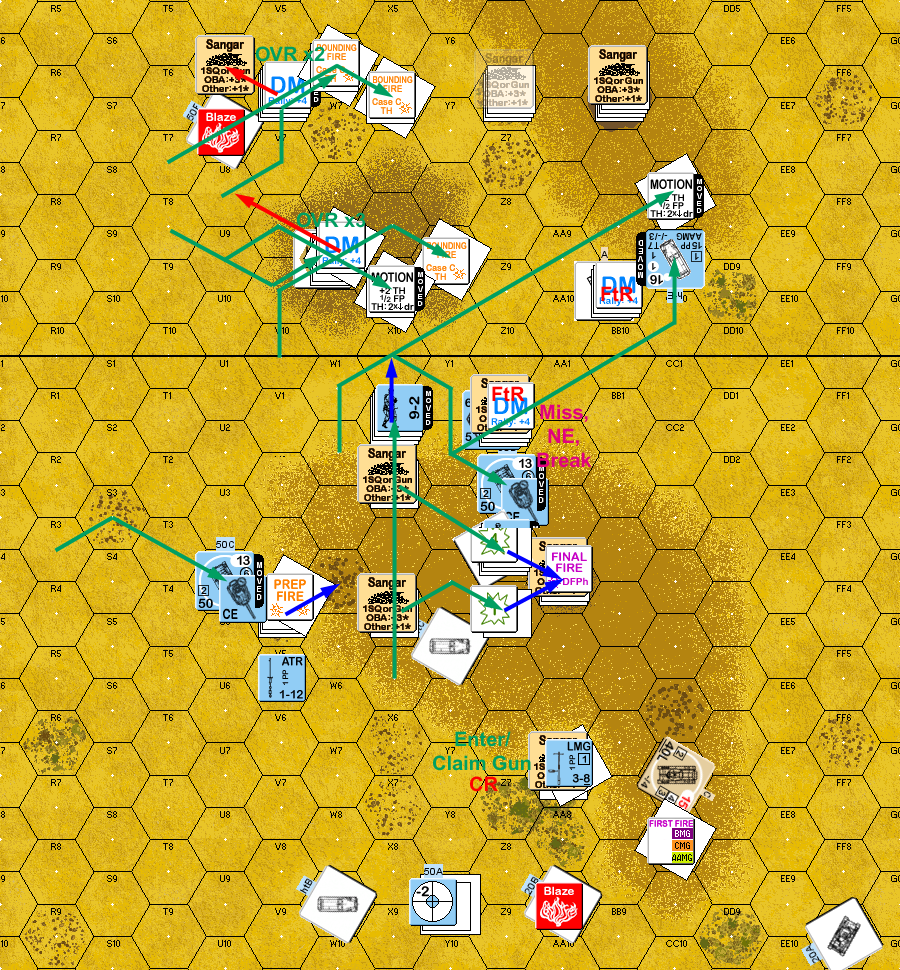
Situation, German Turn 1, showing the full board. My HIP units are visible to show the entire layout. The German mass started breaking up from speed differences.
My armor entered along the three westernmost hexrows. The general plan was race along the board edge towards the south and take up various protected positions (hopefully near infantry backup) and fight a fairly mobile delaying action with most of my tanks paired up. As the fastest unit, the Stuart took a position behind the nearest hillock summit and waited, in case the Germans should suddenly turn north.
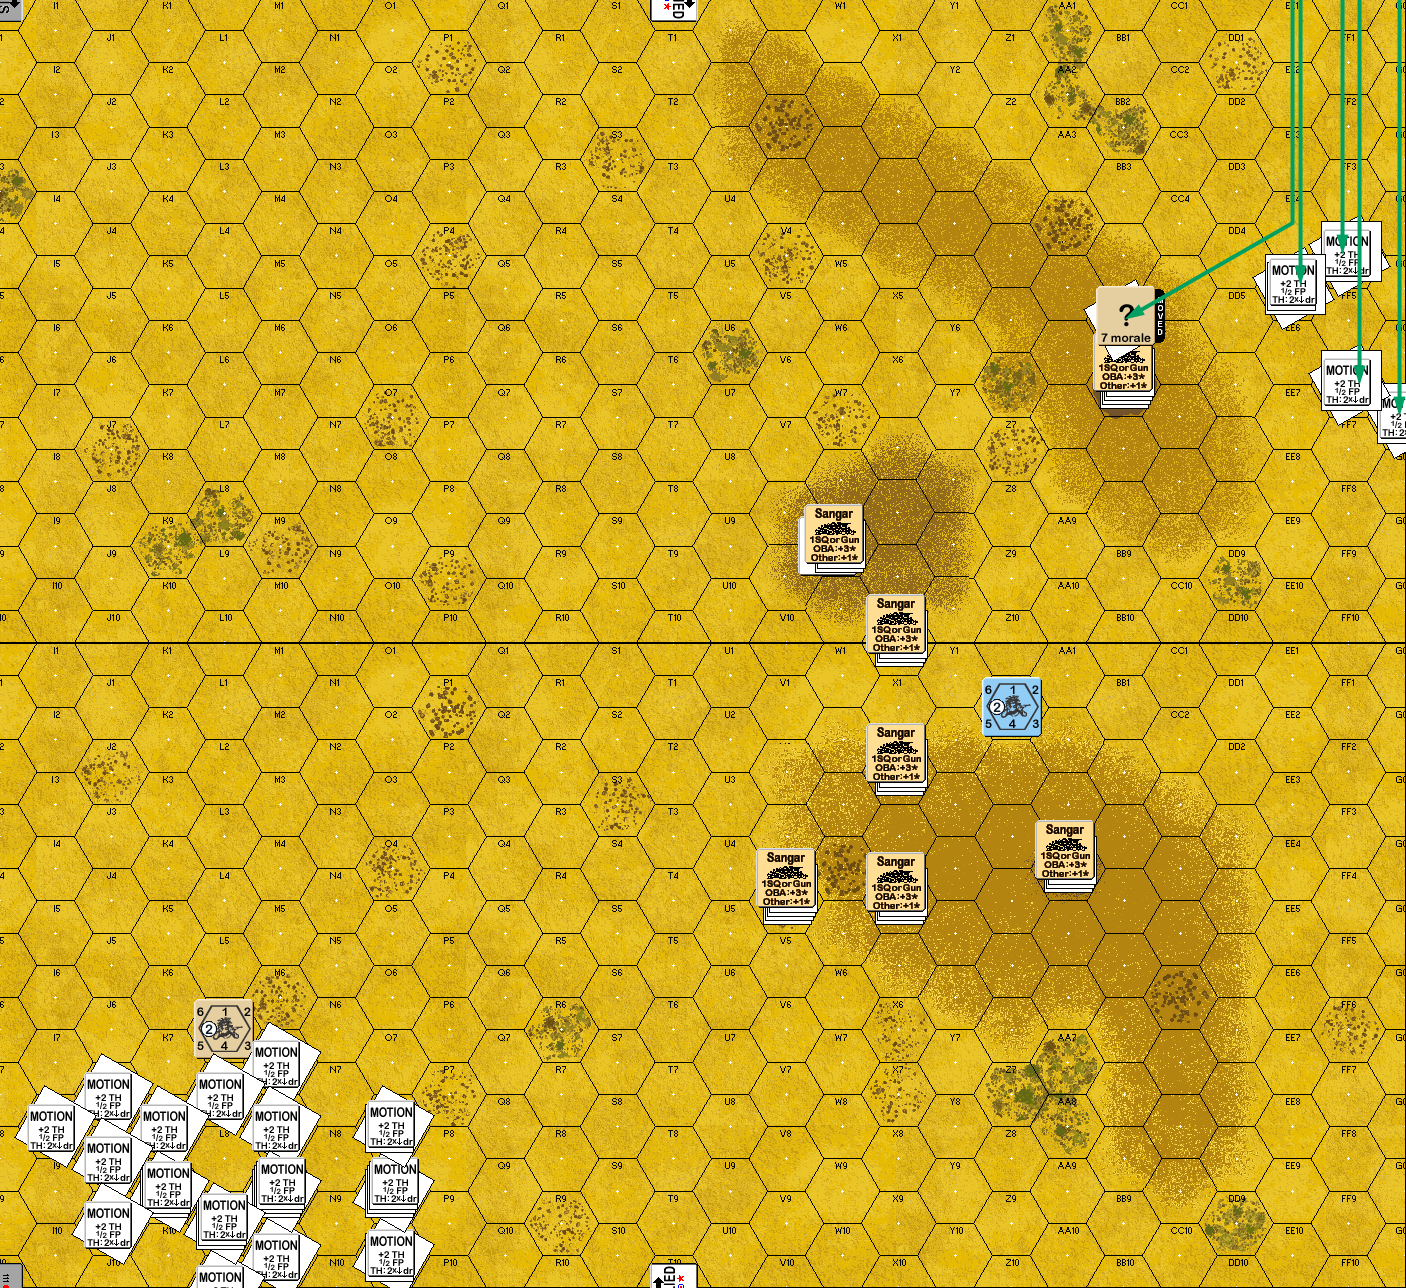
Situation, British Turn 1.
Naturally, Patch’s force continued driving up through the Heavy Dust, with only two units stopping, his Pz IV, and his Marder III. With his lead units down to +2 range (and often +1 for firing into the wind, which we didn’t remember at first), the ATG in AA7, the MTR in X4 and the HMG in V4 opened up. The MTR managed to hit a HT once for no effect (should have been one over with the wind, but it was a ‘2’, with a subsequent ‘3’ for the improbable CH, so it would have been an improbable hit if we’d done it right anyway). The HMG managed a pretty good rate tear, and finally caused a PTC on the HT’s passengers (and this wasn’t into the wind, so this was correct), which he passed, but activated my Sniper (for the only time for either of us in the game), who promptly recalled the Marder.
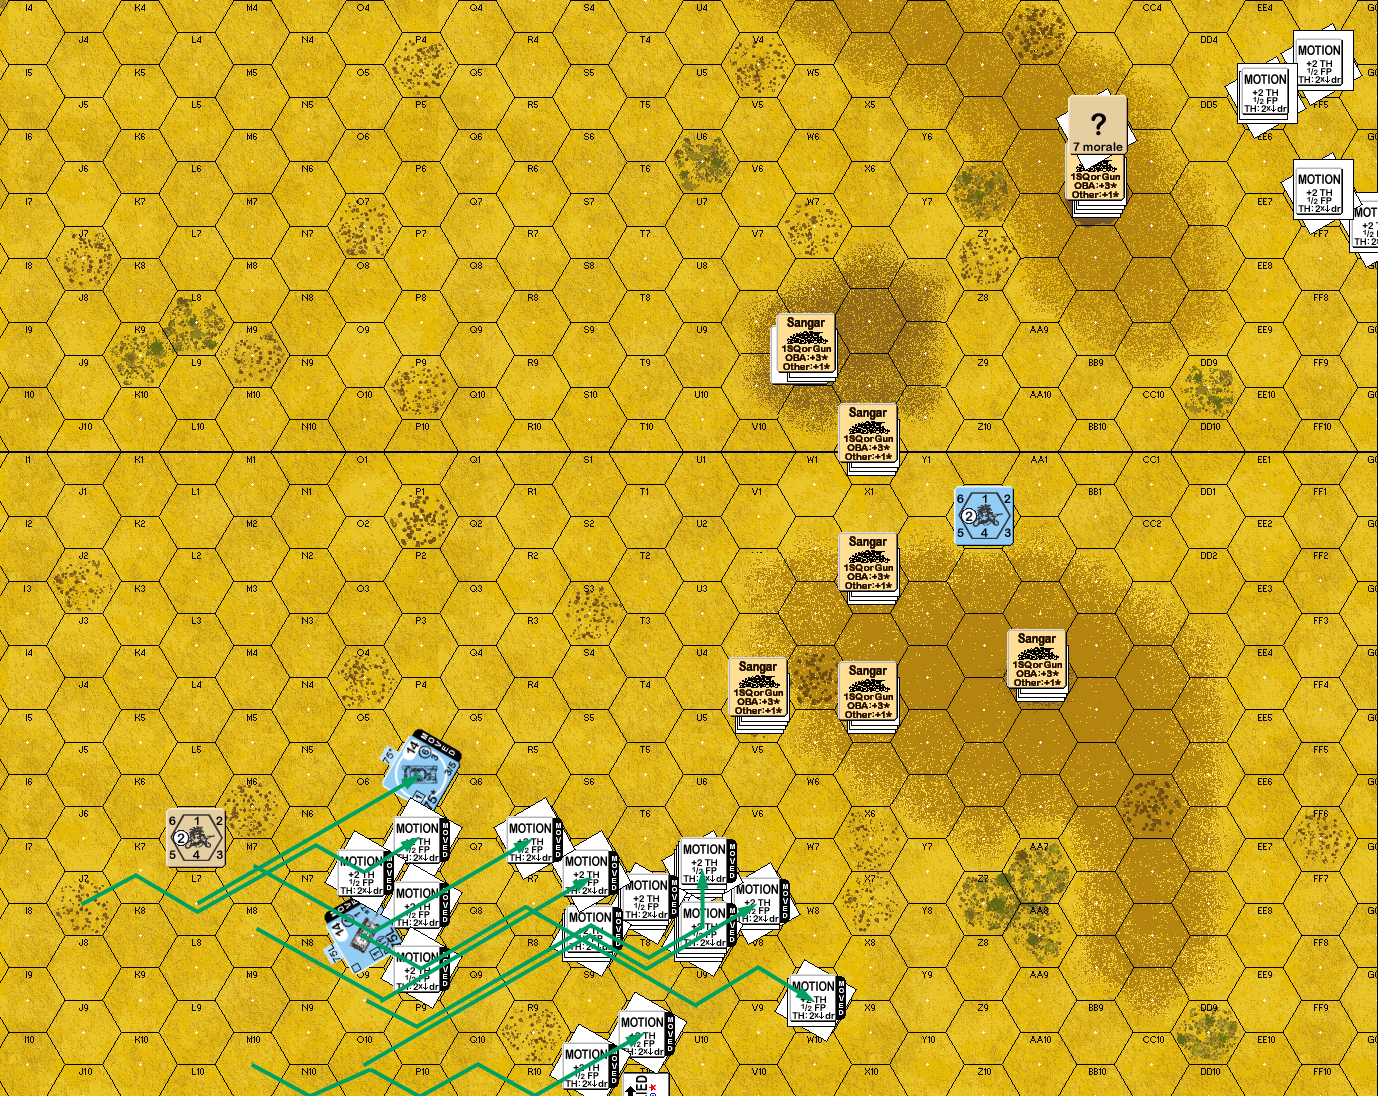
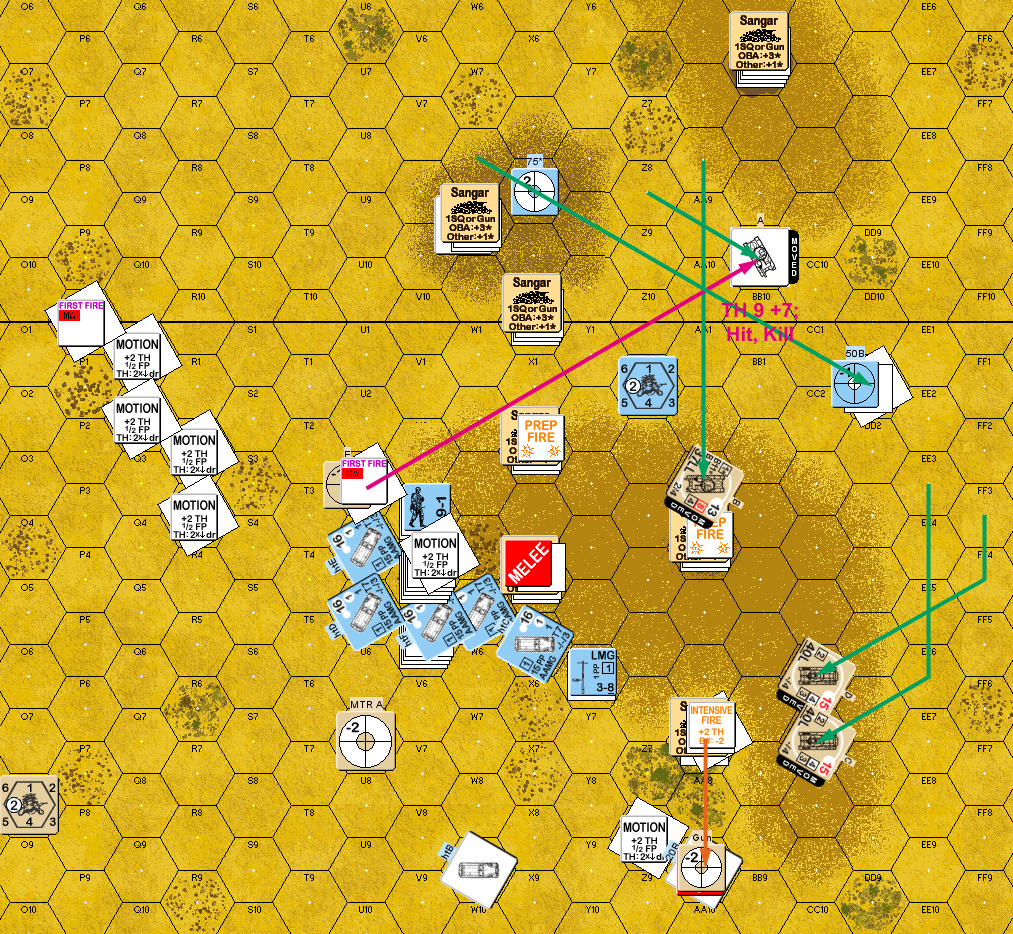
Situation, German Turn 2. No, I’m not tracking every vehicle’s movement….
In my Prep, the ATG took out a HT (no survivors) and got Acq on a second, but the other two guns I had active failed to do anything. The Stuart advanced from one summit to the next, while the Grants swung over to join it, and the Crusaders headed straight south, hoping to back up the ATG. Patch tried a few return shots (mostly from the HTs), but the only thing he did was malfunction the MA on the Pz IV.
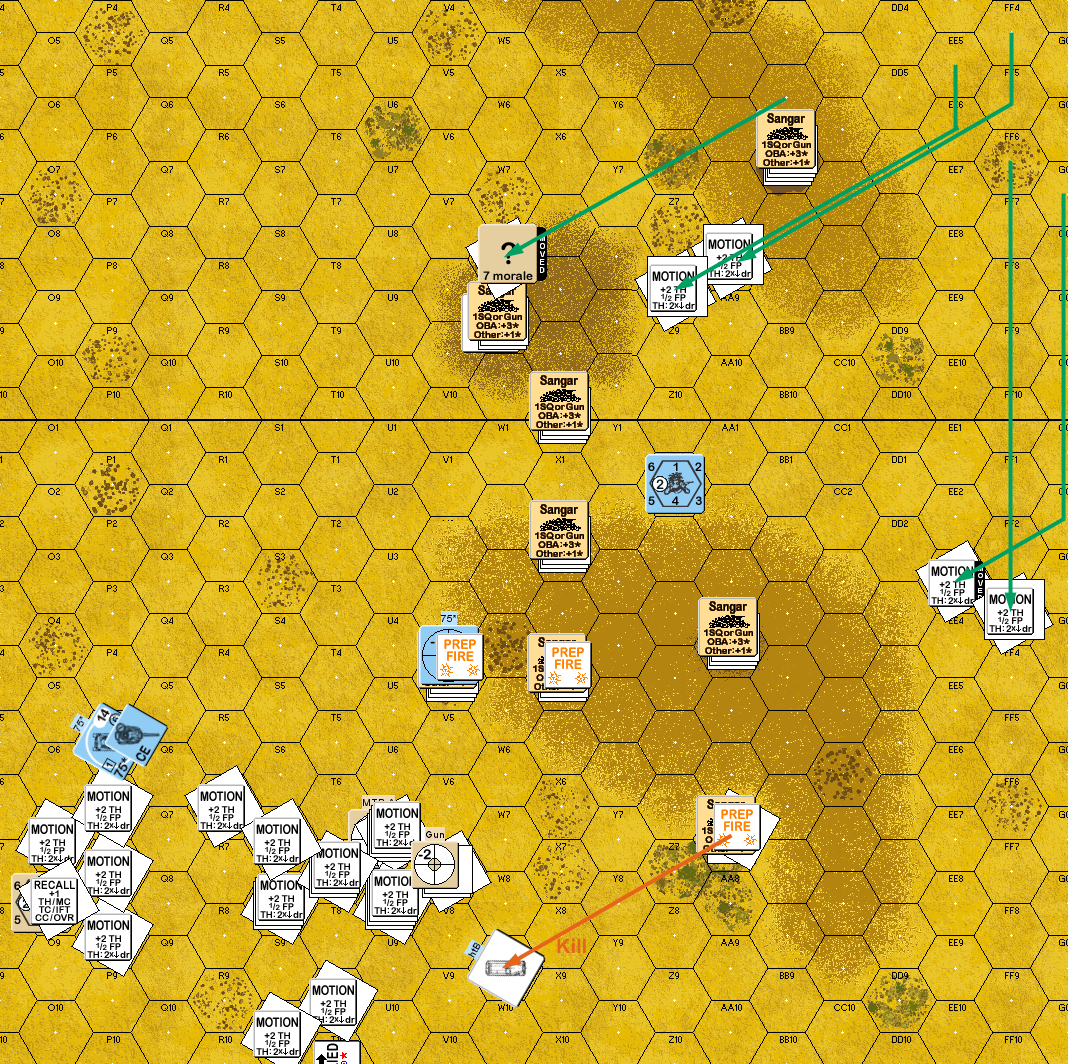
Situation, British Turn 2.
And of course, the MA was immediately repaired at the start of Patch’s turn. It skipped Prep anyway, and Patch got straight to the business of reducing Fortress Hillock. The first thing was Overrunning my HMG position with a Pz III. The HMG doesn’t have what it takes against that (and missed anyway), and even though they survived (with my 9-1 HOBing to 9-2), the OVR automatically destroys the Sangar, and he ended on top of them, keeping them from firing at anything else (like vulnerable HTs). He then unloaded three HT’s worth of passengers (including his 9-1 and 9-2) adjacent to the HMG; my LMG backup in X2 and MTR in X4 were unable to affect him. Then he unloaded another HT next to the MTR; small arms from them, and the LMG+squad on the summit were unable to affect that. For his last move, he unloaded a HT between the two. This was the HT my ATG had acquired, and it missed its shot by one.
Meanwhile, the two Pz IIs starting swinging southeast around the hillock, while the rest of the tanks went NEN, with the Pz IV and one III taking up positions while the rest stayed in Motion. The HTs around V4 all fired their AAMGs for Encircling Fire, and broke the 9-2+squad, who promptly surrendered (Patch was going to refuse it until I pointed out that he can’t in the desert). He sent one squad into X4, and both sides missed in CC.
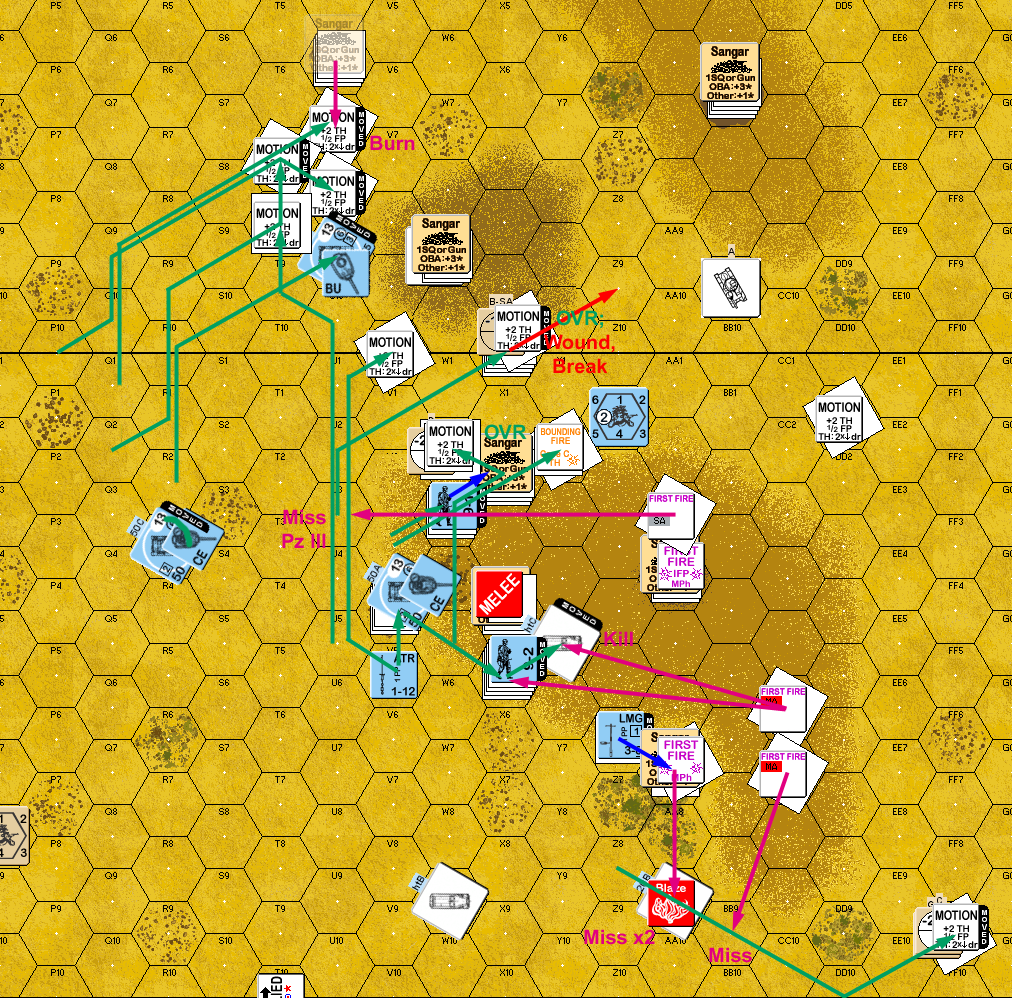
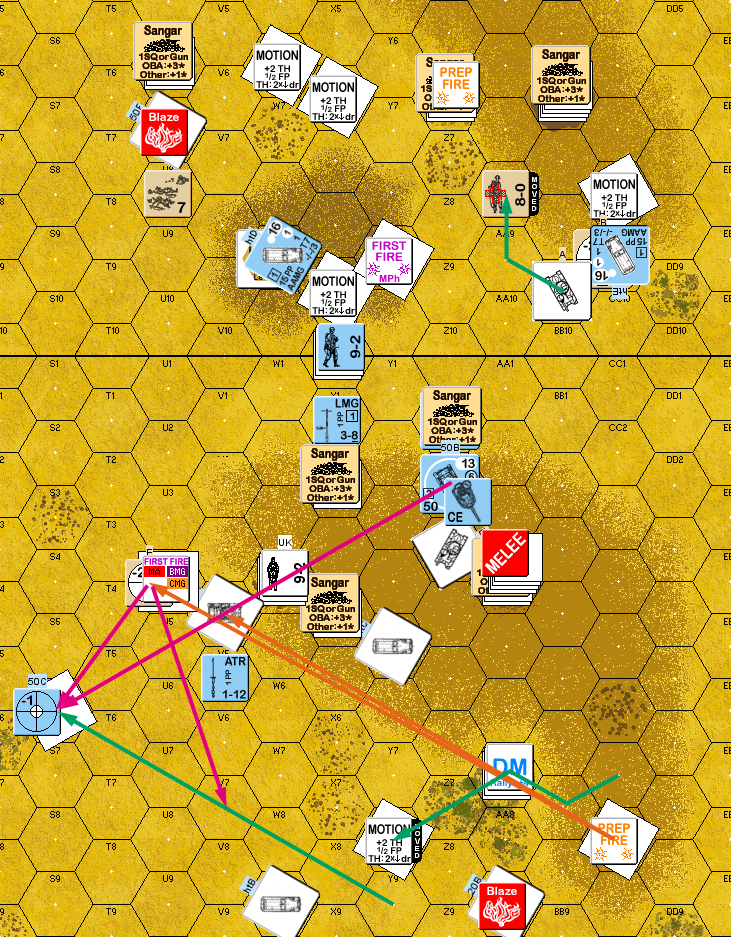
Situation, German Turn 3.
Patch missed getting the abandoned HMG in my rally, and the remnants of the infantry defense in the area couldn’t do anything. The ATG stuck with its primary job, and killed the lead Pz II with a CH on the IF shot. The Crusaders parked on top of the south end of the hillock to back up the ATG, while one Grant parked next to the summit. Disaster struck when Patch hit and killed the second Grant (and unknown to him, my AL) with a lucky shot (2 or less with his -2 AL). The Stuart headed back around the southern hillock (it should have been joining the second Grant…) safely, despite attracting a fair amount of fire.
Melee continued without result.
Situation, British Turn 3.
Patch recovered the HMG, and went straight into movement, overrunning X2 with a HT; it didn’t do anything, but with the +2 for Moving, I couldn’t get him with CC Reaction either. One of the Crusaders had acquired the HT in X5; it missed as the HT started, but killed it in the next hex, maintaining rate all the while. The Crusader took a couple shots at the next HT in line as it started, but couldn’t hit through heavy dust, and it overran X2. He later overran it a second time (no result) and moved up his 9-1 stack.
His mobile group of panzers swung north, preparing to swing around the small hillock, with one of them ending (in Motion) adjacent to my HIP ATR which had a side hull/rear turret shot, but it stayed hidden until DFPh. His 9-2 stack started south but the group on the summit nailed it for a K/2 on a very lucky shot (‘2’ with +0 dust dr) that killed the HS with the HMG and pinned the other squad present.
The Pz III that had parked started and overran X0, wounding the leader and breaking the squad there (Patch thought it was an ATR, but the 8-0 was there as a central position he could go and rally any one who needed it from). The remaining Pz II continued around the hillock, with both the ATG and one of the Crusaders unable to score a hit.
My Final Fire was mostly trying to stop his infantry, and didn’t even manage a PTC. But I revealed the ATR in 28U6 for a rear turret hit on the adjacent Pz III, and got a ‘2’ TK to burn it.
Patch went into CC with my ATG, but couldn’t get a kill, while the 9-1 & squad entered CC with X2 and killed my squad at no cost. The Melee in X4 ended with the British dieing (and rolling a ’12’ on top of it, if had mattered).
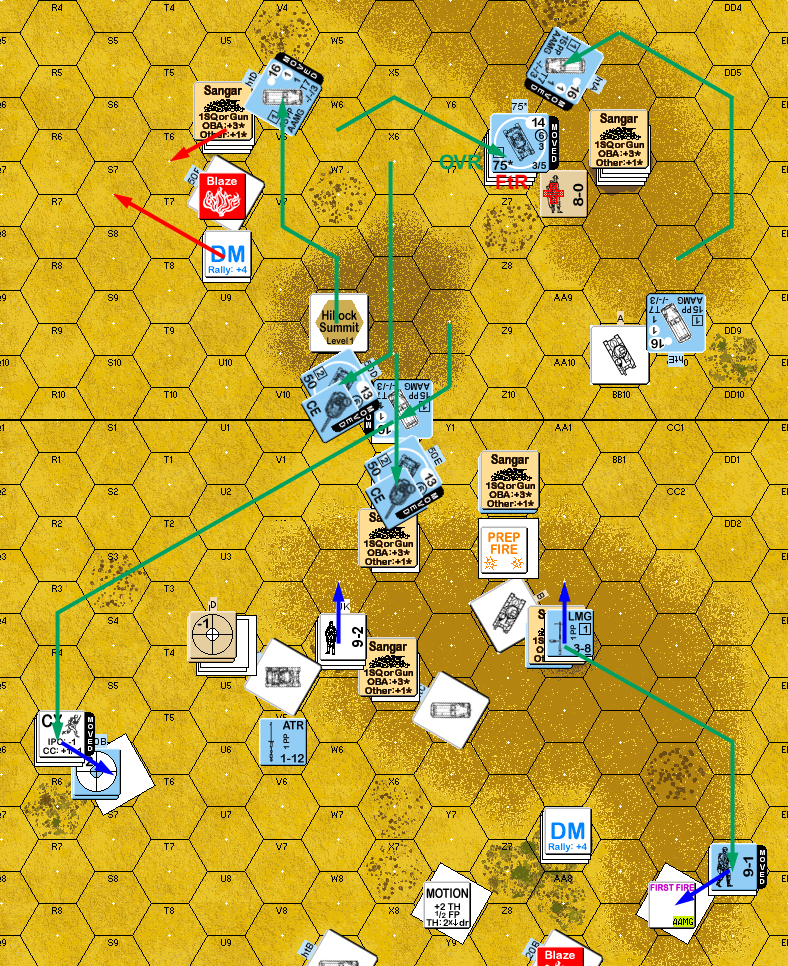
Situation, German Turn 4. German turns were taking a while, while mine flew by….
My one rally failed (not really a surprise), and Patch failed to pick up my HMG again after losing the HS that had grabbed it last turn. I had been planning on keeping the Crusaders together as they swung around the edges of the board in the opposite direction of the Pz IIs so they could get upwind positions on the Germans, but decided to stay and take out the remaining Pz II, which I did on the first shot (keeping ROF without any good targets), while the other stuck with the plan, while the Stuart took up position on the southern end of the hillock.
I didn’t like how the odds were mounting against my remaining Grant (with three different Acq markers on him, and a lot of well-led infantry nearby), so it started and was going to head south to join the moving Crusader, but it was taken out in it’s first hex of movement.
Patch’s Final Fire’s only result was a NMC vs the squad on the summit of the small hillock, which they passed. Melee finished off my ATG crew for no losses.
Situation, British Turn 4.
Patch managed to pick up the HMG for his turn, while my rally failed again. He took one shot at the moving Stuart (missed), and then overran my ATR, who survived a 2MC, only to break to a MC on a second OVR.
His squad in AA7 entered the Sangar (auto-deploying to take the Gun), and the MGs on the Stuart killed the half left outside through a +3 dust dr! (1MC/NMC, and the squad outside died on a ’12’.) A HT entered Z1, which was where my second ATR was still HIP, with high rolls and dust dr, I missed with the ATR, and finally broke/ELRed on a FPF shot without ever affecting the HT.
The squad on the small summit took three OVRs before breaking. During my DFPh I revealed my last HIP unit to open up with the second MTR against some of the HTs that were now in the area. Two of my squads were eliminated for FtR as they couldn’t rout, but there was no infantry adjacent to surrender to. Patch attacked the southern summit in CC at 2:1, and only reduced my squad while I did nothing in return.
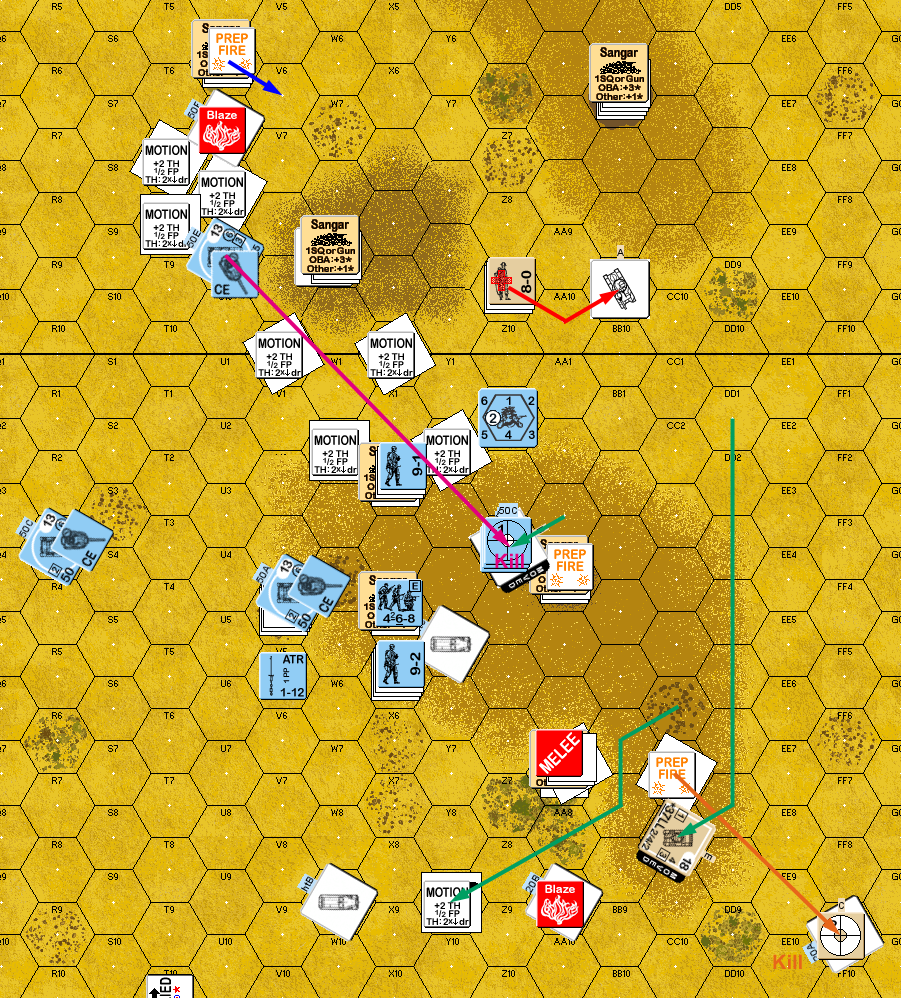
Situation, German Turn 5.
With everything under DM, I couldn’t get anything back on self-rally. The MTR managed a rate a few times, but couldn’t get an effect. The Stuart fired all the MGs at the HS now manning my ATG, but couldn’t get a result, while the MA fired at the Pz III in V4 for a possible shock (passed), miss, and then a hit and kill on the third shot, and then a turret hit against the Pz III behind it (survived) and then missed on the second shot against it (ROF 1…).
Patch fired on the Crusader as it started, but eliminated the captured gun on a ’12’. This allowed me to overrun him without worry, and break the HS. Patch fired on the in Motion Crusader from U4 as it moved up but missed, and then generated a 1MC against the CE crew with the MGs (passed, thankfully), and it parked a couple hexes upwind of the German position.
Patch finished of the defenders of the southern summit for no losses in CC.
Situation, British Turn 5.
U4 prepped at the Crusader attempting a showdown, finding he had no APCR and getting a possible Shock (passed) on the IF shot. The further Pz III in Z2 joined in, but missed. The 9-2 stack that had been going north dropped the HMG and went racing for the Crusader, while the 9-1 that had just taken the southern summit raced for the Stuart. The other two remaining Pz IIIs also headed south and prepared to confront my armor force while the Pz IV overran the MTR position and broke it. Patch finished up by DMing my brokies with a HT and positioning them to cut off routs.
I couldn’t afford to ignore the threat to my armor, and the Crusader had to turn it’s attention from the Pz III to fire the CMG on the infantry, but despite a PTC, couldn’t do anything to him, and then malfunctioned the MA on a IF shot trying for an AP hit on infantry… (no HE ammo). The Stuart had to do much the same, but pinned the leader adjacent.
Patch passed both his PAATCs to engage my tanks in CC. The squad and 9-2 burned my Crusader, but the squad by itself missed getting the Stuart, and it killed the squad in return.
Situation, German Turn 6.
With one concealed defensive position left, I was teetering on the edge of conceding the game, and would have if Patch had gotten both tanks. As it was, I soldiered on a little longer. There was really only one thing to do, sit tight in the north, while the last two tanks tried to find good firing positions to rack up some CVP. In fact, since we had been spotty in remembering to count CVP, I went through and re-figured everything. It turned out that Patch had 49 CVP (including prisoners that could possibly escape, but obviously weren’t going to), and I had 44. Not bad considering how little I had left, but with me needing to have “> 5 more Casualty DVP” than him, not really likely.
Patch prepped with three of his tanks on his turn 7, but couldn’t score a hit against moving targets at range. The Pz IV destroyed the Sangar on the final summit in an OVR, but couldn’t affect the concealed men within. They tried CC Reaction fire, but I still just couldn’t get a moving tank, even with an 8-1 helping.
My turn 8 consisted of me finally getting my tanks into position. Or not, the Crusader parked in 27Q2, four hexes from the primary target, and upwind of everything else. However, Patch got a turret hit on the Stuart as it moved up which Shocked it in T8. That pretty much doomed me as it incapacitated my best anti-infantry platform (with up to 8FP of machine guns), and worse, it did not recover, flipping over to UK for Patch’s turn 8.
That ended things with a Critical Hit against the Crusader, and another hit to kill the Stuart. The Pz IV came back for another overrun of my remaining infantry, breaking the leader, but not the squad. Being well past the point of hopelessness, I called the game there.
Afterword:
Surprisingly, the best units on each side didn’t do anything, with the Marder being recalled before anything could happen, and the Grants taken out with only one shot fired. The Crusaders and Stuart on the other hand, did a very good job, and if I had pulled this out, it would have been entirely thanks to them.
Patch happened to hit my defenses from a direction I hadn’t really thought about, though the interlocking fields of fire idea worked fairly well—except that it often couldn’t do anything through all the dust. The Heavy Dust really does add a lot to the scenario with the enforced short ranges, and the extra dr adding uncertainty to even good odds shots. This does a lot to make the scenario fun, but the British infantry doesn’t have any real good options beyond huddling in the Sangars (the only cover available), which makes the defense too static.
I had not anticipated how Patch took apart my defenses with repeated overruns, which not only tied up my infantry, but demolished the Sangars to boot. CC universally went bad for me even when the odds were even, and the surrender of the HMG crew on the third turn compromised the whole defense with the loss of my only ROF 3 weapon. (It was too far forward, thanks to not thinking about the southern approach.)
In all, I think we both did well, this is probably the best I’ve done in an armor battle yet, and Patch’s rerouting of the infantry is what finally shut that down.
It’s certainly a scenario that would stand up to repeated play, though I’m not in any real hurry to try it again.
Discussion ¬