
OA24 Buying Time
Patch and I have been wanting to do more with the French lately, and still want to see more of the good ol’ American 666, so we decided upon trying OA24 “Buying Time” from Out of the Attic 2, which we’d both gotten relatively recently. Patch took the defending Americans and had a hard time working out a setup.
It’s Morocco in late ’42, and the Americans are trying to keep the French from getting at the beaches where troops are still off-loading with six squads (mix of 666 and 546), two BAZ, a MTR and a MMG. The French enter in the middle of board 19 with ten squads, all in trucks or on motorcycles and three AMD 50 AM armored cars, and have to get 12 EVP off the middle of board 19 (just under one full board length total) in 6.5 turns (and the three ACs could win it themselves). There’s two overlays to get rid of a couple buildings on the already fairly open board 19.
The Americans can set up on three quarters of the available area, but Patch’s line was fairly far back, with only one stack actually on board 17 at all. After fixing a goof where I forgot about the ACs being radioless during setup, they, and a chunk of motorcycle infantry entered on the east edge, where the main continuous road is, and the rest entered near the center, with the plan of possibly deploying in the grain, and/or continuing towards the east, hopping over to the other road.
My second move blundered right into the MMG’s boresighted hex (19I1), which killed a motorcycle squad on a 1MC break and ’12’ Bail Out roll, while setting up a FL. The AC platoon went down the edge-road, towards the outpost in E3, while Patch panicked (You’re usually not this aggressive!), and I hoped the BAZ was not part of the stack. But, I figured it could only kill one of the three before the other two, and approaching infantry support got him where he couldn’t rout. If he was real…. Sadly, there’s no off-board road on the edge by the rules, and with Platoon Movement, it was all I could do to stop in his hex with the lead AC.
The east motorcycle force detoured around the FL by taking a route through a gap in the tree-line and offloaded, in the hopes of getting the MMG up and in action. I also unloaded one squad in the grain, where it would remain concealed and could advance to the hedgeline and try to keep an eye out for American movements. (Note, all the French trucks are Recalled as soon as they’re no longer carrying infantry).
As it turned out, 19I1 was Dummies, which was a relief… and a disappointment. The line ahead of me was just as solid as it looked, and there was a HIP squad out there somewhere.
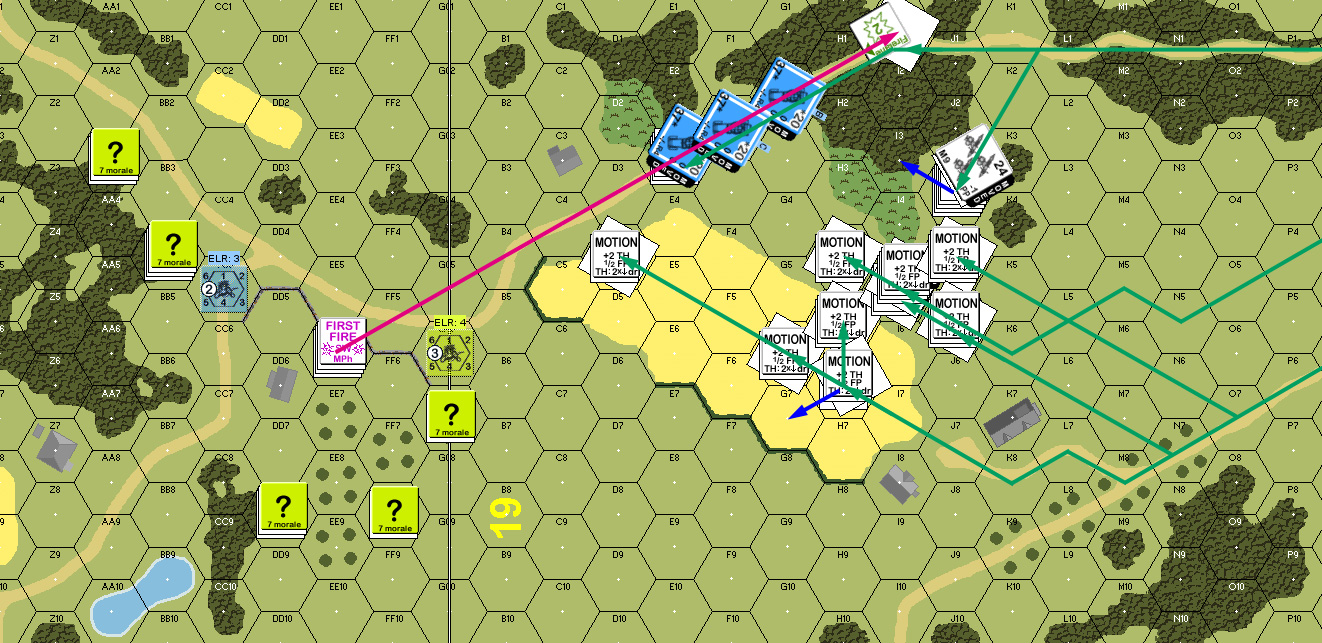
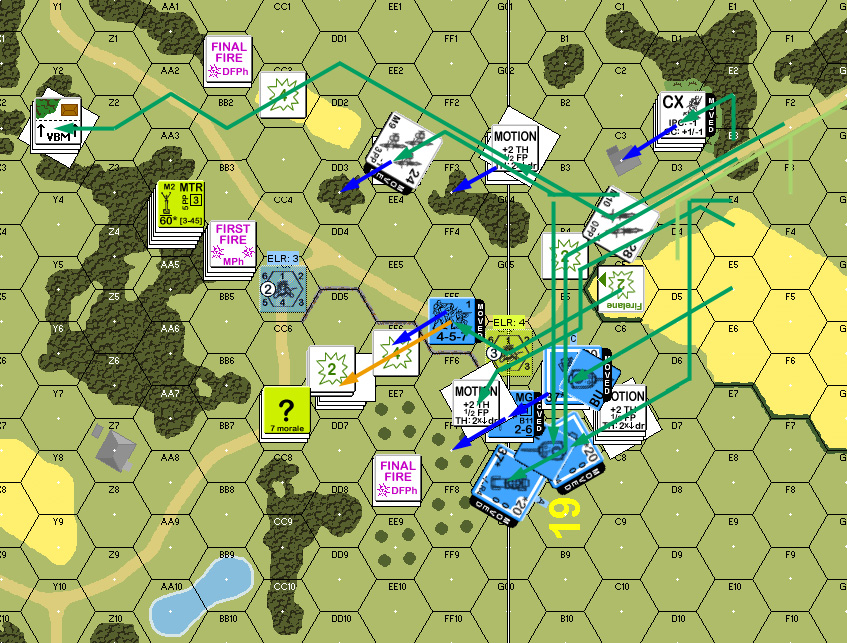
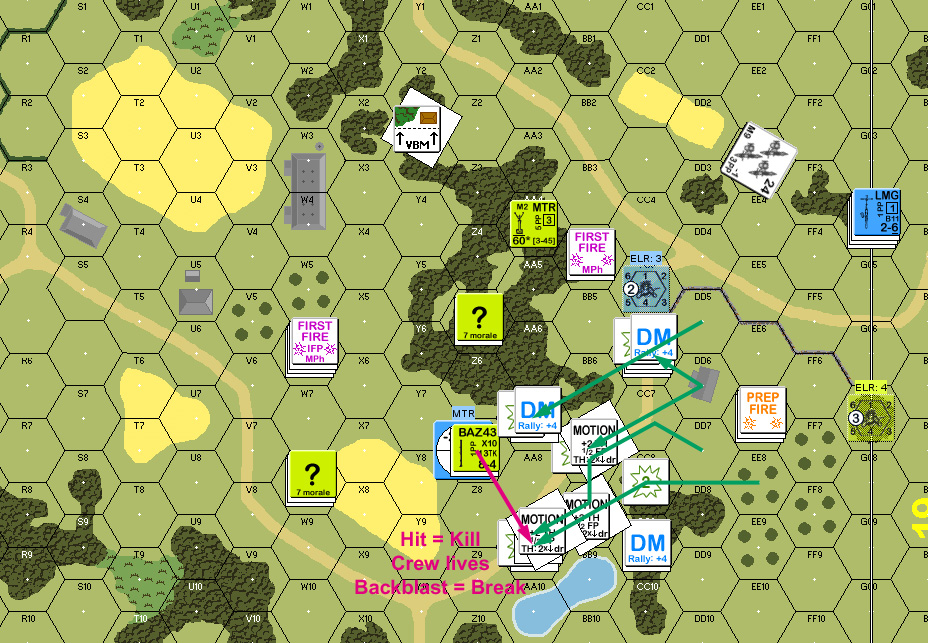
Situation, French Turn 1. North is to the left, the American setup area started at 19H, and the eventual goal is to exit off of 17R; Orchards are Olive Groves.
Patch skipped Prep, and started concentrating around DD8. I couldn’t really see anything, and most of my troops were still Riders, so my only fire was a ranging shot at EE6 from the lead AC. He moved a 3x? in there, but at least the MMG was kept off the prime FL real-estate.
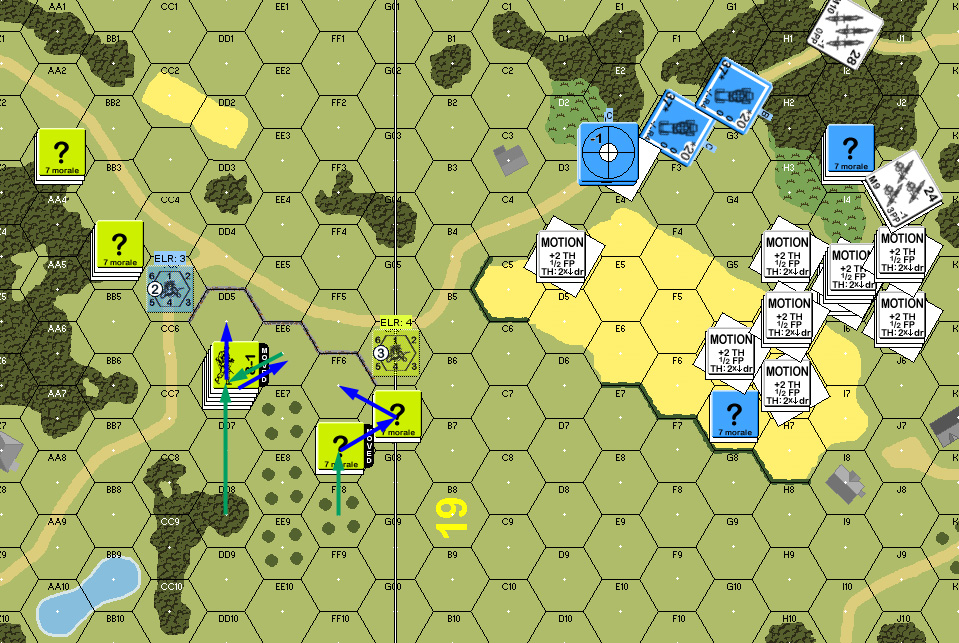
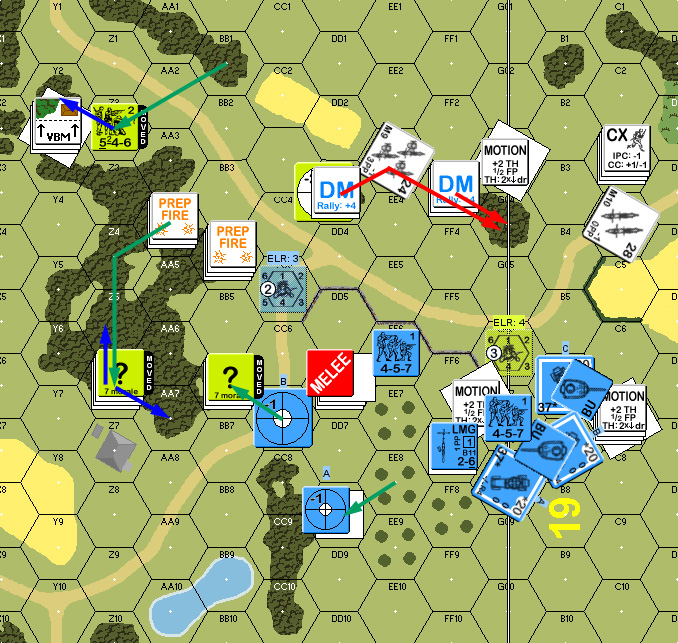
Situation, American Turn 1.
The lead AC took a second shot at EE6, hitting for no effect, and leaving the other two ACs to continue on without him. My first move was a motorcycle HS, and Patch decided to fire at him to put down some residual. He got a 2MC which the HS promptly ELRed on, but got HoB on the Bail Out roll to… go Berserk (+3 roll: French, broken, inexperienced). Since they’d only gone one hex, and didn’t have to pay for unloading, they still had 3MF to make it to the wall in front of Patch’s line.
Disaster struck as my MMG force stumbled into the MTR’s boresighted hex in E2. He hit, got a Final ‘1’ for a 1KIA, and then I yahtzeed the roll to lose both the squad and my 8-0. Since the idea was to hold down that flank with long-range MG fire while the bulk of my forces headed for the CC2 area, I didn’t really have much of a plan left at that point.
Thankfully, he didn’t do any other damage, and I parked the two mobile ACs where they could start shelling both ends of his line, hopefully forcing him into a more compact area where I could bring force to bear, or go around, more effectively. However, I had walked into both his boresighted hexes for once, and so I started getting convinced that his HIP unit was in BB1—right where I was headed.
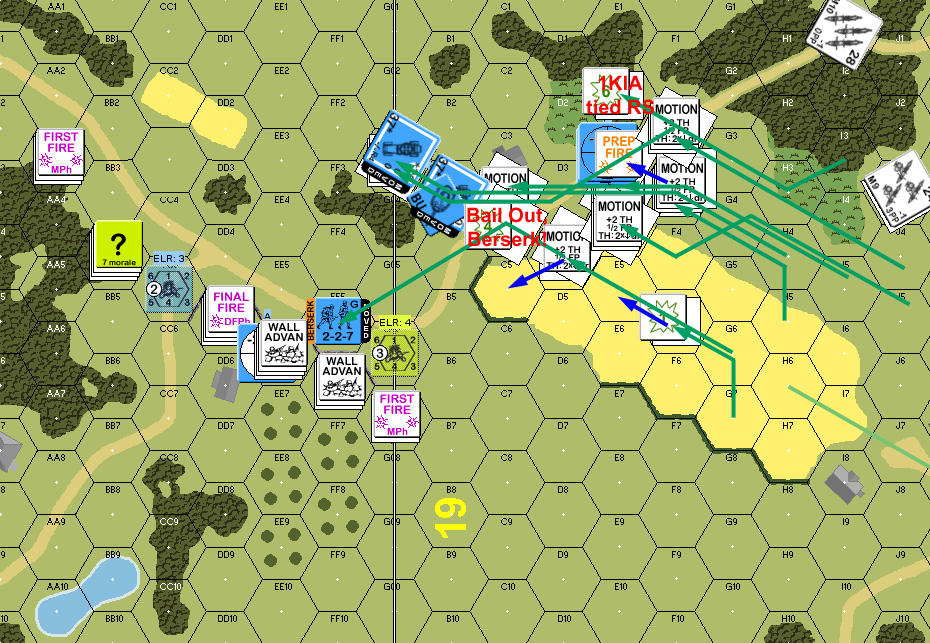
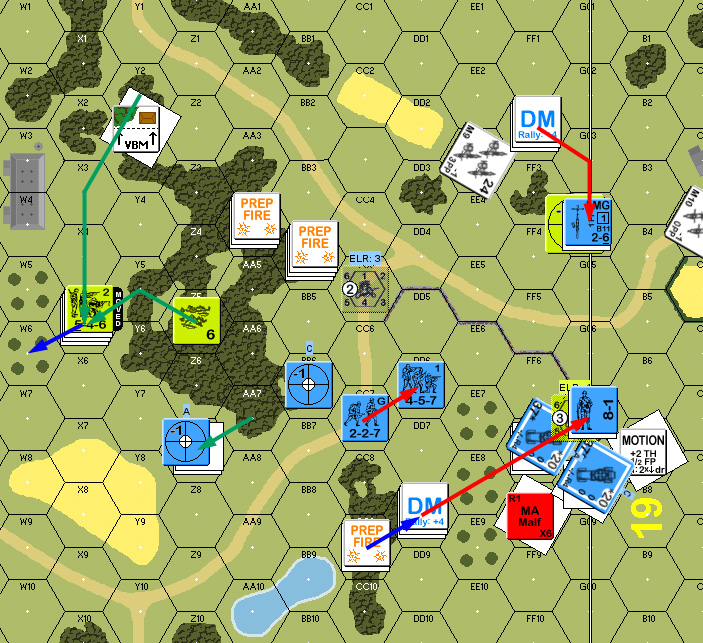
Situation, French Turn 2. Light green is the exit of recalled trucks.
Patch pulled back for his turn, fading back from the stone wall into the olive grove and stone building. Again, there wasn’t much fire, about the only thing I did was convert my acquisition to -2 Area acquisition to encourage him to stay out of those hexes.
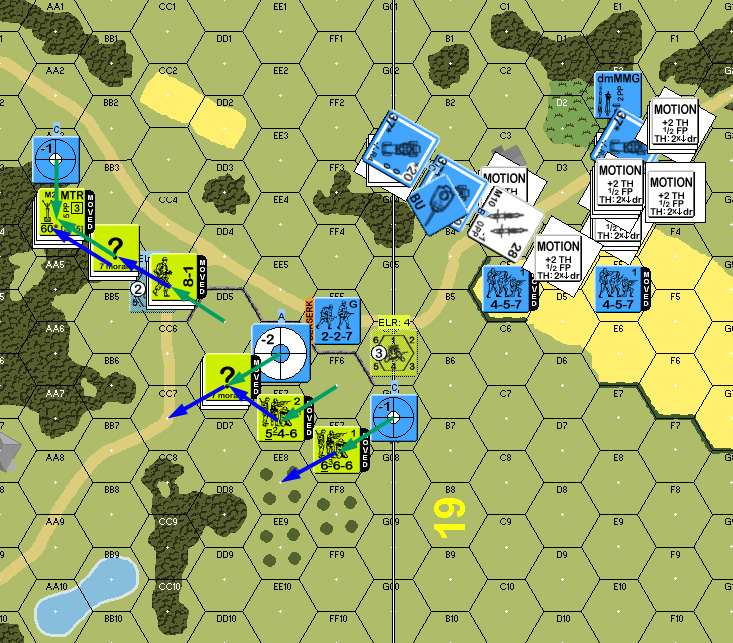
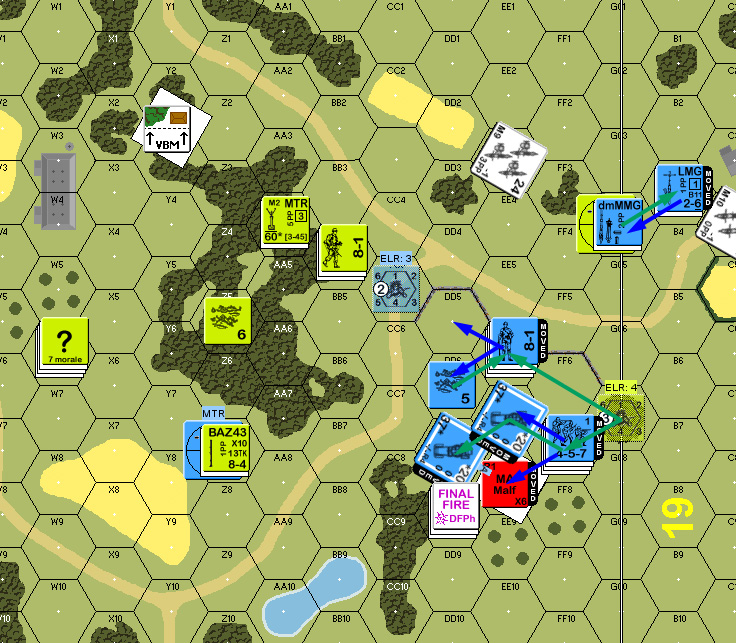
Situation, American Turn 2.
To my surprise, Patch only fired the targeted squad at the ‘zerkies, and couldn’t get better than a NMC, which they shrugged off. I was hoping they’d chew up a little more fire in return for a better chance of not being tied up in CC. The other HS continued its daring ride around the east flank of Patch’s guys, only to find that the HIP squad was in BB1. Unexpectedly, it was a 546 with no SW, and they managed to miss the motorcyclists. My plan for the MMG was to recover it now that the MTR couldn’t see the hex, and get into FF3 in Advance (this required CX), but the squad blew the recovery roll, forcing the leader to pick it up instead, and the entire move was blown.
By this point, I had decided to switch plans. Now, I wanted to try and hold his main line in place with a couple squads, but switch my main thrust west where I could get onto the exit road, if I could just get him away from it. The lone AC made his TC to start, and the full group joined up on the west side of the board, looking over the gap the road went through and the building the ‘zerkies had charged.
The ‘zerkies, thankfully, managed to pin the squad in DD6, which helped them live through the first CCPh, while I pressed his unit in EE8 aggressively.
Situation, French Turn 3.
Patch pretty much blew part of my plan apart in Prep, breaking both of my west-flank squads, though at least the MTR and MMG weren’t moving as a consequence. I was worried that BB1 could advance and force a surrender of a squad, but instead they chased after the motorcycle HS. Patch shifted his remaining concealed units to cover the road, while pulling back the exposed squad in EE8. I took a chance at firing into the Melee (6 vs 10 morale, and an upcoming 5:2 combat…) and broke his squad, at the cost of his Sniper breaking one of mine. I also malfed an MA while trying to shell the road positions.
Patch Ambushed and eliminated my Steve McQueen wannabes in Y2, while my zerkies eliminated the broken squad in DD6 as it tried to escape.
Situation, American Turn 3.
The only news for my rally was bad, as I rolled a ’12’ to reduce a squad in GG4 for my 1st MMC self-rally, and there was no result on my malfed MA. I took one shot in Prep, and got lucky as the green HS managed to pin a concealed BAZ HS. The problem was that the other BAZ was certainly concealed in AA7, and I didn’t think I’d get lucky a second time.
I had forgotten about the misadventure with the MMG the previous turn, and so had to have the leader drop it so the squad could recover it (thankfully they didn’t blow the roll) as they headed to a separate destination. I started up the AC platoon… and instantly ran into an unexpected wrinkle. Olive Groves are 8 MP to move through with truck-type movement. Both Patch and I were expecting it to be closer to normal Orchards and hadn’t looked at that line. I advanced a hex or two and stopped, which is what I had in mind anyway, but the extra MP kept me from swinging the third AC to the south, where he could get a bead on CC9 and try to force him out of those woods. Meanwhile, the last loaded truck moved up and finally deposited my MTR+8-1 stack about two turns later than I had hoped.
Patch couldn’t do much about all of this, but his MTR did wipe out the broken squad and a half in GG4 on two hits. In advance, I started shelling the woods line, and managed to break the exposed BAZ HS. I pushed my remaining infantry forward aggressively, hoping to be able to do something about CC9.

Situation, French Turn 4.
For his rally, Patch decided to have his leader grab the BAZ from the HS rather than try to rally them while under DM. My 7-0 grabbed the abandoned LMG in GG4, I rallied the squad in GG7, and the MA still got no result.
Patch’s MTR hit the squad in FF2 and broke them on the first shot, despite the lack of Air Burst. The squad in CC9 fired, but missed the adjacent squad in DD8, but then the MMG squad in BB4 fired and broke them. I was happy that he was tying down his troops (I really didn’t want to see the MTR shift over to shelling the main thrust with how effective it was being), but I was still missing every MC Patch sent at me.
Naturally, I didn’t have much opportunity to hurt Patch, but he broke my green HS with Advancing Fire.
Situation, American Turn 4.
The malfunctioned MA still had no result for my turn, but at least I managed to rally the LMG squad in GG7. Patch handed the BAZ from his leader to the squad that had joined him in W6, giving him a nice position for when I would have to go through the area, very likely stuck on the road to make it in time. The MTR squad prepped, hitting the building in Z7 for no result, and pinning the squad in DD8 with inherent FP.
Not liking the looks of the MMG, the infantry edged closer to the gap while the AC platoon moved up two more hexes to start getting free of the Olive Grove. This parked the entire platoon nearly on top of the 666 in DD8, but there was sufficient infantry around to protect from that threat (and the second AC had nothing better to do than keep the rear MG pointed towards him). Patch wasn’t able to do much, but did get a NMC on my stack in FF7, who, for once, managed to pass. He also got a couple hits on the lead AC with the MMG, but couldn’t penetrate (Final TK=5…).
Situation, French Turn 5.
Patch failed his 1st MMC rally attempt, and both of my rallies (under DM) failed, as well as the malfunctioned MA still giving no result. He prepped with the MTR again, breaking my LMG-toting leader, and reducing the broken MMG squad.
Patch pulled the MMG stack out, parking it along the road I was going to need to take, while the BAZ squad that had been in that area moved up the road a little.

Situation, American Turn 5.
This left me two turns in which to exit, with a minimum of thirteen hexes to go. It was already too late for some units to make it, and it would be close for anything else. And Patch had set up a nice gauntlet that I was going to have to go straight through. The good news was that the MA finally repaired, so that if (and boy, was it a big ‘if’) I could get all three ACs through, they would win it for me. I also got my green HS back again, and Patch eliminated his HS in Z5 on a ’12’.
I sent in all the infantry first, hoping to force squad in Z7 to fire, or at least cause target selection limits after the first BAZ shot. However, he broke the first squad that went in on a NMC, the HS took a 1KIA, the second squad reduced and broke on a K/2 (after causing CC9 to break on FPF), and the final squad+leader (headed for Z6, which they could technically exit from next turn) took a K/1 to wound the leader and break the squad.
That left the ACs as the only thing I had left. They made it to the road, and ended in Motion with the RMGs pointed towards the BAZ, hoping to get lucky with some halved MG shots. But even with the +2 for Motion, two hexes from a BAZ was just way too close, and Patch killed the lead AC in DFPh to make a French win impossible.
Situation, French Turn 6, showing all the way to the exit.
Postscript:
I have a hard enough time winning when I manage to completely upset Patch’s defense by going the wrong way. Considering I blundered into his Boresighted hexes, this result shouldn’t be too surprising.
Certainly, loosing two squads and a leader that early on did not help. The MTR then went on to kill another two squads, making it one surprisingly effective. I was struggling to sort out my movement, what with all the trucks for the first half of the game, and while I dropped off several squads right where and when I wanted them, the 8-1 and MTR was delayed a couple turns, and I really wanted my MTR in action to return the favor.
I also have to blame the dice. Sticking with MCs generated from enemy fire (i.e., discounting the Bail Out and rallies), I passed three MCs all game. Now, Patch was generating a lot of 1MC and 2MCs, but I expect 7ML units to show a little more backbone. That said, the HoB on Bail Out really paid off, and helped me crack a potentially nasty position.
In all, I think I really needed to push a bit harder and take a chance on turn 5, before a lot of the final defense moved into position. However, the Olive Grove movement cost effectively prevented that, and Patch did a great reshuffle at the end to make an even nastier line than I had thought possible.
Discussion ¬