
No Question of Attack
Mark came over today, and we tried out No Question of Surrender, which I’ve had for more than a year now, and Mark just received in a recent MMP sale. I originally preordered it to try out the new Grand Tactical System that was getting lots of praise from The Devil’s Cauldron. With the long time to publishing, I had kind of gone cold on it, and I didn’t even get around to punching it until recently.
Anyway, it is a fairly interesting, if somewhat fiddly, system. We started out with the first scenario, which finished up in time for lunch, and then sorted out the counters to begin a go at the second scenario. The first scenario is tiny, going two turns, with only three Italian units (plus a leader) involved in the historical attack on on Bir Hakeim.
I decided to take the Italians, so Mark set up his defense once he arrived, and we had at it. Approaching a fortification with light tanks when there’s anti-tank guns around is very dangerous, and this was quickly demonstrated, as I tried to keep advancing once the AT position was revealed (to get into my own range) and lost the first unit on an ‘E’ result. The other two lasted through the turn, but took another hit. The second turn didn’t go well either, loosing a second unit outright, with the last survivor ending the game stuck at the gates with infantry barring his way, and two cohesion hits.
The opportunity fire rules can be quite nasty, as everything in range can fire on a moving unit, and the +3 bonus from moving from an in-range hex to another in-range hex makes the longer-range fire zones especially dangerous to be in, especially here, where there’s no obstacles to LOS. In this case Mark’s dice made things worse, and the AT unit made most of its firing opportunities, and he tended to roll the highest possible result that would hit, causing the high losses (an interesting wrinkle of the system—you want to roll the highest number that will hit).
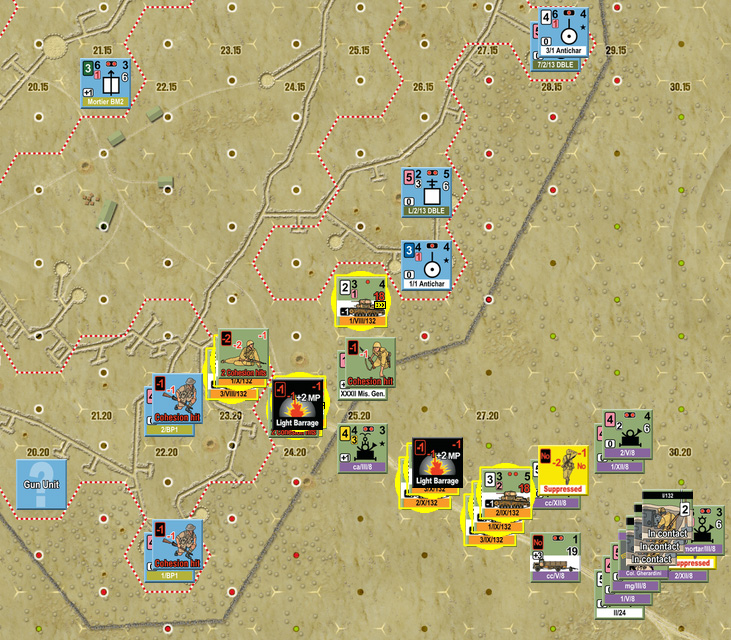
After lunch, we got going on the second scenario, which is the hypothetical set up of if the entire Ariete division had attacked the position in a coordinated attack (which is what Rommel had intended when he ordered the attack), instead of just sending in one battalion. We only got partway through the second turn (of six), but quite a bit happened.
I had the Italians again, and this time had the choice of coming in from three different directions (from NE, E, or SE), and looking at Mark’s set up, decided that the SE looked vulnerable, with two potential AT gun positions, some distance away from each other, and the only route into the fort that was not mined. So I came in from that direction, leaving four independent units to come in later, so that he had to continue covering most of the perimeter, or let them just drive right in.
I was originally thinking of moving the Bersaglieri force in first, advancing on the initial divisional activation, and then moving up further on the free formation activation, while the armor hung back out of AT range. However, I ended up using my Command points to get in touch with my artillery and bring fire on the two AT positions, which blinded them with Heavy Barrages (and getting a hit on a unit that was in the same hex as one of them). This allowed me to race the armor forward, and actually seize the entry hex into the fort, and start fighting the nearest infantry units guarding the area.
His activations came at the end of the turn (in fact, his Direct Command chit was the last in the cup), and his artillery started causing trouble. Thankfully, they’re 4 firepower, one-step units, so they can only lay down Light Barrages (the dice have been much better for me this game, letting me pass some fairly low troop quality checks). We left the day with the Corazzato’s formation activation partly done. I’ve managed to get an armor unit adjacent to his AT position, locking it down (the other turned out to be a Dummy), and we ended the day with a pair of fresh units driving through the light bombardment to assault his nearest infantry unit, which had already taken two cohesion hits. One company ended up taking two cohesion hits itself, but the defender was wiped out in two rounds (and some low rolls).
We’re hoping we might get a chance to continue the fight, so I put our final position into the Vassal module:
While transferring it to Vassal, I discovered an important thing we had gotten wrong amongst all the modifiers. I got the idea that Bir Hakiem was a -1 defensive modifier (like all the other bonuses it gives), instead of a -2. My rolls have been such that it probably doesn’t change too much, but it’s still very important, since there’s just no good odds attacks for the Italians. The annoying thing is that Mark has rolled a ‘0’ for his Dispatch points both times, getting 4 in two turns, and allowing a potentially very active defense (he took the artillery unit for this turn, and has already gotten the chit out).
The system is a little fiddly, with three different types of activation chits, points to keep track of, a number of modifiers to a host of different values, but it’s well put together. It’s fun, and feels like it’s got combat at this scale fairly well handled. I think I’d like to see a game bigger than this, but still smaller than the Market-Garden pair though.
Discussion ¬