
J88 Escape to Wiltz
By the time we finished off the Primosole Bridge campaign, Valor of the Guards had come out, and we wanted to try our hands at that. But before going into something else complicated, we decided to play a regular scenario in May of 2008…:
With the end of the yearlong campaign in Sicily, Patch and I started a new scenario tonight. At one point the plan had been to go right into VotG, but we agreed that it would be nice to get away from HASL maps for a game and cleanse the palate a bit. We also realized that we had never used American 666’s against each other. There’s been a couple with elites, but not any with 1st line troops.
So we started “Escape to Wiltz” from Journal 3 tonight. The Americans are trying to exit the west side of Board 39 after coming on the north side of Board 17 on turns 1 and 2. The Germans come on the east side on turn 1, and another 3 squads come on the south on turn 2. Both sides have a light amount of toys—the Germans get the usual suspects and two PSK, the Americans get the usual suspects plus a M5 Stuart and a M8 Greyhound AC.
Since neither of us showed a particular preference, I rolled randomly and took the Americans. As ROAR shows it 31 to 23 pro-German… and with my record, I took the balance. So Patch went first:
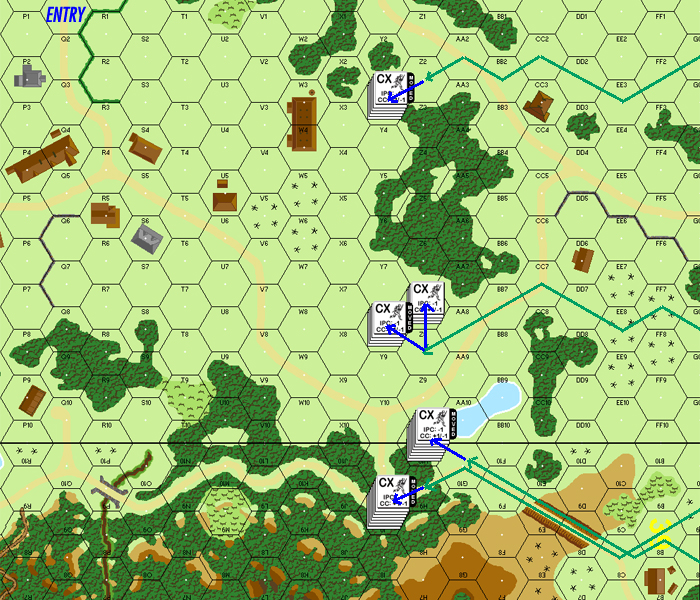
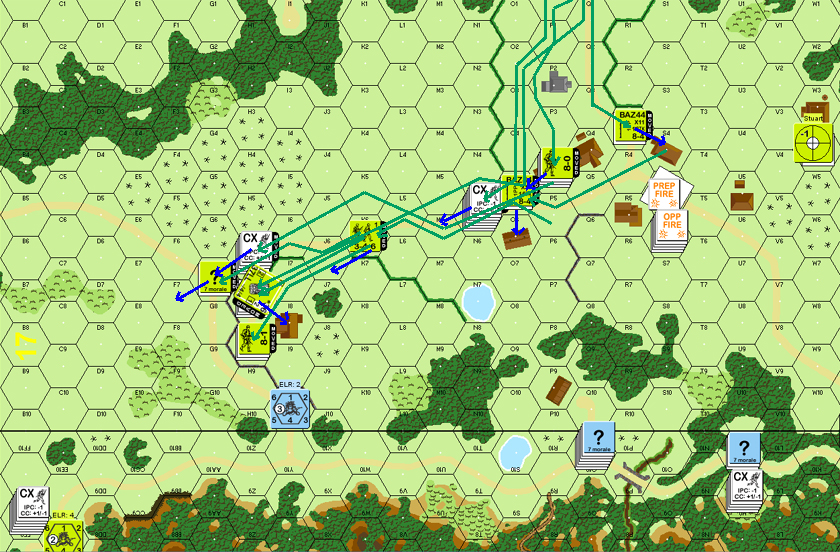
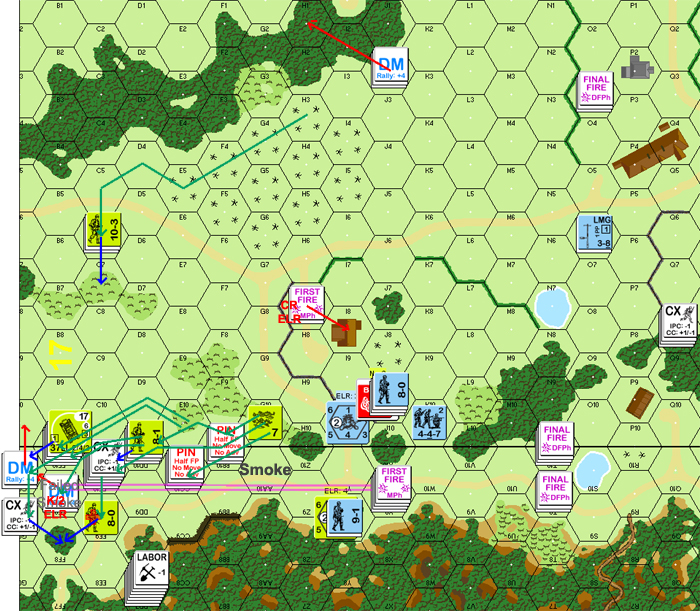
Initial German movement, the American entry area is marked in blue. Green arrows are movement, blue is advance, red is rout.
I had had just enough time to fiddle with the opening before Patch’s move arrived, and he ended up about where I figured. This made figuring out my first move a bit faster, as I already had some thoughts about what I didn’t like in what I saw.
We thought at first I’d lost my initial HS in the intersection, but Patch realized that he’d forgotten CX, which reduced it from a K/1 to a 1MC—which he promptly failed. But, Patch didn’t realize what my plan was yet, and neglected to put down an FL.
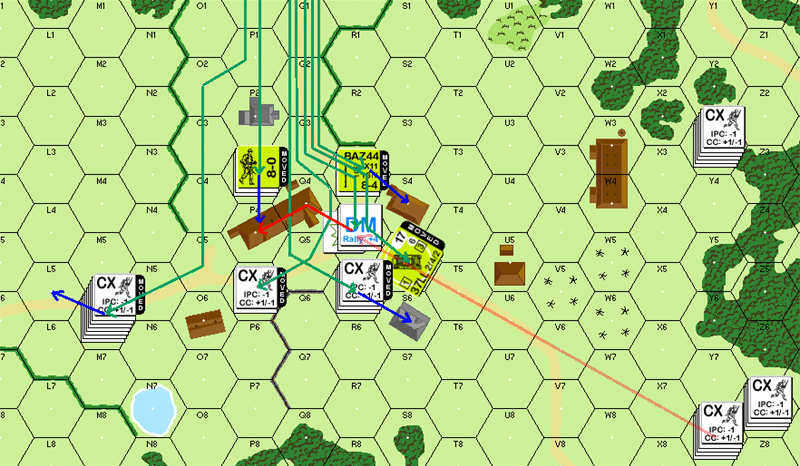
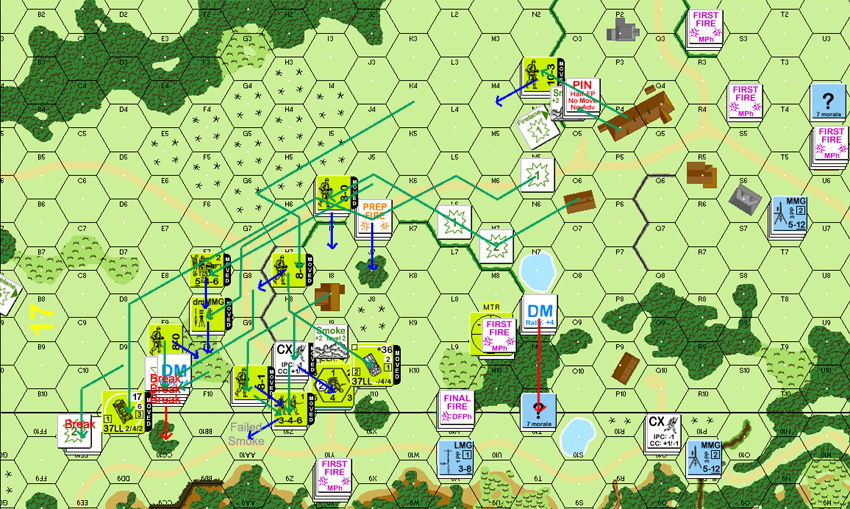
Movement in the first American turn.
Patch reacted to my turn about the way I hoped he would. He looked at the firepower that was facing him and went for cover. Sadly, part of his force is marching down the board 39 road, and there’s nothing I can do about it. Thankfully, that’s true in reverse as well.
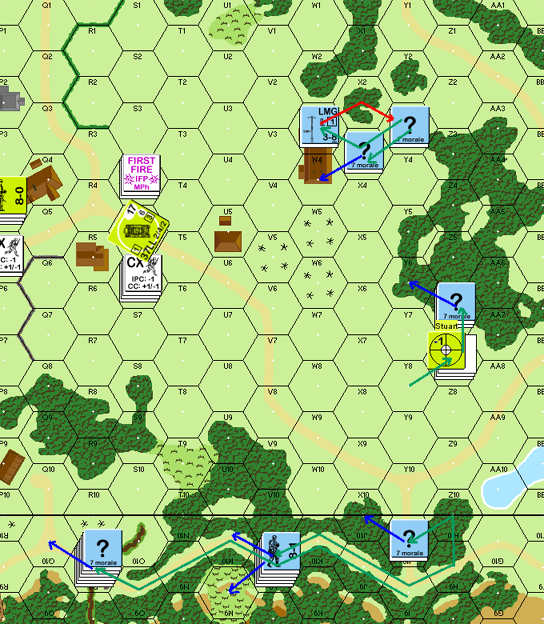
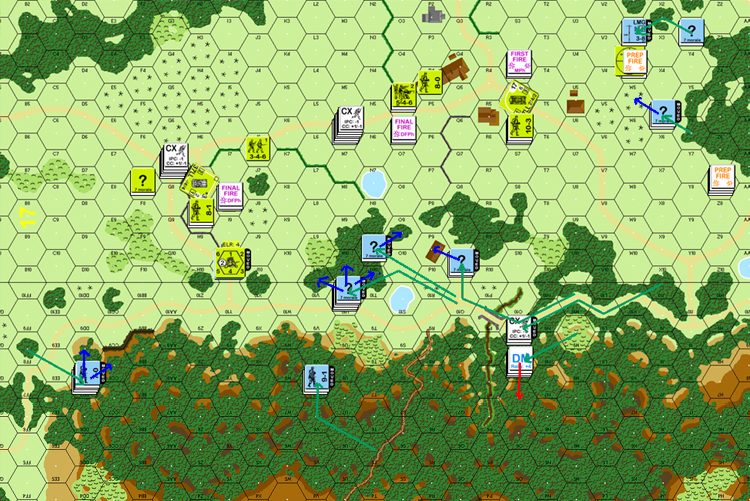
German movement with their turn 1 forces. I got my first break of the game in W3. 😀
And the turn 2 platoon took the obvious good routes:
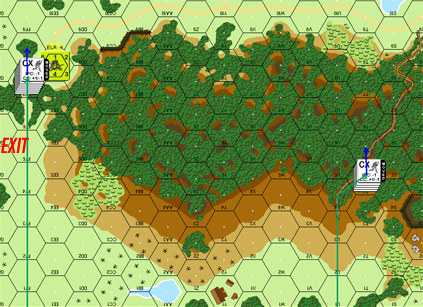
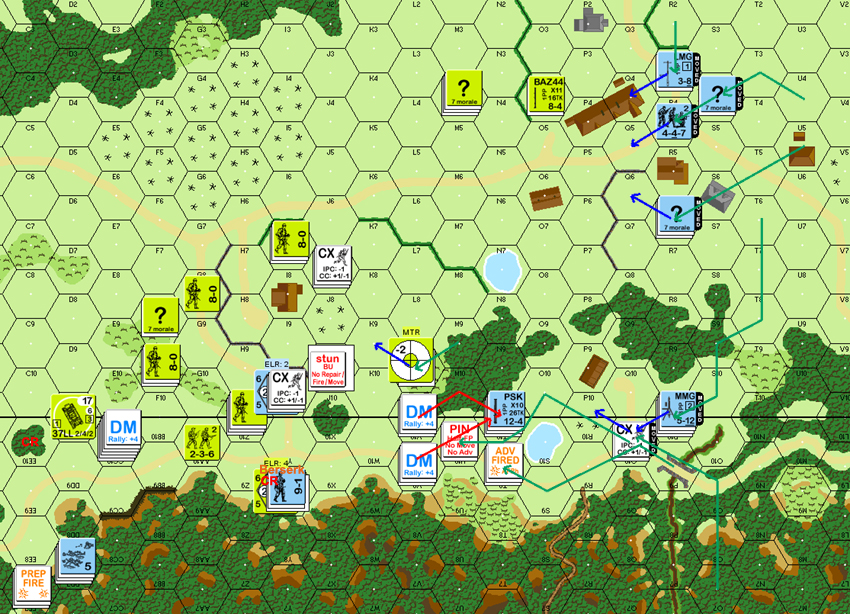
German movement with the turn 2 forces. Exit area is marked for reference.
We finished off the evening partway through my turn 2. Patch is getting very worried that he hasn’t been able to stop my movement yet. It’s pretty obvious that the main fight is going to be over the area just in front of the woods covering the exit area.
Whizbang1963 cheered:
“Awesome AAR…keep up the great work!”
And Patch posted his thoughts:
German Turn 1
“An interesting scenario choice. With no one starting on board, the situation is very fluid. I need to move on-board into a position where I can interdict Rindis’s forces, which is hampered by the fact that even CX, there’s precious little I can interdict. Two platoons go down the board 39 road in an attempt to cut off his entry, one enters mid-board 17, and the other enters towards the north with an eye on the upper levels of 17W3. From 17Y9 I can hit 17P7, and from 17Z10 I can nail 17Q3. Both LOS are not obvious at first glance, and I hope to nail a moving stack that Rindis thinks is safe. Bad news is most of my forces are 447s, so this will be an MG duel for now as the range is 9-12 hexes.”
US Turn 1
“Rindis enters a bit more into the town that I had anticipated, and like an idiot I forgot to fire at the moving 10-2 in 17Q3. >.< Only a 2 (-2) shot, but still! I nail a 346 moving in the open, but Rindis quickly rallies him.”
German Turn 2
“Nothing Preps as I need to keep moving into position. I try and get a squad and LMG into the 17W3 upper levels, but a shot from the Stuart puts an end to that plan. I get set to advance the second squad in later. The forces around 17Y8 shuffle to get out of the open and prepare to deal with the 10-2. I can’t hang around 17Z10 anymore, and those forces go down the road. My blocking platoon makes a run for the victory area, splitting in two with a small force struggling up the hill. I figure one factor in my favor has to be the level 2 heights allowing for me to hit Rindis heading across Board 17.”
US Turn 2
“The Turn 2 troops make a collective run for the exit, with little in the way to stop them. The range is too great, and the modifiers too high. I luck out on a ‘2’ for a 2(+2) against the 10-2, but he passes with ease. We end here moving into Advancing Fire.”
“I like the looks of this scenario. There’s an interesting mix of troops and light AFV, and the scenario appears very dynamic. However, I haven’t got a handle on a good German strategy yet. There’s an awful lot of US firepower present, and it’s looking more and more like a close-in fight. I think the 6ML must work in my favor, but I have to get into position first, and that won’t be until Turn 3. As it’s heavily pro-German, I do hope there’s not a key German strategy I’m missing.”
And I just sent off the end of American Turn 2.
Lots of movement. Patch and I are in a race to the exit area. I’ve got to figure out how to move up the last bit before he can really block things up, or it’s a long fight. Which a look at the scenario length suggests is the idea. 🙂
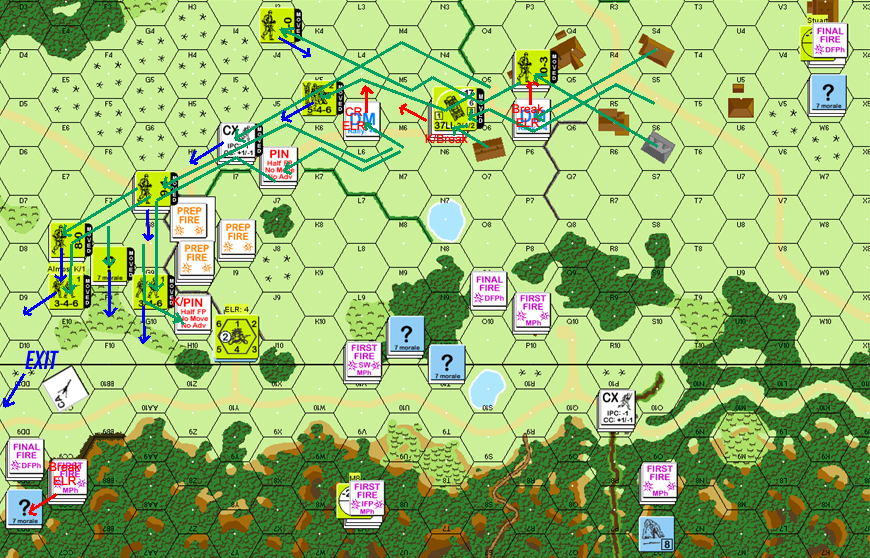
Situation at the end of American MPh. It’s amazing how far you can get when you have clear terrain and no one shooting at you.
Not a lot of fire this turn. I expect that will change rather dramatically next turn as Patch gets into position.
Patch’s Turn 3 finished up a bit ago. A good turn for me. He preped a little, and the biggest result was Battle Hardening my 10-2 to 10-3. During movement he stayed out of sight or in cover, but I did manage to break a leader on the hillside, and the LLTC he caused generated a Sniper that… lowered Patch’s sniper to 2.
My Snipers obviously would rather shoot his Snipers than anyone else.
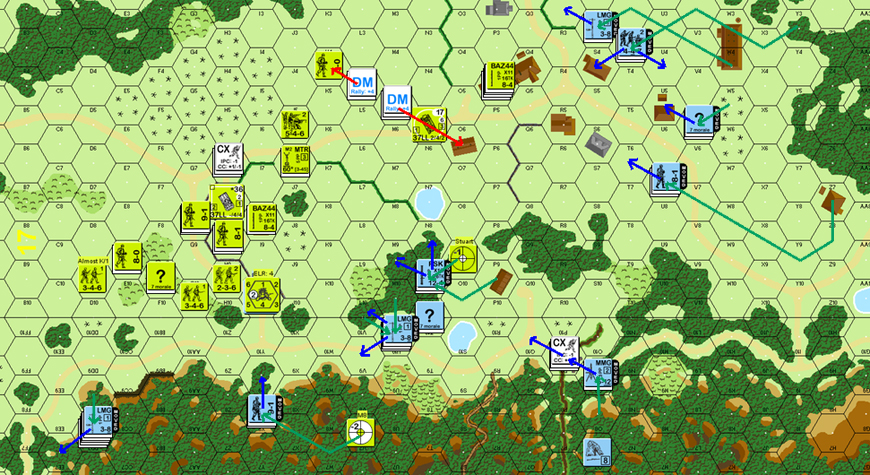
Situation, German Turn 3. Mostly movement.
Well, I could have wished for a better Turn 3. But that would just be greedy. I would like to apologize to Jason1002, who I can see asking to synch in the on-line log. I never even saw it at the time. Which should be an idea of just how riveting the action has been!
My turn 3 started with some Prep Fire around the farmhouse (17I8) to try to suppress the Germans. No such luck. Still, MPh went better than I expected. I actually lost 1 1/2 squads to his fire, but very little other damage. Certainly not the mass of brokies that I tend to worry that this could turn into. I did manage to nail one of his squads in AFPh. Also, I pinned his sniper during MPh.
My Snipers obviously would rather shoot his Snipers than anyone else.
Situation, American Turn 3. Lots of activity.
Patch, for his part skulked and redeployed on his Turn 4. There was no fire all turn, as he parked everybody out of LOS. I assembled the MTR and MMG that were still dm.
Situation, German Turn 4. All movement.
We’ve just barely begun my turn 4. But, I no longer have any broken troops. The 10-3 performed as you’d expect with a net -4 to the rally DR. The free MMC rally was a ‘2’, generating a new 8-0 leader. And the last one… rolled a ’12’ removing himself from the battle. Well, overall it’s average….
It’s being a very interesting game, and both of are finding this to be a very good scenario. We’re up in the air about whether the Americans should have the balance, and we’re thinking ‘no’ at this point. But they’re definitely tricky to play. Having to move in open ground with 6 morale is challenging. Right now, I have just about what I need to exit right around the 17I8 area, so Patch is getting nervous…. But it could disappear in a couple of bad rolls.
Cpl Uhl inquired:
“You guys really set a new, excellent standard for AAR’s.”
“Please share how you do the arrows and cropping of the VASL screen shots.”
Photoshop.
I take a screenshot with the ‘PrintScreen’ key (Windows), and then paste it into a new file in Photoshop. From there I crop it down to where the action is.
In something big, like PBr, I then just scale it down to a reasonable size, and then describe the action. In something smaller like this, I step through the log and just hand-draw the arrows as I go. If I’m smart, I remember to do this on another layer, so it’s easy to fix mistakes.
If I wanted things to look a little nicer, I’d do the initial crop in Photoshop and then export to CorelDraw, where I could make the lines/arrows much nicer looking. [I have since figured out how to resize the arrowheads in Photoshop, so they’re better looking.]
When I’m done, I ‘Save for Web’, which keeps the file size down, and then upload it to the little corner of a server I get to use.
Patch uses a somewhat simpler system, but I’m not sure if he’s on the Gimp or what.
German Turn 3
“The problem with American Turn 2 is there’s just nothing to shoot at against a good US player. I move what I can to get into position to interdict his Turn 3 movement, and struggle to get both MMG up onto the hill. Despite first looks, there are actualy several nooks and crannies on that wooded monstrosity where you have excellent LOS. I shove MMGs into 39O8 and 39V7 (never spotted 39L8 until later, dangit. Would have been easier on the feet.) I take some fire, but thankfully I keep both MG in action, only losing one leader to a break.”
“I work several units into the 17M9 woods mass as well, but make a critical mistake when I fail to move an LMG squad into 17O9. Firelanes simply never occurred to me.  “
“
US Turn 3
“Rindis moves, and for the first time he’s extremely vulnerable. I get two K/1s and a K/2, breaking a total of four units, and reassemble the second MMG. The 10-3 moves back through the town, and I never get a clear shot at him in the open. Rindis’ defensive fire is very effective when he ELRs a Psk squad in 39CC8 into a 436. Ouch! Just how little I have over there is becoming readily apparent.”
German Turn 4
“Rindis goes and creates an 8-0 in 1706, creating his second additional VP to counter the 4 that I’ve claimed. I can’t believe he’s generating units almost as fast as I’m killing them.”
“Seems like everyone has LOS to my units on the hill, and after much consideration I abandon the heights. This decision is prompted by the fact that Rindis can win with the forces around 17I8, and I can’t stop him from where I am, especially as the 17O8 MMG no longer had good LOS. I skulk heavily, move to interdict anyone trying to leave the town, and reposition in the 17M9 woods. I’ve little choice now, as I simply cannot get units into a position where I can hit him in Defensive Fire, yet be immune to Prep. With the 60mm Mtr in action and the Stuart up close this may be a major mistake, but at the moment I think it’s my best option. Biggest downside for the turn is the fact that I completely forgot to move the squad in 39O9.  “
“
*****
“I use screen captures of the map, and hand draw arrows using Photoshop. Rindis apparently has more time on his hands to make things all pretty, so I’m letting him create the maps this time around. :D”
Thripshaw commented:
“I played this one as the American’s against a much better player a few years back (Clayton of the Oregon Berserk Commissars). I gambled trying to get a leader (9-1?) into P9 with a squad and SW to try and hold up the pursuers, but he broke under fire and was swarmed.”
“We ended up in a protracted battle around I8 with my American’s firing both ways to hold off the pursuers and try and open up a path to exit. In the end, I lost my armor to over aggressive play (forced to try and make a push) and that was that. Clayton played very well from my memory, and like I said, I’m much less experienced overall.”
“From the screenshots I see, it appears the German’s are too far Northeast (contesting the American entry point) and not far enough West along the board 39 road and creeping up into the hill. That’s just from a quick view, but I could be wrong. The American here looks like things are going his way, but he’s still got some work to do. The German better get a Stuart or I think it’s over.”
“Good write up, very enjoyable read and nice VASL graphics. Well done.”
“From the screenshots I see, it appears the German’s are too far Northeast (contesting the American entry point) and not far enough West along the board 39 road and creeping up into the hill. That’s just from a quick view, but I could be wrong. The American here looks like things are going his way, but he’s still got some work to do. The German better get a Stuart or I think it’s over.”
“There are three squads NE of the Board 17 village, composing my 17W4 and 17Z7 blocking forces. Everyone else is around the 17M9 woods mass. I would have liked to have folks further west, but Rindis hit the 17J7 area before I did as I could not interdict his Turn 2 movement at all. With the Americans in the town, there’s just no way to do so that I can see.”
Well, it’s been another exciting night. I’m within reach of the exit, but there’s a good stretch of clear ground that Patch has a bunch of LOS on, so my Turn 4 was more moving up to the limits of it, and trying to push him back out of the way.
This was aided by three different units that broke trying to cross some of that open ground.
Overall, I think it went well. I had no casualty reductions. There were a few movement goofs on my part, notably the Stuart which I should have parked over in 17B10, but I thought I needed closer support than that. When moving the 10-3, I decided to move him out of LOS of everyone. Realized at the last second that Patch had a guy covering the back door, realized I could smoke it, and forgot that if I could do that, I should have probably gone the more direct rout through O5.
I moved the M8 up for a nice Cannister shot… pity they didn’t bring any.
Rout… was entertaining. Thanks to various LOS issues, no one could really go where I wanted or expected. I could have declined putting everyone out on a limb in 39CC10 (no more distant), but it beat the alternatives, and it was time to trust in American broken morale and the unbroken 9-1 with them.
Situation, end of American Turn 4 MPh.
Rally was not bad. Patch got a LMG he’d malfunctioned back, but neither broken squad. I got two of the three squads in CC10 back. Pity one of them wasn’t the 666 with the MMG. His prep went well, stunning the M8 and eliminating the broken HS in 39EE10.
My defensive fire went well. I didn’t (directly) kill anything, but I broke two squads and pinned another. One of those was from a MTR rate tear that was nicely effective. My main attack on his MG nest in Y9 caused a HoB and sniper. His squad went berserk, and then immediately got nailed by the Sniper to be reduced to a HS.
Situation, end of German Turn 5 AFPh.
So, going into my Turn 5, I’m increasingly close to the exit. He only has a squad and a leader with the PSK directly in the way (we did RPh already), and he should have a lot less to keep me from crossing the road with.
However, I don’t know what I’m going to do about the poor M8 at this point. I’m sure any attempt to move will result in an immediate PF attempt, and he’s inside my MTR range.
US Turn 4
“Rindis made his initial push towards the exit, but hit a MMG firelane that was successful in breaking three squads that tried the slinking strategy. He’s using smoke to good effect this turn, though it’s having little effect with the firelanes. Unfortunately I was able to do little else, and his troops are massing nicely around the 17F9 brush.”
German Turn 5
“If I can’t start rallying, this is going to go even more poorly for me. Though I was in favor of moving the turn 2 units onto the hill, and in favor of moving them down towards the road, I’m finding it far easier to move down than up. I’ve no place to go with several units, and have to stand and fight. Trouble is, so is Rindis, and he shakes off my attacks, except for the M8 with I successfully stun and the 39CC10 broken HS which I reduce for another VP. With 17 more to go for a lock on the win, it’s apparent this will come down to time rather than casualties, but Rindis has 4 more turns to get off. Ouch!”
“In movement I do what I can to try and get more firepower along his exit lines, but the hill is proving a horrible obstacle. There’s just no way around it, and will take at least 5 turns to get over from this side. I have to fight down the road on a very narrow front. I organize the platoon in the town to begin interdicting the 10-3 stack as it tries to exit, and get a squad closer to the stunned AC.”
“Rindis is successful in his Defensive fire, breaking two squads, and sending another into Berserk land. The good news from that is that 10 morale is likely to survive any Prep Fire to suppress that MMG, but the bad news is that in my movement phase he’s dead.”
US Turn 5
“I fail to get most of my units rallied, while Rindis does a good job bouncing back. We’re off to email for the week, which should be interesting. If I can’t get things turned around with more broken Americans in the next turn or two, this is going to end early.”
Jay White cheered:
“You two win my “Best AAR” award for the work you put into documenting your games. :)”
“It’s much appreciated, and I hope you keep it up for your future games as well!”
“You two win my “Best AAR” award for the work you put into documenting your games. :)”
“It’s much appreciated, and I hope you keep it up for your future games as well!”
“Thanks! I’ve always preferred AARs with images as it makes it easier to follow along. Glad to see others are finding our trials enjoyable.”
“And hopefully, our well-documented tactics aren’t inducing fits of giggles amongst the more experienced players. :)”
Thanks, Jay. I’ve often found the text-only ones to be hard to follow, and the replays from The General/Annuals a bit too complex to wade through. So the idea is to do something that my attention span could follow. 🙂
Also, you can see links to all the AARs I’ve done on the ASL page I recently put up. 😀
“And hopefully, our well-documented tactics aren’t inducing fits of giggles amongst the more experienced players. :)”
Giggles? Surely not!
Guffaws, on the other hand….
Sorry for the long delay here. We’ve missed three Monday on-line sessions in a row, and had 14 logfiles marked “A5_MPh”.
I just wish the news was better. The game’s getting into the point that I’ve been afraid of. Germans in front of me, Germans behind me, and nowhere to but through Open Ground.
Well, that’s what Smoke is for. Naturally, I went 0-4 on 3 and 2 exponents. Patch also missed seeing a couple more rolls as he shot up the troops before they could make their attempts. Those also would have failed. For actual die-rolling I was 0-6.
Other than the M8 AC that he sidled up to last turn, he didn’t kill anyone, but he wounded a leader, and broke all too much. No one got though to the other side of the clear stretch along the edge of Board 39. Also, the Stuart has managed to jam the CMG. Thank goodness I fired that before the MA….
The one good point is my Prep reduced his Berserk squad to a HS.
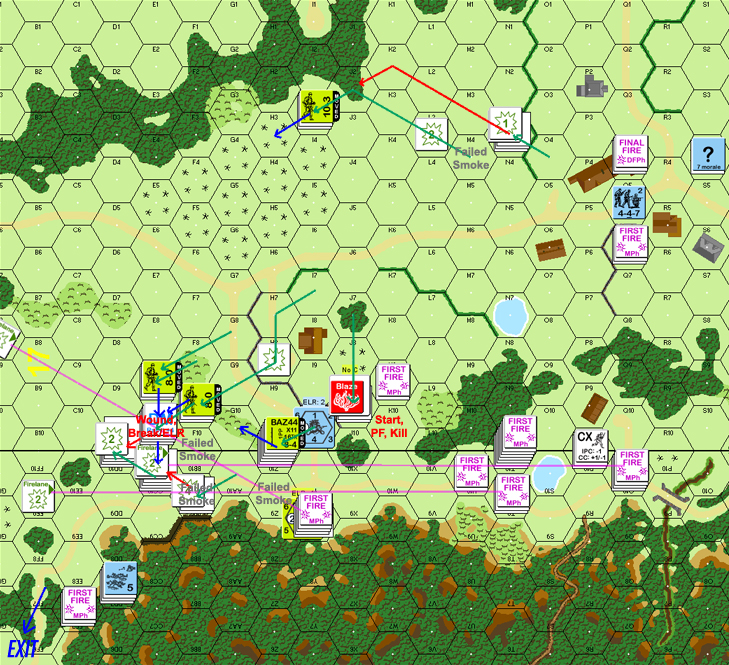
Situation, end of American Turn 5 MPh. Firelanes are in purple.
I’m now in a bad position, and it’s going to take some really good rolls to get enough people rallied to be able to win.
“Boy, this turn took so long I’m not sure what I did anymore.”
“With the mountain in the way, my only chance to slow Rindis down is to try and interdict the 9/10 hexrow road. I managed to maneuver three MMGs into position for Rindis’ movement, though the 39CC10 and 39EE10 woods to provide blind spots. More maneuvering around the board 17 town as I try to find a way to interdict the 10-3 and company. I also move a squad adjacent to the AC, adding yet another piece to Rindis’ puzzle.”
“Rindis made a slow push into position, and the firelanes may have slowed him down as no one crossed them once placed, but I can’t be sure as he was set up to crawl anyway. The M8 died from a PF attack from the squad I managed to shove adjacent and I did break several units, including one squad in the board 17 town, I couldn’t gain any more CVP.”
“Rindis had a lousy rally entering German Turn 6, and I’m compounding his problems by dumping everyone back under DM that I can. Though I can see trouble for Rindis if the game ended on turn 7, he does have 3 turns left at his disposal. He certainly does have the CP poised for the win, if he can only get them moving. So near, yet so far…”
Finished off Patch’s turn and got through all of mine and into his turn 7 last night.
I’m going to need the balance. I had hopes of actually skipping out on that last turn, but I got shut down so severely on turn 5, there just hasn’t been much I can do about it.
Patch of course used the opportunity to move up, even while staying out of my LOS. His Berserk squad from earlier had been reduced to a HS during my turn, and he (predictably) didn’t survive his charge. I did manage to pull the main stack of brokies back a little into cover that’s actually slightly closer to the exit. I also had to self-break the MTR HS, who were about to get swamped.
Situation, German Turn 6 DFPh.
The really bad news is that pretty much nothing rallied on his turn, or at the beginning of my turn 6. That’s not the type of performance I can afford in this situation. However, what was intact was in much better shape to finally get across the open line. An early smoke grenade helped immensely with that.
Situation, American Turn 6 DFPh.
I’ve only got a HS and wounded leader into 39FF8. But that’s across the open stretch, and they should help keep the Germans from trying to get directly in the way to slow me down.
“In a seven turn game, I think I’d have Rindis. But we’ve eight turns, which I think will give him the game.”
“We managed to really move last night, which was good given how slowly things went in email previously.”
“In Turn 6 I dropped units under DM where I could, and moved units up to interdict the 10-3 and company, and to try to better interdict the DD-GG gap. The problem is there’s just too little LOS past the 39CC10 woods, and can’t work my way around board 17 with that 10-3 sitting out there. I moved several units close to the wall to take out his 347 HS in 17J9, but Rindis was smart, voluntarily breaking him and making a run for it. The Berserk HS died, as was expected, but at least absorbed some fire that would have gone elsewhere.”
“In US Turn 6 I dropped a pair of firelanes down the road, which didn’t last long when the LMG died on it’s first FL attack, rolling a 12 which eliminated the weapon as it was manned by my growing conscripts. I was successful in CRing a squad, but by and large despite several results he most popular result was “Pin”. That little smoke grenade made a lot of difference. The 10-3 withstood my defensive fire, including a sneaky shot from 39X9 to 17C5, and made his presence felt in Advancing Fire with a 2FP (-1) that nailed a 447 when I rolled boxcars. There’s now a lot of stuff on the edge of Board 39 that’s threatening to exit, and has 2 turns in which to do it.”
Well, for once I forgot to turn on the log on Monday, so the end of the game reporting is a bit briefer than I’d like.
Patch, of course, continued moving up units, while keeping a suppressive fire going on his Turn 6. The only real damage was a couple Pins while he Dashed across the road and he broke another squad.

Situation, end of DFPh German turn 7.
I looked things over carefully, and determined that the only way that I could get enough EVP to win was for the 10-3 and 667 stack to exit. That was impossible on turn 6, so instead of making any sort of mad dash for the exit, I got everyone closer as safely as I could and ran them up close. Overall, it went well. He did a bit more damage, but not too much. I even exited a single HS. I also gambled on sending a stack with two squads and the 9-1 adjacent to his exit covering force. A point-blank Prep from him might do more damage than I could recover from, but if it didn’t the return fire would most likely take out his only real interdiction for the last turn. He backed away.
In the mean time, he got lucky and managed to break a squad from under the 10-3. He also did a good job driving me out of 39CC10 and driving in there as a fire base without me getting much chance to even fire on him.
Worse luck, nothing rallied on my Turn 7 RPh. Even under DM, I figured at least one unit with the 10-3 would rally (needed an 8 or 6).
A quick check showed that I had exactly enough intact for a win–if I could get it all off-board. My first move was evacuating the wounded 8-0 off. The second was trying to pull out a 666 that had been pinned last turn and was now stuck in the open adjacent to his new firebase in CC10. Not wanting a bunch of -2 shots, they dropped smoke on their current location.
Or tried to. ‘6’
Game over.

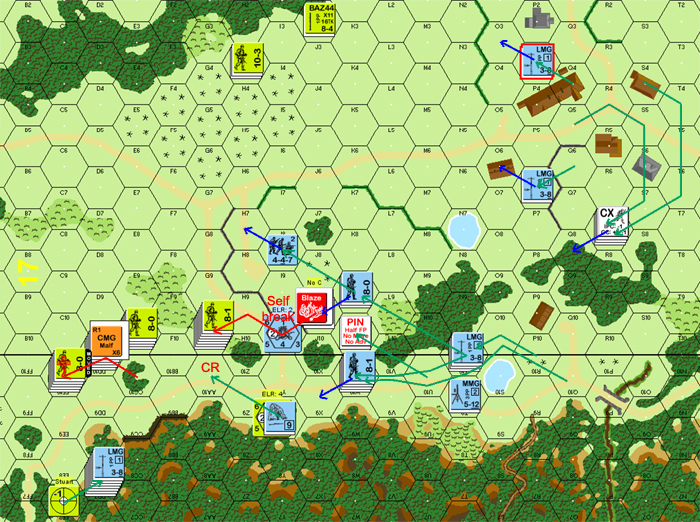
Situation, beginning of MPh, right as American victory becomes impossible.
It’s really painful to have it go this way. A lot of it was that I just did not see how bad the north edge of board 39 was going to be to get through until I was on top of it, and never really had a plan to deal with it. I also let the M8 get exposed, something I was desperately avoiding as it and the Stuart are worth too many points. When it got flamed, I was immediately in VP trouble.
Sigh. Today is not the day to finally beat Patch.
Patch finally got his copy of VotG last week. So, we should be starting up VotG3 “Khopka’s Crossing” soon.
“I’d buy Rindis a bottle of champagne when he finally beats me, but he got me in Gambit in a FTF game some time back so I think the moment has passed. :D”
“Turn 7 was a run for me. How can I get into position to interdict that last, final move? As has been mentioned before, that Board 39 hill is a nightmare to maneuver over and really keeps one roadbound, which is bad as moving down the road leads one right into view of all those American sights. I had a great Rally phase, bringing back several units under DM, and with the lack of Americans in 39CC10 there was a nice cluster of blind hexes that would allow me to get close. Rindis fired his screening 347 against a flanking squad moving in the brush in 17F8, used his SubFF against a leader I shoved out to draw fire, which let me move a full platoon into 39BB10 unscathed, for a later advance into 39CC10. I moved a 9-1 and a 436 up to level 1 on the hill (39GG8) for a later advance into 39AA9, which lets me cover the 9 hexrow out to 39GG9. My 447 and LMG way back on board 17 raced up to 17E8, and combined with the 447 advancing into 17E9 I had the backfield covered for several units. There was little I could do against the majority of his units, but I could interdict a precious few VP that needed to exit. My movement was aided by a German Sniper activation which Pinned the 666 in 39DD9, restricting his Defensive Fire at a critical time.”
“On Board 39, the question of whether or not to fire the 436 against the adjacent American platoon was answered when I completely forgot about them and started moving units. Ah well, probably for the best. The 436/Psk went CX and moved up to 39DD5, out of LOS, and the 7-0/447/lmg went to 39DD4, with a later advance to 39EE5 and 39EE4, respectively. This allowed me to interdict 39GG7 with 6FP, and 39FF5/GG6 with 4FP. There was just no way to bring the 436 along with the 7-0, so this seemed a compromise by denying him the ability to bypass any residual fire without fear of getting hit.”
“Counting factors moving into American Prep, we see that Rindis has only 27 VP unbroken, which is exactly what he needs to win. The low-odds break of a 666 in the 10-3’s hex last turn really paid off when he failed to rally. Rindis then went and rolled our first Wind Change of the game, increasing one level, blowing due north. Any smoke to block his exit could no longer be placed in the hexes he needed it most. Ouch!”
“Rindis prepped against my units in 3EE9 and missed on a 2(+0), and we moved onto movement. He exited the remaining units in 39GG7, then we went to the key movement of the game: the 666 in 39DD9. Adjacent to a lot of FP with negative leader modifiers, Rindis tried placing smoke in his own hex and rolled a 6, pinning his squad and ending the game as he could no longer exit the required VP.”
“All in all, a very fun scenario. I liked how there was no single defensive point to conquer, and both sides were maneuvering for the best position that constantly changed from turn to turn. It was also an interesting mix of units. I think we both look forward to trying this one again.”
JérômeREY had some thoughts on the end of the scenario:
“Wouldn’t the odds for the last turn rush have been greater if the american player had first attempted to place smoke grenades with the stuart in EE9 (and for this matter accepting crew exposure, going there and receiving potential PF attempts, at the end of the day better than First Fire with – 2 DRM aimed at the squad) ? Cos with the squad attempt of placing smoke grenades, there was a 16 % probability of losing the game even before the german fired. And so it was (SNAFU).”
“Hope I don’t talk rubbish since I haven’t checked the MP cost and movement potential for the Stuart to attempt this trick and exit”
“Edit: Nor if the Squad would have sufficent MF for exiting if it had to cross any smoke so generated by the Stuart.”
Patch pointed out:
“Yes, that was a viable option, but also ran the risk of the Stuart CE crew getting hit with a 24FP (+2) attack when it entered the hex. I suppose the Stuart could have entered BU, tried a BFF attack against the units in the road to reduce the odds, then popped CE to try for a grenade? Might have worked, as it did still have cannister.”
JérômeREY responded:
“It must choose what to do but can’t do both – at least in this order – since per D13.2 “An AFV may attempt to dispense smoke” (same rule applies for VSGrenades D13.35) provided ” … the AFV/PRC has not yet fired (including Bounding First Fire) any weapon during that Player Turn”.”
“Nevertheless the Canister Attack, even if halved for Bounding Fire, might have been the best option.”
He then added:
“per D13.2 “An AFV may attempt to dispense smoke” (same rule applies for VSGrenades D13.35) provided ” … the AFV/PRC has not yet fired (including Bounding First Fire) any weapon during that Player Turn”.”
“Which on the contrary seems to imply one can attempt Bounding (First) Fire after attempting to dispense smoke/throw smoke grenades, succesfully or not ?”
Patch responded:
“Yes indeed, it does seem to imply that, doesn’t it? Hmmm… options abound.”
“I hope Rindis isn’t reading this. I gotta keep beating the guy :D”
Postscript:
My initial thought was, with the Americans entering over two turns, they had to scare the Germans away from the entry area on Turn 1, so that the Turn 2 forces didn’t immediately run into trouble and never get anywhere. This worked well enough, but I then had a hard time disengaging my forces from the town, and I think the inability of the 10-2 and accompanying infantry to get to the final confrontation near the exit area hurt more than I could have known. I think it quite likely that I had the right idea, but committed too much force to it. The real problem of course, was getting through the board 39 boundary. Patch set up multiple FLs to go down the gap of open ground, and it left me unable to make any actual progress towards the goal for a fatal couple of turns. The impact of having no infantry smoke on turn 5 cannot be overestimated.
But, it really shouldn’t have to come down to that. I got way too bogged down in the fight near 17I8, and I kept units there that should have been covering the gap, especially given Patch’s trouble keeping troops intact on the hillside overlooking the area. Having one of the vehicles over there to just stand in the road and negate FFMO to one or more firelanes probably would have made a big difference.
Any way you look at it, this is a very wild ride of a scenario, and we both found it a heck of a lot of fun. We really should give this one another go sometime. Still not sure on the balance, though I’m tempted to say the Americans need it. They certainly will if the Germans keep their act together as well as Patch did.
Discussion ¬