
J94 Kempf at Melikhovo
When I advertised on GameSquad for a PBEM game of ASL, I ended up taking on two new games. True to my distractible nature, I let the second one get buried under other things at one point, and dropped the game, only to notice it and get it restarted about a year later. We started in June 2007, and didn’t finish up until August 2008…:
This game has been proceeding slowly for a little while. I picked up a second opponent when I advertised for a game a couple months back. We started up as my game of Gavin Take was winding down. I’ve been a bit distracted, and my opponent, John Bock, just moved, so he’s quite naturally distracted too.
Anyway, he took the Russians and I got the Germans in this little 4 1/2 Turn struggle for three buildings on board 3. With two half-boards, I set up half my force with a Flammpanzer III on board 4 and the other half with a Pz IVH enters the first turn. The main fears for the tanks are running out out of fuel for the flamethrower, getting ambushed by a 45mm ATG, getting ambushed by an ATR, and a KV-I that enters randomly.
My main fear is running out of time. Five turns of movement isn’t much, even with not all that far to go.
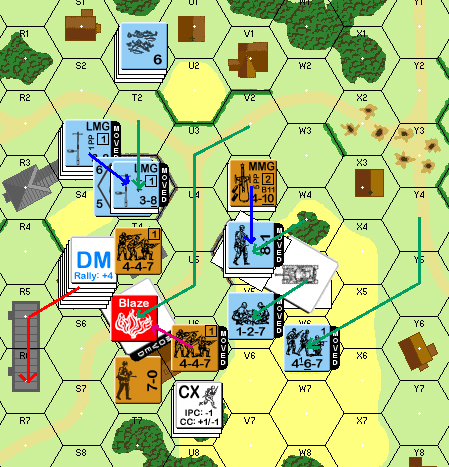
As would be expected, my first turn was composed of getting up to the Russians. The PzIV got a CH with the MA, driving in the picket on that flank. Sadly, the Flamethrower was unable to do more than Pin the squad in front of it. I considered going into CC with him, but the likely result would be to tie up my MMG squad in Melee, so I passed on it.
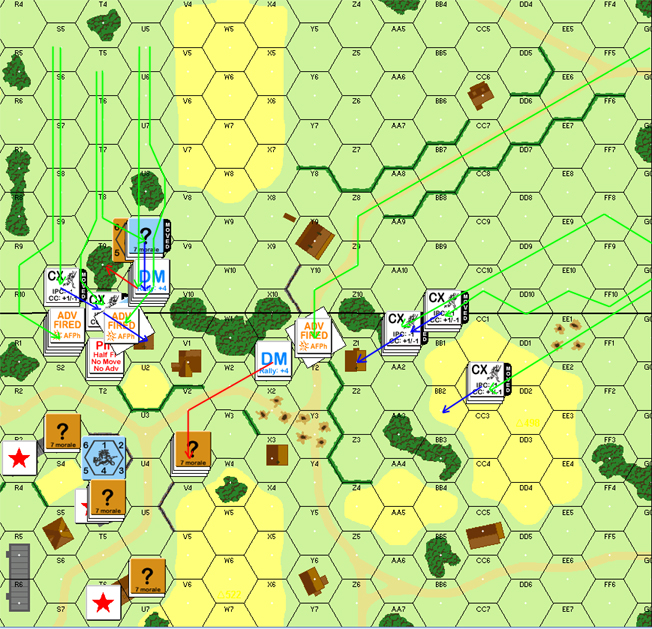
Situation at the end of AFPh German Turn 1, showing movement (green), rout (red), and advance (blue). Red stars are the victory buildings.
Corwin was good enough to report from his PoV:
“Hello out there. We have a tight little scenario here.”
“Pregame”
“My setup is fairly restricted in that I must setup a Squad each in the VC Buildings, 3S3, 3T4 and 3U6. He has 2 separate forces that can approach from different directions and each has armor. The Flampanzer is a nightmare, kinda like a Chuck Foreman Grill. Once it gets you, you are cooked. So we will try to keep away from that but it is not likely as I cannot run very far away from the buildings.”
“Too bad Russians can’t deploy, it would be helpful here. Sooner or later he is going to get in close, but I rather it was later. So the plan is to harass with the light screen forward and to get back to the village proper if I can. Not likely to happen but I can hope.”
“There is some HIP out there. Needless to say it better come through for me. The 45LL has TK of 11, 13 with the A5 ammo. It does have a nice ROF. The longer I wait to shoot the more opportunity he has to use the armor, thinking of the 8mg factors on the Pzkw IV and of course the FT, so I will be trying to take out one of the tanks asap. I will look for side / rear shots but can’t wait forever. Tanks are first priority of course. It will only fire at INF in the end game, if still breathing”
“The KV enters per the SSR (< or = to the turn number). By the way, it is turn 1 now and where the heck is that thing? If it shows up too late, too bad for the Russkies.”
“I fully expect to lose most of my force, hopefully not before turn 3.5. He moves last without a chance for response from me. So I have to stop him by my Movement phase in turn 4 or have some awesome Def Fire in turn 5.”
“Turn 1”
“Here we go. He sets up and drives straight for the treeline, no surprize. I did break a squad but my firing postiion here was too conservative and James gets into the wood line intact. Would have liked to have inflicted more damage. I tried for his CE armor leader but missed and was then reduced by the AFV MA CH.”
“He got in with the FT but I avoided getting roasted. That is positive. My 2 broken squads, both reduced, were able to rout across the road and join the main body. That is positive but they end up in one hex, don’t like the stack. The screen didn’t do much, but the force lived to attempt rally.”
“The Russians will hold firm!”
“John”
commissarmatt chimed in:
“A Chuck Foreman grill? I didn’t know he had gotten in on the act also. He was a good running back for the Minnesota Vikings back in the 70s. :-)”
Corwin:
“Embarrassment has set in. That should be a George Foreman grill, of course.”
Houlie added:
“Right, it was Chuck Foreman who made his mark (and millions) with the Ginsu knife collection after leaving football. That was just prior to his launch of the Mr. Microphone.”
Yeesh. I let my email from Corwin get buried under an avalanche nearly a year ago and only dug up the scenario sheet again a couple weeks ago and wondered, “What happened to this game?” We’ve gotten this back underway, and into Russian Turn 2, after a very confused German turn 2 MPh (13 log files!).
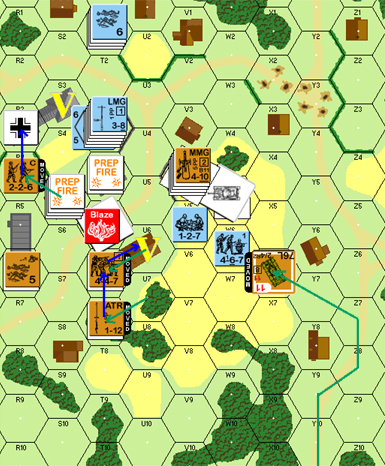
Russian Turn 2 was of course, fairly calm. The Flammpanzer managed to ELR the nearby Russian squad, and I managed to strip concealment from the 3S2 garrison, while he started concentrating around T5.
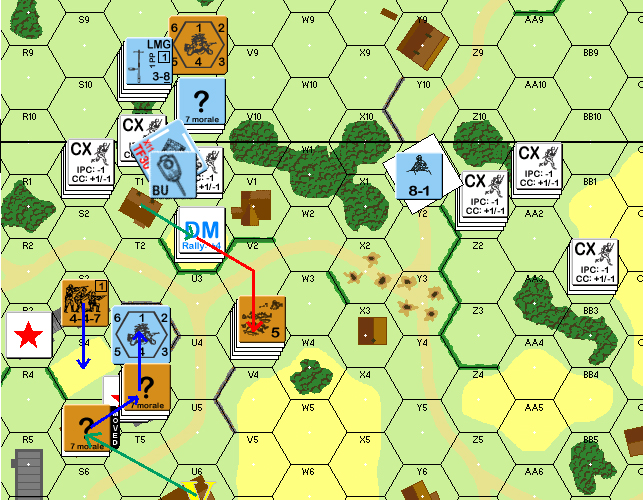
Situation, Russian Turn 1 AFPh.
The plan for Turn 2 was for the troops to put pressure on the 3T3 area while the Flammpanzer roasted V3 and the PzIV moved through the wheatfield to gain some Hindrance and position to cut off U6 until I could get some infantry in there.
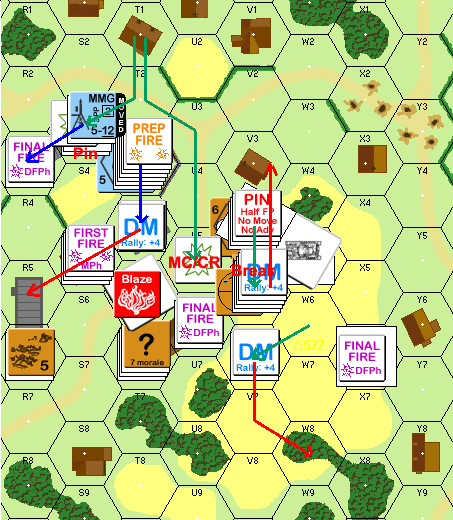
Sadly, I practically ran over the Russian AT Gun, and into a Boresighted hex! The fate of the PzIV was pretty much four mailings back and forth all by itself, as it found the AT Gun on one side and the ATR on the other. After the initial shot went wide, I attempted to turn and overrun the ATG before it could do better, and it managed an IF Immob before I could move in.
My luck with the Infantry could have been better, but it wasn’t too bad. At least no one evaporated while moving out into the streets. There’s always next turn. The Flammpanzer did it’s job, and broke nearly everything in 3V3, forcing the abandonment of the MMG. Sadly, the PzIV was unable to deal with the ATG.
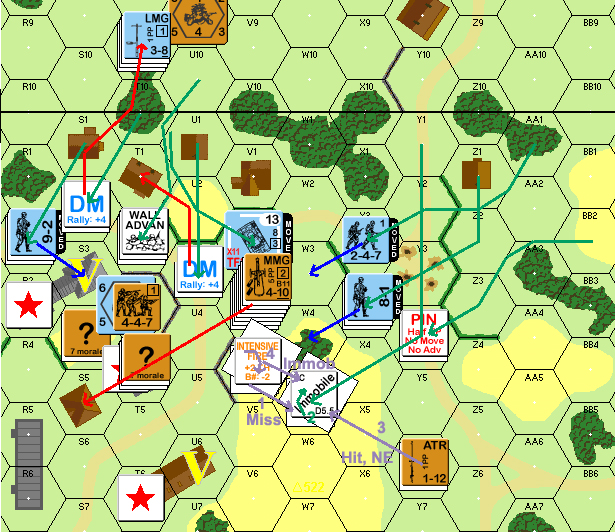
Situation, German Turn 2, end of DFPh.
Words of wisdom from MajorDomo:
“Nice AAR, fun watching.”
“The Gun could not boresite as Germans set up on board, didn’t have an effect. That flame panzer is quite a force in the congested fight.”
“Rich”
“He is closing in Turn 2. I am seriously concerned about the V3 hex. The FT tank is adjacent, kinda looks like he is tucking a napkin in and about to have barbecue. This position is important but the troops there are critical as it holds my best SW, leader and now 3 squads. I placed the mmg there for opportunities to fire in multiple directions as he closed in, but now it is likely to be lost, hopefully without everyone in the hex also.”
“I was able to blunt his first attempt into the street, no casualties for him though.”
“During his Def Fire my guys in V3 survive! Very good fortune, though all are broken, they are able to rout without interdiction to S5. I have to drop the mmg. Still they can’t be seen this next turn so I will possibly get a chance to rally without dm next turn. The game likely keys on how these guys respond to the rally attempts. Would be nice to have a commisar here.”
“My Prep completes the work on the Pz IV. It was the only shot I had but was successful. It was immobilized in a bad place for me with los into the streets to the west. The gun IF into the adjacent infantry but no joy. Had to try. I also fire into S3, pinning the 9-2 leader who couldn’t use his leadership on the squads mc, which they failed. Another fortunate outcome for me as it saves me from that leader directed fire this turn.”
“During my movement I attempt to slide over to protect U6 more. The right flank is a little thin with just the crew and the hs out there. I fully expect to lose the crew this turn with his guys adjacent in W4. They did their job though. Hopefully the hs will survive his journey to U6.”
“There really is not a lot of “space for time” left. Gonna have to duke it out soon.”
“Where is that KV? Wake those guys up!”
“I see the arrival of the KV and the rally in S5 as being crucial this next turn. Plus gotta try to avoid that FT! Given another opportunity it could ruin my whole day. Trouble is how to avoid it? Maybe the ATR can get a good shot in before the KV arrives?”
We’ve recently finished up Russian Turn 2. His Prep Fire went pretty well. The AT Gun knocked out my Panzer IV and then malfunctioned on a IF shot at the nearby infantry. The crew survived, but I really needed that PzIV to keep the KV honest when it shows up. The good news is, it hasn’t yet.
Also, he broke the squad and pinned the leader that took the S3 building. I had to break the leader instead of letting the Russians try to CC him alone.
On the other hand, my DF eliminated the crew of the Gun (pity I couldn’t get it intact) and the Flammpanzer broke the squad in T3, who had little choice but to rout back into a hex that is now overstacked. On the other hand, three shots at the ATR HS failed to get any result.
It’s still a tough wall of troops, but he’s out of room, and with a little luck, I can do this.
Situation, Russian Turn 2, beginning of DFPh.
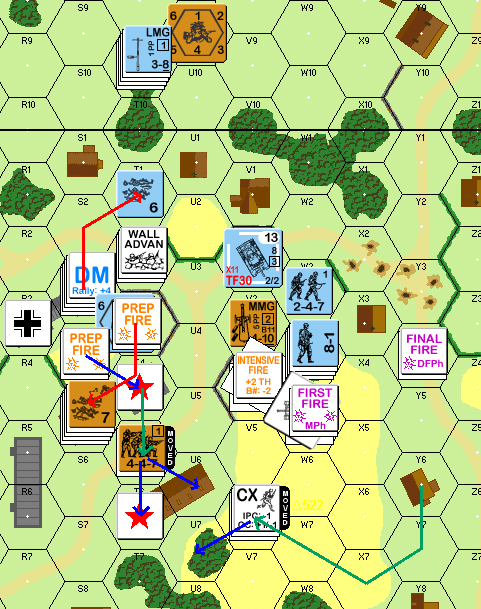
Well, my turn 3 was a disaster. I sent the FlammPanzer strolling down between his positions to take up a covering position at the end of the street. It wasn’t until after I sent the email that I remembered the Street Fighting could happen during movement.
One burning wreck later, and I have no tanks and his KV is due to show up soon.
On the other hand, I’m pretty closely invested on the victory buildings, and one lucky fire phase could break it wide open for me.
Situation, German Turn 3, after AFPh.
ON TOP ASL interjected:
“Designer calling Rindis/Corwin…”
“Fun to read your AAR’s (and good visual too). This must be the longest play of J94 ever :). Anyway you seems to get a nice end-game of scenario, happy gaming.”
Yeah, I let it go for most of a year. My bad. 🙁
On the other hand, it’s not quite as bad as it looks. Took me a week to get around puting together the pic, so we’re actually at AFPh in Russian 3 now. 😉
Just realized I never got around to updating this for Russian Turn 3.
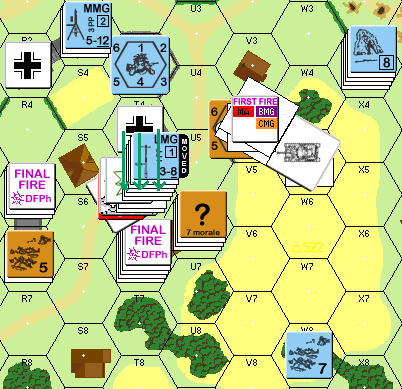
Admittedly, not a lot happened. Fire was fairly minimal, and no one managed to get an effect. This was a problem, as that included a fairly powerful point-blank shot on T4, and he was able to work a conscript squad back into R3, the one building I had managed to capture.
Also, the KV, realizing that the nasty German tanks were gone, finally put in an appearance. Without any AT weapons, the only good news is that it isn’t that great against Infantry either, especially if I can get into cover.
Situation, Russian Turn 3, end of MPh.
With a large stack in T3, it was no surprise that my Prep broke the squad holding T4. Sadly, movement didn’t go so well. I attempted to give him too many targets, but the KV managed to break the 8-1 and squad moving up to assault U6 (and the tank crew that was already there), and on the north side he managed to pin my leader, which forced me to separate him from the squad as they cleaned out R3 (again). At least CC went well, but the effort to really push in on him this turn did not work at all.
Situation, end of German Turn 4 DFPh.
It’s a lot chancier than I care to think of, but there is still a possibility of a win. At least I should have the first two buildings locked down now.
Russian Turn 4 showed that things were determined not to go my way. The KV charged in and broke the HS manning the captured MMG in an Overrun. What little fire I had was ineffective, but he managed to break the MMG squad in R3, reducing my good order troops to the 9-2 in S5, and the stack in T4.

Situation, Russian Turn 3, end of MPh.
The only good news was that his rally in T6 got a ’12’ reducing it to a broken HS, along with the 9-2 and the squad that had advanced in. Naturally, nothing of mine rallied.
So. Last half-turn, and I’m within spitting distance of the last two-hex victory building. Not much for it, but to advance into the street and hope to get lucky with DF, AF and CC.
Not much of a plan. At least the burning Flammpanzer gave me cover.
Not enough as it turned out. I moved my three squads over separately, with the 8-0 helping the second one. The 8-0 and the final squad were all that managed to survive all the fire focused on them. Then the smoke meant that I had a 4FP +5 shot out at the unconcealed stack in T6. Which unsurprisingly failed to have any effect. I conceded at that point, rather than drag it out into a 1:5 CC on that stack with the leader and 1:1 attack on the concealed stack with the 467.
Situation, end of game.
I can claim a certain amount of dicing. Corwin got some good luck at some key points, and I got some bad luck at some key points.
But I can’t blame it all on the dice. Corwin maintained a good defense all the way through, and overloaded the abilities of my remaining troops during turn 4 nicely. I threw away my Flammpanzer on a really stupid move. If that had still been around for the last couple turns, things could have been much different, if only because it would have distracted the KV away from my troops.
“Nice job with the AAR James.”
“You played a nice match. In a smaller scenario the dice can have quick impact. Mine were warm most of the game, hot for parts of it. Yours never got much past lukewarm and lingered at chilly.”
“I felt your attack was good and aside from the before mentioned FL PZ joyride, was well played. I was able to make you root me out, paying for every building with time. You advanced without taking excessive casualties. I felt the conscript half squad that moved back into R3 was a solid move as it eventually resulted in the 9-2 being delayed there and not available for the last assaults on the T6 building. His presence could have been decisive.”
“A good scenario as it did come down to the last turn with a chance for the Germans, despite the armor losses.”
“Thanks for the match James”
Thanks, Corwin, you’ve been great.
Yeah, the conscript charge back into R3 was great, meant to point it out earlier. 🙂 I generally considered it a smart move, but just an annoyance, at the time, but then you went and broke the assault stack in V5, which really wrecked my plans for the final victory building. I think I was holding it together pretty well until that point.
Postscript:
The above covers it pretty well. It’s a good, fun scenario that I’d like to play again someday. I got lucky in that the KV-1 waited to the last second to show up. Loosing the PzIV as I did was a problem. I actually managed to come up behind a AT Gun, and still lost the tank. If it had survived to the end game, things would have been really tense when the KV showed up. As it was, we both had good odds all the way to the end.
Discussion ¬