
PB3 Piecemeal
I’m an ASL junkie; like most players, I buy new products faster than I can ever hope to do more than just sample them. However, Patch and I did spend the time to go through most of the Pegasus Bridge scenarios. It has since sold out, but it still seems to go for reasonable prices on eBay, and I recommend it; it has my favorite HASL map so far.
So in November 2006, we started our journey with the first non-night scenario, “Piecemeal”…:
Yes, I’m back again for more punishment! Right now, me and Patch have decided to go through the non-night Pegasus Bridge scenarios, starting with this little fight.
It’s the early morning of June 6th, and the British (me) are trying to keep the Germans from pushing through Benouville to attack the canal bridge. The Germans have a few advantages, more troops, a couple of (odd) vehicles, slightly better support weapons, and 8 turns to go 14 hexes.
The thing I really didn’t anticipate was the effect that the dawn +1 LV hindrance is having. Most of the terrain is stone buildings and walls. Most attacks are +3 or +4(!), and there’s not really enough troops, or concentration, on either side yet to generate very high FP attacks. So far the most damage has occurred from the German sniper (broke a squad), and one of the vehicles getting Mired.
My initial Idea was to set up forward, and on a slightly broad front, to force a cautious entry, and then start falling back. Well, it’s working, as far as it goes. I’m kind of developing into two separate groups, and I’m getting worried that they’re getting too far away to support each other properly.
This is certainly not the scenario I thought it would be….
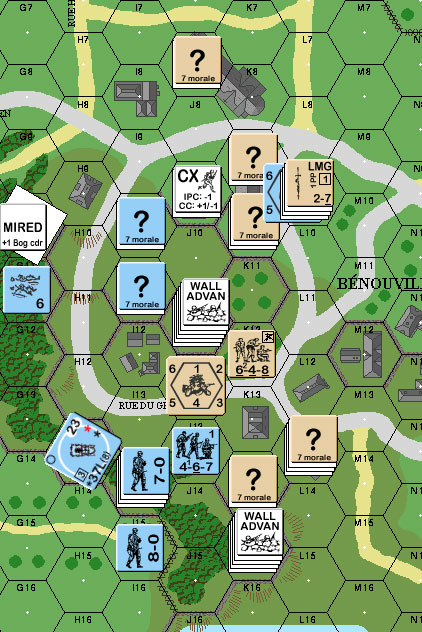
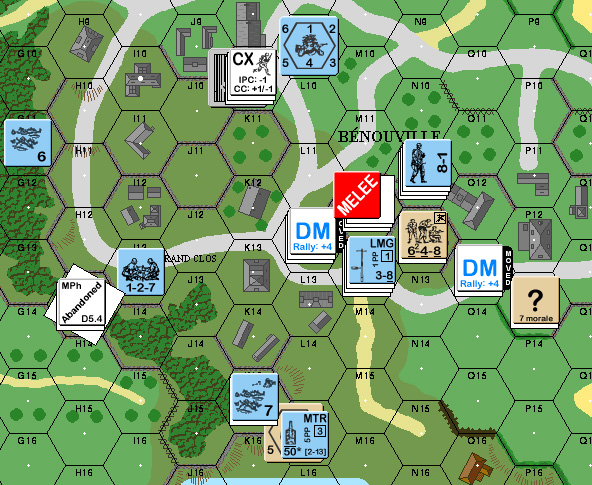
Situation at the beginning of the second British turn. WA is all Germans.
Beseler commented:
“you’re doing the right thing.”
“I thought this scen was alright, but agreed, not AT ALL what you think when looking at the scen card.”
That didn’t last.
Now the middle of German Turn 3, and Patch has shown again that there’s a lot of things to maneuvering in ASL that I’m just not seeing yet.
I saw that my two forces were getting too far apart to support each other properly. I figured that shifting some force from one to the other (where his main push is developing) would be a good idea, but didn’t pursue it aggressively enough. I should have CXed and gotten the squad into N11 with its advance. As it is, he’s in N10, not doing a darn thing. He’s a hex back from the crest line and unable to see most of the action. Something that didn’t occur to me at the time.
Patch then immediately set about exploiting the hole in my defenses… and I didn’t see it coming until too late.
I’ve been worried that he would slip around on the south side given half a chance, and get units into a position where it would be nearly impossible to keep them from exiting. While I was worried about maintaining the ability to fire south, he slipped around my rally point to the north and put a HS in M12. As if this wasn’t unhealthy enough, he then advanced up close and personal on the other side. About the best idea I had was to spraying fire K14/K15. With stone buildings and +1 LV the odds weren’t what I’d like… naturally I rolled high.
At best I’m losing a squad to FtR. With what he has there, I may easily loose the entire South side force…
That, of course, would put a real crimp in my plans. The best I can say at the moment, is that I’ve broken another squad, the Sniper Immobilized one of his vehicles, and while the other one has unMired (darn), it has malfunctioned the MA.
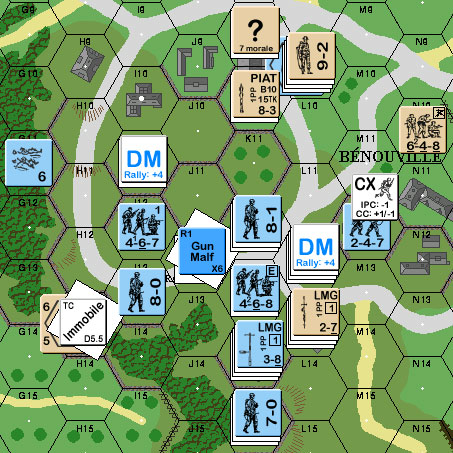
Situation after DFPh on German Turn 3.
Patch noted:
“Not much to add to what Rindis has written. My current difficulty lies in that southern force, which is still partially concealed and is withstanding my fire. I eliminated the broken squad due to FtR (as Rindis noted), and have swarmed his concealed leader in CC in L12. I’ll know tonight if I popped him or if he slipped out the back.”
“What I didn’t do is advance into L13. Tough call to make, but as there’s a concealed unit still in there, my ambush odds aren’t good and I didn’t want to risk losing a portion of my southern force. I’m continuing to envelop and hope to break the hex my next fire phase. It’s still early, so I feel good about my position. Was not going into L13 a mistake? We’ll find out tonight when we fire up VASL once again.”
Tonight was pretty exciting. Got through practically an entire Game Turn.
He got the leader in CC. I tried a reshuffle and limited counter attack. Moved two squads up, one broke immediately, and the other HoBed a Hero. Then he subsequent fired and the squad rolled a ’12’ on the next MC.


About that time, I realized that I could have handed the PIAT to the Hero at creation, and with his better morale it’s not a bad idea in general. Certainly would have been handy if I had.
However, his 1FP advancing shot pins an adjacent squad, and I make the decision to go in for CC. Sadly, no heroics here, just the odds, he gets me, and I miss a CR by one. However, he did DM another squad that did indeed fail to rally because of the extra +4, and that had been part of my decision to go in.
Meanwhile, L13 absorbs a lot of firepower in his AFPh, again in my DFPh, and again in his turn 4 PFPh. Between high rolls and Cowering, he can’t reveal the concealed unit, and he pins the squad in there twice, before finally breaking it towards the end of his PFPh. Darn shame too, he barely got that first pin, and without it, I would have been free to advance into L12, which really could have gotten nasty. I’m thankful that they held as long as they did (about to lose them to FtR again), and would be much more thankful if this scenario had a tighter time limit.
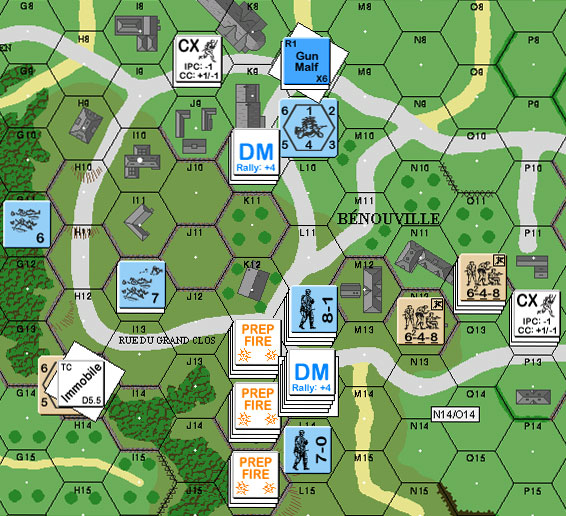
Situation, German Turn 4, just before AFPh. K10 has the PIAT, and is DM after a drive-by threatening by the mobile FLAK-truck.”
“Well, I may have gone and thrown this one away.”
“I simply could not break L13. It’s not that the 648 was passing MCs, I couldn’t even get MCs with multiple 24 and 30FP attacks. That simply threw a monkey wrench into everything and I got horribly flustered and lost track of the plan I had thrown together. As a result I’m out of position and not sure of how to proceed next, which has allowed Rindis some time to recover and form a thin line, but elite squads in +4 terrain have remarkable staying power. I did finally break L13 and will be advancing in to see what lies under the ? counter, but I think my earlier decision to take out the hex with direct fire was still the right one.”
It would seem we’re both somewhat pessimistic about our chances to pull off a win in this scenario. Which is probably a good sign for the eventual tension level (TL). 🙂
The major thing that’s had me worried from the start is the fact that I only had two leaders. Not a bad squad/leader ratio, but it makes for a certain lack of ‘backup’ if something went wrong, which it did. Patch eliminated one during the initial move on my southern group.
L13 proved to have a HS in it, which survived the initial attack while eliminating a HS (through CR). This still left me to deal with a line that had moved up to the L hexrow. The initial good news was that the Flak-truck permanently malfunctioned the MA, Recalling it. (I have to admit that I probably would have Exited it already to keep that from happening. But my CVP cap is approaching, and Patch is probably concentrating on that.)
My turn didn’t do a whole lot, other than find that O12 can’t see L15 (misses the building in N12, clips the crest line in N13). And I advanced down into M12 and N12. With luck, the HS would live again to continue the Melee, and I could concentrate on the rest of the line.
Well, no such luck. I lost the HS (taking another HS with me), and German prep fire broke the squad in M12 (and Patch’s MMG on the second shot). And my Sniper got his MTR squad. Again, my DF (what there was) couldn’t roll under a 10, leaving Patch free to do what he wants.
…and I’m not quite sure what he wants. Looking at it again, I think he’s going for an Encircle on British turn 5.
Sigh, I always see these things late.
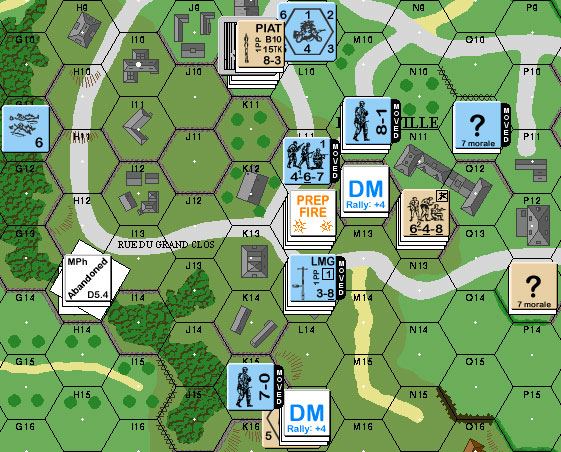
Situation on German Turn 5, right before AFPh.
I was wondering when I did it how smart the move to M12/N12 was. If the Melee continued, I think it would have been reasonable. The question was of course, the more likely outcome of losing the HS. Possibly, I should still be skulking at this point. But the Germans still had four turns to Exit (slightly over two hexes/Turn), and if I put myself in a position that’s hard to get at, it would be hard to interdict any move towards that.
It would seem we’re both somewhat pessimistic about our chances to pull off a win in this scenario. Which is probably a good sign for the eventual tension level (TL). 🙂
“Balderick, I have a cunning plan…”
L13 proved to have a HS in it, which survived the initial attack while eliminating a HS (through CR). This still left me to deal with a line that had moved up to the L hexrow. The initial good news was that the Flak-truck permanently malfunctioned the MA, Recalling it. (I have to admit that I probably would have Exited it already to keep that from happening. But my CVP cap is approaching, and Patch is probably concentrating on that.)
“This is what is known as a “Learning Experience”. Yes, I should have driven the truck off-board. I didn’t that one turn as I was worried what a pair of 648s and a 9-2 could do and I was using it to try and eliminate the broken 338 for FtR. Next time I’ll look more closely at getting while the gettin’s good.”
Well, no such luck. I lost the HS (taking another HS with me), and German prep fire broke the squad in M12 (and Patch’s MMG on the second shot). And my Sniper got his MTR squad. Again, my DF (what there was) couldn’t roll under a 10, leaving Patch free to do what he wants.
…and I’m not quite sure what he wants. Looking at it again, I think he’s going for an Encircle on British turn 5.
“I do admit that the defiant defense of L13 broke my back. I lost too much damn time trying to reduce that building, and lost all direction of how I wanted to proceed once I did. I’ve still not recovered. I think I know what I should have done, but it’s late now and I need to deal with an assault. Not good, as I expect the broken 648 to rally (“7″ or less), leaving me next to a 20FP stack led by a -2 leader. My hope is all the +4 terrain will benefit me as much as it has the Brits, and I’ve three stacks that can deliver 20FP+ attacks in retaliation. I expect two to survive.”
I was wondering when I did it how smart the move to M12/N12 was. If the Melee continued, I think it would have been reasonable. The question was of course, the more likely outcome of losing the HS. Possibly, I should still be skulking at this point. But the Germans still had four turns to Exit (slightly over two hexes/Turn), and if I put myself in a position that’s hard to get at, it would be hard to interdict any move towards that.
“Interesting question. I’ll not answer as I don’t want to give out hints as to what I hope you won’t do so I can win this thing and maintain my record.  “
“
“Entering Turn 6 this has definitely turned into a dice game. Rindis rallies a broken squad, leaving a stack of 3 648s and a 9-2 next to three of my stacks. Rindis hit me in Prep with a 20FP spraying fire attack that managed to do nothing more than Pin 4 squads and break one. My return fire hit him with a NMC and a 4MC, which broke the 9-2, HoB’d one squad, Pinned one, and killed the last through CR. Rindis then advanced the Fanatic unit into CC in M12 and killed a 467 while retaining Melee. My 8-0 bagged his broken 338 in Melee as it tried to withdraw, leaving me with 10CVP. Only 2 more to go!”
“Turn 6 is now a conundrum for Rindis. The 648 in Melee is enough for me to win, as is the broken 9-2. I am now trying to both win the Melee and kill the 9-2, so I can win if either plan fails. With only one 648 to interdict, I think I can pull at least one off.”
Start of German Turn 6
When I start seeing the possibilities on cutting off routs, I may stop losing.
I’ve surrendered. He can move guys into P12 and P14 without me being able to shoot at him. I can’t get effective fire on multiple stone locations (+4, here) with a single squad, so I can’t rout my leader.
I didn’t like the M12 move when I did it. It threw away the advantage of a ML9 squad, split up my seriously depleted forces, and risked losing almost immediately on a lucky die roll. Patch mentioned to me the idea of going to N13, but with how desperate I am to conserve what I’ve got, I can’t really afford sitting out in the open for +1 shots. I suppose it’s a valid idea, but I can’t see that working out either.
But, I didn’t see a better choice. Letting him gang up on my guys with the ability to firegroup three stacks just wasn’t something I could afford. I would actually rather have gone for N11, but I’d go CX advancing there. If I’d seen the possibilities for cutting off my leader’s rout, I would have risked Interdiction to get to P13. It probably wouldn’t have mattered. But at least I’d get the extra -1 on rally, and its obvious that I could not afford to have a valuable broken unit wandering around.
Overall, I’m moderately happy with my performance. I did relatively subtle things wrong, and when I paid the price for letting my troops get out of touch with each other, I kept what I had left intact longer than I thought I could.
“And I accept! Well played.”
“I wasn’t sure I was going to pull this one off at all, especially when I both vehicles. Learned some valuable lessons there. Those paratroopers in +4 terrain were tough!”
“I was leaning towards an advance into N13 by the Fanatic unit for two reasons. One, it removes you from being adjacent to the M12/N11 powderkegs, and two, it permits you to cover the valley to the south with fire. If you advance to O12 and I break N12, you’ve lost all cover to the south. I’d gamble on that 9ML unit surviving my Prep, which would leave my units in the open adjacent to yours. With a -1Ldr in N11, I think your chances of surviving the resulting ambush dr were poor if you had advanced into O12. Perhaps just delaying the inevitable by this point, but I think that would have been my move. Still, you did well in CC all game.”
“I’m looking forward to PB4 and the eventual campaign game.”
I’ve seen Patch get convinced that things have gone horribly worse than they really have on occasion, but this is probably the worst case of it I’ve seen. L13 did indeed take way too much effort to clear, and that could easily be fatal in another situation. However, he had a pretty good handle on everything else during the scenario, and it didn’t have an insanely tight schedule to meet. It was only a matter of time before the position went, and when it did… that was the bulk of my defense in the area, so I couldn’t afford the inevitable loss of L13.
Discussion ¬