
27 The Liberation of Tulle
While looking over shorter, simpler, ASL scenarios for me and Mark to go through, I came across the Partisan set (now in Armies of Oblivion), and we went for the first of those (we’ll need to get back to them; this is the first one I’ve played from that set). It’s set in central France as news of D-Day fires up all the Resistance groups to come out and to get rid of the occupying Germans.
Mark had the defending Germans who have eleven squads (mix of 2nd line and conscript) and poor leadership (three leaders is good enough, but one’s a 6+1). The partisans get twelve squads (three 527s, the rest are regular 337s) at the edge of board 22, and another eight in locations away from the fighting on board 2. They have a few LMGs, a German 50mm MTR and two PSKs. They have seven turns in which to gain and keep control of four out of six multihex buildings on the active half of board 22.
I set up for three thrusts. The initial main one was aimed at the V2 building on the south side, and would continue towards U6 and X7. The secondary one was to grab building Z2 and then help the others, while the third was more vestigial, and would get the support of most of the board 2 troops in taking CC6 and possibly DD7. The first two buildings would be fairly straightforward, the rest needed getting at through other terrain, and would be harder to do.
My first moves were to get at the garrison in S3, and get a flanking position on V2. S3 turned out to be the 6+1 with LMG, based off an idea in an article Mark had been reading. It’s not a bad idea, but this wasn’t really the place for it as he was alone and couldn’t keep me from getting a squad across and adjacent. Still, a K/1 from U3 meant I had to make two attempts on it. I also lost another HS to a 12 MC while dashing across the road, but he achieved the immediate goal of making the German squad reveal. I also tried a Dash to OVR the 6+1, but couldn’t make the TC.
His sniper had pinned a PSK I had put in OpFire, but he still hit V2 for a 1MC that Mark passed. But, my sniper went off (our third successful SAN check of the game was during my first AFPh, think about that for a moment…) to wound his 7-0. I got into CC with the 6+1 and killed him with no trouble while also advancing on U3 and into Z2.
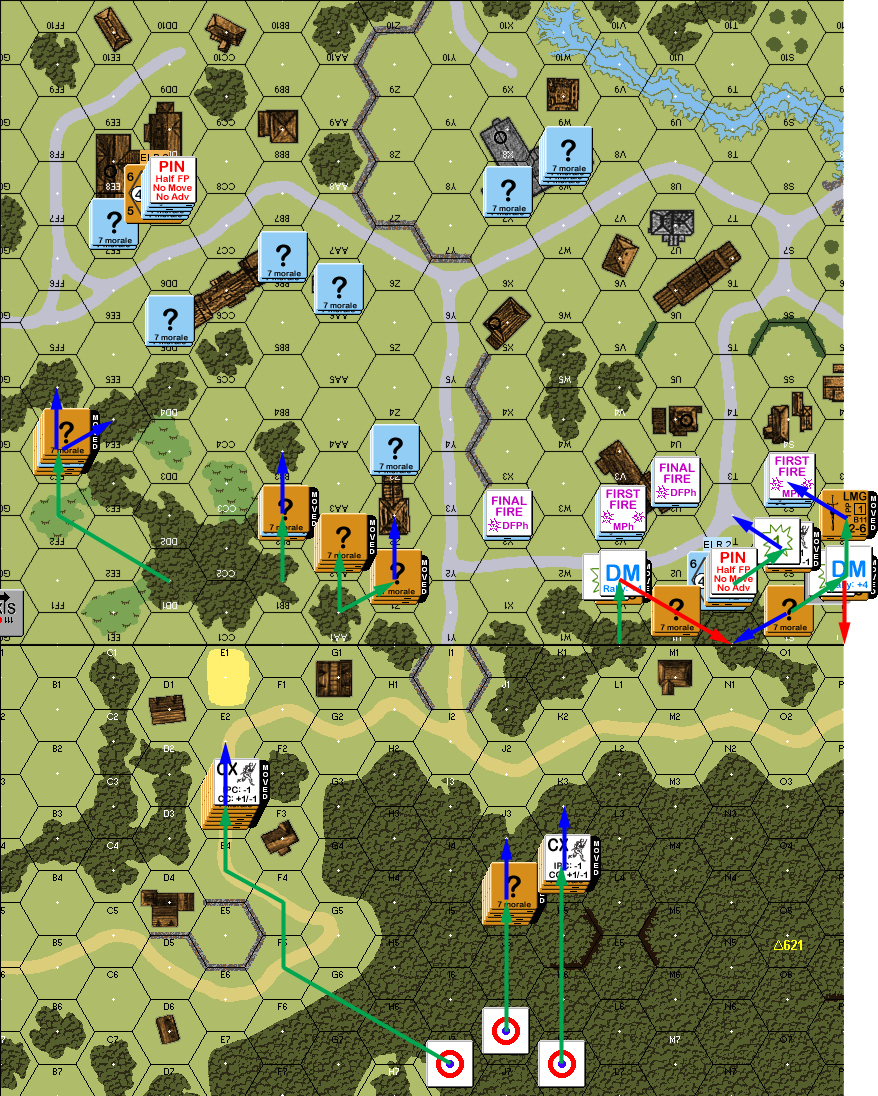
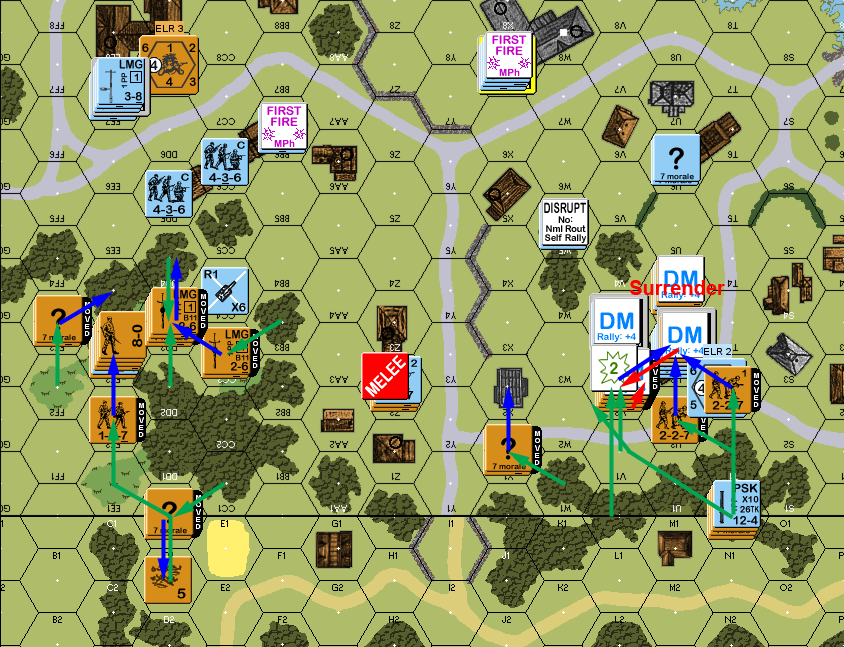
Situation, Partisan turn 1. North is to the left, and the board 2 hill mass has been replaced by woods.
The only result in Mark’s turn 1 RPh was me recovering his LMG. He prepped with the entire southern half of the line, and managed to break (and ELR) the PSK squad, but not the 527 in the street. He dashed a squad out of X7, heading towards the southern area, and moved his MMG to the top of that building. My fire was worse than ineffective, malfunctioning my MTR, and causing U3 to battle harden and generate a hero.
The Z2 garrison could have tried hiding on the upper level to delay the inevitable, but charged into CC, and got ambushed thanks to being Lax by SSR. My two partisan squads merely CRed them, but they did nothing in return.
Situation, German turn 1.
Out of the four broken HS gathered in 22T0, only one rallied for my turn 2 RPh (admittedly, the other three were DM). My squad in the street took a chance to prep, and wounded the hero and ELRed the squad back to conscript with a 1MC. I lost the rallied HS to a K/2 while trying to force V2 to fire (worked a little too well). I got a little too fancy with the main stack on board 2, who were visible to the MMG, and took a 2MC which ELRed one squad, but thankfully the 8-0 and other two squads came through fine, though his sniper broke my squad that had survived a turn in the middle of the street. I lost another squad outright to a 1KIA from X2, and another to the MMG (the worst part was it hadn’t even lost ROF yet).
I did get three squads in position, though Final fire pinned one. He also broke my 7-0 and CRed the PSK squad with him on a 12 MC, which halted my advance on DD5. I got into CC with the hero, who managed Ambush, and withdrew out to the remaining good squad in the building. Nothing happened in the melee in Z2.
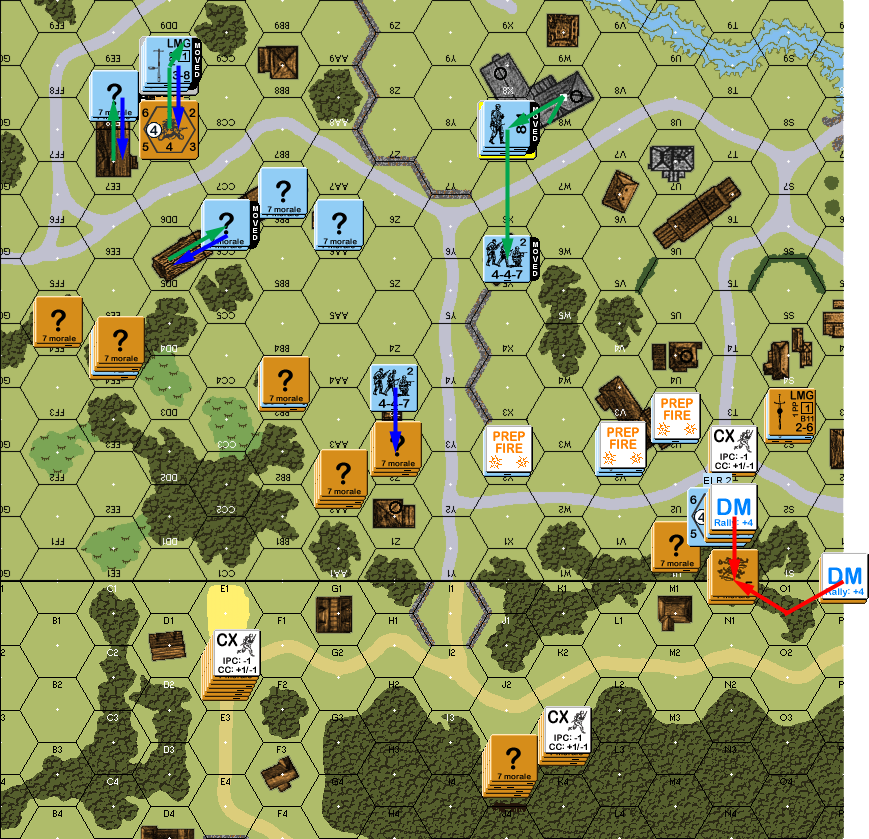
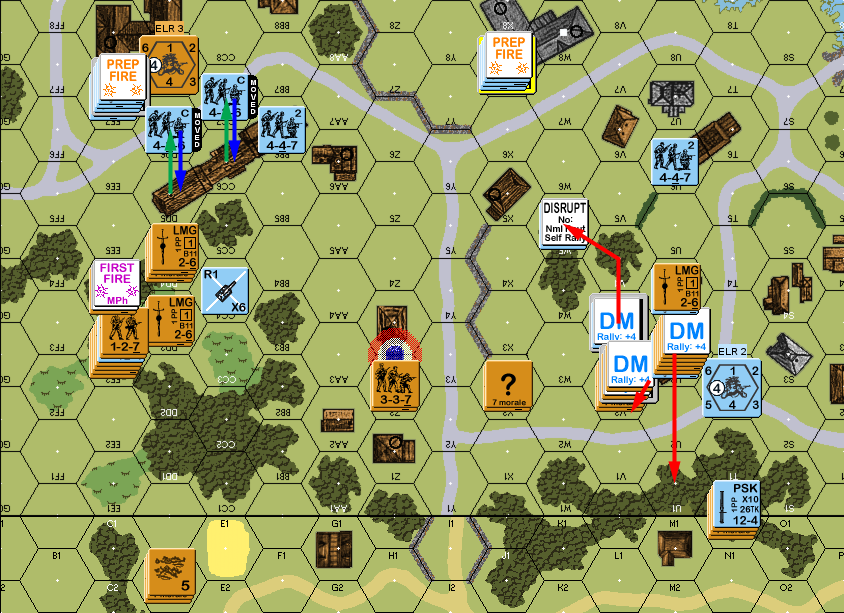
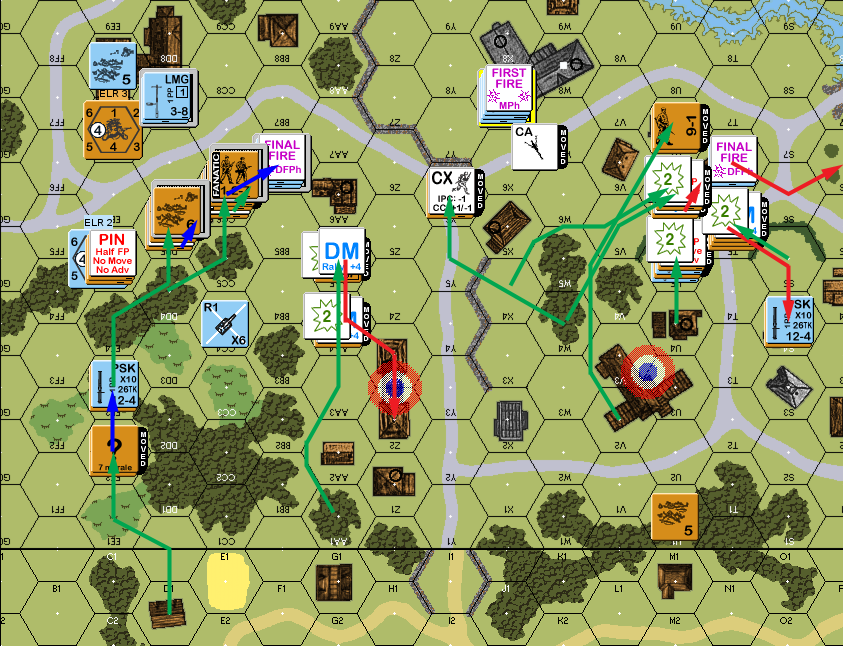
Situation, Partisan turn 2.
I rallied a HS and the 7-0 during Mark’s RPh, but also lost a HS. Prep fire broke my squads in V3 and U3, and on the north end he largely skulked. He shifted a squad over to building U6, but an attempt to pull out X2 ended badly with his squad disrupting.
And still nothing happened in the Z2 melee.
Situation, German turn 2.
I self-rallied a HS in 2D1 for my turn 3 RPh, and rallied two more in 2N0, but in 22EE3 all I did was lose a HS to another 12. I worked on surrounding U3 with little interference, though he did break a HS trying to work around to V3. Later fire also pinned a squad in V3 itself, but Mark didn’t manage anything more.
My squad in U4 ended up surrendering to U3, but then I piled a squad and two HS in there for CC, with the Germans narrowly avoiding an ambush but going down under the numbers anyway and let me re-arm my squad. The Z2 melee finally ended with the partisans finally getting the upper hand, giving me two of my buildings.
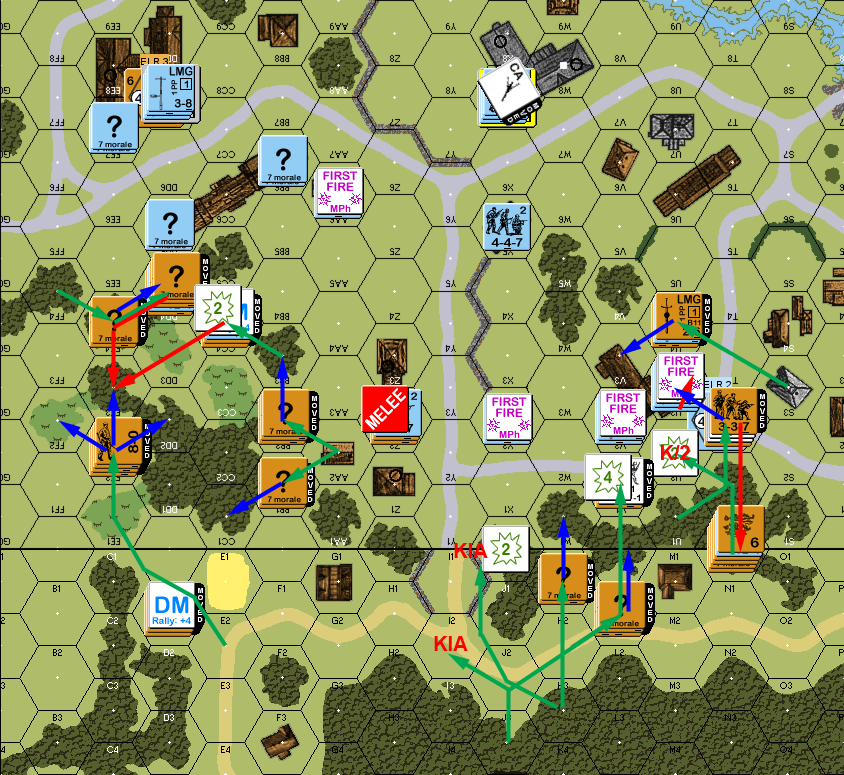
Situation, Partisan turn 3.
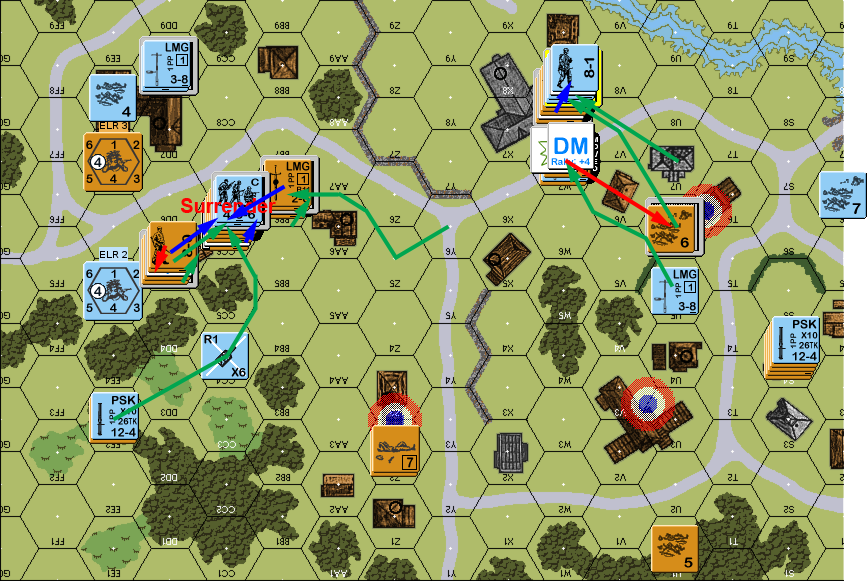
For Mark’s RPh, EE3, my 7-0 in EE3 took the PSK from a broken HS, while the 8-0 failed to rally anyone, while the final (PSK) HS in T0 rallied. The MMG had a clear shot at U3, where almost all the intact men of the south area were, and a 1MC reduced the rearmed squad to a broken HS, while the other squad and a HS broke, leaving only an HS intact there.
After that, there was a little skulking in the north, and my fire merely malfunctioned an LMG.
Situation, German turn 3.
The only activity for my turn 4 RPh was rallying another HS in EE3 and handing off the PSK to a HS there. I tried to shift a squad south from Z2, but they took a K/1 and broke. But that fixed the MMG pointing north and gave me a little more freedom to the south. A second attempt at the same thing also broke in the road. This set off my sniper, who killed his wounded 7-0.
I lined up a number of squads along the DD5 building (two of them concealed), and Mark was only able to break one back a hex in CC4. So I got into DD5 with three squads, and to my surprise knocked out the German squad immediately for no losses.
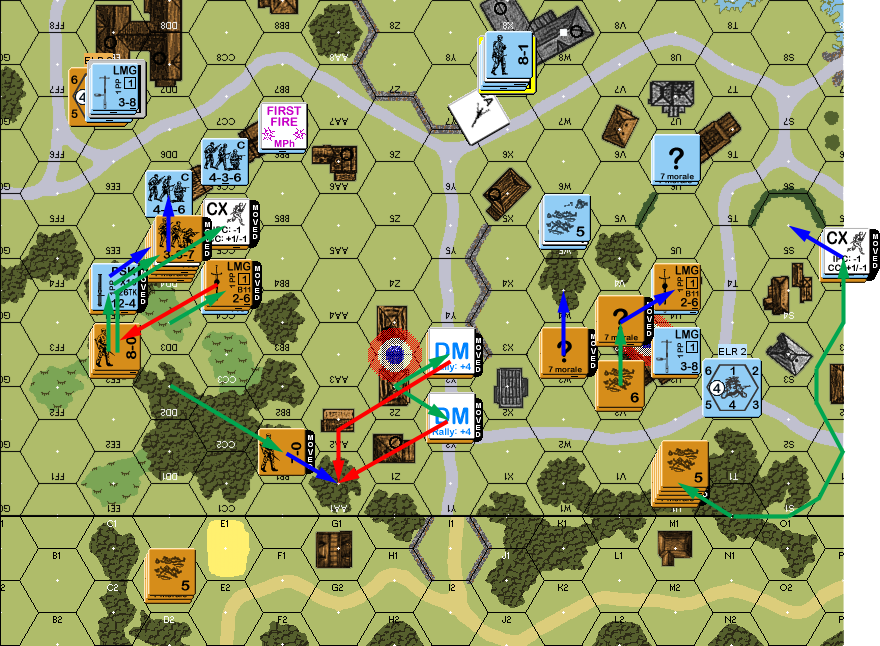
Situation, Partisan turn 4.
Mark self-rallied his squad in W5 for his RPh, while I rallied a squad and a half in U1. Prep fire at DD5 did no more than pin one squad, while other fire pinned the PSK HS in S5 and revealed W4 without harming him, but Mark’s sniper went off to break the other PSK HS in DD4. He only had one squad that did not prep, who skulked in U7.
One of the squads in DD5 fired across the street to break a German LMG squad on a NMC. The reveal in W4 caused the disrupted squad to attempt surrender, but with other Germans right there I rejected it to declare No Quarter. He went in for CC there (4:3 odds…) and we CRed each other down to HS.
I self-rallied a squad in V2 for my turn 5 RPh, along with a squad in AA1, and a squad and a half in EE3 (the squad going fanatic in the process). The push on U6 started, with me losing a HS to fire from the MMG, and and a squad ELRing to the residual, and the resulting HSes were eliminated by the MMG. However, that did give me a chance to finally get a squad across the Y-column street. I moved up another HS into CC6, and advanced another squad into the building. Mark’s fire in there merely pinned a squad and made the HS fanatic. However, he did break my PSK HS before he got a chance to OpFire.
Advancing fire broke the squad in EE7, leaving that building only protected by lateral fire from other German squads. I got another squad into W4 and finished off the Germans there with no losses.
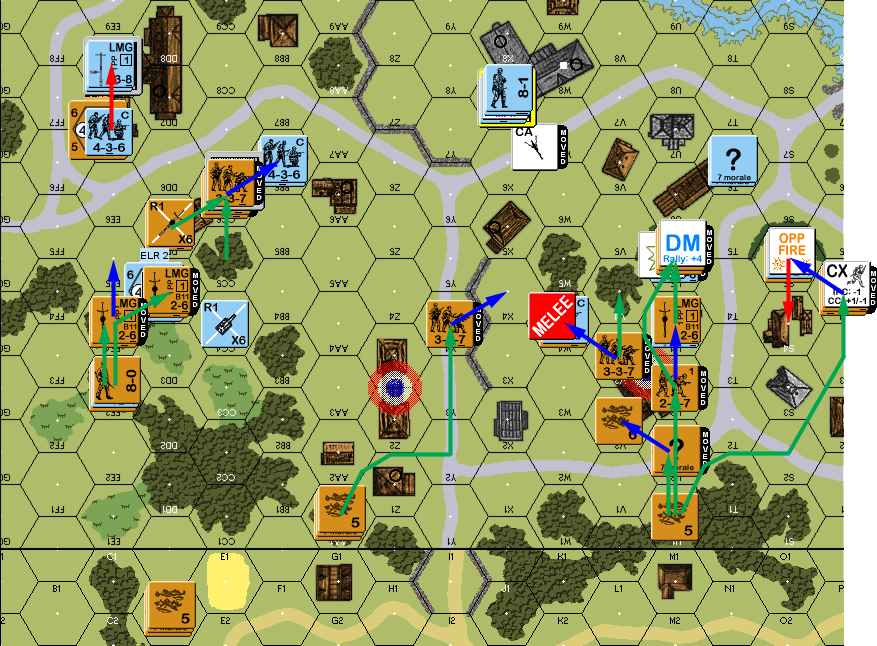
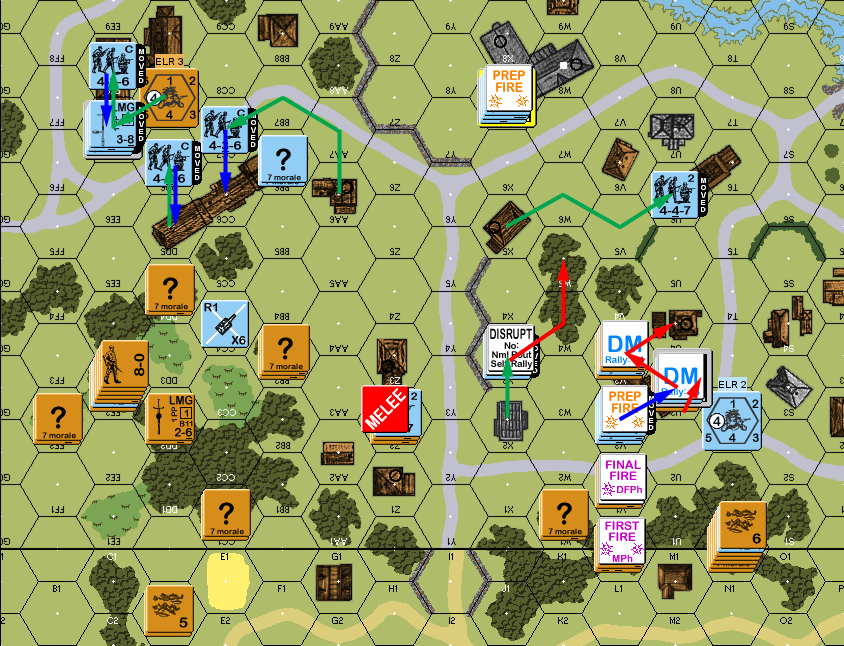
Situation, Partisan turn 5.
Mark managed to self-rally his first broken squad in building EE7, I rallied a couple HS, and after several turns of trying to rally the final HS in 2D1, they succumbed to a 12. Prep from BB6 broke one squad and pinned another. EE8 skulked and ended in DD7, while the squads in BB6 advanced upstairs.
The only activity for my turn 6 RPh was recovering a LMG, and finally eliminating the one I’d malfunctioned a couple turns back. I tried firing across the street to DD7, but couldn’t break him again. A second attempt to get at U6 got a HS pinned short of the goal, and another squad broken down to HSes. However, I took an opportunity to get a HS to Y6, where he had the wall to hide behind, and lock up SFF from X7 to two hex range, letting me get into U6… and promptly breaking to SFF from T6. But after that, I got another squad in there, who pinned to residual, and the 9-1 and a HS worked through the area to U7. I tried flanking BB6 with a HS and the 7-0, but first the HS broke, and then the leader.
Advancing fire broke the squad in T6, ending resistance there when he routed out instead of getting trapped on the upper floor.
Situation, Partisan turn 6.
Mark’s turn 6 self-rally merely reduced the broken squad in EE8 to a HS, while my only success was recovering another LMG in U5 (giving that HS three of them; I think they were planning on supplying a small army with arms after the war). Prep broke my squad in CC6h1, while I couldn’t get any results. I had to rout out, and Mark’s squads advanced into the Location, putting him into the middle of the building.
I was unable to rally anything on my turn 7 RPh, and prepping upstairs in CC6 did nothing. I charged a couple squads towards W8 so Mark would have a hard time getting out of the building for a last-minute attempt to retake one I’d captured… and maybe take him out as well. (The war profiteers had to drop a LMG to keep it slowing them down as they went CX.) And everything available swarmed into building DD5, and Mark couldn’t get any results against them (other than a sniper which reduced my SAN).
Advancing fire finally got a good result in building DD5, breaking one squad and pinning the other. I advanced into CC in both buildings. I muffed the CC rolls (12) in both buildings, and in W8h2 Mark withdraw down the stairwell, while he took out a HS in CC6h1.
Situation, Partisan turn 7.
The only result of the final RPh was my 7-0 self-rallying, but failing to bring the HS with him. The squad in DD8 headed for BB6, but the single partisan HS on the ground floor managed to pin him in the open. The 8-1 stayed in X8 to keep from giving up the building, while the squad headed towards V3, passing a NMC as they left the building, but then breaking to a 1MC in W6. The HS in CC6h0 fired into the melee with no result, which left it down to the melee itself. I had enough for a 2:1 vs the squad, but failed on an 11 for Mark pull off a win with only three unbroken units left as I couldn’t get the fourth building.
Afterword
So, a traditional ‘it came down to the last CC roll’ game. And it was a reasonable such one, not some long-shot last turn push.
Mark was rattled at how fast his 6+1 went down at the start. As I said, it’s not a bad use of the leader, but Mark didn’t appreciate that a single leader on an MG is at half firepower, and he was too isolated for what turned out to be my initial push.
I was disheartened during the early going with the continual losses to fire and bad rally rolls, which was happening about the same time I was going through the same thing in “Kurhaus Clash“.
Having a powerful MG nest up high often doesn’t work well because too many people can see him. Here, it was an excellent position since the Partisans had no effective firepower to bring on it with a normal range of 3, and a few LMGs. The good news on all the casualties I took was I did carry the fight to the Germans and caused them a bunch of casualties, which is what made Mark’s defense so static at the end. It was getting hard to cover everything.
The big challenge for the partisans was arranging good CC odds with strength 3 squads. Two surviving squads in the DD5 building is what made it a slow go for me (that and six locations), and getting rid of one looked to have put it in the bag, but once again CC fails me.
Discussion ¬