
22 Kurhaus Clash
After “Absolut Markajarvi“, Martin and I returned to the early Yanks scenarios for our next PBeM game. Both of us had slowdowns (I’ll admit to having more consistent ones), so the game took far longer than it should have, which was not helped by me being in a bad position for most of the scenario….
Aachen is something of a favorite western front subject in SL/ASL, and this one deals with a near-simultaneous pair of attacks. For scenario purposes, the Germans are attacking with thirteen SS squads with good leadership and a pair of StuGs. The Americans defend half of board 23 with seventeen squads, and a fair number of toys, including 100mm OBA. The goal is to have more squad-equivalents on board 16 (behind the American setup) than the enemy, with ones in buildings counting double, at the end of seven turns.
Board 23 is the ‘canal’ board from Beyond Valor, but the ‘canal’ is here defined as a wide boulevard that both sides set up across from each other from. So the first thing the Germans have to do is get across the boulevard, through the American part of board 23, and then secure some portion of board 16.
Patch remembers the scenario from his early ASL career, but I forget what he had to say about it. But he did point me to a YouTube video of someone going through it. I took one look at the American setup in that, and knew how I’d try to attack it. Sadly, Martin’s defense was much better balanced, and I had to work to come up with a German plan. I noted that both American MMGs were on the west end of the line, and set up forward of everyone else. So, I determined to rush them, using the StuGs to lock them up while taking out the MMGs in CC. With luck, I’d be across the boulevard and capture the MMGs at the start of the game. I’d also hurry some units north, and try to get behind the main hedge in hex column Z before the Americans could react.
Martin was smart enough to see what was coming, and put down residual with spraying fire as the StuGs approached. I then moved a couple of HS to attract fire, and started the main moves. That’s where things started going wrong, as a number of low rolls from the residual broke two and a half squads, and wounded my 9-2. Still, I had plenty to throw against the two HS on the front line, and I got a platoon+8-0 behind the hedge line on board 16. The good news was advancing fire broke both MMG HS, so I didn’t need to worry about the fickle dice of CC, though one HS was able to rout away with the MMG.
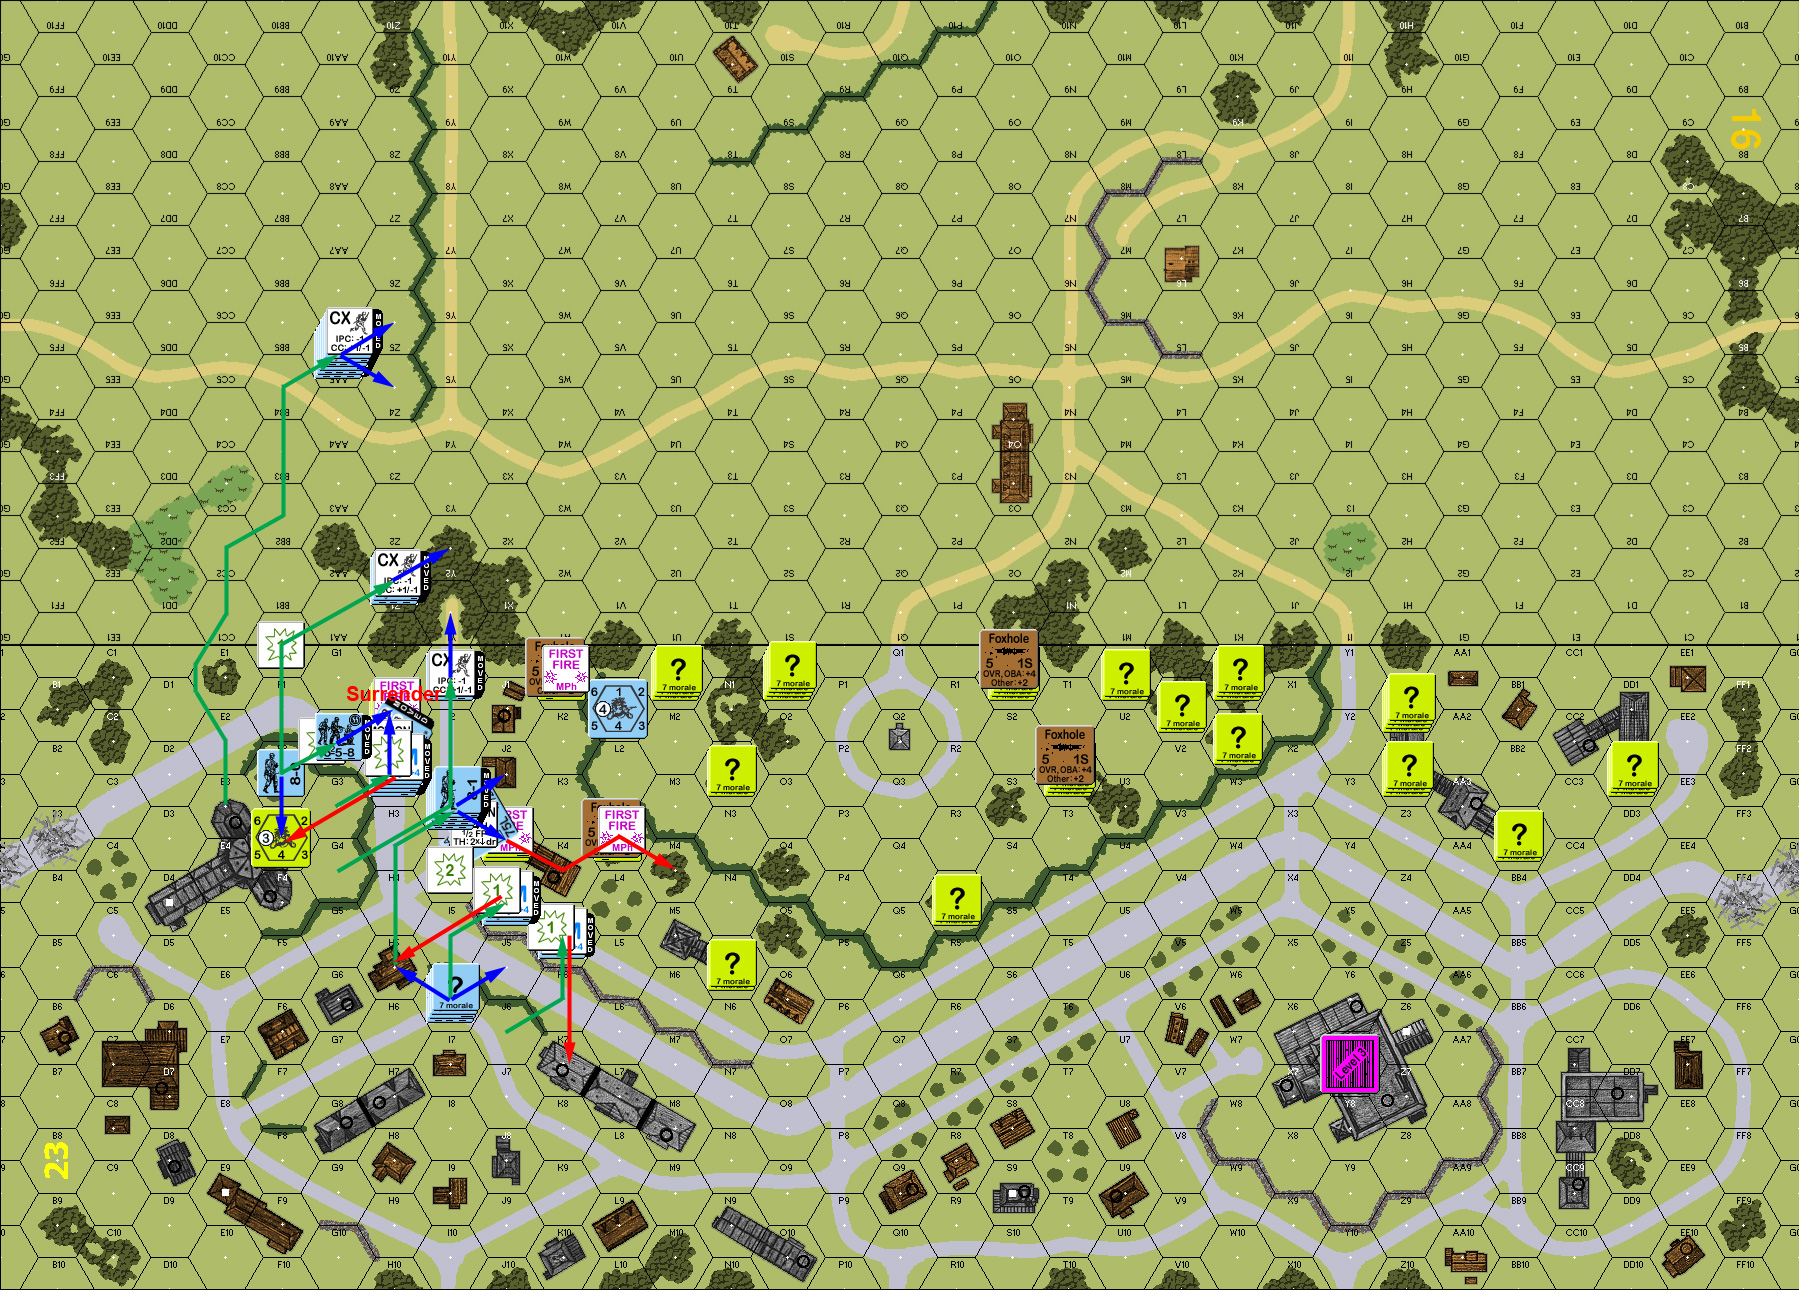
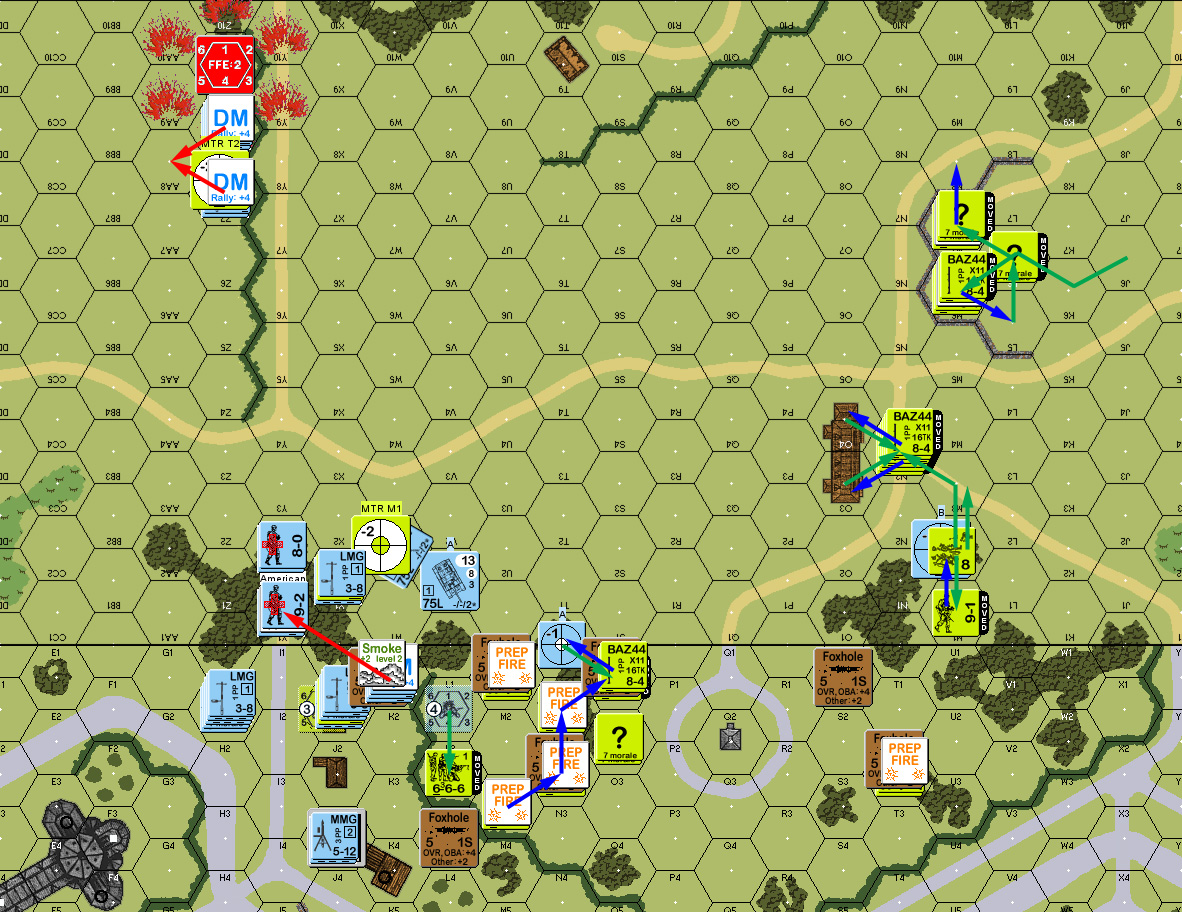
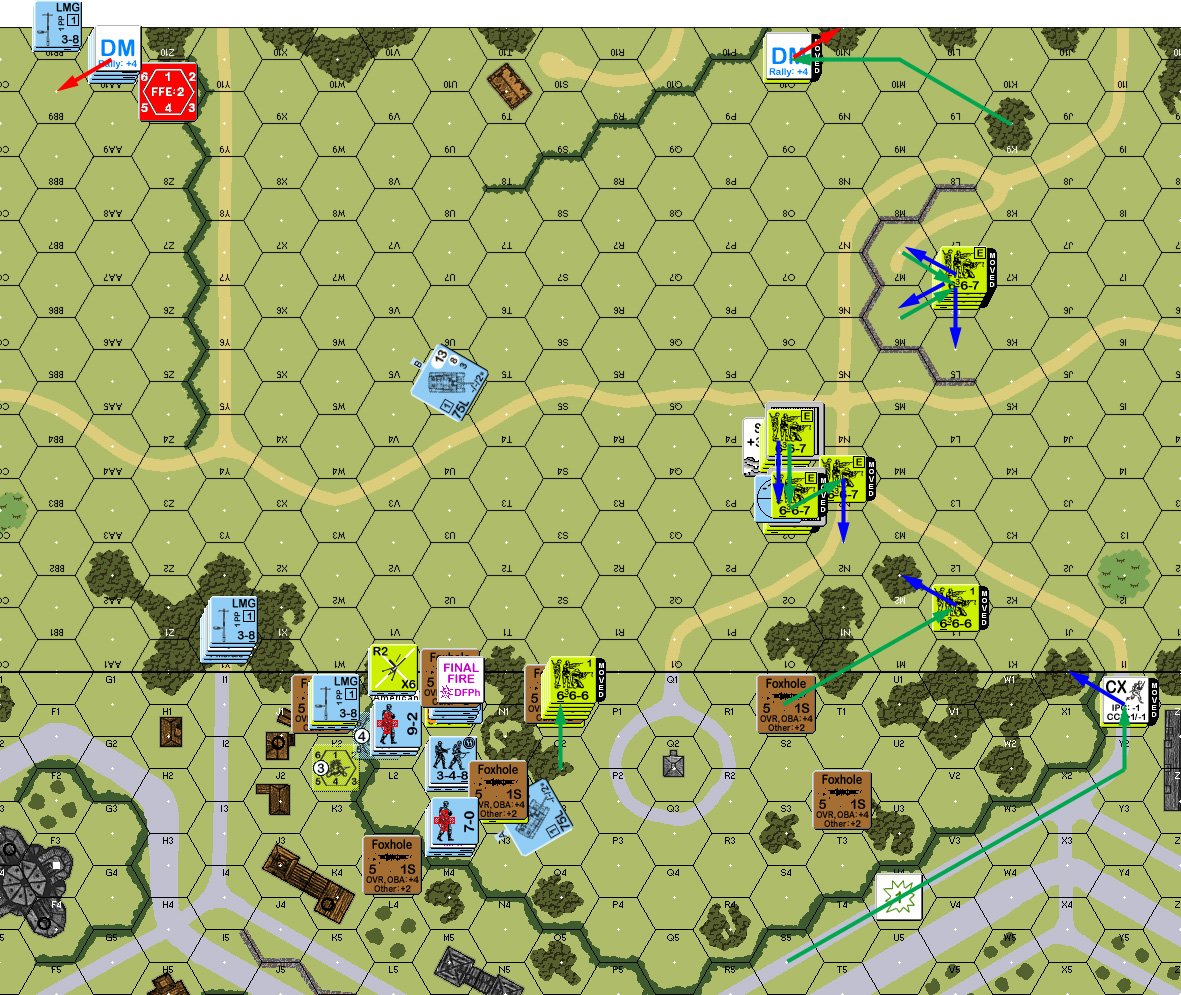
Situation, German Turn 1, showing the full board. Most of the action was on board 23, so any hexes given without a board number are there.
The MMG HS didn’t self-rally for Martin’s turn 1 RPh, while I recovered the one MMG left behind, and rallied one squad, but the other CRed on a 12. The two forward squads on that side prepped, and broke my 8-1 and two squads on a 1MC. Then the backfield moved. Almost all of it was well out of my line of sight, and my only first fire was a range-15 LMG shot with no effect. At least in DFPh, I broke one of the squads that formed the next line of defense.

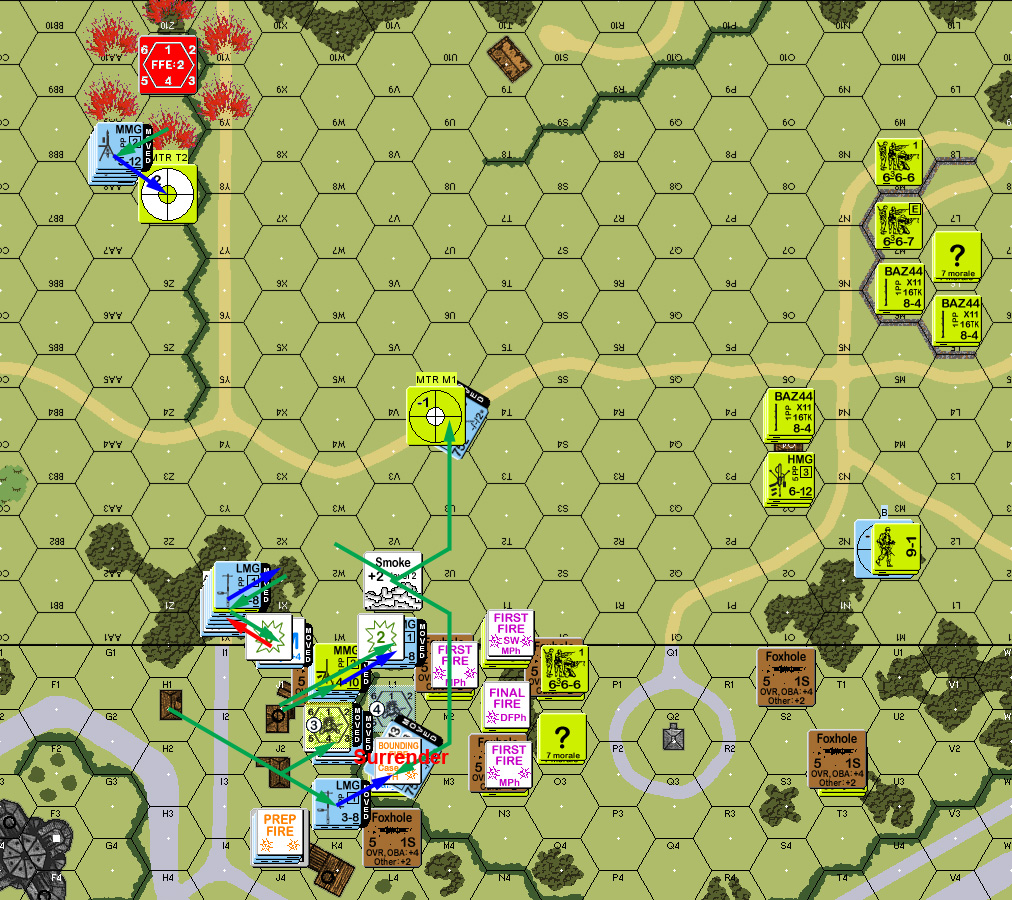
Situation, American Turn 1.
My turn 2 RPh went poorly, only getting back the HS that had reduced last time, and losing the HS that broke on the first turn to another 12. Martin got both broken units back, but the MMG HS went berserk, and could actually see my guys on board 16. I took a shot in prep, hoping to reveal L2, but no such luck. One of the major tricks was to get the StuGs out with a BAZ certainly in L2. I used the building adjacent to J3 to bypass and put the CAPF out of LOS, and then he missed the range-3 shot I gave him in I2. The other one had to circle around the building it was bypassing, and both headed towards the clear part of board 16.
Movement went well, and largely out of sight, but Martin fired on my broken stack and eliminated my 8-1, as well as breaking my wounded 9-2 with another shot.
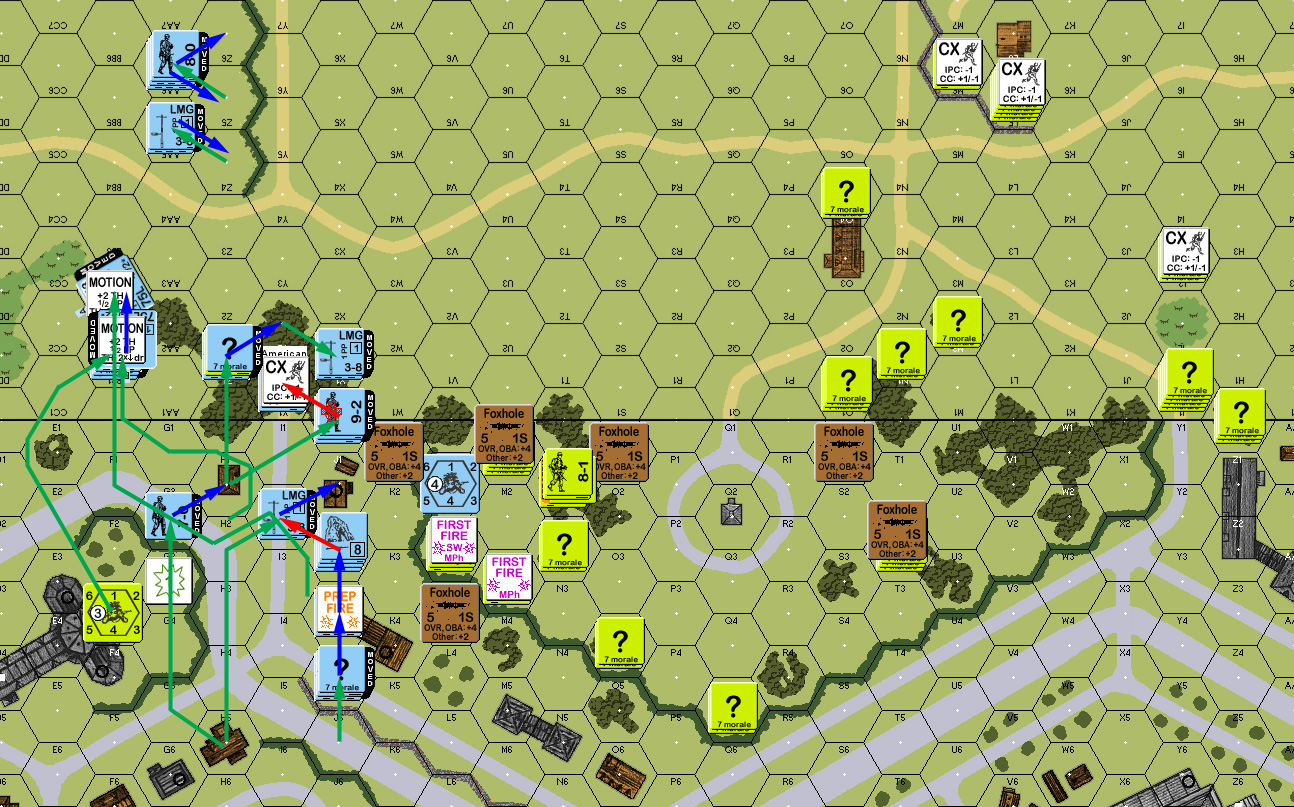
Situation, German Turn 2.
The only activity for Martin’s turn 2 RPh was my leader failing to self-rally. He called up his OBA, and got a SR between my west-flank advances. Then the MTRs opened up on the my platoon behind the hedge, and reduced two squads (one from double-break, and one from a K/1 that he passed). The berzerkers set off for the same area, and then switched to my grouping in the woods which was closer, and took a K/3 from TPBF to end that.
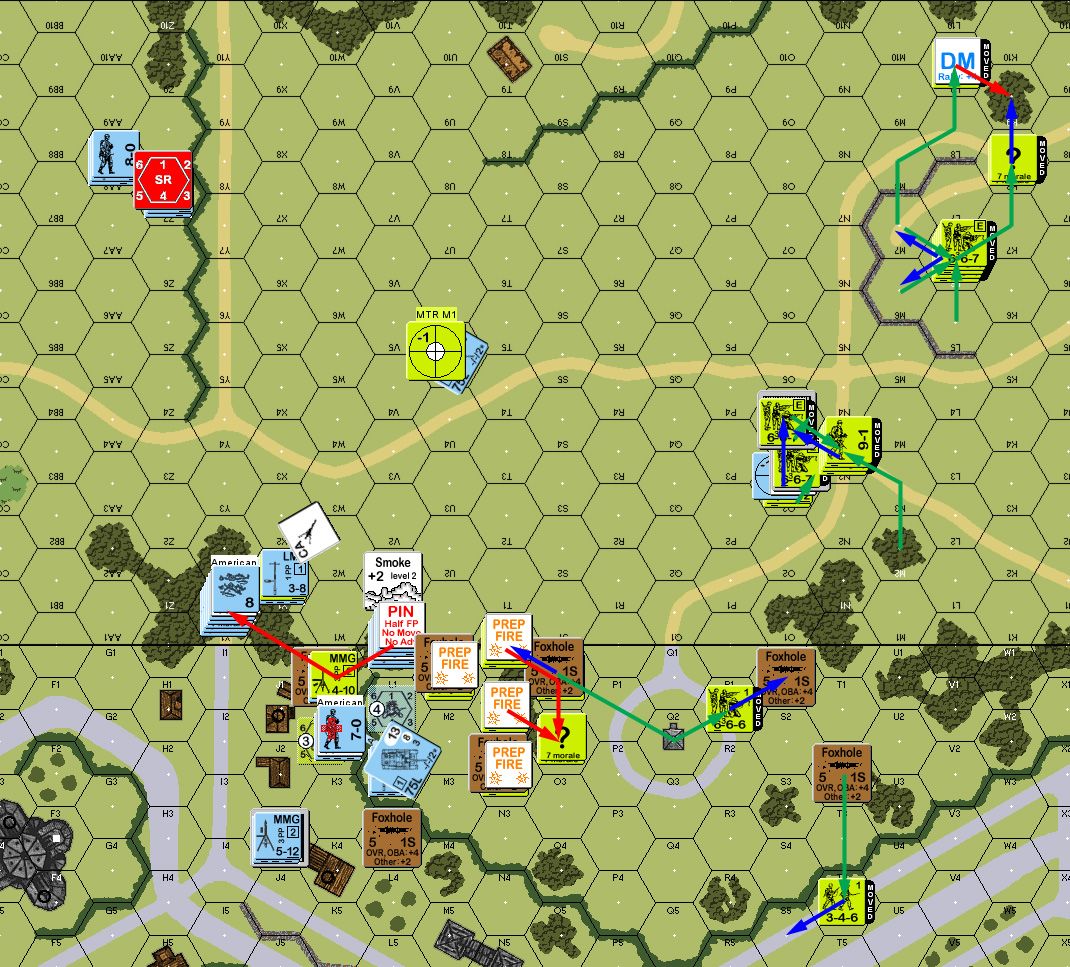
Situation, American Turn 2.
In my turn 3 RPh, I lost another HS to a self-rally 12, and my only positive result was recovering the second American MMG. I had a few Prep Fire shots, which mostly got results on the IFT, but the only practical result was breaking an American squad in the farmhouse, and one of my squads getting pinned by his sniper.
My attempt at armor assaulting towards the foxholes was stopped short by a break (not a big surprise, and there were adjacent woods to duck into), and then later fire wounded my 8-0 and reduced the squad. The OBA was corrected into the middle of the open field on board 16, and not much else had any effect. My HMG HS had advanced through the woods on the American positions, but only pinned to a lot of firepower.
Situation, German Turn 3.
In Martin’s RPh, I finally rallied a couple squads in 23H1 and the wounded 9-2. The OBA corrected onto the hedge, and broke my leader up there, though the MMG HS did not. However, MTR fire reduced and broke the LMG squad that was just outside the FFE. Close-range fire broke the squad in K1, but the HMG HS continued to pass MCs.
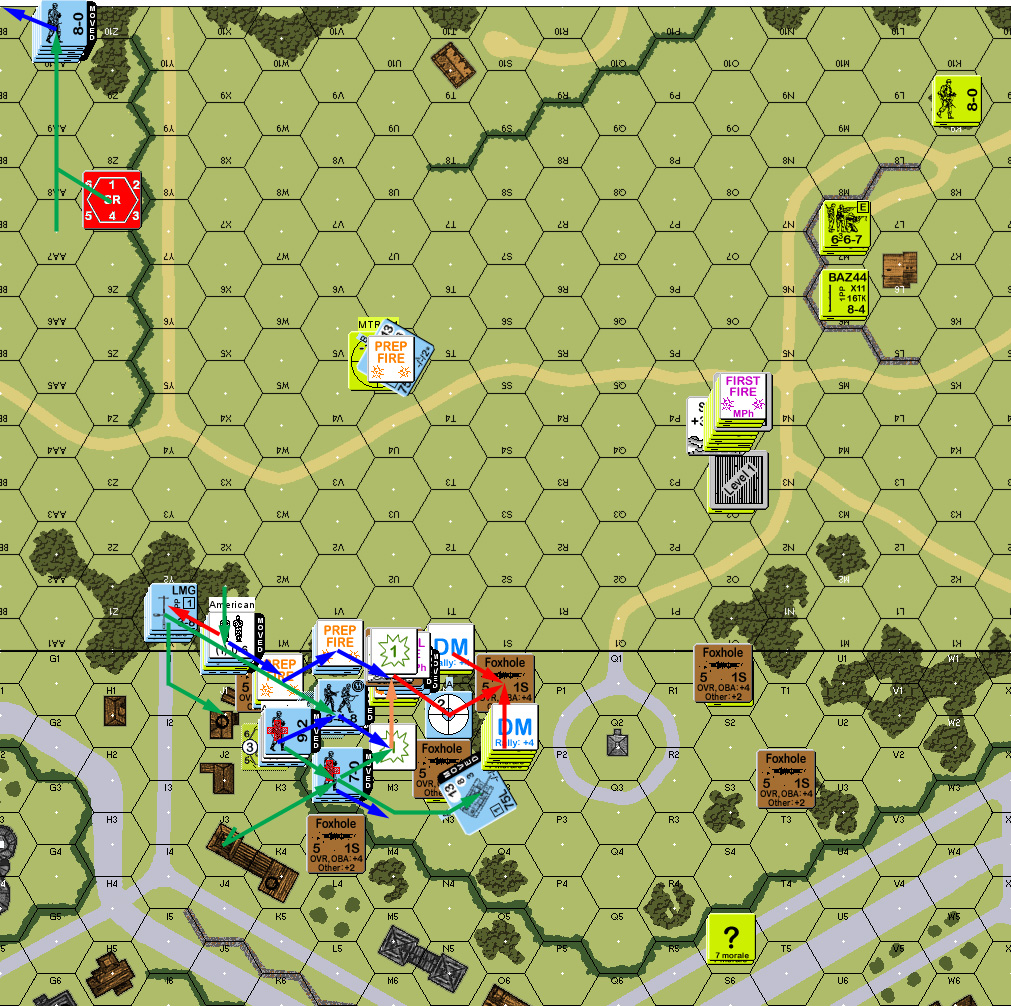
Situation, American Turn 3.
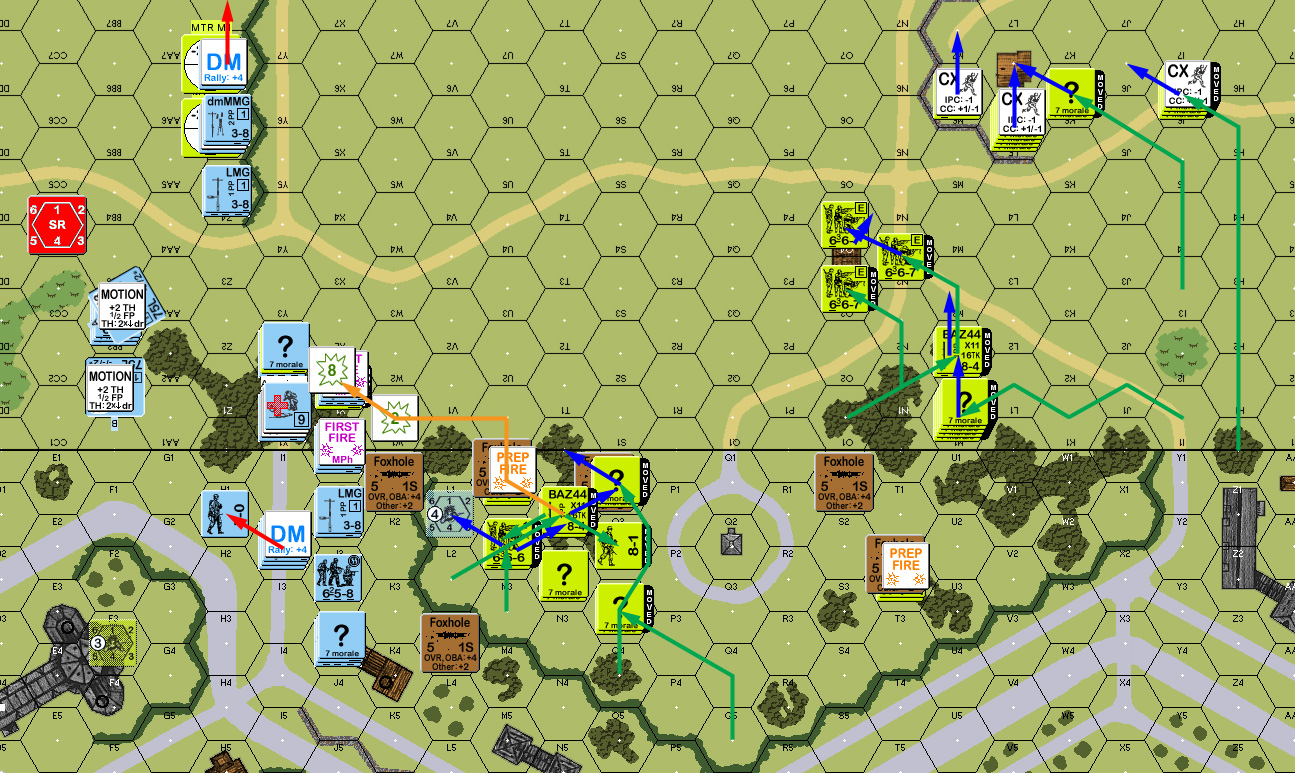
I got a squad back for my turn 4, but Martin rallied his only broken unit too. My biggest concern was the BAZ squad that was eyeing the forward StuG, but my MMG in J3 managed to pin it. The first StuG started up, and the BAZ shot missed by one, and it went south to overrun and break the remaining squad at the board 26 hedge line. I moved my recovered troops up to the other side of the hedge, but fire from further back wounded the 7-0. (Other than the broken leader with the ill-fated platoon—now a pair of HS— off on board 16, all my leaders were now wounded.)
The other StuG placed some smoke and then parked itself out of convenient range of BAZ. (This was not nearly as useful as I had supposed. Since there is no wind direction when there is no wind, I don’t place a direction marker at all unless there’s wind. Martin’s setup has one out for if it becomes useful. I saw the counter and assumed there must be wind instead of looking over at the “No Wind” marker. So… the smoke did not drift on top of his position as I had assumed.)
Situation, German Turn 4.
Martin had malfunctioned is rear MTR last turn, and lost it during his RPh, while I rallied the 8-0 and HS off in the depths of board 16. Most of the area in front of of me fired and broke a HS in L0, though the HMG HS merely pinned. The BAZ fired again, and bounced a shot off the StuG.
Along with the more normal moving around the center, he tried sending a squad towards the building in T9, where I’d been struggling towards for the last couple turns, but a good shot from a captured MMG stopped that. Sadly, the other one malfunctioned during DFPh (inevitable…). However, I did get a 1MC on the BAZ squad, which reduced to a broken HS on a 12, and then broke the squad in N1.
Situation, American Turn 4.
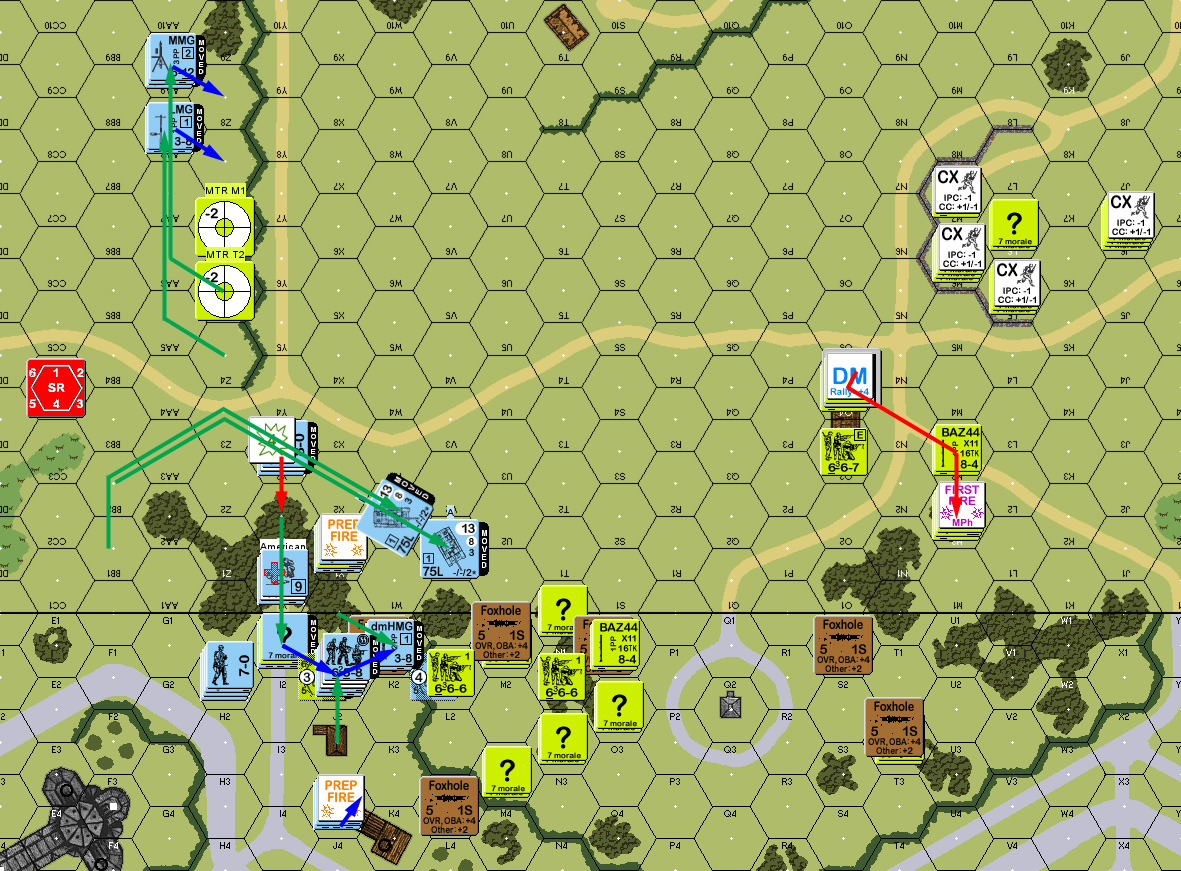
I got a squad and a half back for my turn 5, while Martin rallied a squad in O2, and rallied the squad off on board 16. He had also piled most of the guys in the central farmhouse in 16O4, away from the Acq counter sitting on O3. So, the StuG smoked in O4, putting a lot of firepower effectively out of action. Prep fire pinned the MTR HS, and an adjacent squad, leaving me with a decent chance to maneuver.
With nearly everything smoked, pinned, or broken, I started forward, a StuG going into bypass N2. I then smoked in the MTR HS, after they had shot at my squad, and then the resid got a K/1… with the surviving HS going berserk. Final Fire saw the SR follow my board 16 guys (surviving an extra card draw), and broke my guard HS while eliminating the my prisoners. Advancing Fire broke the MTR team in the foxhole, and pinned the squad with the StuG, which then thankfully did nothing in CC.
Situation, German Turn 5.
Nothing rallied for Martin’s turn 5 RPh, and he lost a HS on a 12. The OBA broke my MMG HS and leader, with the LMG HS surviving only by having withdrawn out of range. Movement was mostly keeping out of the way of my progress on board 23, but he made another attempt to get at the 16T9 building, only for 1KIA from long-range MG fire to cut it short, killing his 8-0.
I wiped out the squad in N2. I hardly ever have much chance to fire on broken units, but I had plenty with no better targets this time, so I managed a triple break to CR it out of existence, and I’m pretty sure that’s a first for me.
Situation, American Turn 5.
I didn’t manage to rally anything for my turn 6, but Martin got two HS (including the one with the BAZ) back in O1. The board 16 StuG put more smoke down on 16O3, rendering that mass of American severely curtailed in what they could do. My berserk HS charged towards the broken squad out at the edge, spotted building 16O3, and about the time he would spot O1, they fired on him, killing him with a K/4. Next up was the StuG cruising around the woods and into bypass of O1 (with the BAZ HS having just fired…). But, he passed a PAATC, and eliminated it with CCRF. I conceded at that point.
Afterword
I had written this off as winnable by me early on, but certainly found the tactical puzzle of reducing the Americans in front of me very interesting. The plan I had evolved was to try and take out O1 this turn, and then Armor Assault up to the smoked-in building. That was going to need enough luck, but then I’d need a lot more to blast the Americans at point-blank, and maybe take some out in CC. Even at best, I probably still wouldn’t have enough for a win, but it would become a lot closer than it had been to that point.
Overall die luck was probably slightly in Martin’s favor, but early-game luck was solidly in his favor, with me losing men and wounding leaders continuously for the first three turns. That said, my plan was a poor one to begin with. I had hoped to interdict his movements onto board 16 by getting there first, but that was nearly impossible, and of course he could go straight for the bulk of the good terrain. If I had cleared out the first couple lines of defense nearly immediately, that might have been better, but I didn’t necessarily have that as an option either.
The best part of the plan was I cleared the wide boulevard immediately, and only took one shot with its modifier. Instead of sending a platoon off to the light cover of board 16 with no support, finding a way to support the east/right flank might have worked better, though managing that would have difficult, and probably involved rushing N5.
An overall better approach would be to set up aimed directly as the V1 woods mass, which would let out near the two buildings Martin took on board 16. Setting up for a firelane down the 16I/23Y road would help keep that group from going anywhere great immediately. On the other hand, the American HMG was set up look straight down the boulevard in that area, and that was part of what I was avoiding….
Overall, a fairly frustrating scenario for me, that Martin played very well. I’m happy with portions of it, like smoking in the 16O3 building, but there’s a lot to be unhappy with.
Discussion ¬