Rindis.com

All my hobbies, all the time
  • Home
  • My Blog
  • Games
  • History

Categories

  • Books (503)
  • Comics (10)
  • Gaming (917)
    • Boardgaming (673)
      • ASL (154)
      • CC:Ancients (83)
      • F&E (78)
        • BvR – The Wind (26)
        • Four Vassal War (9)
        • Konya wa Hurricane (17)
        • Second Wind (5)
      • SFB (78)
    • Computer games (162)
      • MMO (77)
    • Design and Effect (6)
    • RPGs (66)
      • D&D (25)
        • O2 Blade of Vengeance (3)
      • GURPS (32)
  • History (10)
  • Life (82)
    • Conventions (9)
  • News (29)
  • Technology (6)
  • Video (49)
    • Anime (47)
  • Writing (1)

Patreon

Support Rindis.com on Patreon!
Become a patron at Patreon!

Other blogs:

RSS Inside GMT

  • Meet The Northern Wei: A Civilization of GMT’s Ancient Civilizations of East Asia  June 19, 2026

RSS Playing at the World

  • Playing at the World 2E V2 Arrives May 5, 2025

RSS Dyson’s Dodecahedron

  • Blog Updates June 20, 2026

RSS Quest for Fun!

  • The Expense Post May 24, 2026

RSS Bruce Heard and New Stories

  • Pain, Exhaustion, and Morale in D&D BECMI June 7, 2026

RSS Chicago Wargamer

  • The 2 Half-Squads - Episode 310: Cruising Through Crucible of Steel January 27, 2023

RSS CRRPG Addict

  • The Search for Freedom: Our Repeated Petitions June 20, 2026
SF&F blogs:

RSS Fantasy Cafe

  • The Leaning Pile of Books May 24, 2026

RSS Lynn’s Book Blog

  • Summer of Horror: Can’t Wait Wednesday: Sleepers in the Snow by Joanne Harris June 17, 2026
ASL blogs:

RSS Sitrep

  • Cardinal ASL Sins March 18, 2026

RSS Hong Kong Wargamer

  • FT114 Yellow Extract After Action Report (AAR) Advanced Squad Leader scenario April 16, 2025

RSS Hex and Violence

  • This still exists? March 25, 2025

RSS Grumble Jones

  • YouTube AAR for Critical Hit's Gettysburg Turning Point 1863 - ID4 At Will Fire June 16, 2026

RSS Desperation Morale

  • How to Learn ASL March 16, 2025

RSS Banzai!!

  • October North Texas Gameday October 21, 2019

RSS A Room Without a LOS

  • [Crossing the Moro CG] T=0902 -- Rough start July 18, 2015
GURPS blogs:

RSS Dungeon Fantastic

  • GMing Shortcuts in Felltower June 17, 2026

RSS Gaming Ballistic

  • B-Scale: Damage That Scales from Tardigrades to Kaiju June 5, 2026

RSS Ravens N’ Pennies

RSS Let’s GURPS

  • Review: GURPS Realm Management March 29, 2021

RSS No School Grognard

  • It came from the GURPS forums: Low-Tech armor and fire damage January 29, 2018

RSS The Collaborative Gamer

  • Thoughts on a Town Adventures System January 18, 2022

RSS Don’t Forget Your Boots

  • GURPS Supers Newport Academy #6: “Old Friends, New Again” June 7, 2026

RSS Orbs and Balrogs

  • Bretwalda - Daggers of Oxenaforda pt.4 - Fallen King May 27, 2017

Wasteland of Flint

by Rindis on May 24, 2024 at 12:00 pm
Posted In: Books

After way too long, I’ve finally gotten to Thomas Harlan’s Time of the Sixth Sun series.

It is well written and therefore easy to get into. It’s also potentially very hard to get into.

At one level, this is general SF: humanity has invented FTL, and is slowly exploring the galaxy (or at least nearby parts of it), we’ve met some alien species, and there’s a number of colonies out there.

However, this is alternate history, one where the Aztec Empire not only survived the Sixteenth Century, but eventually came out on top. The government isn’t really gone into, but is Aztec, with a lot of cultural synthesis going on in the centuries since. In fact, a lot of this is deliberately not gone into. There’s no big ‘as you already know’ speeches. This is the world we have, and you get to roll with it. (Apparently there was a wiki that went into this, but it seems down now; so just think of something in the future of The Gate of Worlds—which is a book that distracts itself too much with setting for the foundation of its alternate history.)

But, people are still people, so while the culture is somewhat alien, everything else is quite understandable. There is some mixing of tone/genre. The opening part has a lot of really good description of a broken world (literally) and an ultralight that’s used to travel across it, along with survival gear, and camp proceedures… it really sets up a nice, grounded, scene in an alien environment, and introduces the story very well. However, later, the novel has split into two major plotlines, and one of them features the kind of pea-soup asteroid belt you get in space opera… which while great entertainment, is very at odds with the harder SF feel of that start.

The bulk of the novel is classic science mystery, revolving around a planet that someone partially took apart in the distant past, and didn’t quite put together right (which does all sorts of things to the geology and atmosphere—I think the thoughts on local gravity are a bit off though). And that’s generally the best part of the book.

However, the alternate history timeline comes into play to give the book a separate feel from the normal. This isn’t necessarily something to puzzle over and pick apart until all the answers are revealed. The series title refers to the Aztec calendar, which plays upon ideas of cycles of civilizations, and in this universe, humans have found remnants of previous civilizations, which are referred to in accordance to this cosmology, and artifacts found here are referred to as coming from the First Sun. This is a somewhat inimical universe, where humans have been staying carefully away from anything that might attract too much attention. (Imagine going to the stars, and finding we’re in the middle of a game of AI War.)

Well, possibly. There’s a lack of a lot of hard evidence for much of anything here, and while there are parts of things still functioning, just what they would do, whether they would contact anything else, etc., is unknown. There is evidence of another civilization that did get the attention of something… and is no longer around, so perhaps caution is indeed the best policy.

The real shame is that this series seems to be the last thing Harlan got published. While there’s a few difficulties here, and it certainly doesn’t hold the reader’s hand, it is very good, and I’d like to have more to read from him past the next two books of this series.

└ Tags: books, reading, review, science fiction
 Comment 

Two Rounds of Mount Garganus

by Rindis on May 20, 2024 at 12:00 pm
Posted In: CC:Ancients

The death of the Alpini HQ staff meant it was time for Patch and I to play another set of Commands & Colors: Ancients games. Up this time was the Battle of Mount Garganus from Expansion #2. This is Spartacus without Spartacus, as he’s split his army, and his deputy, Crixus, has allowed himself to be surprised by the Romans. This shows up by having a large, impassible, hill mass directly behind the slave army center. The Romans go first, get an extra card, and have a slightly bigger army, including that rarity, the heavy war machine.

Patch had the Romans for the first game, and led off with Order Three Left, getting some of his Mediums in motion. I Move-Fire-Moved, getting both wings moving, and forced a Light to retreat. Patch advanced the rest of his Mediums with Order Three Right, and I Ordered Three Right to force another Light to retreat with ranged combat. Patch forced off a LC with Order Two Left, and I did nothing with Order Four Left.

Patch Ordered Three Right to get his Mediums into contact, trading a block with an Aux. I Ordered One (Heavy) to do a hit and banner with my LC against his MC, which routed it off the field. Patch Ordered Three Right again to hit my Aux, which he destroyed, but not before it did three blocks to a Medium, and a block to a second one from a First Strike. Momentum got a block on Crixus’ Warriors, with another two going on a blocked retreat, though battle back finished off the Medium, and sent Gellius running back to an Aux.

Leadership Any Section saw my Warriors scatter, doing two blocks to a Medium, and trading three blocks for a lost Warrior in another combat (from combined hit and retreat losses). Patch Ordered Three Center, but only did a block of damage from making Warriors retreat. I Out Flanked, and finished off two Mediums, and traded three blocks to three on Momentum. Patch Ordered Two Center to finish two weak Warriors, and reduce another to a block.

I Ordered Two Center, but didn’t do more than force a Light to evade; Patch’s Order Three Center finished off a weak Warrior, and did a block to another, forcing it to flee to the baseline. Line Command ordered one unit who traded two blocks for one and retreated. Patch Double Timed his left in pursuit, but couldn’t do more than a block to me. I Counter Attacked to bring in a line of units and finished off a Medium. 6-5

I started the second game with Move-Fire-Move (with all of four light units to my name…), did one block to a Warrior and ended pretty well where I started. Patch Ordered Three Left and did one block to a Light at range. I Ordered Four Right to drive off a couple units and do a block to a Light. Patch Counter Attacked to wipe out two Mediums. I used Line Command to move up most of the Roman army, driving off Crixus and doing two blocks to a Warrior with a blocked retreat.

Patch Ordered Mediums to bring his entire set of Warriors slamming into my line, doing five blocks across two Auxes, who did one hit each to three units. Order Three Center drove off a weak Warrior, and lost me an Aux to a First Strike. Patch Ordered Three Center and knocked out a weak Aux and the HWM (I was desperate enough to not evade against three dice), and drove off a Medium with losses.

I Ordered Four Units Left and finally finished off a Warrior, and did a hit to an Aux. Patch Ordered Two Center to hit me on my own baseline, and finished off the Medium there. 1-6

Afterword

Both plays saw inconsistent, but fairly solid die luck for the (ex-)slaves. Patch did well in the late game to make a comeback that was a little too late, but got him within reach of a win. In the second game, I had just drawn a Mounted Charge, and hoped to use it next turn to drive in his flanks, but my center was gone, and I wasn’t going to get out of the situation easily.

The mountain really has a large effect on the scenario, largely because Warriors, who retreat 2 hexes, are stuck in front of it, which can make them evaporate fast, even if they get some distance. The Romans should be favored here, as they have the heavier army, a larger army, and don’t have the mountain, but dice were solidly on Crixus’ side. It makes for a nicely different scenario.

└ Tags: C&C Ancients, gaming
 Comment 

Waterloo 1815 (2)

by Rindis on May 16, 2024 at 12:00 pm
Posted In: Books

Dealing with the other battle on the 16th of June 1815, Osprey’s second Campaign book on Waterloo is more of a companion than a sequel.

Interestingly, while having to cover some of the same ground, the introductory sections are quite different from the first book, dealing more with Napoleon’s escape from Elba, retaking power in France, and the general military structure set up. We then get the Prussian maneuvers as the French cross the frontier, and a full description of the battle of Ligny.

Like with the first volume, we have six full-color maps, three isometric view maps, and three of Gary Embleton’s two page spread illustrations. (This is probably their standard art budget.) “The Battlefield Today” section has current photos of La Haie, part of the Ligne brook, and d’en Ligny.

I haven’t read any other books purely on Ligny, and I think this does go into slightly more detail than Hussey’s two-volume book on the campaign. The only other current book on Ligny (and Wavre) I know of is Grouchy’s Waterloo, which came out two years after this. I haven’t read that, but I can say that this book does a good job detailing much of the action, and the full-color presentation helps a lot.

└ Tags: books, history, reading, review
 Comment 

277 Victory is Life

by Rindis on May 12, 2024 at 12:00 pm
Posted In: ASL

After our latest SFB battle, Patch and I returned to ASL, and thinking to get some time with the Italians in, went to the fourth scenario in the Few Returned pack (since updated in Hollow Legions as #274-282 & 287-289).

As ever with Action Pack #3, the scenario has unusual twists. The Russians have an Italian force trapped in a town, and the Italians are attacking with a relieving force. In the town are the corps HQ staff (represented with Axis Minor leaders), who need rescuing. The Italians get MOL and ATMM. There’s one of each grade of leader from 10-3 to 6+1 (but are not considered actual leaders, just SMC with that morale, and CVP/EVP value), and the Russians win if they kill 10 or more CVP worth of them. Failing that, the side with the most CVP wins at the end of turn 8, and the Italians can earn EVP for the HQ staff.

Patch set up the Russians first, who get two strips on half of board 10, and an area on board 42 for their sixteen squads (with good leadership) and five T-34 M41s. In the south, there was just a pair of T-34s, while about five squads set up on the north side of town. Board 42 got the rest, with one T-34 sitting on top of the walled hill, which had a few squads, and the rest on the south side of the main road, with a one-squad outpost facing the incoming rescue force.

The Italians have seven elite squads in the town, and a pair of German StuH (I didn’t notice the designation, and pulled M43 105/25s instead). There is one building the HQ staff starts in, and one assault gun parked next to it to give the staff cover as they exited. The other, and much of the available force was facing the walled hill, looking to advance on the Russians. The rest is eleven squads of assault engineers with two DCs and two FT, who all set up to enter on the north side of the main road in three groups.

The first shot of the game came from an assault gun which hit to ELR Patch’s LMG squad in 42E2. The first move was a probing HS who broke after taking fire from the one western guard. The DC squad came up through the woods and broke on a 2MC SFF. An MMG squad broke to fire from J3. This all upset what little timetable I had, since I had hoped to be sweeping the guard out of the woods on the first turn. The plan to break out also failed when my concealed 9-1 and squad took a NMC and both broke.

Patch’s first DFPh shot killed the broken 9-1 with a 2MC, and a later shot revealed a bad error in my setup. I hadn’t really thought about the south T-34s while worrying about everything else, and one had a clear shot at the rear of the assault gun. Thankfully the first shot missed, but it going to be a long time before I could do anything about it…. The good news was that Patch malfunctioned two of his MAs. And then I malfunctioned one in AFPh. I did manage to break his ‘tripwire’ squad, now that it had slowed me down.


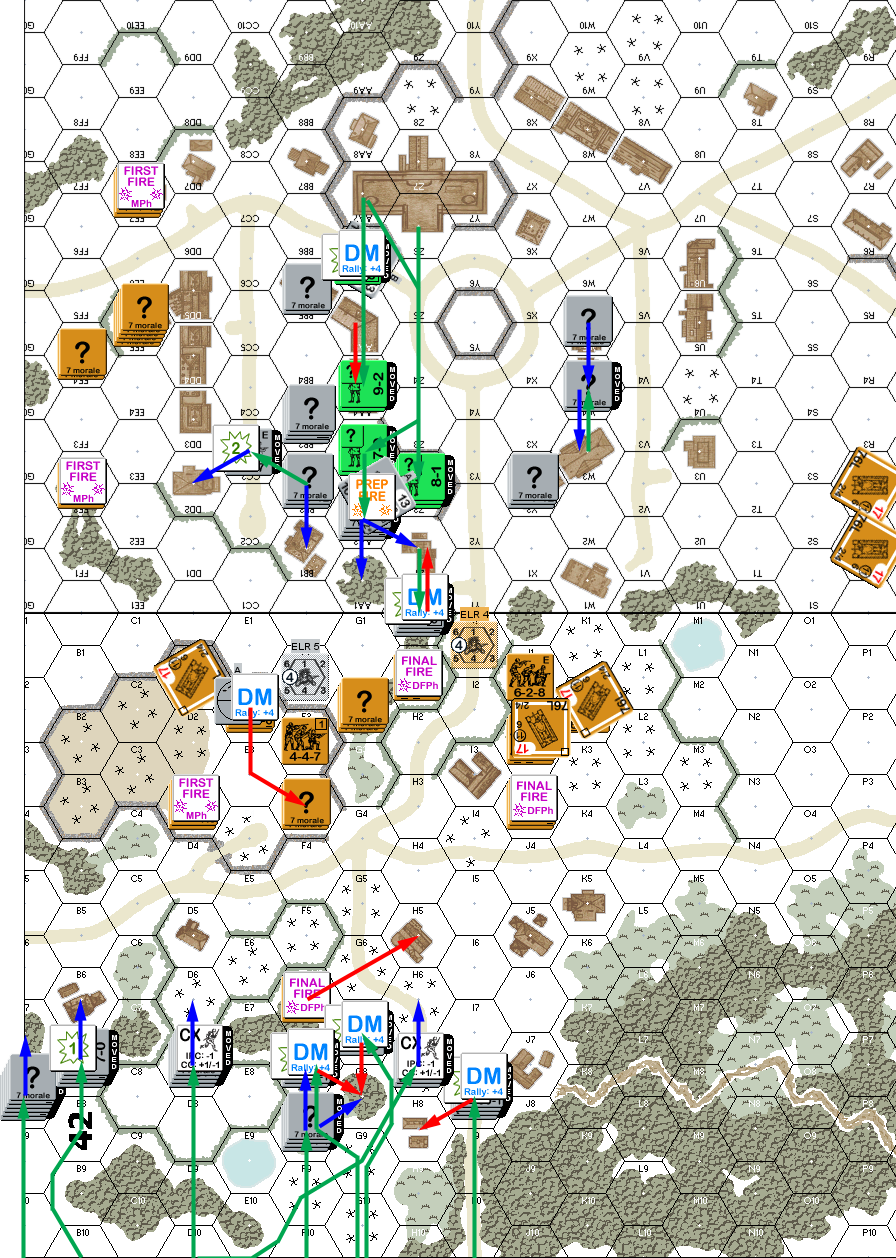
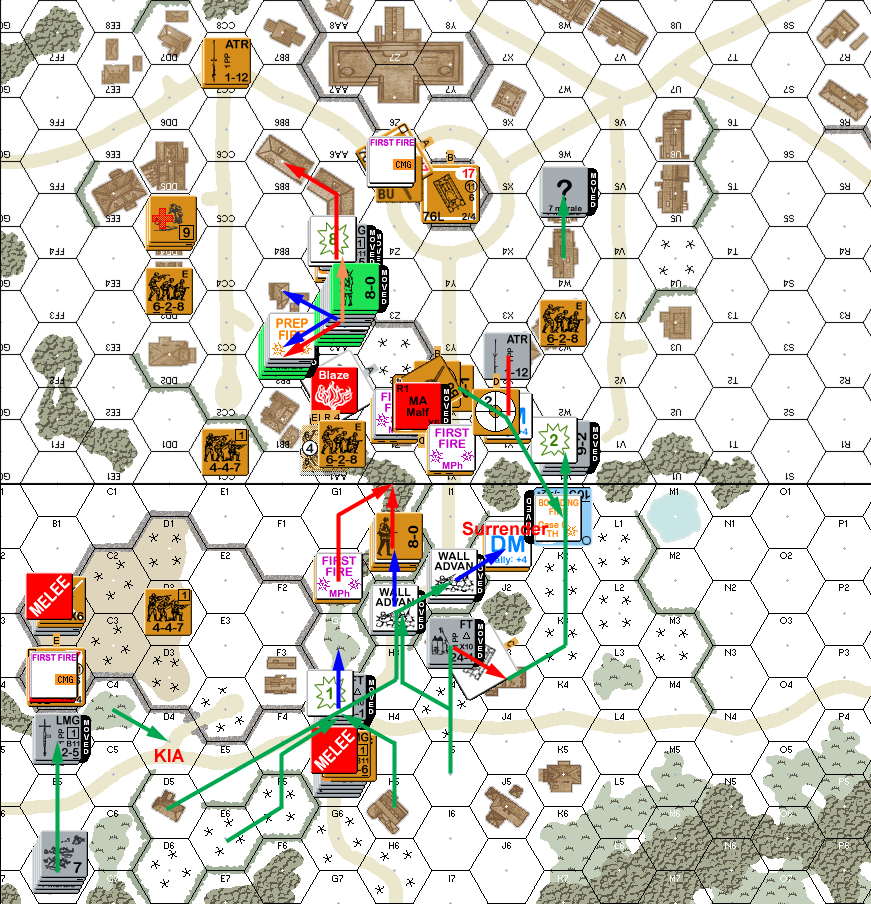
Situation, Italian Turn 1, showing the full board. North is to the left. Which HQ staff is which isn’t known until they need to take a TC/MC, or break. By SSR, they use cloaking counters; I tried just bare concealed counters here, but it didn’t work very well.

Patch’s only rally attempt was the tripwire, which failed self-rally. He also failed to repair anything. I had a lot more attempts, but only rallied one squad in 42H8. Patch brewed up my StuH (M43 105/25) in 10AA2 with his rear shot, though he did have to go to intensive fire to do it. Then MG fire broke my 8-1 in Z1, which revealed the staff 6+1 and pinned him for the LLTC. The malfed T-34 on the hill then broke AA1 with MG fire, and a squad broke my squad in DD2.

Patch immediately moved into 10AA0 in his first move. With everyone adjacent broken, and further units firing through the smoke of the burning StuH hindering the only other real shot, there wasn’t much I could do. Everyone crept closer, and the middle T-34 platoon started and swung around to face the approaching assault engineers (bypass and platoon movement is not a good mix, he burned 17 MP just to shift a couple of hexes).

My defensive fire did nothing, but Patch CRed a broken squad… at the cost of my sniper breaking one of his. I had to self-break the pinned 6+1 and the 8-1 HQ staff to get them away from a CC.


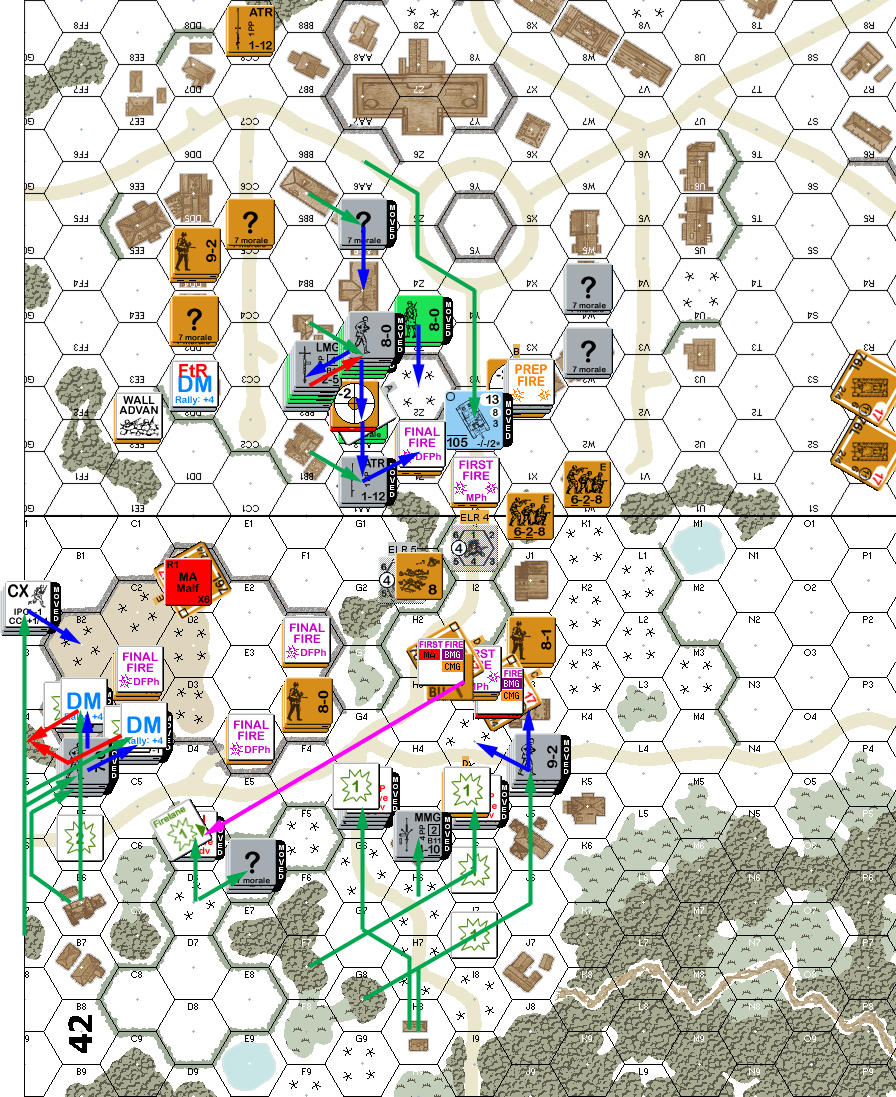
Situation, Russian Turn 1.

My various self rallies did nothing for my second RPh, but I did rally a squad and a half in 42G8, and repaired the MA in 10AA6. Patch didn’t manage anything. I took a couple shots in Prep, notably an ATR at the rear of 42I3, but missed. The main challenge was to come to grips with the forces now facing my rescuing forces, and thankfully Patch was still a bit thin there. The first move got a firelane from I6 and pinned my HS. My second move took me across the road and over the wall onto the hill, breaking from an adjacent 2MC.

On the south side, I got my 9-2 and DC squad in next to his positions, and followed up with a FT squad, who unfortunately pinned on Patch’s last shot at them (I was still happy they hadn’t broken and Patch would have to deal with them on his turn). On board 10, I mostly milled around, but the StuH (which Patch noticed was what it should be at this point) came around to the road out of town, and Patch pinned on a PAATC to street fight it. I brought a concealed squad up to AA1 to try and get him, which collected a lot of fire until a PTC finally revealed him.

Final Fire managed to break 10X2, but Patch malfed another MA. I revealed my FT in 42E6, but Patch passed the resulting 2MC. During RtPh, he rejected the surrender of 10DD2, while I got into a couple of close combats. I managed to ambush the pinned squad in 10Z1, and still did nothing while taking a CR. The 9-2 lead his squad against the T-34 bypassing 42J3 and managed to destroy it.


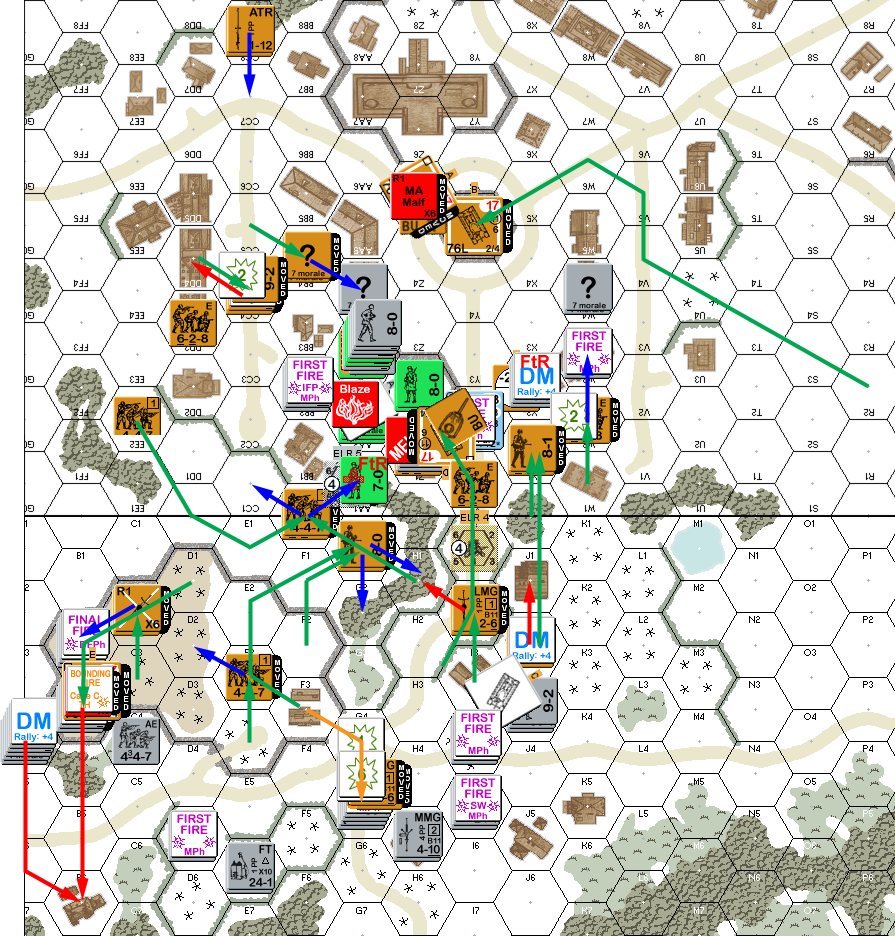
Situation, Italian Turn 2.

Patch tried to repair both MAs on his second RPh, but rolled 5 both times. 42H1 self-rallied, the conscripts in 42F3 went berserk, while the squad in J2 CRed. Of the big mess piling up in 10AA3 the staff 8-1 rallied, and a squad went berserk.

I took a couple shots at the zerkie as it charged 42G5, and reduced it to a HS. The hilltop T-34 started and proceeded to overrun Italians. The squad in B2 failed a MOL check, survived a 1MC, had no ATMM, and rolled a ‘3’ for CCRF. A 2 would have been an unlikely kill…. The squad in B1 had a MOL, missed a kill by one, and then broke to the OVR, while the tank stopped in the hex.

As Patch tightened his noose in the town, his 9-2 and squad moved into the street, where they suffered a K/2 with random selection selecting both to wound the leader and break the remaining HS. His sniper went off and wounded the 7-0 HQ staff (…he grabbed the wrong sniper counter, but since they were adjacent, it would have gone to the same place anyway). His remaining platoon circled around the back, with the good tank sitting in the board 10 walled roundabout, at which point my StuH went into Motion. The T-34 in 42I3 backed out of harm’s way, turned around, got into forward motion, and then went into bypass of the melee in 10Z1.

Final Fire broke the squad in 42I2 and the wounded 9-2, but set off his sniper, which reduced my SAN to a 3. Advancing fire broke the wounded staff 7-0 and pinned the squad in 42B2. I lost the 7-0 and a squad to Failure to Rout. Patch went into CC in 10W3 and AA4, but two 628s failed PAATCs, so his 8-1 went to confront the StuH alone.

On top of the hill, we both rolled 11s for no result, in 10AA4, his concealed squad ambushed my concealed HS and killed it. He also ambushed the HS in W3, finished off my HS in Z1, but was unable to affect the StuH. The one good CC for me, the berserker in 42G2 had no result, and went to melee, tying up a MMG squad and 8-1.


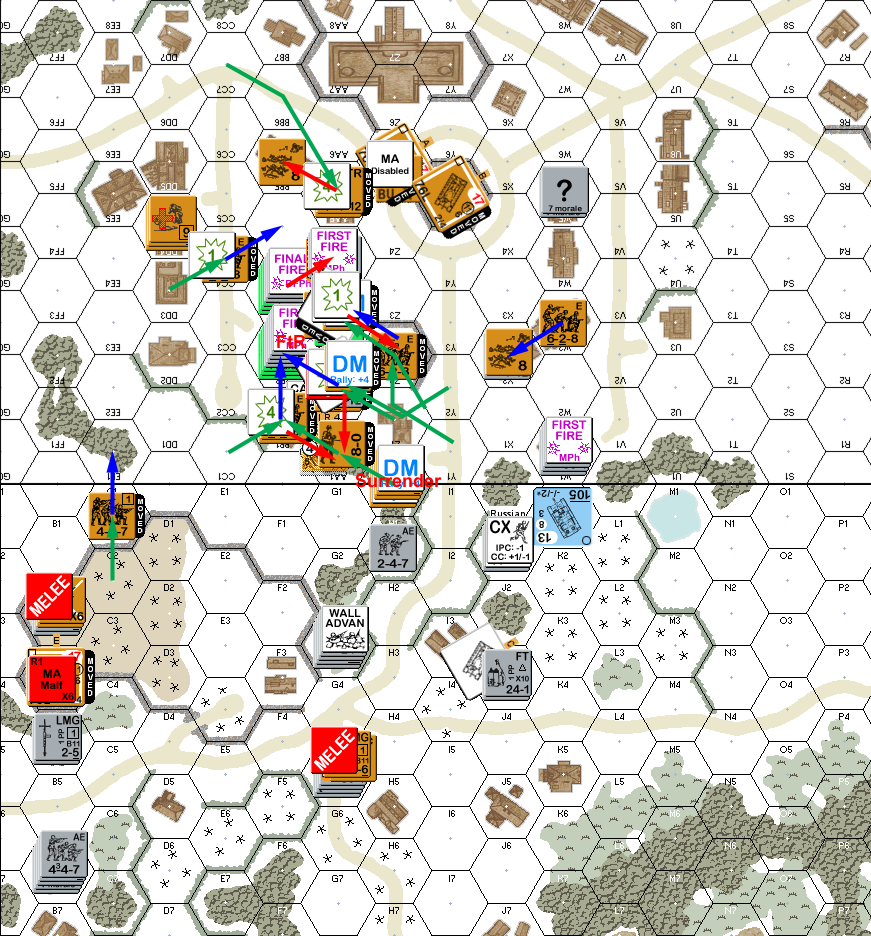
Situation, Russian Turn 2.

For my turn 3 RPh, I rallied a HS and the staff 6+1 in 10AA3, and also rallied a squad in 42B6. Patch didn’t rally anything, but put the T-34 in 10Z5 under recall when it disabled the main gun. I had one prep shot that did nothing. When my berserk squad prepared to charge Z1, Patch dropped “?” in AA4, immediately reorienting them, and they survived a 2MC on the way in. (Frankly, I think having to worry about them and the mass of squads off near the board join was worse than anything the berserkers could do there.)

My StuH ducked out of LOS of Y5 on its first move, but Patch got two shots from the Z1 bypass, and my (former) ATR there, all of which missed, though he malfunctioned another MA with the IF shot. The StuH overran X1, breaking the squad before continuing on and stopping to look back the way it came. I pressed with the relieving force, but Patch wasn’t biting, though he did get a 1KIA on a squad. Final Fire broke a FT squad.

Advancing fire from the berserk squad broke their target (a good thing, since it was 4-6…), and my remaining FT broke 42G2. In B2, Patch CRed my squad, while nothing happened in G5.


Situation, Italian Turn 3.

Patch did not rally anything for his turn 3 RPh, but I got both squads in 42B6 back. The T-34 bypassing 10Z1 started up, cruised through AA3 towards some VBM sleeze, but my HS in BB3 managed to knock it out with a MOL. (We had some debate on if the HQ “leaders” could use MOL, not being actual leaders per SSR, but the SSR actually answers this one by just giving Italian MMC MOL-capability.) The crew bailed out but then broke to SFF from the same HS. All three of his other tanks, made nervous by this, later failed their non-platoon TCs. (Not-quite-answered question: does a Recalled radioless AFV need to roll for non-platoon movement?)

Even with that threat gone, there were a lot of Russians milling about a small number of Italians, and Patch generally passed all the MCs I threw his way, except his 8-1 broke to residual, and his 447s broke to Final Fire. …Just leaving three different 628s adjacent to various stacks of Italians + HQ staff. My squad in 42B4 found a MOL to kill the hilltop T-34, leaving him with one fully-functional T-34, if it would pass its TC.

Patch got revenge during Advancing Fire, breaking and wounding the staff 8-1 and 6+1, and breaking the HS in the hex with them. Another shot pinned my 9-2 and reduced and disrupted the DC squad with him (that’s three 12s in one fire phase…). I lost my 8-1 to FtR, but another Russian squad surrendered to me.

There was no result from the 42B2 melee, but I finally eliminated the berserk HS in G5. In 10BB2, I kept the two HQ staff cloaked in hopes they could walk out of the melee, but Patch eliminated the 9-2 and 10-2 while doing nothing in return. In AA3, the remaining staff stayed cloaked, and Patch killed the 10-3 and 9-1, putting him at 13 CVP in HQ staff leaders, and giving him the game.


Situation, Russian Turn 3.

Afterword

Patch needed to get both CCs for a win at that point, and things were getting grim for him elsewhere. You’d think with a -2 differential, I’d get Ambush on him in at least one to just walk out of the hex, or failing that, he’d miss one of the attacks, but no. After a bad first turn, my dice had been fairly hot, and then it went south on me again at the end.

The opening mistake was going for an aggressive breakout stance, which helped put my head in the noose. I think that generally is a correct strategy, but not when the Russians are mostly set up to press on the town immediately. In that case, it would have been better to plan on keeping the HQ staff back, keep a perimeter at the far edge, and hope the cavalry makes it in time. Certainly, Patch was going to have to pay more attention than he wanted to with the anti-tank capabilities of assault engineers with MOL, DC, and FT.

Early on, Patch had racked up a pretty decent CVP count, with the death of the first 105/25—eh—StuH helping. The death of most of his tanks and the prisoners were turning things around fast. With the HQ staff, Patch was up to 30 CVP at the end, and, once you count the prisoners and the recalled T-34, I was at 29. If the game had gone on, the eventual CVP counts were going to be wild.

This game went extra-slow for us. Some of it was dealing with unfamiliar rules, like OVR and MOL. However, the main cause is that there’s a lot going on, and its a really tense situation. So far, every scenario from Few Returned has been good, and unique, and this is right there with the others.

└ Tags: AP3, ASL, gaming, Hollow Legions
1 Comment

Waterloo 1815 (1)

by Rindis on May 8, 2024 at 12:00 pm
Posted In: Books

The Battle of Waterloo is a much-discussed bit of military history for many reasons, so it was a logical choice for Ospery’s Campaign series. Really, the surprise is that it didn’t appear until book number 15.

It is much less surprising that it was eventually replaced a set of three Campaign books covering everything in more detail. I haven’t read the original, but the first volume of the new work was offered for free (in electronic formats) during 2020, and I’ve finally gotten to reading it.

As usual, we have a great visual presentation, with six full-color maps, three of their isometric-view maps, and three double-page illustrations by Gary Embleton, along with a host of paintings and engravings from the time. Embleton is one of their better current artists, and while I think a couple of the pieces are more on the passable side, the first is pretty good.

Since this is volume one of three, the real subject matter is the preliminary fight at Quatre Bras. The introduction gives a few words on the abdication of Napoleon, but mostly concerns itself with the formation of the United Netherlands, and then Wellington being installed as the local commander of the allied forces after Napoleon took control of France again. The usual introduction to the major figures and the armies on both sides ends with a 3 1/2 page order of battle down the battalion level – a handy source for those wanting to research such, but a bit much for anything else.

The narrative of the battle itself is well done, and I can tell it was informed by Robinson’s The Battle of Quatre Bras. While it’s not nearly so one-sided as that account, there is generally a lot more detail given on Anglo-Allied movements than French. Sadly, Hussey’s two volume work didn’t come out until about three years after this. However, there is at least some discussion of Allied plans to invade France, and Wellington’s assumption that Napoleon would seek to repeat his 1814 defense of France.

For a detailed treatment of the campaign, Waterloo: The Campaign of 1815 by John Hussey is definitely the place to go. This however still gives a good amount of detail for its size, is a good jumping off point for anyone truly wanting detail, and of course has a wealth of illustrations and maps all in full color. Especially nice are some photographs at the end with an aerial view of modern Quatre Bras, and photos of Petit Pierrepont and Gémioncourt, which are still extant.

└ Tags: books, history, Napoleon, Osprey, reading, review
 Comment 
  • Page 38 of 314
  • « First
  • «
  • 36
  • 37
  • 38
  • 39
  • 40
  • »
  • Last »

©2005-2026 Rindis.com | Powered by WordPress with ComicPress | Hosted on Rindis Hobby Den | Subscribe: RSS | Back to Top ↑