
J157 Rage Against the Machine
Patch was in town doing shopping this weekend, so he came over to my place and we played some ASL yesterday. We have both gotten Action Pack 6 recently, and wanted to give the new ‘sideways’ boards a spin, but the scenarios tended to be a bit bigger than we wanted. I found J157 “Rage Against the Machine” in Journal 10, which uses board 3a, and looked like it might fit our time budget, so we went with that.
It’s December ’44 in the Courland Pocket, with a strong Russian force of sixteen squads and eight AFVs (mostly ISUs, but with three T34/85s), attacking a mixed force of eleven squads (everything from 468 elites down to 436 conscripts) and a 75mm AT Gun. On turn three, the Germans get three 548 elites (really, that’s everything but the SS and 838s…), two JgPz IVs, and a late model Sturmgeschutz. Patch doesn’t have Journal 10 yet, so I sent him a Vassal set up of the game so he could get an idea of what he was in for. He remarked that he had some ideas on the German defense, which I’d like to hear, but I managed to poke something together in the time before he arrived.
The terrain is surprisingly dense, with lots of orchards (out of season), and brush (enhanced by the fact that grain=brush for this scenario) giving way to a village as you move from the start line to the victory condition areas on board 3a (a pair of buildings at the north end of town, one in the center of town, and a bridge in the south; the Russians must take two of the three in 6.5 turns). I mostly set up in a ‘shell’ defense, with plans to fall back as fast as I could while delaying him, with all my hidden assets back a ways. I tried to get cute with the AT Gun, placing at the far limit of my set up area pointed towards the center victory location, hoping he’d drive by it. I should have set it the other way around, a good amount of the southern approaches are visible from there. I also set one squad south of the river, hoping to harass any attempt to move up the southern flank, which was weaker.
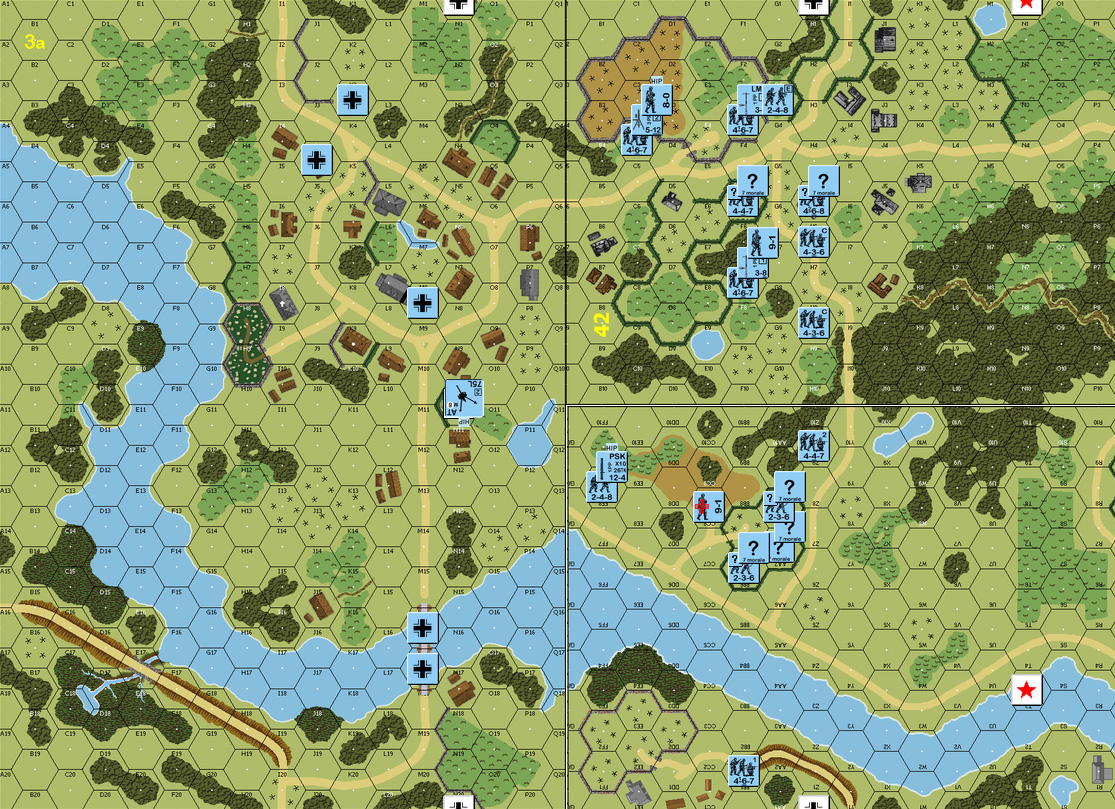
An approximation of my setup. Details of who exactly was where in the center are a little off. Russian infantry sets up on/east of N/T, armor enters turn 1.
Patch surprised me by setting up the majority of the infantry in the north, and the majority of the AFVs in the south. About his turn two, Patch was looking at the southern side and realizing that if he really wanted to, he could send a chunk of his armor along the riverbank and into my backfield, where it could cause routing problems and give me some hard decisions on the entry of my reinforcements. (This isn’t quite as easy as it looks, vehicle road rate is NA.) I was kind of hoping he’d try it. An SSR effectively allows each leader to have one automatic PF shot, so I’d probably get a shot with the leader who started in CC8, and certainly with the PSK HS. One semi-lucky roll and a burning tank might force a re-evaluation, and confuse his plans. But it was a little far for where the armor currently was, and he stayed cautious.
Patch didn’t have much infantry in the south, and neither did I, so he was pushing me around fairly hard there, and exposing the fact that I just did not have enough near the board 40/42 junction, and a hole was opening there. Patch caught up to the main defender in there and got into CC with him. I only had a 226 HS to his 527, so the HS refused to attack, staying concealed and lived. We hadn’t quite appreciated the consequences of this. I was just trying to delay him. However, since I was still concealed, there was no Melee, and I was able to hit him with TPBF in my turn, which broke him, while I advanced away.

Situation, German Turn 2.
Even better, a turn or two later, Patch caught a conscript squad in the center in CC. Patch muffed his roll, I rolled low, and the squad continued to keep the hole closed.
Patch played a nice mixture of cautious and aggressive throughout the day, which meant that while it was a slow grinding advance, it was grinding my force into powder. Particularly bad was when the 9-1 and HMG stack finally got some good targets and a couple of good rate-tears during turns 4 and 5. A couple of defensive plans were literally shot to death with those. I had been expecting to get a lot of breaks early on and end up running to the town as fast as I could, but things went fairly well until this point. The reinforcements came in just in time to shore up the northern part of the line, after Patch had finally cleared out walled hill-orchard on board 42, leaving me almost nothing in good order. He had also finally cleared out the south, largely by overrunning everything that was left, and the armor force was finally boiling out of board 40, and headed towards the town. (The PSK HS had missed their only shot at a T-34 by one… which shows why I was trying to hold out for an ISU.)
I planned to use one JgPz to hold the main approach to town (3aO6), the other to hold off the T-34 on the north flank (in 3aO4), and the StuG headed for P8, where Patch might get tempted to go by the AT Gun on his way to a flank shot on the StuG.
That would have worked better if Patch needed to worry about the front armor of a StuG IIIG in December ’44.
One burning StuG later and I was in a lot of trouble. The north flank had firmed up, but the survivors of the middle were down to a broken conscript HS, a conscript squad, and… a heroic 9-2 leader. Just when it looked like Patch’s HMG was going to blow away everything in it’s path, I got a HoB on my 9-1 to Battle Harden him an send him Heroic, and the extra modifier was proving troublesome for Patch.
He sent a ISU into the walled compound to face off with my JgPz, but didn’t realize that he was vulnerable to shots through the gate in 42E4 while he was a moving target. (I didn’t quite have that right at first either, I just remembered the LOS exception, and thought it would apply to HD/TEM; no, only as you move in/through.) The JgPz scored my first armor kill of the game.
The next turn, one of the southern T-34s roared into the village, where I revealed the AT Gun two hexes away, and turned it for a flank shot. Not liking the odds of the IF shot that would follow as soon as he spent another MP, he went into Bypass out of it’s LOS, and gave the PzJg that was it’s target a clear shot. It turned and kept rate, and then burned it on the second shot.
Things got very busy for the AT Gun after that, as it killed an ISU, and kept the Russian infantry from swarming over it, almost completely unsupported, for a turn. Patch finally nailed the middle JgPz a turn later (this time he really was HD, and I didn’t like the odds of a duel. I got smoke from the sN, but it wasn’t enough to prevent a hit). The north one managed to survive, despite the tide of Russians washing over it. He got into CC once, didn’t connect, and didn’t like the 16FP attack in return; he lived, but Patch hadn’t realized that Naga…tirers…waffe… whatever… came on things other than Tigers. Thanks to a misspent youth reading Squadron/Signal books, I knew all about it. ^_^
Patch had been getting more and more pessimistic at his chances as this went on, and with good reason. The end was approaching fast, and he was just barely in movement range of the various victory locations. I was looking at what I had left (three squads, the Heroic leader, and the PzJg), and knew that a couple bad rolls would do me in. Heck, average rolls should do it.
The squad that I had started across the river was now guarding the approaches to the bridge, and Patch managed to get into CC with him on turn 6 and eliminated him (and he had another couple MMC in the area). The Hero and squad were holed up in M8, with lots of Russians around, but the Russian HMG refused to have another magic turn. However, a ISU and a T-34 managed to get near K3, and start shelling it. During my turn 6 DFPh, the inevitable happened, and the ISU hit, with the resulting high-FP attack breaking 548 squad that was holed up in there. Patch had the units on hand to take both buildings, and the bridge, so that was the effective end of the game.
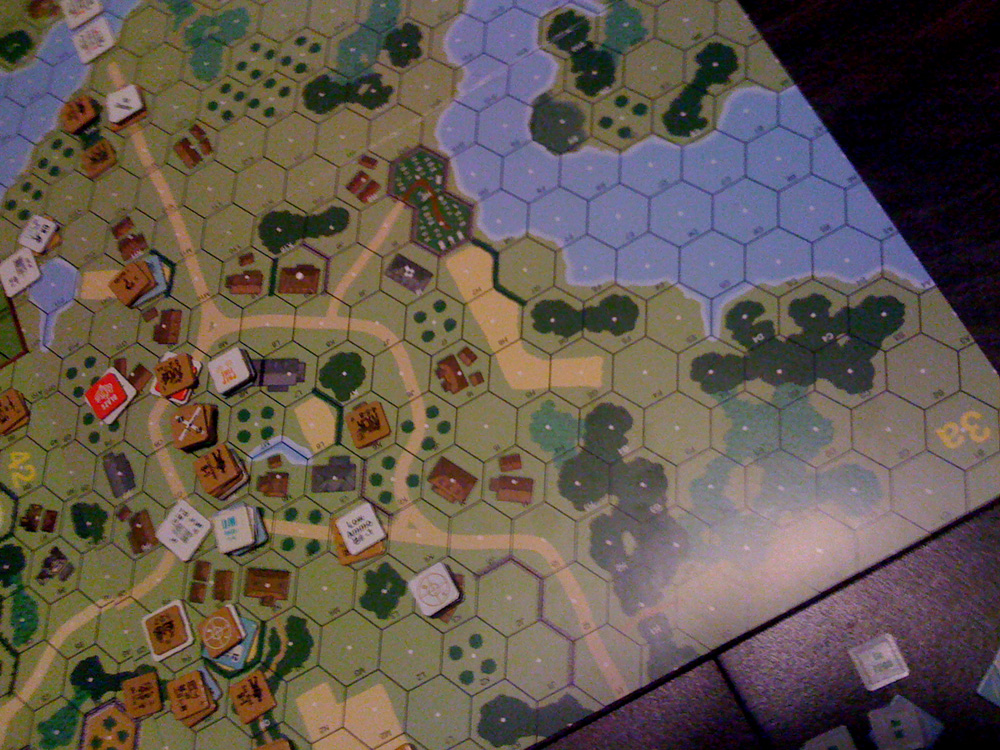
End of the game.
This year has seen a record thirteen games of ASL from me (plus three more that are ongoing right now), and this one has to rate as the most tense of any of them, and that’s a really high bar. I should mention that one of Patch’s T-34s went on a ROF tear that might have broken his record for a 1 ROF gun (six with a Tiger I as I recall; thankfully that was before he met me!) if he hadn’t run out of targets. My final defense was aided by the fact that my guns kept managing to keep ROF on their first shot. Three shots in a phase with IF can really make a difference. Two of Patch’s ISUs got recalled for running out of Ammo (one at the very end of the game), and another couple were under Low Ammo markers. LMGs malfunctioned a couple times, but the only Gun malfunction was on an ISU that then spent about four rally phases with no result before finally repairing it. I had a HS Low Crawl down the road for three turns before the Russians finally got to it and eliminated it for FtR.
In all, a great scenario, a great time, and a very fast 10 hours…. (Patch looked up at the end and said, ‘Quarter til nine? That clock can’t be right!’) I was more aware of the time, but kept forgetting to take pictures, and most of what I did take came out blurry. This one goes on the pile of ‘to play again’… right after I play everything else.
Discussion (3) ¬
Good AAR. Just finished this as a win for the Russians as well, but it went down to the last AFph
I saw the commentary on the Scenario Archive. Sounds like a great game!