
A37 Dreil Team
Continuing our tour of the Market-Garden scenarios, Patch and I started this one in October 2009…:
Just started the sixth scenario of the Market Garden series with Patch tonight, with me as the Brits.
It’s fairly interesting. The Brits have to exit 8 VP off the GG end of board 22 in 9 turns. The distance isn’t that great, and the British have a good amount of firepower, and are well equiped with multiple MMGs, LMGs, PIATs, and a mortar. But the stream on the board is flooded, except for the two edge hexes (which are merely deep), which limits the crossing options to four hexes, two of which are adjacent to each other.
The Germans only have six squads, two leaders and two LMGs. However, three of those squads are elite, and both leaders are 9-1s.
Oh, yeah, and they have a Panther.
Patch set up with the Pather guarding the NE (right) bridge and ford by himself, one leader, two squads and LMG on Level 2 of the one Multi-Story building in his setup area, and the rest near the other (closer) bridge.
I took a while to do my setup. I just wasn’t at all sure as to how I wanted to handle this.
The eventual plan was fairly conservative. Even with only two areas to cover, he doesn’t have enough for a great defense in depth. I figured to move out into the center area and engage the troops guarding the nearer bridge. I’d also send a unit across the W10 ford. It’s slow, but it makes sure I will get someone across. I planned on pushing a PIAT as far as I could towards the other bridge to keep him honest. That didn’t work out so well. DFF broke a LMG squad with the 8-1, and and Final Fire broke the PIAT squad in R1 (he retained rate).
Sadly, I only thought of it after I was moving, but it would have been interesting to run a squad from Y6 to the R7 bridge, and advance to Q8. Thanks to all the buildings and the range, it’s easier to do than it looks. They’d be in some trouble, but it would force some hard decisions from Patch.
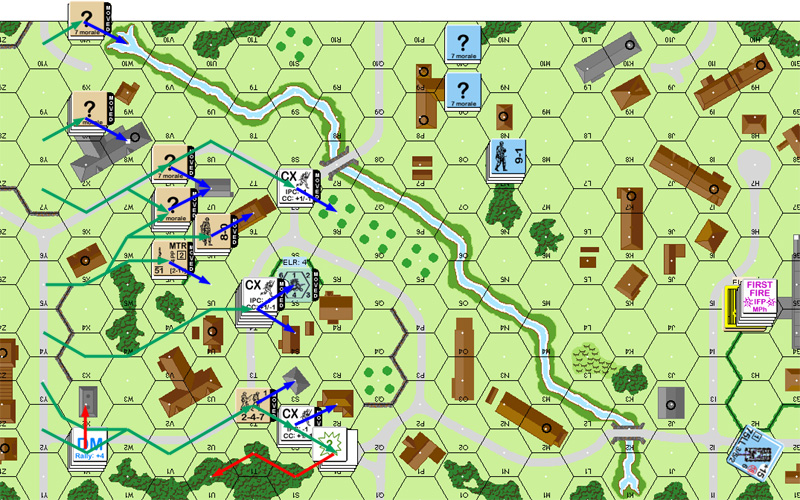
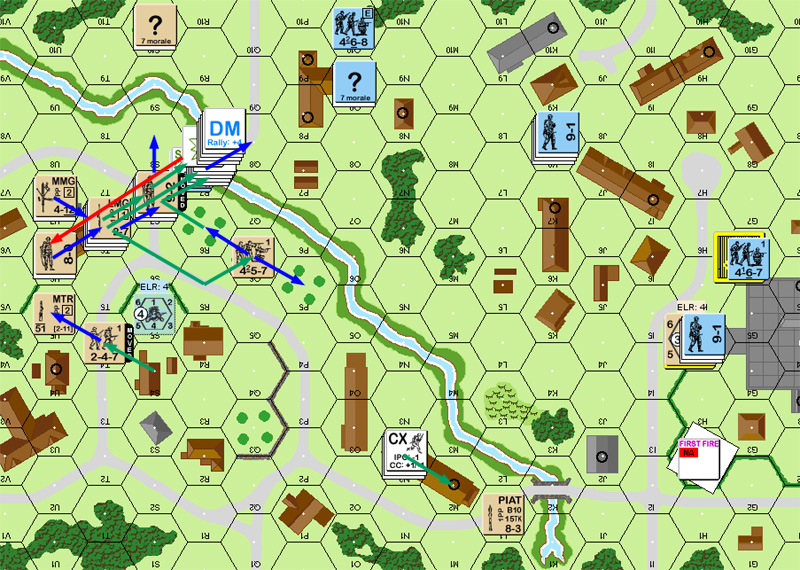
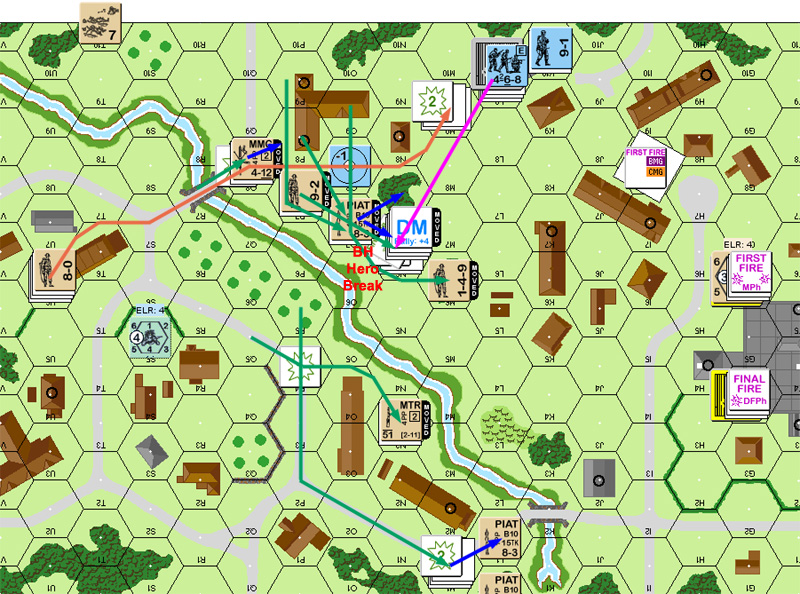
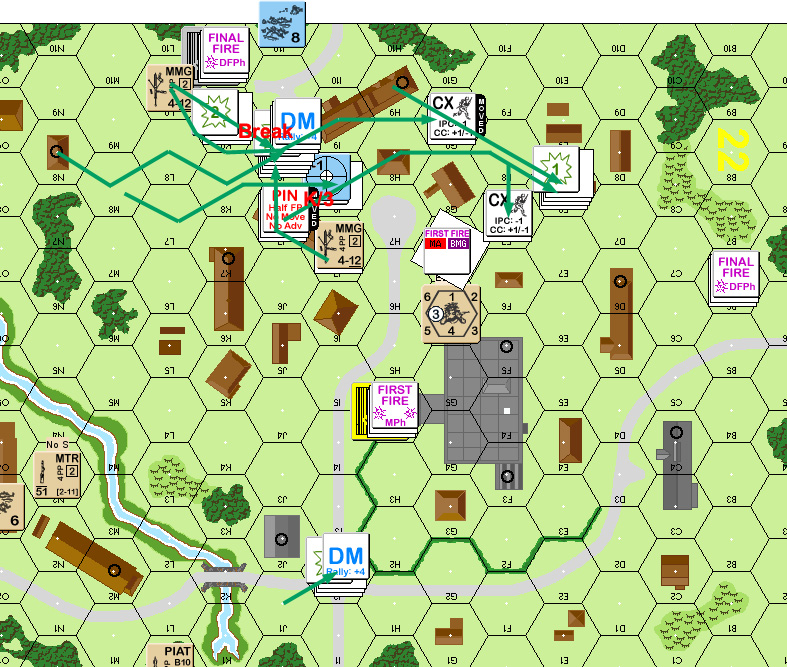
Situation, British Turn 1, end of MPh.
I rallied the LMG squad with the leader during rally. Since Patch couldn’t get at the other squad, that left me in a very good position for the next turn.
Patch preped the squads in N7 at my squad in the Orchard near the bridge and rolled poorly. The LMG fired twice at S5, but couldn’t get an effect. H4h2 fired at S5, with a -1 (no cover…) and got a 2MC. Thankfully, both squads passed.
For movement, he pulled in the O10 flank, and shifted the Panther one hex so it could cover the R7 bridge.
My MTR managed three shots (ROF 2…) but couldn’t get anything at 2FP, even with the -1 Air Burst TEM. However, R6 got a 1MC on them, breaking the leader and pinning both squads.
This left Patch with quite a problem, and had to think about it quite a while. He ended up routing the leader next door and leaving the squads in place. He’d been tempted to self-break them to get them away from the MTR, but the furthest available rout target was M6. If he was going to rout, he wanted to go further.
This leaves me with a decision. I had been planning on using the MTR to put Smoke on the bridge, since I assumed the ACQ would be useless anyway. Now I need to decide if I want to try to kill the two squads, not great odds, but the best that MTR is ever likely to see….
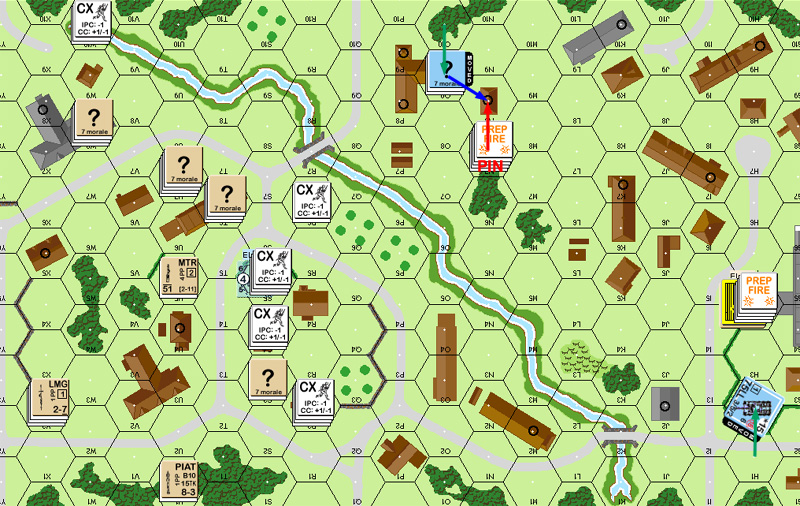
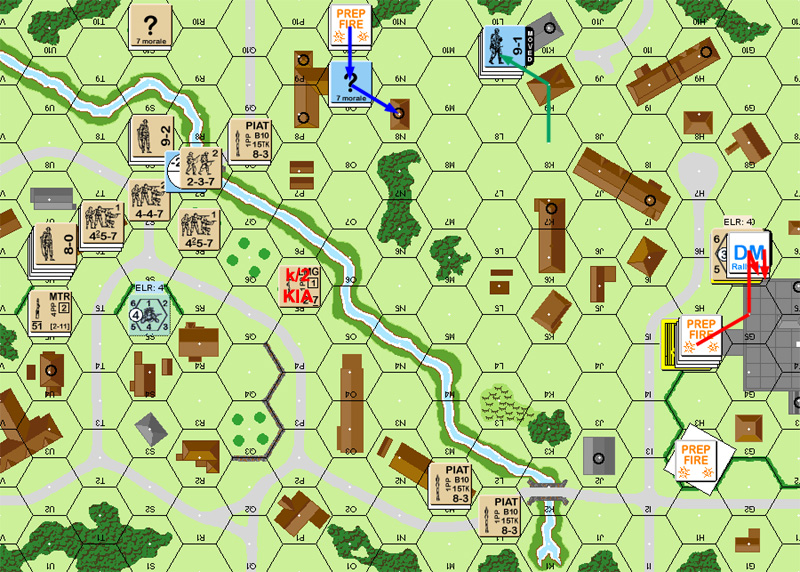
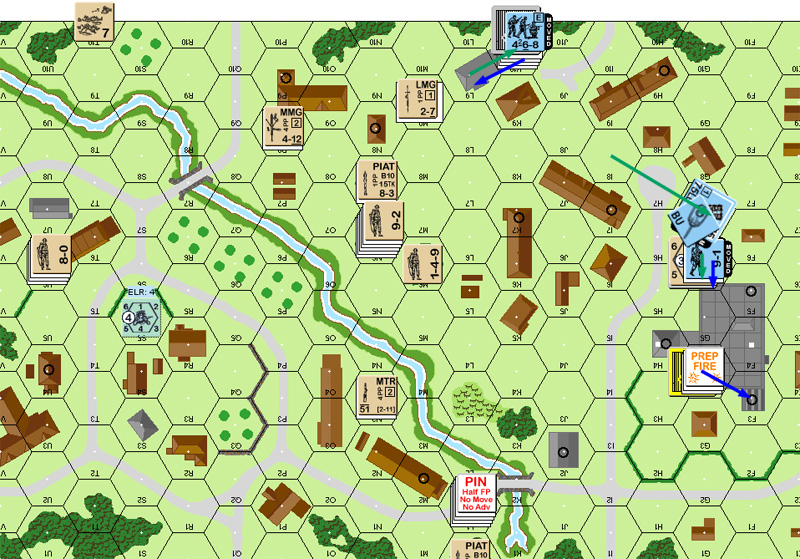
Situation, German Turn 1, end of MPh.
My turn 2 got off to a wonderful start with Patch’s 9-1 failing to rally… and my squad in U1 reducing to a HS with a ’12’ rally DR.
I decided to prep the MTR at N7. No hit, no rate, and if I had gone for the Smoke, none of that either. The MMG and 9-2 in W8 fired on H4h2, to no effect.
And that sort of set the tone for the turn. I was hoping to force the bridge with some luck, determination, and smoke. Never did get any smoke. Nor luck. After that, determination was a bit lacking.
First, R6 tried for it. Failing they AMed away, and a squad from U7 moved up, and broke/ELR before they had a chance (done by email, roll failed anyway). A second squad came up, survived the residual, but also failed smoke. I decided to put out a sacrificial HS on the bridge, but they broke (and ELRed) to the residual in S7. Then I moved a squad out of S3, which promptly broke from fire from H4h2.
In DFPh, Patch got a K/2 against Q6, which broke the remaining HS. The Panther switched targets and got a K/3 against the pinned HS in M1.
“Ah, the battle for the road to Arnhem continues in A37, Dreil Team. I am Germans once again (4th time out in the baby blues), and for a change this scenario is a little more even at 53-69 Pro-German in ROAR. I offered Rindis the balance, but he declined.”
Set-up
“Boy o boy. Long odds in infantry, but I do have the tank which (if I keep it BU this time) is likely to survive and inflict some damage. It’s essentially impenetrable frontally to Rindis’ PIATs, so I need to pay attention to those flank shots in this urban terrain.”
“Rindis is heavily set for a crossing at R7, but switching focus isn’t that hard and there’s an annoying platoon or two that looks determined to make a try for K1/K2.”
“Essentially three crossing points to cover with 6 squads and the kitty — W10, R7, and K1/K2. I’m looking at sneaky LOS between the buildings to try and interdict Rindis’ movement, as there’s no way I can duel in a stand up fight. The Panther goes in H1, covering the K1/K2 crossing and the approach road. The tank is enough for me there so I load more squads to the east. Two 467 squads, an LMG, and a precious 9-1 go upstairs in H4. I’m looking for long shots, which will be difficult due to the increasing blind hexes with range, but if you look closely there’s a lot of sneakiness to be found. I’m hoping Rindis will realize this too late. Rindis is leader-poor (3 for 14 squads), and I’m hoping to nail one and make things a little worse. To the east, I have four squads. I stack two 468s and an LMG with the remaining 9-1 in N7, and I plunk a 467 in O9 and the 468 in O10. Not the best placement, but I’m looking to remain off the front line on turn 1 so a MMG and 9-2 doesn’t nail me. This way I can get concealment on set-up and advance up front turn 1. N7 can cover Q8, providing some protection for a turn 1 rush.”
UK Turn 1
“Rindis moves cautiously, using a lot of bypass which is becoming his trademark. A long shot with the H4h2 LMG breaks a squad in X2, and I broke a second squad in R1 with ROF. Rindis shoves heavily for R7, but things are going slowly, with no rush apparent until turn 2 at the earliest. Two broken squads ain’t bad.”
German Turn 1
“Rindis rallies one squad (dang), and in Prep I see the opportunity to break another one. 8FP(-1) from N7 to R7 gets a NE result, and H4h2 gets around the back side of the hedge in S5 for a 2MC, also to NE. So not a good start.”
“In movement I move both O9 to O8, and the Panther to H2 to cover R7, as well as the K1/K2 crossing. True, I can’t see K2 from there, and the BMG is unusable, but I can hit the exit points and I expect a turn to redeploy if needed. Anyway, I need the extra firepower on the bridge and I expect the R7 area to get hot next turn. I area fire against the bridge with the Panther for the acquisition bonus.”
“Boy, was I right about that. Rindis gets his own sneaky shot with his mortar that I never saw against N7 and breaks the leader and pins both squads. This is trouble. I can’t stay, as the Mortar can nail me in Prep, yet I have no good rout path that can’t be hit next turn if I voluntarily break. No choice, so I keep them put but rout the leader to N8. I advance the concealed 468 into N8 to cover Q8, and with much hand-wringing, I keep the concealed 467 in place in O9. I could move him up front to P8, but there’s a MMG and 9-2 (I deduce) in W8, and another MMG in U7, making any up front position risky, and I’m at risk of losing two 468s in the N7 woods. I need to play conservative, and keep units intact. I may only have that 467 left at the end of the next turn.”
UK Turn 2
“My 9-1 fails to rally (no shock there), but Rindis loses a HS when he rolls a ’12’ on his U1 self rally attempt. Nice to see, but damn, half squads can be annoying.”
“Rindis leads with his mortar and rolls a ’10’, missing and losing his rate. BIG save for me there. W8 reveals a MMG and the 9-2 with a Prep against h4h2, but to no effect. On to movement.”
“Rindis makes the attempt to smoke the bridge for a crossing. R6 tries, fails, and creeps along the orchard instead to flank. U7 moves up, but is broken and ELRs before be can try. There’s 1FP residual in S7 now, but Rindis braves it and moves in another squad, but fails in his smoke attempt. A little desperate to stir things up, Rindis throws a HS at the crossing, but falls to the residual. A squad moves into S3, a tempting target, and H4h2 opens up, breaking him. To the west Rindis moves two squads towards K1. I pin a squad in M1 with H4h2, and the Panther switches targets from the bridge to M1 and gets a K/3 result, breaking the remaining HS. Rebuffed! The best Rindis can do in retaliation is get my 9-1 under DM again, and he retreats to L9.”
“I think a push for a turn 2 crossing was perhaps a turn early. 9 turns is a long time, and I think Rindis maybe should have moved into the orchards and gotten some fire in the P8 building backfield. That would leave a lot of FP against my defenders to hold against a turn 3 crossing, and the mortar would be available to place ordnance smoke for better coverage. As it is he can try for a turn 2 crossing, but he doesn’t have the FP up front to discourage my defense. Still, he does have 7 turns left to go. I have to be careful not to let units get flanked and cut off, or I’ll be trying to redeploy my front lines under fire, which would be fatal to me.”
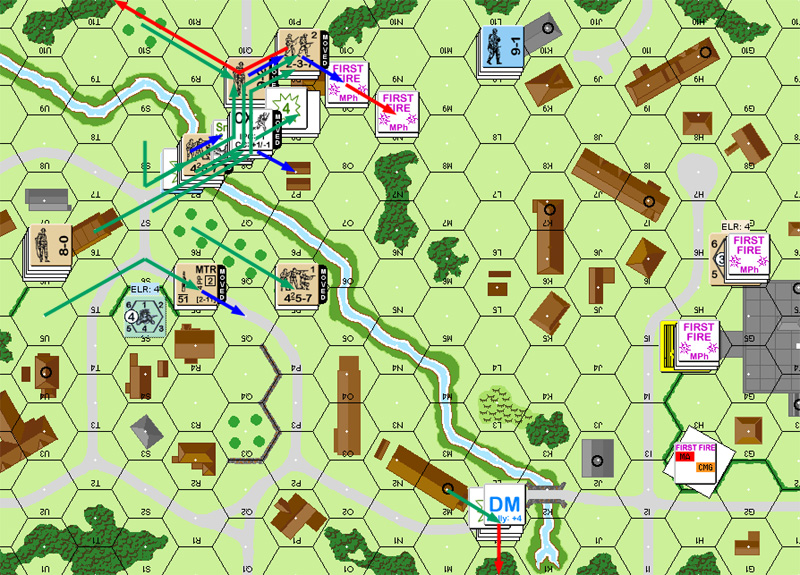
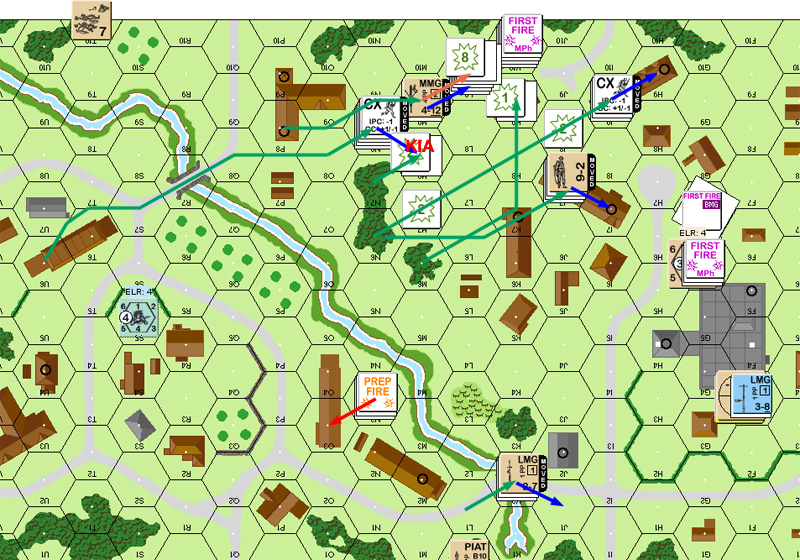
German turn 2 starts off fine enough, I rally two squads and Patch’s 9-1 refuses to rally. Of course, he’s now where I’ll never get him under DM again. The bad news is that two good rolls during prep reduces the squad on the bridge and breaks it, and breaks the MTR squad. My fire produces a 1MC on N7, which he passes, but it reminds him that it’s a tough place to rout out of.
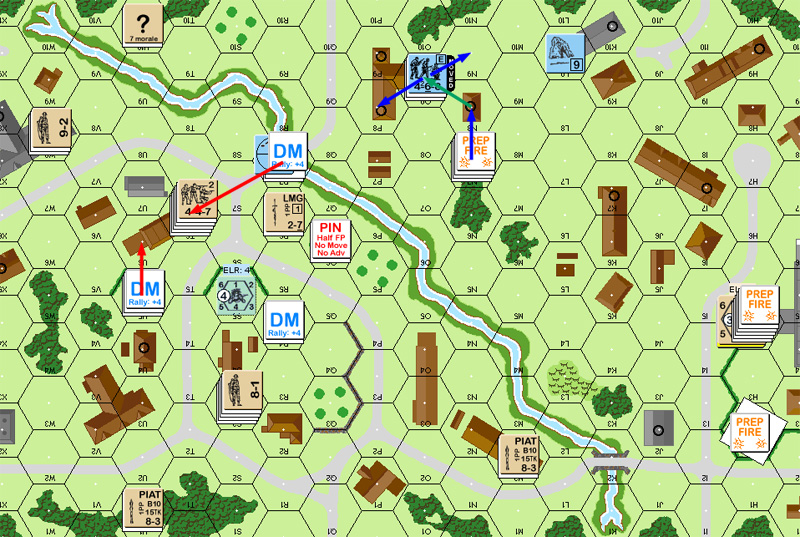
Situation, end of German Turn 2 MPh.
For my rally, I get the HS in U1 back, but that’s it. Patch naturally rallies his 9-1, who’ll be in a good position soon enough, no doubt. I’m seriously contemplating whether to try a race for the other bridge before he can redeploy his infantry and hope that I can get close enough to the Panther, but decide to keep mounting the pressure on the close bridge. After some consideration, I Opportunity Fire the two squads and MMG in T6, but leave everything else to maneuver.
Things immediately go wrong. I AM the squad in M2 into the street with the idea of crossing the other flank at K1. A 1KIA immediately disabuses me of that notion. R6 tries to smoke the bridge (again), and fails (again) on a ‘6’. I move in Q6, who does manage to get smoke finally. I then miscount in my head and my next move ends with a squad having to stop short of the bridge. The next group, escorted by a leader, makes it on. Deciding that the action was about to move up, I Dash the 9-2 and MMG across from W6 to U7.
In DFPh, Patch’s last shot finally gets a result on the bridge, breaking my leader, and the LLTC Pins the squad in place.
Situation, end of British Turn 3 MPh.
“This sucks. None of the text formatting buttons or smilies work.”
German Turn 2
“The 9-1 didn’t come back, but I didn’t expect him to (looking for that ‘5’ or less under DM). Rindis brings back two squads.”
“In Prep, the Panther re-aquires the bridge as he fails to hurt the occupying squad, but the big hit comes from H4h2. I roll snakes on a 4(+0) attack on R7, reducing the squad who also breaks, then the LMG takes a long shot against the mortar in U5 with a 1(+0) and rolls a ‘3’, which breaks the manning squad. Nice! The shot does activate RIndis’ sniper, who pin the LMG unit in H4h2.”
“With the removal of the mortar threat, I decide to hold tight in N7 and see what other damage I can do. Little risky, but I’ve tanked down two units, and I’m feeling a little cocky. Besides, what’s the point of ML 8 units if you don’t get dangerous with them? They both fire on R6 (8(+0)) but roll an ’11’, getting better luck with the LMG’s 2(+0) vs Q6, which pins the squad there.”
“In Movement, nothing left to do but skulk N8 to O9.”
“In Defensive Fire, Rindis combines Q6 and R6 against N7 for an 8(+1) which generates a 1MC. Both pass, but I’m really rethinking my decisions to stay up front now. I’d like to fall back, but I have to keep R7 covered. Turn 3 is too soon to let the bridge fall in British hands.”
“In Advance, I move N7 to N8 (which has LOS to Q8), the concealed squad in O9 moves up front to P8 (I expect to see him break, but what Prep Fires can’t move, and the concealment should help him withstand at least one attack), and I fall back the 468 to N9. I have no idea why. For some reason, it seemed like a good idea.”
“(Just noted an error in our game. When the broken HS in R7 routed, it should have dragged the acquisition along with it to T6. I’m used to the orchards blocking the LOS from H4h2, and apparently got to thinking it blocked the Panther’s LOS, too. This error will continue for the next few turns, and would have had a big impact on the crossing attempts on turns 3 and 4.)”
UK Turn 3
“Rindis brings back a HS in U1, which I know will cause me trouble. My 9-1 comes back, but without support will not have an impact this turn.”
“Rindis Opportunity Fires T6, hoping that by Advancing Fire P8 will be exposed. No one else fires, so this turn promised to be bloody.”
“The U1 HS with PIAT makes the run up to O2 unopposed, as I prefer to keep the remaining H4h2 available for the R7 fight. However, when Rindis makes a two prong attack, moving a squad into L1, I take a shot with a 6(-2) and nail it with a 1KIA. R6 then tries to smoke the bridge, failing on a ‘6’. Q6 then moves over and gives it a go, and is successful. Rindis CXs a squad from S3 and tries to make the crossing, but forgets he needs 7 MF to make the trip. This is followed by the 8-1 and squad still in S3. I try a shot from H4h2 against T5 with the remaining 467, but miss. I don’t fire P8, as the smoke will eliminate any residual, and a 4(+1) isn’t as nice as a 4(+0) in Final Fire. Rindis moves the 9-2 and MMG up with a dash, unattractive to P8 due to the smoke in R7, but no one else enters R7.”
“In Defensive Fire I miss with the Panther, but up the TAQ to -2. However, N8 fires on the bridge and breaks the 8-1, and the 457 Pins with the LLTC. I decide to keep concealment in P8 due to the Opp Fire opposite me.”
“Advancing Fire brings the anticipated Opportunity Fire from T6 against P8, but to no effect. Fire from U7 and R6 also fails to reveal P8.”
“In Rout, I elect to maintain concealment and don’t interdict the routing 8-1. It’s going to get harder to maintain/gain concealment, and it’s worth more than a low crawling 8-1.”
“In Advance the 9-2 moves up to T6, making covering the bridge much more difficult. Other units slowly move up.”
“Rindis is in better shape this turn, now that he has the FP to keep me off the front lines, but I think that he’ll still have issues trying to rush the bridge Turn 4. There’s a lot of sneaky LOS around N8 and O9, and I don’t want to get cut off by the Brits creeping through the orchards. But if I can hold him back one more turn, I think it will be huge. I plan to get off the immediate front, but still look for those oddball LOS which allow me to get the bridge covered yet avoid his Prep.”
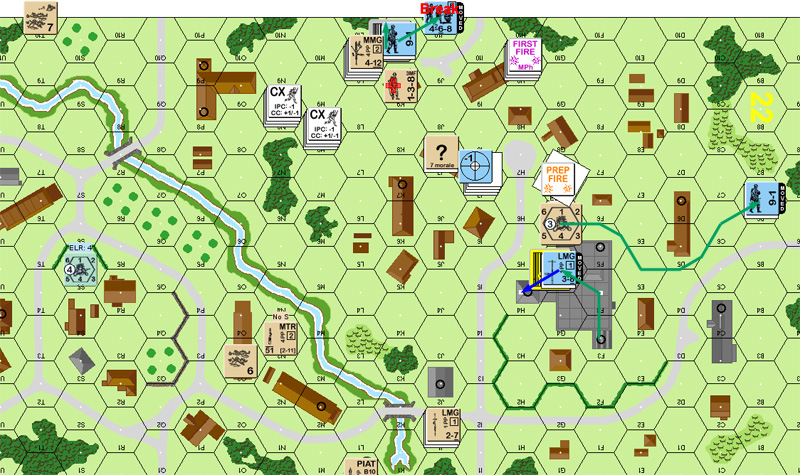
For German rally, the only activity was me. However, I got the 8-1 and both HS in T6 back.
The Panther shelled the bridge, breaking the squad on a critical hit. Other than that, he mostly skulked, and sent a squad around from H4h2 to G6h2. I was surprised at first when he pulled out of N8, but when he advanced into K8 it was clear: without anyone in W8, he was clear to put a nice Fire Lane through the Q8 bridge exit.

Situation, German turn 3, end of MPh.
In rally, I got the R4 HS back, as well as the freshly routed squad in T6. I’d lost a few people, but other than that was in fine shape. I was still contemplating a fast break to the other bridge, but with the two squads now back in K8, there really wasn’t any chance of beating him there, and not worth serious consideration.
My standard R6 smoke R7 opening worked and I moved onto the bridge. Naturally, the Panther hit and broke the squad. The good news was that with BU and bridge, the residual was a mere 2FP. The second squad moved in and attempted smoke and failed. I decided to try to draw the initial 2 -3 attack from K8 with a HS, but they broke on the bridge. This left me with a major problem. Moving any squads in would cause overstacking, which could get deadly fast. On top of the problem of the FL just waiting to be declared when I finally did get into Q8. I made one final stab by moving in another HS, which pinned on the bridge.
At this point I was extremely frustrated, had no workable plan, and was watching the scenario turn into the slog for the bridge crossing that I had been afraid of all along. Patch admitted he didn’t have any good thoughts on what I should do.
I finally came up with something: It meant that the bridge crossing had to be scrubbed for another turn, which I doubted I could really afford, but there was no other choice. I shifted the 8-1 and a LMG squad around to the south to put pressure on the area behind the bridge crossing, and moved the 9-2 and a MMG squad into S7, where there was no LOS, and then advanced into S8, countering his 9-1 and stack in K8. The other MMG advanced into T6, holding the center down.
Wish I could have done that a turn earlier. It’s a valuable lesson on controlling the approaches when crossing a bridge. Though I’ll admit I hadn’t really thought of K8 as a possibility.
There was some satisfaction to advancing a squad off the bridge into Q8.
Situation, British turn 4, end of MPh.
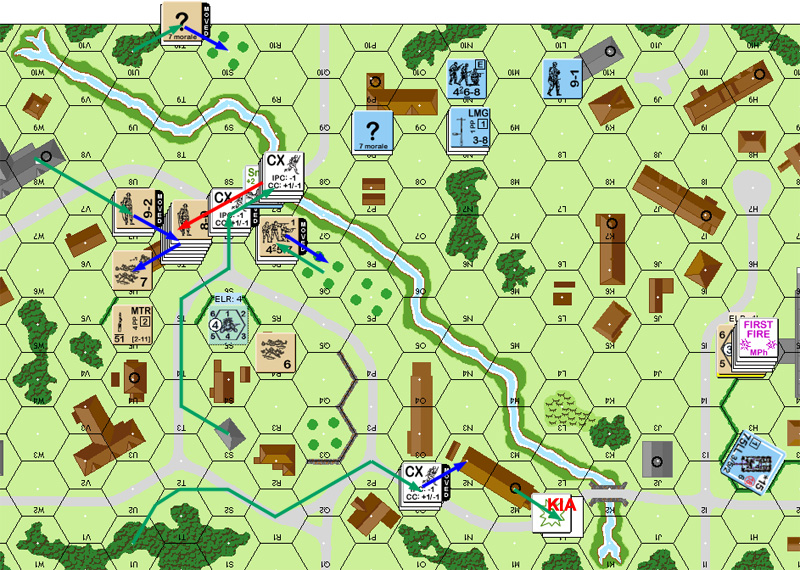
For rally, the only thing that happened was my HS recovered the light MTR. Prep was a disaster. On two shots he killed the squad and 8-1 in P5. (k/2 reduced the squad, and broke the remaining HS. 1KIA killed the leader and CRed the HS out of existence.) The good news was that my sniper activated and nailed the squad in G6h2.
In return, I did manage to break the 9-1 in H4h2, but only pinned the squad. Of course, the bad news was that allowed him to rout to join the squad the sniper broke. But it still put the modifier out of action for a turn.
Situation, German turn 4, end of MPh.
Sadly, for my turn, Patch got his guys back, but I didn’t. I started with the obvious but dangerous moves. The HS on the far flank advanced into L1, and broke on the shot from H4h2 (which got the real job done; thankfully they survived a sneaky LOS shot from G6 first). The squad across the bridge advanced into P8 and took the shot from adjacent O9 without trouble. I put the HS across into P9. I then surprised Patch by moving up the squad in S10 and smoking the Residual in Q8. He had forgotten the difference between Resid and FLs for ‘soft’ Hindrances (which is odd, since it came up just the week before). R6 tried to smoke the bridge yet again, but didn’t manage any this time.
The Panther naturally hit the bridge when I did go across, but got an ’11’ for the effects, so the main shot did nothing. Pity, one more and it would have been a Dud. Thanks to poor residual rolls, he Pinned a MMG squad on the bridge, but did no other damage during movement. He did manage to break a squad in P9 during DFPh. My return fire broke O9.
Situation, British turn 5, end of MPh.
GeorgeBates asked:
The good news was that with BU and bridge, the residual was a mere 2FP.
“Why should AFV BU status have any effect at all on the amount of RFP placed?”
“(he asked innocently)”
“Sadly, any positive DRM caused by conditions outside the hex will reduce the residual FP left behind, including for TH rolls. See A8.26.”
GeorgeBates:
“[SFX: busily consults the Book Of Armaments…]”
“…caused solely by conditions outside the hex (including CX, BU, Stun, leadership modifier …”
“Oh dear. How many years have I been playing this game? I can’t recall an opponent or me ever applying a column reduction for any of these, only TEM or a hindrance. Or have I been rolling dice in a coma? Ah, a whiskey-induced coma, that’s the ticket…”
“Please move along. Nothing to see here.”
It surprised me as well. I was just as happy with it though.
Of course, if Patch had just opened the hatches, he could have put a 4FP residual on the bridge. For some odd reason, he seems convinced that the Sniper will find him if he does….
“Hey, if I didn’t have the doors shut, I would have been nailed on Turn 2. If I had more than one tank, perhaps I’d go CE to cover that bridge. But the Panther is too damn critical, even at this late stage.”
German Turn 3
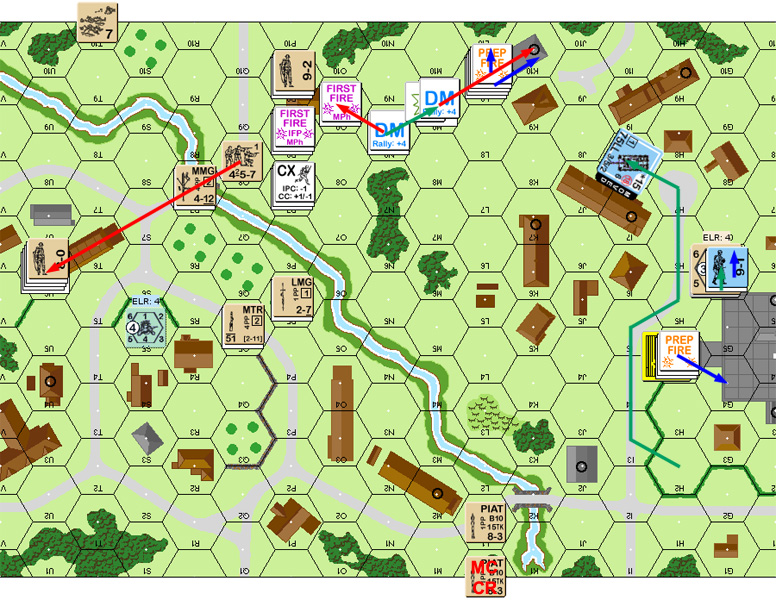
“In Rally, Rindis gets his 8-1 and a HS back. He has a fair amount of infantry left on the board (and all clustered around R7). Time to scoot.”
“In Prep I fire the 9-1, 467, and LMG in H4hs at N2 to no effect, but the Panther scores a CH in the R7 bridge. Gets a 4MC off of that, but the squad only breaks, and doesn’t ELR. Dang!”
“In movement, I move a squad to G5h2 (ultimately to G6h2). The goal here is to divide my forces so a lucky shot doesn’t wipe out the stack, and I think G6h2 has a long range shot against Q8, expanding my coverage of the bridge crossing. P8 falls back to O9, and N9 also moves to O9. N8 falls back to K9, where the stack joins with my 9-1. Rindis has no meaningful return fire this turn,and his broken 457 routs to T6.”
“I advance the 468 into O10 to cover the S10 squad, and I leave the concealed 467 in place in O9 to offer fire if he moves into P8. I don’t want to move into N8 as I think T6 can hit it, and the 9-2 and a sizable stack is tucked in there. K9 advances into K8. Blocked from any Prep Fire, I can hit Q8 with 8FP, a meaningful attack even with smoke in place, and as Rindis notes, I can lay a FL down the hex grain.”
UK Turn 4
“This is the first major push by Rindis against the bridge. His rally is good, and be brings back another HS and the freshly broken squad.”
“Rindis shoves several squads and HS against the bridge, but get stopped cold on the structure. With units stacking up, and no way to cross, Rindis bails from the assault and moves south along the orchard. This works heavily against me as the O9 building is key to holding the R7 bridge, and with Brits in my backfield I can’t withdraw without taking fire. Rindis also advances the 9-2 and MMG into S8 to end any attempt to get fire down on Q8. (There is G8, but things there are getting a little remote for my tastes.) Rindis also finally crosses the bridge when he advances into Q8, and manages to re-man the mortar in U5.”
German Turn 4
“Ok, the Brits are getting closer, but… I’m not quite ready to abandon the crossing. Rindis is strong, but a little fragmented, and if I can control his crossing one more turn, it will have a big impact on his ability to exit for the win. I think I’ll base my movement on how Prep goes.”
“I have plenty of time to move the Panther into the I8 area, so I fire at the bridge (to no effect), but H4h2 fires on P5 with a 6(-1) and gets a k/2 result, reducing the squad and breaking both the leader and HS. This activated Rindis’ sniper, which breaks G6h2. The LMG ROF shot against P5 gets snakes and kills the 8-1 and HS with a 1KIA. My backfield is clear! I fire O10 against S10, to no effect.”
“In movement, K8 hightails it out of LOS of the 9-2 to L9, which is about all I can do. Defensive Fire is minimal, but the 9-2 and MMG manages to break my 9-1 in H4h2. Both the 9-1 and 467 rout to the ground floor of G6, and I advance O9 to N8 (to cover Q8), and O10 advances to O9. I needed G6h2 in action for turn 5. Rindis is definitely getting across in Turn 5, the question is how organized.”
“I’m not happy about L9 being out of play for the crossing, but there’s little I can do about that. I expect to lose one of the squads in the O9 area next turn. The alternative to that, though, is Rindis getting into the O9 building in force. The N8/O9 units will force him to remain a little cautious, and will force a fight for the building. The loss of a squad is worth a turn’s delay to his forces at this point.”
UK Turn 5
“In rally I get both my 9-1 and 467 back, and Rindis fails to rally anyone. Woo-hoo!”
“Rindis passes on all Prep Fire. Rindis assault moves Q8 into P8, and O9 fires to no effect other than to lay down 4 residual. M2 assault moves into L1, where he survives a sneaky shot from G6 (check it – it’s clear!), but breaks from H4h2. I’m not that concerned about wasting H4h2 on this unit, as his LOS to much of the crossing is blocked (and I’ve lost a lot of FP and a leader to make the bridge a truly attractive target), and I do need to secure this flank. But let’s talk about this little crossing point for a moment.”
“Back on turn 3, Rindis launched his first assault on R7. Most everyone in the vicinity of R7 moved, then M2 moved. This was a mistake, IMHO. The best thing going for the M2 squad. If he moves first, it force my hand with H4h2, drawing fire from the bridge crossing. If he survives this fire and continues, I have to make some hard decisions about firing the Panther. Firing the CMG against other than an acquired target will force loss of the acquisition on the bridge, and be one less unit I can fire against the crossing units. Rindis also made the same mistake on Turn 4, when the HS in N2 did nothing to draw fire from H4h2 or the Panther, simply moving to M2. I think an opportunity was lost here.”
“Anyway, back to the assault.”
“Rindis gets smoke placed in Q8, and with some poor DRs gets most of his infantry across the bridge, and gets it across intact. Still, with just 5 turns left to play, I’m thinking he needed to be a little more aggressive in moving units into the O9 building. The 9-2 and a 457 had the ability to enter P8, which would permit greater Advancing Fire FP, and improve CC odds should O9 survive. The 4(+1) residual I think was worth the risk given the time remaining. The mortar moves up to R5 (then Q5) to get smoke on the G4 building, and a squad moves to P5 to interdict P8’s exit points.”
“In Final Fire I break a squad in P9, and in return fire he breaks O9, who retreats to N8, one of several very unattractive destinations. Rindis advances a HS to O9, the 9-2 and the concealed S10 squad to P9, and gets other units into P7 and P8.”
Patch’s rally phase generated Gusts. I’m so glad that wasn’t my turn. Patch tried to self-rally the broken squad in N8 and got nowhere (no surprise). My squad in U6… went berserk. Not exactly what I was hoping for, though he’d certainly cover some ground. P5 recovered the LMG left behind by Patch’s lucky shot last time.
A ‘2’ from the H4h2 squad killed the broken HS in L0. Two PIATs in the area, and no one to pick them up. G6 started climbing the stairwell back to it’s commanding view over the battlefield, and the Panther moved west to cover the cluster of buildings I was headed for. The intact squad in N8 tried to move out, but broke as it crossed open ground.
He managed to break the squad in Q8 with fire from the Panther. N8, unable to rout without going into Open Ground (thanks to P5), surrendered. I don’t get EVPs for prisoners, and I don’t really want to be carting them around, but it beats forcing other squads to rout away instead of surrendering later.
Somewhat surprisingly, he shifted H4 south, to get away from my MTR ACQ, and keeping a run south difficult, while cutting his reserves to the north.
Situation, German Turn 5, end of MPh.
Turn 6 got off to a poor start when everything refused to rally. Thankfully, that included the German squad in K10, so I didn’t have to worry about sneaky LOS from there.
The Berserk charge was interesting, and the most complicated one I’ve ever had to deal with. He had two potential targets, G6 and G4. It looked like the shortest route was across the north bridge, but with the loose clusters of buildings, it was all straight-line movement with lots of bypass. In fact the north bridge was slower thanks to the walls and hedges on the way. So, I targeted G6 and headed over the south/west bridge. Upon exiting the bridge in Q8, he spotted the Panther and switched targets. While Bypassing between N7/N8 he spotted the squads in L9 and switched targets again. I had seen this coming, and purposefully chose to Bypass in N8 so he could end up in M9.
Patch only took a couple shots at him, since he couldn’t get to CC range, but they survived, and were now able to block Subsequent Fire from L9. …As soon as they First Fired. My first voluntary move was to move up a MMG squad, who promptly broke in N6 as Patch put down a LMG firelane. I tried moving the HS and prisoners behind this, but the residual caused first a Battle Harden and Hero, and then broke them (FL and regular residual). The Hero continued on to M6 alone.
A squad and a half broken in N6 reduced my options quite a bit. I don’t have the men to be leaving a bunch of extra trailing bits behind. There’s no place good for them to go. I’d have to have the 9-2 sit on them and hope for the best. I did move the squad on the far side of the stream around to the north bridge, drawing a couple shots and making it easier for the MTR crew to move into position in N3, where the little 51mm could actually reach targets. I attempted to help get the MMG on the bridge across in the face of resid by smoking with P8, but no luck. He had to advance in, and an ’11’ ensured his safety.
Situation, British Turn 6, end of MPh.
I get lucky for the German RPh. Despite the fact that I couldn’t put his broken squad under DM in my turn, he refuses to rally anyway. Also, the squad and a half in U6 finally rally. Would have been handier the previous turn. The 9-2 shows his worth by rallying the DM squad in N6, though not the HS guarding the prisoners. L1 recovers a PIAT, hoping that it isn’t cursed, PIAT squads just haven’t been doing well….
Prep is confined to G4h2, who pins the squad in L1. G6h2 heads downstairs, the Panther pulls back, with the front armor facing my advance, and the turret facing the north bridge, and everything else skulks. In advance, I’m a little surprised when G4 goes into F3 to get away from the MTR fire, and G6 goes down to the ground floor. He also pulls the squad on Level 1 of K10 to the ground, and puts a LMG-armed squad into L9.
Situation, German Turn 6, end of MPh.
For my rally, I get my HS back, but miss the 1st MMC roll for T10. Would have been really handy. Still unable to fire at K10, Patch gets his squad back.
With the squad and LMG guarding the east side route quite effectively with a potential 6 -2 shot, the MTR tries to Smoke the position, but has no ammo. The ‘zerkies charge into L9 and pass the resulting NMC with ease. I’ve got some dangerous gaps to go through, but half of his fire is potentially restricted thanks to the adjacent berserk squad. I just have to tease out the initial fire without taking it on the chin….
A mad dash with the guards does the trick, the HS making it untouched, but the prisoners are reduced (good, that’s a HS that’s never being rearmed). And immediately thereafter, I loose a squad to KIA when he fires through a gap from G6 to M8 I didn’t see. I really can’t afford goofs like that…. I eventually set up shop in J7 while moving up the other MMG squad to help with CC (and hopefully provide a dangerous amount of FP at point blank afterwards), and the 8-0 and company moves into position to recover another PIAT.
Patch’s defensive fire nearly malfs the MA on the Panther, and he decides against chancing an IF shot. He does break the MTR HS. That’s probably the last we’ll hear from the MTR. And he wounds the Hero. My advancing fire Pins the defenders in L9, which was quite a relief.
CC is excellent. I kill the defending squad at no loss to myself. He’s down to four squads and a Panther, but they’re all in excellent position. I have two turns to go. I have 17 EVP in unbroken squads left (need 8), but getting them to the board edge is going to be a problem….
Situation, British Turn 7, end of MPh.
German Turn 5
“In self rally I failed to get N8 back. No surprise, but unless I can break O9 I’ll lose him. Rindis rallies in U6, gets HoB, and goes… Berserk? What? Cripes, get the kettle on. We’re about to have company.”
“I, foolishly, get too attached to the idea of rescuing the broken squad in N8, and L9 Prep Fires instead of moving, but gets no effect. H4h2 fires on L0 and scores a ‘2’, killing the HS there. Nice! The K2 bridge is secure for the short term.”
“With the R7 bridge no longer a choke point, in Movement I shuffle the Panther over to I8. Now I have fire on the open fields behind O9, and also a LOS to Q8. G6 skulks, and I try moving the 467 in N8 to M9, but get nailed and break. Bad news there — 33% of my infantry is out of action. In Exchange the Panther breaks the 457 in Q8 in Advancing Fire. N8 surrenders to the HS in O9, and M9 routs to K10.”
“In Advance I send the 9-1 to K10, and split L9 between floors to play safe against a lucky shot from the 9-2. H4h2 moves to G4h2. The plan there was to reduce my exposure from the masses to the west, while keeping FP available to interdict the K2 bridge, as I figure P5 and Q5 are headed this way. On reflection, this was a bad move. I should have stayed in H4.”
UK Turn 6
“No one rallies! That’s good, and bad. I”m not sure if I will be able to keep K10 free of DM.”
“Rindis skipped Prep, and chaaaaarge! I had thought the berserk squad would head to K2, but it turns out the R7 bridge is the shortest route. Rindis switched targets several times, but he wasn’t able to enter a target hex this charge, ending in M9. I fired at Q8 (dropping 4 residual in Q8 for when the MMG sqaud in R7 moved), and I gave it a try from G6h2, but to no avail. Rindis then moved up a MMG squad to N6, but broke under fire from L9h0 with also dropped a FL from M9-M8-N7-N6. I wasn’t expecting much from 1FP in the woods, but I did Battle Harden a following HS, who then broke under the 2FP residual from the squad FP. Rindis is rolling far too many 2’s.”
“R5 makes a charge for the K2 bridge, surviving fire from G4h2. I dumped residual in P4 which I hoped would slow the Mtr unit down, but he sailed through to N3, where he can hit G4 and G6 with smoke next turn. Rindis also moved his 9-2 and a squad to N6, surviving the residual and firelane. With 6’s needed to rally the broken units there, I expect them back quickly. The good news is no one can see K10, so they will likely rally next turn.”
“My plan next turn is to move back, and try to get to building I9. K10 will dash across, and I think L9 will skulk, or try to shuffle to I9 depending on how the 9-1 fares.”
German Turn 6
“K10 fails to rally. That’s bad. Rindis rallies U6, and also a squad in N6. That’s worse. I finally took a look at N6’s LOS, and I’m not happy about where I am. The 9-2 can hit I9 with a 12 flat, and I really can’t afford more broken units. I probably should have pulled out and taken the chance, but instead I skulk to K10. I figure when I move back to L9, the ground floor unit will take the ‘zerkie, and the upper floor will be free to interdict the field.”
“I Prep G4h2 against L1, but only Pins the squad. I debated firing on the Mtr unit in N3, but the squad is 2VP vs 1 for the HS, and I’m willing to risk the smoke as I plan on bailing from G6. I pull the Panther back from I8, as I expect a push through the K6 buildings and don’t want to get flanked. G6 drops downstairs to support the tank, and Rindis is largely left without targets. In Advance I move K10 downstairs to join the 9-1, move a 468 forward to absorb the berserk charge, and fall back to F3h2. Again, I should have moved back to H4h2, and K10 should have gone to L9h1, as there’s no one to cover the field. I try and revolt with my prisoners in N6, but fail the NTC.”
UK Turn 7
“Rindis fails to self rally T10, effectively putting him out of the game as he can’t exit. Rindis rallies the HS in N6, and I rally in K10.”
“No Smoke from N3, and on to Movement. Rindis moves into L9, surviving my fire. Everyone moves up, and I get some fire out, but aside from a nice LOS from G6 to M8, which gets a 1KIA against a squad, Rindis does pretty well. He also manages to move a MMG squad up to M9, where it can advance into the upcoming CC, improving the odds in his favor. In Final Fire I break the Mtr HS and wound the Hero in K9, but there’s nothing I can do to swing the balance in L9. At 2:1 odds, the German squad quickly dies.”
“Boy, I’m not in a good spot. I’m still favored to win, but Rindis has really switched things around these last two turns. I’m getting flanked by a HS in H9, and the 9-2 is on the front lines leading a MMG. But really, Rindis has to exit about half his remaining force, and has to run through OG to do it. Placing smoke, entering buildings, will all keep him from winning. It’s going to be a matter of how low can I roll. I figure he’ll have to push along the western board edge, with the single squad in J1 adding to my trouble.”
German Turn 7 rally was almost non-existent. The formerly-berserk squad picked up the LMG kindly left behind by the Germans, and the squad in M8 picked up the PIAT that had been dropped there last turn.
The Panther shot at I7 and hit, breaking the MMG squad there. That was a problem. I’d been hoping to close down some of his movement, instead I had fewer options. Given that I needed everyone I could get for the exit push, it might have been wiser to stay hidden in J7, but I had hoped the 9-2 would keep things together, and I’d have shot at keeping Patch from interfering as much on my turn.
Patch moved away from (or at least away from LOS of) L9, transferred the remaining high-level squad in F3 to cover the west side by going to G5 and put the squad and leader into B6, right near where I was going to have to exit. I tried a sneaky LOS shot at him, but it was blocked. The only positive thing I did all turn was a lucky shot from J7 broke a squad J10. It wasn’t the most dangerous unit he had, but anything I could do to cut down on the volume of incoming fire was worth it.
His only advance movement was to move the high-level squad/LMG to H4h2 where he could cover the north and south sides.
Situation, German Turn 7, end of MPh.
My turn 8 saw a ‘2’ for Wind Change that did nothing, and no rally. This posed real problems. I had two turns left and a possible 15 EVP in range (8 needed). Given that anyone who broke at this point would not be able to make it, I had to move as much of that as possible to be within one move of exit at the end of the turn. 7 of that 15 were just barely in range as it was.
I began with some simple stuff. I moved a PIAT HS (who couldn’t exit) into range of the Panther, and the forward HS moved into LOS of his blocking force in B6, but he didn’t bite on either one. The big problem was getting out of L9 alive, since he had the squad+9-1 in K10h1 who’d be adjacent to anything they did while starting to move. The first squad went through the nearby building but broke when they hit open ground in J8.
Smoking the J8/I8 area would was tricky, since the cost in MF meant that anyone who tried would have trouble exiting. I did try to smoke J8 as I went by with a squad/leader combo, but missed it by one. Then he fired on them in the next hex and pinned the squad. I tried for the J7 squad next, who got nailed by the Panther’s MA in open ground, and took a K/3. However the remaining HS HoB’d and generated a Hero. If Heroes could count for EVP, I’d have a better shot at scenarios like this.
Things were complicated enough that I’d forget the things I told myself I wouldn’t do by the time I was done with figuring what I could do. So, the second squad in L9 dropped the MMG and ran for it. Bypassing K9, and taking an adjacent SFF shot in the open. They made it anyway, a bit of luck that I was really starting to need by this point. All of this had failed to get the attention of his squad in H4h2, so when started the mad dash of the squad J1 towards the exit, they broke in the first hex.
Then it was time for the 9-2’s mad lonely dash. He went to J8, where the resid was the smallest, and still broke on an ’11’ on 1MC.
That ended the game. The best I could do at this point was 6 EVP.
Situation, end of the game.
It was a pretty tight game, but I was stymied getting over the bridge for too long. If I’d known it’d take that long, I would have put another squad over the stream with the W10 ford. The greatest annoyance was the complete failure of anything to ever go right at the NE bridge. I had hoped to sneak someone across the K1 ford and give him something that he had to pay attention to, but they died before getting there for minimal effort on his part.
I had known for the past few turns was that my critical weakness was the 9-2. He represented a good fraction of the points I could hope to exit, and if anything happened to him I wasn’t going to be able to win. And sure enough, his breaking broke my chances of a win.
German Turn 7
“Ok, things are tight. Rindis doesn’t have the best odds here, but he can certainly still win. What’s in my favor is that he cannot enter buildings or lay smoke with units that want to exit. What’s not in my favor is that I have little that can fire, and really need to use SubFF to the best of my ability, as I lack the LMGs to make firelanes. The 9-2 is my biggest worry, as he and his troops will be hard to break.”
“I consider falling back with the Panther, but I have a decent position in G7. I can see the road in front of building H4, can see down to J8, and most of the British troops that move will end up in my vicinity, so I can safely redeploy next turn, I think, with a better feel of where to go. I’m not that worried about CC, as I’m counting on the sN to peel off any adventurous Brits. PIATs will be a concern, as they can easily punch through my sides, but I still think I’m good.”
“I Prep fire the Panther vs I7 and get a hit with just what I needed. The 9-2 passes, but the squad fails. BIG plus for me, though Rindis has decent odds (41%) to rally him. I seriously consider counterattacking with G6 to drive him back, but it’s late in the game, and I need troops elsewhere.”
“In movement I split K10 into K10h1 and J10. The risk of staying in K10h1 with everyone is L9 may take the time to drop Smoke in K10, and I don’t want to move everyone into J10 in case everyone breaks in Defensive Fire (which, as we saw, happened). The loss of the 9-2’s MMG squad helps make this possible, else I’d be facing an 8(-1) from him. I’m still light in the backfield, so G6 heads out to form a last line of defense. I consider heading to E8, but there’s some iffy LOS from N8 and J7, so I duck back to B6 instead. F3h2 heads to H4h2, as from there I can hit I1 and I2 free of the hedge TEM. I can also move in Turn 8 to hit other exit hexes from the second floor. Yes, a LMG downstairs would be nice, but I need hm upstairs to interdict J1, and if he doesn’t break, J1 can cut off the backside of building F4 to keep the LMG from redeploying to where I want him. Tough call, but I’m playing him a little conservatively.”
“In Final Fire Rindis breaks J10 (ouch!), but does no other damage. I7 stays put, hoping to rally in place.”
UK Turn 8
“Wind Change occurs, but no wind results. In bigger news, I6 fails to rally. No Prep Fire, as expected.”
“Rindis leads with M8, which I ignore as he can’t exit without a leader, and I need to save fire for targets that can get EVP. H9 moves up to E8, which I ignore for the same reason. Rindis has no choice but to move through OG, and gets nailed in J8 when he tries. He tries smoking J8 from bypass in J7, but misses, then I Pin the squad with MG fire from the Panther. J7 gives it a go, but the Panther scores again and get a K/3, but fail to break the resulting HS (who goes and generates another damn Hero).”
“With a lot of residual and other clutter in the J8 area, Rindis errs and bypasses K9 with the remaining squad in L9, which permits me to SubFF with K10. My 4(-3) fails to break him, and he makes it to E8. J1 makes a run for it, and takes a 6(-2) in I2 which breaks him. The 9-2 makes a run through a 1FP residual, I roll a 1MC, and the 9-2 falls with an ’11’. At his point Rindis concedes.”
Reflections
“Ok, not a bad scenario. I think I did better with the fall back defense this time, except for getting caught in the L9 building. Rindis really got held up at the R7 crossing, and I wonder if he shouldn’t have split more of his forces for the thrust against K2, perhaps a 1/3-2/3 force division. Still, if he had, the Panther would have been tough to overcome. If he had managed to cross one turn earlier he would have had an excellent chance of pulling this one off.”
“North Bank is next,with me as the British. I’m way behind on my set-up, and it looks tough. I’m hoping the balance is better with the errata I’ve seen.”
Pirke spoke up:
“Thanks for doing this Rindis and Patch. I’ve haven’t read the whole thing yet but with the maps and position included in the AAR and with the comments form both perspectives it makes a fun read.”
“It motivated my nephew and me to play the whole Arnhem batch of scenarios in following order. Finished scenario 32 and currently halfway on 33.”
“Thanks for the feedback. I always prefer AARs that have some sort of map published, otherwise I can’t effectively follow the narrative, especially if it’s a scenario I’ve never played. Rindis does an outstanding job with his maps and diagrams. I should probably let him win more as compensation.”
“Yeah, right. :D”
“I mailed my British set-up for A38 North Bank last night. Look for that AAR soon.”
Postscript:
It was a simultaneously interesting and frustrating scenario. It’s certainly one of the ones from the M-G batch that I’d like to try again. The first couple turns had a lot of frustration where I just couldn’t get any smoke down at all. Given recent experiences, it does seem the thing for the British to do is to maneuver for good shots and threaten to break German resistance until the let you get across the bridge. The main problem with that is of course the Panther, as there’s just nothing to be done about it until the British can maneuver on the same side of the stream as it.
Discussion (2) ¬