
A35 Guards Attack
We continued our tour of the Market-Garden set of scenarios in A ’91 with “Guards Attack” in August 2009…:
Started the fourth scenario in the Annual ’91 Market Garden set last week. I think I’d be doing pretty well as the defending Germans if I could just remember what I need to do….
For some reason, during most of my set up, I just completely forgot that he was going to be entering board 13, instead of setting up on board 13. I don’t know where that misconception came from, but I was kicking myself the entire first session over it.
Obviously, it’s expected that the ATG will set up to ambush Shermans as they cross the stream over the elevated road. None of that here. So, Patch got to enter in safety on the first turn.
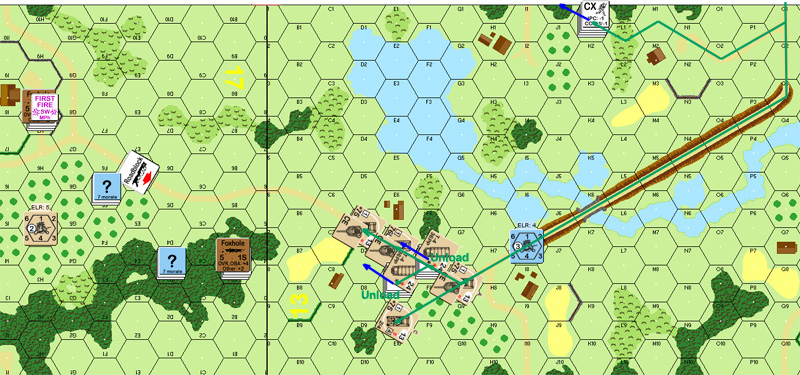
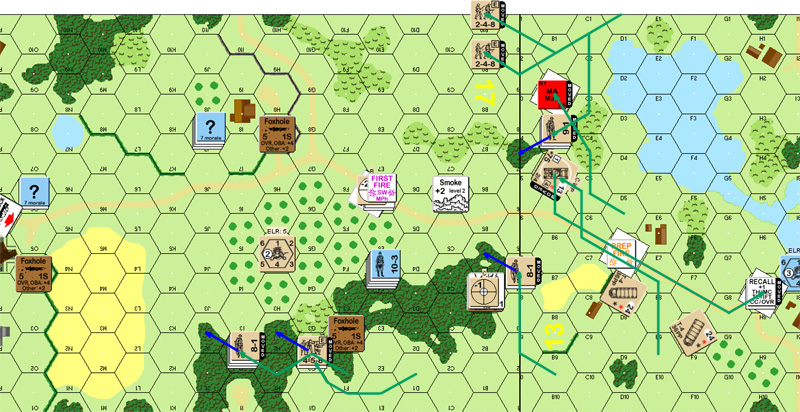
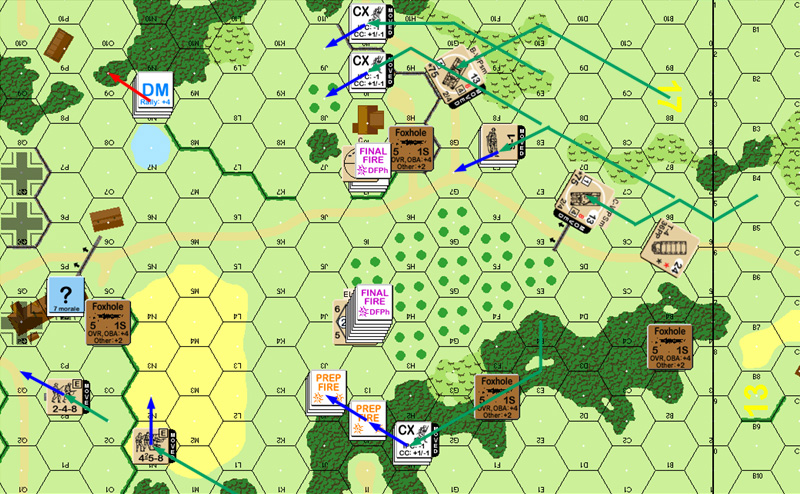
Situation, British turn 1, beginning of DFPh.
Obviously, my turn was generally occupied by reshuffling my forces a bit to set up the real defense, and slow him down. Thankfully, despite a good volume of British fire, nothing happened.
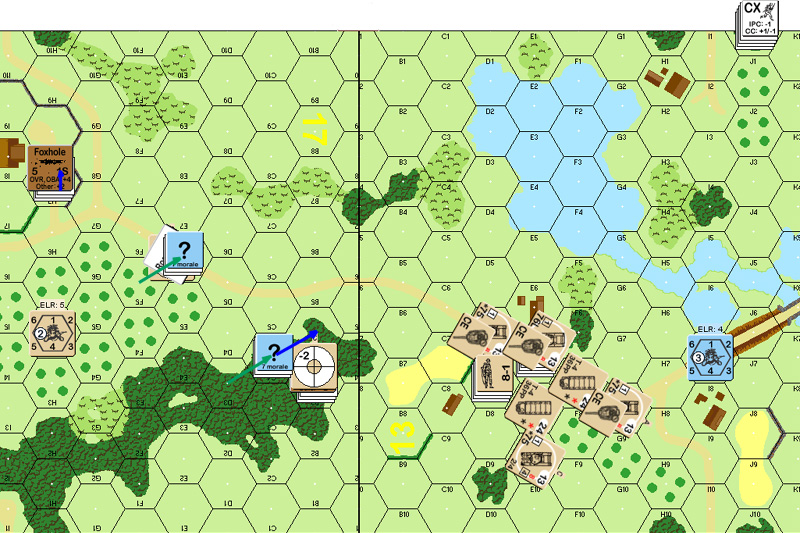
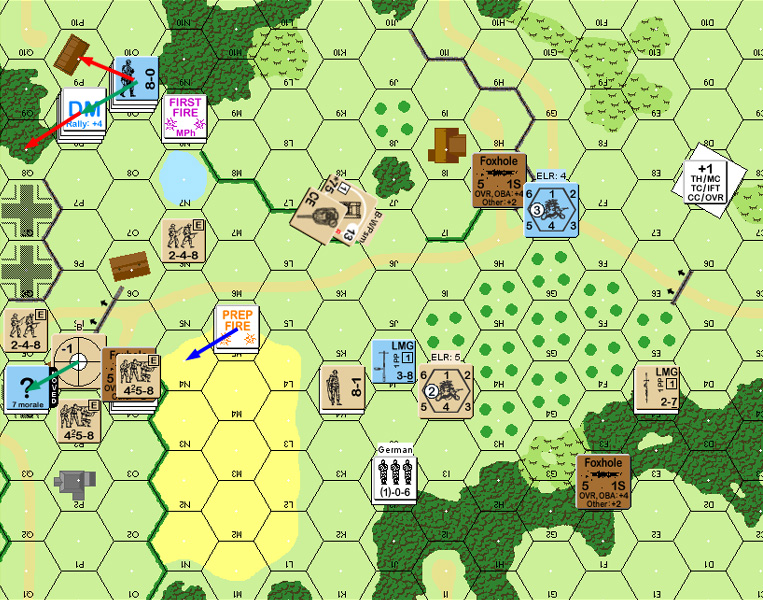
Situation, German turn 1, beginning of DFPh.
Patch began his second turn with a pair of WP shots. One hit 17B3, but depleted the ammo, while the second (at B4) turned into no shot at all. The same tank then tried for regular smoke, but didn’t have any of that either. (One wonders if they remembered to pack lunch?) He then tried a regular shot, got a hit, but no effect. Bad dice. Glad I wasn’t rolling them.
During movement, Patch sent the bulk of his infantry west (bottom of the board) around the tree line. Thanks to the WP, I could only get a PTC on the first group and nothing on the second. (Well, with the cower, the second was bad no matter what.) So I pinned a squad and leader, while the rest got way too close to what had been intended as the second defensive line before I even abandoned the first.
The Shermans (that didn’t fire) moved up cautiously, keeping the front armor front at all times, and staying scrupulously out of PF range. My first DFPh shot did nothing but malfunctioned a LMG. Then I revealed the 838 and 10-3 at three hexes from the CE Firefly, and got a K/2 to STUN/Recall the tank.
Not a bad start, really.
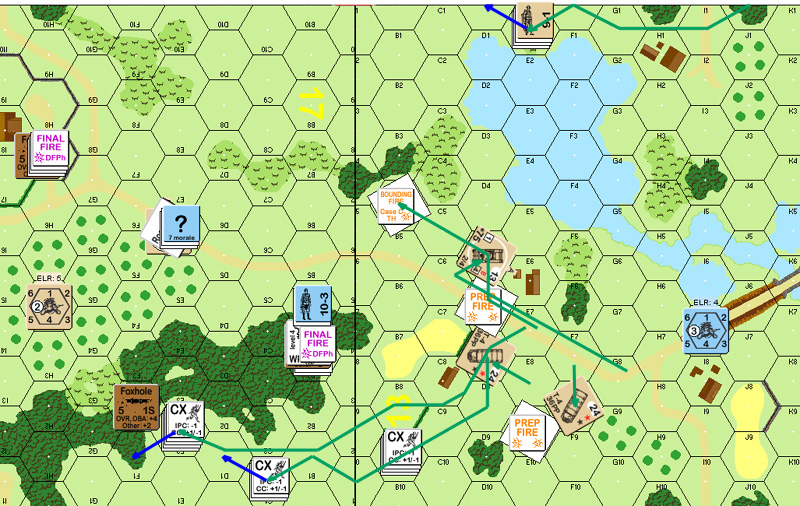
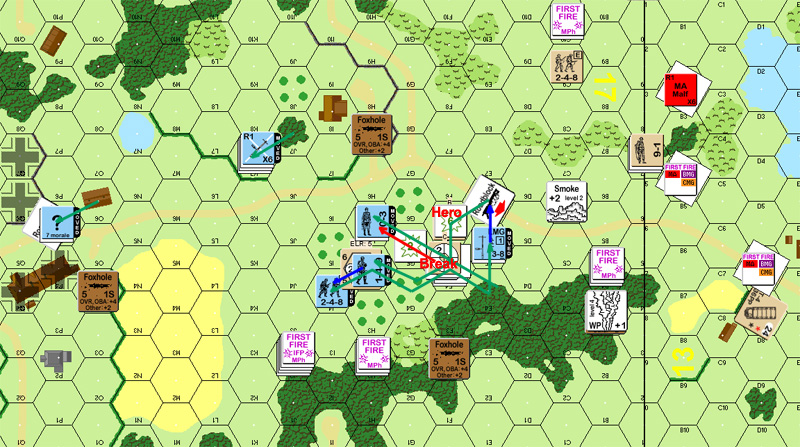
Situation, British turn 2, during DFPh.
If I can just get a handle on the west edge….
UK Turn 1
“I was nervous about entering forces on board in trucks, but review of Rindis’ set-up revealed that the worst I was looking at was an attack on the 1FP column, so I loaded up the trucks and sent a platoon along the eastern edge to keep pressure on two fronts. Everyone ended up in the 13E7 area with only an LMG long shot from 17H7. The roadblock in 17E6 was a bit of a surprise, but isn’t a tactical concern as of yet. No clue where the 10-3 is, but he’s not with an LMG as the stacks aren’t high enough. Infantry advances to get into position to attack the front line in 17B3.”
German Turn 1
“If the ATG was up front I expected to see it this turn, but no fire and Rindis stayed hunkered down under cover of his concealment. Two stacks shift to cover the central road, and all of my Defensive Fire has no effect as I roll high for every shot. I note that if forces are shifting to the center, there’s nothing to screen the west. Hmmm….”
UK Turn 2
“I just cannot roll. I deplete WP when I drop a round on 17B3, getting the first MC of the game and revealing a 468 and LMG. I fail to get smoke or WP on 17B4, which means I’m not doing a slow advance up the center this turn. I CX and make a flanking run, but a shot out of the WP Pins my leader and a squad, meaning I’m not getting where I want to be this turn. Since I really need to get into the 17F1 area, I switch plans and CX my second infantry stack and send them along the same route. The third stack advances along the eastern edge.”
“I move the Firefly to 13B4 where he can fire at 17B4 and get an OG shot at the units behind the roadblock in 17E6, but completely forget to go BU. Rindis reveals his 10-3 and an 838 in 17B4 and gets a k/a result, removing that tank from the game with a Recall result. The game may favor the Brits, but I cannot continue making boneheaded moves like that.”
“Still no sign of the ATG. Hrm…”
I had some decent ideas as to what to do on my turn. It’s a pity that I didn’t remember them at the time.
I, of course, abandoned the forward foxhole in 17B3, and Patch, of course, fired on me as I pulled out. Thankfully I passed both the resulting MCs. Patch’s poor dice continued with a ’12’ on a third shot. It’s a pity there was nothing to break with it. During Final Fire, he managed another ’12’ to malfunction the MA on the Sherman in 13D3.
It’s a pity that I’m somewhat out of position, and he can win with his infantry. The tank force is being attritioned nicely.
I had thought to get the 10-3 and 838 into F3 where he could at least partially keep an eye on the north end of the woods, and force Patch to be a little cautious. But I forgot about that, and he ended up in E4, helping delay the tanks. At least I had a squad in J7, where he could watch the proceedings through the gap in the hedgerow. However, as a second-line 447 and and with a malfed-LMG, his ability to project firepower that far was lacking.
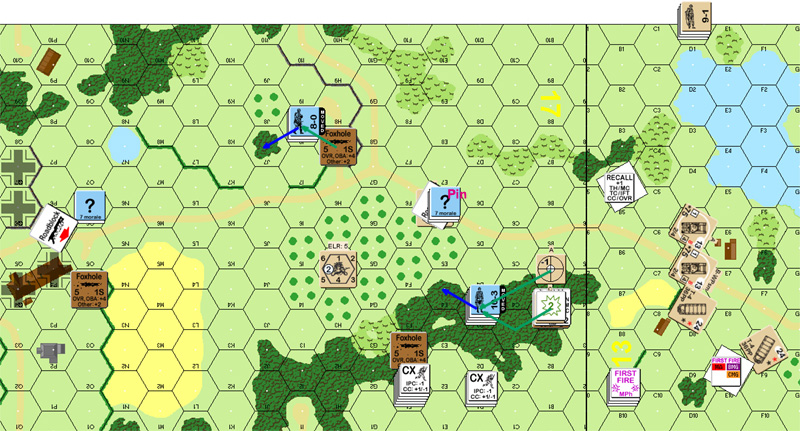
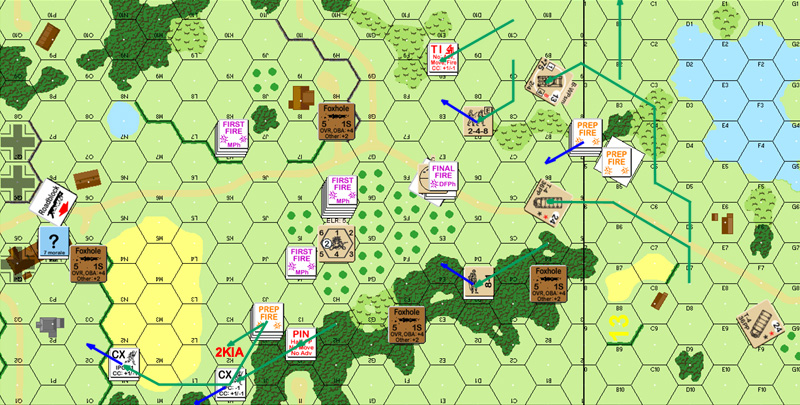
Situation, German turn 2, end of MPh.
Neither of us had anything to rally, and neither of us got our malfunctioned equipment back. Patch made good use of the Recalled tank by firing its smoke mortar into 17C6, and firing on 17E4 with the CMG and MA, barely missing an Improbable Hit with the latter.
During AFPh, I showed that I can roll poorly as the entire 10-3 stack pinned (starting with a ’12’ from the 10-3). Thankfully it was just an off-turn PTC, or else I could have had a major problem.
Situation, British turn 3, end of MPh.
German Turn 2
“There’s lots of British firepower forming up front, and Rindis decides to pull back. After all, I have to roll low at some point.”
“The 8-0 and 447 in 17H7 falls back to the I8 building, and the 10-3 stack and the 468 move and combine into one stack in E4. I had feared he would counterattack to 17E3 and treated all my stuff in the open with that -3 modifier, but he decided to give that a pass. I fire everything I can at his troops leaving the foxholes, to no effect. A series of shots against the roadblock units malfunctions a Sherman’s gun.”
UK Turn 3
“I deploy a squad with the 9-1 in 13D0 to improve my odds and maybe cause some headaches for Rindis later in the game. Prep Fire is a singular affair as a tank tries to silence the squad behind the roadblock to no effect, making it time to move once again. The Firefly, before it exits, lobs a smoke mortar into 17C6, nicely screening my advance along the eastern edge from the 10-3, then BFFs against 17E4 to no effect. My infantry moves over to the 17J2 area, and I replace the Firefly in 13B4 with a Sherman. It truly is a nice spot, since the roadblock units are in OG from that hex. I move the 8-1 and a squad to 17B4 as I need infantry near the tanks, and I get the tank with the malfuncitoned gun to the eastern edge by bypassing the B3 woods, avoiding the box hex of 13C3 (flooded marsh still makes adjacent hexes bog hexes – B16.6!) The 9-1 and a 458 head to 13A7, as I don’t want to throw them across the OG just yet, and this also provides support for my tanks. He’s still close to the two 248s, and I’m comfortable to let them pose the threat for now as I doubt the 10-3 is staying where he is next turn, so things may open up a little for me.”
Morbii pointed out:
Patch made good use of the Recalled tank by firing its smoke mortar into 17C6
“…which is illegal as it costs a MP.”
“Good AAR though, as usual guys.”
“Not how I interpreted the rule, but what’s done is done.”
Bad Dice celebrated:
“Great AAR, following this one every step of the way.”
“BD”
Morbii:
“You should definitely check out their recent AAR on Hill 621 as well.”
You can find links to all my AARs (most of which also feature Patch) at the page in my signature.
Will try to update this in the next couple days. Short version: I was out of position, the dice turned around, and now I don’t have a position….
“You should definitely check out their recent AAR on Hill 621 as well.”
“Just ignore the horrible error I made in the MkIV entry.”
daveramsey:
“For what it’s worth, my irregular (in ‘games played’ rather than ‘general demeanour’) opponent, who’s stronger than me, played this one – with me specifically given the Brits.”
“It’s pretty pro-British as we recalled which is why I got the easy side, and it’s perfect for these kind of match ups. As it happened it came down to the last turn, and I won, but my only notes were “Very tough on the Germans”.”
“Still, I have no problems with playing unbalanced scenarios, as long as the scenario was fun.”
“Enjoy!”
“Dave”
Hmm. Going to have to stop goofing around on other projects if I’m going to catch back up on this.
Rally was uninteresting, other than the fact that I Deployed my elite 468 squad. I had a fair amount of movement I needed to do, and a couple of HS with good morale looked like a good way to try and make sure it worked out.
Movement went pretty well, and was designed to force the Acq markers off me. When the squad manning the roadblock pulled out, he drew a good amount of fire. The dice continued to be with me and a double ‘2’ generated a Hero on the first MC (that is, ‘2’ for HoB, and then ‘2’ on the HoB roll—what a waste). Sadly, while the Hero got another ‘2’ in the next hex, the squad broke. That was the only bad news of the phase, and I positioned my 10-3 to catch him as he routed. Meanwhile I was positioning around the periphery of the orchard, sent a LMG HS to man the roadblock, and I put a squad in place to put a FL across his line of advance. If they could only repair the LMG….
Patch meanwhile, was getting antsy about the location of the ATG. (With good reason, as you’ll see.) This showed as he fired at the empty hex C7 to see if anyone was there.
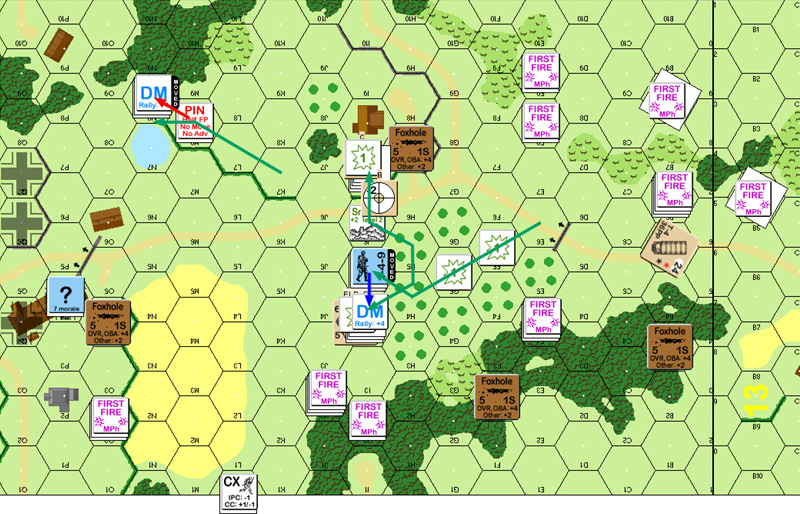
Situation, German Turn 3, end of MPh.
The 10-3 showed his worth by rallying a DMed squad away from rally terrain. Patch meanwhile got a ‘6’ on his MA repair, Recalling his second Sherman. I can’t say I was sorry to see it go.
Sadly, 17K7 failed to repair his LMG, making this turn that much tougher on me.
13B4 and A4 both fired on 17E6, trying to free things up on the south end of my defense. Thankfully he barely passed without pinning on the 1MC he got. However, the luck finally started to shift when he fired on I4, and my HS rolled a ’12’ on a NMC, eliminating it, and making the Hero there not quite as threatening.
An interesting rules note came up during movement. He entered at 13Q1. Since there’s no SSR defining otherwise, that makes the entire east edge a friendly board edge. Given the situation, it’s pretty obvious that only the areas across the stream on 13 should be friendly to the Allies, but… the rules are rules. The second Sherman just turned east and exited 13B0.
Patch’s paranoia about the ATG continued as he searched the brush around 17E9 for it. It’s not a bad idea. I need to remember it for next time. He started his dash north with a single HS into K2. I didn’t have the LMG/FL that I wanted, but I did get a ‘2’ to KIA the HS. He thereupon ran the other HS a bit further out where I couldn’t get at it. The two squads in H2 made a break for it, but a final desperation shot throwing everything I had in pinned the second one.
Situation, British Turn 4, end of MPh.
German Turn 3
“Rindis deploys his 468 squad to increase his coverage. Not 100% on that decision, but he does have too much to cover and too few units with my flanking maneuver.”
“Everyone pulls out of the 17E4 woods in quick jumps, and there’s difficult decisions to make as the 10-3 and 838 are taking their sweet time to move last, making me wonder if he’s going to counterattack in the woods itself. My fire is a mixed bag as I break a 467 yet generate a hero. a 248 and LMG retake the roadblock, closing off the center again. My smoke in 17C6 blocks a lot of firepower against this shuffling, making that little tactic of mine a mixed blessing. 17J7 moves to K7, interdicting the K column and making a dash next turn riskier.”
“With no one to fire at, I pepper 17C7 with my board 13 units. The ATG location is a mystery, and I have suspicions about that roadblock in 17E6. I suspect that Rindis placed it there hoping I’ll use it to take a ‘safe’ hull down position, then get nailed in the flank by the ATG in the C7 or E9 brush masses.”
UK Turn 4
“In Rally I lose Sherman A’s main armament on a ‘6’ MA repair dr, sending him (and my armor leader) home. Rindis fails to repair his LMG, but quickly rallies his 467 under the 10-3’s tutelage. I really hate 10-3s. I also deploy a squad in 17J2. If I have to run through OG in the face of firepower, I’m gonna do it with a lot of units.”
“I fire at the units in 17E6 hoping to free up my HSs to move, but I fail to break him with two attempts. I fire an 8-1, LMG, and 458 against the hero and 248 in I4, killing the HS when it rolls a ’12’ on a NMC. Enough has fired, time to move.”
“I send a 248 into E9 and search the surrounding brush for the ATG. Probably not the best idea, but I know nothing is in that area now. The second HS clears D7 by moving through the brush, the goal there is to encircle the E6 units if Rindis chooses to remain. I don’t send them on the continuing end run, as I ned to find that ATG, and I figure I’ll lose one to defensive fire from E6. Searching for the ATG seems the best choice. No clue where the ATG is hiding, but I’m thinking now it has to be in the backfield near the victory hexes.”
“My first HS makes a sprint across the K column, and dies under a 2KIA. Ouch. Deploying certainly appears to have been a good idea. The second HS sneaks along J1 in bypass and makes it to N1. The two squads in K2 make a run towards K1, but I lose one to a Pin in I2. I move my 8-1 and a 458, sending them to E4 to complete the encirclement nest turn.”
“I rather like the idea that there’s no ATG at the top of the map, so I send a Sherman up thataway. I also shove a truck up further, thinking I might get some better movement and make a dash towards the victory hexes with a loaded HS, but the more I think about it the less I like it so he’ll stay where he is the rest of the game.”
“I end the turn up to O2 with a CX HS. Still OG to cover, and there’s the 228 in P4 to deal with, but any German reinforcements have to cover a lot of OG as well. I think it’s my game, but the last few years with Rindis have taught me that good fortune can change quite easily.”
Naturally, the LMG still wasn’t repaired in my rally.
Even with a British HS all the way O2, I figured I could hold of that advance a little longer, and I needed to stop the flow of reinforcements if I was going to have a chance. I actually had a pretty tight little plan.
It’s a shame it all came apart.
The HS in the roadblock left to put his LMG on the north side of the orchard, generating a Hero on the way. Then the 838 went into I4 to put some high-FP pressure on J2. But, since that was a short walk, he first put smoke into I6 to cover the 10-3 and 467 as they moved to cover the I8 area.
And that’s where it started going bad. I survived a 3MC in I6, but they both pinned in I7, which kept them from advancing into the more central J7 woods. Then the squad and 8-0 in K7 left to start reinforcing the victory area. In M8 he pinned the leader, and the squad generated a sniper check (I’d been doing a lot of that), which was warm, hit I4, and tied RS. The ‘2’ wounded the Hero, and the reroll was a ‘1’, breaking the 838. Then he managed a LOS from O2 to N6 to break the squad in bypass (I had been going to go through the woods, but with the leader not there, I needed the extra MP).
The best I could do with the situation was self-break the 8-0 so he could rejoin his squad, and move up the troops in I5 to I4.
Situation, German turn 4, end of MPh.
I got some luck in rally, the 8-0 came back. Patch tried to lead of with some smoke rounds, but came up empty again. He then prepped at the I4 stack, but couldn’t get more than a couple ineffectual PTCs. I wasn’t able to do anything to him, and in AFPh he managed to break the 10-3 and the squad with him.
When I lost the 8-0 and squad, I was pretty sure it was all over. I really didn’t have the ability to hold him off for long, and didn’t need the delay. This showed that it would take a pretty big miracle to pull it out now.
Situation, British turn 5, end of DFPh.
While the 10-3 rallied, the squad with him did not, putting him in a very bad position. Also, the 838 CRed on a self-rally attempt.
With only the two crews (one hidden and one obviously in P4) two leaders, a Hero, a wounded Hero and a fanatic 248, I didn’t have a lot of choice.
I put the wounded Hero into J3, hoping to restrict his fire; I just got a LMG fire lane and a dead Hero. At least I got a Sniper out of it, and stunned a tank. The second Hero was wounded with a second FL going active. And the HS died to the FL in the first hex. The sniper activated again, and killed Patch’s 9-1 on a mortal wound, also breaking the squad.
I could have used that a bit earlier.

Situation, German turn 5, end of MPh.
German Turn 4
“Having been thoroughly flanked, Rindis makes an effort to pull back his lines.”
“The HS at the roadblock not only successfully pulls back, but generates a hero! As if the 10-3 isn’t putting enough negative modifiers on the board. I now have horrible images of both heroes teaming up with the 10-3 to generate a stack with a -5 modifier. The 838 moves, dropping smoke in the road to cover the retreat of other units, a nice move on Rindis’ part. The assault engineer joins the hero in I4 to cover the western OG gap before the wheatfield. The 10-3 and 467 make a run through the smoke and get nailed by a Sherman, but pass the 3MC. However, they both pin across the hedge. Further north the 8-0 and 447 in K7 make a move to the woods, but on a 2 Pin DR, my sniper activates with a 2 and a random selection tie results in a wounded hero and a broken 838 in I4. HUGE break for me, as there’s no leader near him and now there’s little firepower covering that OG. On a longshot I also break the bypassing squad in N8, leaving Rindis with just a HS, crew, two heroes, and the 467 unbroken on the board.”
British Turn 5
“With two heroes and the HS in I4 with the broken 838 I try and inflict some additional damage, but fail as my bad DRs come back into play. I leave them there as I don’t want to just move everyone this turn. I have time (4 turns left to go), and there’s the chance to make the 838 a 338 so I take it.”
“In movement everything to the east goes. My HS flank around the board edge, with the goal of getting encircling fire and coverage of more OG hexes. I put a Sherman against the wall (buttoned up this time!) to catch the 10-3 in the open. This works to an outstanding degree as I break the 10-3 and the 467 in Advancing Fire. 😀 Yeah, things are going my way. I thought I had the 10-3 for a FTR, but with the HSs not yet in LOS, he escapes to J7. To the west, I move the 248 and 458 closer to the victory hexes.”
German Turn 5
“The 10-3 rallies! Have I mentioned I hate 10-3s? Thankfully, the squad thinks this is a lost cause and stay in their holes.”
“No Prep this turn and Rindis makes a run for it. I bag a hero and a 248, and wound the remaining hero in exchange for my 9-1 and a broken squad from a Sniper strike. Yeah… it was worth it. I was certain that I had that 467 in J7, but it turns out CX units can’t interdict! The 10-3 pulls his Luger and prods the broken squad over to N8, where he fails to rally again.”
“Yeah, this scenario is mine. There’s nothing left to the west except for a crew and hero, and barring lousy CC rolls I can conceivably win this in Turn 5. But if the ATG is hidden in P4, that could be bad news for my probing HS. Three turns left to go, I’ll play it safe. I’ll get into Q4 this turn, see what turns up, and throw more units closer for a Turn 7 win at the latest.”
As if to show that hoping for hot dice was futile, nothing rallied on British 6. With pretty much nothing to shoot at him with, Patch went anywhere he wanted, and I was surprised that he didn’t push harder than he did.
As it was, the most exciting part of the turn was when he malfunctioned the MA on a Sherman. He pushed around the guys in the north, and the broken 838 was forced to surrender.

Situation, end of DFPh, British turn 6.
With the 10-3 helping, I got my 447 back for my rally. Considering the number of Brits around, it wasn’t that big a help. In fact, as soon as I tried to move out, he broke again on a 1MC, even with the 10-3 to help. He had been headed for Q6, in the hopes of stemming the tide, even though the 2 FP -2 shot I’d doubtless take in Q7 would probably have stopped that in a hurry.
Situation, end of MPh, German turn 6.
For the seventh British turn, I couldn’t rally anyone, even the squad with the 10-3 helping.
Patch killed my Hero with a ’12’ MC roll during Prep and then started moving in. He finally found the ATG hiding in Q7… which turned out to be illegal. I had studied the Concealment Chart very carefully, and it very clearly says that an emplaced Gun in open terrain doesn’t lose concealment if it doesn’t do anything like change CA. The general rule for HIP is that it is generally lost just like Concealment. So of course I missed the exception in A12.34.
I really wish the RB was a bit better cross-referenced, I’m spoiled on the SFB rulebook, which cross-references anything that might apply. >.>
After that, everything else moved up, and the crew broke on FPF. They and the 447 surrendered, leaving him an easy win when he advanced into Q7, having already taken Q6 and the win. He also managed to get a PTC on the spare crew holding down Q4; they passed, but it stripped my Concealment.
A HS moved in on the 10-3, and they killed each other. The squad he moved into Q4 got Ambush and promptly killed the crew. So, he won with both pairs of Victory locations taken, one turn early.
Really, I had been in trouble ever since he got to F2 before me. My dice just managed to keep me very much in it ’til turn 4. After that, there was only a marginal hope of recovery.
Morbii:
“Ahh, the 10-3 ninja. I love with 1 man kills 5+ (without a modifier, even!) :)”
Yeah, but it was such a waste. That mod should have kept the 447 going, at which point it’s a very different game.
But as Patch said, “He went down as a 10-3 should.”
UK Turn 6
“Lots of opportunities this turn. I could make a rush for the game, but I’m lacking in MF to reach the Q6-Q7 victory hexes, and I can’t overwhelm Q4/P4 with out taking chances. So, I’ll be conservative. Three turns left, after all.”
“I send a HS into M9, with the goal of keeping as much under DM as possible, and forcing Rindis to rout further away from the playing area. A second HS moves to M7, en route to Q6/Q7.I figure the ATG is in O6 or P4, so I move a Sherman to K7 to keep both suspect locations under fire, and I reverse a second Sherman to D7, which has a sneaky LOS to P4.”
“The 248 in Q3 assault moves to Q4, the 458 assault moves to O3, and I move the 8-1 and two squads to N3. I’m slow to move my 8-1 and a 458 in the backfield, as by parking in J3 I force the broken 838 to Surrender, as he has no place to rout. The last thing I need is that unit coming back on a lucky self rally DR.”
“Rindis only fires the Hero, the ATG remains hidden, and the crew in P4 does not fire, preferring to take his chances with ambush in CC. N8 routs away to O9, and is rapidly followed by my HS in Advance. In Q4, since the ATG may be in P4, I’m not happy about sending my HS into a bad Ambush situation facing 2:1 odds, so I send the 248 instead to Q5. There, he threatens Q6/Q7, and can still help encircle P4. N2 goes to P3, and N3 goes to O4, entering the entrenchment with a squad and the 8-1. I don’t care what he has in P4, by Turn 7 the building will be mine. I also get a HS to N6. If the ATG is in O6, it won’t be happy next turn.”
German Turn 6
“Rindis rallies his 447under the 10-3’s direction, which isn’t the best of news. He can now at least block off the Q6/Q7 victory hexes from me, although he can’t affect what happens with Q4/P4 as he has no LOS to O4, my main assault stack against the building. This all becomes irrelevant as the 447 breaks under a 2+0 attack even with the 10-3’s help. Rindis falls back from P4, and I’m unsuccessful in revealing him or in unveiling the ATG in O6, leaving P4 or O6 as still candidates. But if he’s in O6, why hasn’t he fired? :(“
UK Turn 7
“The 447 fails to rally, leaving Rindis with just the 228, hidden Gun crew, and the wounded hero active on the board with any FP. That’s reduced to two when the Hero dies in Prep fire.”
“I enter P4 with three squads and the 8-1, and move the 248 in Q5 to Q6 and Q7… where he discovers the missing Gun and sparks a search for the rulebooks. Yeah… there’s a disagreement between the Concealment Chart and the rules, as the ATG should have been revealed some time ago.”
“Rindis fired on Q5, to no effect, and I moved up N6 and K4 adjacent, triggering Subsequent FF and FPF, which only broke the crew. N8 moved to P8, blocking any further routs and killing the 447 and 228 for FtR. In Advance, everyone jumped onto a victory hex, and I threw a crew against the 10-3. Technically I’d won at this point, but we all wanted to see how the CC turned out. Q4 fell to 4:1 odds, and to the east, the 248 and the 10-3 kill each other off. In the end, I claimed both victory areas.”
Comments
“This is certainly a tough one on the Germans. Rindis played well, as always, but the balance was against him, and my dice came back just as I flanked him to J2, preventing him from closing that off.”
“I was surprised that Rindis didn’t counterattack on Turn 2. Caught in the open and CX, the 10-3 and 838 had the opportunity to move from 17B4 to 17D2, with good odds of surviving any defensive fire, and then would have a 4 (-3) against my units in 17C1. An Advance to 17C2 would then have been trouble for 13B9, with an 8(-3) (or a 4(-2) if I moved to 13C9) in Defensive Fire. Half my infantry could have gone down. It would be a gamble, but with this scenario’s rating I think the Germans should look at such opportunities.”
“The biggest break I received was on Turn 4, when my sniper strikes and breaks the 838 in 17I4. The odds in the fight between 17J2 and 17I4 would have been close (8(+0) for him and 8(-1) for me), but the loss of the 838 left him at 2(+0) with the hero and 248 remaining. For a SAN of 2, that couldn’t have come at a better time and I think was the best shot of the game.”
“Of four tanks in this game, one was Recalled for a k/1 IFT attack, one was Recalled for a Disabled MA, and one received a stun result from a sniper. Not good at all. The k/1 was entirely my fault as I forgot to button him up going against a suspected 10-3 location. As for the Sniper shot, that’s a harder one for me to judge. Rindis’ SAN is 3, and if I’m outside effective small arms range, I think going CE is worth it. I paid for it here (and I’m really paying for it in ‘Oy Veghel’ at the moment), but the odds of a successful attack with a SAN of 3 is 2.8%, assuming it even hits the tank, and the benefits are so much more, increasing the odds of hitting with the MA by over 10% in some cases. It’s a puzzle.”
thedrake:
“Excellent AAR.Thanks for posting it.Find the pics are a great help in following the action.”
Morbii:
“I paid for it here (and I’m really paying for it in ‘Oy Veghel’ at the moment), but the odds of a successful attack with a SAN of 3 is 2.8%, assuming it even hits the tank, and the benefits are so much more, increasing the odds of hitting with the MA by over 10% in some cases. It’s a puzzle.”
“I know what you mean. But I generally notice that if I CE a tank, it gets taken down by the sniper immediately :)”
Postscript:
I don’t remember this one so well at the moment, though I do remember that it was a very interesting situation for most of the length of the game. The 10-3 can really even things up with that massive bonus. Directing a LMG with him is a good job, but I decided to put him with ‘massive’ firepower (the 838), which paid off when Patch gave me a 8 -1 shot with him against the lead tank.
The conventional wisdom says it’s tough on the Germans, which is hard to argue, but I did myself no favors with my setup goof of forgetting that he was entering, and not trying to shoot him up on the causeway. A 10-3 and LMG and the AT Gun could really cause a lot of havoc there, and I figure that’s really how this is supposed to balance out, that long exposed approach at the limits of German firepower.
Discussion ¬