
HA1 Fire on the Volga
For a long time, I posted session reports of my Vassal ASL games (mostly with Patch) over on the GameSquad forums. These were written while the games were still ongoing, instead of trying to remember just what happened months later as the game finished up, so they were the ‘AAR in Progress’ series. However, I changed domain names recently, and the threads are all old enough that I can’t edit the posts to change the image links, so I’m starting an effort to repost them (with Patch’s comments) with the images intact.
As of 2006, my experience with ASL was still pretty minimal. I’d played a few games against other people over the course of about a decade, and three FtF games with Patch (which I barely remember at all), and then two games with him via VASL, 19 Backs to the Sea and HA2 The Commissar’s House. So in August 2006, we wanted more action on the RB map…:
To give the RB map a bit more of a workout, we’ve decided to try Fire on the Volga from Annual ’91. ROAR reports 10-2 in the Russian’s favor, so I (the less experienced one) get the Russkies, and we used the German balance.
Looking at the forces and the VC, I have to say it sure looks tough on the Germans. They need to either exit a fair amount of their MG firepower or get them into Level 1 Locations within Normal Range of the East side of the board, and are attacking with about an equivalent strength to the defenders.
Once I started setting up, my opinion changed a bit. The nature of the SE corner of the RB map isn’t what I was expecting. There’s a couple of ways the Germans can go about his attack, and an alert German could bull through a defense that leaves one too weak. I think it favors the Russians, just not quite as much as first glance, and ROAR, suggest.
Patch set up his attack to go down the slightly more predictable straight-East route through the densely-packed wooden buildings. The first fire phase didn’t go so well for them. His SR fell short almost on top of his own troops. His first fire attack woke the Sniper, so we both got a broken HS from it, and a HMG broke.
But it certainly isn’t all going my way. The initial perimeter has been overrun (could not hit an adjacent HS…), the HMG is repaired, and my ordnance has yet to do much. Got a rate tear on the 50mm MTR, NE. The 81mm has had one shot (spotted and CA change – miss, forgot to set the CA when I set up). The INF has taken two shots, both on blocked LOS and is broken (I think the crew bent the barrel trying to get it to fire around a corner).
I also probably set up with a little too much on the north side (of course, I wouldn’t think that I he went that way), and am still figuring out how to hustle units back over. My fall back is going the way I’d like [EXC: rolling a ’12’ on a 4MC; break, ELR, CR]. Overall, die luck is probably a little high for both of us at the moment.
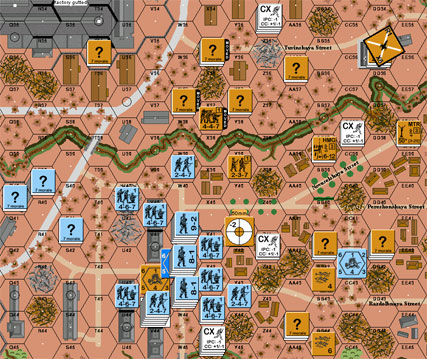
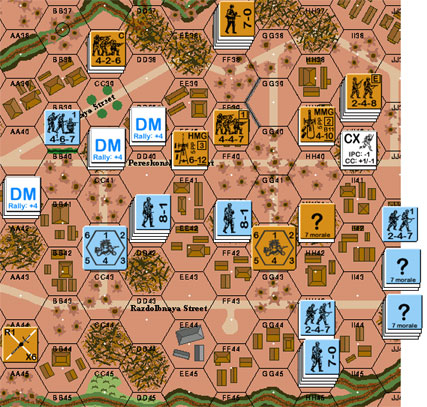
Situation at the beginning of the second turn.
New (for me) rules:
Non-small MTR ordnance
Emplaced Guns
Minefields
Roadblocks
Rule lessons (i.e., my mistakes):
B23.912 must Fortify every level of a building below the one you want to fortify.
A4.72 Advance into Difficult Terrain is all MF or >=4
C5.11 Case A TH DRM doubled in rubble
[This was an idea I wish I had managed to continue. Thankfully, the list of mistakes is much shorter these days, though the amount of rule questions might still be just as high….]
Patch noted:
“Yeah, what a lovely little scenario this is turning out to be. I thought that making a push across the southern map edge would work, but I’m finding it to be tighter than I had expected. My biggest mistake of the game? Forgetting to deal with OBA during my DFPh, which is going to have more than serious consequences turn 2. With that stack sitting on top of it, I just forgot it existed. I’m way out of practice. For now on, SRs go on top of the stack. More ’bout my game plan in later turns. Don’t want to give things away too soon!”
And then he picked up the narrative:
“Well, Turn 2 was certainly exciting, and it’s not even over yet!
“G2 started with minimal Prep Fire and lots of movement against an outpost in AA44. Rindis’ defensive fire DRs averaged above 10, so he was reluctant to FPF even against me in the open (a mistake), enabling me to not only surround and kill him, but gain a few extra hexes. (Rindis, ya should have chanced it.) I finished off on the AA/BB hexrows, surrounding a concealed outpost in BB41 and ready to assault the DD41 strongpoint.
“My biggest failure this turn was in my Prep fire, when I again forgot to use the OBA properly (been far, far too long). I corrected the SR, but forgot to pre-designate I was converting to a FFE, so spotting rounds continue to fall around the Russian positions.
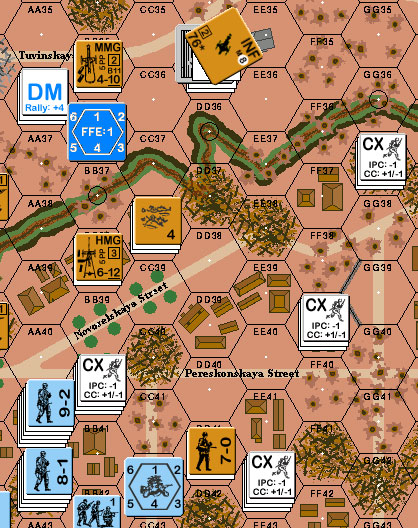
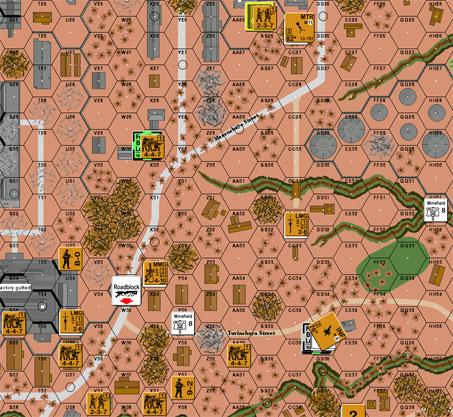
“Russian Turn 2 was disastrous for Rindis. His Prep fire scored a critical hit from his 82mm MTR against a stack (he’s finding the most wondrous LOS with his spotter in BB25), but did little else. As Rindis’ situation is getting desperate he’s flooding the BB36 area with units as he tries to cross the gully bottleneck and reinforce the south. Mistake. I finally remembered to get my OBA done properly and landed a FFE on top of them, breaking several units. My OBA can now keep this reinforcement route closed. My DFPh was done by mail, so I’m awaiting the results of a 2MC on the concealed units in BB35. The current map looks like this:
“I have no idea how BB41 survived all my defensive fire.

End German DFPh. Only a HS in DD35 is broken. DD35 also contains a 7-0, 447, & MMG
German Strategy
“What you’ve all been waiting for!
“The Victory Conditions for this scenario are terrible. Terrible! The first time I saw this scenario I was convinced that the Russians, not the Germans, were attacking. I’ve barely got a small arms FP edge, and I’m also up against two guns, a minefield, and two platoons of reinforcements on turn 4. Ouch! With the required victory buildings far away, my best option seems to be to exit 20 MG FP, so that’s my goal as I’m sure Rindis knows (no one tell him if he doesn’t). Squads are remaining behind to cover my rear and prevent a Russian counterattack in that area and try to interdict the looming Red wave along my flank. My strategy is working well thus far, but it nearly didn’t happen.
“Despite my confidence in the southern attack, there was a hole in the Russian set-up which was tempting. Was the northern attack worth the risk?
“I felt confident I could turn the Russian flank along the board edge past the factory and make a push for the X28/Z26/AA25 victory buildings, and the southern flank appeared thicker than I had anticipated. But is it worth it? Going north will be a tough fight with growing LOS problems for my offboard observer in W45. I’m also certain I’ll be moving towards closer towards his ordnance protecting those buildings. Plus, where are those mines? In the end I chose to press forward in the south, but it was close.
“Right now I’m confident in taking the EE41 block by turn 4, and will be well positioned to make the reinforcements’ life difficult. Despite the ROAR imbalance, I think I’ve got this scenario well in hand.”
Mehl observed on the forum:
“Played this one shortly before that dog Ghosts in the Rubble and I think the Germans best bet is definitely to attack on their left flank through/around the factories. Putting guys in crest helps put more Germans in the set up area north of the gulley for the initial assault on the factory.
“The Russians have to set up the bulk of their infantry (at least 2/3) south of the gully to stop the exit blitz, so if the Germans drop a spotting round on BB36 (the cliffs in the gulley are a *****), they can seriuosly interdict any Russian reinforcement of the north side. I think the Germans should get the balance of the offmap observer in order to do just this.
“Then the Germans can use the wide open spaces to get past what Russians are in the north and they then have multiple options for where the MGs go (up the stairs, off the board, and/or sitting on the map edge).
“If the Russians set up strong in the south and the Germans go for it anyway, the reinforcements will probably arrive just in time to stop them from exiting or sitting on the board edge interdicting the river.
“If they don’t set up strong in the south, then blitz away!”
Having setup a defense, and watched it fall apart, I think Mehl’s got it right. The South side needs to have the bulk of the Infantry. The ordnance keeps the Germans cautious if they go north, and the greater distance to cover provides the Russians time to shift their defenders across the gully (which very effectively turns this into two separate areas). I definitely did not set up enough down there, and may be about to pay the price.
I hadn’t considered the east of the factory route, but I think I could have worked with that approach.
Afterward, I decided I should have FPFed like mad with AA44. However, my die rolls show he would have broken on the first try. (My rolls for the MPh/DFPh were 12,10,9,10,8,4,6 with four doubles in there. Patch walked right through some fire that should have caused some pain.)
The end of the Russian turn had some bright spots. The encircled squad got out and successfully ambushed a HS. He’ll probably be right back in the same pickle as soon as the German moves (if he lives that long with a 9-2 stack next door), but he should contine delaying them. And the INF Gun has been repaired. Now if I can just do a bit better on my LOS checks with it this time….
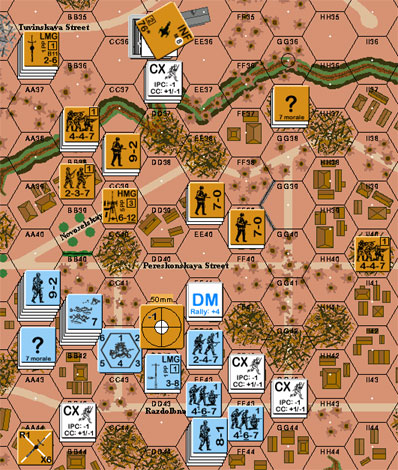
Situation as of German Turn 3 RPh. The CXs are all Russians wearing “?”.
We’re to the beginning of the fourth turn now. Continues to be a mixed bag, though the Germans still have things pretty well in hand. There is nothing standing in their way on the south flank, so I can just be thankful that much of his MG FP is tied up in AA41/BB41.
The last note before was about my squad that had been encircled in BB41. They are all getting ‘Hero of the Soviet Union’ decorations (hopefully not posthumously). They advanced out (going CX), ambushed a HS and killed them. They took a fair amount of firepower on the German turn before breaking and routing back to DD39. On the Russian turn, they promptly self-rallied and generated a 7-0 leader.
Meanwhile, a melee started in DD41 during the German turn. The Germans fired into it on the Russian turn and managed to break my HS while not touching his. My HS then managed to successfully withdraw on the following CCPh.
Even better, his FFE:C resolution during his DFPh drew a red card, which will force him to start over again from a SR (assuming he does get access back).
Before that could happen though, I attempted to push my HMG forward, and broke the squad to the FFE, leaving the HMG in the middle of the road.
Now I just have to survive one more German turn before the reinforcements come in. If I can just get across that gully….
Situation during German Turn 4 Rally.
Reporting fell off a little, as I got busy, and Patch had some troubles but caught people up:
“Erf. My new computer doesn’t have the graphics software installed, so this is all text.
“Turn 4 was all about one thing: Movement! I drew my second red card, ending my Battalion Mortar assistance. T_T No wonder we lost Stalingrad!
“Rindis is being annoying effective in reinforcing his forces south of the gully, and with the loss of my only obstacle to that movement I expect the trickle to become a flood. With the vast majority of my MGs still west of the CC41 road, I need to move my stacks across the road before he begins interdicting it with his 9-2 and more squads. The difficulty is he’s got a squad and LMG that can see down the road, and I daren’t risk moving in stacks and risk even a 2 (-2) against a Dash (and does his Gun have LOS?). Since I have a lot of time left, I edge close to the road, Advancing into it so as to bring the DD39 building cluster under fire while maintaining my firegroups. Should I have moved further? Probably. I find that in the years of not playing I’ve lost my risk assessment skills. The remainder of my units work their way east, trying to build a line to prevent a firm entrenchment of the reinforcements that will enter in the Russian’s MPh.
“The rest of the Game Turn was a mess. I finally found a minefield (casualty reducing a squad that was to interdict the BB39 road). Russian Prep Fire ELR’d a leader and a squad, and breaking several others. I broke my MMG in Defensive Fire, but did manage to hurt his reinforcements, and kept forces from crossing the BB39 road. The Russian sniper was amazingly active, striking three times and breaking the squad guarding the T38 bridge. Rindis now moved him to better cover the action.
“I’ve 5 turns left to get off the board, and I believe I’m still in good shape though I still feel rushed. That damn INF Gun is finding all sorts of sneaky LOS, forcing me to plan carefully how to reduce his covering units so I can exit. The Rubble is making such an endeavor troublesome, so I expect a lot of close-contact combat in the remainder of the game.”
Well, it looks like my position is finally going terminal.
It’s been quite precarious for a while now, but the reinforcements came on in just in time, and in pretty good order. With them, I was able to put even more pressure on his north flank, and give him a very small area where he could safely exit the map.
However, German Turn 6 has seen him wipe out two stacks and engage a third in CC with a berserker.
Also, during my turn 5 I took what I deem a fairly good chance, but it didn’t pay off. I had a reinforcing 458+MMG in HH39, under CX. I put him on opportunity fire, on the gamble that he wouldn’t be able to break an ‘8’ in a wooden building, and I could fire without the extra +1 DRM.
Well, he broke him. I advanced a squad in, and they failed to recover the MMG, and he broke him. I have a HS available, but that’ll have to wait for my turn, and I may also have the 458 back.
But really, the loss of II42 and JJ42 will probably keep me from keeping him from easily moving enough MGs off the map in the next three turns.
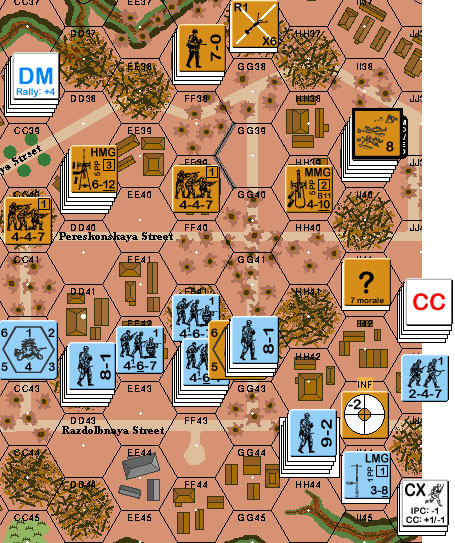
Situation at the end of German Turn 6 RtPh. CC is Berserk German 247HS vs a Russian 458+LMG. JJ44 (gully) is about to exit a LMG.
And Patch continued the story:
“And it’s not getting any better.
“My 247 advanced into the CC, making the odds 1:1 against the 458 (last unit I was worried about). I put the 9-2 and a 467/LMG combo into Crest in HH44 in case the CC failed, thereby allowing me to put all of the wood houses that can interdict my route unde fire as I follow-up with units into JJ43 and HH42. Everyone with an MG, just about, moves one more hex to the edge. Units without MGs move forward to provide covering fire. I’ve the CC41/EE40 road interdicted by several units, so his 9-2 and HMG will have a hard time pressing into my rear.
“I expect this to end next turn.
“On a note that has not been mentioned, Rindis’ sniper has been active beyond belief these last two turns. His “5” activation number has been rolled an inordinate number of times, and it’s getting damn frustrating. Thankfully he’s not attacking every time, but 2-3 activation numbers in a fire phase are not uncommon. His sniper even pegged my sniper, so my number is now a “2”. This is Stalingrad, after all, so I suppose I shouldn’t complain.”
And he was right. I have conceded as of the beginning of my Turn 7.
Russian Turn 6 pretty much cliched it. My rally phase consisted of me getting a single HS back in action while eliminating my small MTR and CRing the 458 elite squad that was supposed to rally and man the MMG in HH39. This left me without many choices on my turn. I tried to shift south of the xx40 hexrow road to put more direct pressure on him and actually get my MGs to bear on his MGs.
It didn’t go poorly, but it didn’t go as well as I needed with how desperate the situation was getting. I managed to ambush and eliminate a squad of his in CC. But, while satisfying, it was just part of the outliers protecting the valuable part of the OB. Despite my efforts, my fire during German Turn 7 was largely ineffectual because I couldn’t get LOS to the guys I needed to hit. Some things were going my way, and an extra couple columns on the map would have kept me in it for a turn, but as it was, he had exited 16 of 20 points at the end of his turn and had more guys I couldn’t reach ready to exit.
Situation at the end of the game.
It’s a fun scenario. We both agree that it’s quite a thorny problem for both sides. My setup was on the premise that the Guns and Fortifications would be positioned to cause problems for a north assault, and be high enough to see over things to help a south assault. Not a bad premise, but needed… say two more squads in the south. I had a HIP squad w/LMG in CC33 and mines in HH31, because I think one the trickier things a German could do is strike north to get away from where the infantry needs to be, and then try to exit. The DD32-JJ32 gully seems ideally suited for this. It’s more open than the south route, but not so open as to give every Gun on the board a free shot.
The scenario does seem a little too dependent on just how big of a choke point BB37 can be.
Patch’s alternate attack would have headed for the X29 building after going around the factory. It would have been interesting, as I had tried to design the defense to come to it’s aid in the case of a north attack as it is an obvious objective.
One serious variation I had considered was to set up the INF pointing down the xx43 road and trust in covering troops and the gunshield. Nice for the south attack, useless if the Germans go north.
Initial Russian set-up north of the gully without HIP or ‘?’. Note the MTR pointing the wrong way….
Next time out will be scenario 79, “Bridge of the Seven Planet”s, from CdG. Patch will be taking the defending French, leaving me to figure out how to use trucks (and wondering if there’s any special reason why I’ve got one Gun and two crews).
Patch’s final commentary:
“Yep, BB37 is the key hex of the scenario. The Russians need it to move units across the gulley to meet the German assault axis. if you can, it’s worth it to park the OBA there for a turn or three to permit your forces to advance deep before the Russian reinforcements arrive. Losing my OBA as I did forced me to divert more of my attention to my northern flank than I had planned, and probably delayed me by a turn.
“I’m definitely interested in trying this one again as the Russians. The key appears to be investing heavily in the south, and relying upon the open ground to the north to help interdict a push that direction until reinforcement arrive.
“A replay should be fun. :)”
Discussion ¬