
France 12-12
After our refresher course in C&C: Medieval, Mark and I went back to the Simonitch ZOC-bond games, and tried out France ’40. It’s two scenarios and a conjoined one, and we did the Sickle Cut scenario, which starts on May 13, as the Germans cross the Meuse.
Mark had the Germans, and presumably played more cautiously than he should have, though it certainly worked out towards the end.
Getting across the Meuse is probably best done with help from the scenario rule that lets the Germans use multiple air units on one combat for the first turn. However, we missed that, and Rommel didn’t even need to re-roll as the 7th Panzer got a 5 on a 1:1 for a DR2 to advance over the major river. Similarly, the 6th Panzer had a 2:1 (boosted to 3:1 with air and no opposing artillery) for a A1/DR2 that forced a fortress brigade back. Similarly, the pair of green divisions near Sedan were defeated and forced out, one with a D1.
This was also the major rules goof of the game, as we didn’t notice until a turn or so later that crossing a major river stops all advances, even with a road bridge (which we generally didn’t have here either). So there were also some advancing combats to make things even better for the Germans (which was at least good practice on that mechanic, which we haven’t gotten use nearly enough in other games).
All this meant that the French line pretty much dissolved between Sedan and the central Ardennes. I had to leave the south-central plains open, and merely start anchoring a new line on the Aisne.
For the second turn, an assault on the center of the Dyle Line produced an EX, but an attack just north of the Ardennes got a D1, prying open that area, especially when a breakthrough to the south produced a DR2. An EX took out one of the defenders of the Aisne, but the 2nd Panzer declined to advance, and the Germans lost more tanks to a DRX near the Maginot Line. The main German problem in the south became a lack of supply since there was no clear road west.
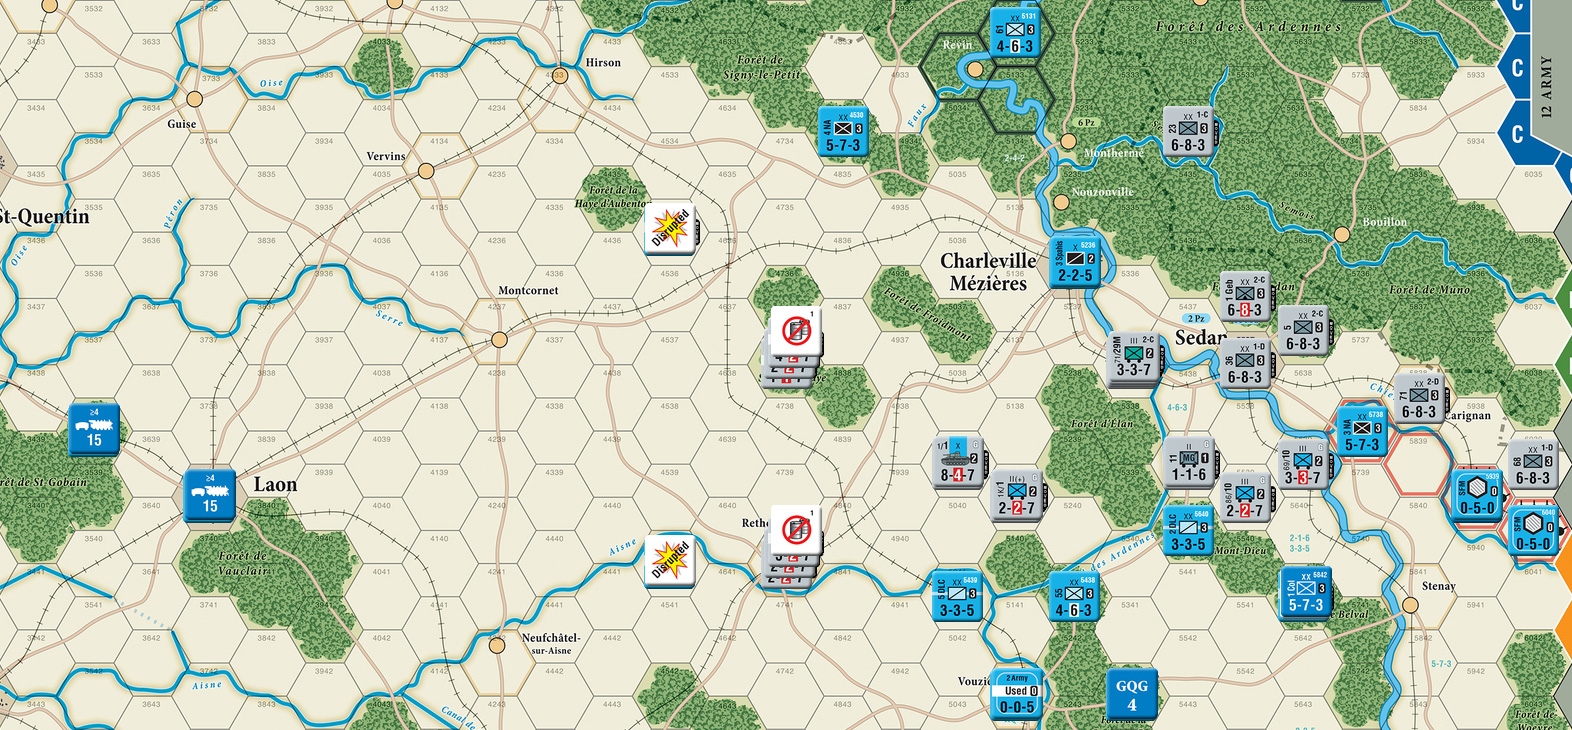
I got a SE infantry division, a French tank battalion from the north, and the British LAR recon unit. The last sped south towards the main trouble, but in the south I had to give up the line of the Ainse, though there was still a shaky line through Reims. The Germans knocked out the middle of the Dyle Line (D1), giving the north a new problem, and Mark got an EX on Charleville, leaving the city occupied, but he now occupied the vital road link just to the south for supply. The south continued to crumble with a couple attacks forcing a full retreat to Reims and and crossing the canal further east.
My turn saw a reduced infantry division come in from the north, and two full-strength ones from S/SE. I had to abandon the Muse in the middle (I think Mark could have made pulling out even tougher, but he was more focused directly north of the Ardennes), and I realized that the SE corner was going to become a pocket (a supplied one, thanks to off-map entry, but still with no good way out), and started shifting divisions to cover the edge of the map near the Aisne. But, there was now a skirmish line running from my center positions to Reims, so I could slow the Germans down again.
I had abandoned the southern end of the Dyle Line, but the north end was nicely positioned behind the Dyle itself. Of course, there were now a lot of Germans up there. The fort itself took an A1/DR2, while two full stacks took on a two-division defense for a D1, with the advance getting over the canal there. The Charleville defenders were wiped out in a desperate defense that at least took a step with them. In the far south, movement and combat started cutting off 2nd Army HQ, along with three divisions.
I got a tank battalion in E, which I sent to SE by rail, a second one in SE, and a division in SE (and de Gaule). The good news in the south is that one arm of the encirclement was elements of two panzer divisions that I could in turn hit from a few hexes. This was complicated that a GQG marker was in the pocket, and we remembered (re-discovered) that they can’t attack just in time. Annoyingly, I got a DR2, and Mark got a 12 (modified) desperate defense to hold. A second attack at least managed a DR2, putting three motorized regiments out of action for a turn.
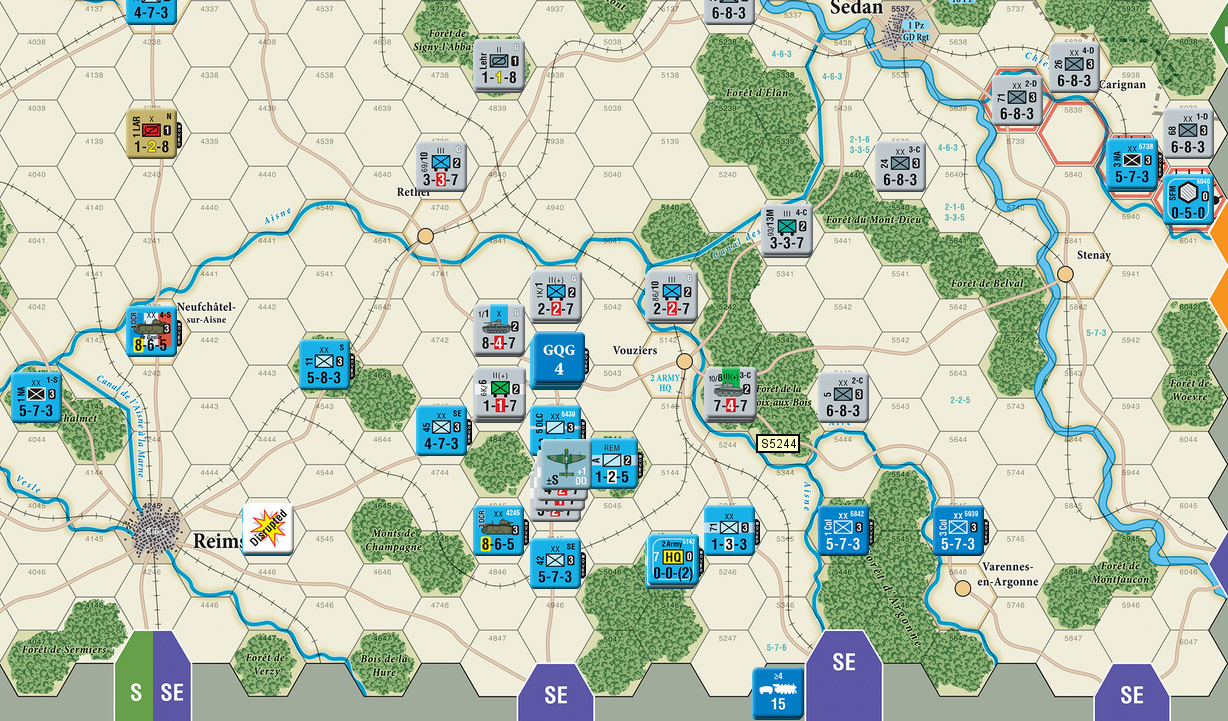
The Germans continued their advance in the north, completely overrunning the canal line, and wiping out a remnant backup to the line in breakthrough. At the far south, a D1 reduced a division and sent an entire stack running for the board edge, while another remnant was knocked out. My reinforcements were two British motorized divisions in the north, and two French divisions in the S and SE. This let me patch up a new line on the north edge (a bit too far forward), and do another attack in the south for a DR2 to put the 6th Panzer out of action for a turn.
Mark had actually cut two divisions in the Ardennes off from supply the previous turn, and now he cut off a third because I just didn’t have anything left in the area. The big surprise for me was with a bunch of French units coming in the south and actually managing good counterattacks, German units started heading away from the area to the north. A D1 turned the north edge again, and he cut off a fourth division in the Ardennes. My turn 6 reinforcements were two armored battalions (E and SE) and two more French divisions in the south.
The German pullback in the south gave me the room to finish rescuing a couple divisions out of the SE, and push back towards the Aisne, driving a mixed stack back north of it with a DR2. This meant the far north was still in very bad shape, and Rommel actually diverted up there, and Mark started diverting units to close entry hexes (notably to keep a pack of British units from potentially entering behind the line and using them as supply while threatening German supply. He broke the next canal line up there with a A1/D1, and got a D1 against the stack that was out in front of Mons and Maubeuge, and then DR2s to force the thin area west of the Ardennes, and a DR4 to take Guise, and finish off (in exploitation) the only unit in front of St-Quentin.
My reinforcements were a small British motorized division, and three French divisions in S and SE (and the first of the four French recon units). The French army struggled to follow the Germans north (there’s not nearly as many motorized units…), and managed another DR2 on the mountain division, driving it away from the Aisne as well.
The breakthrough in the center had not been stopped up this time, letting 5th Panzer go west and around the defenders of Cambrai, headed north towards a number of ungarrisoned cities, with other units just east of there. My attempts to hold in the north came to nothing as series of high rolls eliminated two British divisions, and left Mark in control of Tournai.
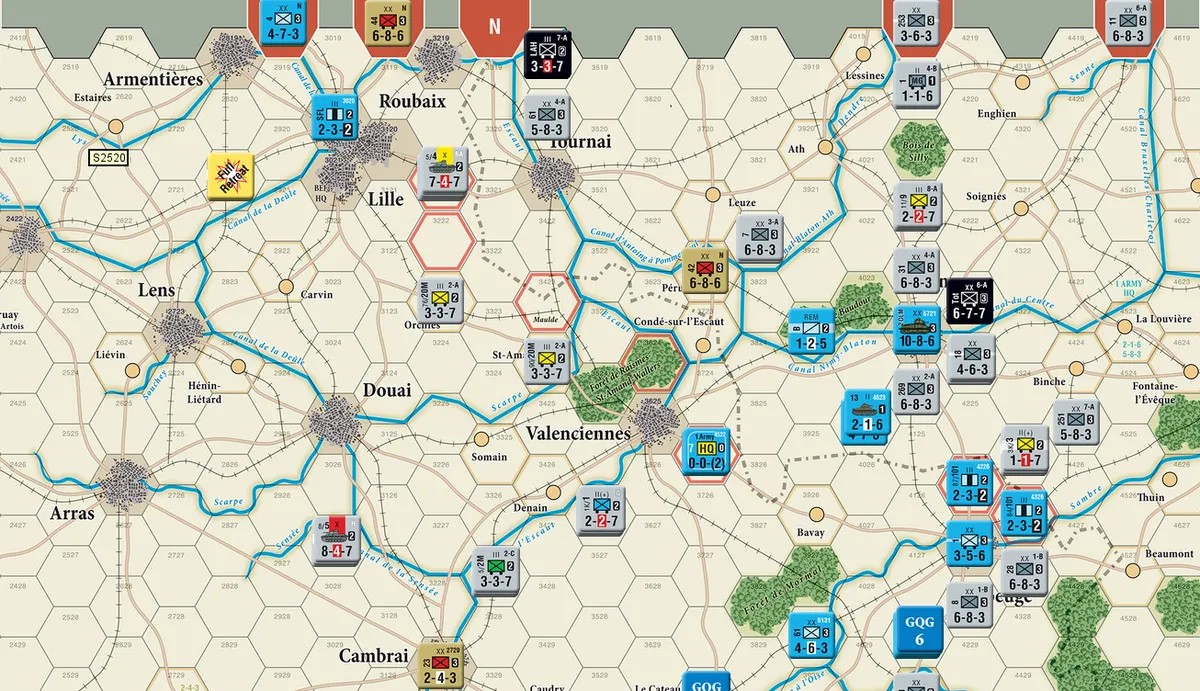
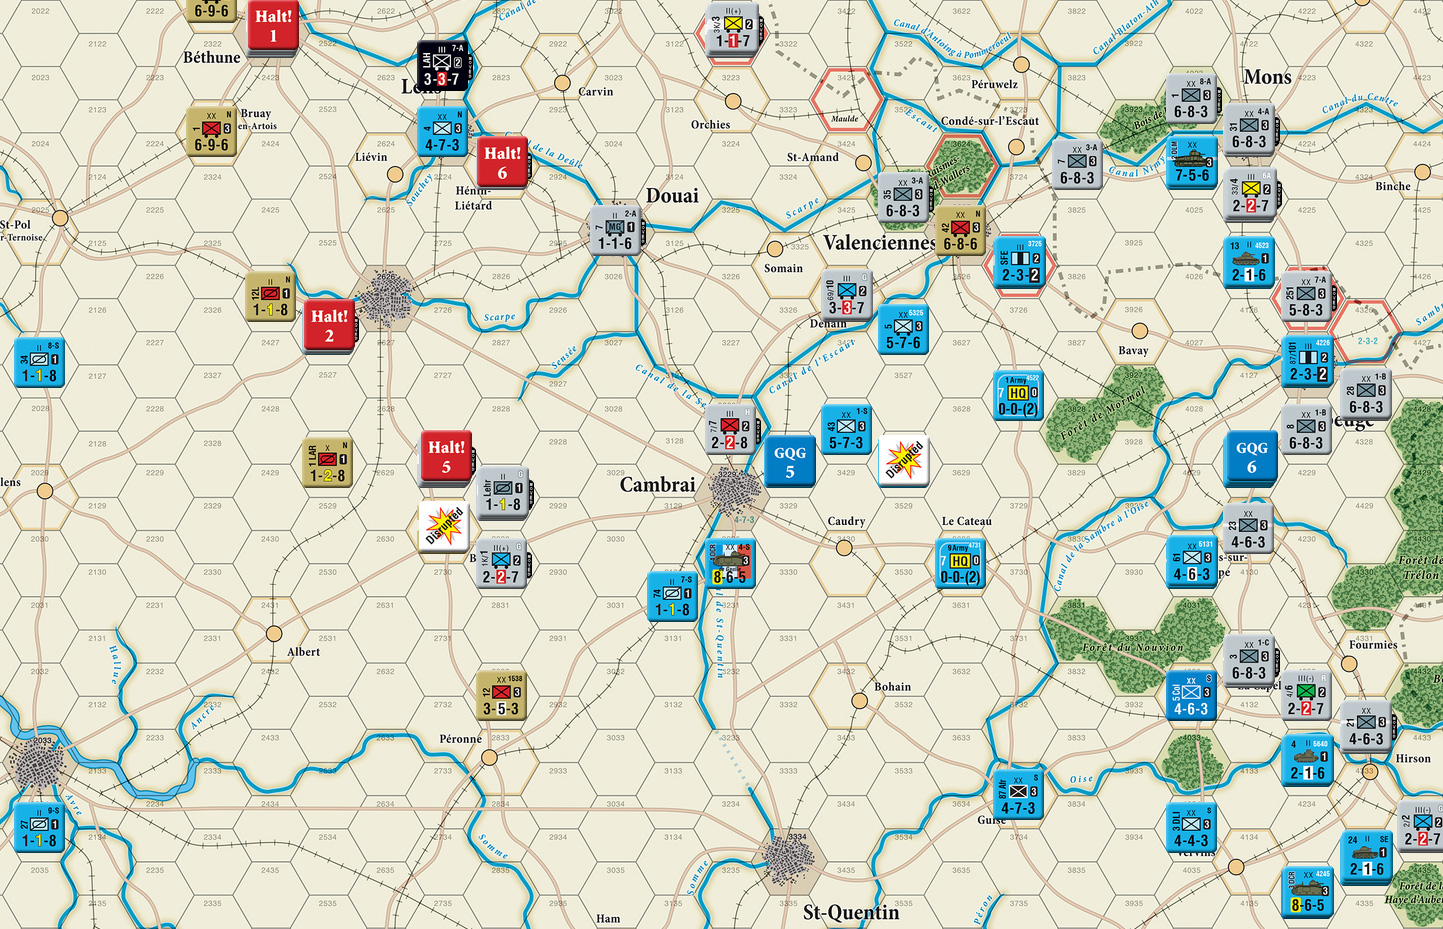
The good news was most of my reinforcements were in the north: a recon, a French division, a British motorized, and then a French division in the south. This gave me a basic line up there, but I was still only holding Lille with a fortress unit. I managed a D1 to retake Rethel, and also a DR2 to push him away from Montcornet. Mark’s advance took him through Arras and Bethune, and he easily took Lille (all three hexes) and Cambrai.
A bit late, the British started showing real force with two of the two 6-9-6 motorized divisions showing up on turn 9, as well as two French divisions and a tank battalion in the south. There still wasn’t a lot they could do, and a lot of effort went to interposing ZOCs between the Germans and the main north-south rail line for the next (last) turn. In the center, I could probably have retaken Cambrai, if a key unit hadn’t been under GQG. As it was, I couldn’t concentrate enough force on any one location for a decent attack, but the drive north did reach the center, where my forces had been getting hemmed into a pocket, but with Germans racing west, the area was clearing up for me again.
Mark reminded me about he Halt Order scenario rule, and I deployed it now to interfere with the last German turn. And, actually, it would have been hard to use much earlier, as it requires motorized/mechanized units to the west of everything else. The German advance in the north had actually run leg divisions out in front of nearly everything else until the complete breakdown of the north edge shortly before. It did keep him away from the west edge of the map, but he did manage to close another N entry and advance into an X entry hex.
Afterword
We called it after German combat, as it didn’t look like there was much to be done to change anything. The results when we counted VPs was surprising. Mark had closed one of the E hexes (he really should have gotten both), three of the SE, six N, and one X, for a total of 12 VPs. I got 10 for an intact rail line into X. But while I’d lost nineteen non-fortress units, I’d only killed four, two of which were one-step MG battalions. So the score was tied 12-12.
There were a couple of loose motorized regiments I could have attacked on my final turn, but even if things went well, doing more than one step at a time is very hard.
A look through the leftovers shows that British arrivals were about at the right proportion, though it tended to be the weaker units, and I was a bit short on the French north units (and I also tended to get the weaker ones). Certainly, getting the Matildas would have been nice, as would Monty’s 3rd division. As it was, we mostly felt like we kept forgetting the reroll rule for Rommel, but Mark rolled 5s and 6s for every combat he was in the first time.
Overall, its a very good scenario, and neither of us played particularly well, though Mark’s drive along the north paid off better than we expected. A note for anyone else trying it is that it nearly requires taking Mons, as roads in that area tend to go off map instead bypassing it.
Discussion ¬