
HF3 First Timers
After failing to get some Ukrainian partisans out of a Russian search-and-destroy net, Patch and I went back to Hatten, for the third Hatten in Flames scenario, “First Timers”.
I had the Americans, who are counterattacking in the eastern part of the map. They’re well-equipped, if a bit short on manpower, with eleven squads, two each of MMGs, MTRs, and BAZ, and four Shermans, (two 75s and two 76s). The Germans are defending one of the major roads with ten and a half squads, the usual mix of MGs, some extra “?”, and two Pz IVJs arrive on turn 2. The Americans are trying to grab 13 out of 26 building locations in 4.5 turns. There’s a +1 LV for all attacks, though I’m not sure if that’s for dusk, mist, or overcast (my biggest gripe with the set is the complete absence of footnotes).
While the Shermans are a match for the Pz IVs (and the 76s more than a match), I am painful aware that Patch’s armor tactics are better than mine, so they made me nervous. Between the squads and the “?”, Patch assembled a very formidable defense in and around the victory area. Pre-game rubbling also provided him some good positions and annoying positions to get at.
The Americans can enter some of their forces on turn 1, which lets them be further north than their setup area. I entered one pair of Shermans and a couple squads in that area, while the rest lined up near the boundary road looking to put pressure on the center. I started with a MTR WP attempt, but all the orchards meant it missed, and the other MTR merely got a -1 ACQ. On the other hand, a Sherman was able to put smoke in N22 with a sM. That was at the thinnest part of the orchard line, and allowed to to maneuver with some confidence. Maybe too much, as two squads and a leader broke to Patch’s fire. Or not enough, as Patch only had two shots at me.
I got into N22 to find it empty of more than smoke and mirrors. But it put a squad next to two more “?”, and +6 meant he was unlikely to dislodge me with fire. I also got into H27, which was also empty, which just left worries about K29, which was surely too far out there to have a real unit…?
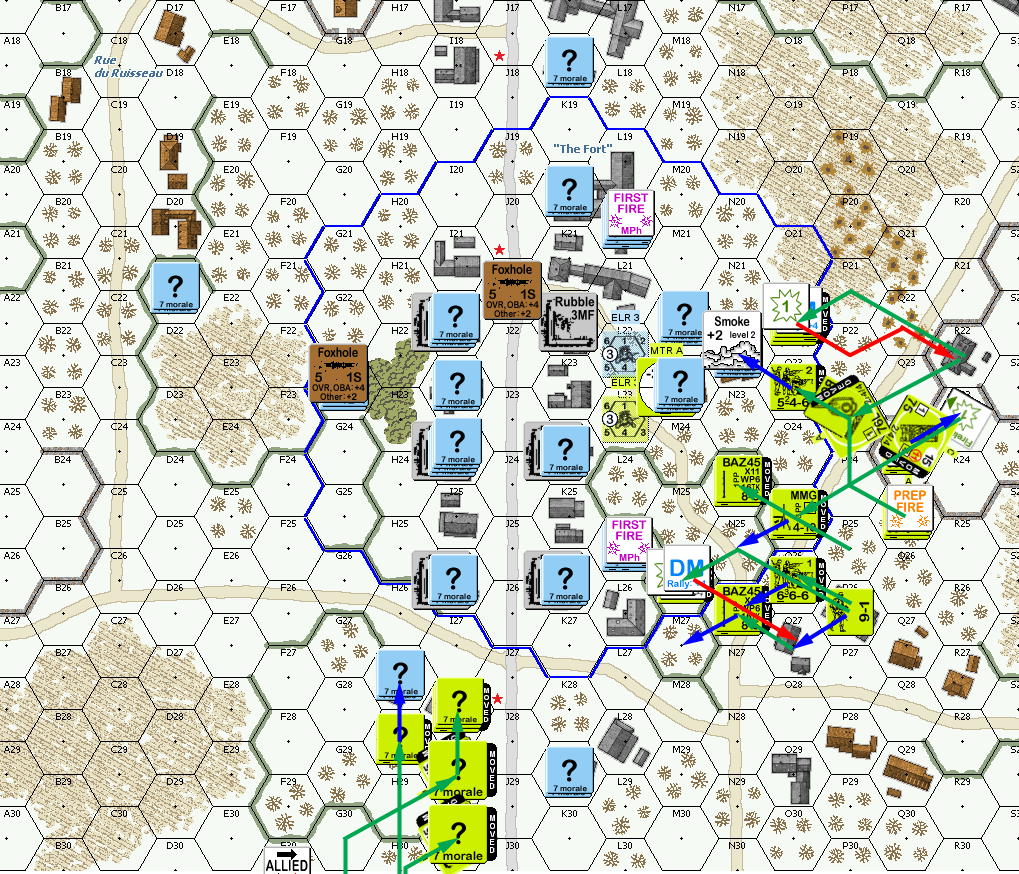
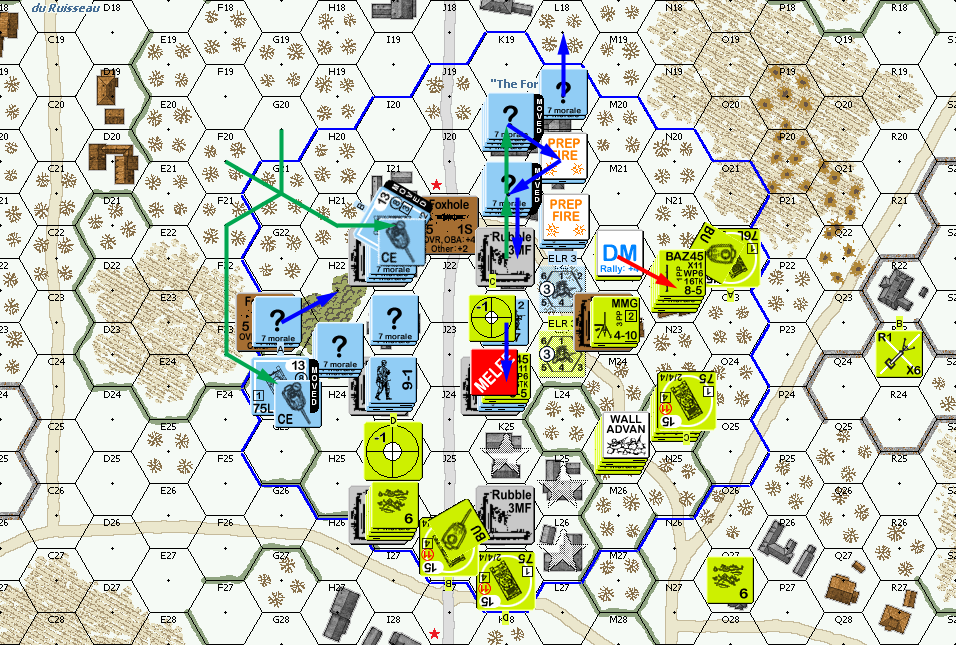
Situation, American Turn 1. North is to the left, and the board continues to the east (up) and south for some distance.
Nothing happened for Patch’s RPh, He didn’t bother trying to match firepower with the Americans, and largely skulked, though he pulled in his north and east outposts. I pretty much had nothing to fire at other than putting ACQ markers on places he might want to move into, and a shot from one of the Shermans rubbled M23.
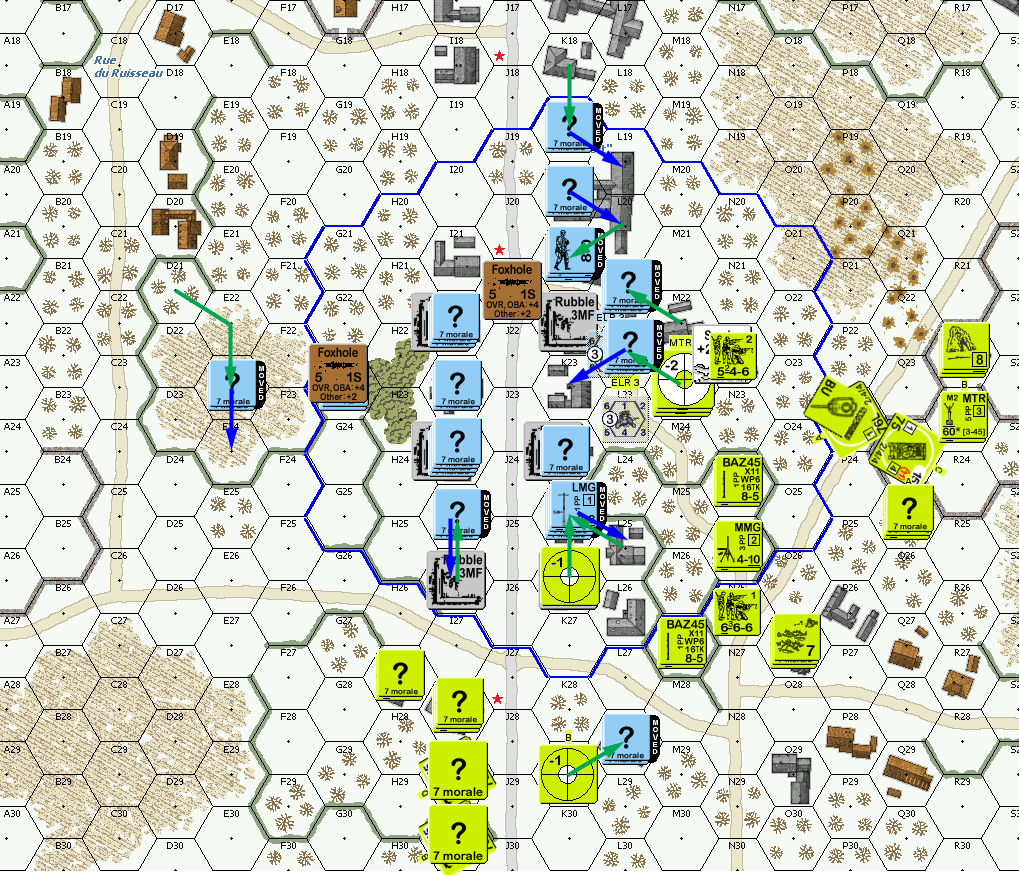
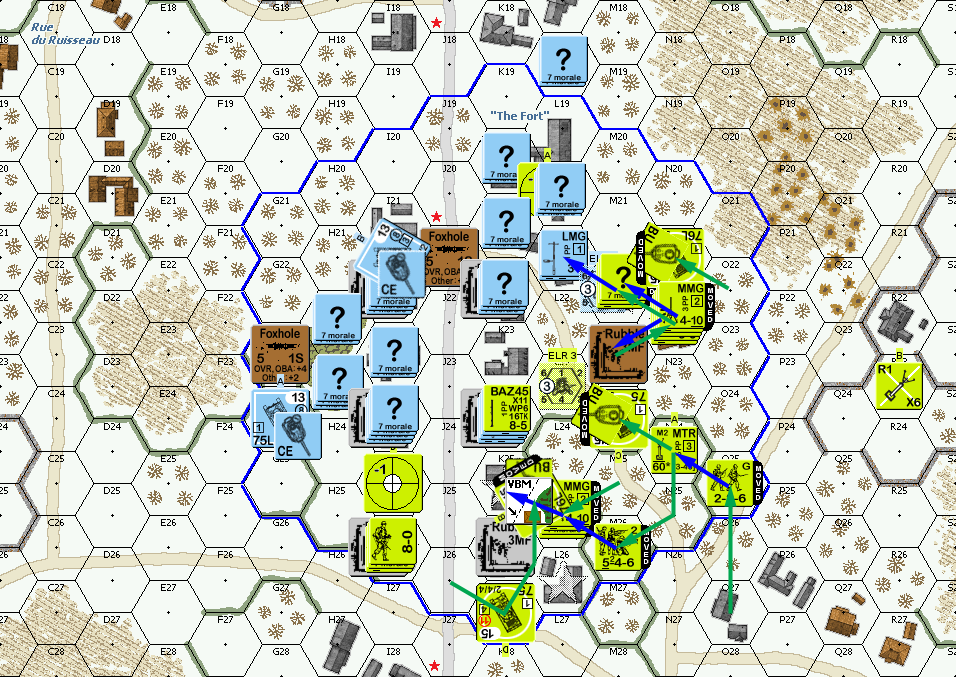
Situation, German Turn 1.
My Turn 2 RPh got my 8-1 back, and a squad, but not the squad with the 8-1. My one Prep was a MTR WP shot at L20 that only missed because of the LV. I started MPh by Dashing across the western road, and finding I26 to be empty (which became my first victory location). I then charged a squad to L28, but it turned out to have a HS, whose fire broke my squad to green. This led me to send the other flanking squad over to take care of the problem. I wasn’t keen to be diluting my effort that way, but I couldn’t leave a PF-equipped unit behind me either. And, that flank of the main line was also moving up, taking L26. The Shermans from that flank then moved forward and put smoke on K25 with a sM (I was having great luck with those…).
Near the center, Patch revealed a squad to break another of my squads to green, but thankfully his final fire had no effect. I claimed another three locations in APh, including L25, which just had a Dummy. For a moment, it looked like I was going to have another bad CC in L28 when I rolled a 6 for Ambush, but Patch also rolled high, and I took out the HS for no loss.
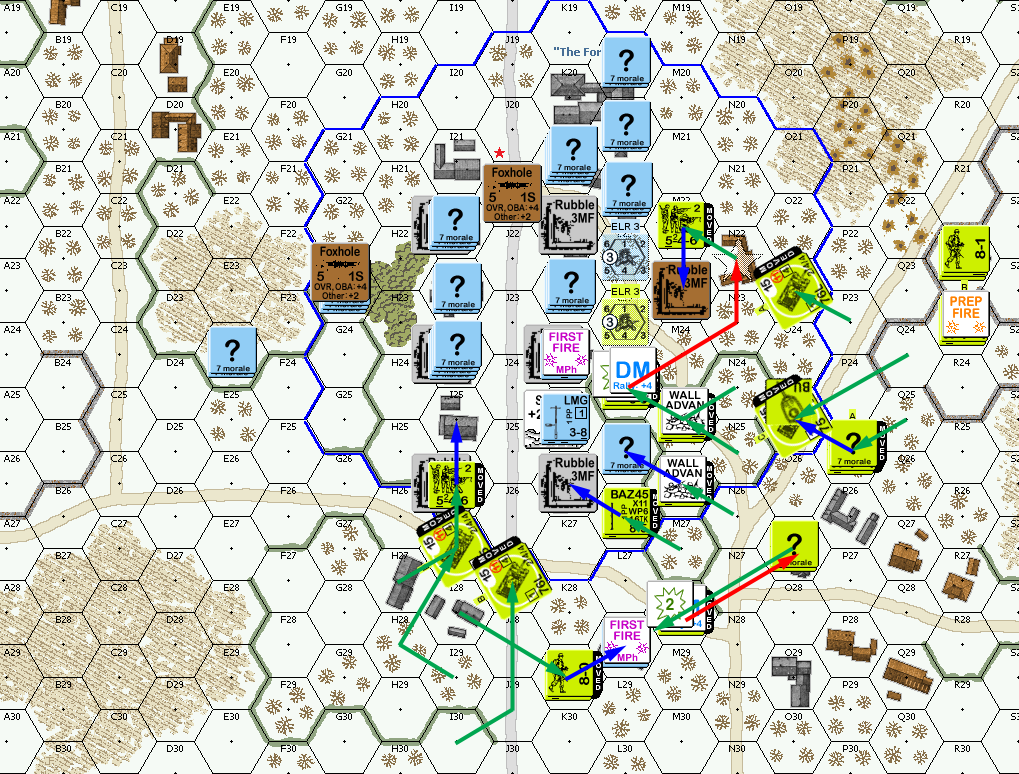
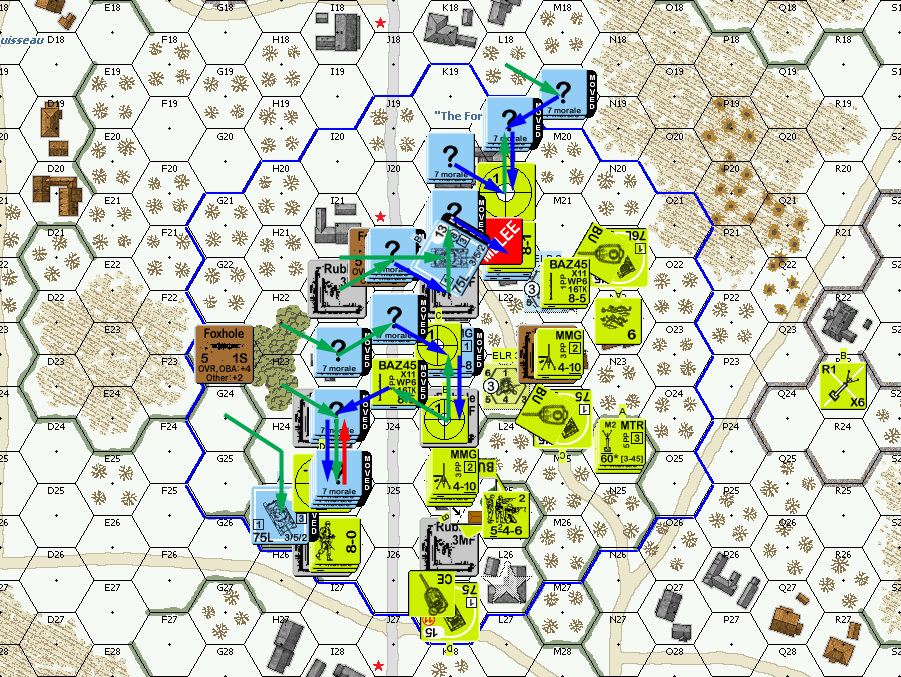
Situation, American Turn 2.
Patch lined up his Pz IVs on the northernmost road (D10/D9), opting for a sensibly cautious entry, while I’d been worried about the possibilities of entry down say in X10, and play hide-and-seek in all the hedges and buildings after zooming down the road towards R20. Of course, I had two Shermans pointed towards that approach just in case, and I could stop diverting my attention now. I rallied one squad, while another reduced on a 12 for Patch’s RPh.
The stack in I24 revealed itself as his MMG, which broke my squad in I25 (20FP!), but failed to break K26 on two ROF shots. Patch mostly skulked, but re-took M22, and the arriving tanks stopped a few hexes back from his main line (at the limit of their movement). I had no fire at movement, and my ranging shots ended up malfunctioning one of the MTRs (which it was probably time to stop playing with anyway…). One worry was that the unit in M22 was “?”, so my broken squad next door didn’t know to rout, and was vulnerable to CC. Patch had been considering this all through his turn, but eventually just voluntarily revealed them (causing DM) and advanced back to his line, instead of risking being stuck in CC with other American squads nearby.

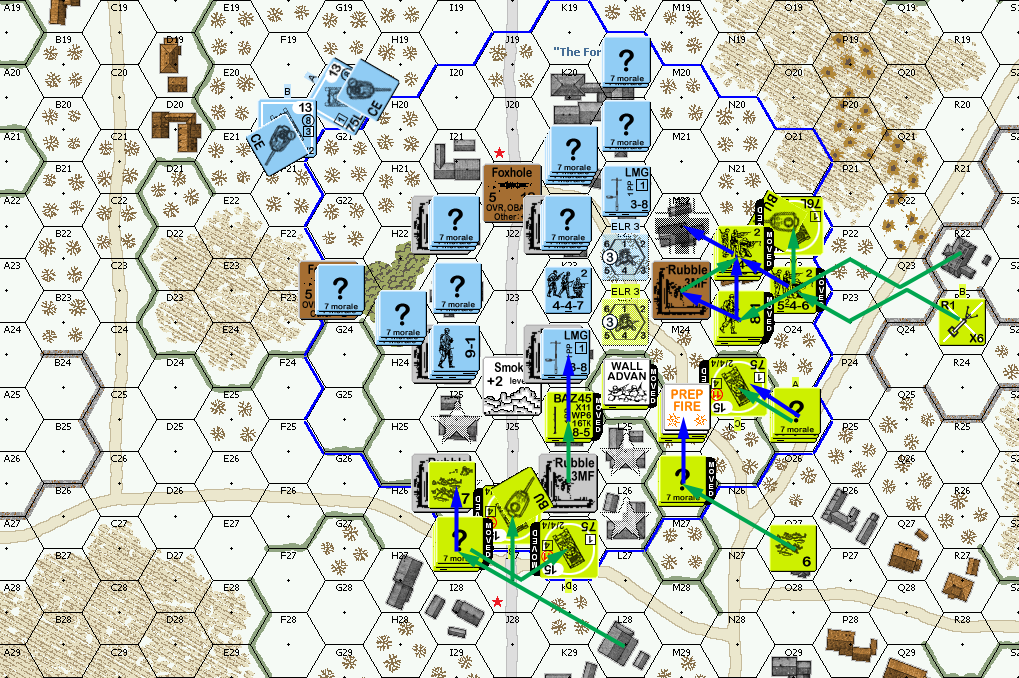
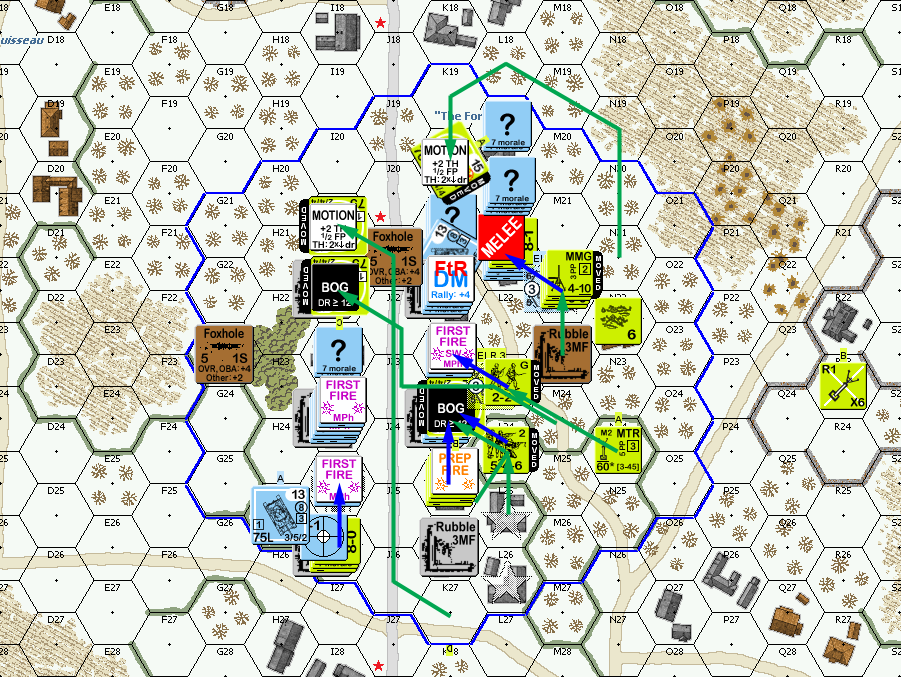
Situation, German Turn 2.
Nothing happened in my turn 3 RPh, and my one prep fire had no result. However, I got more smoke with a sM to help cover my advance from the west. My movement was mostly adjusting position a little, and trying to put pressure on K24. This cost me a squad when his big attack on L24 came up with a K/3, and a shot from further away eliminated the broken remnants. My fire didn’t do anything; Patch contemplated self-breaking K24 to get out of the way, but rubble would have kept him from routing far enough. This forced me to fight for K24, which dissolved into a melee.
Situation, American Turn 3.
Gusts blew away my smoke for Patch’s turn, and one of my squads Battle Hardened to 1st line, but my other rally attempt merely reduced the squad to a HS. Patch’s prep broke my squad in M22, but he moved very little. Mostly backing off from my advance in the SW, and positioning the Pz IVs around his stronghold. My fire did nothing but set off Patch’s sniper which reduced the squad in M22. I did scare Patch a bit with a timely switch from ITT to ATT, which let me hit, but the +3 rubble TEM still meant nothing happened. He advanced a second squad into the melee, and they knocked me out for no loss.
Situation, German Turn 3.
I managed to self-rally the HS in O27, but lost the HS in I26 to another 12 rally. I mostly crept closer, not giving Patch any good shots. I contemplated sending one of the Shermans after the Pz IV in G24. I figured with LV, motion, limited LOS, and the faster turret, I could get at least even odds on the initial round of shots, and I could try firing at his exposed crew as well. At the very least, it’d be too busy to fire at I26. Instead, I sent one Sherman around the south edge of the buildings lining the main road so it could get a bead on K24. (Thankfully, these are the “fast”—15 MP—Shermans, as I needed them all for that.)
I got into L21 and failed ambush with -3 modifier (I rolled a 6), and we ended up in melee (would have CRed him with ambush).
Situation, American Turn 4.
The only activity for Patch’s RPh was me failing to recover the MTR in N24. Patch nearly prepped a 548+LMG in K24 at K25, but decided against it at the last second. (It’s a tough call, especially with my trouble making MCs, but a +4 modifier is tough even with 16 FP.) Patch reshuffled his defenders for the end of the scenario, while I wished I’d kept a Sherman looking down the length of the main road.
It was looking like I’d have another turn of ineffective fire, when a decision to Intensive Fire K27 got a critical hit, revealing the 9-1 and breaking the squad (who took a 3MC from the CH). He’d moved adjacent to I26 with a Pz IV, but thankfully it missed in AFPh. Patch fed another squad into the melee, which continued without result.
Situation, German Turn 4.
Going into the final turn, I had eight Locations, and needed five more, which was a very tall order with the wall of Germans in front of me. However, I’d been watching Patch’s movements very carefully during the last turn, for I had a plan. Since I needed Locations, and it was the final player turn, the Shermans could actually Control any place with no enemies present, and Patch had left a few places in his rear open. As long as I could get there and live (likely, at least without a German turn to counterattack), that was three Locations, just leaving me to take two more. (It also helped that his Pz IVs were now stuck in places where they couldn’t get shots off at them.)
I only had a failed self-rally for RPh, but Patch got the squad I’d just broken back. My one prep was the MMG squad at K24, but I still couldn’t get a result. My HS in N24 moved up into K23 revealing a 447 there (I’d been hoping for a Dummy). The Sherman I’d walked into bypass last time went into K24 and bogged, keeping them from firing at my squads next door, and Patch didn’t want to risk breaking from backblast. The second one circled around the east end and, after using ESB for one more MP ended in K20. The third cruised down the main road, with Patch trying a PSK (miss and X#), street fighting (pass PAATC, miss), captured BAZ (12), PF attempt (success, missed, and broke squad) to go into I21. (He contemplated the Pz IV as I went by, but realized it was a +8 TH thanks to needing to swing the gun 180° with limited LOS.) And the last one squeezed through the gap in K23 and (after barely passing an ESB check) bogged in I22, after a PF check that pinned K23, and another missed PF.
Final Fire saw the H25 Pz IV miss with MA and MG, another two PFs at K20 (one missed, the other failed the attempt, part of the nice part of this plan is those Shermans were now all in +3 terrain, with a +1 LV cancelling the size modifier). The other Pz IV fired into the melee, generating PTCs for everyone, which pinned everyone. He then finished with IF shots from both tanks but merely disabled the MA on H25.
We ended up with three close combats and the melee. I25 was fairly easy, with a concealed 666+8-0 vs a 238. I failed ambush, declared HtH… and nothing happened. K23 was the real longshot, where I had a HS against a pinned 447. This time, I got ambush, and successfully took out the squad. K24 was decent for me with two of my squads and the Sherman against his 548. However, thanks to the Sherman, he got ambush and withdrew out to K25, trading Control of the two Locations. That left the melee in L21, which had pinned 548, 447, 546, 8-1 and the 666 and 546 I advanced in. I converted the melee to HtH, went all-in for a 14:9 attack… and missed with yet another 11.
Situation, American Turn 5.
Afterword
So Patch won on the final CC roll, after a very clever ploy to withdraw from K24 and not give me a chance to win there.
The final turn or so had some bad luck for Patch, which he was overdue for, since he’d had some hot dice earlier (our averages were about 2 pips off of each other for turn 2). Meanwhile, I could hardly pass a morale check all game, and saw my infantry whittled down steadily the entire time—a squad and a half gone just from bad rally rolls.
That said, Patch had a solid setup, some rubble placement that really shut down some fancy LOS, and made me pay for every inch. He obviously hadn’t contemplated a last second tank rush; I had contemplated a more limited version in the middle game, but just couldn’t get everything to line up for making it worthwhile. Part of the trouble is remembering that LV makes the Shermans less vulnerable to PFs than usual.
It’s a nicely tight little scenario, and definitely recommended for anyone who has the HASL to try.
Discussion ¬