
Across the Potomac/Johnston vs Paterson
One of Mark and I’s long-deferred projects (there are many) is getting back into the GCACW series. We finally did so around last Thanksgiving, playing the first two scenarios of All Green Alike, the First Battle of Bull Run section of Stonewall Jackson’s Way II.
The first scenario deals with the initial Union offensive into Virginia at the beginning of July 1861, and goes for four turns (/days). The Union forces all start out in Williamsport (except one regiment back in Hagerstown), with two divisions, a cavalry detachment (which at that point in the war was considered part of the 1st Brigade of the Cadwalader’s First Division), and another separated regiment which becomes available on turn 3.
They’re trying to take a crossing on the Potomac, and then press on for pairs of deeper objectives (just needing one of each pair). The only Confederate troops nearby are Stuart’s cavalry (at Falling Waters), and Jackson’s brigade (south of Hainesville), with the bulk of Joe Johnston’s army back at Winchester (with another three brigades), and it isn’t allowed to move far on the first turn.
We actually did two tries on the first scenario. The first try had a series of really bad march rolls, and Mark let Stuart stand in front of a Union brigade that could just barely reach them on their second action, and found just how bad the early cavalry is against anything, as a Column of Route attack wiped them off the map and allowed an advance into Falling Waters. Jackson exhausted himself (and Thomas’ 1st Brigade of Cadwalader’s division) in an attack, and better rolls allowed the rest of the division to start getting behind him, while Kelm’s division started crossing the Potomac to the east.
In our next Vassal session we started over with what had been learned. Cadwalader’s initial activation went a lot better, and occupied Falling Waters after a quick cavalry retreat. The Union had several more activations, and Cadwalader found Jackson south of Hainesville and started deploying to fight. Jackson finally got to activate, and pulled back to Martinsburg. Kelm started his division around the long way to cross the Potomac at Sheperdstown while Patterson detached a brigade (Abercrombie’s) under his own command to follow the Opequon south.
Thomas’ cavalry was posted to guard the bridge near Martinsburg, and Jackson came out and scattered the unit (poor retreat roll), while Stuart moved from covering Jackson’s flank to protecting Kearneysville.
Johnston got the initial activations for the second day, but made bad time, leaving Jackson to face the approaching army on his own. However, Cadwalader kept rolling 2s to keep him from getting far either, and Kelm barely did any better. Abercrombie (under Patterson) got across the Opequon and onto one side of Jackson, while Williams’ brigade came up on the other side (becoming disorganized in the process) to close out the second day.
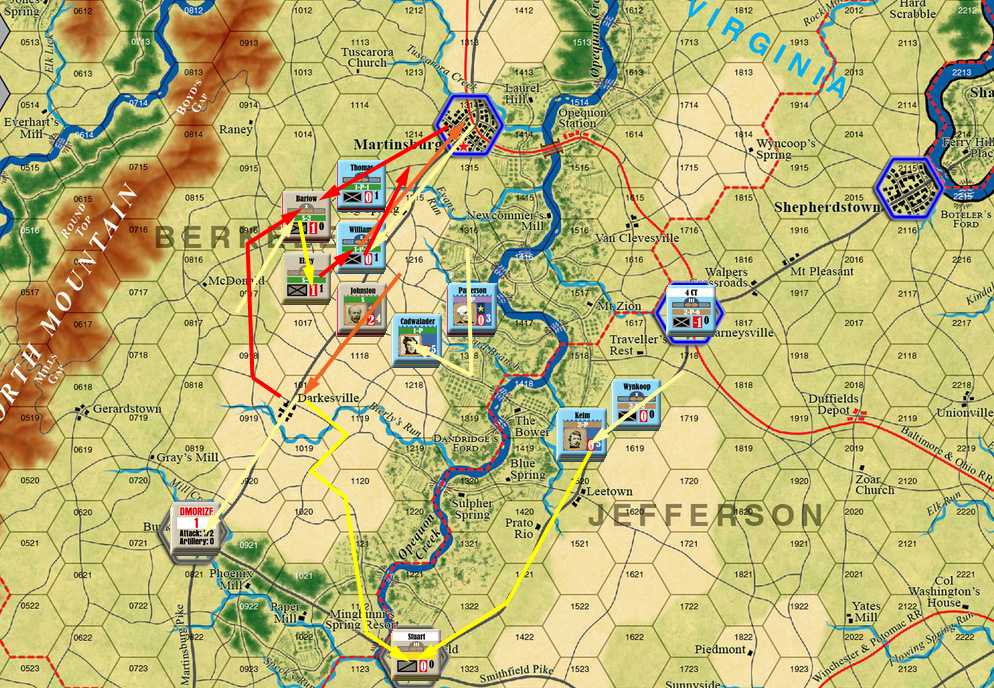
End of turn 2/July 3; Johnston’s stuck another nine hexes off the bottom of the image. Arrows are colored by the current fatigue level.
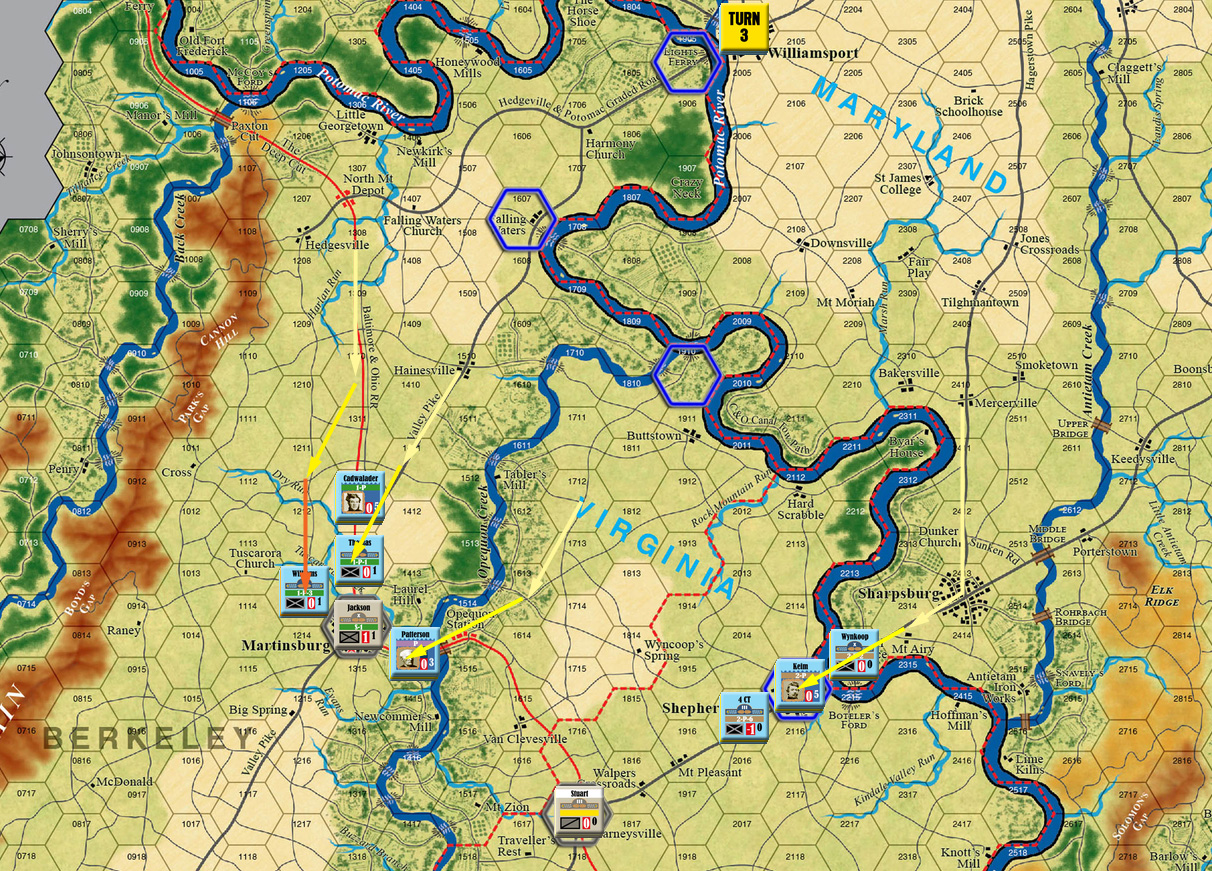
Johnston got the first initiative of the third turn, and made much better time, but Paterson got the second one to do a grand assault against Jackson in Martinsburg and send him reeling back along the pike after losing half his brigade (2DR/a). Johnston established a line south of Eyans Run, and Stuart attacked the 4th Connecticut as it lead the way towards Kearneysville, but despite an overall positive modifier, just wore out both units.
He then had to retreat in the face of Negley’s brigade, who took Kearneysville and the 2nd Division continued south from there. Cadwalader closed up on the Confederate line, and Paterson crossed the Opequon twice to end up on Bartow’s flank.
Paterson attempted another grand assault at the start of the fourth turn, but only managed a regular assault, though the other units on the flank still managed a decent final modifier with tied rolls for a Dr/Da. Elzey moved onto Thomas’ flank and Bee then got the same results on him, forcing him back to Martinsburg. There followed a bunch of maneuvering in the open area west of the Opequon, with both sides moving nearly-blown brigades to hold flanks, with Bee finally attacking Williams for another Dr/Da and separating the Union forces into two distinct parts. But the Confederate units were now all at fatigue 4 and unable to do any more that day. (Other than Jackson who retired to Bunker Hill while still demoralized.)
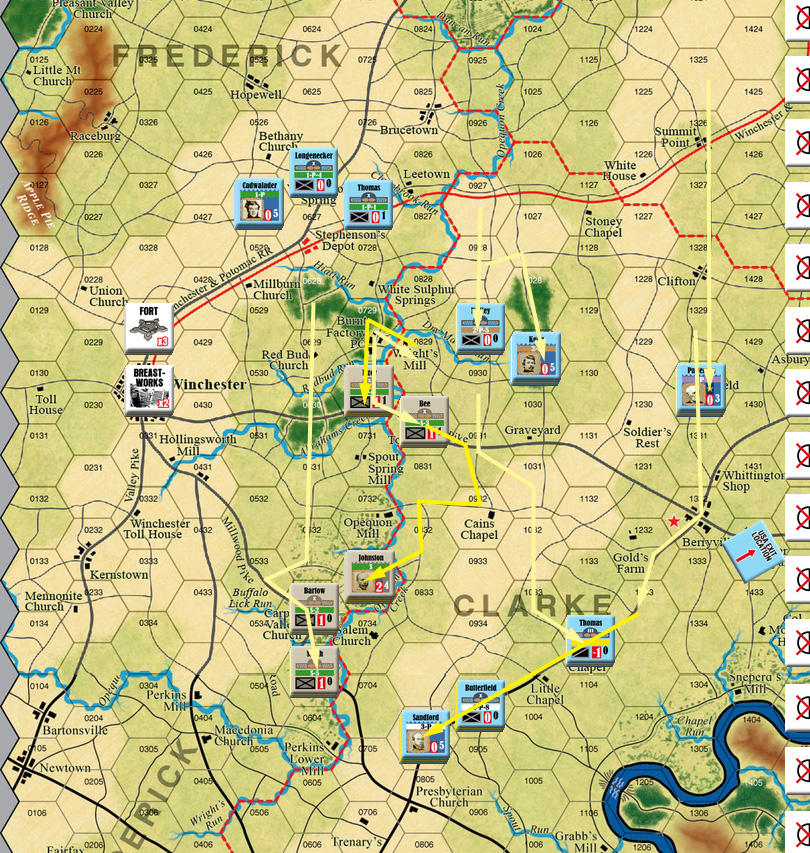
Battle of Martinsburg, mid-day.
However, Kelm finally got a good march roll, and got down to Smithfield (one of the final pair of goals), and chased off Stuart’s troopers to occupy it. The day ended with a decisive Union victory (20VP).
It’s definitely an interesting scenario, though the Confederates are going to need to work to keep Jackson’s brigade from getting wrecked early on. My plan from early on was nearly what happened: Put one division on each side of the Opequon to threaten both halves of each objective pair, and use Paterson to command one brigade to put it on whichever flank needed the help. This was largely based off the fact that squeezing two divisions in on the west side would take some work.
The second scenario is unusual. It covers Johnston pulling out of the Valley and shifting east to join Beauregard’s army near Manassas. The map area is very limited, and the main goal is for units to leave the east side on their way to the battle brewing to the east. The scenario notes that if both sides do just this, it’ll be a Confederate victory, so the Union goal is to engage the Confederate army and keep them too busy to leave. Johnston starts out camped around Winchester, with some fortifications, with generally the same forces, though there’s also two small brigades not under his command to hold Winchester, and the Union can pick up some points for capturing the town (which also distracts from Union units leaving the map…). Patterson’s army is at Bunker Hill, and is the same as before, with the addition of the Third Division, under Sandford.
The primary Confederate exit is the railroad at the south of the map, but both that and the regular east-side one are off limits on the first day (out of three) as long as the Union doesn’t proceed too far south. This leads to some gameyness, including the potential for the Confederate player to pass, as he’s not allowed to go anywhere important, and the Union player to then pass, effectively cutting a day off the scenario…. And if the Confederate moves too much, the Union player will sweep in after the troops are too tired to go far that day.
Mark took the Confederates again, and got the first initiatives to set up blocking positions in front of Winchester. I finally got an initiative, and Cadwalader’s 1st Division headed south sweeping Stuart’s cavalry before him (botched retreat roll). Johnston concentrated his army behind the Hiatt Run, and then started passing, so I had a chance to do something. The 2nd Division started moving behind Cadwalader, and the 3rd headed down the east side of the action. By the end of the day, both armies were close to each other, but not in contact.
The day started with elements of Johnston’s army crossing the Opequon, and Thomas’ cavalry retreating towards the south. Then the 3rd Division headed south, passing through Berryville and headed towards the Millwood Pike, which is the northern Confederate exit point. Kelm’s 2nd Division moved SE, trying to get in the way of any moves east, and Johnston headed half his army south, getting onto the Millwood Pike, but Sandford managed to get into range of the crossroads first.
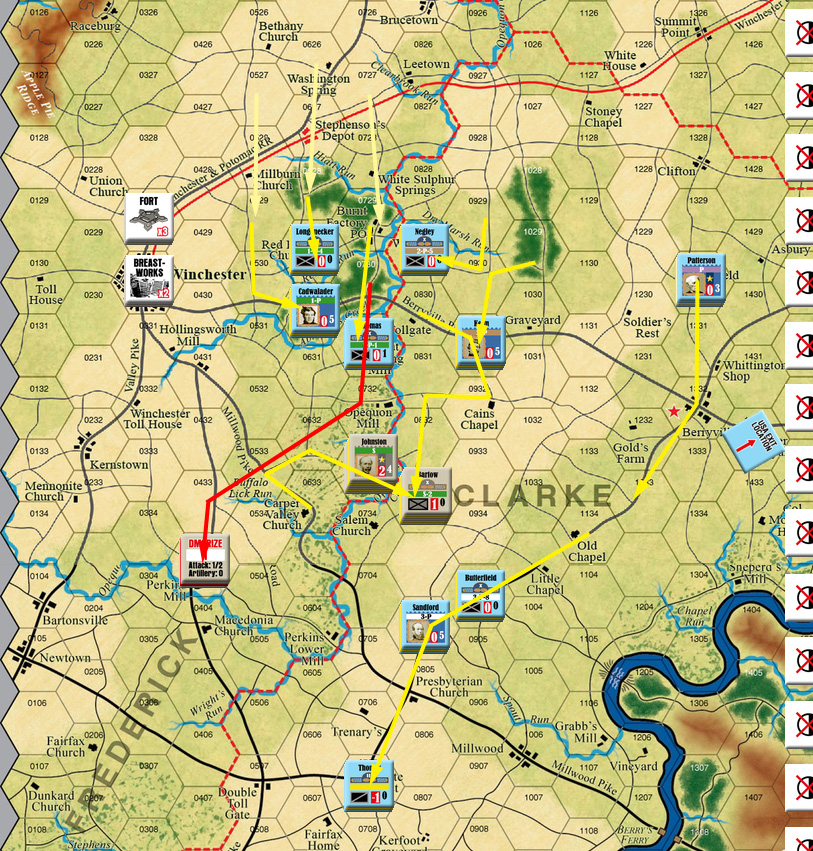
Morning of July 18.
Johnston maneuvered back to the north a bit, while Cadwalader’s 1st Division finally moved out and nearly surrounded Elzey’s brigade, which was wrecked by a prepared attack (2DR/a).
Battle of Abrahams Creek.
That was the last major event of the day, and the third day started with Johnston moving forward to attack Butterfield’s brigade for a D/1D, while Bartow blocked Paterson and Abercrombie, and Jackson moved his brigade up. The second activation saw Jackson take on Butterfield for another D/1D, and Bartow headed south towards the Millwood Pike, having worked through the separated elements of the Union army. He then got onto the pike, and was just shy of exiting on the next activation, which saw Smith start the same move.
I finally got an activation, and assaulted Smith with Abercrombie’s brigade, for a similar D/1D, but left Smith unable to move. Bartow exited, Elzey headed out, but couldn’t get the movement to get close to exiting, and Sandford caught up to him with Stone’s brigade and got a 2DR*/a on a standard attack.
Afterword
And that was the end of that, with a final -3 VP score for a decisive Union victory. Obviously, the Confederate player needs to do everything he can to position himself for exiting at the start, but the gameyness I mentioned actually makes that rougher than I think its meant to be. I also got some activations right when I needed them so that Sandford could get in the way of the easy exit.
However, the special rules for All Green Alike as a whole are good, and really give the early war a different feel, with overall low tactical ratings for everyone (with some Union leaders being -1!), cavalry doesn’t do its screening job very well yet, and there’s hardly any artillery available. Also, command radius is smaller, so formations need to stay more compact. I’d like to see more 1861 campaigns, with McClellan’s initial victories in (future) West Virginia being an obvious one.
Discussion ¬