
183 The Pouppeville Exit
After finishing up “Stand Fast”, a look for shorter ASL scenarios led me to 183 “The Pouppeville Exit” from the current version of Yanks. It has quite a publishing history, originally presented in the General as ‘quick-play’ SL/COI scenario F, then becoming tournament scenario T5 for ASL about a decade later in the General, reprinted in ASL Classic, and now appearing in Yanks. It would fit in with the Paratrooper scenarios, taking place on June 6th as part of the 101st Airborne secure the town of Pouppeville, which lies at the end of one of the exits to Utah beach.
As a comparatively early scenario, it features a very rare fixed defensive setup (the only other one I can think of offhand is “Buchholz Station”, where both sides have a fixed setup). The Germans have seven squads (mixed conscripts and second line), plus a kubelwagen with AAMG and two 37mm AA guns. The Americans have six 747 squads, a MMG, BAZ, and DC, and need to take two (out of three) of the multi-hex stone buildings on board 3, and knock out the AA Guns (which can’t be moved, and merely breaking crew counts). Play ends at the end of any Player Turn where this is true, and the Americans have eight turns to work with.
All the action in on board 3, but but board 5 is also part of the scenario, and the Americans can either set up on the road leading to town on board three, or on the road on the other side of the gully on board 5. Mark took the board 3 option and headed for the hill overlooking the village.
This meant there was no contact, and I was free to move about to establish a defense on my first turn. It also meant that everyone gained concealment, as there was no LOS.
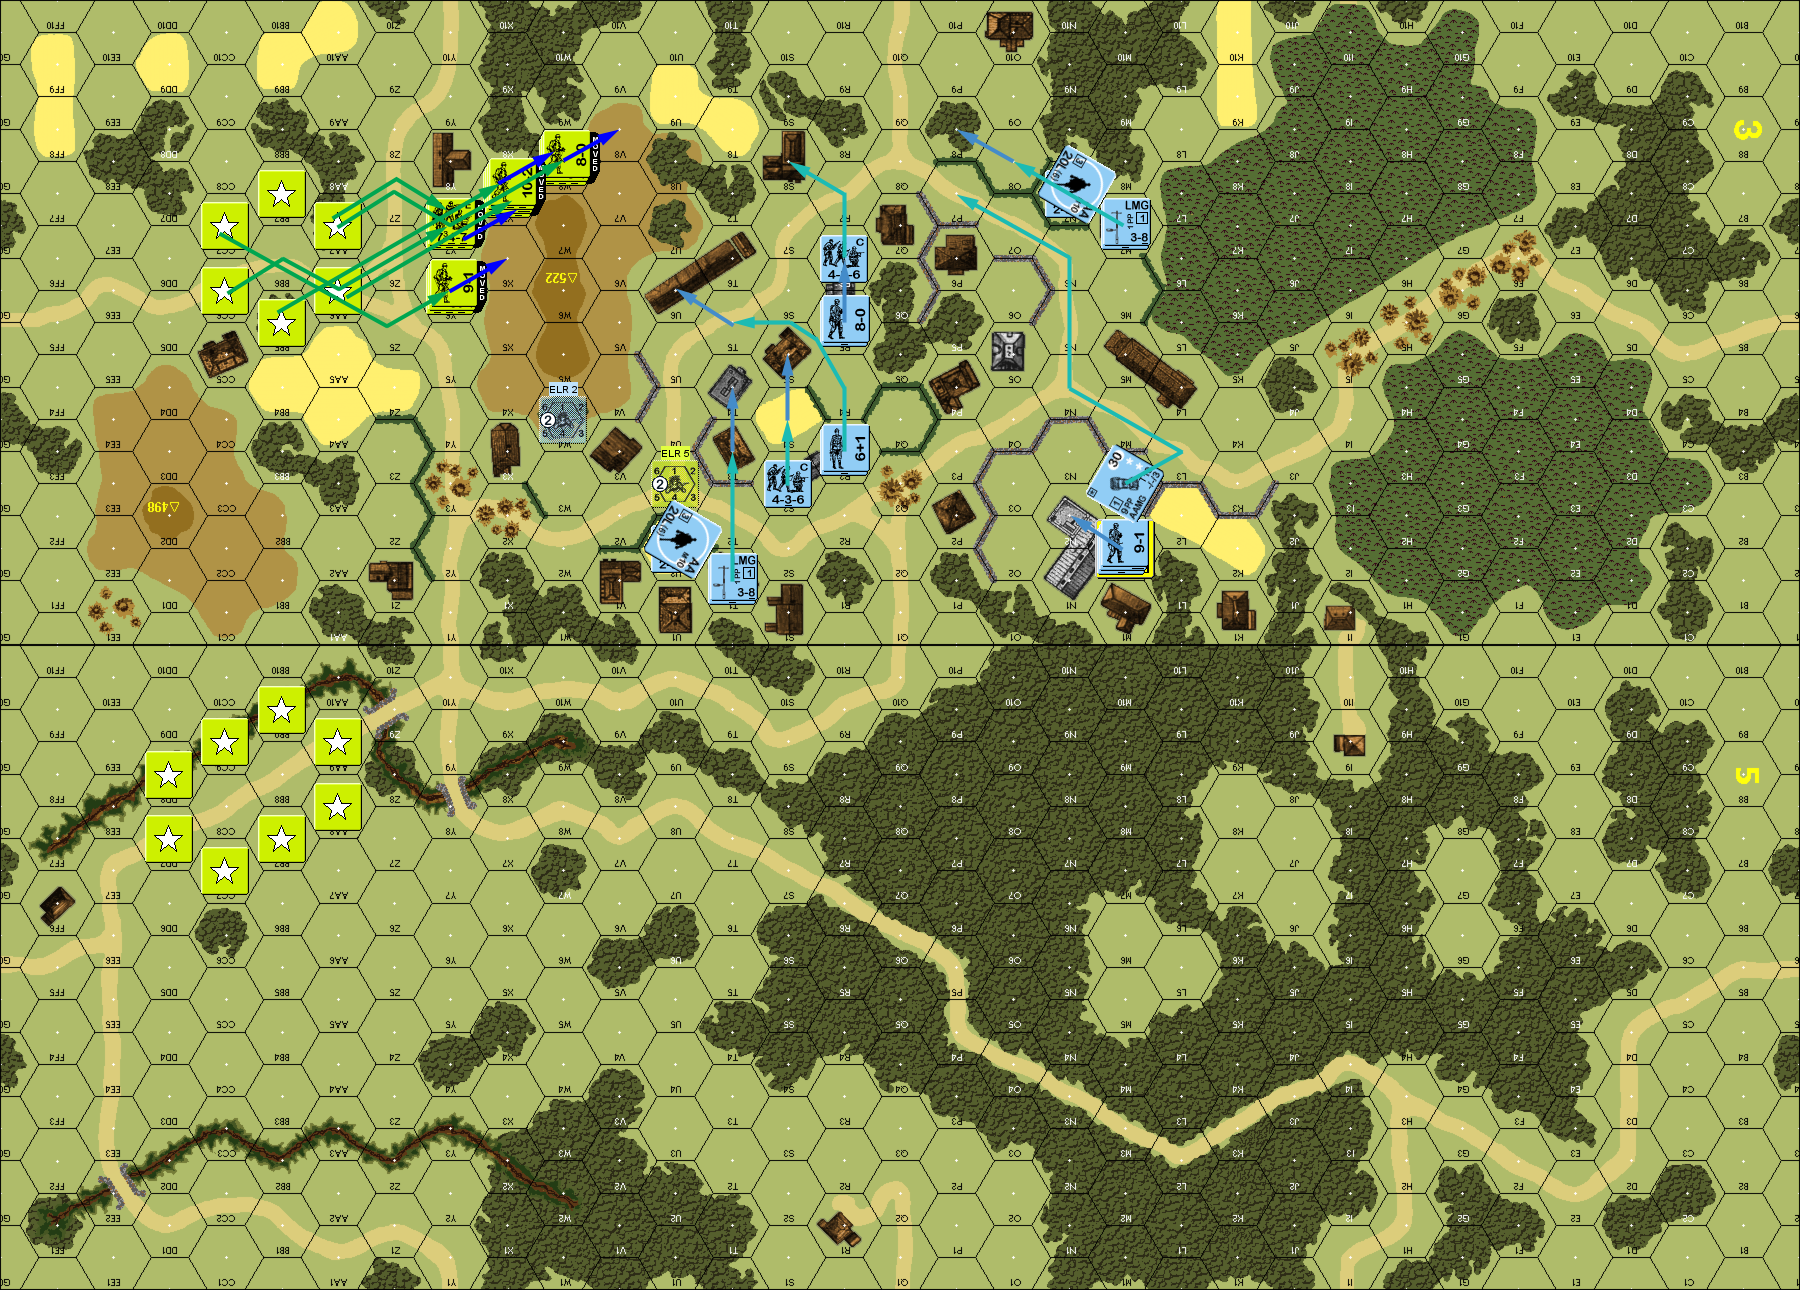
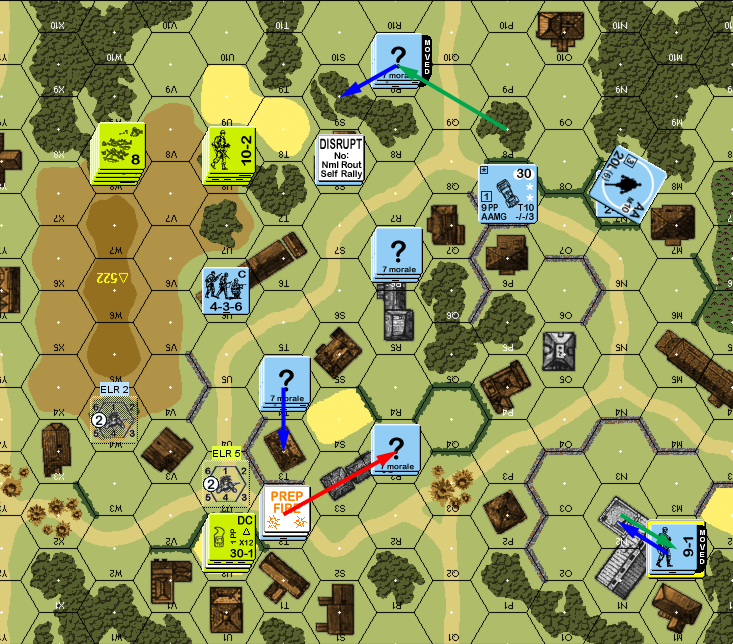
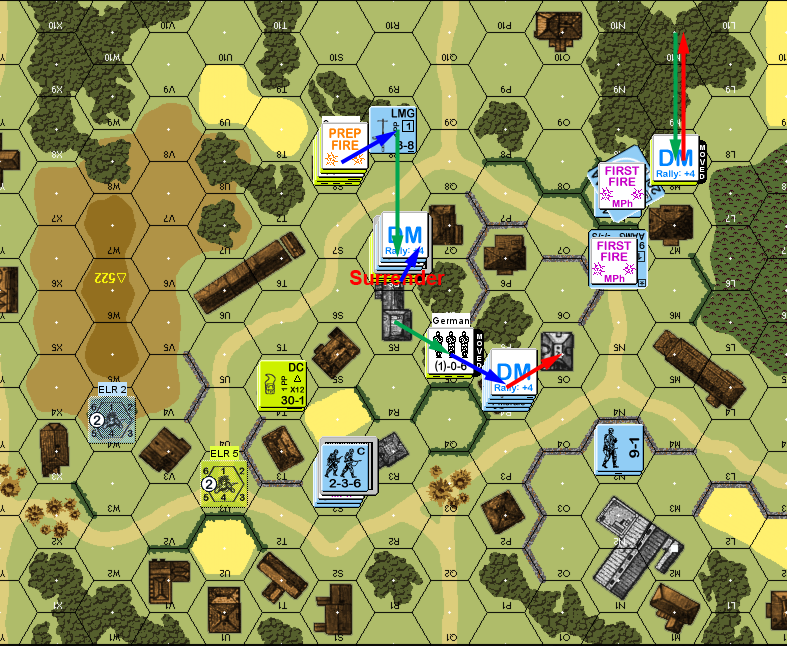
Situation, American Turn 1, showing the full board, and the American start areas. Also, my turn 1 moves are shown in paler arrows. Note that the east hills are swamps, and the building that would normally be in I10 is removed.
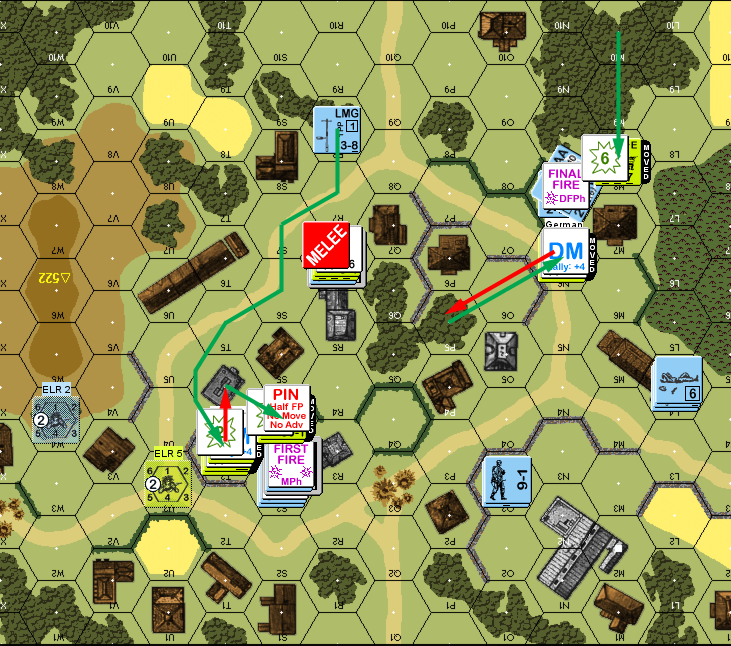
Mark rushed into contact on turn 2, and paid for a lack of subtlety (and letting me move around unobserved), with his first squad and 8-0 breaking to fire from conscripts. However, when the second move took fire from my MMG in N2h2, it turned out the ammo for it was bad. A pair of squads ran into fire from more conscripts, pinning one and breaking the other, and was also just in range of the squad in N2, who then broke the good squad and reduced the other on a 1MC. Then a final stack ran south to approach the closer AA Gun.
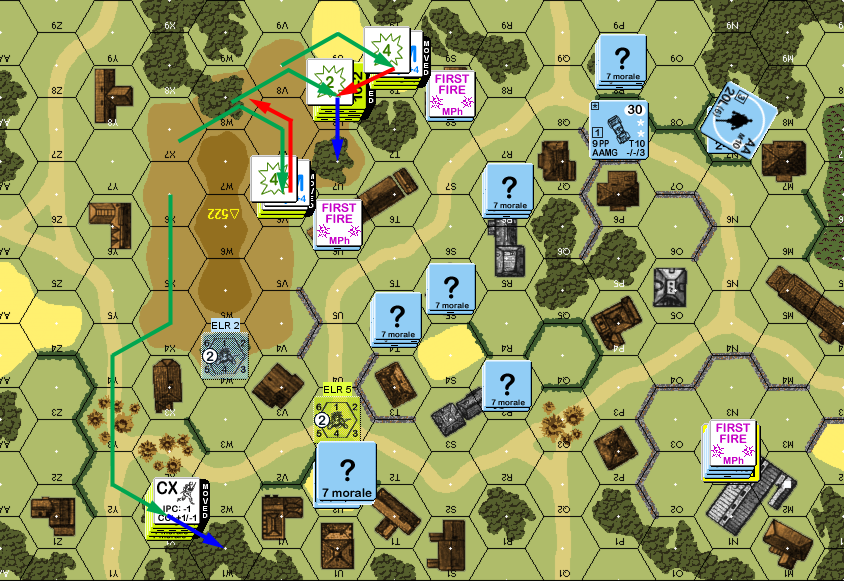
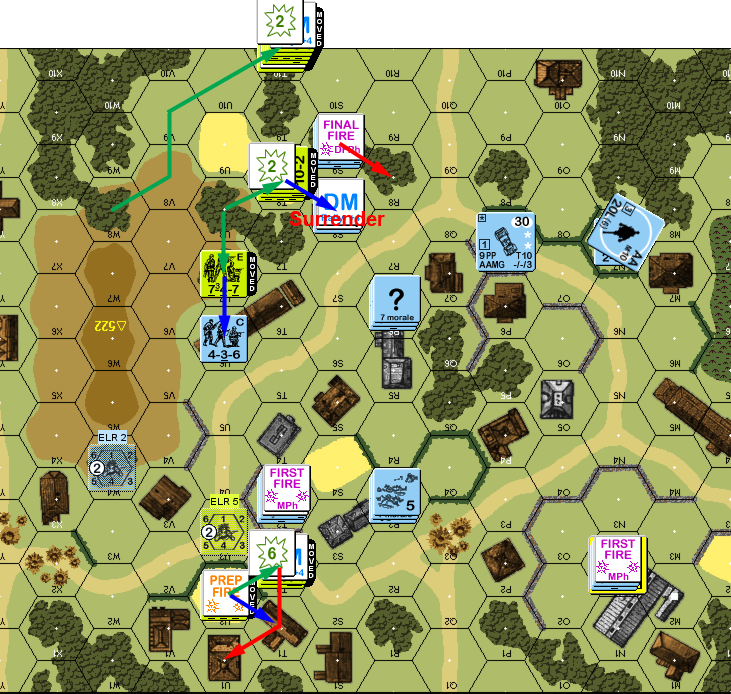
Situation, American Turn 2.
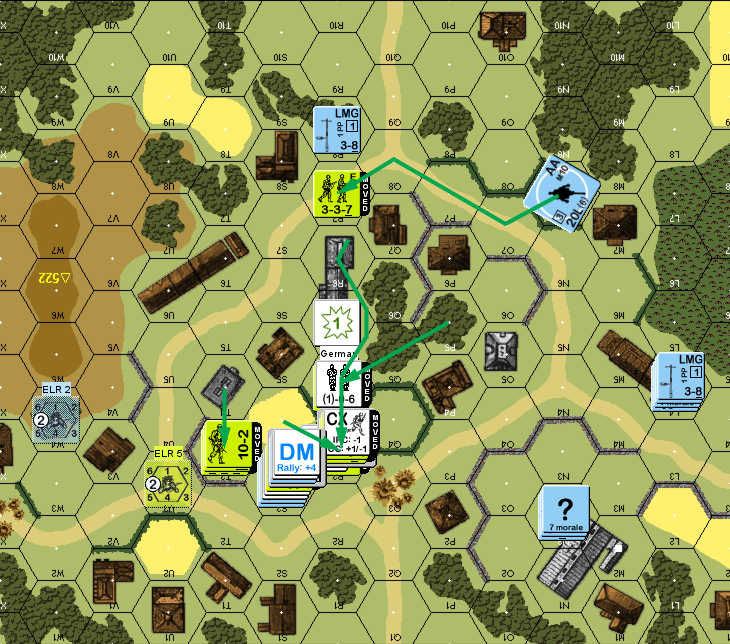
The 10-2 advanced to threaten building U6, leaving his 8-0 to self rally in U8, which unsurprisingly didn’t happen. However, I eliminated my MMG in N2h2, depriving me of the only long-range firepower in the scenario (well… there is the kubelwagen). I prepped at the stack in U8 to keep it DM, and got out of the 10-2’s way. The wisdom of this was shown when Mark’s only DF shot was the MMG in U8, which disrupted the conscripts in S8.
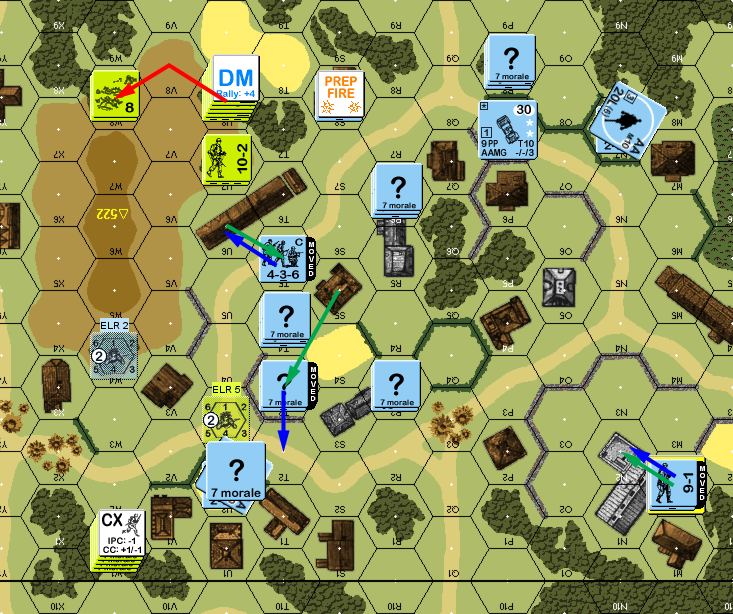
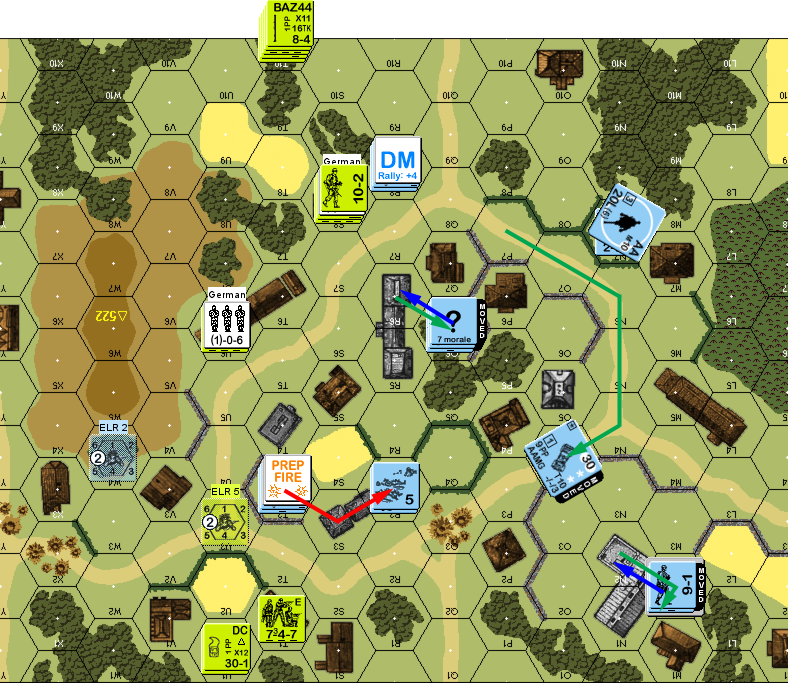
Situation, German Turn 2.
Nothing came back for Mark’s turn 3, and he pressed on U6 and approached the close AA from outside its CA. The squad I’d moved to help cover that fired, but had no effect on the paratroopers. U6 Final Fired for a 2MC, which surprisingly broke both squads, even though the 10-2 was fine. He advanced into CC with the AA, and knocked out the crew and Gun, even though they didn’t attack to maintain concealment.
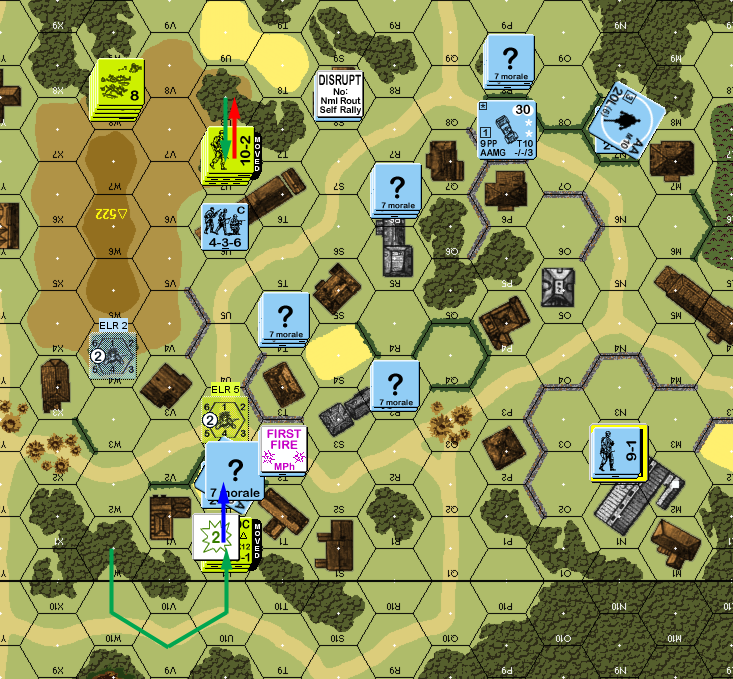
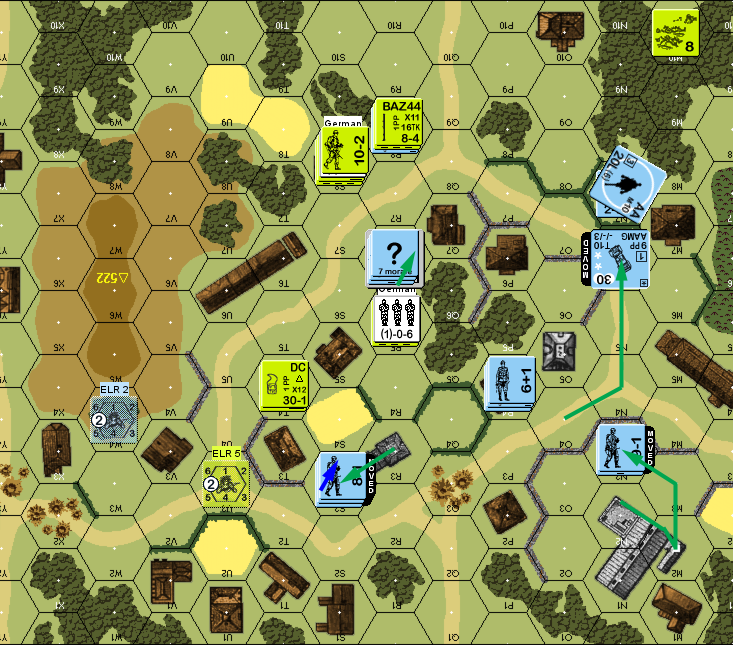
Situation, American Turn 3.
On my turn, Mark’s 8-0 refused to rally, but he did get one of the squads that broke last turn back. My squad that had been covering the AA prepped and managed to pin the 9-1, but did nothing to the squad, and return fire broke my squad. Movement was minimal—more skulking in N2, and moving up another squad to cover the north flank.
Situation, German Turn 3.
Everyone rallied for Mark’s turn 4 RPh (well, except my conscripts), and the southern squad prepped across the street to no effect. Mark pressed on the squad in S9 from two directions, and they managed to break one squad and the 8-0, but ended up with the 10-2 and the MMG adjacent, while another squad advanced back to U7. The 9-1 advanced on T3 with the DC, but was first pinned, then broken by my fire. S9 passed a 2MC in AFPh fine, but then broke on a K/2. The middle squad went into U6 to ambush and capture my conscripts without trouble.
Situation, American Turn 4.
With DM, I naturally didn’t rally anyone on my turn, but Mark got his 9-1 back. I prepped at T1, but a PTC had no effect, and return fire broke my squad to conscripts. Instead of being burdened with more prisoners, Mark fired on R8 for a 3MC that eliminated the broken HS. Otherwise, I skulked and the kubelwagen swung around to the other side of the road loop.
Situation, German Turn 4.
Mark got his squads back for his turn 5 RPh, while I managed to rally a conscript squad (with a 6+1 no less!). He prepped at R6 to no effect, and then Dashed across the road into the village loop. My one shot didn’t do anything, but when the 9-1 crossed the road, he broke to residual. Approaching the remaining AA got him some defensive shots that broke a squad and killed his 8-0. It kept ROF, and during DFPh, it it got a K/2 to take out the HS it hadn’t fired at. He got into CC with my rallied squad in R3… which went oddly. He had a successful capture attempt, but then I rolled ‘2’ for Field Promotion, getting an 8-1. This changed the capture to a “CR”, so he captured half the squad; then I killed his squad to free and re-arm them. I went from a single conscript squad to to a pair of conscript HS and a 8-1.

Situation, American Turn 5.
My turn was spent staying out of the way of the Americans… while also trying to defend the stone buildings. I ducked out of sight where I could, and thankfully was not more than pinned, with the kubelwagen moving to support the remaining AA directly.
Situation, German Turn 5.
Mark’s squad stuck out in the woods behind the AA self-rallied as the only action for his turn 6 RPh and prep nailed my R6 position as a 12 MC caused my conscripts to reduce to a disrupted HS, leaving the 8-0 alone to hold the building. Mark sent a squad over to secure the building, while the one already there went to take care of the broken squad + 6+1 in P4. The rallied squad approached the AA, only to break when it swung around for a couple IFE shots. Advancing Fire reduced the broken squad and pinned the 6+1 who self-broke to get out of the upcoming CC. He went upstairs to take out the 8-0 in CC, but only managed to wound him.
Situation, American Turn 6.
Mark finally rallied his 9-1 on my turn, and my broken conscript HS in O5 got a ‘3’ to get close, but didn’t actually rally. There was little activity for me, since I was still worried that Mark would sneak in to claim building N1 if I abandoned it (I should have Deployed and left a HS to play hide-and-seek inside the building). The 10-2 and MMG managed to destroy the Kubelwagen, and O5 routed back to L4. Since there was an ongoing melee in R6h1, my HS tried to escape and failed (no surprise), but this forced the American squad to attack both them and the 8-0, keeping the result to a CR, which wounded the 8-0 again.
Mark’s squad self-rallied again on his turn 7, so now he could come at the AA from multiple directions. The center squad came up first, taking a K/3 that reduced them and the prisoners and broke the remaining HS. Then the rallied squad came up and survived a ROF shot with no trouble. The 10-2 and MMG squad came up to S3 on a tricky bypass move (too tricky; it still cost 7 and needed DM, it got overthought and missed at the time; it did cause me to try a blocked shot at a bypass vertex though), and the squad broke to SFF. The 9-1 tried placing his DC on S4, but got pinned by my last shot.
The melee in R6 finally finished with the deaths of the Germans, the squad in the woods got to the AA and eliminated the crew, but was reduced to a HS in the process. Mark just needed to take one more stone building for a win. However, the squad held prisoner by the MMG squad made their TC and started a melee in T4, meaning the he couldn’t try to rally on my turn.
Situation, American Turn 7.
My 6+1 self rallied for my turn 7, but didn’t bring the HS with him, and a couple shots at the 9-1 did nothing. With the HS in N7 having a clear run towards N1, I kept my only other units there. (With one American turn left, having the 6+1 play hide-and-seek in a nine-location building, while the 9-1 and squad helped in S3 would have been much smarter.) T4 resolved with the death of the escaping prisoners.
Both the HS in P5 and the squad in T4 rallied for Mark’s final turn. The former moved to R4, while the squad in R6 moved to R3, but took a K/1 while in bypass, but the HS was fine and made it to h1. The 9-1 got into the building and placed his DC on S3, and my FPF broke the HS there, and pinned my 8-1.
The DC was a mere NMC, which eliminated the HS while breaking the 8-1, then advancing fire from the 10-2 and MMG broke the HS on h1, which gave the Americans the game after they surrendered to give him building control.
Situation, American Turn 8.
Afterword
It’s not hard to see how this scenario has stayed in print over the years. The Americans have a good amount of time (compared to a modern scenario), but are outnumbered by Germans who are inferior in every other way (ELR 2 hurts as well.) I wonder how often it goes to turn 8, but I imagine the struggle for the last objective is generally just as bitter every time. I certainly recommend it as a light scenario, though the Germans do end up without a lot to do once they’ve organized a defense.
Mark suffered some bad setbacks, some caused by stacking at the wrong time, but he was saved by a squad rallying immediately, as it meant I couldn’t send anyone into the hills to keep them DM (well, I could have, but I would have lost him to fire in the open with a 10-2 directing). Later, the loss in the R3 CC was a big problem, and kept him from potentially finishing things early (though I would have shifted to a last-ditch defense of the AA), and that was all dice. It’s been a while since I’ve have a leader promotion, and the 8-1 was something the Germans in this scenario really needed.
Mark was surprised I hadn’t moved to defend R3 more aggressively in the end game, but I was all too aware that leaving N2 empty could be just as bad. I should have split the force, as I mentioned, but that didn’t hit the top of my mind until writing this. I can say in that last turn, I was busy tutoring Mark on how to try and take a multi-floor building in one turn, which I’ve found to be a tough task in the past. Having lots of firepower, and guys to move sure helps.
Discussion ¬