
2 The Groaning Woods
Mark and I returned to Operation Dauntless after our Operation Mercury scenario, with the first wholly historical scenario of the set. It’s the next day (from scenario 1), and the Germans are more than willing to contest the Parc de Boislonde, which forms the focus of the scenario. We took our usual roles with Mark taking the Germans, while I took the Brits.
The set up is complicated, with three different German forces with different setup areas, plus another two groups that inactive, and can only be activated by spending ‘reinforcement points’ on them (instead of the normal rules where they’ll go active if someone gets too close to them). Worse, one company can’t go more than a little ways west, which Mark kept tripping over (I assume they’re actually part of a battalion mostly assigned to the east of the map, but all we can see here is that they’re part of the 12th SS like everyone else).
The British have an easier time of it, and the game starts with a bombardment exactly like the previous day’s, reducing line of sight, slowing both side’s movement, and British artillery is already committed. The Germans can win by eliminating three British infantry companies; otherwise the Germans need at least 10 more VP than the Brits, with casualties counting for their normal amount, and the Germans getting 1 VP for each of three hexes (the Parc, and Point 102) each turn they hold them. Obviously the British need to take these, the earlier the better, and not take too many casualties in the process for five turns.
This called for another rush to assault and dig out the German positions before the barrage lifted, and I found myself locked out from advancing like last time. Unfortunately, I found it very difficult to get where I was going, and spent quite a bit of time rejecting all possible plans because I just couldn’t get where I needed to be (a slightly better setup would have helped; notably using the non-Firefly-enhanced Shermans in front with their slightly better speed; but…).
So I had just one assault against 1207, with AAA tactical advantage letting me take out a 251/10 platoon, and a 0/4 result at 3:1 odds forcing him to lose a MG section while the remaining platoon retreated out. I set up for an attack on 1308 by sending the carrier platoon to get a concentric attack. I think we’d temporarily thought the carriers were immune to friction fire, as there wasn’t any to stop them. My one combat focused on 1308, with some of the on-board mortars in support, and the units in 1309 providing defensive support. None of it had an effect, and the combat ended up on the 5:1 column (actually at 6:1 after all shifts) for a 0/3, with Mark losing a mortar section (too slow), and a platoon to retreating through my ZOC.
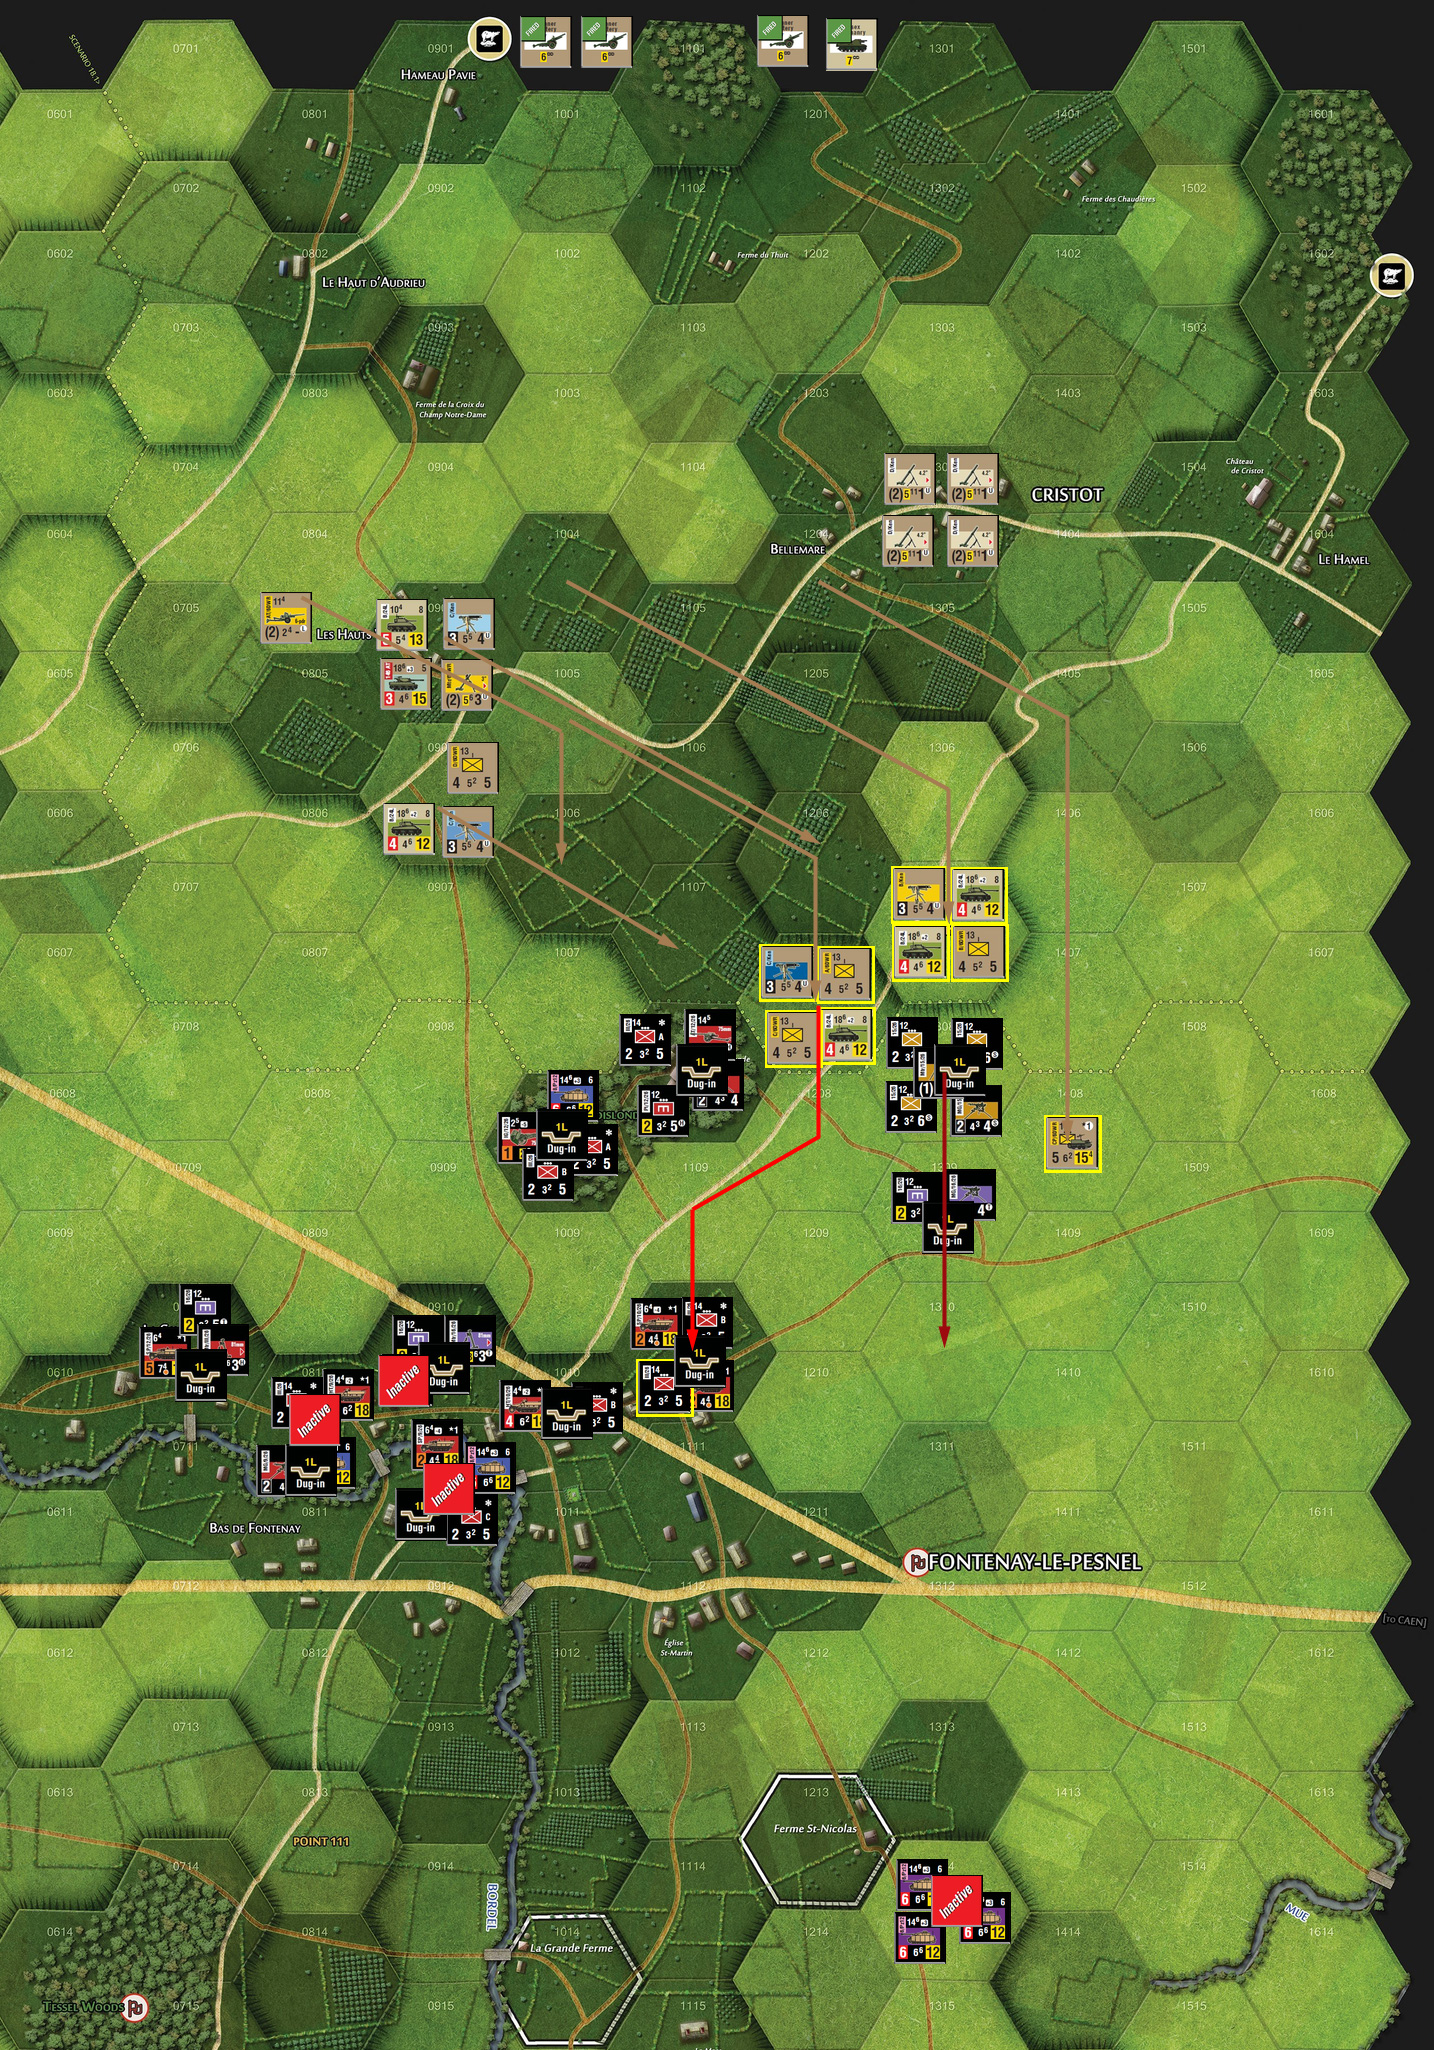
Note that British units cannot move below row xx08, and German units cannot move above row xx06.
Mark pulled his units out of the large open fields, and his 75mm AT battery in the woods got a successful shot, eliminating the Fireflies in 1207. In the combat phase, the gun managed to finish off the Shermans of the section as well, and I just didn’t have anything with a decent shot at them to respond with.
That was the extent of the activity for his turn, and limited British artillery became available, including a medium battery asset draw. Two units (carriers and MG) had advanced into 1308 after the combat last turn, and they now moved forward to start surrounding 1108. I moved a company from where it had assisted last turn to the other side of of 1108. The bulk of my forces concentrated on clearing out the closer hex of the Parc in combat, with all the support I could throw at it, while Mark supported the defense with everything in range, and two of his three off-board 105mm batteries. I had mostly poorish dice, but had two good rolls just as I got to some of the stronger artillery batteries for two suppression and to knock out a platoon. In return, Mark got four suppressions and one step loss to reduce a company. This generated a 3:1 attack reduced to 3:2, with a good roll for 0/3. This eliminated the towed AT battery (huzzah!), while the remaining engineers and MG section retreated, with the other hex of the Parc saving them from ZOC-effects. I advanced everyone in the open into the Parc.
Mark activated two of the Pz IV units in 1314 on his turn, and they moved up to the light cover in 1311, which drew fire from my Fireflies for an extended ARC that ended with the reduction of both Pz IV units. He rearranged a few things, and pulled the infantry guns out of 1008 (to make room); I tried to stop them but missed, and then lost my Fireflies in 1108 in the ARC. He then tried to move into 1008 with the two units stuck in 0909, but friction fire kept them from getting anywhere. In the combat phase, he took a shot with a 251/10 unit, and in a short ARC, I lost the Shermans in 1108.
For the third turn (turn 17), the British get more artillery available, but I drew a No Asset, and took an Achillies troop from my available reinforcements. I pulled the reduced company back to Le Hauts Vents for rest and refit, and moved new Shermans and a new company into the Parc. I had a few shots in the action phase, with a few suppressions I couldn’t follow up, and finished off a Pz IV unit in 1311. A similar series of AT and ranged attacks in the combat phase (with the addition of some of the OBA) eventually got two step loss results against 0909, destroying the two German units still stuck there.
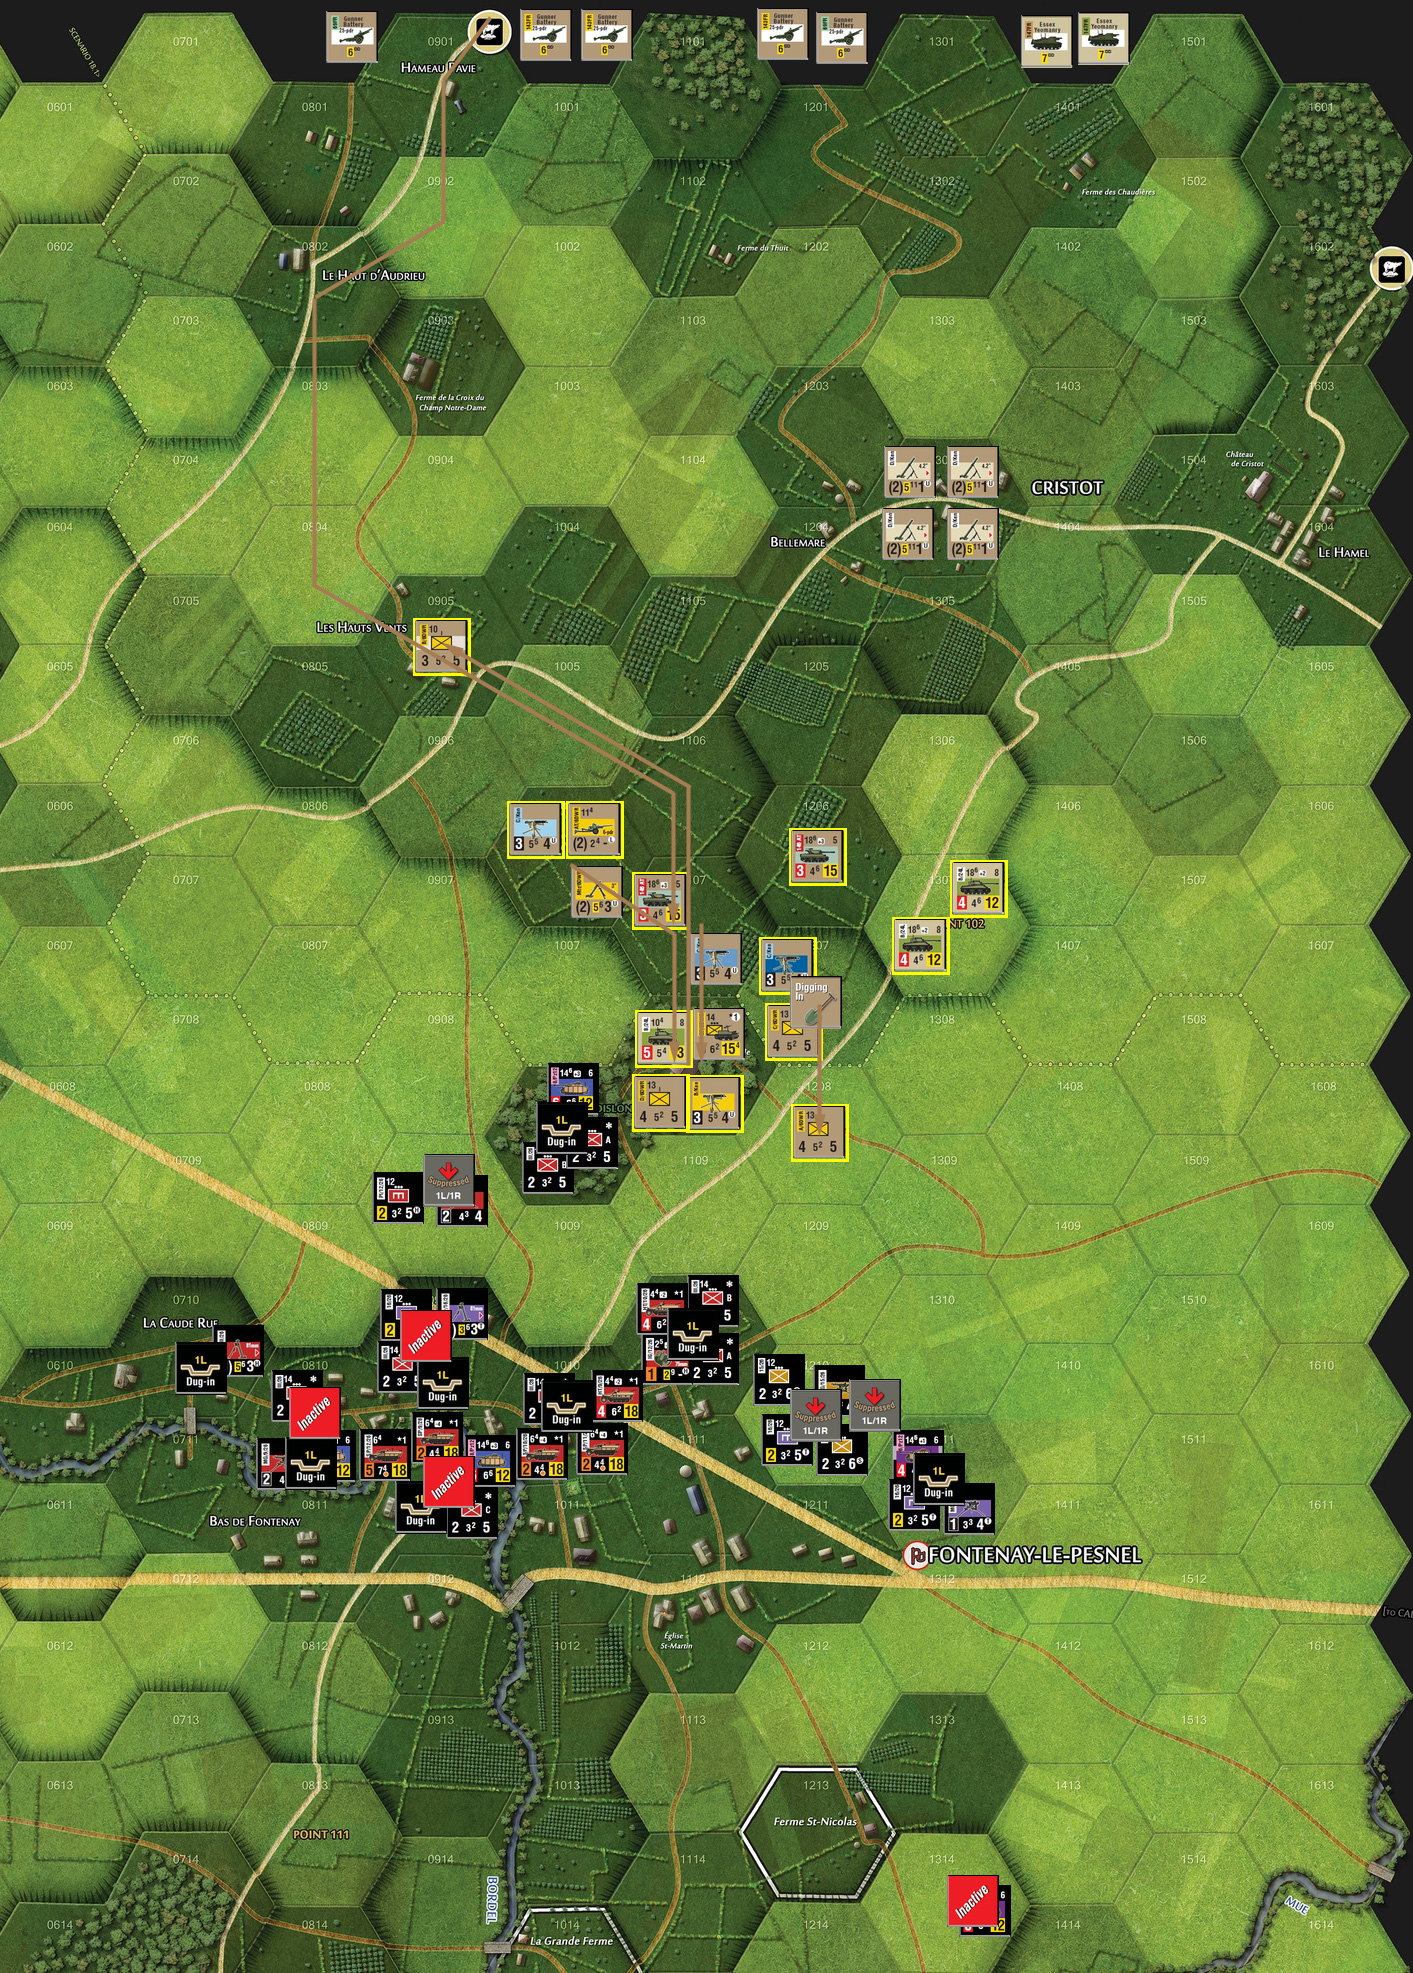
Mark activated a MG section with his reinforcement point, and sent it into the Parc in 1008, and my friction fire was unable to stop him this time. He rearranged his armor a bit (including finding a more active position for his Stummels), and pulled a platoon out of 1210, as I’d been pounding it with the +1 for a full company. In the combat phase, he took several ranged shots at my forward company in 1208, and the Stummels connected to reduce them, but reaction fire reduced the Stummels in turn.
For turn 18 (4 of 5) I drew another medium battery asset, and took the only other available reinforcement: a towed 6-pdr battery. The company in Le Hauts Vents recovered, but the one in 1208 was halted by friction fire as it tried to leave. I swapped a Firefly unit with the Achilles at point 102, took a number of ranged attacks and AT shots, but nothing came of them. I also forgot to move my new AT battery.
We’d done a look at at the VPs, to see how things were going, and called the game after a last couple ranged attacks on the German turn. The Stummels fired on 1208 and rolled very low for no effect, and my reaction-fire from a Firefly-enhanced troop destroyed the remaining Stummels. At that point Mark threw in the towel.
Afterword
As of the end of the game, the Germans would have 6 VPs from holding on to part of the Parc, and would have another 9 from my losses, including two complete Sherman troops. However, I had caused 20 VPs of losses, putting me well ahead, and I just needed to be at 5 VP fewer than the Germans for a win.
After how stymied I got in the previous scenario, I was worried that I wouldn’t be able to do anything after turn 1 here, either. However, without an actual strongpoint to deal with, it wasn’t as bad. I was able to turn out the AT battery, which didn’t have nearly as large a field of fire, on the second turn, which also did a lot. Getting a concentric attack on the first hex of the Parc was also a help, and… isn’t allowed against the second hex, thanks to the movement restrictions, which was one of the reasons I left it alone. I was hoping to keep it cut off and slowly reduce the defense, but that was proving difficult.
I think part of the key is Mark needed a better defensive line for the start, but I don’t know what it would be without a lot of thought.
Discussion ¬