
1 SNAFU
After going through the introductory scenario, Mark and I turned to the first scenario in Operation Mercury, which depicts the initial German landings near Rethymnon. This uses the main Rethymnon map, but as a practical matter, only a bit more than a third really sees play. Also, it uses the (game-specific) alternate formations, where dispatch points go to battalions (there’s two on each side) instead of regiments (which are actually the upper command level instead of divisions here).
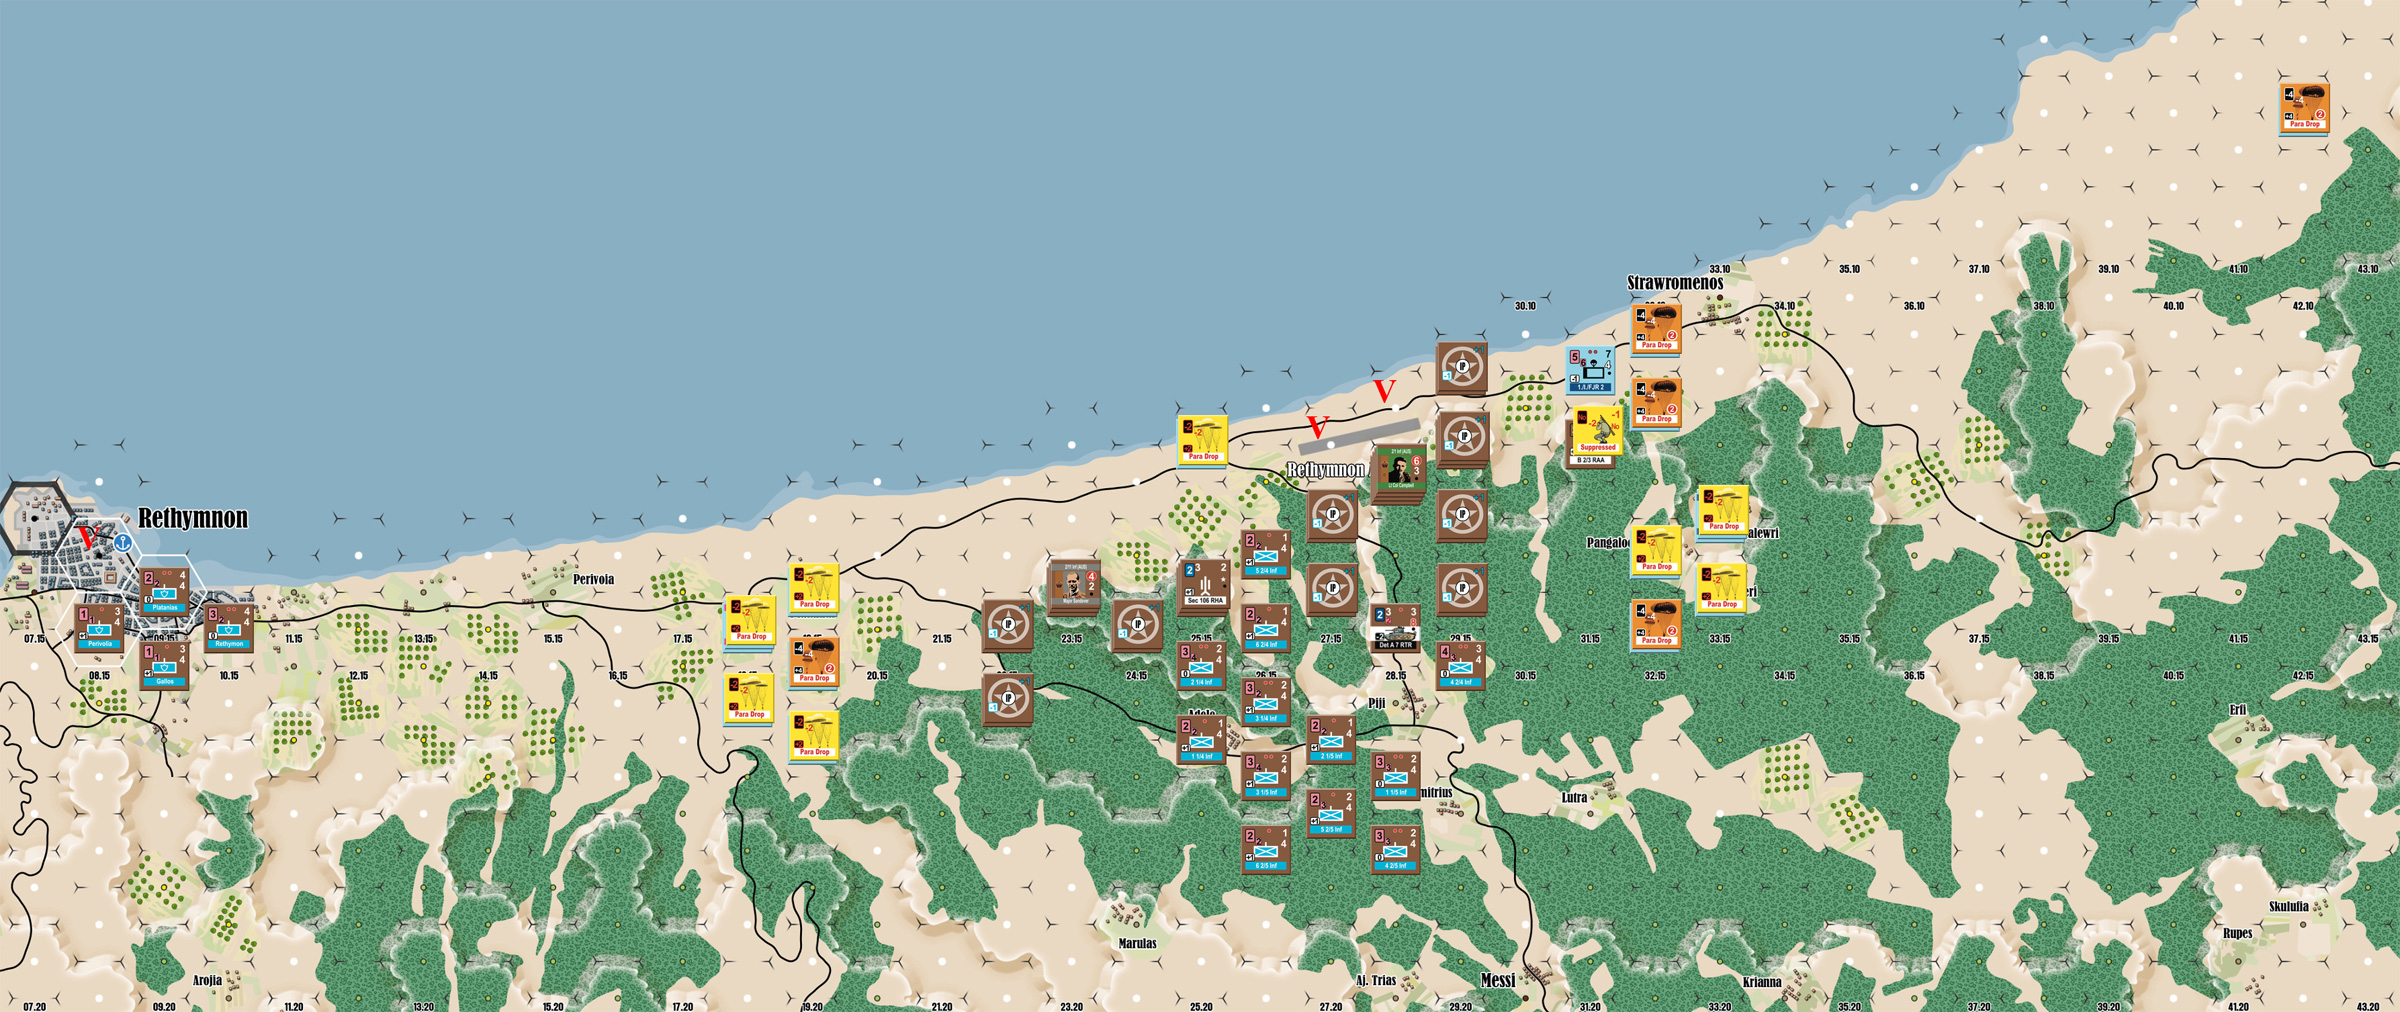
The German drops did not go off as planned, due to poor coordination, leading to the scenario title. Interestingly, while the German drop zones are fairly constrained, the British setup is fixed, with the Greek units actually randomly placed (there’ll always be one Greek unit in each designated hex, but which one is where is randomized). The Vassal module actually has pretty nice support for this. In general, two battalions of the 19 Australian Brigade are on either side of the airfield about a mile away from the port, with Greek units trailing off inland of it, and Greek police units garrisoning the city itself. The German 2nd Fallschrimjaeger Regiment drops on either side of the British, with the III Battalion to the west and the I Battalion to the east… except two companies of III Battalion drops to the east, one company of I Battalion drops next to the airfield, and one other drops well up the coast away from everyone else. Overall, the German goal is to take and hold both hexes of the airfield, and the port until the end of May 21 (eleven turns in all), not an easy task.
I reprised my role as the Brits, and the scenario begins with four Luftwaffe air strikes followed by the drops (using the German ‘divisional’ activation chit). Mark hit three units at the east end of the airfield (one of them twice), doing a cohesion hit each to a MG company, and Company C of the 1st Battalion. The drop system is interesting, with units taking a drop marker that must then be earned off through a later activation. As part of the German practice of dropping all the equipment in separate canisters that had to be recovered, it is possible to pick up a second marker which makes the unit extremely vulnerable (with a 4 shift to both fire values and defense).
The west group went well, with the only ill effect being one company picking up a second drop (/delay) marker. To the east, things went much worse, with several high rolls that gave four units the second delay marker (including the one well up the coast), and 2. MG company took a step loss. (A nice bonus for the Brits, since they have a goal of eliminating thirteen steps of Germans). Mark used one command point to re-activate 1./I. Company (next to the Royal Australian Artillery) and remove the drop marker. After that came the British random event (no event…), and the British Direct Command chit. I spent two CP to fire the RAA as it was obviously going to be overrun (miss), and move a Greek unit to extend the eastern defensive line. Then came the German Direct Command chit, and spent one CP on 1./I. again to assault the RAA, managing to suppress it, but did nothing else (messed up the sequence and skipped a second round of fire after a charge failed to get rid of the RAA; that would have had a good chance at a cohesion hit). And then the turn finished with a ‘No Event’ German event draw.
We had initially missed that the two German formation activation chits are placed in the mug with the division activations and direct command chits. (I’d really expect such things as part of the setup section, instead of the Command Points section.) But, we put them in near the end, and they both came up next, giving the Germans a chance to largely collect themselves. The RAA was assaulted again, this time wiping it out with a charge.
So the 17:00 turn started with the 19 Australian Brigade (‘divisional’) activation, netting a minimal 4 command points, and a very fortunate 3 dispatch points on a 0 roll. Mostly, the Greek units were tasked with extending my defensive lines, though it would take a while for some to arrive. One company was put directly on the airfield to hold up a German move there, and I spent a CP to have a mortar battery fire on the company that landed near the airfield, to no effect.
Mark passed on the German direct command chit next (being down to 1 CP), and then I drew a heroic random event, which I put on a Greek company that was going to put the coast road under fire near the airfield. My direct command chit came up next, which allowed me to get that unit into position. A null German random event ended the turn.
I purchased the 2/1 brigade for the following turn, while 19:00 started with the FJR 2 activation, which got Mark 6 CP, and no dispatch points. This got rid of the rest of the drop markers, and he started heading towards the airfield from the west, and spent 2 command points to move up to the British line on the east. (One of these was a mistake: he moved up the heavy weapons/mortar company, who has range. Also, my MG company managed an Op Fire cohesion hit on them.) The British random event was tanks break down, suppressing the RTR. After that was my direct command chit, and I spent one CP to rally the RTR.
Then came my divisional activation for another minimal 4 CP and no dispatch points. I avoided spending any CP, and missed a couple fire opportunities, as we hadn’t yet noticed the exception for purple fire codes, and just moved the Greeks into line. The German random event made the company near the airfield heroic. Then came the German direct command, and Mark traded out the heavy weapons company for a regular fallschrimjaeger company dealing with the British line for 2 CPs. The end of the turn was the III./FJR 2 formation chit, and two companies went into column to advance on the airfield.
Mark spent his only dispatch point to put a formation chit into the mug for the upcoming 7:00 turn. The night turn started with the British divisional activation, and I got 6 CP and no dispatch. This time I did remember to use the light mortar units, but only got a single S?, and the Germans passed the resulting TQC (the line units here are generally quality 7, making them very competent). Also, being night, I was able to rally the MG company, who had taken a cohesion hit back during the airstrikes. The German random event was rally, but Mark had no suppressed units, and the British random event was an air strike, which can’t happen at night.
The German division activation was drawn for 7 CPs and no dispatch. He spent three command points moving units up to the west side of the airfield, and another moving 1. MG into a fire zone, as the various big gun units slowly moved to back them up. And of course, we was also able to rally the cohesion hit I’d done earlier in the day. Then the 2/1 Inf went (buying a chit for a night turn was not my best move, but I hadn’t thought about the timing at that point). I did lots of fire attacks, but between night and plenty of high rolls (four 8s and 9s), didn’t accomplish anything, and then I passed on doing anything with my direct command chit.
Dawn of May 21
We both purchased a dispatch point, and I spent one to get the 2/1 Inf on the following turn. 07:00 started with the German Direct Command, and 9./III. assaulted the airfield, destroying the Greek 5 2/4 Inf there to secure the west half. Then my divisional activation came up for 5 CP and 2 Dispatch. One of my attacks got a suppression on one of the German companies coming in from the east, and I moved another Greek company to the other half of the airfield, spending a CP for a forced march to get there (a slope caught me by surprise), and a CP to pass a possible suppression from Op Fire. I also spent a CP to move into the flank of the Germans in the east, but Op Fire suppressed them before they got there. I also put two Greek units into column, one to move to reinforce the west side, the other was already there, and started marching to get between the Germans and Rethymnon.
Then came the I./FJR 2 activation, and he rallied away the suppression, while managing to suppress the Greek unit that had just moved onto the airfield (with the mortar unit). The British random event was intelligence, boosting my already-high CP and DP. The German random event was out of ammo, which caused a cohesion hit to 2 MG 7, which he’d just put on the line. Then came the German divisional activation for 8 CP(!) and one dispatch. He spent a CP to assault the other half of the airfield, but failed the bravery check, and then spent a second CP to get a second company on the half he did control, and also spent on a fire attack on the eastern line, but got no result.
I spent CP to get a dispatch point at the start of 09:00, and we both spent a DP to put a formation chit in for next turn. The turn started with the British direct command, which I used to rally the Greeks on the airfield, and continue the move to put a unit near the coast road west of the fighting. That move was completed by drawing the British divisional activation next (getting 5 CP and 1 DP). I got a second cohesion hit on 2 MG 7, and suppressed 1./I. I then rallied the suppression to the south, and spent a CP to go adjacent to the longer-ranged units there, and this time made it. This allowed B 2/1 to close up with the end of the German line safely. And one of the Greek units I had early-on moved to cover the coast got lucky and completed an improved position.
That was followed by the 2/1 Inf activation, during which I assaulted the suppressed 1./I. and did two cohesion hits to it (…and spent two CP to avoid possible suppression). I also got a cohesion hit on one of the units holding the airfield. Command confusion robbed me of two CP. And I paid another to avoid a possible suppression from an attack from the German direct command chit, during which the company that landed far east finally showed up in the main line. The German divisional activation netted a minimal 4 CP and no dispatch for Mark, and he rallied the suppressed unit, pulled his bigger guns back out of contact with the Greeks, and pulled 2. MG 7 out of line. 1. MG 7 went into column and started heading for Rethymnon, and and 2./I. started pulling out in that direction.

Start of 11:00, May 21.
Mark spent command for another dispatch point, and then immediately put a chit in for the following turn, while I just bought a chit for the following turn. 11:00 started with a null German event, followed by the German divisional activation, for 5 CPs and no dispatch. 2./I. continued down the coast road, taking a lot of Op Fire, and a cohesion hit. He assaulted the end of the British east line in 29.11, with both sides taking a cohesion hit in the first round, and 3./I. losing a step in the second, but suppressing A 2/1 in return. Then 10./III. assaulted them, and did two more cohesion hits, flipping them to one step, and I went down to 1 CP paying to pass various TQC. 1. MG 7 marched through the gap between the Greek units. The British direct command was next, and I spent my last CP rallying the remnants of A 2/1.
After that was the 2/11 Inf activation, and they largely abandoned the line of improved positions to get at the Flak and Art units, though C 2/11 took a cohesion hit and suppression in the process. The German direct command had Mark try to assault A 2/1 again, but failed the bravery check. Then I./FJR 2 activated, and he assaulted again (with the weakened 3./I.) and took a cohesion hit from Op Fire, and then a Suppress to end the assault. 2./I. moved back east to cover the flak unit. I got a rally random event to remove my one suppression.
At the start of 13:00, I paid a DP for an activation next turn, and we started with my divisional activation for 4 CP and no dispatch. In the east, 1./I. passed a couple suppression checks, and then I failed a bravery check when I tried to assault it. In the west, I got a lucky shot that caused a cohesion hit to 2./I., and I assaulted 2. Art 7, which was by itself, causing two cohesion hits and a suppression (after draining Mark’s CP to 0 to keep it from just dissolving when I charged).
Mark’s division activation came next, and he got 6 CP and 1 dispatch, rallied away suppression, and 1. MG 7 continued towards Rethymnon. 9./III. and 11./III. assaulted the airfield, eliminating the 5 2/5 Inf (yes, an actual Small Arms “E” result), after taking a cohesion hit, and occupied the other half. He then assaulted A 2/1 on the eastern line with 10./III., suppressing them and doing a cohesion hit. After that, intelligence gave me more CP and dispatch. The German direct command allowed him to send 9./III. back to the other half of the airfield, but he ended up taking two cohesion hits doing it. He then removed a cohesion hit from each unit on the airfield thanks to a resupply drop. Then the 2/1 Inf activated, and a ‘0’ with my mortars took a step off of 9./III., but the rest of my rolls were 8s and 9s (I’m sure Mark thought one 0 was more than enough).
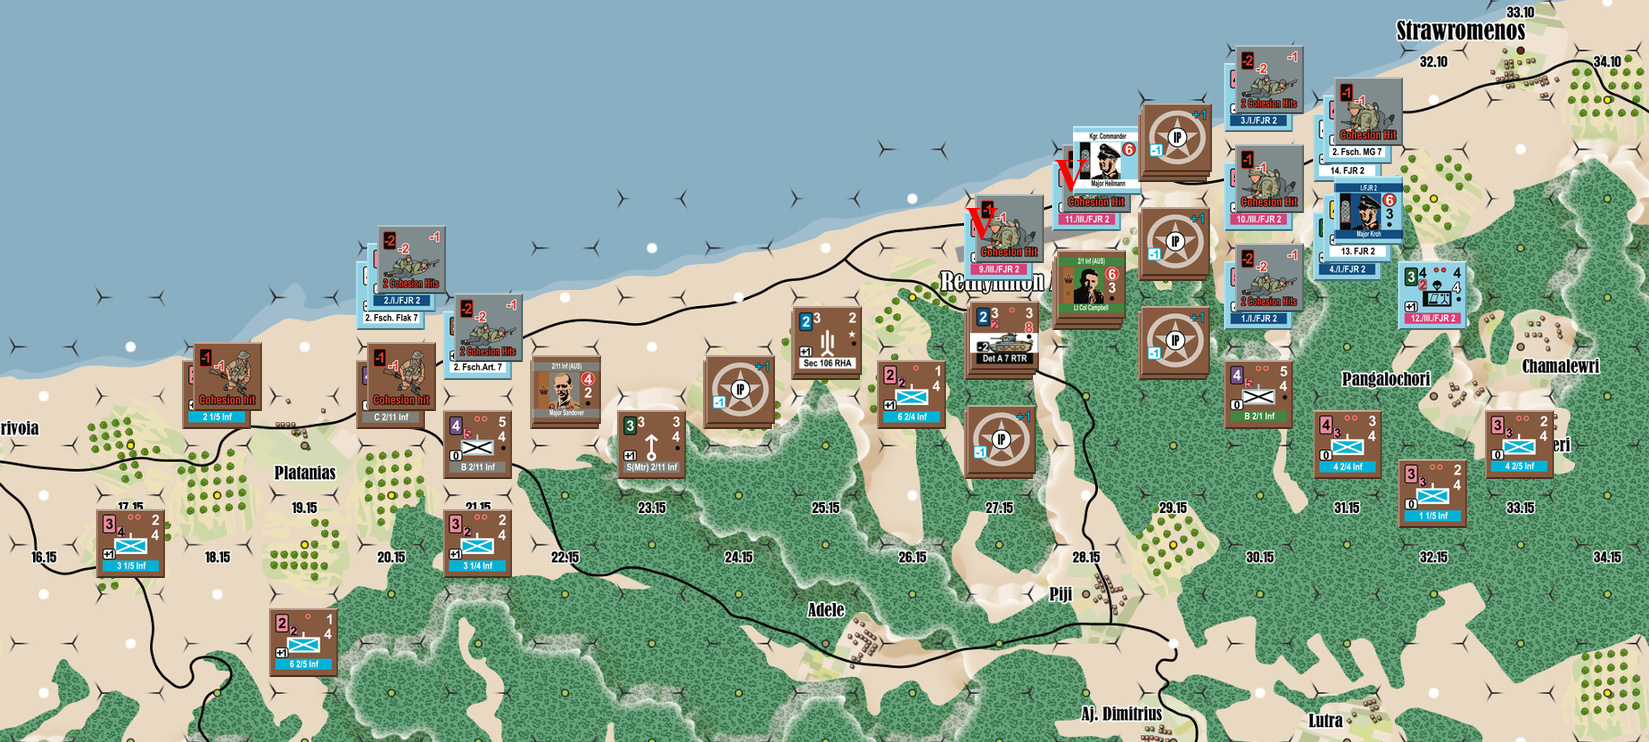
Start of 15:00, May 21. 1. MG 7 is in 11.16, near Rethymnon (five hexes off-screen).
I purchased another activation for the following turn, and 15:00 started with III./FJR 2. 1. MG 7 came out of column, went down the slope and assaulted the Gallos police unit, but failed a bravery check. Attacks in the east piled a cohesion hit and suppression on A 2/1 at the shore, and did a cohesion hit to the HQ company. My direct command came up, and I rallied the suppression. Then my divisional activation came up for 8 CP and a dispatch point. I managed a cohesion hit on 1./I. to reduce it a step. A 2/11 moved up to the airfield to so it could put pressure on later; The Greek 6 2/4 Inf moved to its old location in case anything should happen to the RHA. I knocked out 2. Art 7 (third cohesion hit), and moved into it’s location to put more pressure on 2. Flak 7 and 2./I., the latter of which was suppressed by another attack.
The German random event was air support, but he rolled a 0 to get nothing. His divisional activation got him 4 CP and no dispatch. 1. MG 7 assaulted again, and Gallos ran to take cover in the city proper. 11./III. constructed an improved position on the airfield (something we were a bit late on in general…). The 2/11 Inf activated. I got a cohesion hit on 2. Flak 7, and then assaulted but failed the bravery check, and my random event was nothing.
I purchased a formation chit for this turn, while Mark purchased both of his for the following (final) turn. His direct command started the 17:00 turn, but he did nothing with it (mostly thanks to 1. MG 7 being an independent unit that couldn’t be activated). Then came the 2/11 Inf, with the mortars getting a cohesion hit on 2. Flak 7, and then I assaulted the stack, which went well, reducing both German units to one step, and 2./I. took another two cohesion hits, but D 2/11 also took a step loss. I followed up with another assault, but only took a cohesion hit myself.
The German random event allowed him to rally 2./I. from suppression, and then my divisional activation went off for 8 CP and 2 DP. The Greeks in the east moved forward to envelop the German line again, and I got a cohesion hit on 1./I. I got a cohesion hit on 9./III. on the airfield, but failed another bravery check when I tried to assault. I then suppressed them with a mortar unit, and assaulted with the RTR to finish them off and retake part of the airfield. I got no results against the 20.12 stack, but with them fading fast, I started a couple units into column to march towards Rethymnon. Then came my direct command chit, and I assaulted 20.12 again, but this time Mark ran, losing the Flak unit. Then the 2/1 Inf activated, and two good rolls got me two cohesion hits on 11.III. to reduce it to one step.
After that, the German divisional activation came up for 5 CP and no dispatch. He assaulted Gallos and Perivola, which failed to stand when he charged, so he got into the outer part of the city. He assaulted 29.11, doing a cohesion hit to finally knock out A 2/1, and link up the eastern group with the airfield, and 3./I. moved in afterward, and he managed a cohesion hit on 6 2/4.
This moved us to the final turn, and I spent to get both of my formation chits (with 2 DP left over!), and started with my random event, which was out of ammo, which I took on one of the units surrounding the Germans in 19.13. I didn’t do anything with my direct command, and then the 2/1 Inf activated. I managed to suppress 1./I. and then assaulted it for two cohesion hits to finally finish it off. Then S 2/1 got a step loss to destroy 3./I. and end the game as the thirteenth German step loss.
Afterword
The Germans have a really tough goal here, needing to go two ways at once. Mark was also hampered by poor dispatch rolls the entire time, while I was generally lucky with mine (starting with that initial ‘0’ to get three right at the beginning). The 17:00 turn really showed how much the momentum could swing since I had both of my formation chits, but Mark had neither of his in the cup, and the turn was just a torture of him getting pounded by me the entire time.
The fact that Allied infantry companies are generally purple light mortar fire codes is also nasty as they can get an attack in for free on the divisional activation. Combined with being on defense, they can get by with a lot less CP expenditure, while the Germans are just nasty with high fire ratings and troop quality. But Mark’s average CP replenishment really couldn’t keep up with demand, especially for the first half of the game.
However, despite a slow start, things got very exciting towards the end, as he finally broke through the east line, and started getting the troops he needed into the airfield. Better play, and understanding of how/when to assault such positions would presumably make a world of difference, just just being able to afford more formation activations early would have done a lot too.
We’re not sure when, but the general plan is to swap sides and play scenario 2, which lets the Germans to a more controlled drop (‘what if their coordination was better’), but the British setup isn’t fixed either.
Discussion ¬