
AP73 Happy Valley
Patch and I’s latest ASL fight revisited Action Pack 8, with “Happy Valley”, an early armor clash between the Americans and Germans (with a couple Italians thrown in) during the race to Tunis in November 1942. It’s not DTO, but there’s plenty of arid terrain, with brush turned into cactus patches, woods turned into olive groves (regular orchards are still that, and out of season), and all walls and hedges are cactus hedges (that’s a lot of spines on that board).
The Americans are defending the board 6a village with four squads, two MMG, two 81mm MTR, a 37LL ATG, two M3 GMC, and a T30 HMC. In addition, there are three HIP Stuarts who can set up nearly anywhere, and three more that come in on turn 1. The at-start Stuarts are meant for an ambush, as they are revealed in the same way as emplaced guns, and their TCA can be whatever is desired when first revealed. The Germans enter on turns 1 and 2 (BS is NA for the Americans, something I forgot during setup, and wasted a fair amount of time on…) with twelve squads (mostly 1st Line, but there’s three 5-4-8s), as passengers in trucks and halftracks, a couple of ATRs, DCs, six Pz IVs, three Pz IIIs, and two Italian AB 41 armored cars. They need to cross most of boards 2 and 40 to get at the victory area and take all the buildings there in 6.5 turns, and get random air support every other turn.
There’s three or so general approaches, the most obvious is right down the center along the board 2 road. There’s a fair amount of hindrance, but it’s a straight shot in more ways than one. One thought that worried me is swinging around the east side of the hill. It would be slow going for the trucks, but it would allow getting fairly close without worrying about defensive fire. To the west, the board 40 hill overlooks the victory area, and has a good amount of cover, and there’s a gully in front of the hill. Two of the Stuarts set up HD on level 1 hills, with the bow pointed along the hill for a quick getaway, and the third was in 2D7, where it could cover the D4 farm area, and possibly ambush that east route. One MTR was hidden inside the village with 6aP12 to act as spotters (with the MMG—I seem to have missed the second one when pulling counters), the ATG was in P10 to look down the center
Patch mostly went for the center route, entering just his armor on the first turn, and keeping the mounted infantry back. The first couple tanks started climbing the board 2 hill, while the first AC started down the center road before climbing up the shoulder, and ending next to one of my hidden Stuarts who promptly rolled a 10 and 11 to miss and reveal himself, and then malfunction the MA on IF. He also set up a park near the main road, and around of the base of the smaller hill, with one Pz IV a hex away from my hidden Stuart, with a Pz III with it’s turret pointed that way, and an AC behind the position.
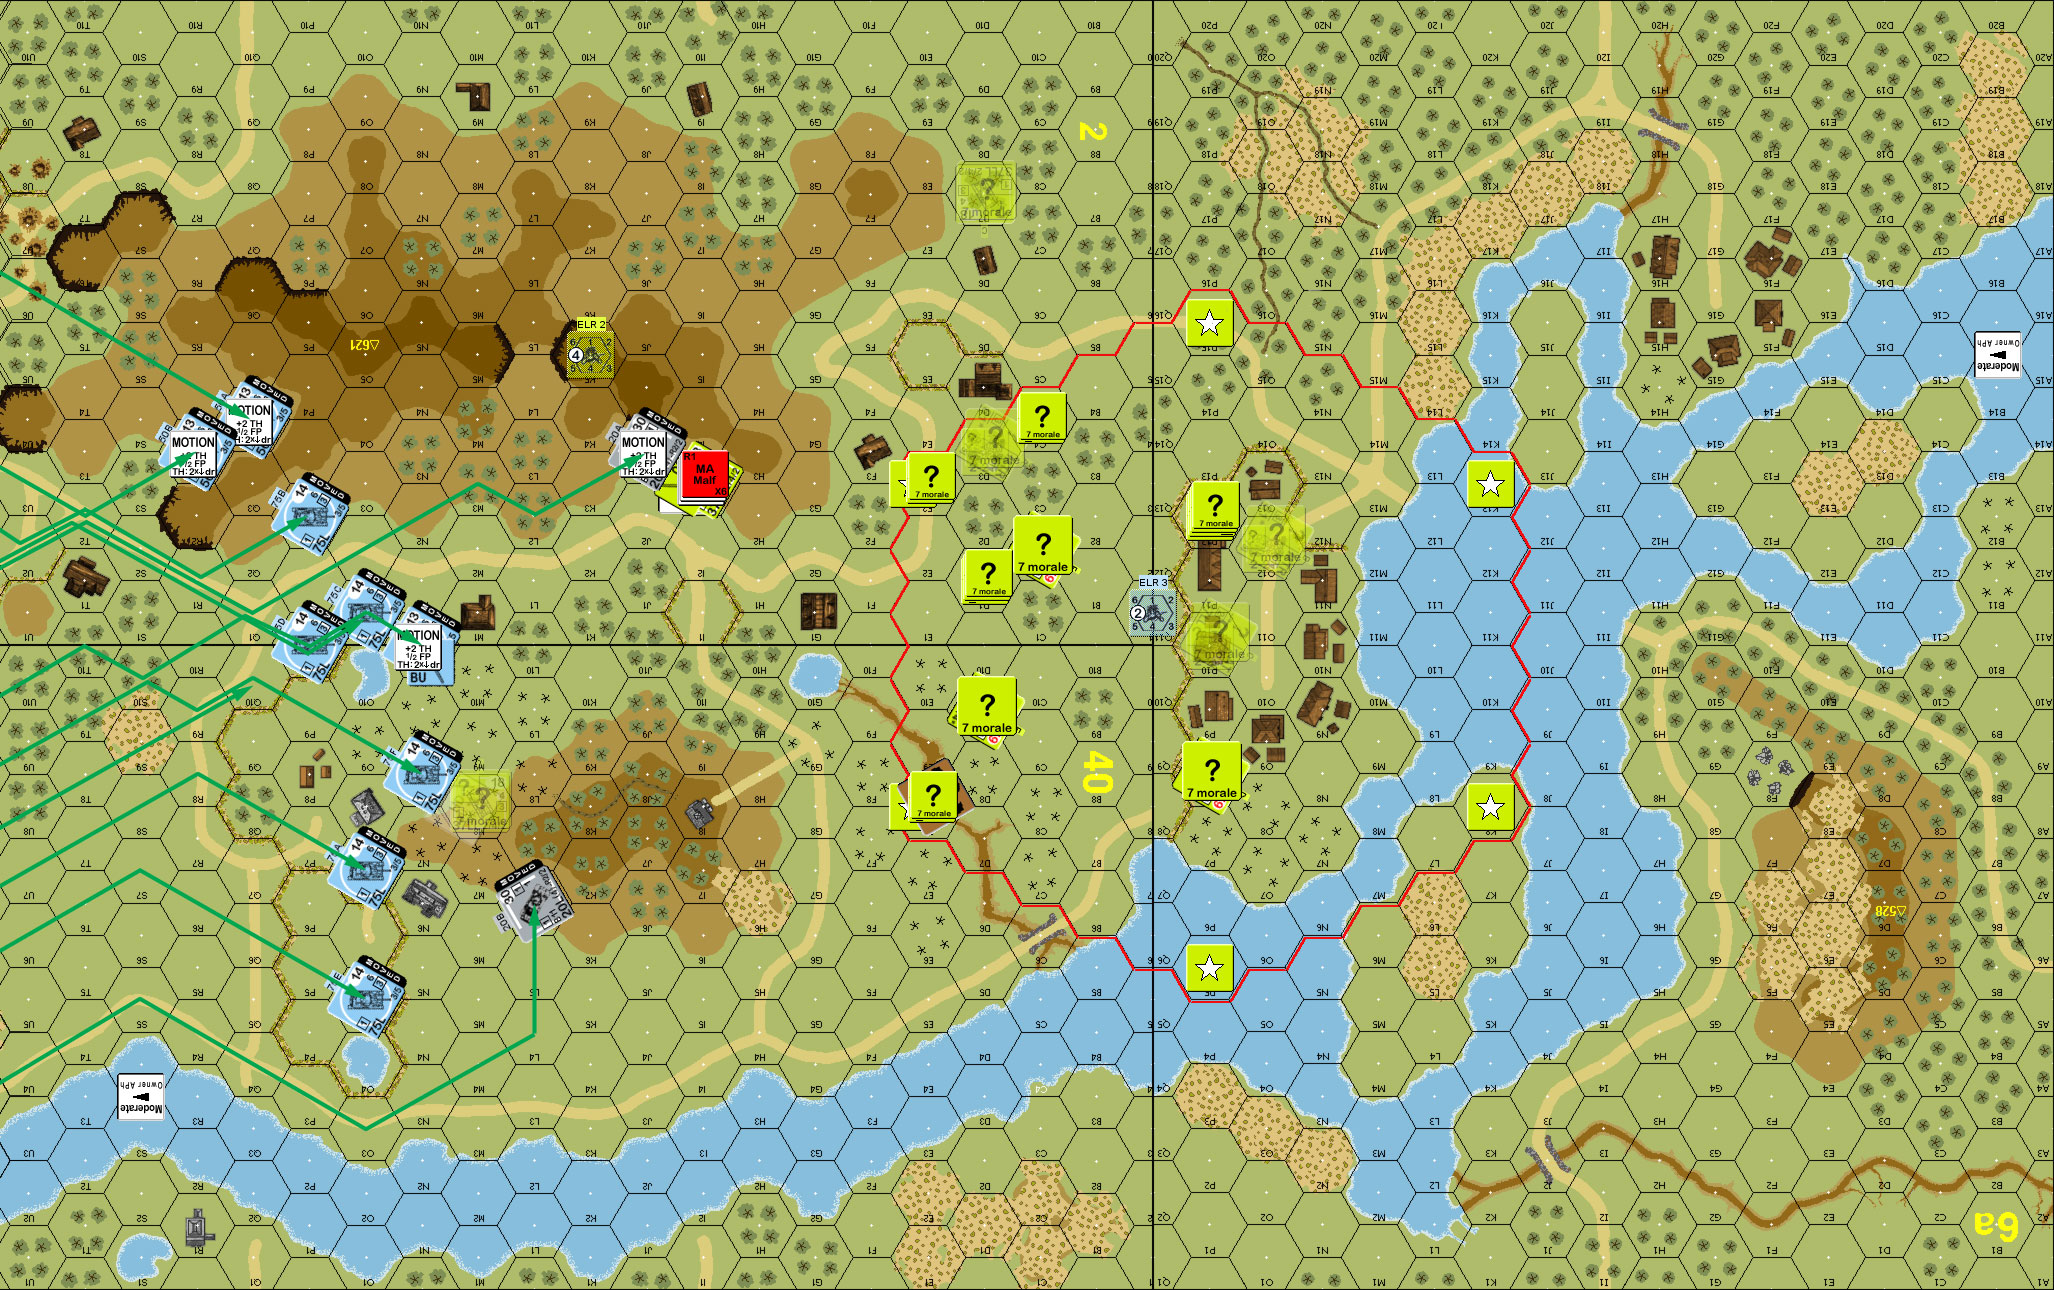
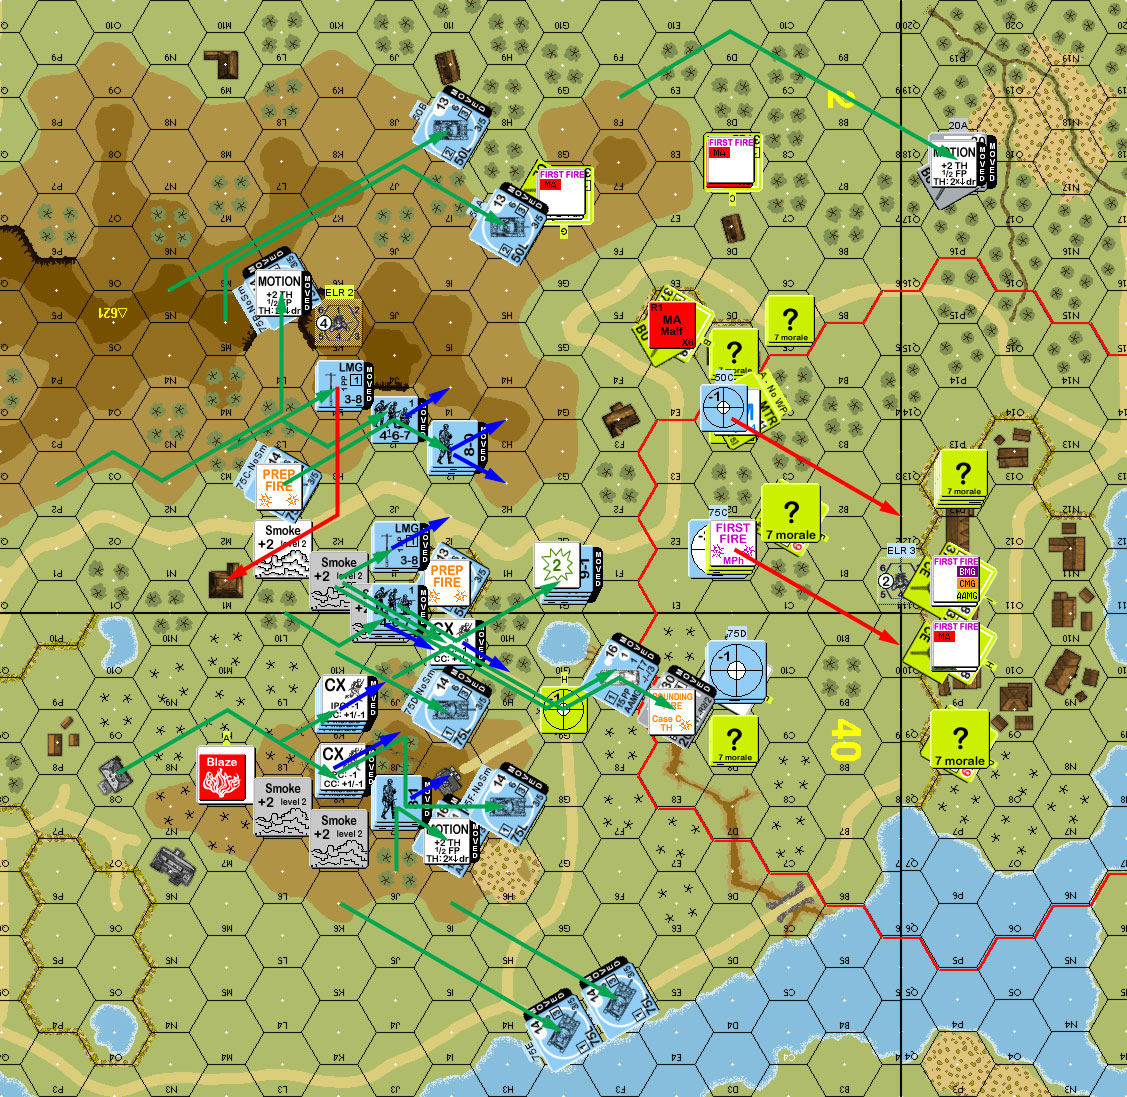
Situation, German Turn 1, showing the full board. North is to the left. The river is fordable, but neither of us bothered, especially with the north end having three places with no dry land. EC is “Dry”.
I did not manage repairs to the MA in my RPh, and the reinforcing Stuarts lined up at the SE corner of the board. The malfunctioned Stuart started up, and Patch took a shot at it from P2, missing only because he was at range 7 (i.e., Final 10), which he’d deliberately done to give me an red 8 TH if I tried for a shootout. 40M8 was in a real pinch, with two tanks and an AC practically on top of him, and I was fairly sure that the Pz IV in O7 would end up trying to go through M8 on his next turn. So, I revealed for a BFF shot; he could either Gun Duel me (which he did, winning handily) while I was still HD, or he could let me shoot first and try to get me as I drove off (since HD goes away as soon as I Start). He got a turret hit to burn it before it did anything constructive.
Situation, American Turn 1.
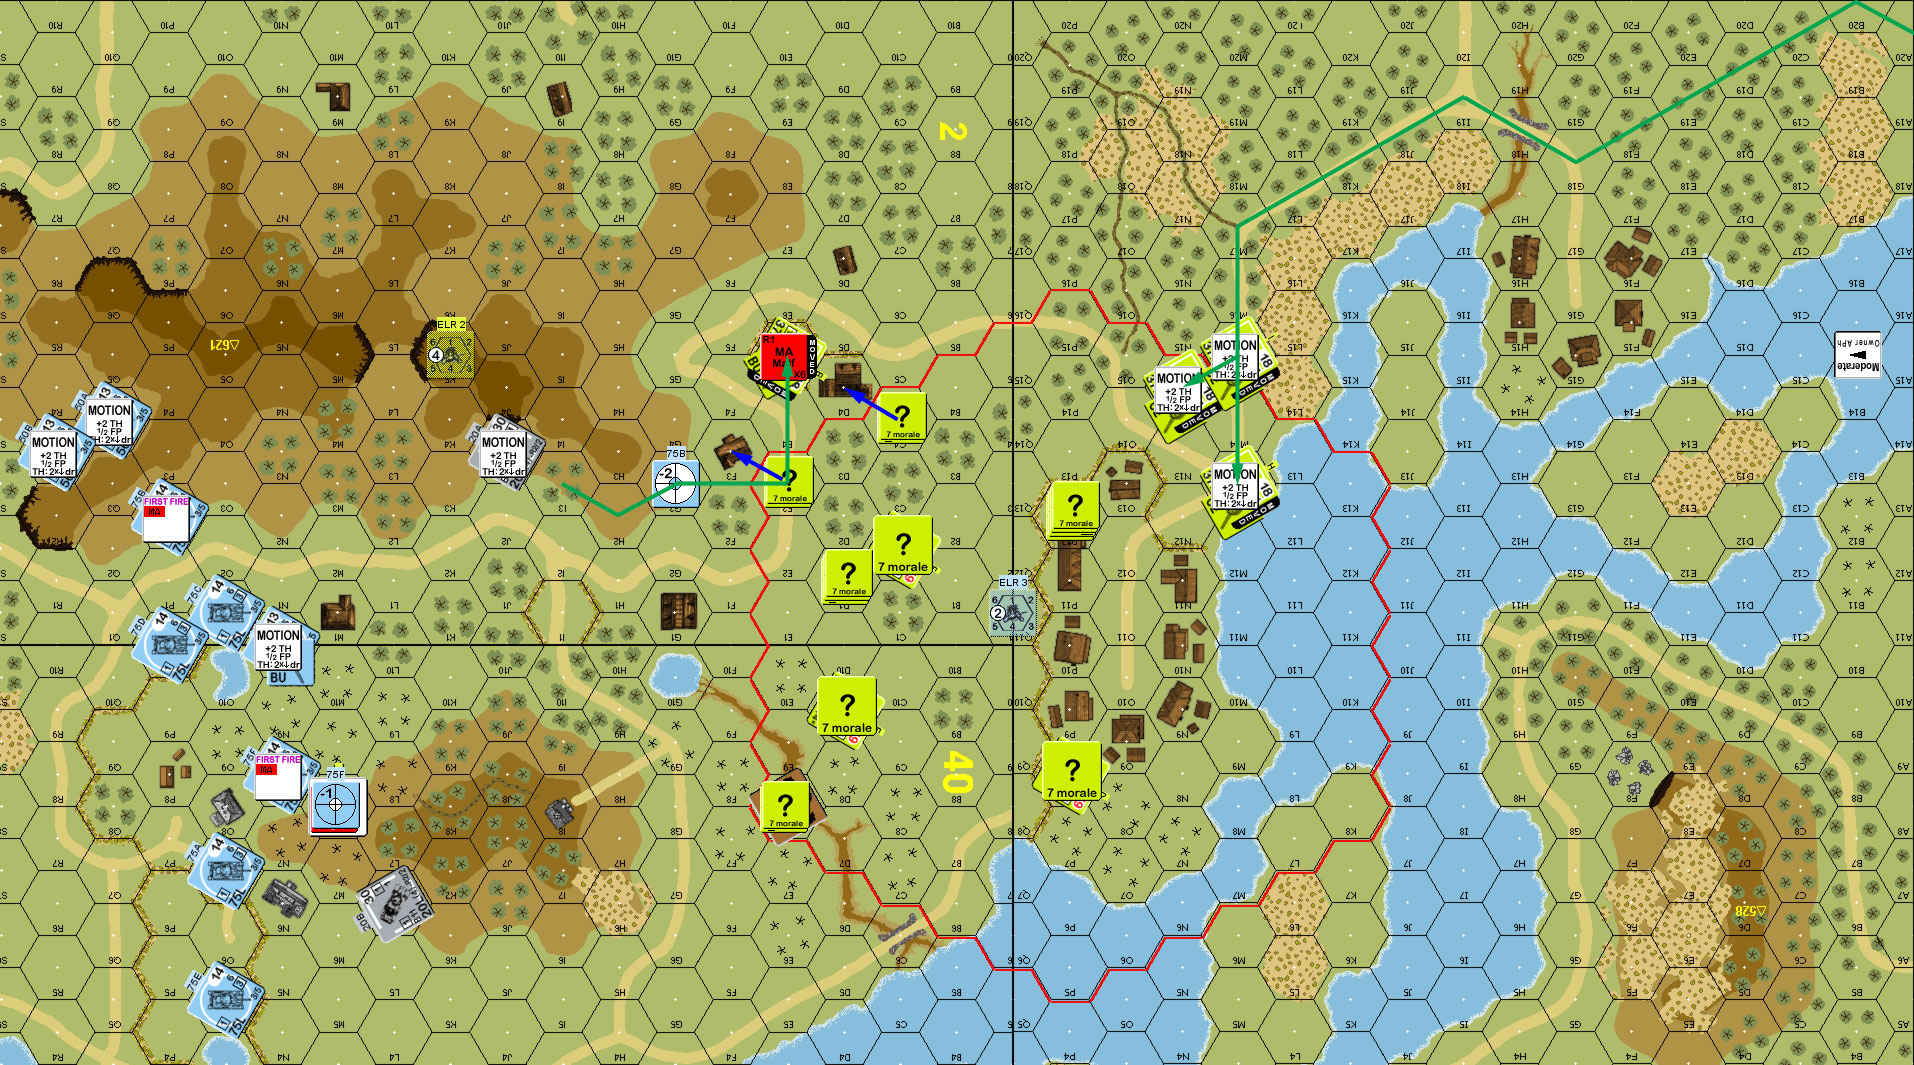
The transports lined up in the center for entry, with one truck and halftrack to the west; in addition, Patch got a ’42 FB with no bomb this turn. Patch covered his advance down the road with smoke rounds in 2L1 (after rolling three 10s in a row for a lack of smoke in those tanks, and then using the last round from P2). To my surprise, Patch moved up as much as he could, and unloaded almost all of his infantry, largely near 2M2. One truck unloaded at 40P7, and one halftrack went up the smaller hill without unloading.
Situation, German Turn 2.
I still hadn’t repaired the MA for my turn 2, and an attempt to smoke-in 2I1 revealed my forward MTR had no WP. It settled for targeting the building in G1, though that still involved revealing it for changing CA. Part of my initial plan was to delay Patch getting into 2F3 and D4, which is why I set up next to them, and advanced in. With the big mass of infantry in the center, it was already time to abandon F3, trying to avoid problems by going around the back of the D4/E5 farm. But, I forgot about his Pz III at level 3 in N5, who stripped concealment, and then got a PTC with the MGs; thankfully, the HS passed. The HMC was way too exposed where he was, and just couldn’t get the shots I’d hoped for with all the hindrances, so attempted a smoke grenade (failed), and tried to get out of Dodge. Patch’s first attempt hit (he had three different tanks acquiring the hex), which naturally killed it, and the crew did not survive.
Two of the new Stuarts lined up behind the cactus hedge (CE), waiting for the Germans to come closer, while the third moved up to the board 2 hill, hoping to push action towards the last hidden Stuart. Patch’s FB went after my MTR, but failed the Sighting TC. He didn’t have many other shots, and nothing with a effect, while my Stuart in 2G7 barely missed a shot at his AC.
Situation, American Turn 2.
Patch had some prep, which unfortunately broke my MTR crew in 2D3, and then the Italian AC in 2F8 ducked out of sight off the large hill, and practically on top of my waiting HIP Stuart, who promptly malfunctioned his gun. The two panzers on top of the hill came down to engage the Stuart in G7, which successfully got into Motion. The last of his infantry unloaded on top of the board 40 hill, and the second AC drove down into the gully for BFF vs my “?” in 40D8 for no result. Two Panzer IVs headed west, and took up positions on the riverfront road, just out of CA of any of my guns. In Advancing Fire, one of his tanks made my Stuart on the main hill BU with MG fire (actually, Stunning it, which halted it again), but my sniper broke a squad in return. He broke my squad in D1 (who had caused a 1MC, for no effect, on the squad that broke them as they moved into G1), and a shot at the Stuart in 6aP11 missed only because it was at range 8 (or the excessive number of branches getting in the way of LOS; take your pick).
Situation, German Turn 3.
As expected, I didn’t get anything rallied for my turn, but I finally got results on my malfunctioned MAs. Both were eliminated, recalling two Stuarts I really needed keeping the east flank busy (and of course, Patch didn’t bother them as they went home). The remaining Stuarts immobilized the Pz IV in 40H7 in prep, and the crew bailed out. 2G7 recovered from stun and attempted to work its way out of trouble, moving into H7, where it took a 50mm hit for a UK, and then a second hit burned it.
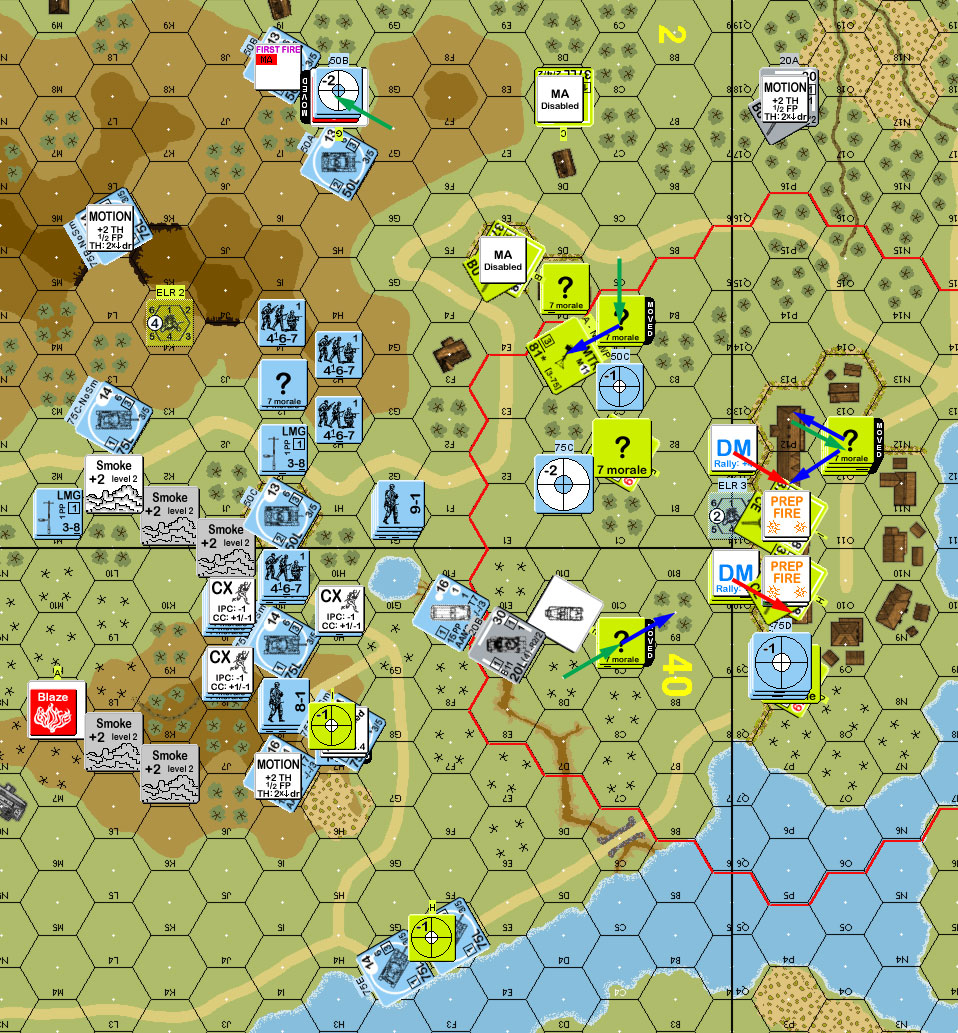
Situation, American Turn 3, just before the two Stuarts leave.
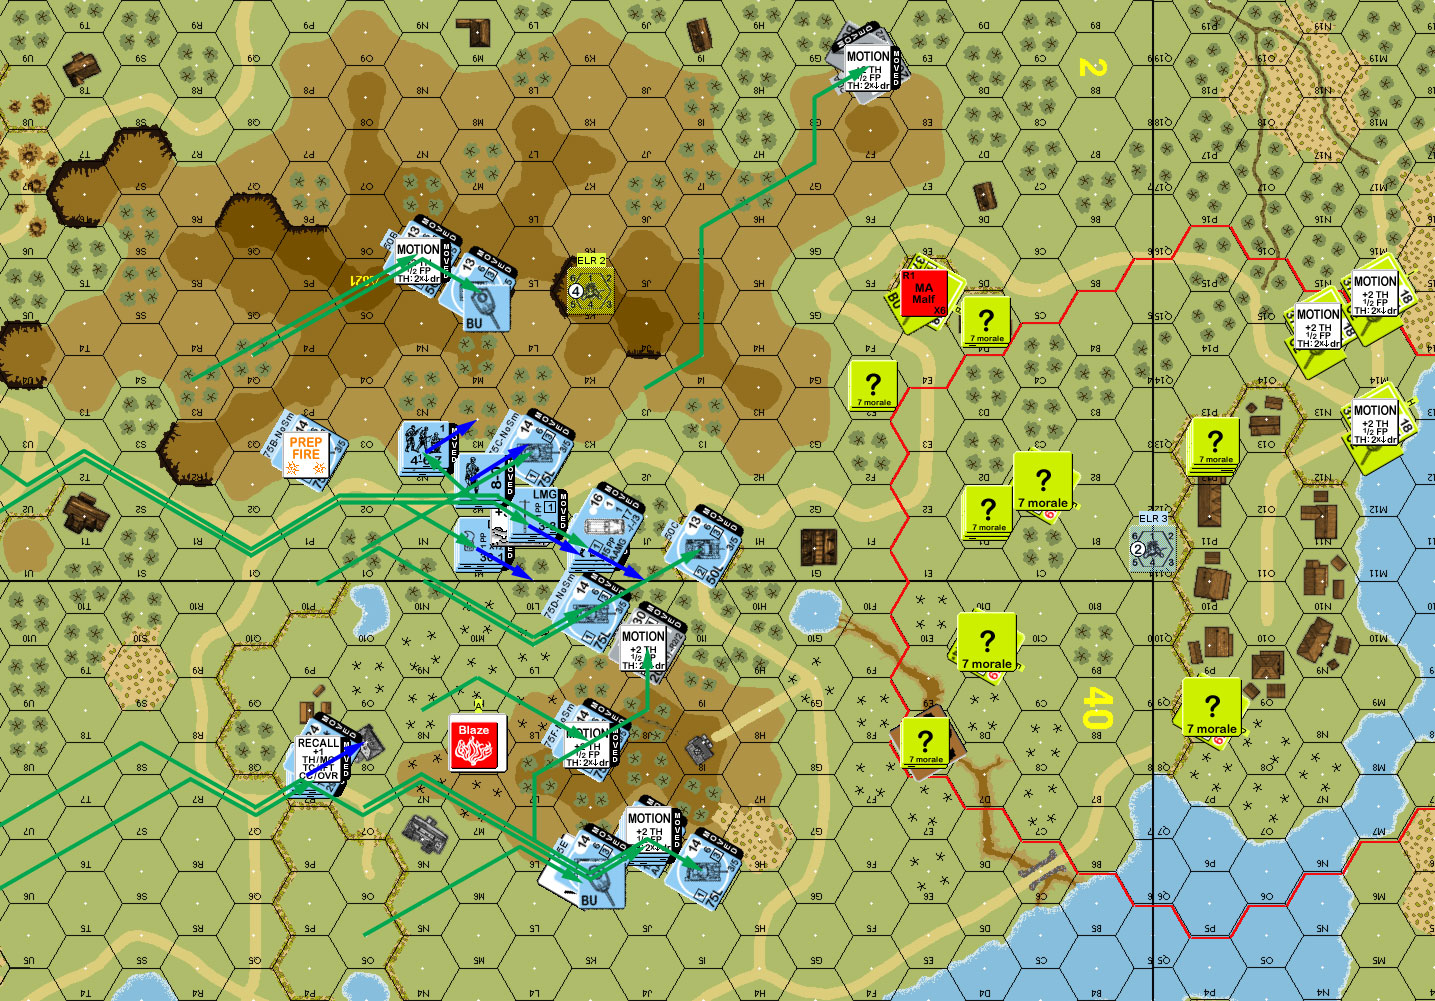
Patch got a turn 4 FB with a bomb for the second air support roll, and I rallied my broken crew, while a HS grabbed the MTR they’d abandoned. He prepped a MMG several times at 6aP8 (aided by ROF), until he got a result to reveal it (the crew passed a NMC), and then a Pz IV blew it up (2 TK DR…). The AC in 6aP17 went first, headed for the rear entry to the victory area, and discovered my second MTR on the way in. The other AC climbed out of the gully, and headed to the west edge of the line, where it caught a 37mm shell and was destroyed.
Two of his tanks drove up to 2D5 for BFF to try and drive me out of there, but couldn’t get a result. His crew tried to get back into the immobilized Pz IV, but MG fire broke them as they tried to climb in. I didn’t have any other effective fire, but Patch got a good MG shot at 6aP9 to CR my broken squad and forced a Stuart to BU.
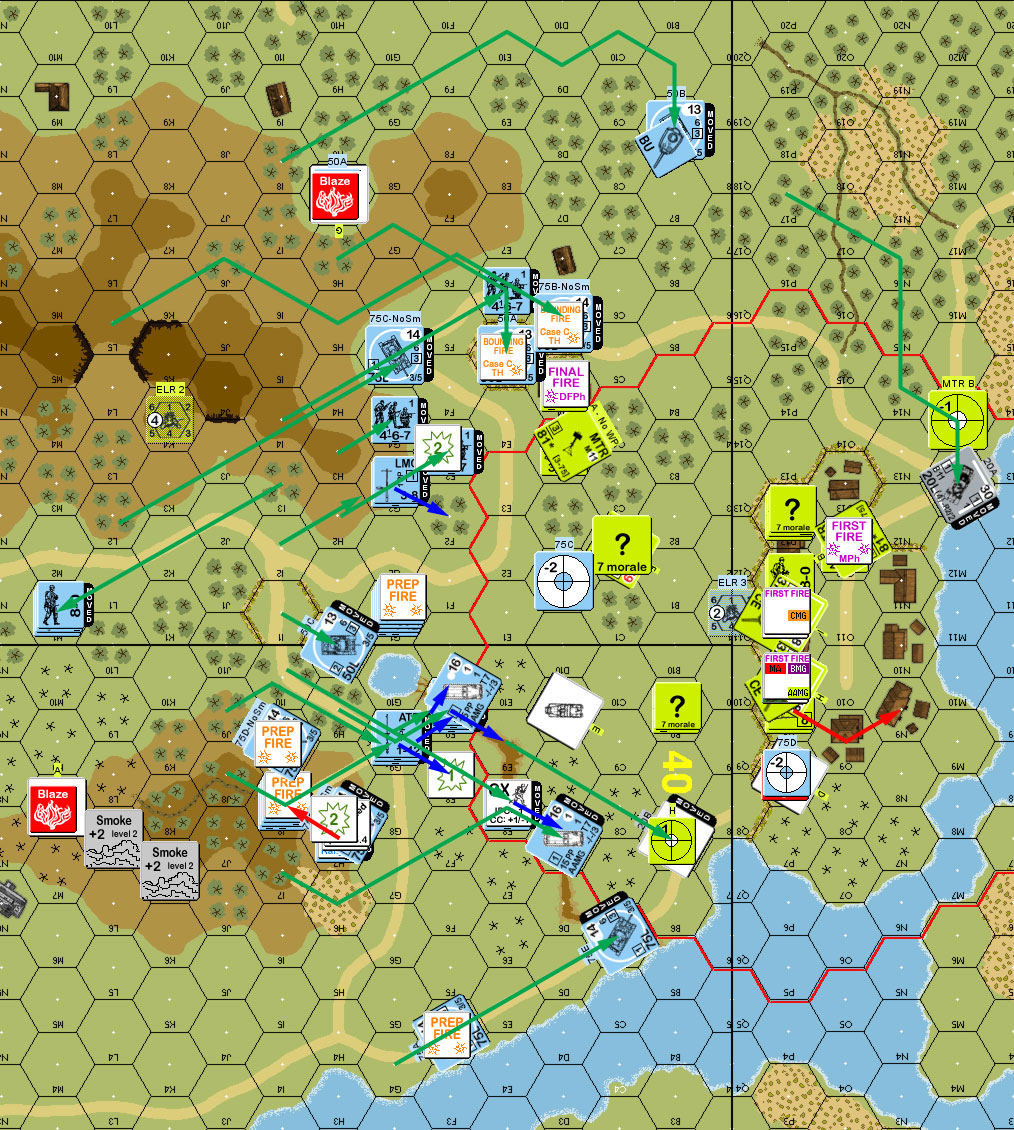
Situation, German Turn 4.
I didn’t get anything back for my turn 4 RPh, but I did immobilize a Pz IV on the 40C6 bridge, though the crew was smart enough not to abandon the tank, and a IF shot narrowly missed. The second Stuart in the line went into reverse so it could take care of the AC in my rear, but Patch hit and killed it before it could move. 2C2 tried to bug out as well, and it took two tries before he got a hit, and blew it up (both the hit and TK DR were 2s as well…).
Generally, I was pulling back with AM, and Patch didn’t have any other worthwhile First Fire shots. But his FB came in and strafed the MTR in 6aO12 before breaking them with its bomb, and another ‘2’ reduced a squad to a broken HS, and another shot broke the HS next to him, leaving me the contents of the village and a concealed squad just outside it. Also, the orchard in 6aP8 caught fire from the burning wreck.
Situation, American Turn 4.
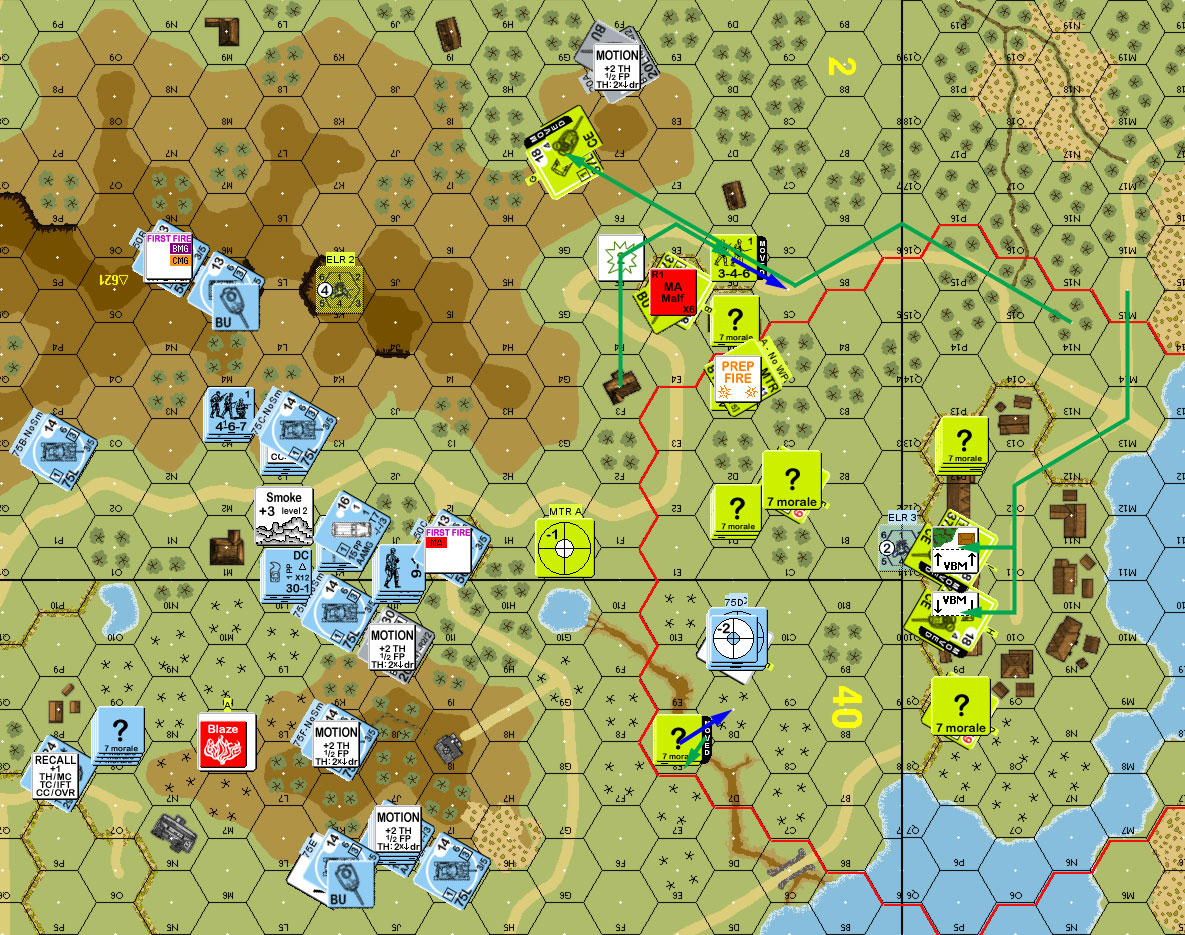
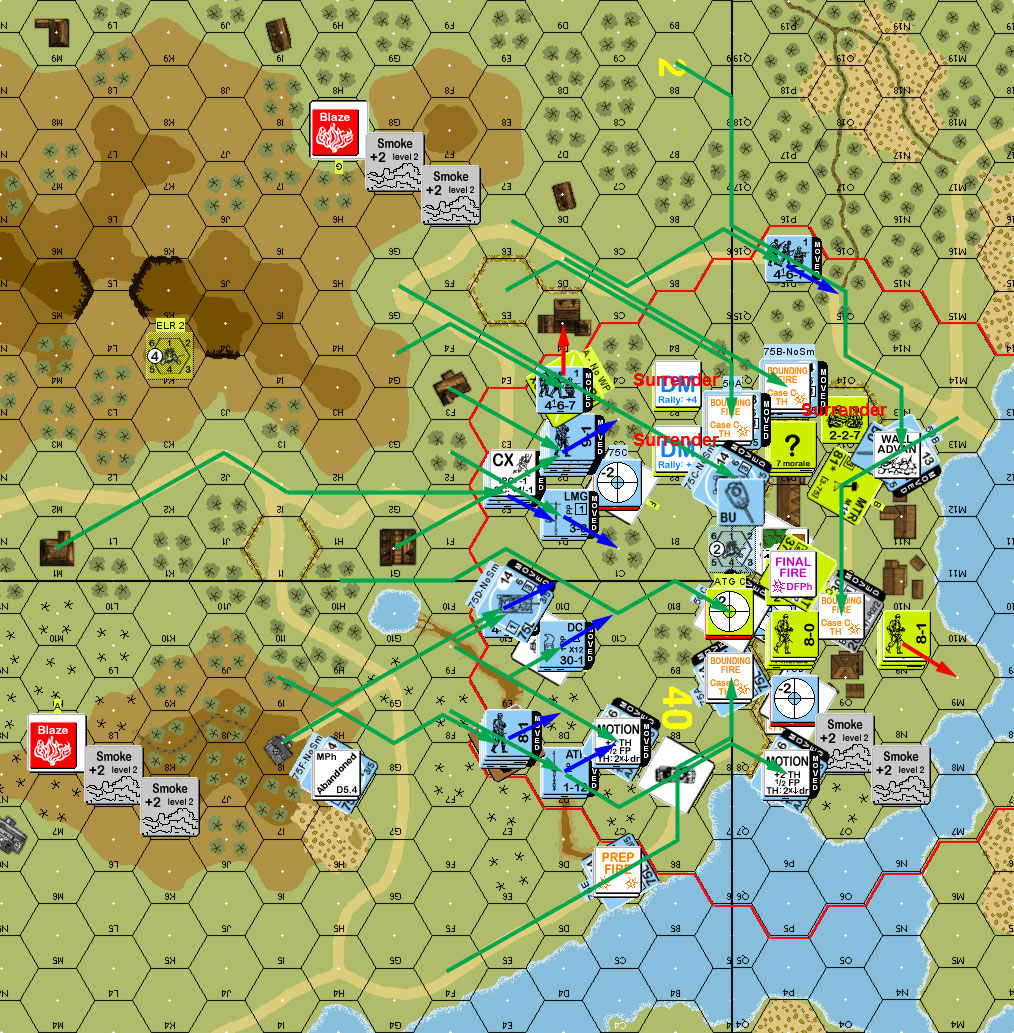
I self-rallied my 8-1 for Patch’s turn 5, but that was as far as the good news went. Patch drove the AC through the middle of the village, with all my guns pointed the wrong way, and parked next to my rally point in 6aN9, DMing them, but BFF failed to get any results against them. The tanks started lining up at the cactus hedge perimeter, and one knocked out the last Stuart, while all his fire against my infantry was ineffective. However, one of them moved up in CA of my ATG, who fired at two hex range, bouncing a round off the turret (passed possible shock), and then burning it as it moved up to the hedge.
The infantry was struggling to get up to the besieged village, but Patch loaded his two halftracks back up to hurry a couple squads. One went early in the turn, and the last Stuart fired on it as it moved towards the back corner, but couldn’t connect. Advancing fire broke my crew in 6aO13, though it set off my Sniper to break a squad in 2D3. 40M8 came alight from a burning wreck, and 6aP8 turned into a terrain blaze. Thanks to the overrun of most of the board, I lost the crew and two HS to FtR.
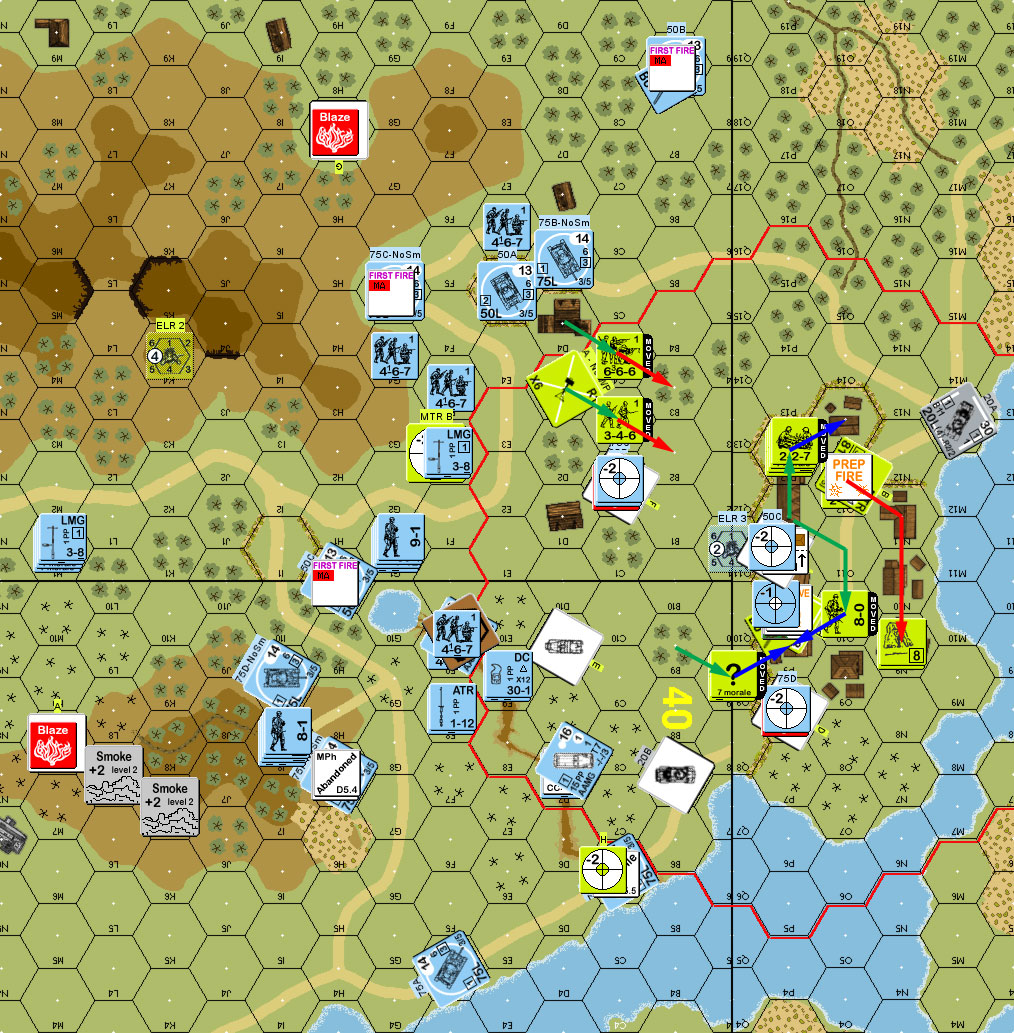
Situation, German Turn 5.
I didn’t get any rallies for my turn, and the ATG had to turn around (in a building to get at the decent targets, the first shot going wide of Patch’s Pz III in 6aN12, and the IF shot malfunctioning the gun. I tried crawling away from the big guns, but Patch broke the ATG crew, and revealed and broke my MMG HS, leaving me with a single concealed squad in 6aO9 as an intact MMC. I had planned to just hunker down there, with assistance from an 8-0 and smoke from a burning Pz III… but then the hex came alight in my AFPh. With Dry EC, that was a 7 or more to burn to death (or really, self-break and try to rout out) over the next couple turns.
So, I advanced away, into N9. Patch’s squad self-rallied, and generated a shiny new… 6+1. I couldn’t get anything back. The AC Preped at the lone defenders, and pinned my squad, while my sniper broke another squad. A Pz III moved adjacent and BFF… to malfunction the MA, and then a Pz IV swung around the back/west side and got a 1MC with BFF to break my squad. With no one left to fire at him (and due to be eliminated from FtR), I conceded as he had this turn and next to claim all the buildings.
Afterword
So, not the best use of what I had. None of the 75s ever fired, as I never had shots I liked as much as the +2 TH of being concealed. The MMG never had any shots worth taking, and the MTRs barely got any shots off. Part of this was setting up with the assumption of Bore Sighting (and Patch did go into several places I’d sighted on), and part is just the lack of good options. I could have set up in the village… at the cost of letting him advance faster, as there just wouldn’t have been anything to make him cautious.
One thing I missed was the idea that the HIP Stuarts could well have started in buildings (I finally thought of that around turn 2). +2/+3 TEM while they get started, and hopefully a solid obstacle to block further fire while moving. Starting in O8 would have been great, as I could have shot a Pz IV in the rear; or if I’d managed fire discipline, I might have shot a loaded truck as it came up adjacent.
All of these problems, and Patch nearly came short on time. Crossing a cactus hedge is an all turn affair, so if I’d had anything left, the last struggle would have been very desperate for him, and that was the general plan. Bringing on all the infantry on turn 2 was interesting, but probably not a good idea. Certainly, I think there’s enough in the German OB to keep one halftrack loaded the entire time, just as a threat of a sudden move.
But, things really came apart for me on turn three, when two Stuarts recalled. Without that, Patch would have been a bit busier on the east flank (even if it was just shooting up Stuarts with malfunctioned MAs), and could have delayed things critically. If either of my attempts at actually killing the Italian AC had actually worked, Patch would not have arrived at the back gate to the village for… well, as long as the fight with the Stuarts lasted. I tend to think it would have taken nearly two turns for all that to come apart.
So, it’s a really interesting scenario (though I would not want to deal with all those terrain transformations FtF), and both of us had flawed approaches, and despite how it ended, was really tense just about the entire time. Turns tended to move slowly as we had plenty to think about, and lots of cluttered LOS to deal with.
Discussion ¬