
Operation Dauntless T3-T4
As mentioned last time, Mark and I are working our way through the Operation Dauntless tutorial scenarios. The third one is fairly simple and very quick, while the fourth one got into one of the rules sections that really had me puzzled when I went through the rule book. Not that it was actually confusing or poorly written, it was just different enough that I knew I’d need to see it in action to ‘get it’.
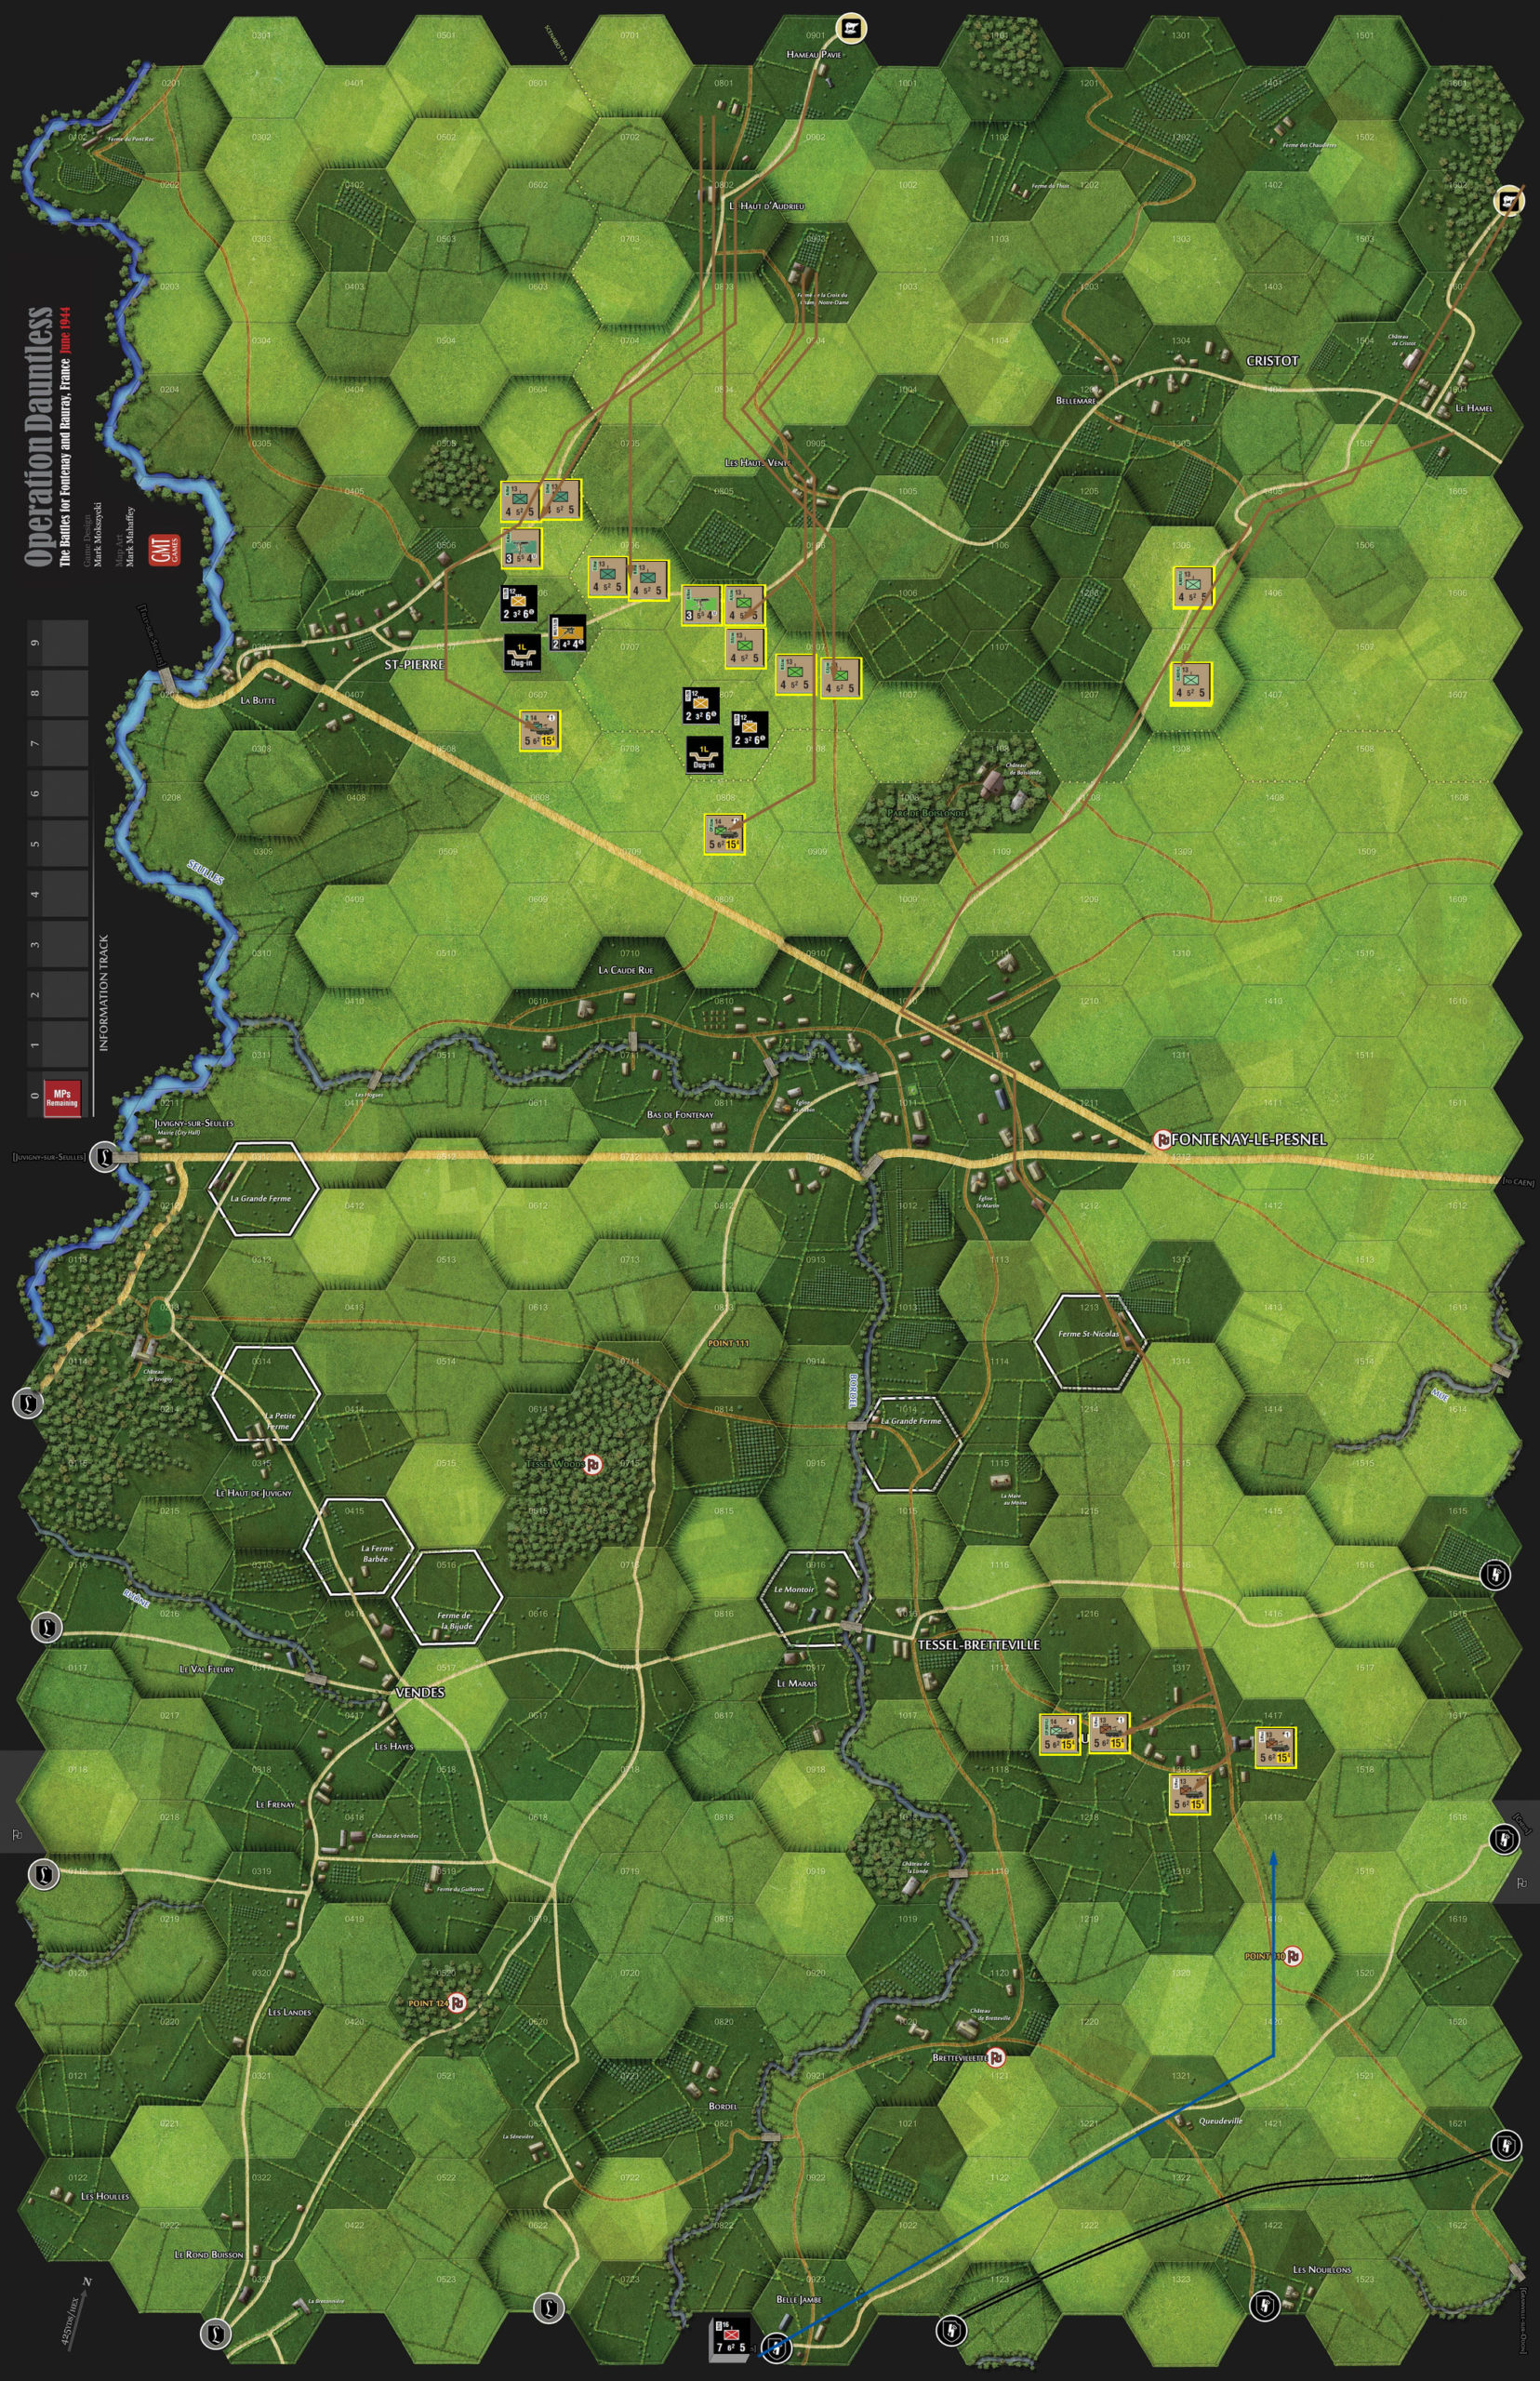
T3 “Recon Roundup” basically shows off the capabilities of the British Universal Carrier platoons. They start with two full battalions, plus three recon platoons (note that each battalion also has an organic carrier platoon), and a third battalion enters on turn 1. They have three turns to wipe out the four starting German units (three platoons and a MG section), and occupy Rauray (three of four hexes) against three German companies (and associated MG sections) that enter on turn 1. There’s some restrictions on where the British can move, that enforces this as two separate fights; the carrier platoons can go wherever, but everyone else is limited.
The order of the day is movement, and the carriers finally get their full movement allowance, instead of being special ruled as just ‘leg infantry’ for movement, as in the first two scenarios. This brings in tracked movement, which is naturally more sensitive to terrain (leg movement is surprisingly simple: 1 for everything except woods [2], and 0.5 for roads), and an allowance of 15 (as opposed to 6 for the very fastest normal infantry).
First turn moves. Yes, there is ZOC in this game, but armored units ignore it.
The initial goal of running around and cutting off the German units is easy to do, and concentric attacks are also an odds shift, which helped for an otherwise weak attack against 0606—attacking out of a field is deadly, and the doubled MG factors meant it was a 2:1 (I had also neglected two include a third hex while concentrating on getting the concentric bonus), which caused one loss, which the Germans took on their platoon. 0807 took a full 5:1 and four losses, which was all retreat, with one platoon being eliminated for retreating through a zone of control.
The remaining German platoon got all the way to 0520 (road net, and the retreat got him a good head start), while new units approached Rauray. The MG sections couldn’t get up on the first turn, but the three companies managed a 4:1 attack (lowered to 2:1 for dense terrain and armor), and rolled a ’12’ to send a platoon reeling four hexes back, and occupy a hex of the village.
On the second turn, my main two carrier platoons were able to catch up to and surround the retreated German survivor, while the Kensington battalion hurried forward in case they were needed. In the east, the main column continued to Rauray, but still couldn’t get there, while the scout platoon moved back into the village. Both combats went well, finishing off the initial German forces.
The German MG sections caught up to everyone else, and Mark did a 5:1 attack against 1417 (3:1 after close terrain and armor bonus), forcing a one hex retreat, and taking a second hex of the village. However, for my last turn, the infantry finally came up, and the carriers moved around for encircling attacks against the Germans now in the village. The two carrier platoons that had hunted down the surviving Germans last turn also had an easy time moving up to help.
That still only added up to a 3:2 and 1:1 (both then shifted up one odds column) against the big German units, and both results were 0/1, and Mark flipped a unit each time to stay in place and win by occupying two hexes of Rauray.
T4, “PIAT and Panzerfaust” is a really tough scenario for the British. It’s only two turns, and the Brits must clear the north side of a stream in that time, without losing any units. Like in T2, heavy fog is in effect, limiting everything to movement and assault. This time, the ‘tactical advantage’ system is used, which inserts a short anti-tank action before the main part of an assault. Surprisingly, considering the armor tutorial starts at scenario T6, both sides get some armor platoons.
Interestingly, regular infantry units pretty much all have an anti-tank factor, with a range of 0. These are for short-range LATW like Panzerfausts and PIATs, and only come into play in an assault. When there’s armor and AT-factors on opposite sides of an assault, you figure out the tactical advantage to determine what kind of AT fire (if any!) happens before the assault itself happens. The Brits have three Firefly platoons and one of regular Shermans (along with two brigades, an extra MG section, and no carriers), while the Germans have a SdKfz 251 platoon, plus three more that include some 251/10s (the 37mm gun version), and one Pz IV platoon (along with four each reduced infantry companies and MG sections).
The German set up is fixed, in four hexes on the north bank of the Bordel, and the scenario recommends the British set up in four groups, with each one set to do an assault. That part was easy, figuring out how to do good assaults was a bit harder.
Tactical advantage consists of adding up various modifiers, starting with a comparison of the number of infantry steps; heavy fog actually adds one to the total, making assaults a bit easier. If the final number is positive, the attacker draws chits, and if it’s negative, the defender does. In all cases, you draw one more chit than the total, with a ‘0’ being a single defender draw. The person who drew the chits chooses one chit for the assault to use. Each chit gives a sequence of AT fire by either the defender or attacker.
So, in my first move, a combined force of Shermans, Fireflies, and two infantry companies assaulted the left of the German line, with a company, MG section, and 251/10. At this point, the odds would be 17:10, with the halftracks generating an odds shift, and preventing an armor bonus. But heavy fog and four infantry steps to two generates a ‘+3’ tactical advantage, giving me four chit draws, which were DA, No AT Fire, D, and AA. That second one would cause nothing to happen, the first and third would allow Mark (who’s Defending) to do one AT fire against my tanks (followed by one from me with the first chit), while the last one just gives me two anti-tank shots. The chits range from zero to four AT shots (in all sorts of mixes), and at low numbers are unlikely to be what you want.
So I took the ‘AA’ chit, and took out the halftracks, shifting the base odds to 17:8, or 2:1 (which was also the final odds), for a 1/0 result that only flipped my Shermans. The second assault was fairly similar, except that with a MG section instead of a Sherman, I had 5 draws, which allowed me to knock out that 251/10 section, and a better roll got me a 0/3 to knock out the MG section (can only retreat two), and send the company back across the river.
The third assault was against the Pz IV hex in a village, and the penalty for attacking out of a field (-4) generated a 0 tactical advantage, with the chit draw being No AT Fire. This turned into a horrible assault with three left shifts (close terrain, dug in, German combined arms) (we did four, as we missed the ‘normal’ 251 didn’t have an orange combat strength), and a poor roll generated 4/0 results, forcing me to flip a two companies.
I at least learned my lesson, and the fourth group moved down the edge of the active board into 0810 so as to not be penalized on the tactical advantage draw, allowing me to use a AAA chit to kill the 251/10s. Another poor roll gave a 2/1 result to flip both companies, but eliminate the German MG section.
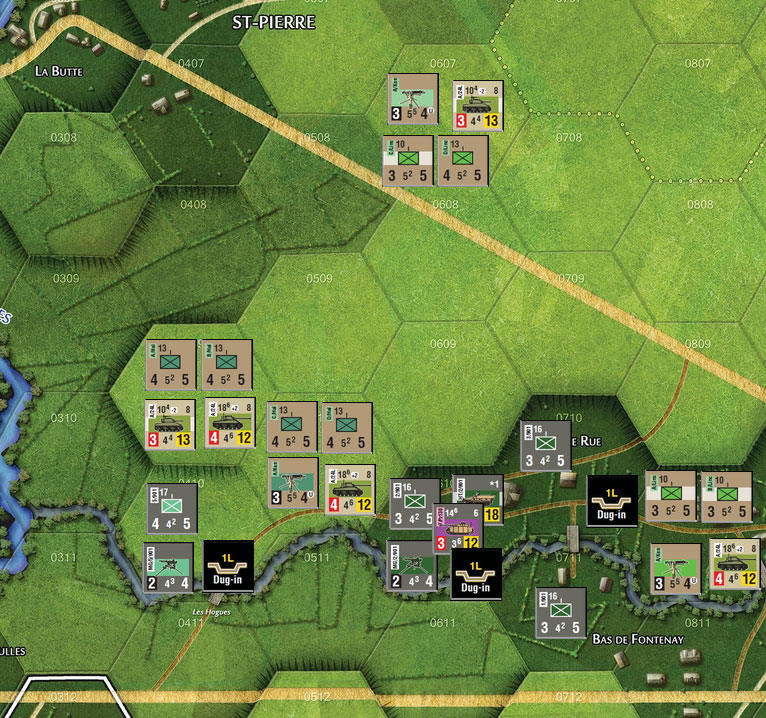
After the first turn.
Mark moved the retreated company into 0710, but frankly it wasn’t needed (though his best move). I needed 0710 to be cleared so I could assault 0610 from there, and not confront his Pz IVs in the open. Clearing it on turn two doesn’t do a lot of good, as the assaulting stack is forced to advance into the hex, blocking anyone else from using it.
But, I gave it a try. 0810 tried again against 0710, and generated one loss, which Mark took, to keep a company sitting there. I swung the stack with the Shermans across to hit 0610, with a TA of -1 (4-2 steps, -4 for coming out of a field, and +1 for the fog), and Mark chose a D chit (the other draw being No Fire), and effectively won the scenario by eliminating the weakened Sherman platoon with his Panzerfausts. The assault itself was 1:1 (or 1:3 after three shifts against me), for a 2/1 that flipped my infantry and eliminated the halftracks.
We did the last two assaults anyway, hitting 0710 again, and forcing the company there to retreat three hexes after a No Fire draw, and then 0410 where I chose a No Fire chit (I could have chosen AAAA or AAA, but I had nothing to fire at) and then a 0/1 result eliminated another MG section, but left a company behind, leaving me with two hexes of Germans north of the river, and having lost a unit.
So, a horrible time for the Brits on the ground, but a really good introduction to an important part of assaults. As the infantry moves into rang, the armor has it out, and what comes out the other end may have a big effect on the assault itself.
The actual AT fire is dominated by a comparison of the AT value to the target’s armor value (though that does max out a +8, which all of ours were well past). Normally, range reduces the 2d10 roll, but of course this was all at range 0. The potentially annoying part is that one of the modifiers (flanking fire) relies on seeing the die roll first. Often, it’s not going to make a difference (at least when the penetration is already high), but it is extra fiddly.
We did miss another wrinkle of AT fire: a second draw of a different set of chits. This is purely for infantry (range 0 AT, really) vs armor in an assault. Now, all my fire was with the Shermans, so we just missed it late when Mark’s infantry got my Shermans. You draw chits depending on visibility (4 for day/good visibility, down to 2 in fog or at night). At that point, no modifiers, even the big penetration one, are used unless the chit draw says so, meaning Panzerfausts aren’t that reliable (but the base ‘to kill’ is 14+ on 2d10, so not likely, but far from impossible even without modifiers). A quick draw of two chits gives me Terrain in Assault Hex (+5 for village), and Enemy Infantry+MG Steps (-8 for four steps). With a roll of 14, that’s 11 for my Shermans to actually survive, thanks to all my covering infantry. (Or he could have just used the Pz IV instead, with two less AT/penetration than the infantry [but always uses it], which would have done the job.)
I still wasn’t going to push him out of the hex though.
Discussion ¬