
AP18 Village of the Damned
Patch and I finally got around to revisiting Action Pack #3 recently, which has a number of inventive scenarios around the collapse of the Italian 8th Army in Russia. “Village of the Damned” has seven Italian squads and two and a half German squads left behind by the main retreat determined to sell their lives dearly as the Russians approach the village they’re sheltering in.
The action is on board 48, with the Axis needing to have at least one unbroken MMC at the end of 4.5 turns. Most of the squads are (secretly) declared Walking Wounded (an idea from Pegasus Bridge, where IPC is reduced, MF is limited to 3, and they have a penalty in CC). Leadership isn’t bad, and there’s some markers for Dummies, and a single Italian LMG for SW. The Russians have ten squads and two half-squads and a T-60, which enter from the east, north, and/or west on turn one with a MMG and two LMG.
Extra wrinkles: There is ground snow, two buildings are randomly set ablaze before things begin, there is a Mild Breeze blowing smoke from those buildings across the board. The Russians get to declare HtH CC once during the scenario.
Thanks to the extra distance, and short time frame, I’m sure the Russians don’t usually do much with the east and west, and my defense was generally oriented toward the north. The Germans all went on the west end, with their Dummy stack in K7, and the squads backing up the Italians. The German HS was in the gully, where he could potentially interfere with the Russian advance, or even try to stay out of LOS for most of the game, and then pop into the victory area at the last moment. My two forward Italians were a Dummy and a conscript squad (not WW, as I hoped he’d get a chance to run).
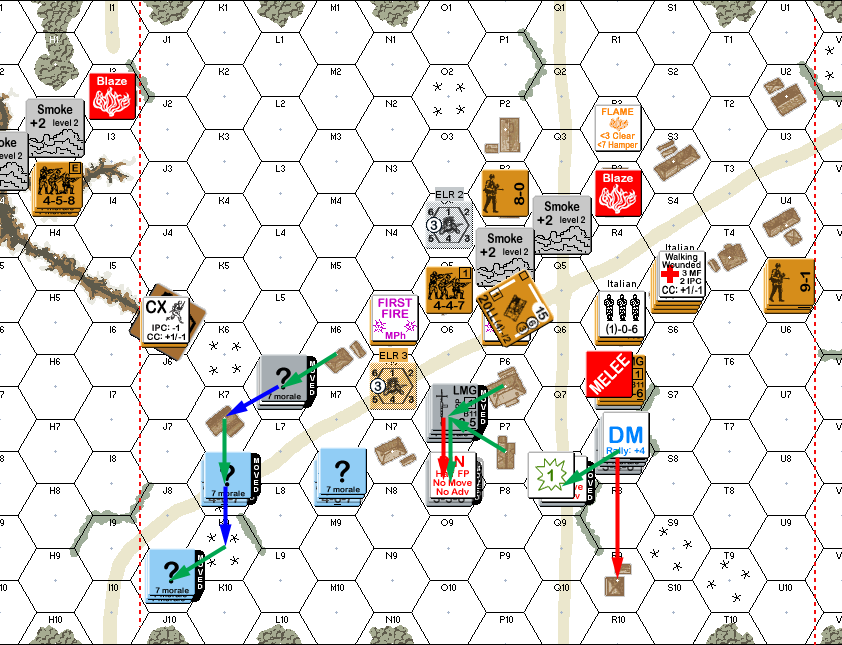
Patch forgot the setup instructions for a moment, and his first setup was to attack from the south…. Which said nice things about how mine was working. His revised entry stretched over a good portion of the north edge, but didn’t use the other edges at all, and the T-60 was in the middle of things to provide cover across the initial approach. I had forgotten the breeze during setup, and my LMG position was promptly smoked-in by the fire in R3, which was less of a problem than it might have been.
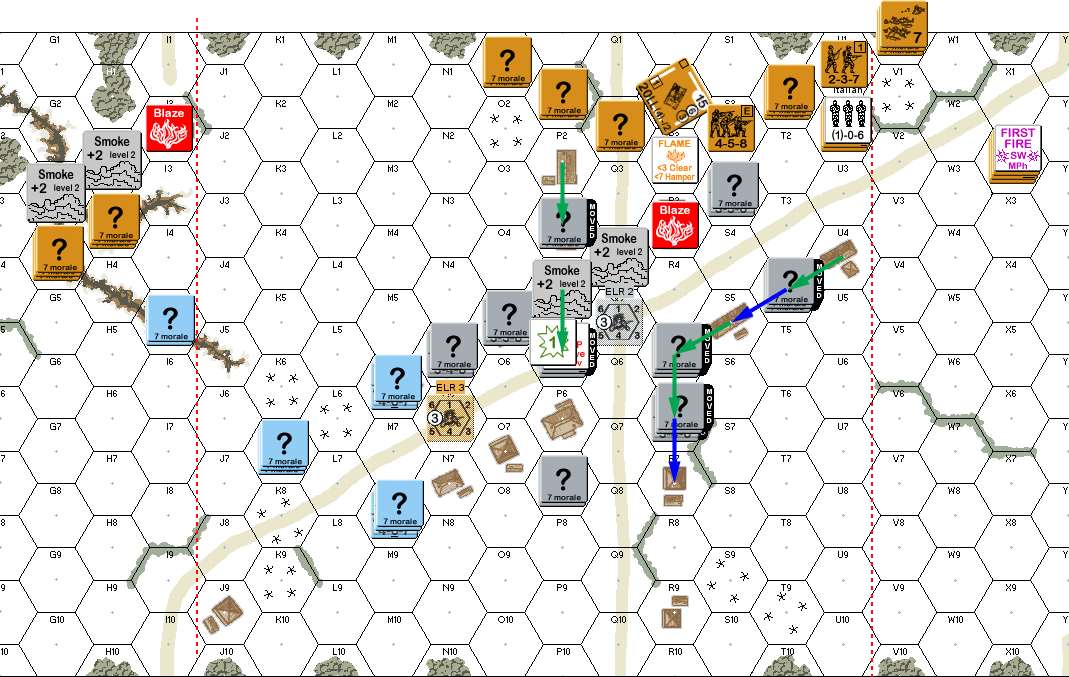
Patch’s first entry was straight into the gully, which was going to be more than a HS could handle, but there was still some hope of keeping him cautious. The T-60 came on with one squad doing Armored Assault, and he stopped once the LMG set up a fire lane across his advance. A HS searched U2 to find my conscripts there, who then pinned them on DF that cowered, and then broke a squad with FPF. A second squad moved up, and further FPF was a ‘2’! Which… being conscripts, cowered down to 0FP. Worse, that was HOB, and they decided they were out of ammo, and had done their part, and surrendered to the Russians. Flames spread to R2.

Situation, Russian Turn 1. The red lines are the victory area.
I briefly contemplated taking a shot or two at the oncoming horde, but stuck with the better part of discretion. Many of the troops huddled in place, but I pulled back where I could. The LMG squad tried to Dash across the road, but got pinned in the middle of it. After some effort, Patch revealed and pinned a WW conscript in S3 (he had figured it was a Dummy; a slightly higher roll could have kept their “?” and given him a problem next turn…), and pinned the German HS in I5.
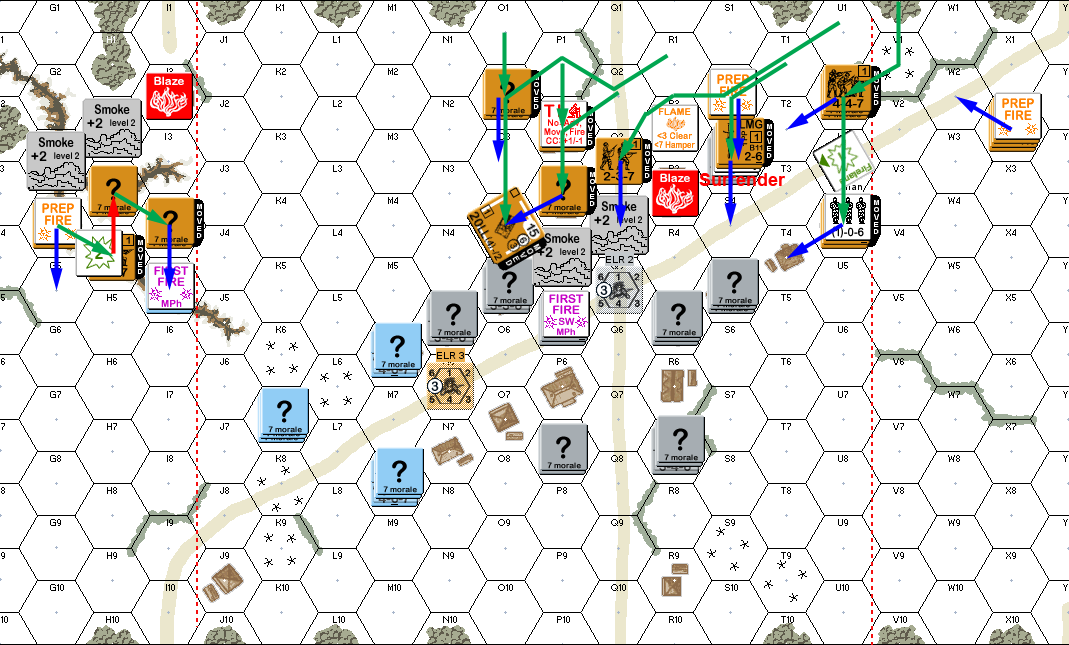
Situation, Axis Turn 1.
Patch got his one broken squad back for his second turn. The 9-1 and MMG tried to take out my LMG, but instead malfunctioned his MMG. Fire from S2 disrupted my conscripts in S3, but a shot at I5 did nothing. He Dashed his LMG guards across the primary road, and got across despite a PTC from my LMG, who set up a fire lane. More searching revealed P3 as Dummies. His gully force advanced along it, with another squad clambering over the top. First fire did nothing, but, Final Fire broke the squad in the gully, providing some welcome relief. The “?” up above, advanced into the gully, and turned out to be a HS, who ambushed me, used the one allowed HtH… and missed! I then managed to kill the HS.
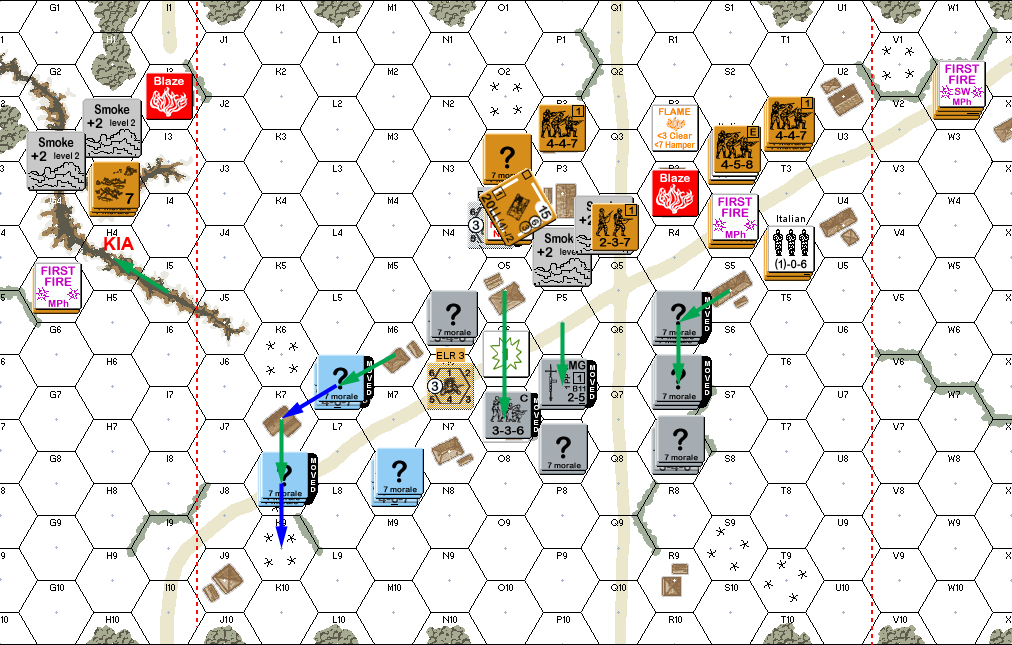
Situation, Russian Turn 2.
Patch repaired his MMG for my turn, and I continued pulling back. Except for the German HS, who advanced down the gully, and took a 1KIA from the adjacent squad. I had hoped he’d survive, and then dive into CC with H3, which had a broken squad and “?” leader. No other fire had an effect… on the enemy. In Patch malfunctioned an LMG, and in advancing fire, I malfunctioned my LMG.
Situation, Axis Turn 2.
Even without DM, Patch failed to rally his brokie, and to add insult to injury, I repaired my LMG, while his was still malfunctioned. With nearly half the time gone, it was time for the Italians to put up as much fight as they could, while the Russians looked to overrun the east. They got into R5 early, finding only Dummies, and I left residual around, but only pinned one squad with it. However, the LMG squad got a K/1 to kill a HS crossing the street, but cowered for no more fire or residual.
Advancing fire broke my 8-0 in R6, but only pinned the squad there. He got into CC with me in N5 and R6. I was still concealed in N5, and Patch was disappointed I wasn’t a Dummy; the squad managed ambush, and withdrew out to M6. In R6, my pinned squad managed to avoid being ambushed, and there was no result.
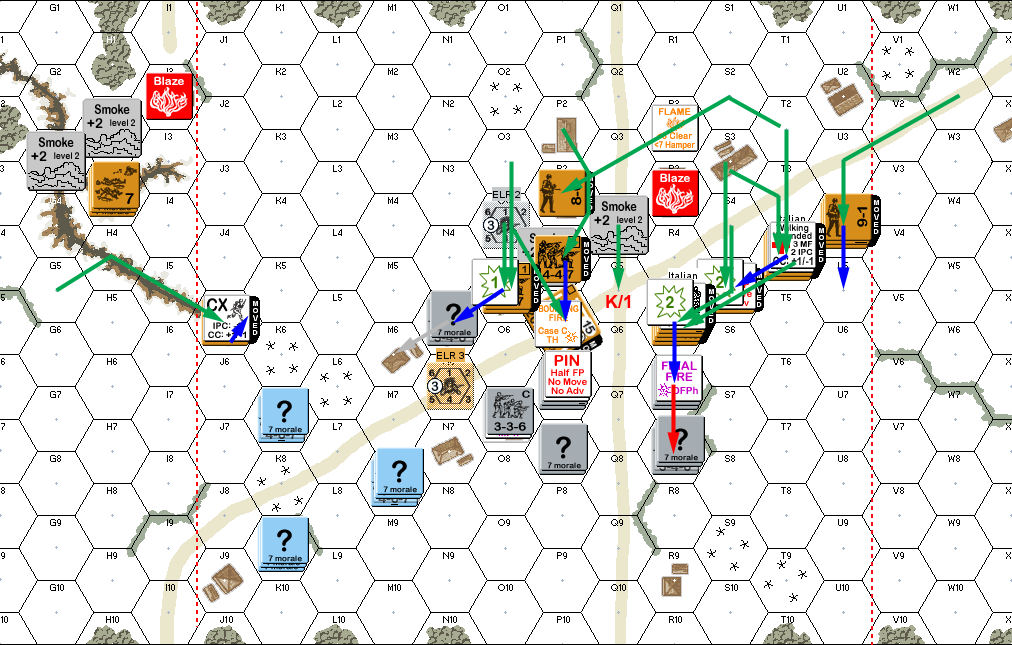
Situation, Russian Turn 3.
Patch rallied his squad for my third turn, and battle hardened the squad to elite (they would have gone berserk if they’d had anyone in LOS). The goal was largely to back off again, though I was starting to run out of places to go. One squad tried to sneak out the back, but thanks to all the small buildings, there was plenty of LOS, and they got pinned. Worse, my 9-2 tried getting across the central road, and got pinned in the middle of it.
Defensive fire managed to reveal L6, ELR my LMG squad, and worst of all, break the squad in R7. They’d been concealed, so I’d hoped they’d be able to stay intact, and reinforce the CC in R6. With luck, I might have had a nice Italian stronghold to hold up part of the advance for another turn; at the least, the CC would probably capture more Russian attention. And both were subject to Interdiction as they fled to R9, and failed it, though at least the leader survived his wound. O7 could see Russians to the east and west, leaving N10 as their valid target, and with the open LOS of the area, they Low Crawled. However, despite being unable to reinforce the melee, I got a CR to reduce him to a HS, while Patch got no result.
Situation, Axis Turn 3.
Patch repaired his LMG for his turn 4 RPh, while my 6+1 wrestled the LMG away from the broken squad in O8. What I hadn’t thought about before, or else I probably would have taken the Interdiction, is that O8 was a prime target for an overrun, which was Patch’s first move of the turn, and a 2MC broke the squad and CRed the brokie… but the 6+1… battle hardened to a 7-0! For all the good that did me. And everything else was something of a rush at my positions, and despite trying to put up residual where I could, all I did was pin a single squad.
Advancing fire broke the German squad in M8, but the Italians in K7 came through a 1MC fine. In RPh, 2.5 Italian squads, a German squad and the wounded 8-0 all surrendered to the Russians, leaving me with the wounded 9-2, the 7-0, a German 8-0, a German squad, an Italian squad, and a Dummy stack. Of that, only the Dummies and the German squad did not end up in CC. In general, I went down hard, with Patch even generating a new 8-0 leader in Q8. The one exception was M8, where he could only send in a HS against my leader, who killed the HS while they did nothing.
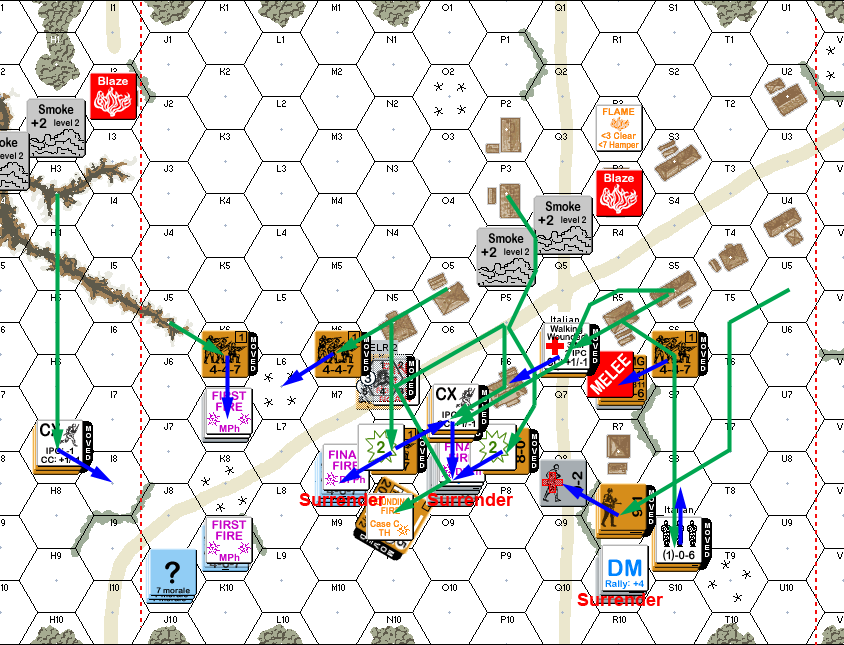
Situation, Russian Turn 4.
That didn’t leave much to do for my final turn. The 8-0 tried crawling for the rear, and got broken, after three different attacks. I contemplated holing up in J10, just to give him a little further to go. But I stuck with J9 as my inadequate Alamo, as it had a better TEM than the woods. The 8-0 low crawled into L9 to present a block to movement near the edge of the board.
Patch’s final turn was the rush at the lone survivors, trying to break or kill my final squad. His first move was to have his T-60 end in Motion bypass of J9, preventing me from firing out (and eliminating the Dummies on a failed PAATC). I thought that might be a mistake, as if it came down to CC, I’d have an easier time getting Ambush, where I could Withdraw out of the hex. Patch had thought of this, and parked men in the surrounding hexes. He got encircling fire on me easy, but of three fire attacks, only one had a result, and I passed the 1MC.
In APh, he sent in three squads and three leaders, and parked men in all the hexes that mattered (since I9 & I10 were outside the victory area). Patch rolled a ‘1’ on Ambush (Final 3), so I didn’t get that anyway (I did manage to avoid being Ambushed…). Patch had a 3:1 attack with a -1 for his 9-1 and another -1 for my being Walking Wounded. Original 12… No Effect. The squad fights on, and the Axis win. (For the record, I rolled an 11 to do nothing in return.)
Afterword
I’d been thinking my chances were pretty good until my position evaporated on turn 4. That left way too much focused on the remaining squad to have a real chance with. Part of it was not realizing just how exposed being in the open would make me. The squad possibly should have fired on the T-60 as it came in to leave some residual, though if they’d made it intact, not having a fire marker would have been good too.
In general, the plan worked, with Patch hitting the more forward side first, and rolling up from one side to the other. I didn’t really lose anything to having to cross the main road, which was a worry. Also, the HS in gully tied things up enough that his squads over there didn’t come out of the gully until late. If they could have hit the German flank a turn earlier, things might have been very different.
Both SANs are 3, and mine went off twice… pinning the Russian sniper both times, and preventing one SAN roll by Patch. The single HtH declaration really is a neat touch, and I think we’re agreed on the fact that Patch needed to hold it longer. But he didn’t want to get tied up in the gully either, which was an understandable concern.
Discussion ¬