
185 Not Out of the Woods Yet
Patch was wanting to see some regular American squads (as opposed to Elite 667 or 747s) in action for our next ASL game, so I looked through the new Yanks collection, and found 185 “Not Out of the Woods Yet”, which uses a mix of those and 2nd Line 546s. It originally appeared in Annual ’95W (as A73, and was in Rout Report before that), which I’ve also meant to play more from anyway.
It is July ’44, and American forces have recently taken a dominating hill, but the advance has been getting delayed by a reverse-slope defense, and attacks on the flanks. This turns into a board 39 setup with 13 squads (about evenly split between 666 and 546, and Lax to boot), 3 MMGs, and 4 M4A1s needing to take five of seven buildings on half of board 6 (with the manor replaced by grain) in 8 turns. The Germans get seven 548s (plus two HS), some “?”, two 50mm ATG, six foxholes and another two and a half squads enter from the side on turn 3. By SSR, the hill woods are level 2 obstacles which the Shermans can enter at 4 MP per hex, with no Bog (kind of a light pine woods; there’s still a lot of double-crest lines that vehicles can’t cross).
I had the defending Germans, and figured there was probably no way I was keeping Patch out of the forward four buildings for eight turns. The amount of firepower he’d be able to throw at the front line would make sure of that. But, if I slowed him down long enough, I should be able to keep him from the back three, R9 and P9 especially. Keeping him out of C10 could be a bigger problem, but if he went hard for that, I’d just have to hang on tight at K4.
I put the two HS (and two Dummies) on the part of the hill in my setup area to encourage some caution, and hopefully block a path for a turn. The real units got foxholes for better protection, while two more anchored the ends of my line. Another went in 6J2 to give covered access between adjacent woods, and the last went in K5 where it could give me another hex of cover near building K4. Also, with all the bocage around, those last two were going to need a lot of attention thanks to the lack of LOS they could cause. I figured I would be fighting to maintain the center as long as I could and possibly let him loose for hide-and-seek in the orchard in preference to giving up the K4 area.
Patch lined up on the crest of the hill at the limit of his setup, and started feeling his way down some really rough terrain. Searching revealed the two HS, but missed on some Dummies thanks to being Lax, while I completely missed on my casualties rolls. Defensive fire did manage to break a scouting HS, and reveal a concealed squad that had come up behind them in 36R6, but there wasn’t much for me to do past that.
Patch did some ranging shots with the Shermans, and my sniper went off to reduce his SAN to a 2. He found that W8 was a Dummy in CC, and eliminated R7 with no problems, but failed to eliminate Y8, and took a HS in casualties there.
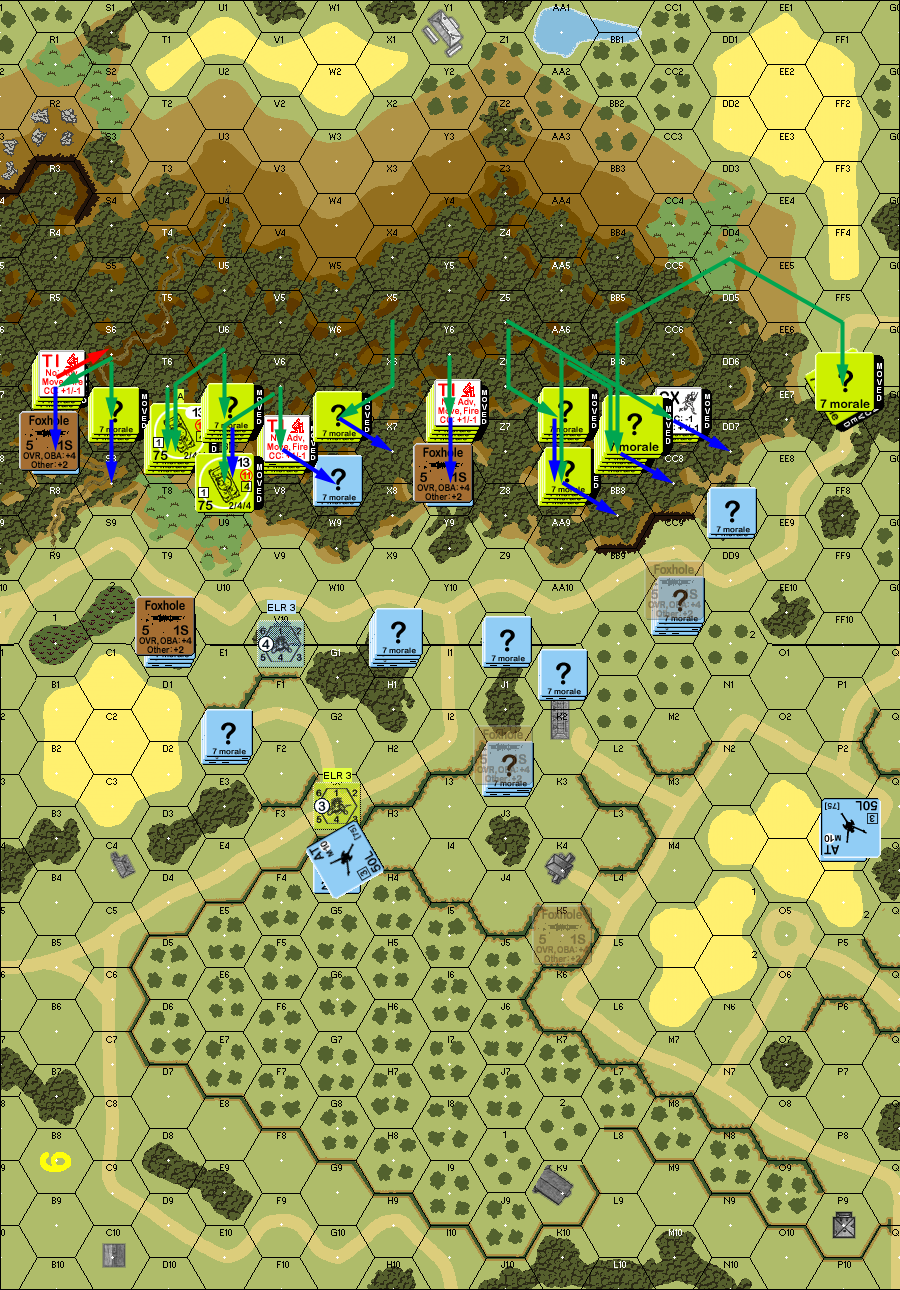
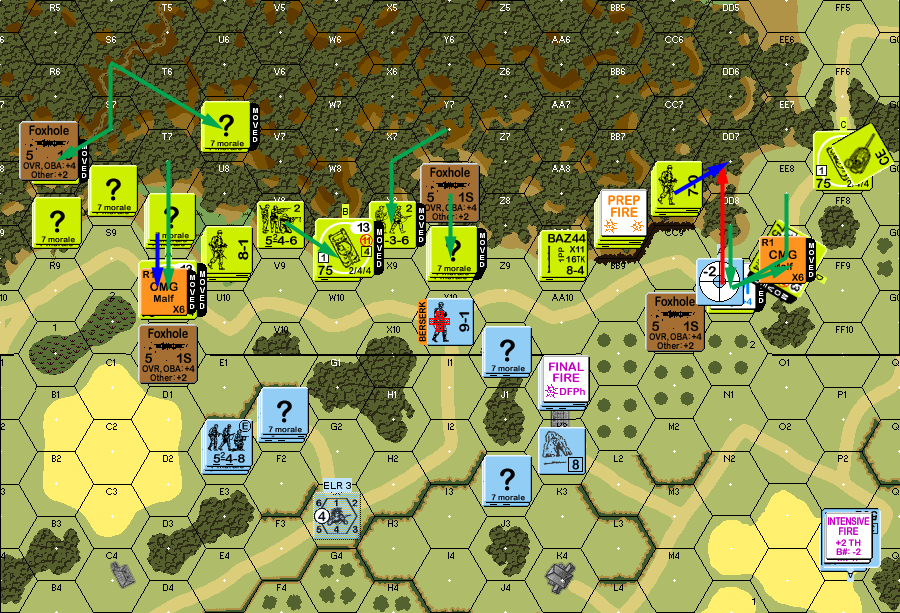
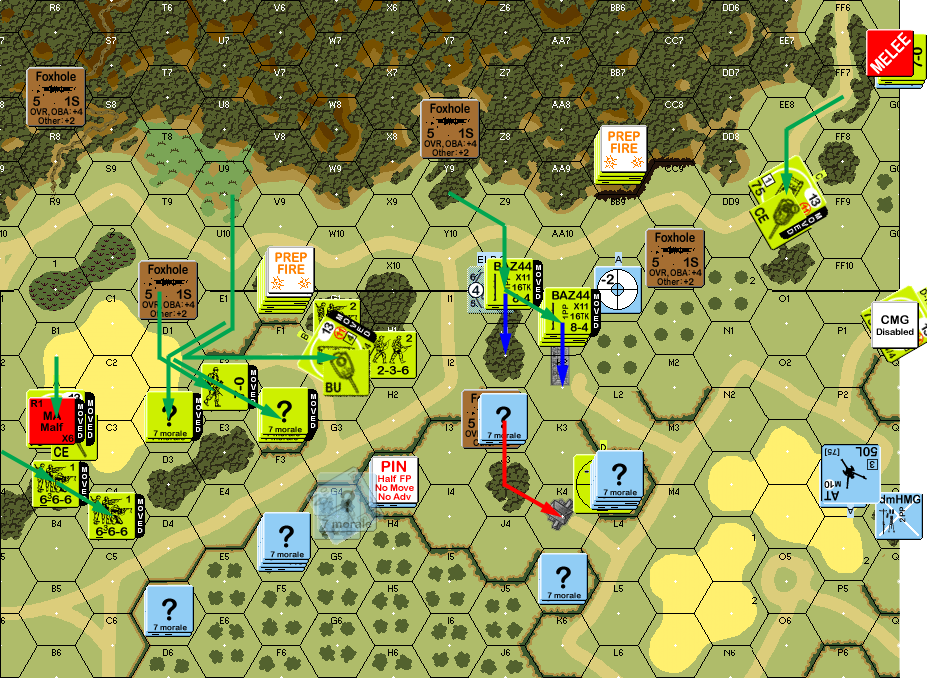
Situation, American Turn 1, showing the entire board. Note that this is ‘mismatched’ halves of 36 and 6.
I had little to do for my first turn other than skulk, and ponder how to get a guys out of foxholes before things got bad. Patch’s DF managed to reveal the Dummy in DD8, the contents of both forward foxholes, with bad results, as one pinned (keeping him from advancing out; not too bad), and the LMG squad in 39CC10 went berserk! That was a problem, since it would denude the entire east flank of the defense (and cost me a LMG), and leave my ATG in 6P3 with no screen.
On the other hand, I finished off the squad in Y8 in CC while my HS survived.
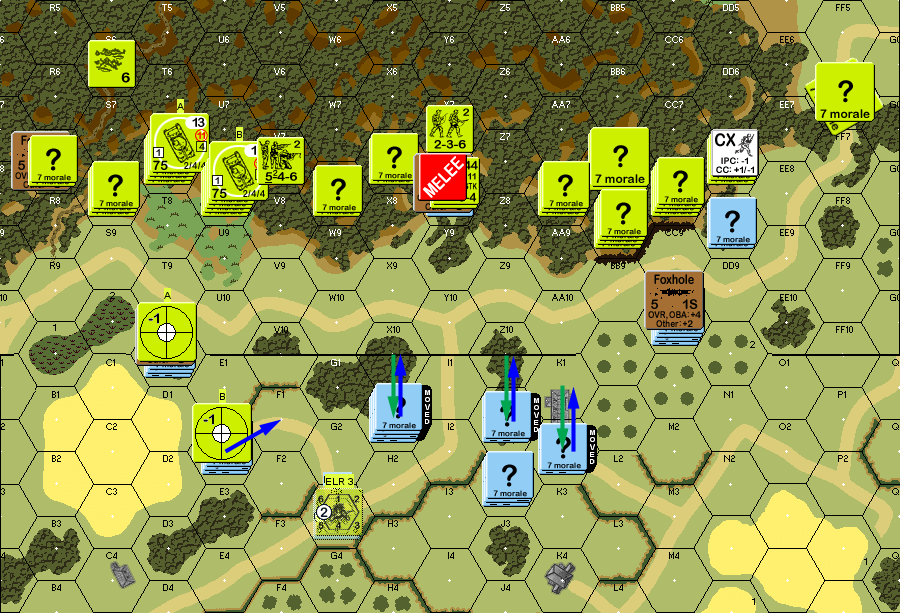
Situation, German Turn 1.
Patch didn’t self-rally his HS for his turn 2, and malfunctioned the CMG of a Sherman during Prep. He did pin the 8-1 with my berserk squad, and the 8-0 in T10. To my surprise, while key units fired, most of his line didn’t, and it didn’t move either. The other three Shermans re-positioned, a leader headed back to the broken HS, and one unit moved up, and that was it.
My HS in Y8 managed to pin an adjacent HS, but that left another “?” adjacent to worry about. Patch’s advancing fire was mostly ranging shots, but another Sherman malfunctioned its CMG. With the squad not listening to orders to stay down, I self-broke the 8-1 in CC10 to get him somewhere useful faster.
Patch advanced into LOS with most of his line, and a squad went into Y8, but managed to get Ambushed despite having concealment, and I snuck out into Z7 rather than take 1:3 odds.
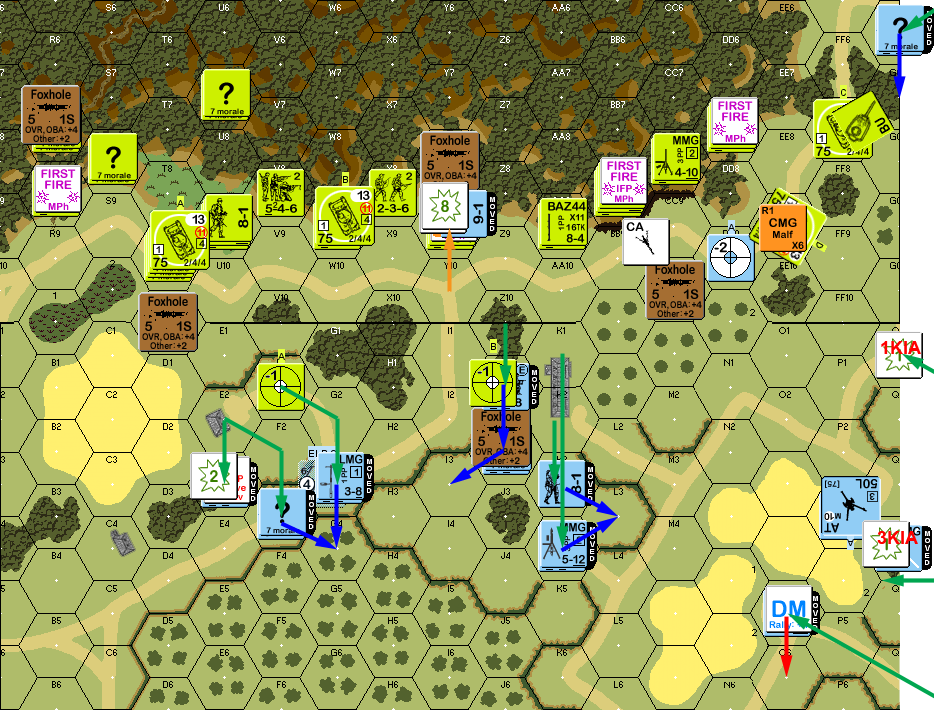
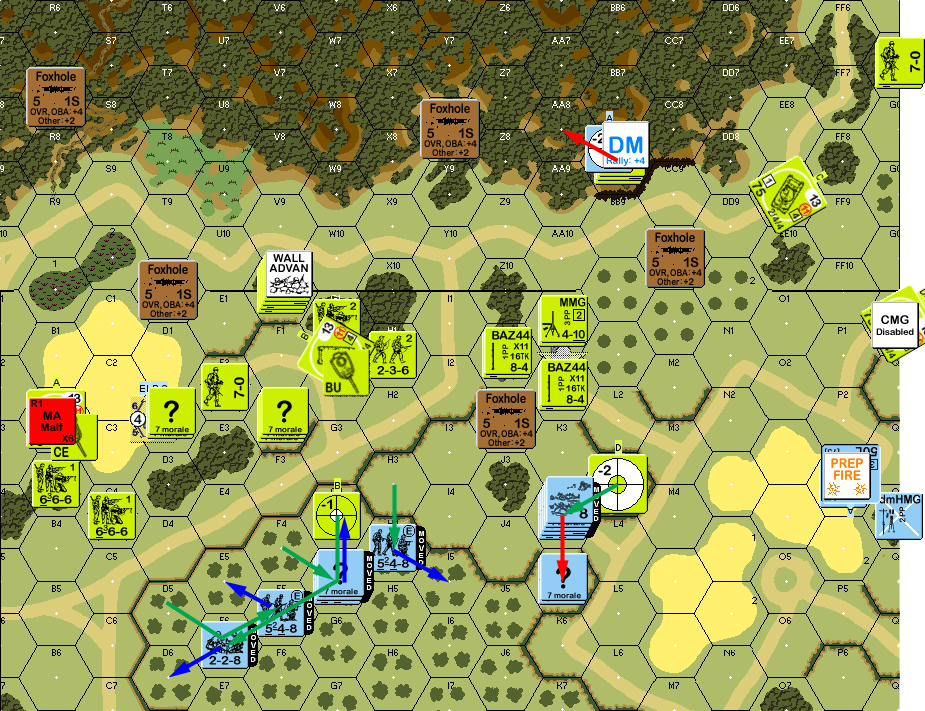
Situation, American Turn 2.
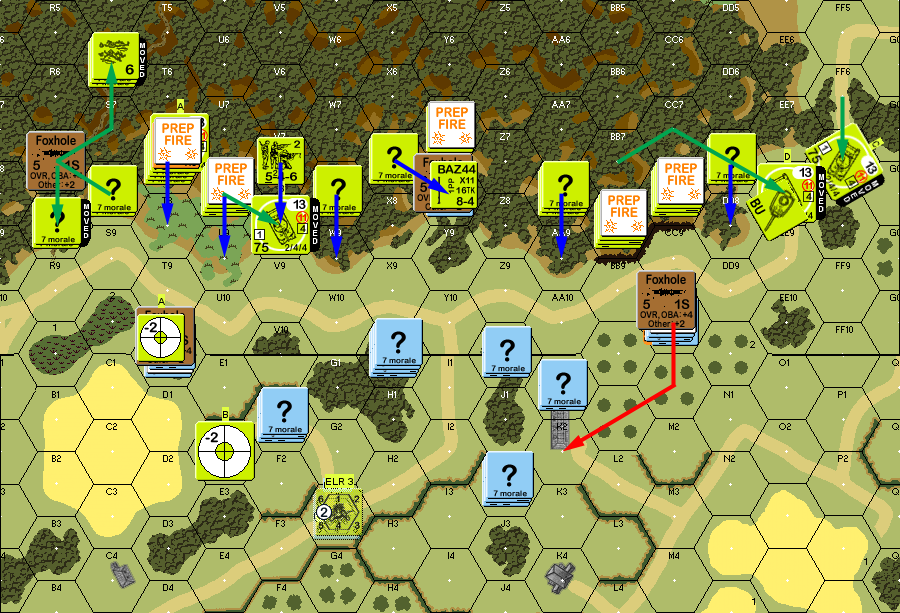
Nothing happened for my turn 2 RPh other than Patch rallying his HS in S6. The berserk charge went about how you’d expect: They survived a couple shots from the lead Sherman as they got out of the foxhole, and then took a 30FP -2 shot in DD9 for a 5KIA. Definitely the biggest result I’ve ever seen.
The rest of movement was me skulking, until Patch got a 1MC as I pulled back to 6H1 (I hadn’t thought he could see me there). My 9-1 went berserk, and took another LMG squad with him. They charged out at AA9, taking a lot of fire in Y10, where the leader wounded (pinning him), and killing the squad and destroying the LMG with a later 1KIA.
Final Fire broke the squad in T10, but my sniper went off again to eliminate the American sniper. He finished off the phase with a final shot from one of his MMGs that still had ROF from killing berserkers at P3 fishing for ATGs. Thankfully, there was no result, as that was indeed where one was….
Situation, German Turn 2.
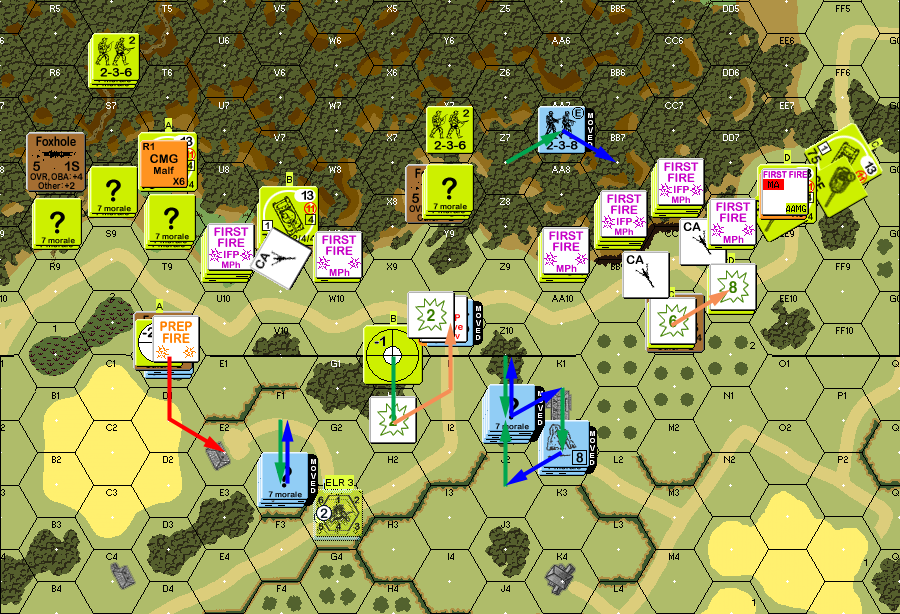
My leader failed to self-rally for Patch’s turn 3, but my squad in E2 rallied, and even better, there were Gusts, eliminating the American habit of throwing infantry smoke everywhere. I had moved my surviving road-bump into BB7, and Patch did what I expected; he killed him with a K/3, that tied up BB8 on not moving, or trying to fire on anything out in the main area.
Patch started coming down off the hill, and my MMG in K1 stopped his first real attempt by breaking a squad, but sadly, the squad cowered, preventing my FL from going into effect. A Sherman moved up the road to DD9, and the ATG opened fire, revealing itself on an IF shot, while the Sherman quickly halted and reversed back into cover behind EE10. Surprisingly, he didn’t even Advance, except to put a leader with his broken squad, and a stack with a Sherman in T9, instead preparing to lever me out of the first line. …Or maybe just force everyone else to go berserk and charge him….
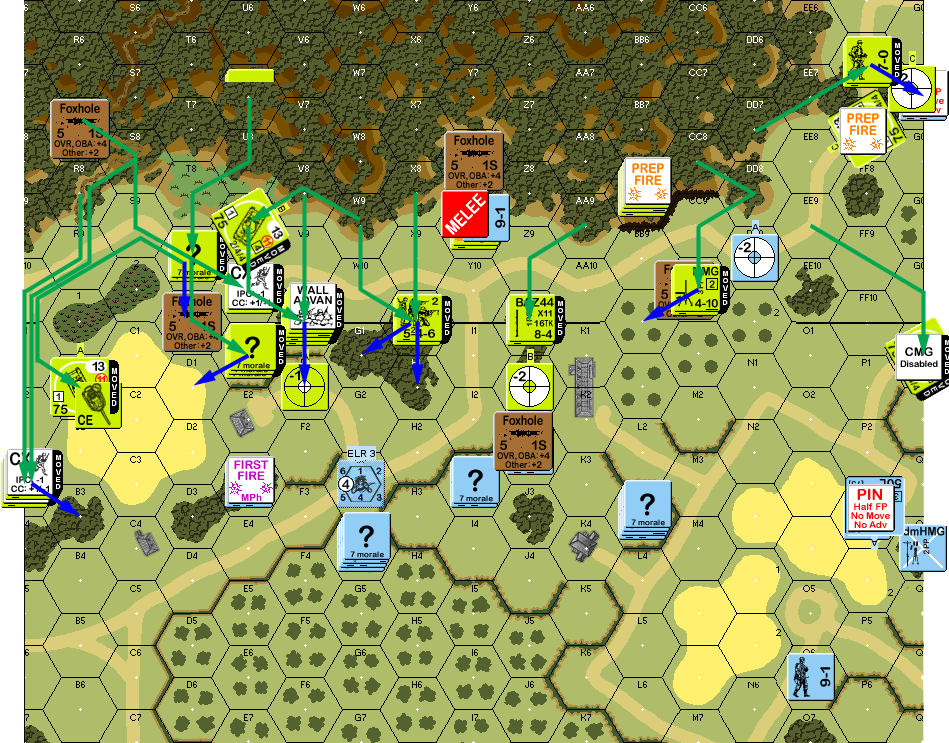
Situation, American Turn 3.
For my turn 3, I had a big decision. The reinforcements can come on anywhere on the east or west sides. I didn’t consider anything on the west side worthwhile, but I could put them in right behind the two Shermans hung up on my ATG. While tempting in its own way, I didn’t think it was necessarily wise, especially as both flanks were down important men, and the east flank in particular need of reinforcement. Despite knowing that it really should be all-or-nothing, I decided to split my forces, with one squad coming in near the Sherman, the HS near the board seam to threaten PF shots from another direction, and the remaining squad+HMG+leader near the ATG to provide cover for it. My 8-1 finally self-rallied, and Patch rallied his 548 from last turn and repaired one of his CMGs.
The berserk 9-1 finished his charge, and survived a 2MC with no trouble. The big problem was completely misjudging the reinforcement’s situation. There was an orchard between me and the MMGs, right? Of course, with that hill, they were at level 2, and could see right over the orchard, and Patch caught the main squad in the open as they came in with a -3 shot for 3KIA to leave nothing but a malfunctioned HMG. The 9-1 survived a 2MC and then broke on a 1MC just short of actual cover. The HS also died in the open with 1KIA as soon as they entered. Of 2.5 squads+leader all that was left was the northern squad.
Patch had a harder time with stationary targets, and only pinned my ATG crew in AFPh. I got lined up behind my next line of defenses, and in CC my leader did nothing, but Patch couldn’t do more than wound him again.
Situation, German Turn 3.
For Patch’s turn 4, he lost his CMG permanently, and my 9-1 self-rallied. His FF7 Sherman managed to pin the adjacent squad, which really left that plan a shambles; at least he survived a couple shots from the MA after being revealed. One of the MMGs concentrated on the ATG, who only pinned thanks to some good rolls. Patch finally started a real advance this turn, occupying a lot of the ground that I’d just retreated out of. A poor shot from E3 turned out to be a bad idea when he did a late CX into a less well protected hex, and then everyone else came rushing forward to join him in A3. One of the Shermans had moved into a position that there was no easy way out of, and spent the turn getting out, while EE9 moved into the shadow of a hedgerow from my ATG (who declined to try a pinned, limited-LOS shot).
GG7 tried for two PF shots at the Sherman in DFPh, but couldn’t find any (‘4’ and ‘5’). Patch’s AF at them was a 1MC, for HoB… and they went fanatic and generated a Hero. (Why couldn’t the other times have done this?) It also activated my sniper to pin Z10. His 6B1 Sherman nearly malfunctioned another MG… and then did malfunction the MA. Patch advanced into GG7, and I managed to get Ambush, but thanks to the pin, couldn’t do anything, while he reduced my squad, while he finished off my leader in Y9.
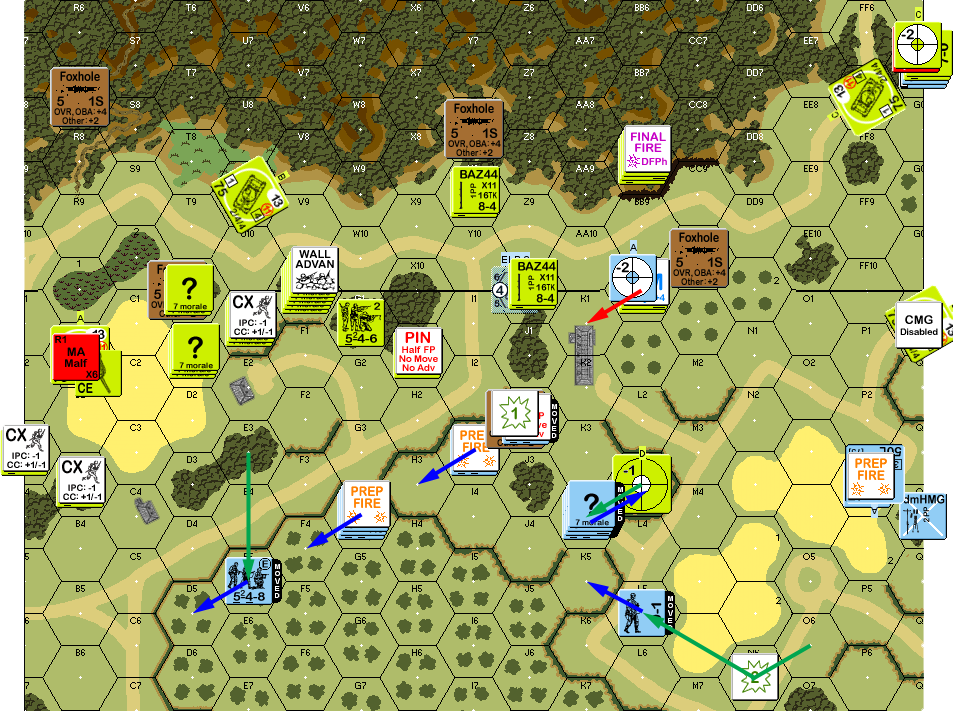
Situation, American Turn 4.
Patch refused to try to repair his MA for no activity during my turn 4 RPh. The ATG got a hit on BB10 to break the MMG squad in Prep, but G4 malfunctioned his LMG while trying to get G1. At least I pinned a HS in H1….
Mostly, my efforts to fall back went well, but J2 got pinned exiting his foxhole (hadn’t seen the shot from BB8), leaving him very vulnerable. Still, I assembled my next line of defense behind the major bocage line, which I was afraid it’d be too easy to poke holes in, but at least it was going to slow him down a bunch again. The east side was covered by L3 and the ATG, but that really couldn’t be enough… In GG7, I still did nothing, while Patch got another CR, with a tied RS to wound the hero and eliminate the HS.
Situation, German Turn 4.
Nothing happened for Patch’s turn 5 RPh, but Patch’s prep pinned H3. He also shot at the ATG, who passed a NMC, and he tried flushing me out of L3 with WP, but the Sherman didn’t have any. His movement was mostly cautious, but to my surprise, he parked a Sherman in bypass of G1. That puts it out of PF range, but there’s limited visibility, and any fire would be side VCA arc, with the extra +1 to shots that don’t already have acquisition.
Of course, it also gave me a beautiful range 3 side shot with my second ATG. I never see side shots against Patch. He’s right, they’re hard to get, period, in ASL, but he’s been very good about preventing them when I’m seeking them out. So of course the ATG malfunctions on its first shot.
None of my other fire had any effect, but Patch managed to break J2, which set off my sniper to pin D2. Patch didn’t do a lot of advance, and finally finished off my hero in CC.
Situation, American Turn 5.
I lost both the ATG and LMG to 6s for my RPh, and Patch, possibly wisely, refused to try to repair his MA again. I finally realized that my good ATG could fire back at the MMG that had been threatening to break my most effective unit, and promptly got a K/2 on BB8 to reduce and break the squad.
My pull back continued, and I abandoned the H3 position and L3, though kept the MMG in building K4. I could only spare the crew for guarding the flank, and the D5 corner was vulnerable, but a slow retreat down the orchards still had some merit.
Situation, German Turn 5.
Patch self-rallied the K1 MMG squad for his turn 6, but nothing else happened in RPh. He successfully fired WP into G4 to make fire nearly useless, and pin them. Patch started by moving into C5 and placing smoke there, followed by a Sherman parking itself in C7. The crew failed to find a PF, but the attempt still made him useless for preventing an advance around the orchard. He then put several units adjacent to G4, and what little fire I had was ineffective.
He then raced the group that had finally finished off the CC in his last turn down the east edge of the board, going over the bocage to end adjacent to the ATG. The plan was just to force the crew to fire, but a pair of -2 shots did absolutely nothing. Then the good Sherman on that flank went in for an OVR, and 16FP still did nothing…. Final and advancing fire did nothing other than set off my sniper to pin C7, which was very handy under the circumstances. I self-broke G4 to avoid an insanely bad CC, and surrounded position. He did naturally go for CC against the ATG crew, and eliminated them with no trouble.

Situation, American Turn 6.
Afterword
I called it there, but I mentally lost this one on turn 2 when I lost a third of my squads to useless berserk charges. That helped put me in the frame of mind to create the debacle with my reinforcements. I’d kind of like to see just how things would go if I’d put both squads in behind the Shermans. Extra PF attempts and firepower should have created a nice amount of chaos there. The HS would have still gone where he did as I was expecting the DD7 squad to not rally.
Overall, I think my setup was good, and I’d go with something similar again. I don’t know about throwing the two HSs up front like that, but they did help slow down an advance already slowed by the terrain, so it was worth it, but not something to regularly do. My biggest problem is the second ATG in G4. It turned into a good position, but I was thinking of being able to shoot I1 (along with H3-J3), and you can’t do that with bocage. Patch was thinking it’d be around B7, which isn’t bad, but a bit further back than I’d go for here. I really don’t have a good position for it.
P3 was so good that Patch guessed it. But it really dominated the east half of the board, and if I’d had more men, I’d probably still be fighting near L3 with its help. That says a less obvious hex would be good, but it’s hard to find a decent one. L3 has real possibilities though.
Patch ran through the next turn or two on his own, and found it interesting, as the Germans ran back through the orchard and made it (so that plan worked). The American rush after them got pinned and broken, and he just couldn’t get at K9, and didn’t have anything in range of P9. But, there was nothing preventing him from taking C10, and while K4 turned into a real fight, it was still very much a last stand.
Thanks for the detailed and illustrated AAR.