
81 Fratricidal Fighting
There’s a few things that Patch and I keep coming back to for more of in ASL, and looking through the Croix de Guerre scenarios, I spotted one with Vichy French versus Free French in the desert, which hit three of them (desert, French, and Brits), so went for that for our next game. It’s actually set in Syria, which makes it related to “Dayan to Meet You”, which was an interesting scenario as well.
In this case the Vichy are defending boards 25, 28, and 29 with 10 1st line squads and 3 HS, plus 5 green squads, a HMG, MMG, 37mm INF (so small it’s a SW), a MTR, and two 25mm AT guns. There’s some Dummies available, and a good number of sangars and foxholes for the relatively open terrain. The Free French have 12 elite squads and 5 HS, a couple MMGs, MTRs, and four H39s. Additionally, there’s three British squads (648s) with their own leader, an ATR, and a DC. The Free French need to take the top of the north end of the hill (25BB5) and one of a nearby crag hex (BB8), or a stone building at the bottom of the hill (Y2), in 8.5 turns, while avoiding a 30-point CVP cap, though that can be avoided with more than 25 points of Vichy casualties. Since this is Syria instead of North Africa, while there are some hillocks scattered about, broken terrain (F13.1) is effect, which is a first for me. Sadly, what this does to the boards is affected by the overlays, so we had to tweak the Vassal setup a bit.
Patch took the Vichy French, and set up a very solid network of entrenchments, and used the wadi for more protection. There was some flank protection, and a solid group around the board 25 stone buildings. As the Allied forces can only set up on boards 25 and 29, I didn’t do anything with board 28, since getting the armor onto that board would be painful. I set up with two small platoons of armor; one on the hilltop to provide covering fire, and cover to a MMG position, while the other was prepared to provide an armored assault to the British troops as they advanced into range of the stone buildings. Everything else was a fairly solid line at the limit of my setup, with plans to creep forward, and keep the Vichy busy while I flanked and took the buildings before heading up the hill.
…The next time board 25 is involved, Patch gets to attack. It’s just a nasty bit of ground to negotiate, and I’ve attacked it twice now. (Patch suggested “Hill 625” with this in place of board 2. It’s a scary thought.)
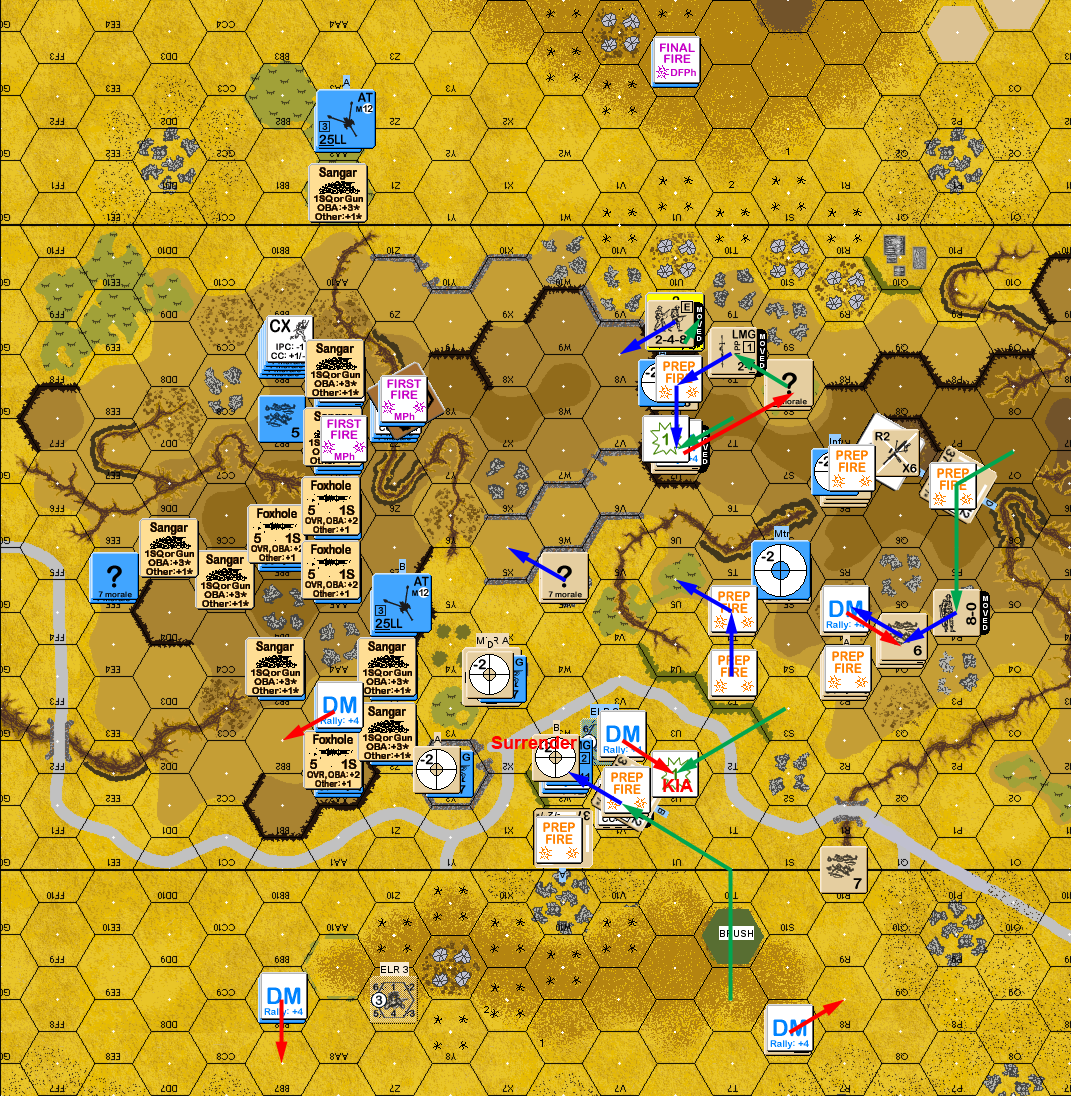
I had a little prep fire, and revealed a squad in 25X6, but they passed the MC. One hilltop tank Op Fired to observe who revealed himself down below. I had meant to use spotted MTR fire on the area, but I forgot about it as we got going. My second move was over the bridge in 25R1, and Patch revealed his MMG in V2 for a K/1 that broke the survivors. …Patch though started worrying that he’d set up the MMG way too far forward. On the next move, the MMG broke a squad as it moved behind a hedge, and the next the squad passed a NMC as the MMG finally ran out of rate.
Things didn’t go much better on top of the hill either. An early move saw a squad break, and another saw a 3KIA from Patch’s HMG. The good news was that activated my sniper, who revealed and pinned the squad in Y2, and the HMG’s second shot malfunctioned it. However, the armored assault went well with two squads getting closer while, the third 648 and 8-1 worked their way around the hillock. Thankfully, DFPh didn’t do anything more, though I found out the INF had a nice position in 25AA2. Advancing Fire started zeroing in on V2, but had no immediate effect, but a lucky shot did break the squad in 29W10.
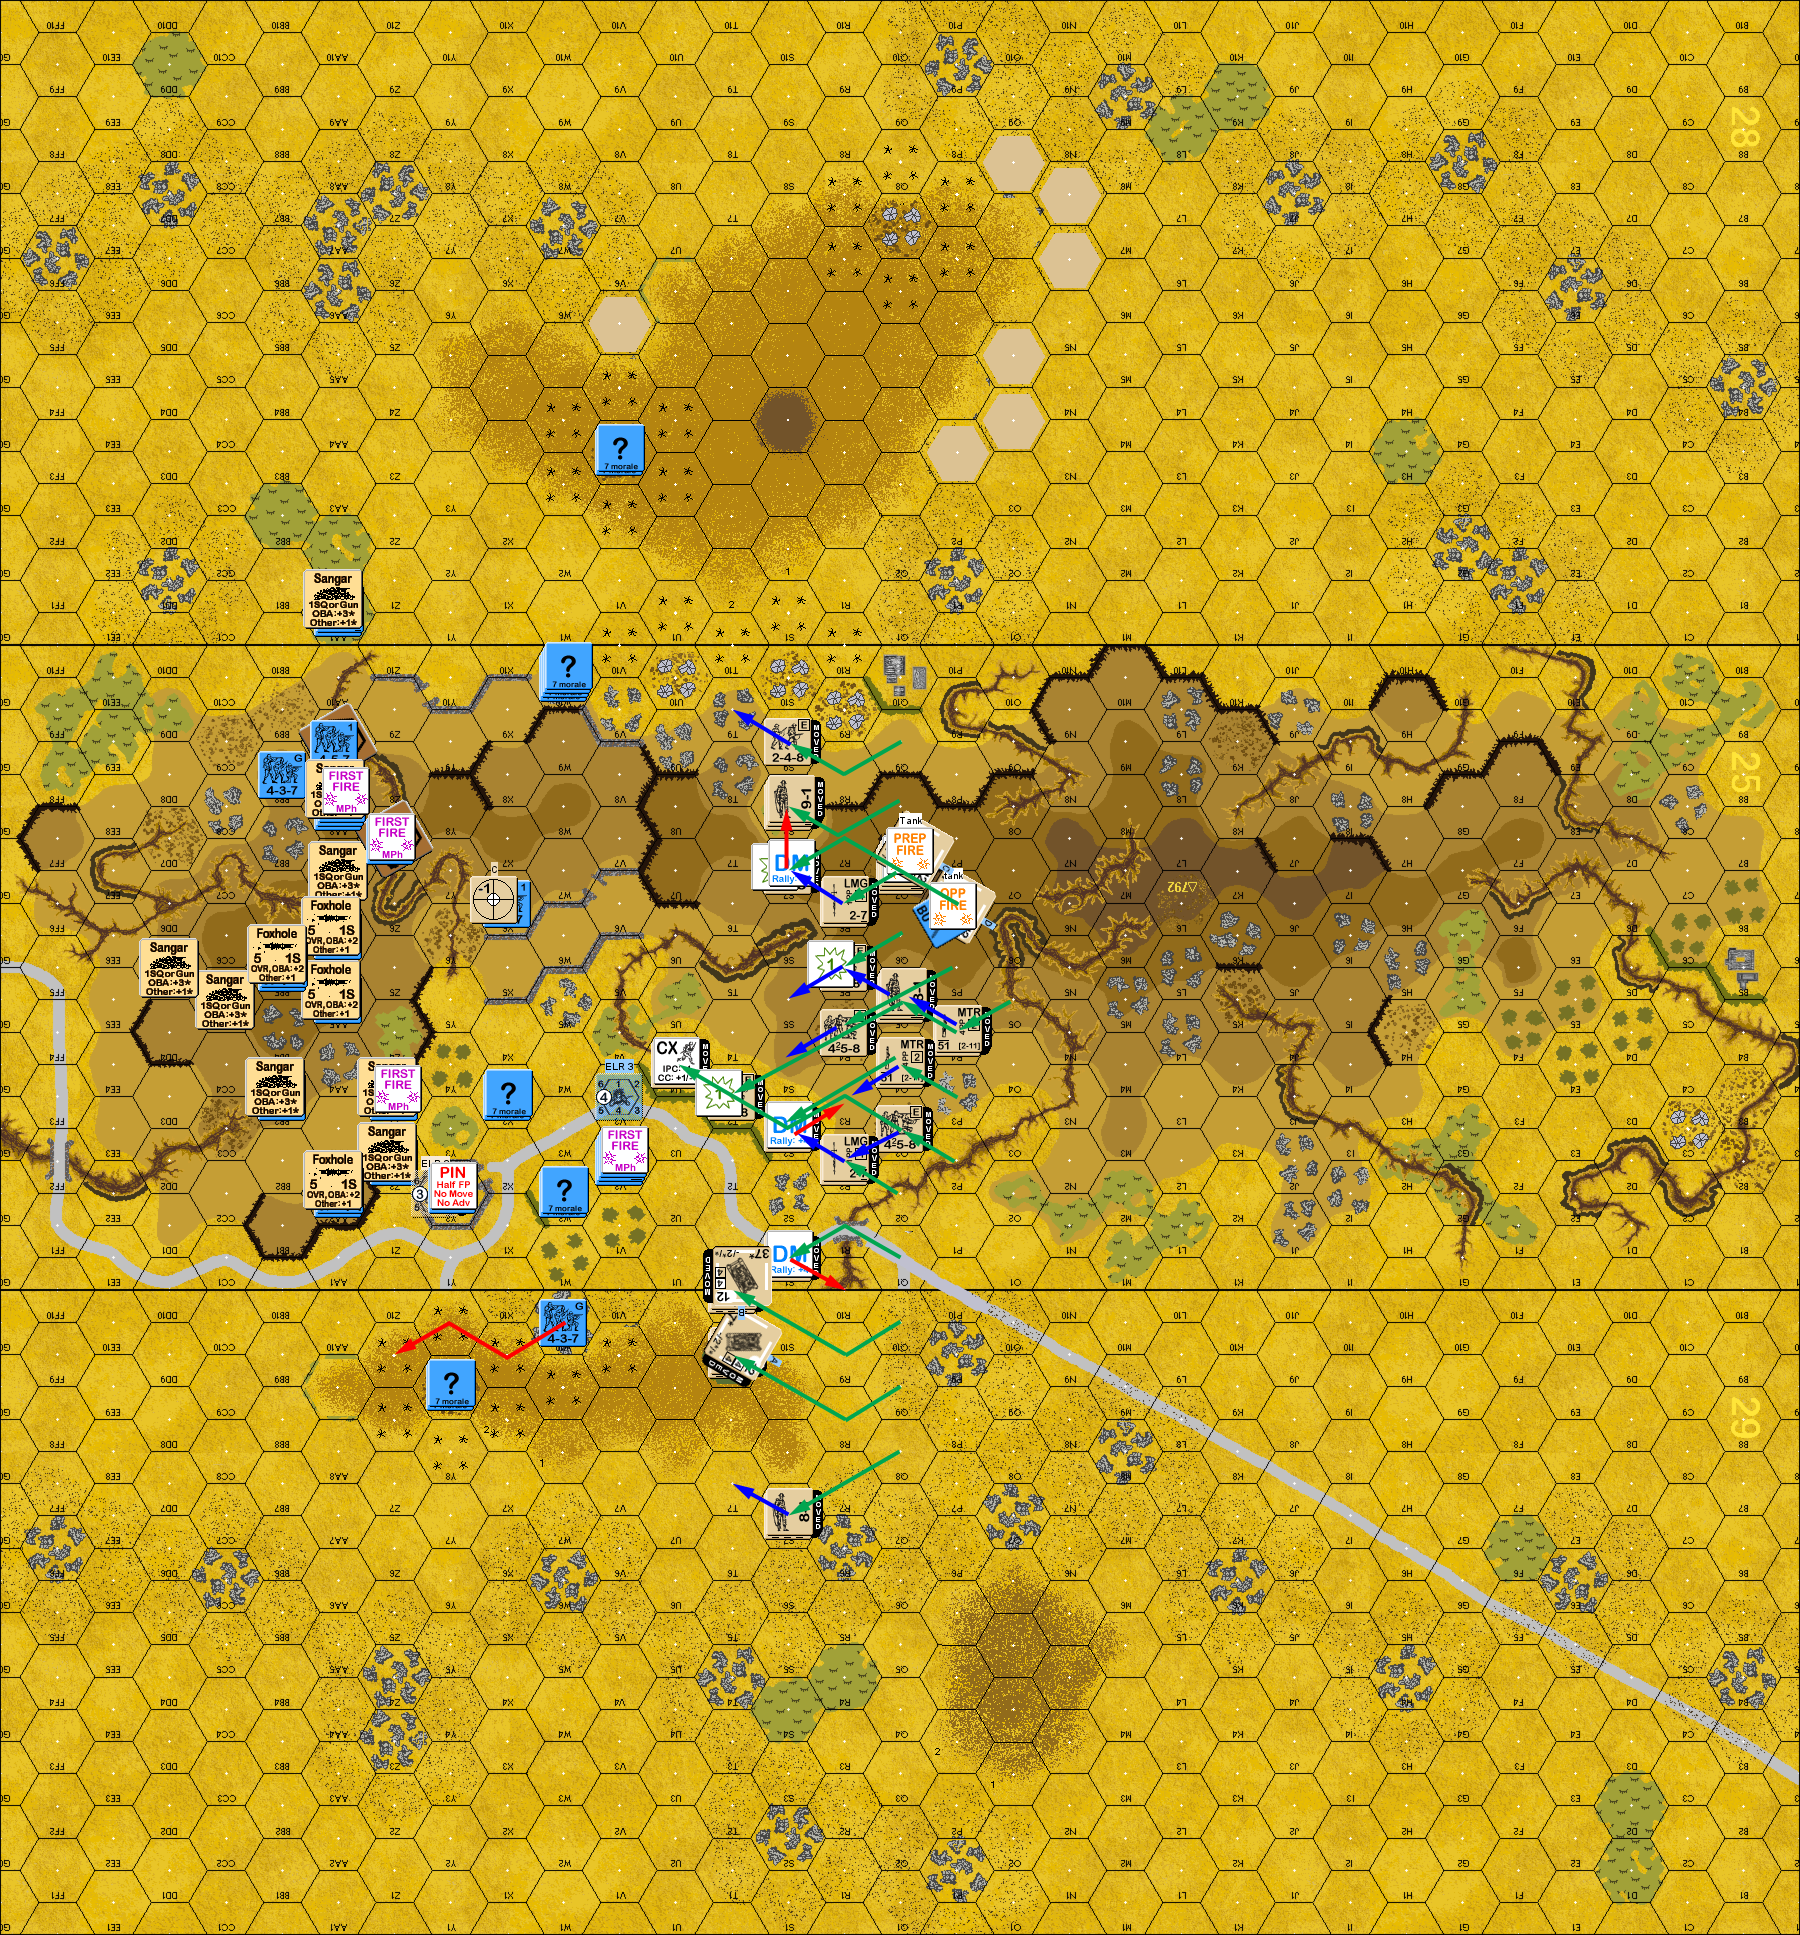
Situation, Free French Turn 1, showing the full board. North is to the left. The ‘orchards’ are further broken ground, and some extras are covered up on board 28.
There were only a couple of rolls for Patch’s RPh, and the one result was good news: The Vichy HMG was eliminated. This was immediately countered by Patch’s first shot being a MTR hit on Q7 with a ‘2’ result for a 1KIA… and a lot of head scratching. Despite it being a 1KIA to anything in the hex, the tank is checked separately (with its own DRMs) so it takes a 1KIA, and the infantry takes a different 1KIA, which killed the MMG HS (and malfunctioned the MMG), along with the H39. With static defenses there was a lot of firing, and another ‘2’ caused a K/1 on T3, ELRing the surviving HS, and a S3 suffered the same fate by rolling a ’12’ on a NMC.
Patch did a little bit of shuffling around on the hill, but one squad went racing around the end of the hill, while he traded stacks in 25W2/V2. However, my armor leader got a hit on the MMG stack, and broke the squad and leader, while other fire revealed and broke a HS in 29X9. My remaining MMG fired on what had been the HMG nest to pin his 9-1 and reduce his squad on a ’12’ 1MC.
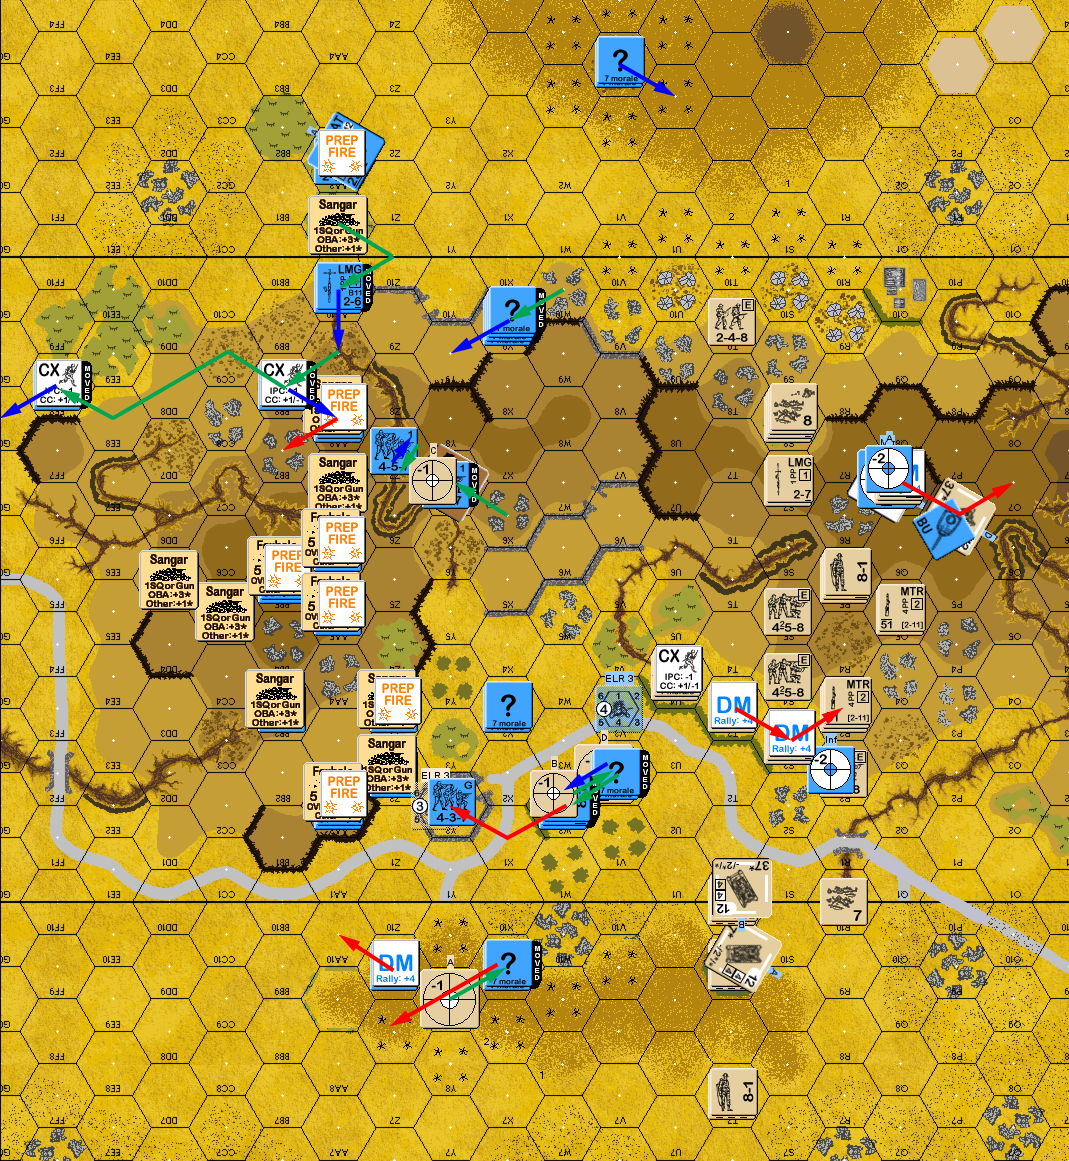
Situation, Vichy French Turn 1.
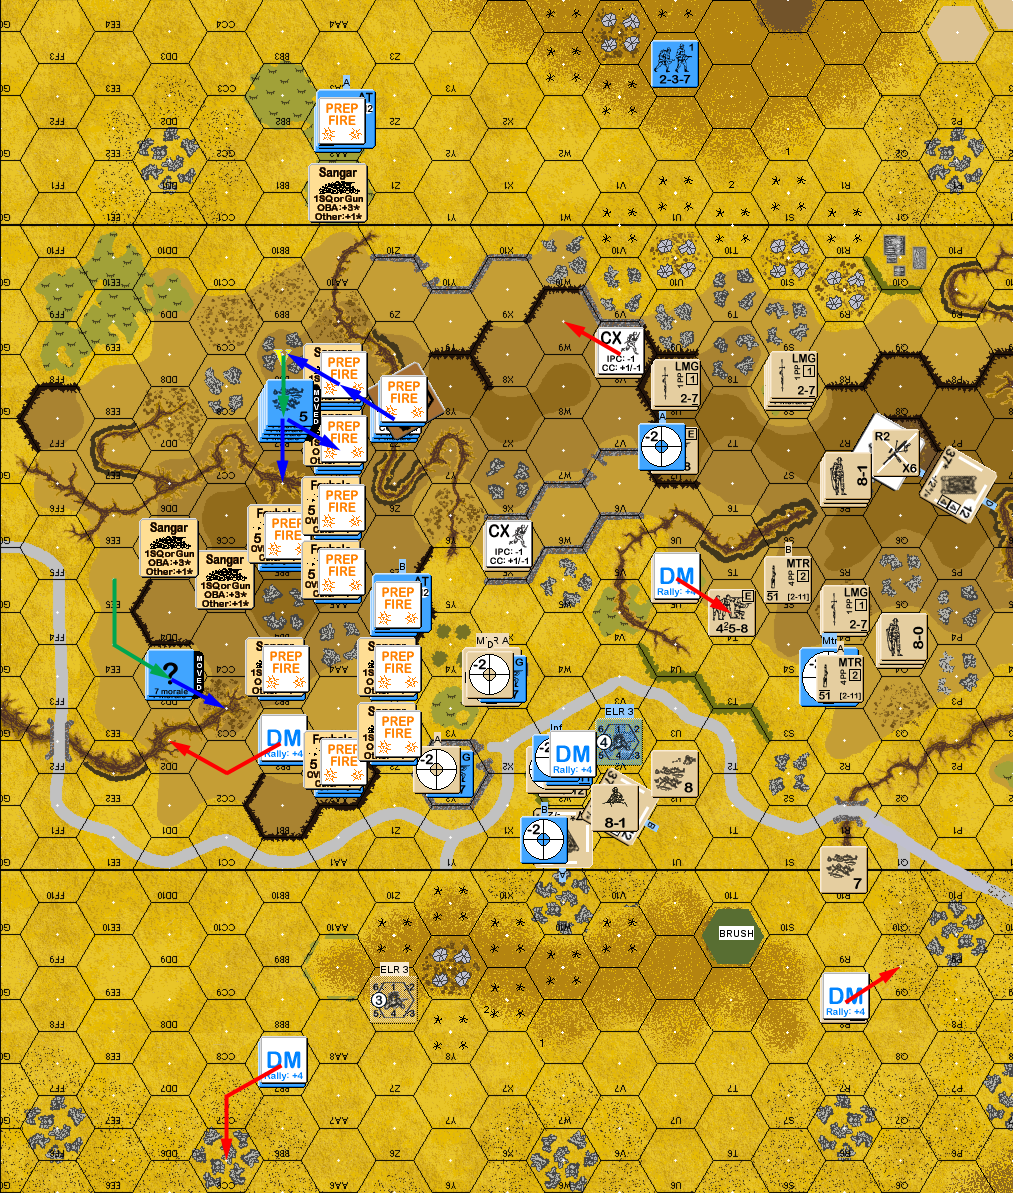
I managed a self-rally and rallied a squad in 25S8 for my second turn; Patch’s broken leader did not rally. The “?” in 25W2 turned out to be a squad which successfully recovered the MMG. If I had been smart, I would have attempted to Smoke V2 or U3 with a MTR, but I didn’t think of it in time. Instead, it started acquiring X3, along with the remaining hilltop H39. Despite the lack of smoke, I decided to make a solid push for V2/W2, starting with moves on the hill to get fire from there out of the way. I ended up with a couple units pinned, including an early move on the objective, and a K/1 broke a (now) LMG HS, though that set off my sniper, who pinned an unfired squad. Despite the decent beginning, the armored assault did not go well. I drove up adjacent to W2, and the first shot was a ‘3’ for a 1KIA to kill the DC squad and its DC. The ROF shot was another ‘3’ for a K/1 on my ATR squad, but the remaining HS HoBed to Fanatic, and generated a hero (who got the ATR). All that also set off my sniper, who eliminated the broken Vichy HS in 29Z8. The leader and third squad tried to move up, but fire from the hill pinned both of them.
Patch manged to do nothing more than pin another squad in DFPh, but he revealed his second ATG in 25Z4, where it had a clear shot at the H39 that had just parked in W1. The big decision for the end of the turn was whether to try and take on the squad in W2 with a HS+Hero. I went for it since it was a 338 HS, so I still had 1:1 odds, with the Hero bonus, and a -1 to Ambush for a Stealthy Hero. Sadly, while I did get Ambush, I still couldn’t get a result, and we ended up in Melee.
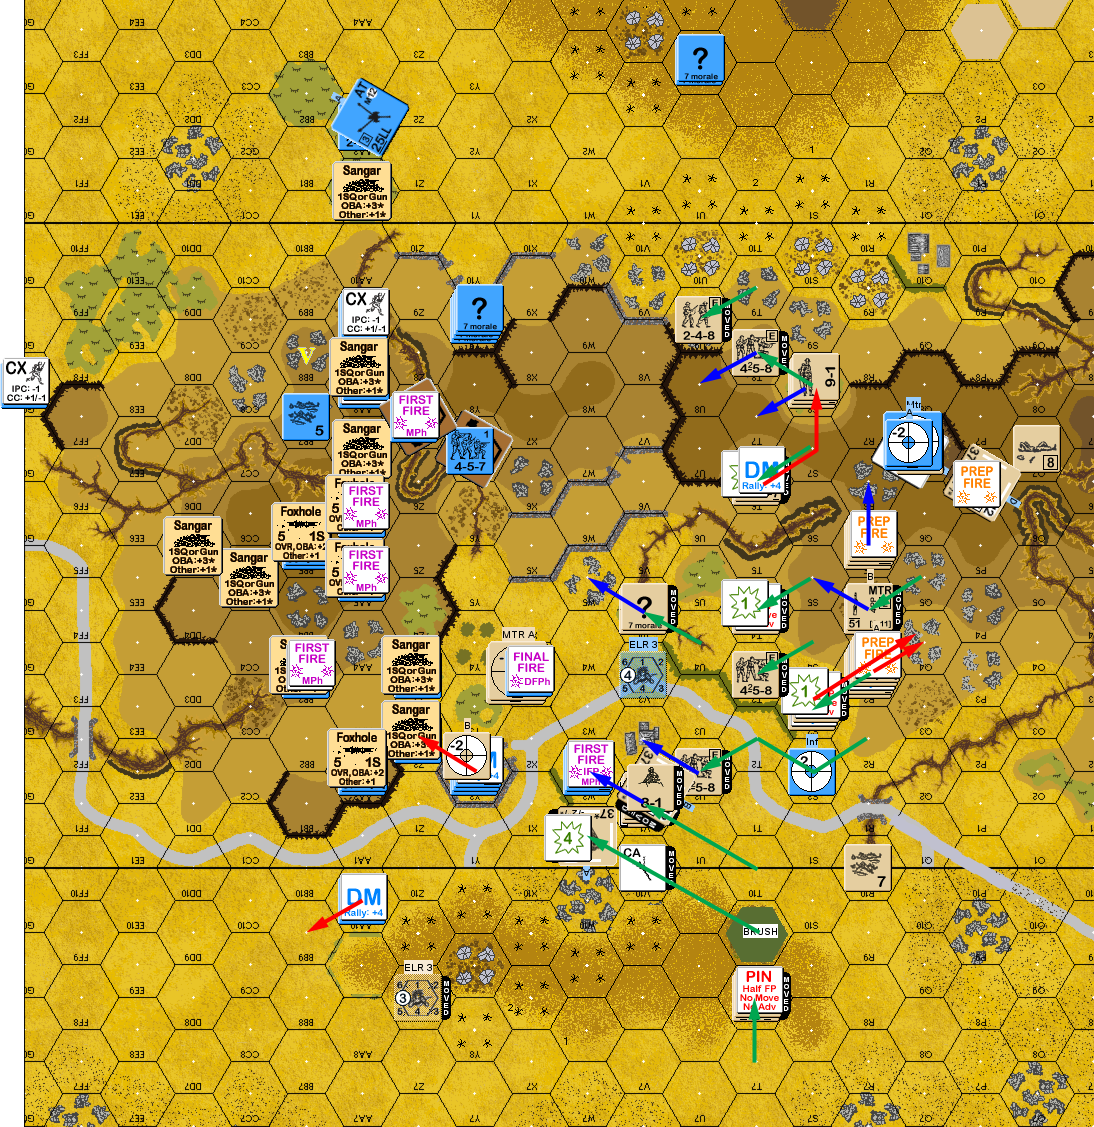
Situation, Free French Turn 2.
Patch’s 1st MMC self-rally failed, but his 8-1 in 25Z2 rallied… going berserk in the process! I’m still not sure if it was fortunate or not that neither the squad in the sangar, nor the broken squad that was routing through failed to go with him. I could have been very hard pressed to stop two berserk squads, but Patch didn’t need that kind of manpower drain in the area either. Again, most of Patch’s line preped, and did a good amount of damage (there were two ‘2’s in there, as well as some ‘3’s and ‘4’s). His MTR hit one of mine for a 2MC, which I survived, only for a later ROF shot to break the HS on a 1MC. My 8-1 in 29T9 broke to fire from the hill, and 25U8 was reduced on a K/1 (which didn’t break them).
The berserk charge ended quickly when my first shot generated a 1KIA (real pity a squad hadn’t gone with him…). There wasn’t any other movement I could fire at, and DFPh was useless, only generating a single passed PTC. The worst thing is that Patch eliminated me in the Melee, though I did CR the squad.
Situation, Vichy French Turn 2.
I manged to rally two LMG HSes for my turn 3 (one on self-rally), but the broken 8-1 stayed that way (and DM thanks to being out in the open in LOS of a Gun). During Prep, my plan took another hit: I managed to break the HS in W2 before the MMG caused any more trouble, but in the process Patch’s sniper went off, breaking my squad in V2. This was a ‘softening up’ turn, and most of my available line fired, but short of that and a hit on Y2 (for a passed 1MC), all my rolls were high, and I malfunctioned my remaining MMG.
The remaining 648 squad got next to W2, but an attempt to get another 458 in the area met with a 1KIA. And then a LMG squad broke AMing into position. My HS in 25U9 surprised Patch by climbing the cliff. It turned out the “?” that had been in/near 28U3 all this time was a HS, who thankfully failed to affect them (by this point, I had assumed it was a Dummy). Thankfully, Patch’s DFPh was about as bad as the end of my PFPh, with a lot of high rolls, and I was able to pass the couple of PTCs he got.
Situation, Free French Turn 3.
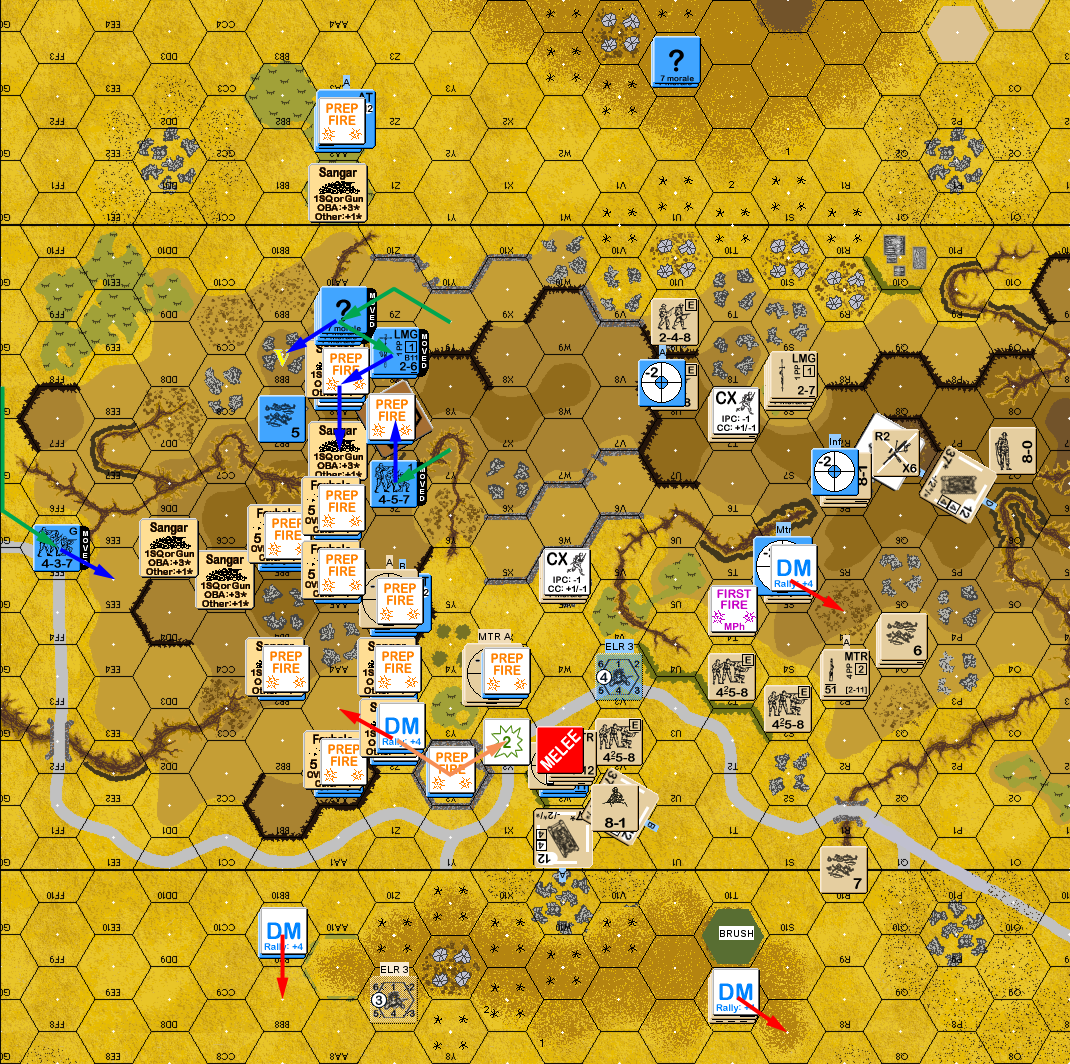
There were no results for Patch’s turn 3 RPh other than my squad recovering the French MMG in W2. But that didn’t last long as the INF got a hit for a 1MC that eliminated the prisoner HS and broke my squad. His MTR got a hit on my remaining MTR HS to kill them on a K/2. Again, nearly everything opened up, and while there was a fair amount of shots that did nothing, and I passed a couple of MCs, he did break 25U5, and malfunction a LMG.
In DFPh the H39 in W1 Intensive Fired to get a hit on Y2 and the squad there got a ’12’ to disrupt the remaining HS. But that set off Patch’s sniper, who broke the HS that had just climbed into V8. That gave him a problem, as he couldn’t rout back out, but a long look at the situation showed that he couldn’t see anyone that would keep him from routing to W9 until he got there, and then he’d be unable to see anyone who would keep him from going back to V8, so he was going to be Low Crawling back and forth for a while.
Situation, Vichy French Turn 2.
I managed to get a squad and a half back for my turn 4 rally, but missed my self-rally in 25U2 (8 +1), and Patch lost his LMG permanently. With 25Y2 broken, the main plan was to shift the H39 platoon to provide cover on the road while setting up to shell X3. Once I’d taken Y2 (next turn), the platoon would lead the way up the hill… probably with overruns and destroying sangars on the way.
This got to a good start when a good shot from the ex-MMG squad broke and disrupted the squad in Z2, helping clear the eventual path up. The remaining hilltop H39 (now that it no longer was needed to provide cover for my 8-0 as he got out of his rout position) started up and headed down the hill to join in the advance, though he couldn’t make it to join the platoon in one turn.
But MPh turned into the usual set of problems with two HS breaking ELRing (on 11s) as they moved, and then a LMG HS died on a ’12’ MC during DFPh. Annoyingly, Patch also pinned the squad in R6. The next thing was to get them up the hill to other (malfunctioned) MMG, and that stopped that.

Situation, Free French Turn 4.
Patch didn’t get anything for his turn, but I rallied the final HS in Q4, and the HS R6 went berserk (with a likely target of X3 next turn). …But we didn’t get that far, as Patch finally scored a pair of kills on my H39s during Prep to drive his CVP up to 34 and a win on turn 4 of 9.
Afterword
It’s really hard to say on this one. Part is that I didn’t have a solid plan going in, and strung out a bunch, and got chopped up. Of course, the general plan was to work my way forward along the hill while the British platoon worked on the initial victory Location. And that plan was just unworkable. There’s no cover, there’s Hammada on the hill, which is just nasty with that INF and MTR available; sangars aren’t much (+1), but it’s better than I had. The advance on the stone buildings is the only thing that worked, and I lost the platoon in the process, and just couldn’t get anyone else into the area to follow up.
Overall, the dice favored Patch, though he certainly had problems, losing his HMG early. I had a lot of 10+ MC rolls, which only helped Patch slowly cut me to ribbons. And while Patch bounced a lot of shots off the H39s (Final TK of 4 on the hull; 2 on the turret for most AT shots) and kept going back and forth on whether DI was worth it (especially every time he rolled low enough that it would have worked), I just had no great way of doing anything about the AT in Z4, and desperately wanted to get that INF in AA2, which was part of cutting up my infantry. But I had nothing to do it with while I had even more immediate problems.
But, the Vichy were just fragile enough that it wasn’t immediately impossible that I’d get somewhere. I just couldn’t get my act together, and any attempt to re-concentrate got shot up. Despite the frustrations, it was a very interesting situation all the way through. I think the big mistake was the big turn two push on X2. That cost me two squads, and I had the time.
Patch suggested a board 28 approach, and certainly it has advantages. But you’d need a couple turns to begin getting the armor into position, and there really isn’t any cover outside of the big cluster of crags.
Now to find another ‘assault board 25’ scenario….
Discussion ¬