
FB13 Don’t Economize
It was finally time to return to Festung Budapest for me and Patch (I had figured our previous game would be FB, but ended up in an early-war adventure instead) a couple months ago. It is now February 7th, and the food shortage rules have taken effect for the Axis, as well as Ammo Shortage 4. The food shorage means the Axis troops cannot use double-time (oh dear, we forgot that towards the end), and lowers broken morale by one (that one we got). There is still ground snow, and the outlying areas of the map tend to be a level higher, meaning the extra MF does come up at odd times.
The Germans are defending a couple of large blocks in the southern section of the FB maps against a Russian push, with Hungarians holding part of the line nearby, and more in the Postal Palace. The Germans get nine SS squads of varying quality (which boosts broken morale against the lowering of the food shortage…), 18 factors of mines, three hexes of wire, two roadblocks, a DC and a PSK, while the Hungarians have another five squads, and 3 1/2 squads inside the Postal Palace. The Russians enter on turn 1 with fourteen squads, good leadership, a FT, a couple DCs, three T-34/85s, and can set up up to six squads on board; up to three in the Postal Palace, and three more in a nearby building. On Turn 3, 3 squads of BVR enter from the west. Both sides get reinforcements on turns 2 through 4 by means of purchase points, and a fairly diverse schedule of things to spend them on. Both sides get 4 VP for control of the Postal Palace, 1 for each building controlled in the victory block, and 1 for each unbroken squad-equivalent in the victory block at the end of seven turns.
I had the defending Germans, and the pre-game rubble check was interesting. Three hexes of the building the Russians can start in rubbled, and four of the gigantic rowhouse/block the Germans can set up in outside the victory area rubbled, leaving debris all along the street between them, and three hexes of debris between the setup building and the victory block on the end that the Russians will approach from. Also, two of three hexes of a building on the west side rubbled, knocking down a hex of an adjacent building, putting rubble in the street, scattering debris around, and leaving the BVR entry area a bit exposed.
I put the three wire on the rubbled hexes of the setup area facing where the Russians could set up, and put two six-factor mine hexes at the north end of that block. The last mines went in CC17, since it seemed an exposed location that Patch may want to advance into. One roadblock sealed off one of the main streets into the victory area, while the other was clogged by debris, and the second roadblock sealed off the opposite end of the block from any daring T-34 flanking moves. I had dummies on one of the mines, and my HIP PSK squad adjacent in the debris, hoping to get a shot off before having to leave.
Patch set up with a strong MG platoon in Y15, and the allowed three squads plus all his Dummies on the ground floor of the Postal Palace (I knew some had to be Dummies… but which stack?). Meanwhile, more set up off board to get into the Postal Palace, and some from the NW, but the main thrust was towards my outer defenses, and on the flank of his on-board setup.
Patch admitted to some mistakes with the first turn; he forgot some prep fire (I assume from Y15), and headed an entering armored assault stack in the wrong direction, which I assume left them a bit behind schedule. Overall, his advance was cautious, and I had no fire. Y15 did fire in APh, but got no result on Y17. The T-34s got acquisition on a couple of my forward positions… and U14 in the Postal Palace, which surprised me, but the top of the building (where I was…) was visible from behind a rowhouse. That last did set off my Sniper who ended up reducing Patch’s Sniper to a ‘2’.
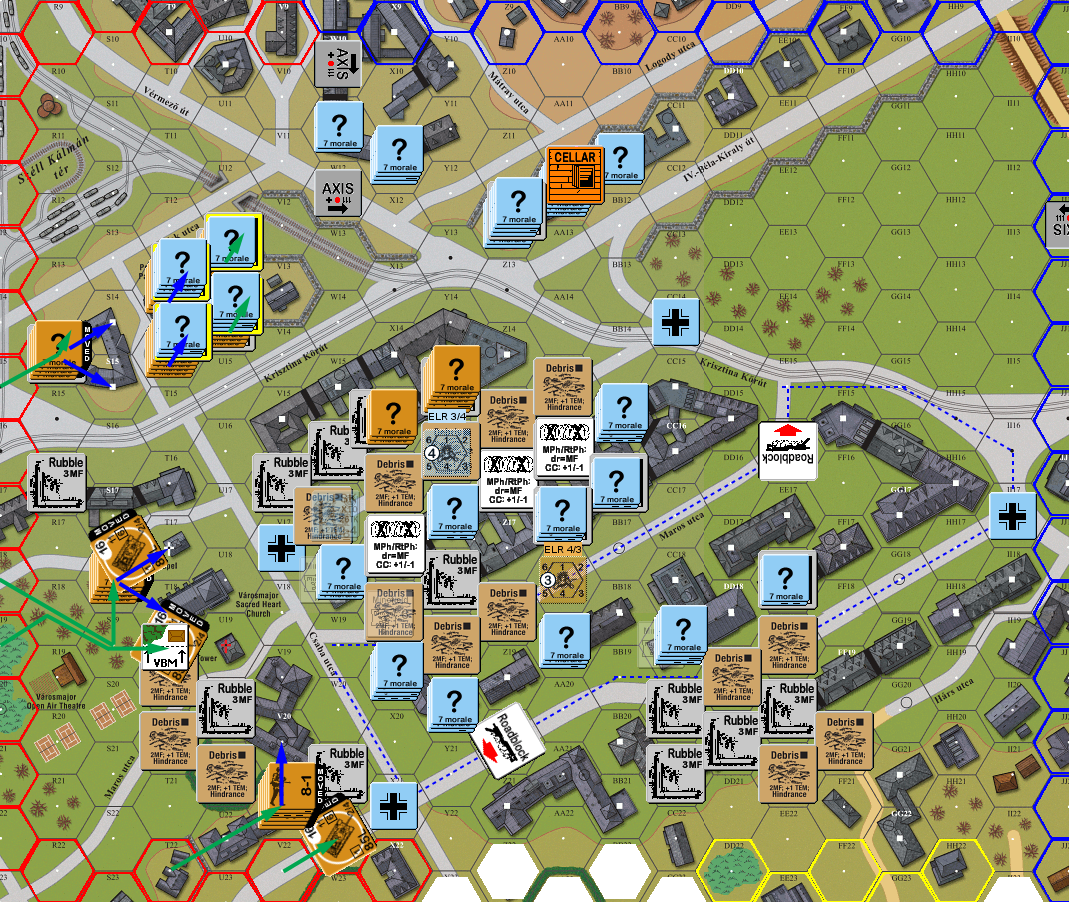
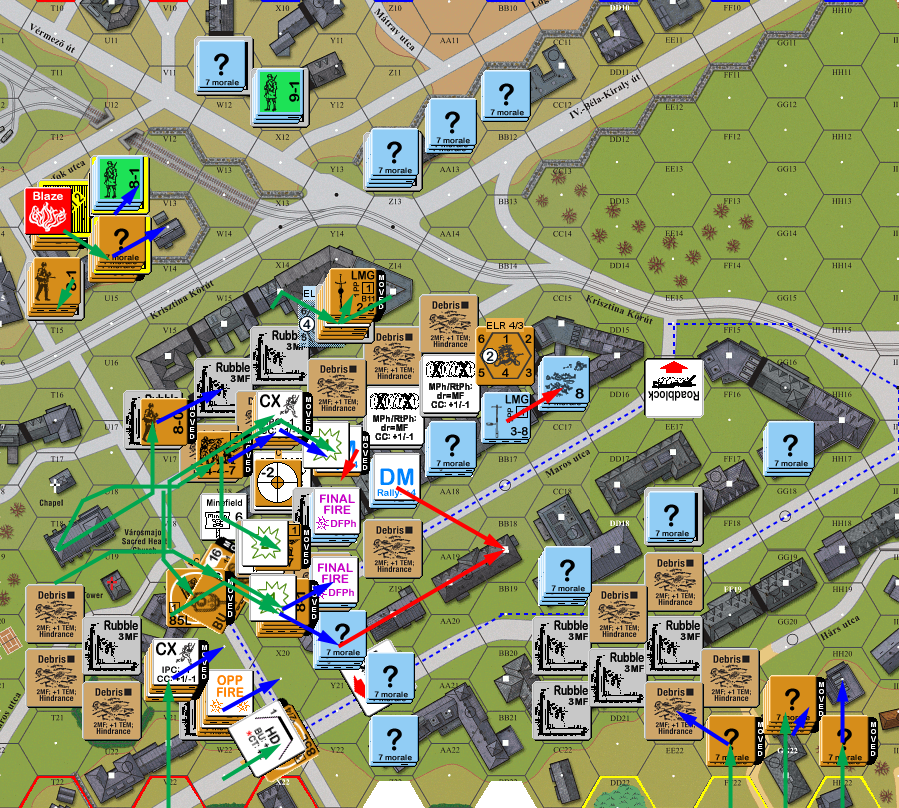
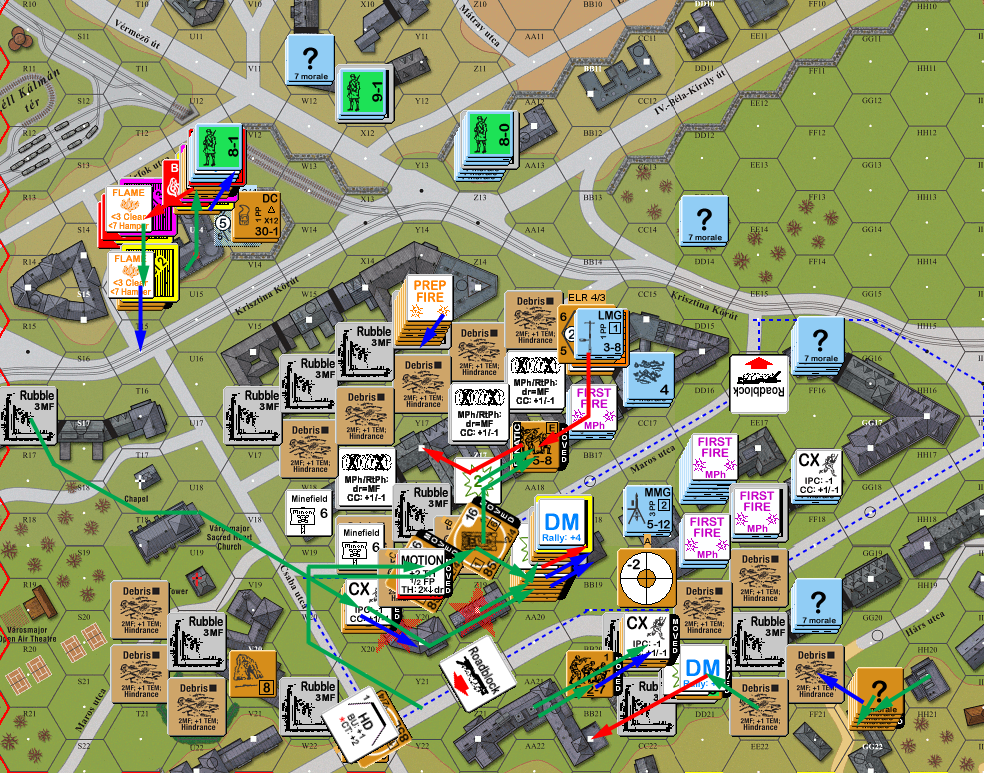
Situation, Russian Turn 1, showing the entire board. North is to the left, blue hexes are the Axis entry area, red hexes the Russian entry area, and yellow is the BVR entry area. The German crosses are the limit of the setup area, while the blue dashed line is the victory area.
My turn continued to be quiet, as I pulled back and skulked in most places. I pulled my western groups in the Postal Palace east and away from where the T-34 could pepper the building. The MGs in Y15h1 got a PTC against my main stack in the opposing area, revealing my 8-0 with a 548/LMG. And… it turned out that his FT was in the Postal Palace, and it fired up the stairwell into T13h2 for a 2MC to eliminate a Dummy and pin a Vannay squad while further fire broke and then eliminated a HS with him. My Sniper went off on the last shot, and ended up wounding the 9-2 in Y15h1.
I did send one Hungarian squad across the street to lurk near Patch’s MG squads, and hopefully foul up any advance near there. My advancing fire also broke the wounded 9-2 and reduced the HMG squad with him on a ’12’ NMC.
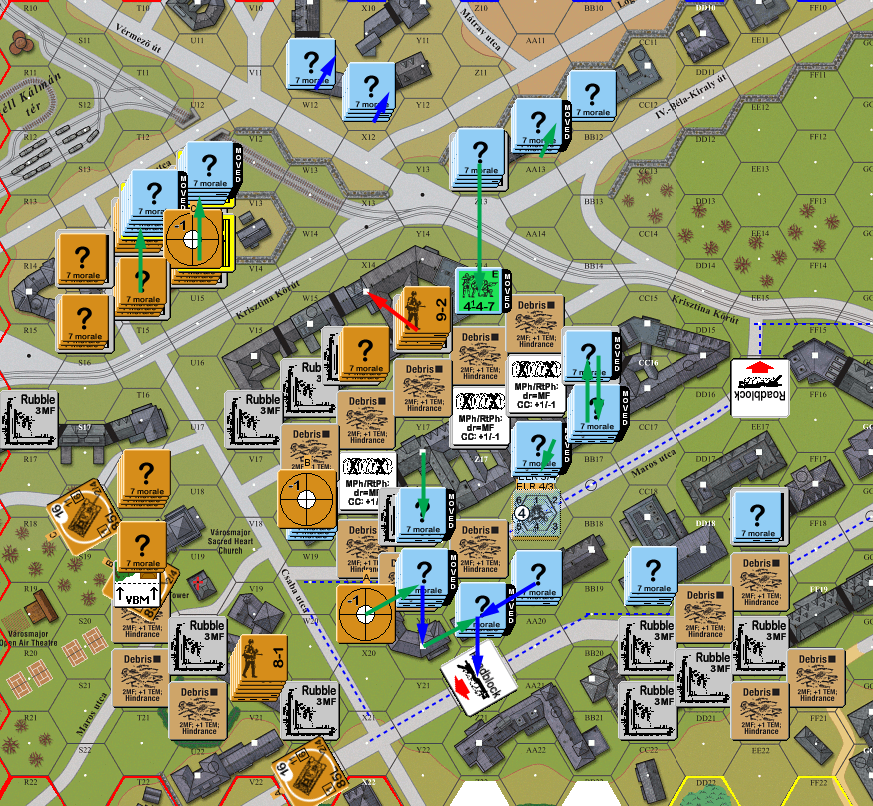
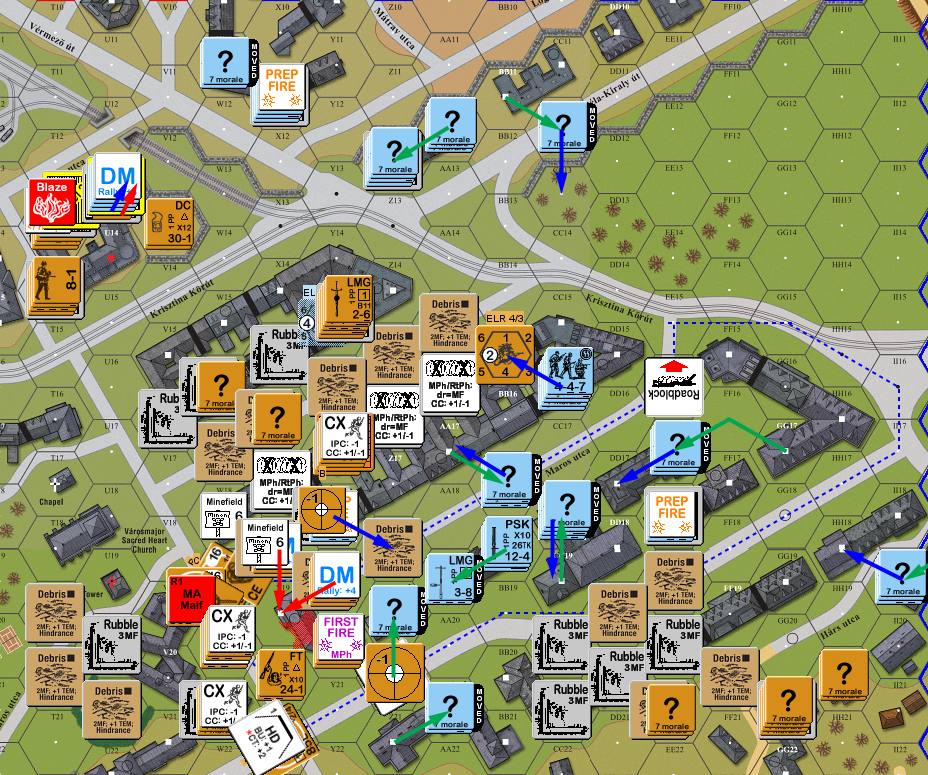
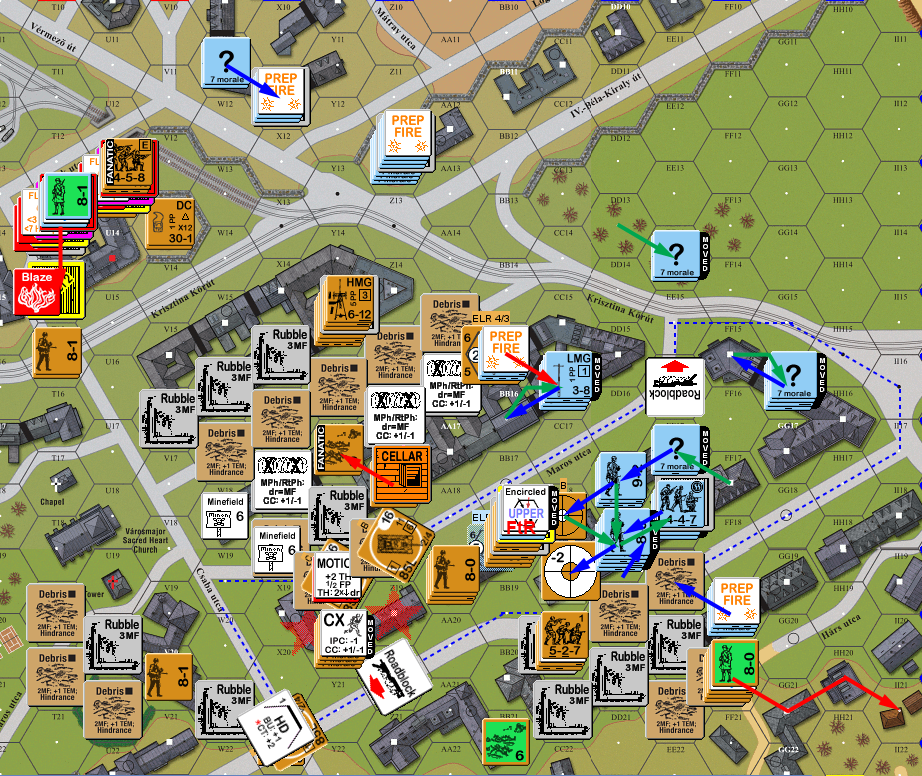
Situation, Axis Turn 1.
Patch bought a 8-0 and 628+FT for his turn 2, and entered them on the west side. His wounded leader didn’t rally, and the HS was eliminated on another ’12’ for rally. The remaining squad in Y15 manned both the HMG and MMG, but got no effect in prep on a pair of shots. His FT in the Postal Palace got a 1KIA to eliminate the squad and MMG above them… and started a flame there (this is the second fire in the Postal Palace, and third overall we’ve had in the FB scenarios… all started by Patch). His center T-34 kept pounding W18, but couldn’t get a result, while the west one adopted Opportunity Fire.
Initial moves were concentrated against W18. First a couple squads Dashed to V16, and then another one moved into the open in V17. Since it was likely I wouldn’t be getting a closer look at a T-34 before the area was overrun (and those first two squad would likely advance into the position), I revealed the PSK squad in W17 and broke the squad despite cowering. Of course, with the PSK out of action for the moment, the last T-34 then moved up adjacent to him (which probably means he was already figuring W18 as Dummies as there’s still PFs…).
Patch moved two of his groups in the Postal Palace to h2, and the last one turned out to have a DC, which he Placed in U13h2. Not having many good options, I revealed a Vannay squad+HMG and 8-1 (while keeping a 347 concealed) for 20FP +2… and rolled ’11’ to eliminate the HMG and do nothing to the Russians. My MMG group in X11 joined in, and got a NMC on a good roll to break the placing squad, and end that immediate threat.
Neither DFPh nor AFPh did anything, but Patch did reveal an 8-1 with 628+LMG in T14h2 to fire across the courtyard to fire at my Hungarians. He pounded W17, and still couldn’t get an effect, who then self-broke and managed to get under the wire in X17. Patch advanced around W18 (bravely manned by Dummies), and got into CC with Z14, who I hadn’t realized was that exposed to counterattack. Despite him being concealed, I avoided Ambush, but lost a HS to him and rolled a ’12’ in return, though he preferred to stay in Melee rather than exit the hex.
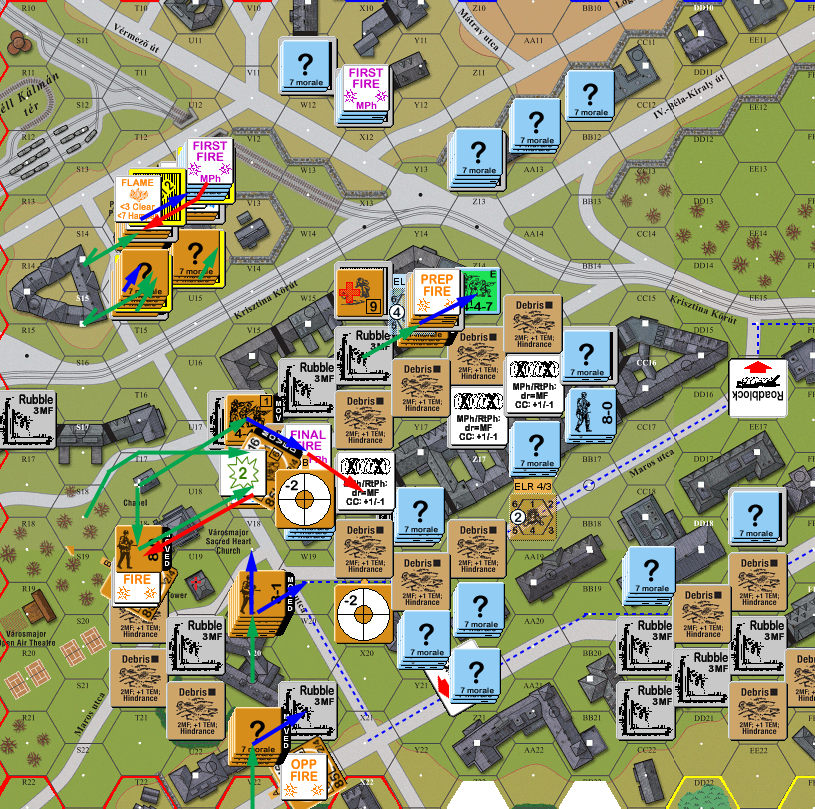
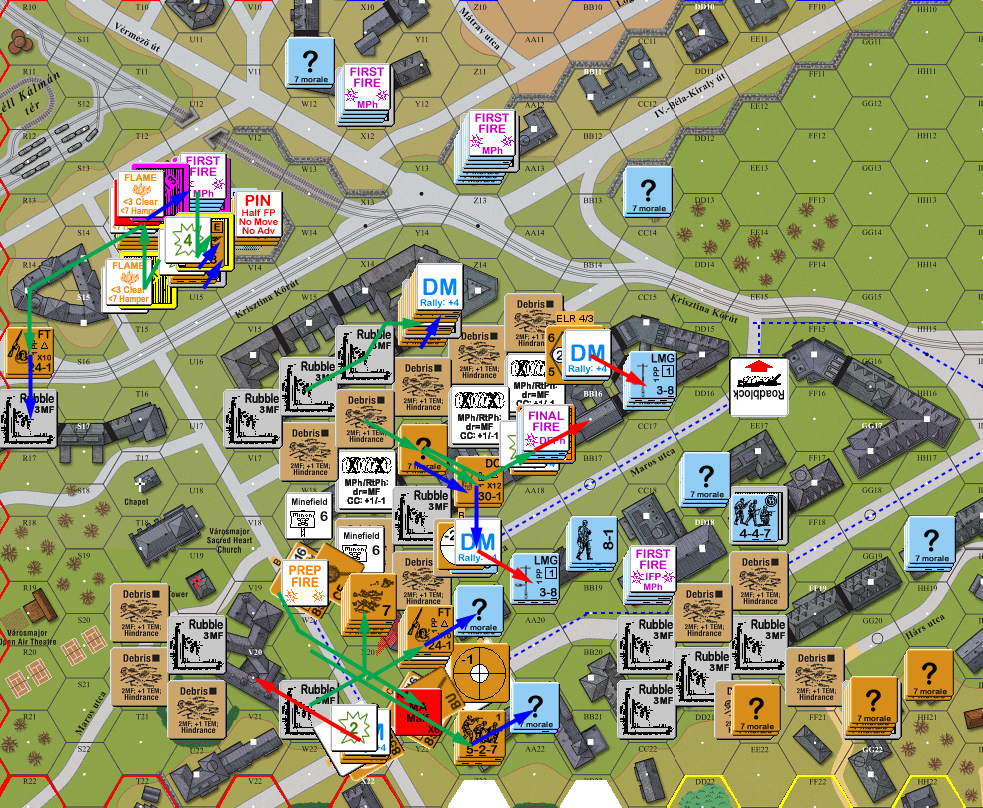
Situation, Russian Turn 2.
I bought a pair of Hungarian 537 squads for my turn 2, sending them in at the final victory block. Patch got his wounded leader back, but no one else rallied. X11 continued pouring supporting fire into the Postal Palace, and broke the FT squad in U13h1, but set off Patch’s Sniper, which broke BB15. A second shot at a 458 squad got lucky… but the squad turned Fanatic to give me more problems (a Berserk would have been interesting, since he’d end up charging X11).
I continued re-shuffling in the west, and Patch managed to reveal and pin a HS in Y19, and after way too much fire had been thrown at it, revealed my Dummies in W18. The flame in T13h2 turned into a Blaze on the first opportunity, showing that the Postal Palace was indeed going to burn down again. Patch finished off my HS in Melee for no casualties.
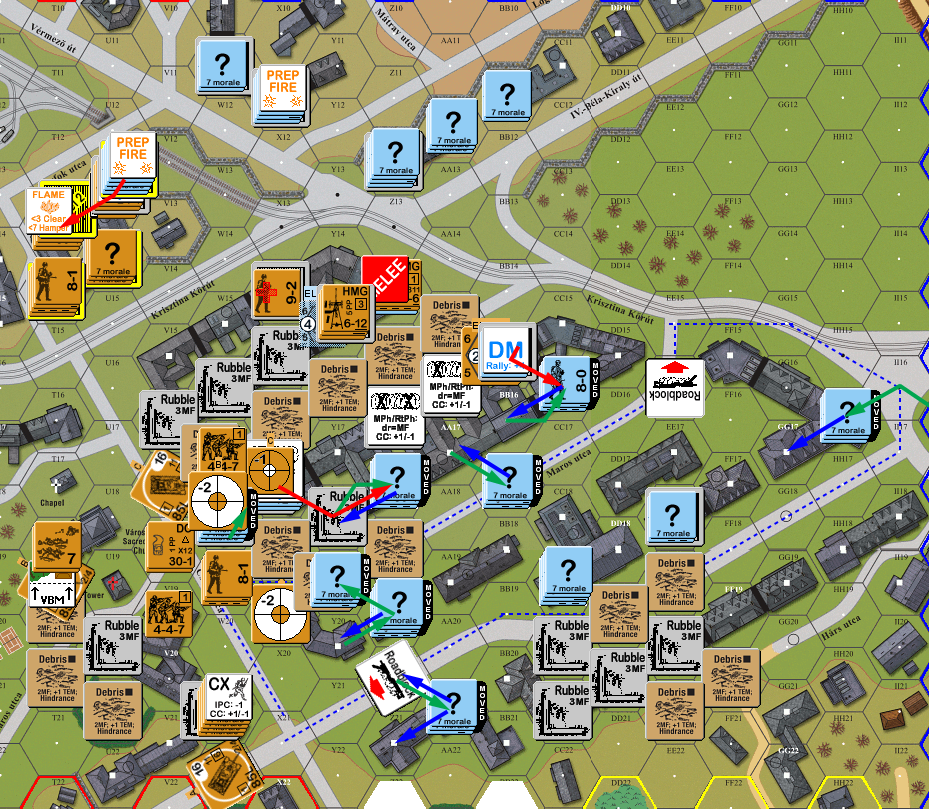
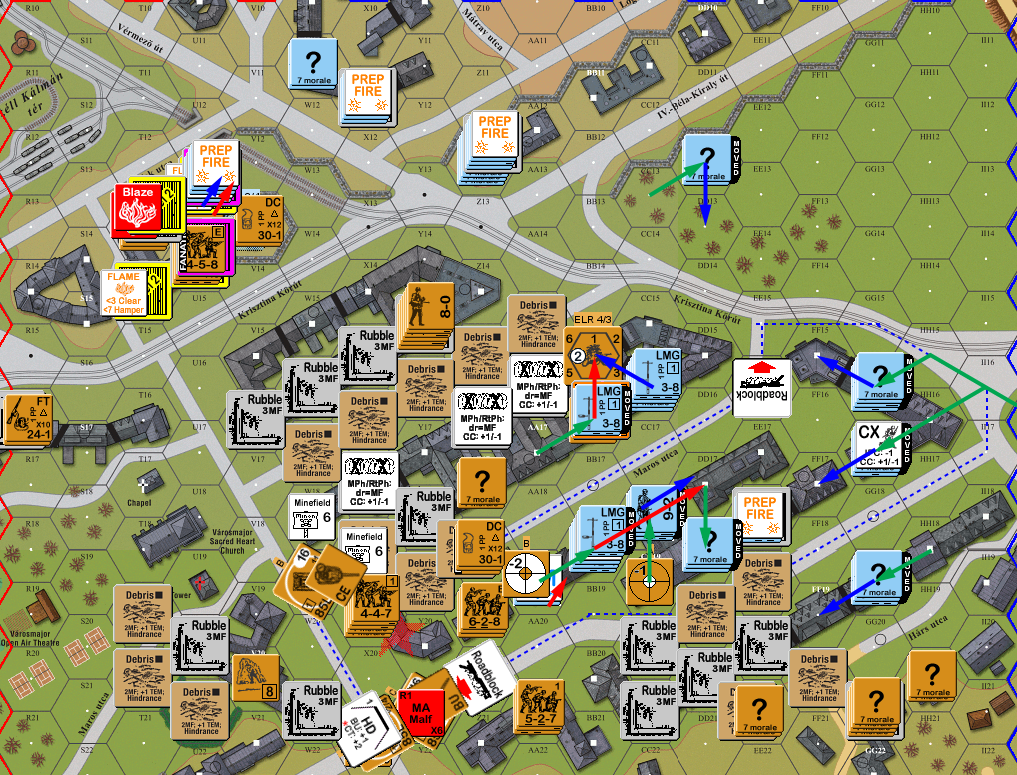
Situation, Axis Turn 2.
Patch bought 2×527 and a LMG for his turn 3, which came in at V22 again, while the BVR appeared near GG23. He rallied the DC squad in the Postal Palace along with the squad in T18, while I missed my only opportunity. The MG squad in Y15 and a FT squad in W21 both declared Op Fire. The wounded leader made his way back to the OpFiring MGs to help out there. He moved into Y17, his first foothold in my setup building, and I revealed a 658 in Y18, who got a 2MC to break the squad. His second move was into W18, which revealed mines… which did nothing. The squad then continued on to X18, avoiding the mines on the way out… and finding more mines there! …Which did nothing. (I revealed their strengths at this point, for some reason thinking that’s all I had at that moment, and therefore the strengths were obvious.)
Next a squad Dashed into X19, and then the adjacent stack assaulted in. Patch commented that I had funneled things nicely…. But I’d just generated six rolls without getting a result, so while true, it wasn’t helping much. I finally eliminated Patch’s Dummies in the DFPh, which I should have known about, but I had lost track of what he could/couldn’t have in the Postal Palace by this point. Patch broke the Vannay squad in the Palace to 1st Line, and a 548 in BB16, while pinning Y20 with the FT, and then breaking the leader there. The good news is that a T-34 malfunctioned its MA, another one malfed the CMG, and my Sniper went off and returned to Y15 to kill the leader he’d wounded before. The Blaze spread downstairs into T13h1.
I self-broke Y20 to get out of the way, while Patch’s Y17 had to hide in the Cellar, as they could see the Hungarians in the Postal Palace behind them. Patch advanced a squad into CC with Y19, and killed my HS in return for losing a HS.
Situation, Russian Turn 3. I think we were both happy that there was no wind to send smoke streaming across the NW corner.
I bought a 468 SS squad (best morale squad the Axis get) and 8-0 in JJ18, and managed to self-rally a 548 in BB18, and rally a 447 CC16. I was really concerned with my main defense collapsing after last turn, so the self-rally was really needed. Patch transferred his HMG to the new squad in Y15, and repaired the BMG, but skipped trying to repair the MA to avoid a possible Recall.
Y18 was getting cut off, so he Threw his DC at Y17 hoping to blast a way out, but the roll against me was much better than the roll against Patch (9 & 5), and Patch made his PTC, while I made the 1MC so they could Spraying Fire at X18/Y19, and broke the squad and HS in those Locations. Most of my effort went to reorganizing and skulking out of the way of the Russians, so I was surprised when Y18 absorbed a lot of firepower from Patch, and came out of it unscathed after multiple morale checks. The Blaze spread to U13h2, T14h2 and T13h3.
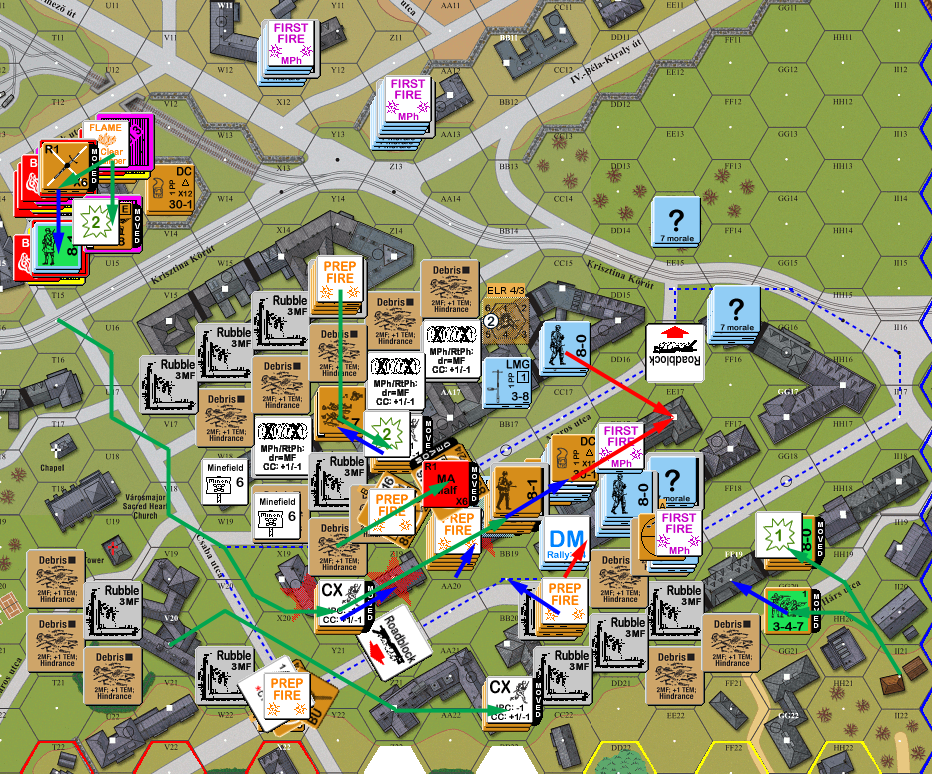
Situation, Axis Turn 3.
Patch bought a 628+DC+LMG and a 8-1 in W23 for his turn 4. Y17/c self-rallied, but the HS in the Postal Palace didn’t rally, and I got both of my broken squads, and my 8-1 back. The MG group got a 2MC on BB15h1, which rolled a ’12’ to reduce to a broken conscript HS. But that activated my Sniper, who hit Y15 again to break the 628 manning the HMG. It took a few shots, but he also broke Z18, which set off my Sniper again to pin V13.
Patch moved in on AA17, first moving his DC squad adjacent, and then his just-rallied squad moved through the cellars to below my men. I opened fire at that point, and despite cowering, broke the squad. X11 continued trying to support the Postal Palace at range as Patch pushed further up the building, but only malfunctioned the MMG. After that was largely a push on the west end of my line, with the FT threatening my position in Z19 (Dummy…), and moving into Z21 on the other end of the roadblock. Then his reinforcements moved up under cover of the T-34 at the crest of rise, and I revealed the MMG+9-2 in CC19. Patch figured anything good there would have fired at his squad going for Z21, but I had planned on saving the reveal for when things were a bit closer, but this was way too good to pass up, and a 1KIA killed the new squad, malfed the LMG, and destroyed the DC, as well as breaking the 8-1.
Patch cleared the way in front of him in AFPh, revealing the Dummy in Z19, and revealing and pinning the HS in AA21. T13h1 became a-blaze. Patch advanced into CC in AA21 and only avoided an Ambush because I was pinned. However, he knocked me out for no losses.
Situation, Russian Turn 4.
I had saved up a few points from previous turns for my final purchase, and contemplated getting a Pz IV to at least make the T-34s more cautious. However, they hadn’t been a huge problem, and I wanted to concentrate on squads to hold ground and count for the final victory totals. So, I bought a SAN increase to 5, and 2x447s with a MMG and 7-0 in JJ16. I didn’t rally anything, and lost the Hungarian MMG, but Patch rallied a HS in T13 and a squad and a half in X19.
My first shot did a 1MC, but the squad in Z18 got a ‘2’ to go fanatic and generate a Hero, who took the DC. However, I didn’t do anything else, and my forward post in BB18 proved too exposed. It took some fire to do it, but Patch broke the good squad there, and ELRed my 8-1 leader. Flame spread featured a lot of really low rolls I wish I’d had elsewhere, but it still spread to T13h3, and U13h2 turned into a Blaze.
The broken Hungarian squad and the 8-1 routed onto the roof of the Postal Palace, with the intact squad following in advance. It wasn’t my first choice, but with a Flame already in T13h3, it wasn’t safe there, and at least U13/r was now smoked in by the blaze on h2. The real problem is that the squad in AA19 could only go up, as the Russian squad in BB17/c prevented him from joining his buddies further back. He’d prevent building Control, but that wouldn’t last, and I’d rather be able to rally him.
Situation, Axis Turn 4.
Patch rallied the HMG squad in Y15 (I’d forgotten I needed to fire there for the DM, despite other odds and Ammo Shortage…), but didn’t get anything else, though he did finally start trying to repair his MA. Meanwhile, I got my PSK squad in DD17 back. Patch’s only Prep was the MG section in Y15, which only malfunctioned the MMG.
The DC Hero moved into AA19, and not wanting him to get closer with that, I took a shot across the street which wounded him (and effectively stopped him there). It was obviously someplace everyone else needed to go. Another six units went in there in three groups, and the last one got a low roll to break a squad; sadly everything else had no trouble. He sent two squads after BB16 while it was busy firing elsewhere, presumably wanting to start clearing the area out so his MGs could start moving up. In the west, the Russians moved up, and the BVR started stirring, but I broke the lead squad. DFPh went fairly well. The squads in AA17 took a NMC without trouble, but that set off my Sniper, which I relocated back to victory block. But another shot generated a 1MC that broke both of them. AFPh didn’t do anything, but the flame in T14h2 converted to a Blaze.
Rout was… interesting. Patch kept routing the squad that had been bouncing around the cellars of the setup building as he couldn’t see most of the neighbors up on the ground floor. He’d moved a HS to T14h0 to keep me from routing out of U13/r… but with all the blazes, there was too much smoke for them to be visible. He still advanced into CC with the GO squad and wiped them out for no losses.
Situation, Russian Turn 5.
For a moment, I thought I managed to self-rally the squad in BB18h2, but Patch pointed out that he was Upper-Level Encircled, which reduced his ML by one (on top of being down one for starvation), and he didn’t quite make that. I did rally my 8-0 and 548 in DD17, which was needed, but couldn’t get any of the low-odds rallies that could have made a bigger difference. Patch didn’t have much he could rally, but did repair his MMG.
I’d kept guys in Z12 just to interdict the street between the Postal Palace and the rest of the board. No doubt that’s why the FT+leader earlier had taken the long way out, and now that there was a HS+leader in the street to fire at… all that happened was a malfunction of the Hungarian LMG. My squad in FF19 opened up on the advancing Hungarians, and while the leader passed the resulting 1MC, both of the squads broke.
Movement was just reshuffling the defensive perimeter, and Patch broke a squad in BB15 in DFPh. The fires failed to spread any further, but T13h3 turned into a Blaze.
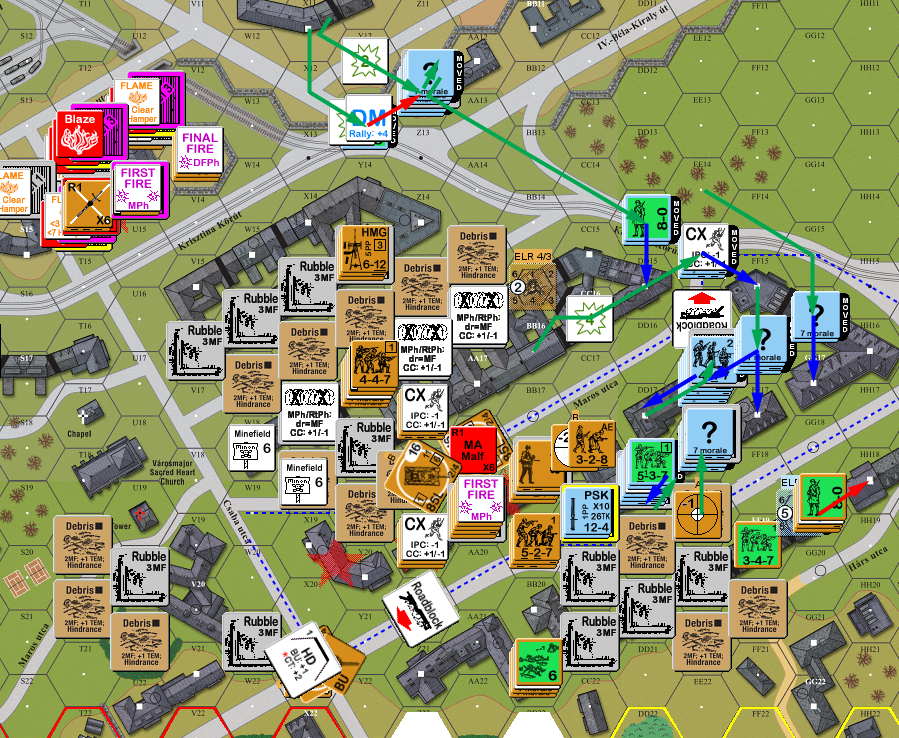
Situation, Axis Turn 5.
Patch’s self-rally in Y17 failed, but he got the squad in AA19 back, and both BVR squads in II21 rolled ‘2’ to Battle Harden (one would have gone berserk, if there’d been anyone around…). I lost a HS to a ’12’, and didn’t get anything else done. The good news in Prep was that BB16 took four ROF shots from Y15 and survived, but Patch got a K/3 to reduce a 548 squad. The remaining HS only pinned (to LLTC) but he broke the 9-2 and the PSK squad, and then revealed the leader in EE19, and pinned the squad with him. Overall, both of our rolls were pretty good, and my Sniper went off at one point to wound/eliminate his Hero.
Patch ended up cornering the broken squad in the Postal Palace… and we realized that I couldn’t even see his guys with all the smoke, so they’d stay in place to get taken in CC. The remaining HS in BB18 grabbed the DC and Placed it in CC18, then the leader with FT moved up to BB18. The noose tightened as as squad detached from MG section last turn arrived in Z17 (having to go CX because of overstacking in Y17), The BVR moved up again, and one of the T-34s moved up. My defensive fire was completely ineffective.
The DC broke my HS in CC18, but the already-broken leader was fine. The FT fired across the street at BB16, and pinned my squad there. He also managed to pin the 8-0 in EE19, but that was it. Fire spread to U13h3, T13h0, T14h3, and S14h1. I tried evacuating CC16, braving Interdiction, but lost a HS and the 8-0 to it. Despite the problems I still had 2×537 on the ground floor of DD18, and a 658+MMG+8-0 at h1, so taking the next building in line was going to be an expensive proposition (more so if the mines in CC19 actually did their job), and while Patch considered it, he ended up only sending a single HS into CC18.
The CC in T14/r was a bit tricky. If my leader teamed up with the squad, he couldn’t attack, but the squad was the important part, as they’re what maintained my Control of the building. I eventually decided to all defend together, and Patch wiped them out to take the Postal Palace and a very important 4 VP.
Situation, Russian Turn 6.
I didn’t get anything back for my Turn 6, and lost the Hungarian LMG to boot (finally rolled a ‘6’ after a couple straight ‘4’s). Patch got all three squads in Y17 back on the first try. My one Prep Fire was with the MMG, and it reduced the better BVR squad to a broken 1st Line HS with a ’12’ 1MC roll. I forgot the downstairs squads were there, or they would have fired on the Russian HS in the building. Movement was preparing for his last turn by making sure he couldn’t just walk into a building and take Control, and trying to get as many intact squads into the victory area as I could.
Mostly, there was little for Patch to do, but he shot up one attempt to move a Hungarian squad over to the victory area (…who had been illegally going CX, though he could have barely made it there legally on my last turn), while two other squads (with leader direction and no illegal CX) were unmolested, but one was going to be exposed to fire on his way next turn. U13h1 turned into a Blaze.
Situation, Axis Turn 6.
Patch rallied the BVR squad in BB21 for his final turn, and I rallied the 9-2 and both HSes in EE17 (with the help of a 7-0 I had advanced in). Mostly, he was defensive, skulking in Cellars, and sending in what he could to the victory area for more squad VPs, though the HMG moved to cover the Hungarian’s route to the victory area. My LMG FF15 established a FL across most of his advance, but it didn’t do anything. (Actually, I just realized I let all the tanks and debris counters confuse me, and I should have set the FL counter a couple hexes further back, which would have attacked his main three squads moving up. At 1FP +3… not a big deal, sadly.)
My fire didn’t do anything, and Patch’s AFPh only malfunctioned the MA on the T-34 in AA18. U13h3 turned into a Blaze, while flames spread to T14h1 and U14h2.

Situation, Russian Turn 7.
At this point Patch had 11 squad-equivalents in the victory area, held three buildings, and had the Postal Palace for 18 VP. I was likely to get rid of the HS in CC18 to reduce that to 17. I had 10 GO squad-equivalents, and held four buildings for 14 VP. With luck, I could rally a squad (8 +3), I should be able to get one more squad in… and had a shot for another one or two past that. If everything went well, that would get me to 18 VP for a win. However, that not only meant the Hungarians had to run the gauntlet of HMG fire, but had to rally a squad there (5 -2). If any one thing failed, Patch would win the tie at 17 VP. So, I conceded there. (I don’t think I saw the broken Hungarian at the time, I would have at least checked RPh if I had a chance at an actual win.)
Afterword
Patch considered this one of the best defenses he’s seen. And certainly, everything worked very well. The hexes of wire along the west side kept movement options down, though the MG section meant I didn’t spend much time in the h1 locations overlooking them to help deter an advance there. This channeled things towards the mines, which while they didn’t do anything, were still a nasty surprise. All of that meant that he never had a chance to sweep that big rowhouse block and use that to force a defense of the entire victory block at once. He swept into the victory block from the end, and maybe I should have planted the third set of mines in Y20 or Z21. But that would have reduced the mobility I used to delay him there for a turn or two.
Overall, my luck was pretty good. There were a number of missed Sniper activations over the last two turns that could have changed things a lot, but over the course of the game, SAN was probably about on average.
Which brings up real questions of just what went wrong, if things went so right for me? The main thing is being too passive with the Hungarian part of the OB. They spent most of the game being a ‘threat in being’ instead of really helping. Patch pointed out that he was worried they’d come in and try to help contest the Postal Palace. …Which I suppose is what should have been done. If they went in at the very beginning, they might have made it to cover while Patch was avoiding revealing troops for fear they’d get shot up and before the entering troops could interfere. But I avoided doing that simply because it meant exposing the more fragile Hungarians to shots in the open from the Soviet units already there. So I’m not sure. Perhaps a more solid advance (2-3 squads) into the area around his MG section would have derailed thing enough. Either way, the Postal Palace was decisive, and we just can’t figure out how to hold it.
Discussion ¬