
WO2 Failure to Communicate
After Patch and I’s last SFB game, we returned to ASL, and decided to try “Failure to Communicate” from the first Winter Offensive pack, which I’d picked up during MMP’s Fall sale. It’s May ’40, and a miscommunication leads to an overwhelming force to take out a French garrison. The French have a mix of nine elite and 1st line squads with good leadership, a MMG, MTR, 25mm ATG, two AMR 33 ‘tanks’ (with 4FP MG MA), one AMD 35 armored car with a 25mm gun, all radioless, and 10 “?”. They get to choose between also getting either another AMD AC, another ATG, or a ATR (with HS) and some mines), and get another elite squad, 8-0, and DC on turn 5. The Germans have 6.5 turns to take five out of seven multi-hex buildings with fourteen squads, with a typical mix of leaders and support weapons. On turn three they get two Pz IIs and three Pz 38(t)s. The French can also win by getting 25 CVP.
The new board from WO1, 59, has a stream crossing it, and board 42 has a stream overlay, so the stream goes across the entire board, and only four multi-hex buildings are on the near side of the stream to the Germans. I took the French defenders and concentrated on two things in my defense: the main village (with four victory buildings), and defending the stream. Especially with my limited anti-tank ability and the fact that he’d need at least one building across the stream, I wanted to make that painful. The main weight of the defense went in and around the main village, with the MMG and MTR behind the stream, and 3.5 squads (with a lot of Dummies) around the board 42 crossing to keep him from just trying to seize that bridge early, drive on the two victory buildings across the stream on board 59 and then try and take the village from both sides. I took the ATR… and then stuck it in a corner that was less likely to see armor (42J1 might have been much better), with the mines going on the one board 42 building in case he went there. I used two “?” to look like a fourth vehicle in 42U1, so he’d think I took the extra AC instead. Sadly, I had forgotten that French tanks tend to have radio trouble, and didn’t consider setting up any platoons. The ATG was set up so it could cover the board 59 bridge, but facing down the road coming from board 42.
Patch setup entirely concentrated on the village. With a hill, and a bit of woods in the way, I couldn’t see anything, and many moves still didn’t give me a chance to see anything, but his 9-2 and a HMG squad moved through the grain to a clear shot of 59J2, which Patch had figured as a Dummy. However, he was part of my outer defensive line (with the Orchard to provide cover for his withdrawal later), and a K/2 wounded the leader while breaking the squad. (It would have been soo nice to get a fatal wound, ah well.) He did get two positions that could fire on J2, and broke the squad on his second attempt with a NMC in AFPh.
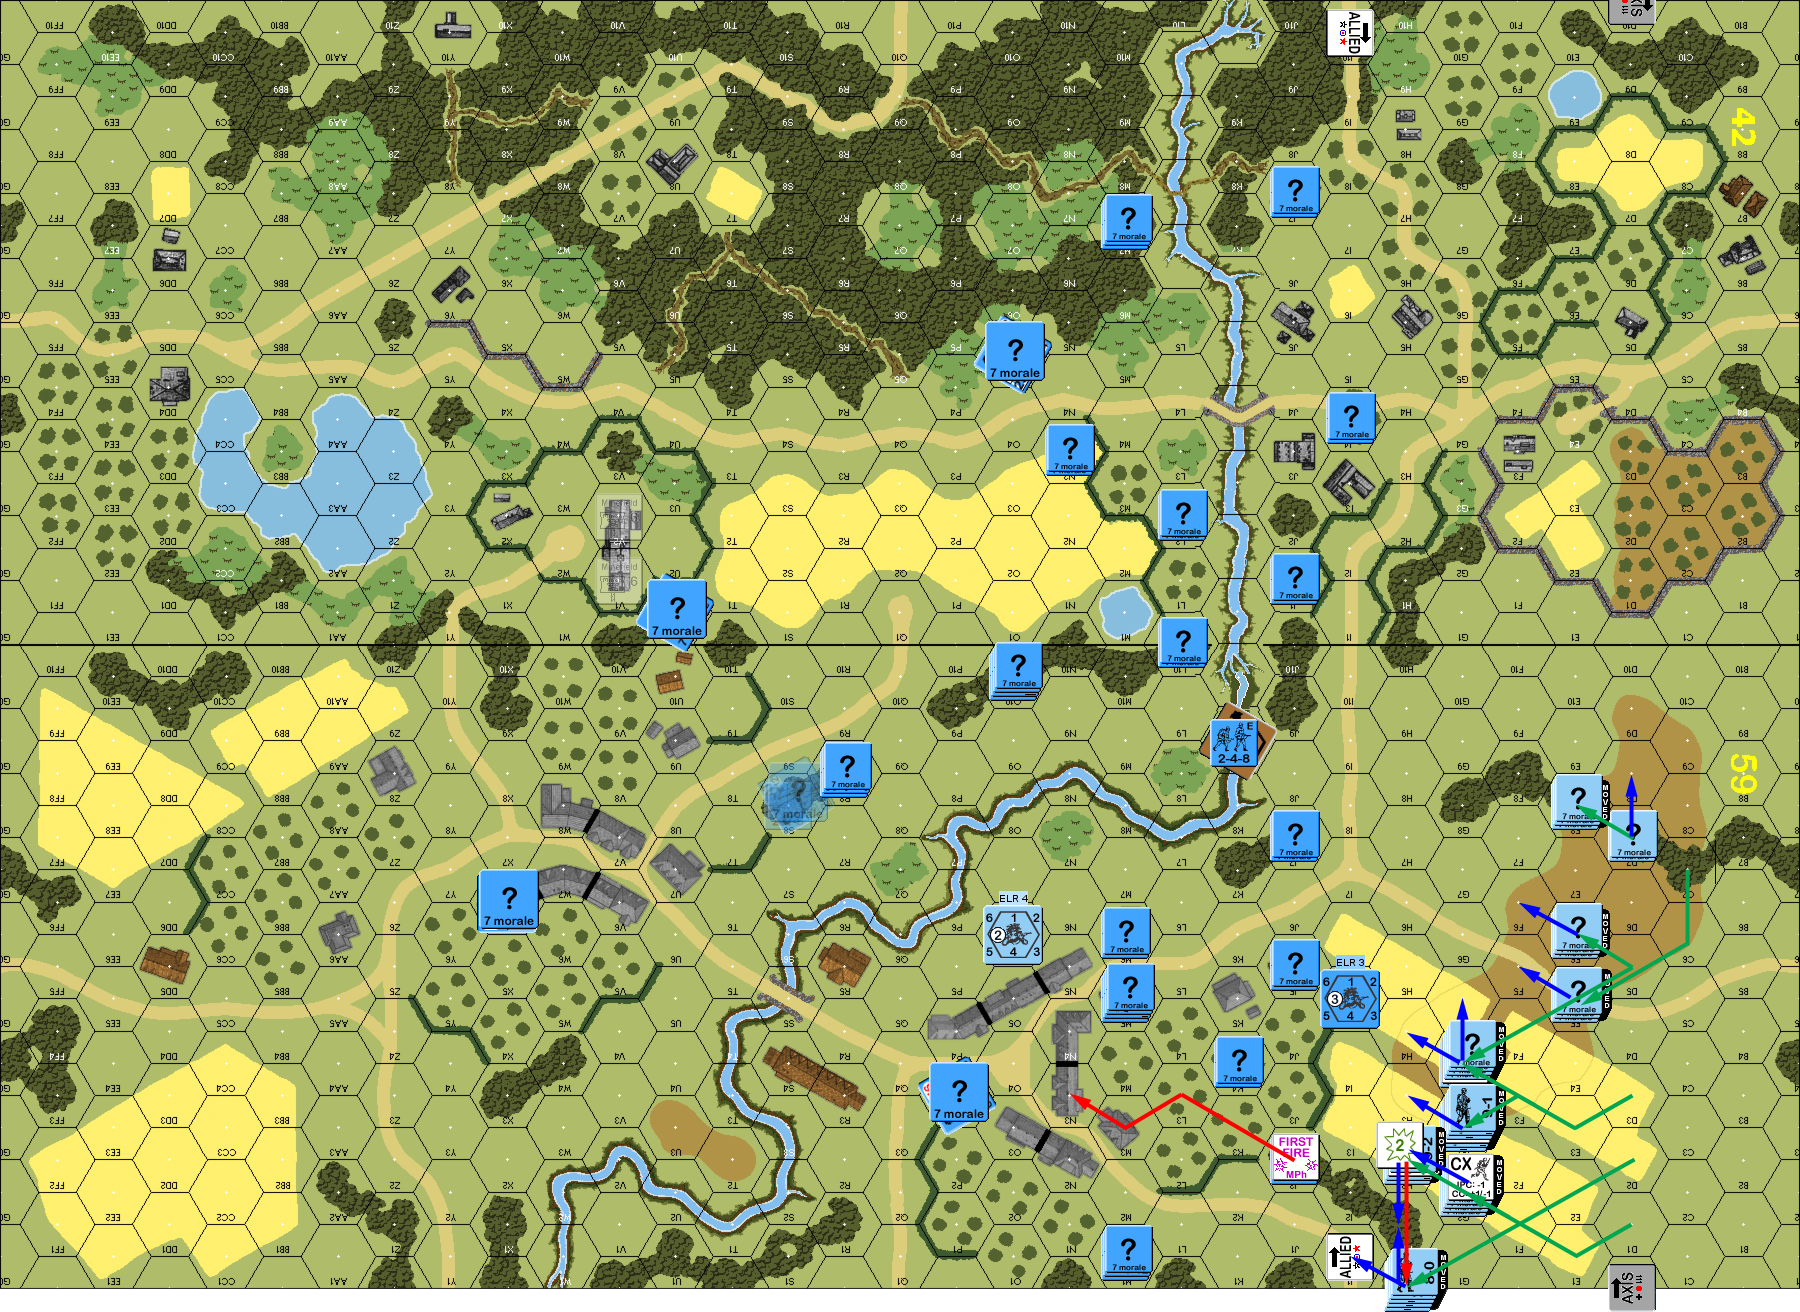
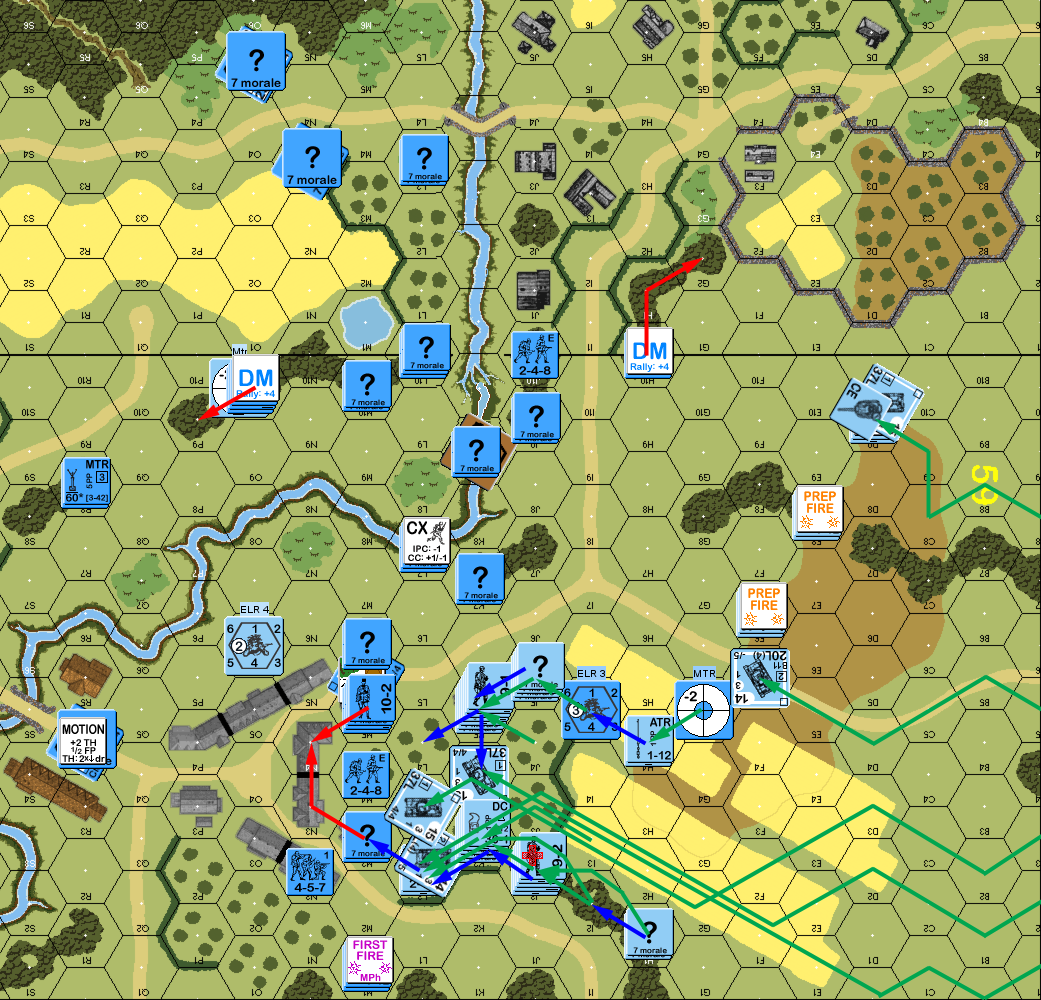
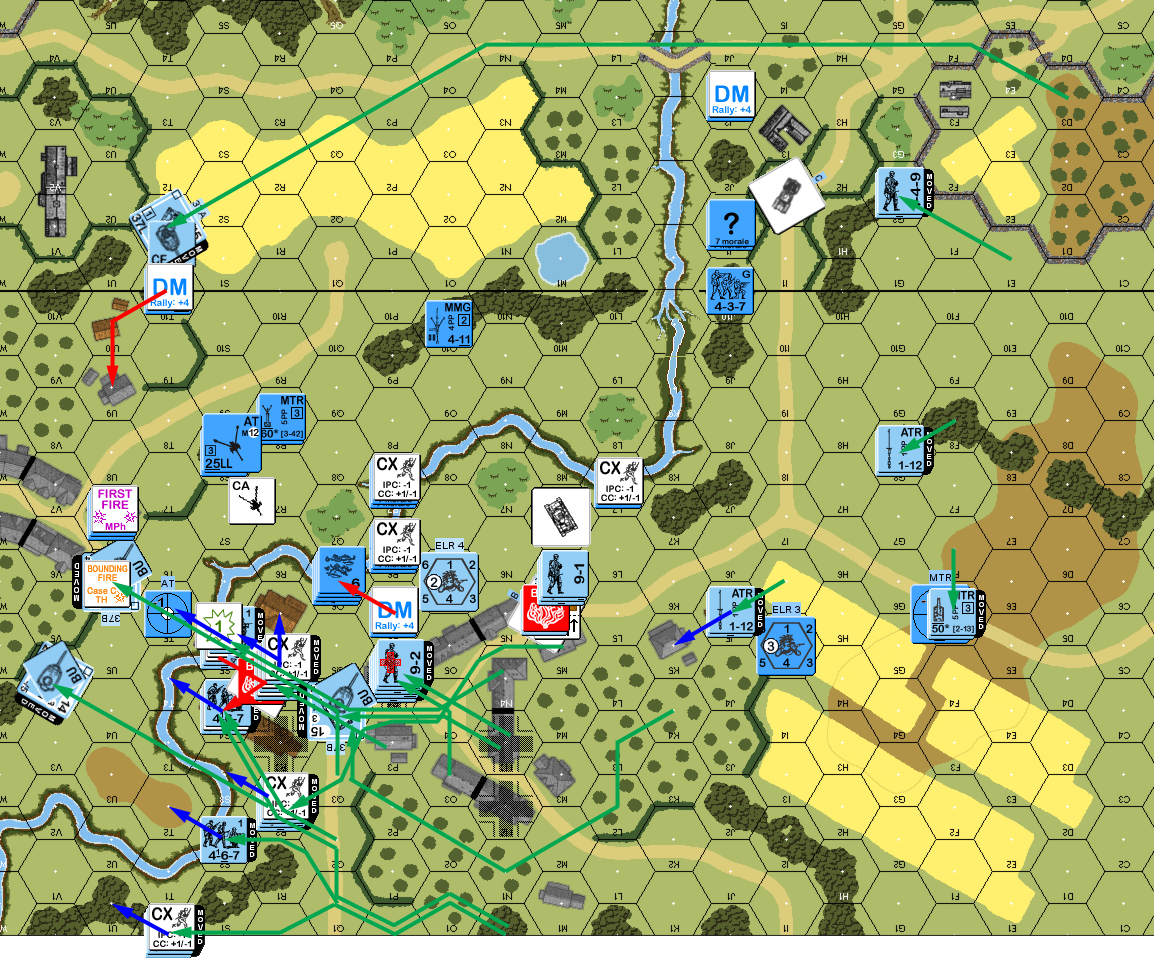
Situation, German Turn 1, showing the full board and my HIP setup.
Nothing came back in my RPh, and I opened up with my MTR in Prep. Or tried to, as the LOS from 59R8 to F5 turned out to just barely be blocked, and I didn’t retain rate to try again on G5. In the village, I started falling back, while most of the troops on board 42 raced to flank Patch’s advance, with some caution needed for my Dummies. Patch spotted one squad as he got on the road thanks to the other terrain in the area being 1/2 level (was used to thinking terms of all the woods around), but thankfully his shot Cowered for no effect. The bad news is that three attempts to reposition my AFVs (including the Dummy…) failed due to bad TCs (the actual AC in 42O5 didn’t try to move). Patch assembled his MTR and MMG during the end of DFPh.
I hadn’t really given enough thought to how I was going to reposition important units once I knew where the attack was. My 7-0 was with a squad on the far north end, and needed a couple turns just to get into action. Basing him around 42N3 (which was a Dummy) instead of M7 to guard the path would have been much better. My 10-2 left the LMG in the village alone to rally the broken squad from last turn, while the 8-1 waited with the MMG across the stream for the Germans to get closer.
Situation, French Turn 1.
Patch rallied his squad for his turn 2, but mine failed on an ’11’ (Final 8), despite the 10-2’s help. Patch’s MTR fired on my Dummies in J7 but missed, while one squad took time to assemble his HMG, and the wounded 9-2 and two squads declared Op Fire. With Patch’s guys a lot more concentrated than mine, I expected a fairly solid push into the village this turn, but Patch mostly shuffled sideways, moving along the edge of the hill towards the village. Early on, one squad moved into J2, on my MMG’s primary FL line, so I revealed it, and set up the FL to keep him from pushing hard into the orchard, but that push never developed.
What little fire I had was ineffective, though my MTR started acquiring 59G5. Patch’s only advancing shot (at the “?” in J5) was a ’12’; it was a pity he’d left the two LMGs out of it. Patch advanced into J5 with a couple concealed units, but I managed to get Ambush on them with my HS, and slipped out to K5.
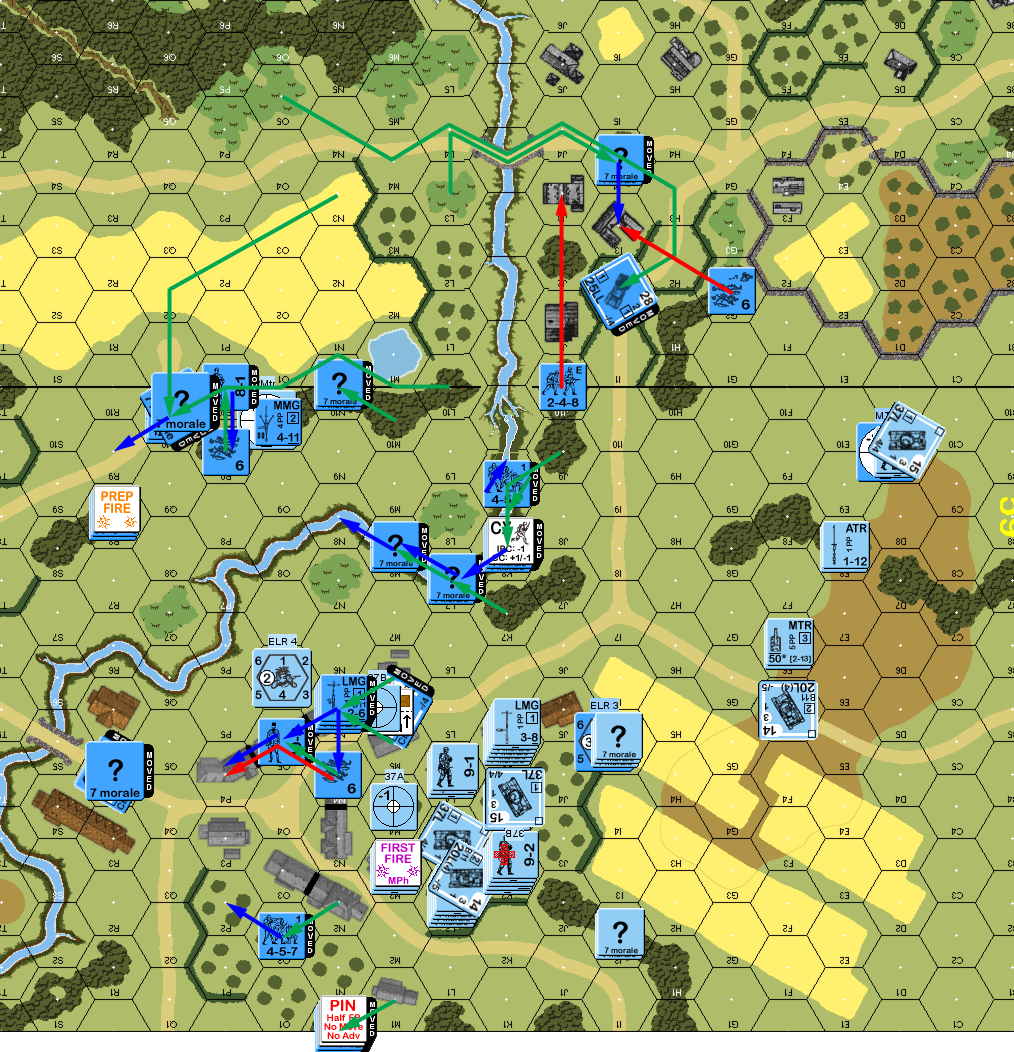
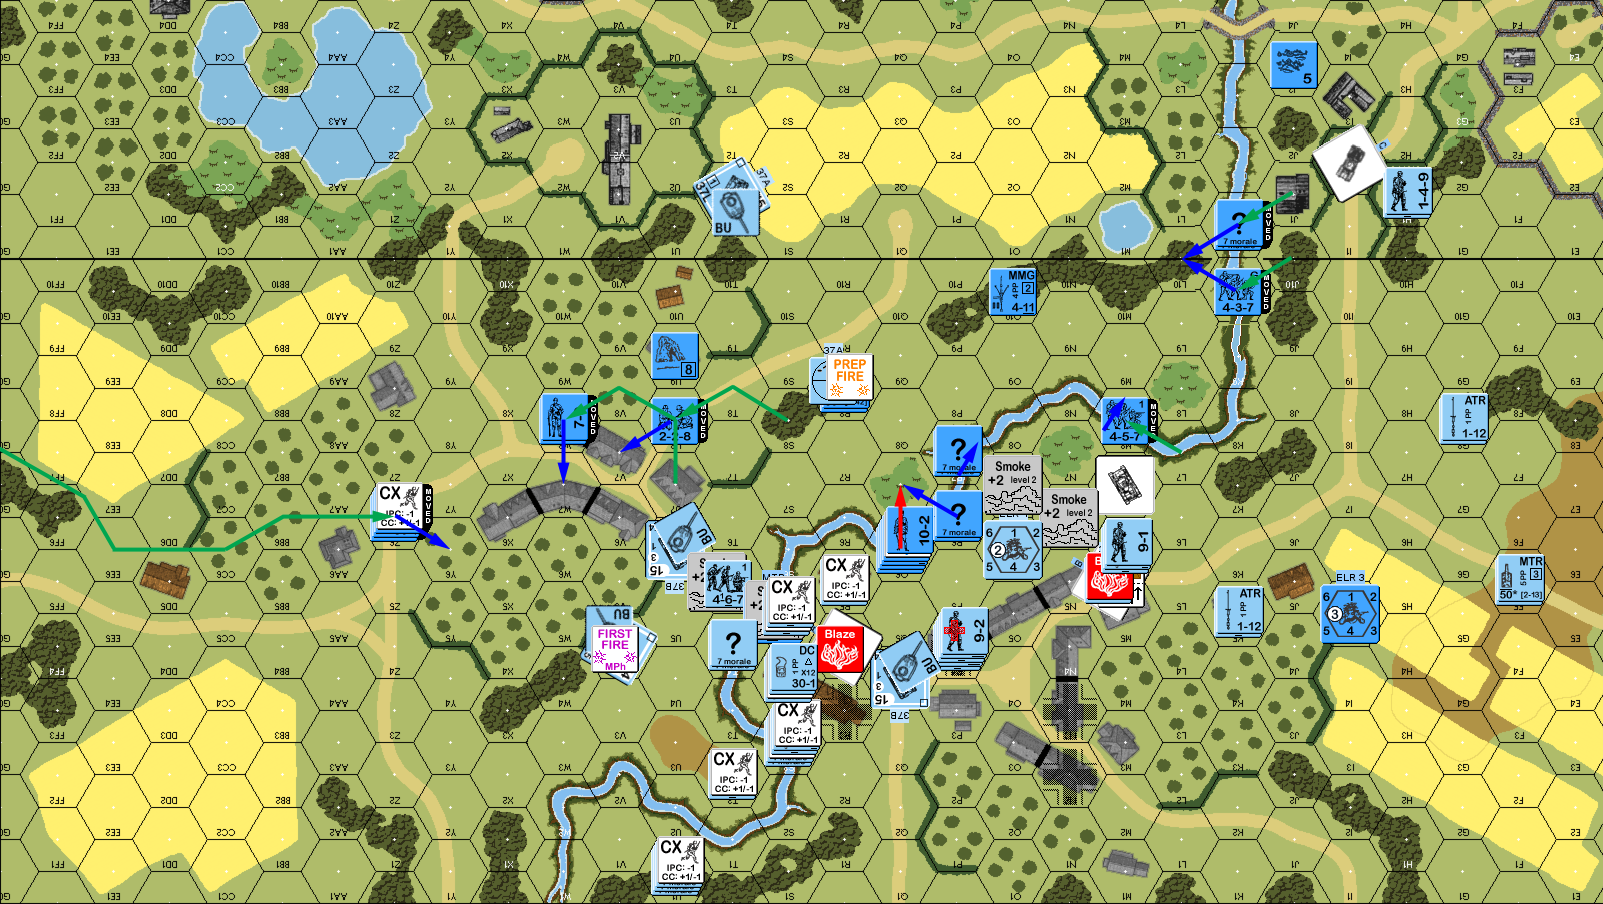
Situation, German Turn 2.
I rallied my squad for my turn, and Patch deployed a squad in 59I2. The MTR got a couple more shots at G5, and revealed his ATR squad with a 2MC, but he passed. The MMG tried to do something about J5, but had no effect. I skulked in the village, while the board 42 defenders started getting into useful positions, and all three of my non-Platoon Movement TC succeeded. If 59X6 could have stopped adjacent to P3 I would have had them form up, but he was a couple MP short (and if I’d thought of it in time, I’d have parked him on the bridge). So P3 advanced to the front line, where he was a little more exposed than I was thinking at first. The Dummy in 42U1 advanced to ‘support’ the AMD in O5 who stayed to guard that bridge from the appearance of German tanks.
Patch had a few shots after movement, and revealed the HS in L4, and pinned the MMG squad+leader with his MTR, and his second ATR took a shot at my lead tank, but missed. My one good shot in AFPh caused the squad in D9 to Battle Harden to elite and generate a hero.
Situation, French Turn 2.
The only activity for Patch’s turn 3 RPh was the entering tanks lining up on the southernmost part of the board. In Prep his MTR got a k/1 on my MMG position to reduce the squad and break it and the 8-1 leader, while a shot from 59D9 broke and ELRed my squad in H10. The first three tanks entered and dived into the orchard, with the second one parking in L2. I surprised Patch with my ATR in M1 (he’d thought the stack was a Dummy), and hit, but couldn’t penetrate (I had been hoping he’d turn away from the ATR to face my main forces, but even rear armor wouldn’t have helped). My fire was ineffective. I got one PTC against his 9-1 stack, and they all passed, and my MTR got several shots, and a couple hits against the wood building in J5, but couldn’t get an effect.
Meanwhile, my HS broke to advancing fire from one of the PzIIs, and a 38(t) got a critical hit to kill the HS in M4 with a k/2, and the 10-2 broke to a 1MC (though the LMG squad with him was fine).
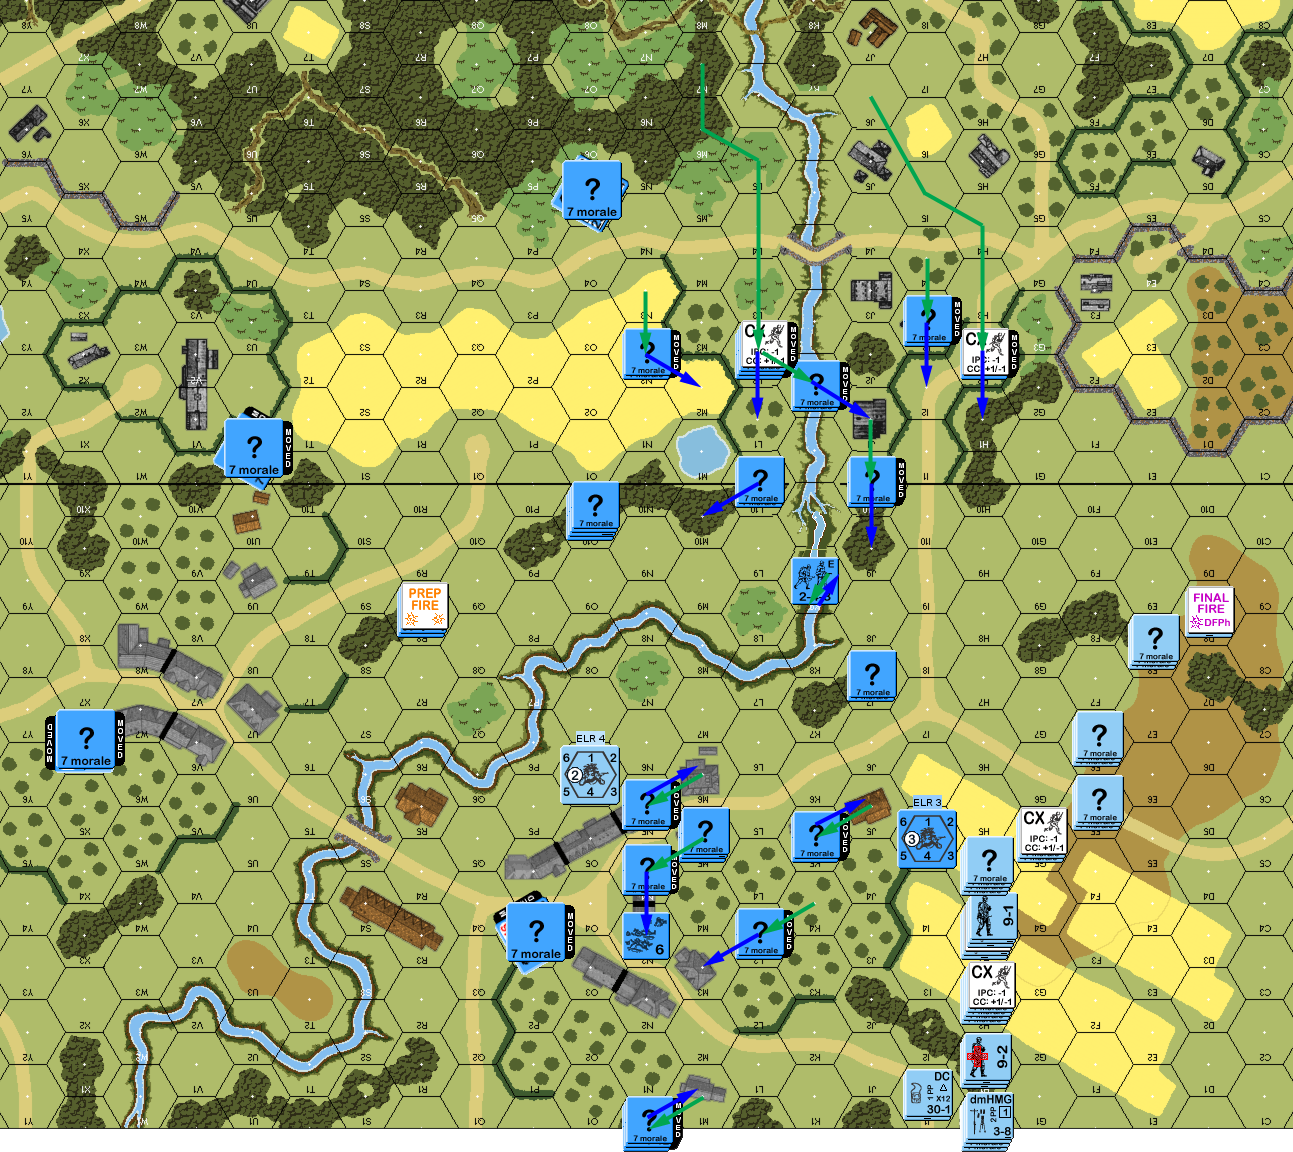
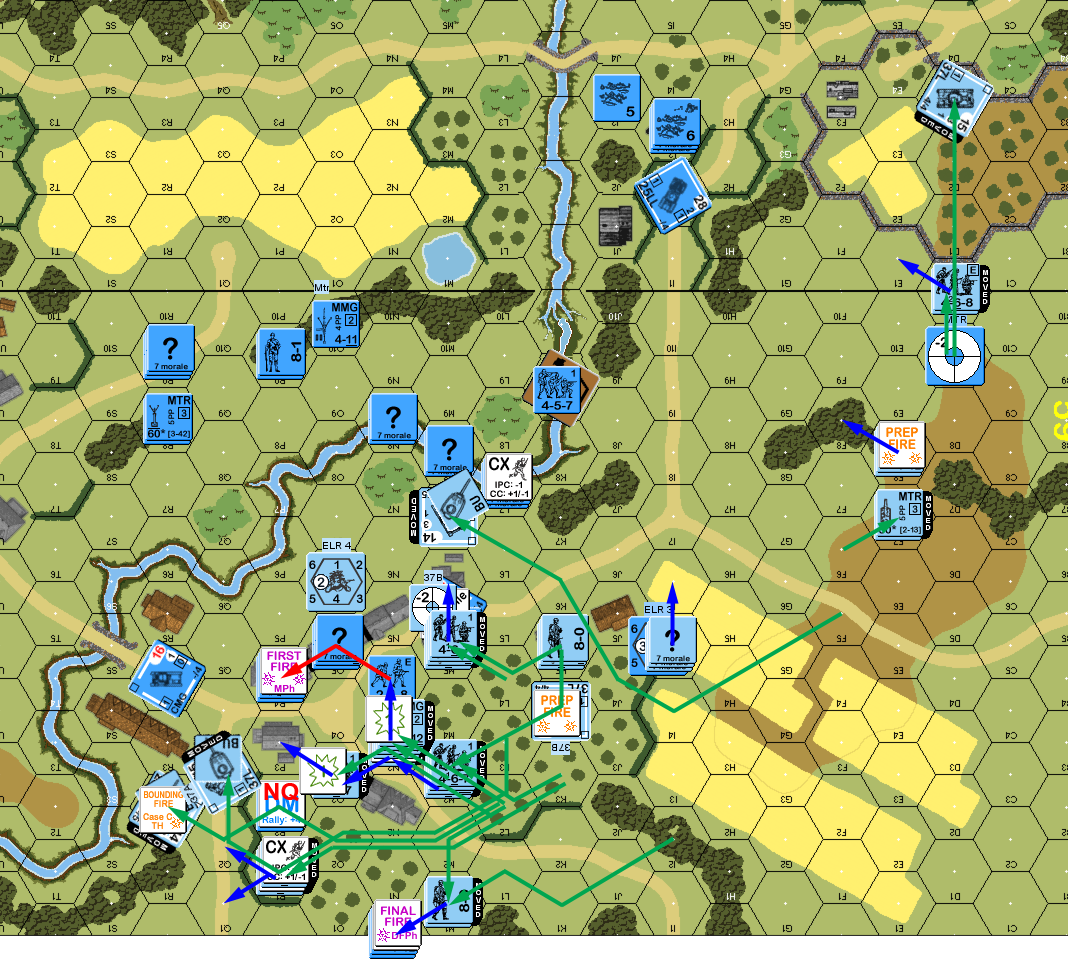
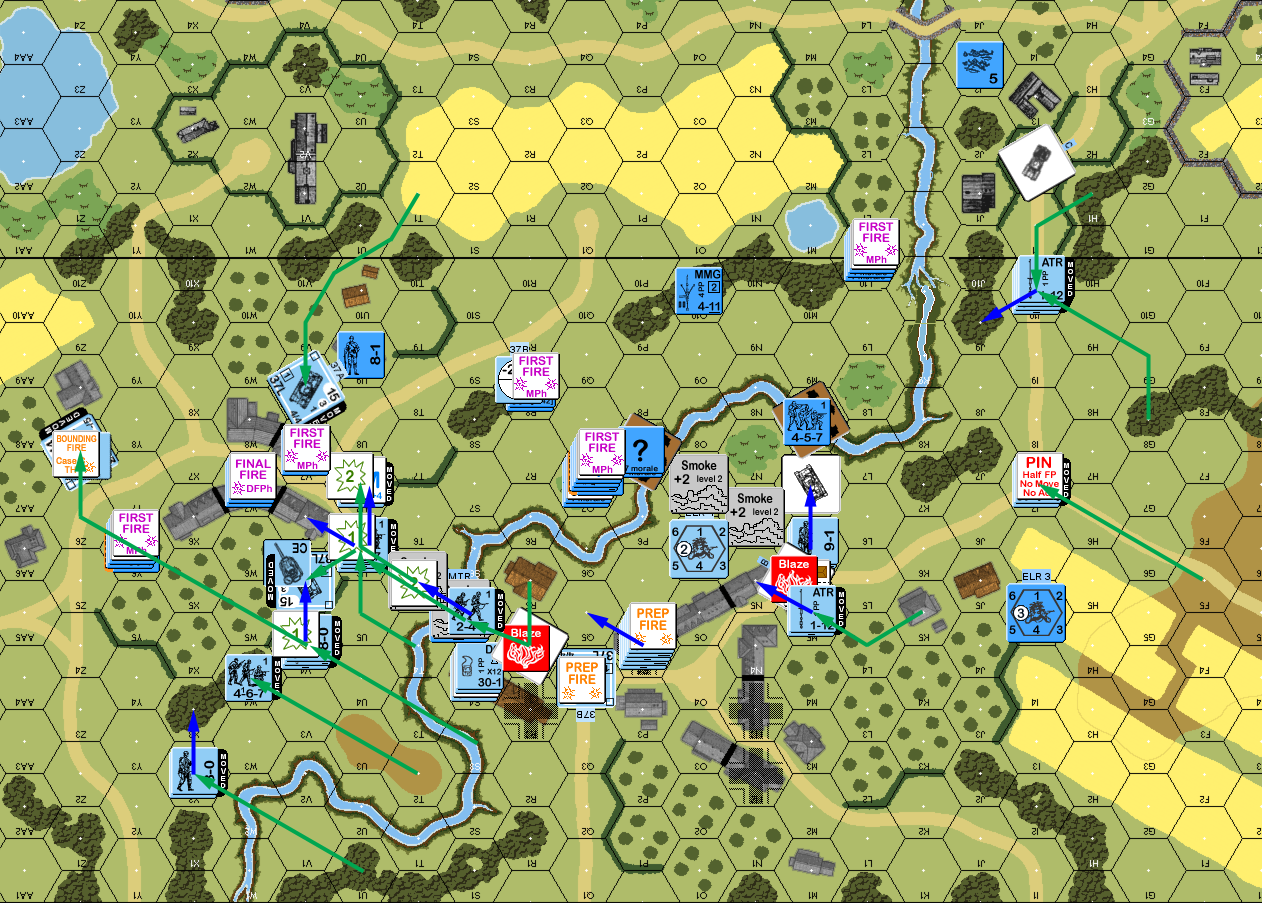
Situation, German Turn 3.
My 10-2 managed to rally for my turn, but none of my MMC rallies worked (two just barely), and I started moving troops along the stream, trying to get into range of the bridge in time. The 7-0 moved around the woods, headed for the next two victory buildings. The ATR squad tried to move around to be behind the hedge near the bridge, but got pinned in the first hex. The main problem was that the two AMRs failed the non-platoon movement rolls, leaving the forward one unable to withdraw (though it was already looking bad for that), and the second stuck in a not-bad location. The AMD moved up to threaten the flank, but didn’t have much support, and the Dummy moved to ‘cover’ the west side of the village.
Patch broke the HS in 59J10 with fire from a PzII, while he hit the AMR in front with an ATR and a 38(t)’s 37mm, but the latter merely did a possible shock (passed), while the other glanced off. Other fire eliminated the Dummy in N10.
Situation, French Turn 3.
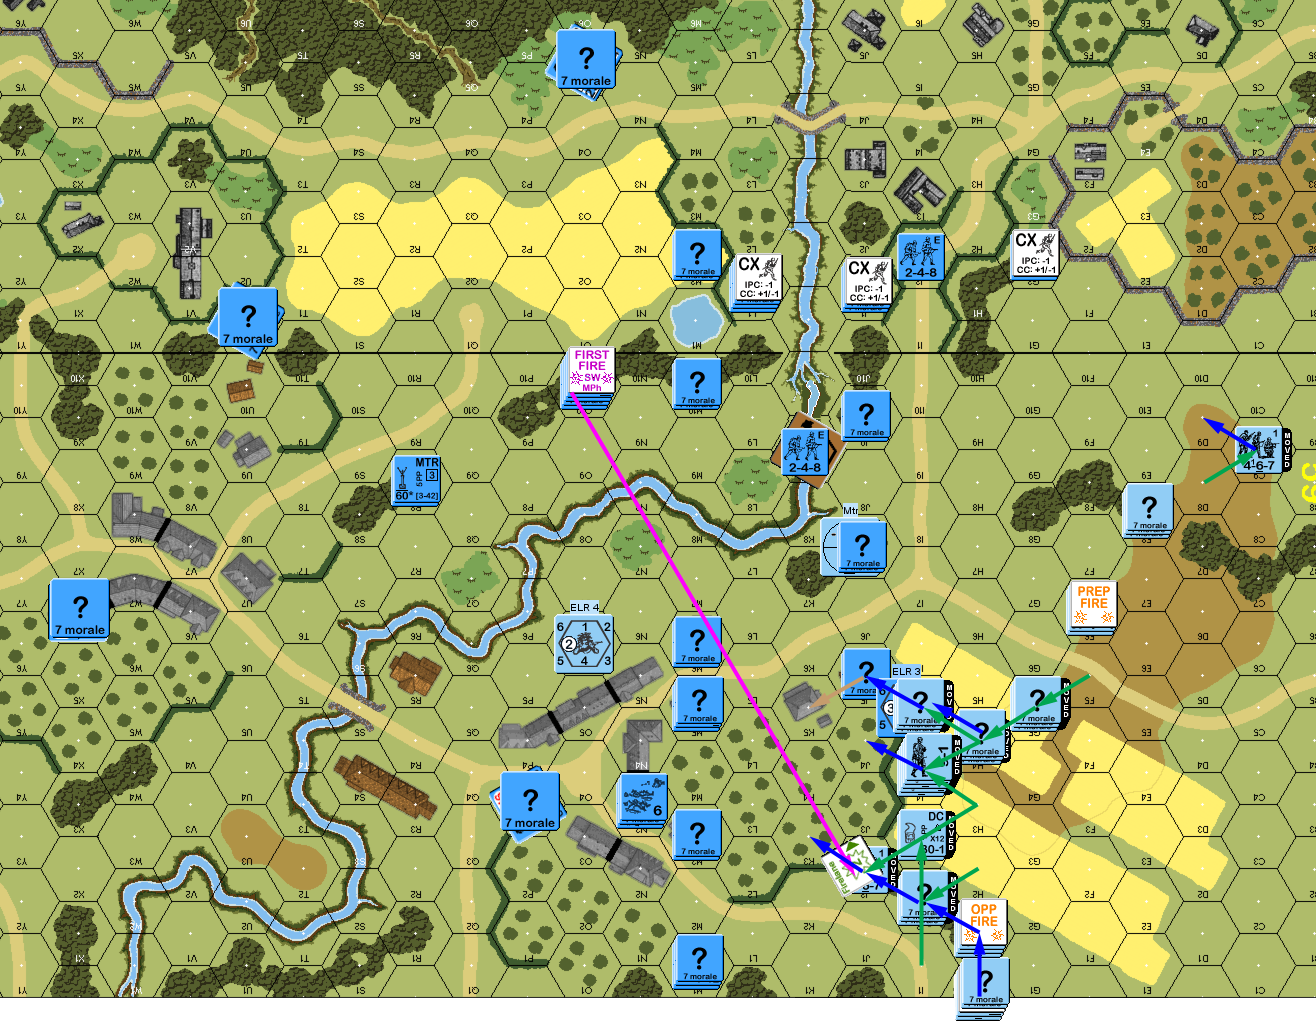
I managed to get two HS back for Patch’s fourth turn. He took another pair of shots at the AMR, and immobilized it this time (we much later realized that the 38(t) had a flank shot, thanks to VBM arcs, and should have killed it), and the crew decided to stay put behind the armor that had protected them so far. Patch poured into the middle of the village, and my fire was completely ineffective. A PzII overran P2, and broke and ELRed the squad there. The second AMR tried to get into motion when a Pz 38(t) parked in view, but failed. Patch had trouble figuring out what to do with the Pz 38(t) on the hill, but eventually moved over to the adjacent orchard-hill on board 42, which completely outflanked my AMD and put it in an impossible position.
In DFPh, the immobilized AMR finally got a result for me—a PTC against the stack in M5, which everyone passed easily. Patch’s fire wasn’t much better, with a 1MC that I passed, and another against a Dummy in the stream (revealing that prompted a rare case of swearing in text; a highlight in a turn that had been a disaster for me; I also wonder at Patch’s reaction if he’d known both “?” that he parked next to were Dummies). I self-broke N4 instead of taking an impossible CC, and P2, surrounded, surrendered. Or tried to. Patch decided to not burden himself with prisoners and declared No Quarter.
Patch advanced into CC with two squads and the 9-1 with the immobilized AMR, and burned it easily. Meanwhile, the 8-0 and a HS went into CC with my ATR HS in N0, and both sides missed.
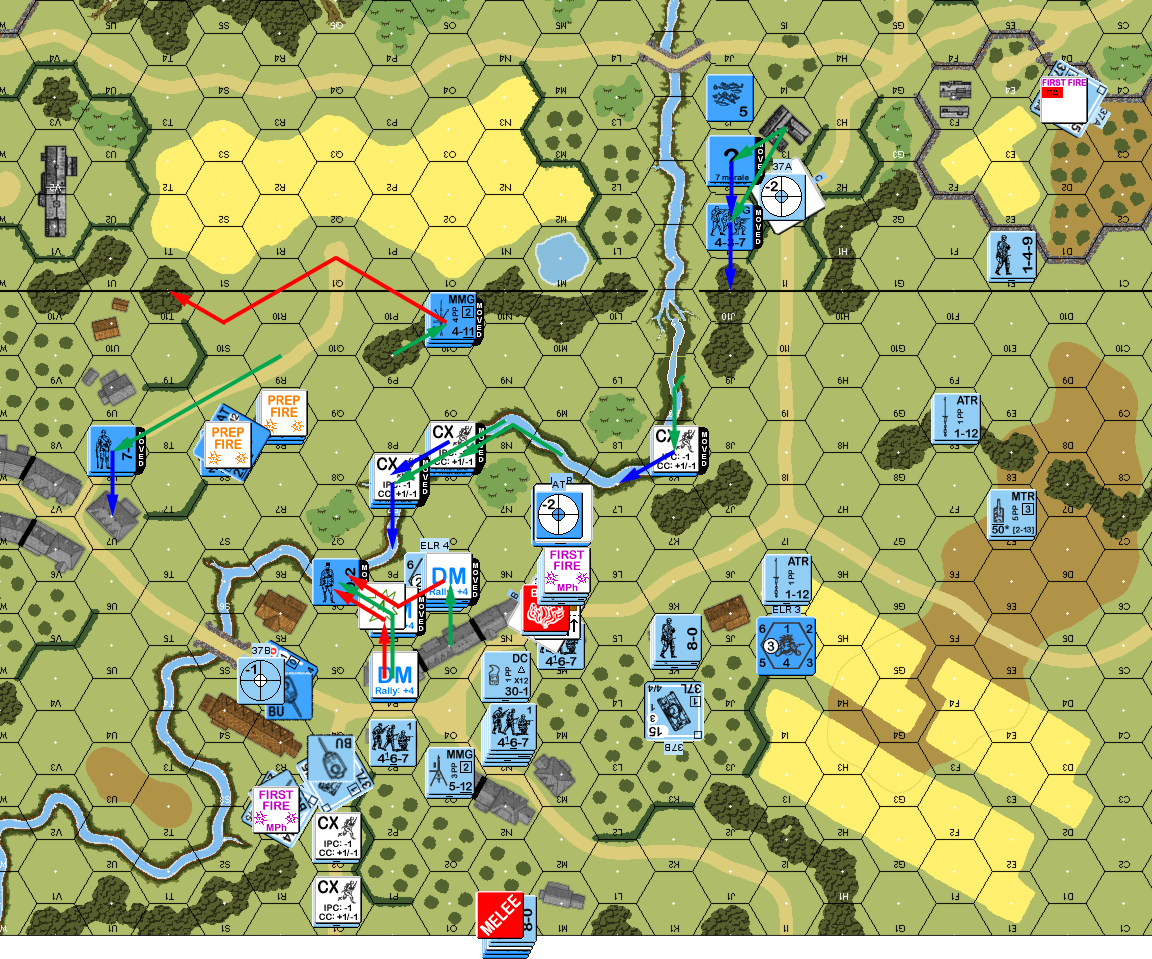
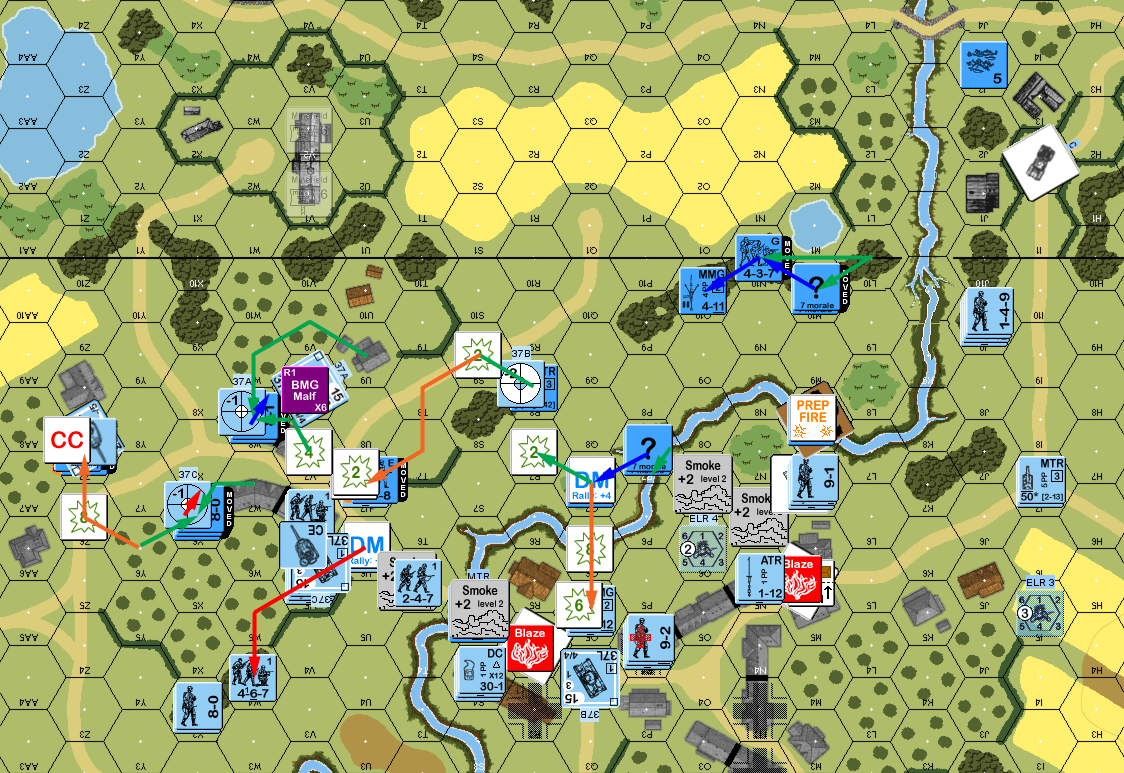
Situation, German Turn 4.
I managed to self-rally a squad in 42I3 for my turn, and while the MTR didn’t manage anything, the ATG swung around, and got three shots at the Pz II in M7, before penetrating the turret and knocking it out for my first CVP of the game. The main goal was to pull out of the villiage and set up along the stream until I could get into the remaining victory buildings next turn. However, even that was difficult, with everything but the 10-2 breaking before they could make the stream.
The AMD started, and was immediately hit and knocked out by the 38(t) behind it. The remaining AMR missed the non-platoon TC, and Patch burned it in DFPh. A shot from the same tank’s BMG got a NMC where I’d just recovered the MMG (finally), and a ’12’ wiped out the HS there, and a later MTR shot broke the 8-1. Rout took some figuring as it was fairly complicated. The broken LMG squad was reduced by interdiction, though the HS in P4 made it to the stream, giving me two HS and a 10-2 hidden in Q6, with another HS still in P5. The Melee in N0 finished with Patch rolling a ‘2’, and generating a new 7-0.
Situation, French Turn 4.
The scenario actually starts with a Mild Breeze blowing to the SW, which was starting to blow smoke from burning tanks across Patch’s line of advance, but he rolled a ‘2’ in RPh to shift it to the NW, meaning that as soon as the smoke reformed, it’d be blowing across the bridge. Patch skipped Prep entirely, and immediately ran his 38(t) down the board 42 road and parked in the rear of my positions; the type of thing I had hoped to avoid.
Patch sent a squad into the stream, and more next to it, ready to advance in, and got two units onto the bridge, one of which pinned to my fire, with another 2.5 squads in the hex of the burning wreck. The AT Gun fired on the lead tank to cross the bridge, but with a +12(!) to the roll, had no real chance of leaving a wreck on the choke point. On the other hand, it got a NMC on the occupants of the bridge during DFPh (using 1FP HE Equivalency!), and broke the pinned squad. I thought about not getting greedy after that, but took another shot and malfunctioned the Gun.
Situation, German Turn 5.
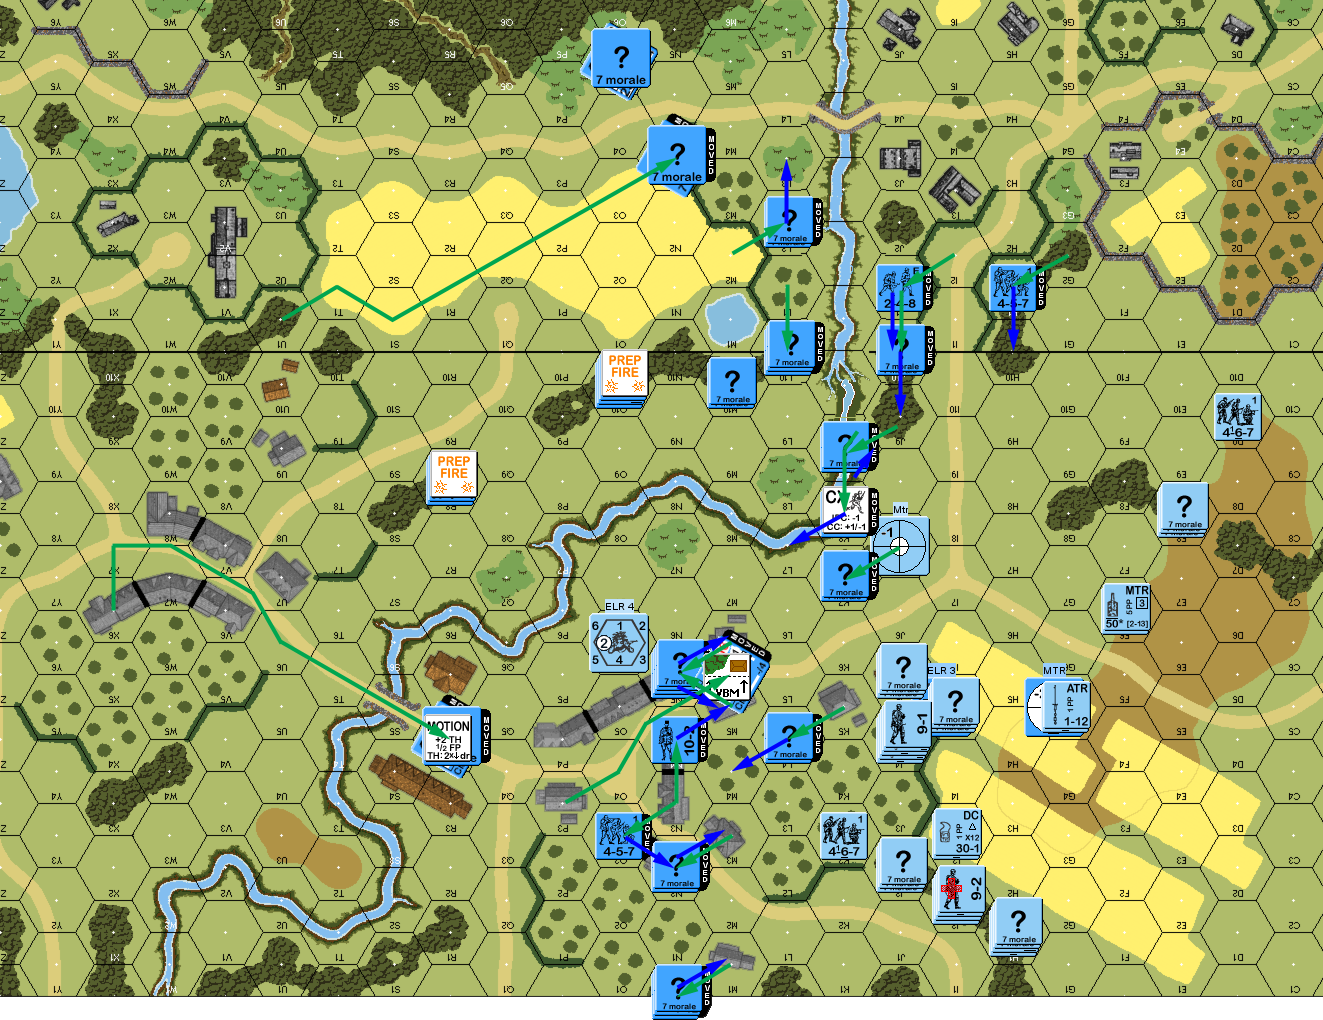
With several rally possibilities… I got nothing back for my turn. Even worse, the ATG went away on the repair roll. Which at least meant I had no qualms about sending the crew off to hold the victory buildings. The MTR missed on its shot at the bridge, and did not keep rate. The good news is that I finally got my reinforcements, and while they couldn’t get into the victory buildings this turn, they could get close.
Patch started pounding my MTR position, but couldn’t do more than pin them, while I got my crew and squad into the victory buildings to deny an easy means of gaining Control.
Situation, French Turn 5.
Patch couldn’t get his one broken squad back for his turn 6 (even without DM), while one HS with my 10-2 went away on a ’12’, and the LMG HS… went berserk (thanks to NQ)! I also self-rallied the 8-1, giving me four leaders, all decently near the action, and 4.5 GO squad equivalents, plus another two further away. Patch preped one large stack and a Pz 38(t), but didn’t get any meaningful results out of it.
Patch’s first move was to put a squad into U7. My first shot did a PTC that he passed, but a second one was a 1MC, and a ’12’ got rid of his lead men. His Pz II in V4 overran the reinforcements, generating a 1MC, which the leader passed… and the squad went berserk! As he moved another squad up to V4, I declared a firelane through the smoke with the LMG, but Patch pointed out that the ‘zerkies couldn’t do that (“But damn, nice thought.”).
Situation, German Turn 6.
I didn’t manage to rally anything for my last turn, but Patch finally rallied the squad in 59S4. With nowhere better to go, the squad still trailing behind took a shot at the adjacent stack, but Cowered, and couldn’t affect them. The LMG squad charged Q5, took a 2MC without flinching, and then died on a 1KIA as they entered the target hex. The squad in Y6 charged the tank in Z6 and survived a 3MC without issue.
I tried moving the 10-2 and intact HS over to the main action, but a 1KIA killed the leader, and the HS double-broke. The MTR squad went for a similar move to get him into W8, but he took a 1MC crossing the road… and went berserk! They charged U7, and CRed from a 1MC as they entered the hex.
In DFPh, Patch managed to break the squad in X6, while pinning the leaders there. He also broke the squad in Crest in M8, activating my Sniper in the process (this was something like my sixth or seventh SAN of the game, and the first one that did anything), who broke his MTR squad. I routed the squad into the upper floor of X6, and advanced the crew into the upper floor of W8. In CC, my HS in U7 reduced his squad, while he did nothing, holding him in Melee. In Z7, the Pz II managed to knock out the squad in CC, but not before the squad had Immobilized the tank.
Situation, French Turn 6.
I didn’t have much left, but I had MMCs on the upper floors of both focus buildings, with SMC on the lower floor, so Patch was going to have to charge into my fire, successfully do Infantry OVR to get rid of the leader(s), and then advance upstairs to knock out the MMC in CC to win.
Patch had forgotten about that possibility (after having make me fight my way up stairs in the past…), and thought it was all over. Then he realized he had one more possibility. He had a few units in range of 42V1, the last victory building, which was empty, and he only needed one. My crew in W8h1 was the main obstacle (if my 10-2+HS had survived, it would have been in the way). Patch maneuvered his two mobile tanks in the area through W8, and on the second attempt got a successful sD attempt to smoke in the crew (Patch realized right after he started the first one—V8—that he’d made a mistake, as he wanted him there to provide cover as men went through the hex.
Patch’s first attempt failed when the crew got a NMC through the smoke and broke the squad in V8. But, I had no residual, and SFF did nothing as the second squad in V6 followed the same path. A 8-0+squad from V5 got through with me unable to fire, and Patch ended with two squads adjacent to 42V1. Even though the hex is mined, and he has to go through the mines to get to the building, this still happens after the move. So even if I killed them all when they Advanced in, Patch still got building Control, and won.
Afterword
After a fairly dismal third and fourth turns, this game ended up a lot more exciting than I expected. The initial problem was getting too hung up on the idea of a quick advance across the board 42 bridge, and just not having anything near what I needed in the village against all the force Patch concentrated against it. Having the MMG in 59O10 did not work out at all, as it was vulnerable to Patch’s MTR. It beat it getting overrun and captured in the village, but that position did nothing for me. On the other hand, the MTR & ATG in the R8/S8 woods worked out better.
Using the stream as part of the defense was a good idea, but has challenges. First off, as a stream (instead of gully), movement was extra slow, and I couldn’t shift around as I needed to. Second, the French can set up concealed by SSR, if they’re in concealment terrain. So anyone in the stream (Crest or not) is either visible during setup, or has to use one of the OB-given “?”. I ended up with quite a few Dummies, and I’m pretty sure some of them had Patch concerned for a while.
I was expecting Patch to use his tanks a bit more aggressively, especially towards the end, when locking up my fire could be quite handy. I think this slowed down Patch just enough to make the ending close after wiping out most of my defense.
Discussion ¬