
A96 In Rommel’s Wake
Having fallen into playing a couple scenarios from a set of four SL-conversions/tournament scenarios in ASL Annual ’96, I arranged for a third and advertised for a game of the last one in the set, A96 “In Rommel’s Wake”, and got a game with Pierce. In May ’40, Rommel has crossed the Meuse, but the French are still holding other crossings, and the German army is trying to seize another one from a small defending force.
There’s a number of interesting things going on here. It’s a three-board scenario with board 7 and two bridges in the middle. The Germans enter from board 5 with nine 1st line squads of bicycle troops (with an errata SSR that allows them to carry four LMGs) and two PSW 222 armored cars. The basic French defense is six 1st line squads, two 8-0 leaders, a MMG, two LMG, and two DCs on board 2 and the south bank of the river, all but one squad HIP as long as they’re in concealment terrain. However, they secretly draw a chit before the game that determines the length of the game, and their exact troops. With a draw of ‘1’, it’s the basic troops and 5 turns; a ‘2’ is 6 turns, and adds a squad, an 8-1 and a MMG; ‘3’ is 8 turns and one of the DC is already secretly Set on a bridge hex; and a ‘4’ is 10 turns, and adds an eighth squad, and promotes an 8-0 to an 8-1. The Germans need to have 12 VP south of the river at the end of the game (including broken units!), and at least one of the bridges needs to be intact.
The scenario has a lopsided record on ROAR, so we went with the French balance, which gives them a pair of foxholes, and Pierce volunteered for the French. He (unknown to me) drew chit 1, and set up the foxholes at the exit to both bridges, which now that I think of it should have been HIP until I came into view, though the non-HIP troops in them would have been something of a giveaway, and it wouldn’t have take long to see them. I decided to go for the far, wooden, bridge as it was much shorter, and I didn’t want to be stuck on a single clear hexrow forever. I gave some consideration to sending some forces to the nearer, longer, bridge, so that both were threatened, but decided I would need concentration of force more than the French.
Bicycles are fast. They count as Infantry movement, so there’s no changing CA, and CX and leader and road bonus still count, but each road hex costs 0.5 MF, so I made 16 hexes this turn (+1 in APh). Also, there’s no MF cost for getting on/off them. The two ACs went down the middle, one of them to 7Q3 so it could try to interdict any shift of troops to the targeted bridge, and try and keep the French from hurrying onto the bridge to Set a DC on it, and the other to a more sheltered position that could see near the exit of the stone bridge.
To my surprise, there was no French response at all, and the second half of the first turn passed quietly. I had figured there’d be at least one squad covering the main bridge who’d rush towards my attack.
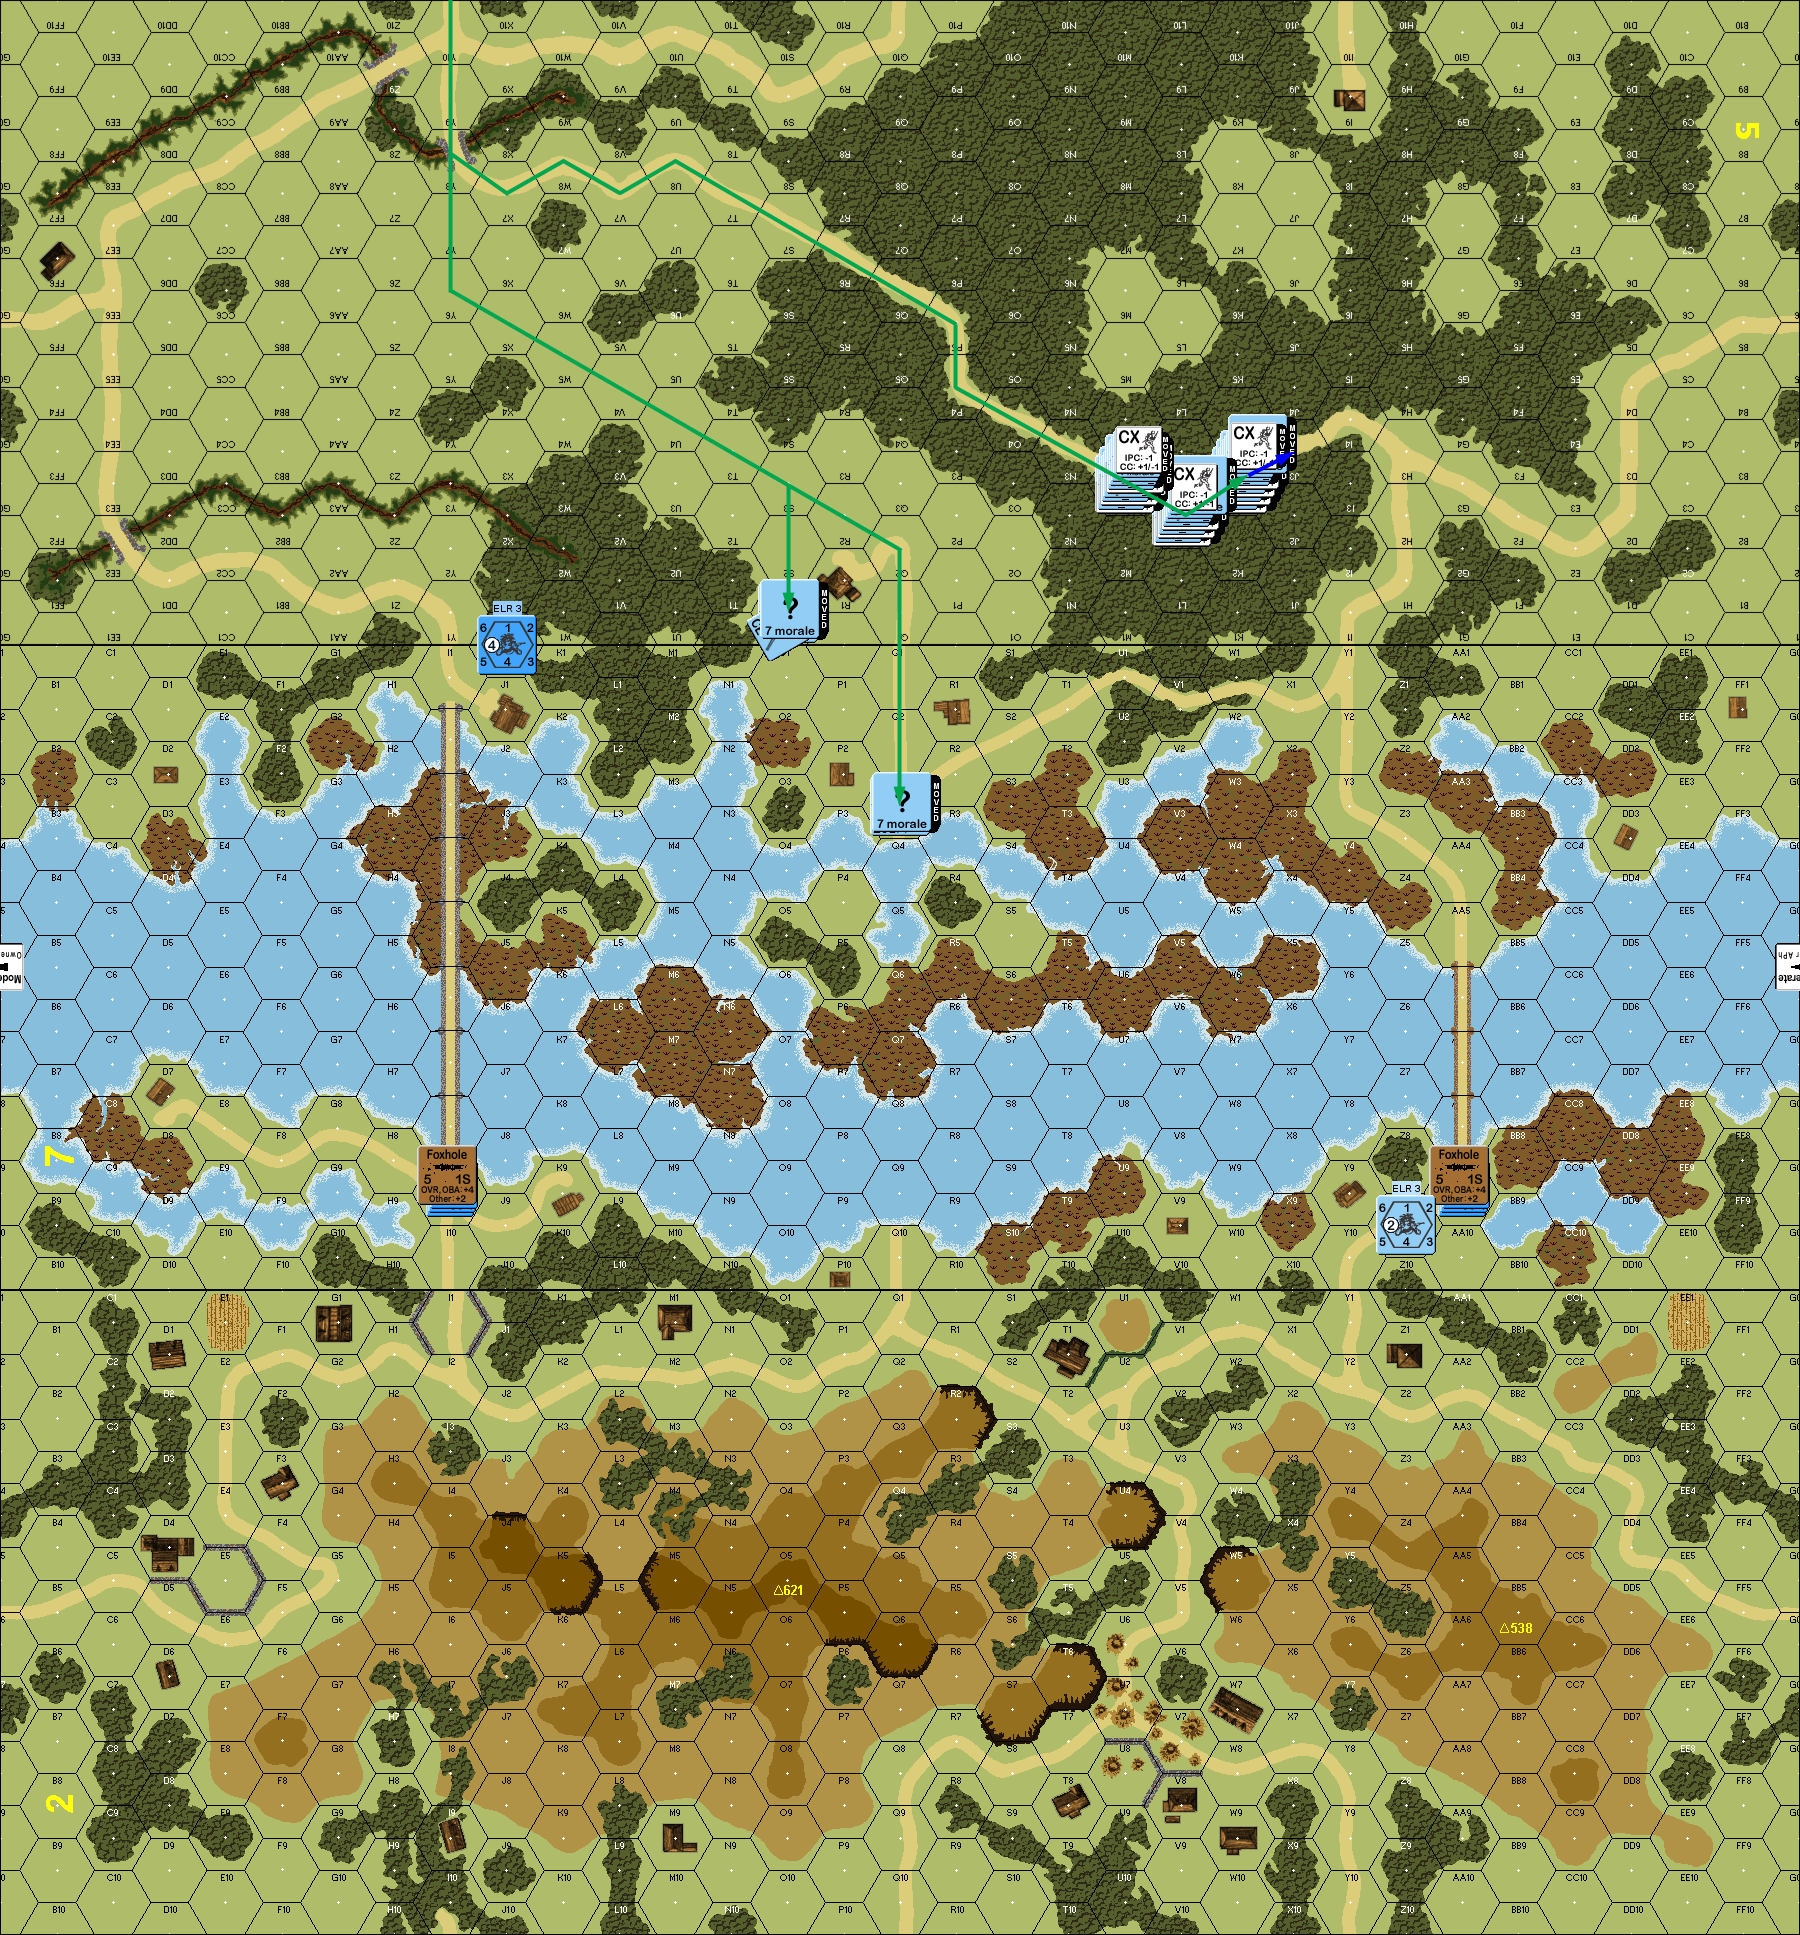
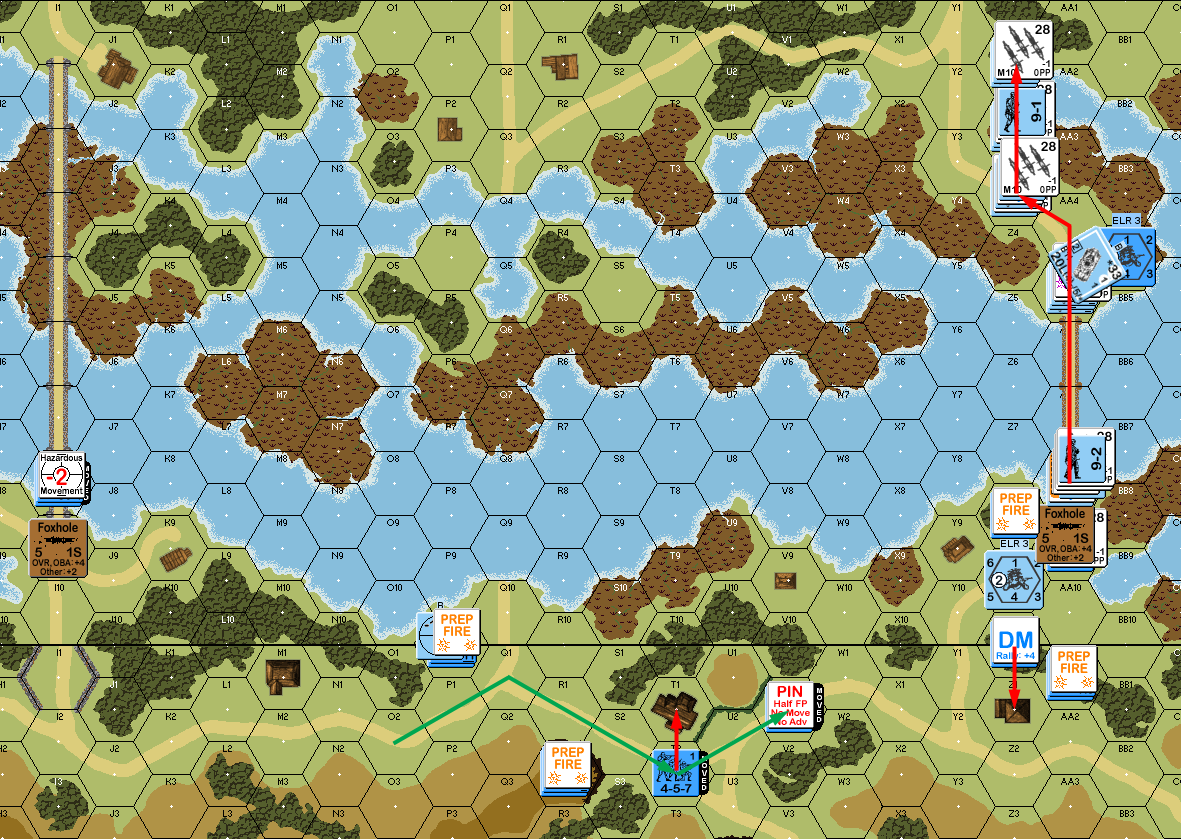
Situation, Turn 1, showing the full map.
For the second turn I started breaking up my force a little as I moved into contact with the bridge defenders. My initial HS made it into view down the length of the bridge, and broke to fire from the guarding squad, though the second HS took the residual without trouble, though an AC pinned from it. The rest of my movement involved moving up right behind this hex, dismounting from the bicycles as I came into view.
He pinned my forward leader with prep fire, but couldn’t do anything more. This time a two units came out of HIP and moved east. A squad in 7K9 moved through the woods, while a HS+LMG showed up in 2I3 and made better time down the road. My AC managed to get a hit on the force in the foxhole, and broke the squad there. However, that set off the French Sniper, who Recalled the AC in 7Q3. The squad in 7I9 transferred its DC to the leader there, and then advanced out of the foxhole.
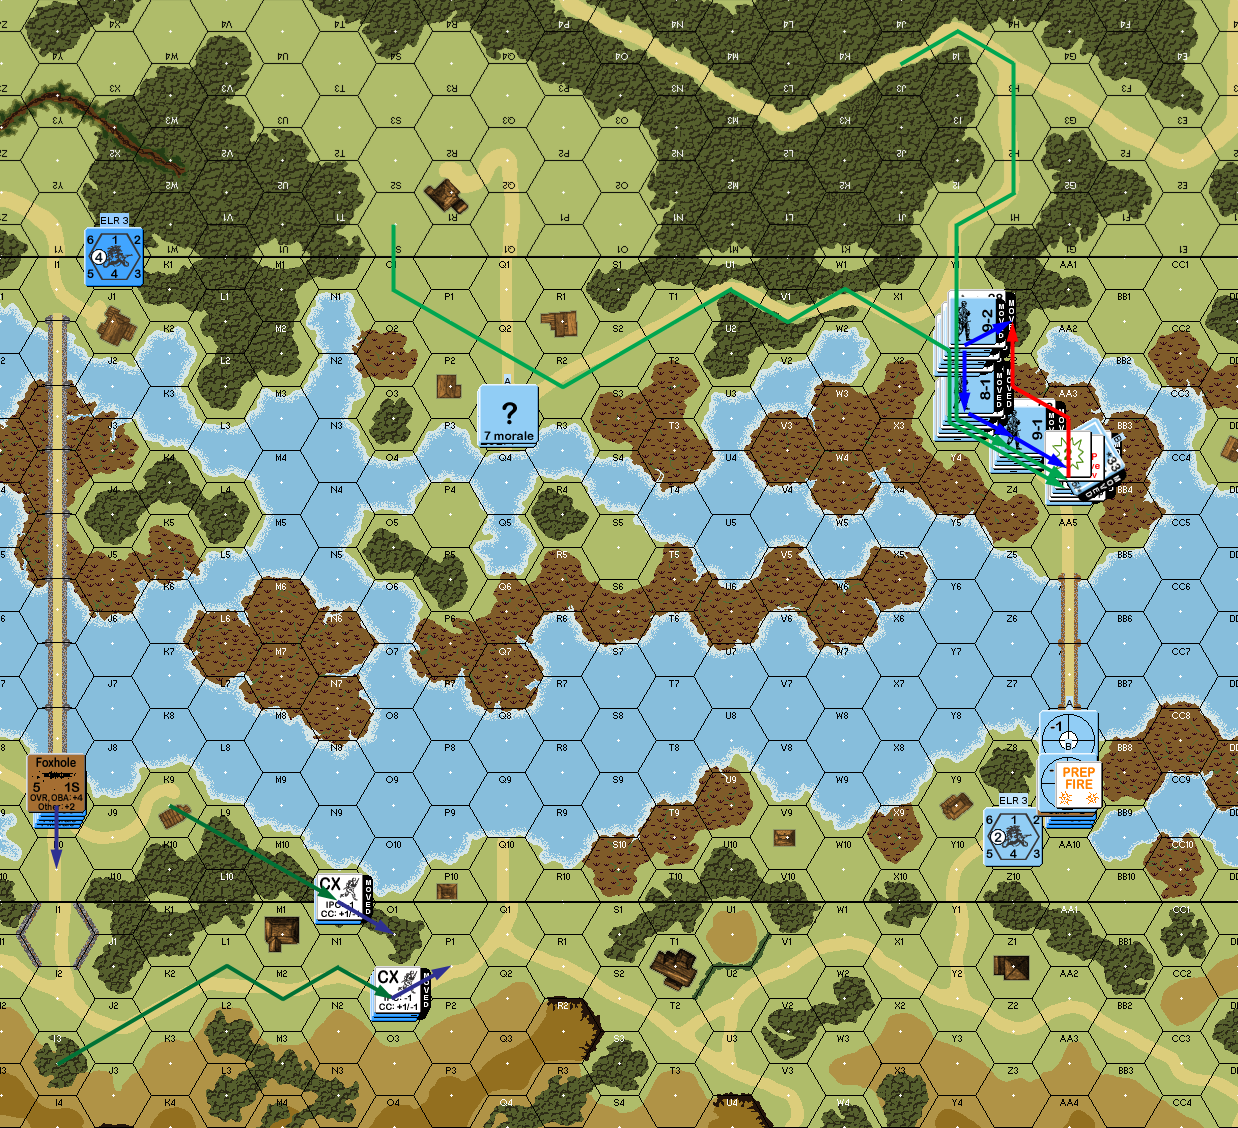
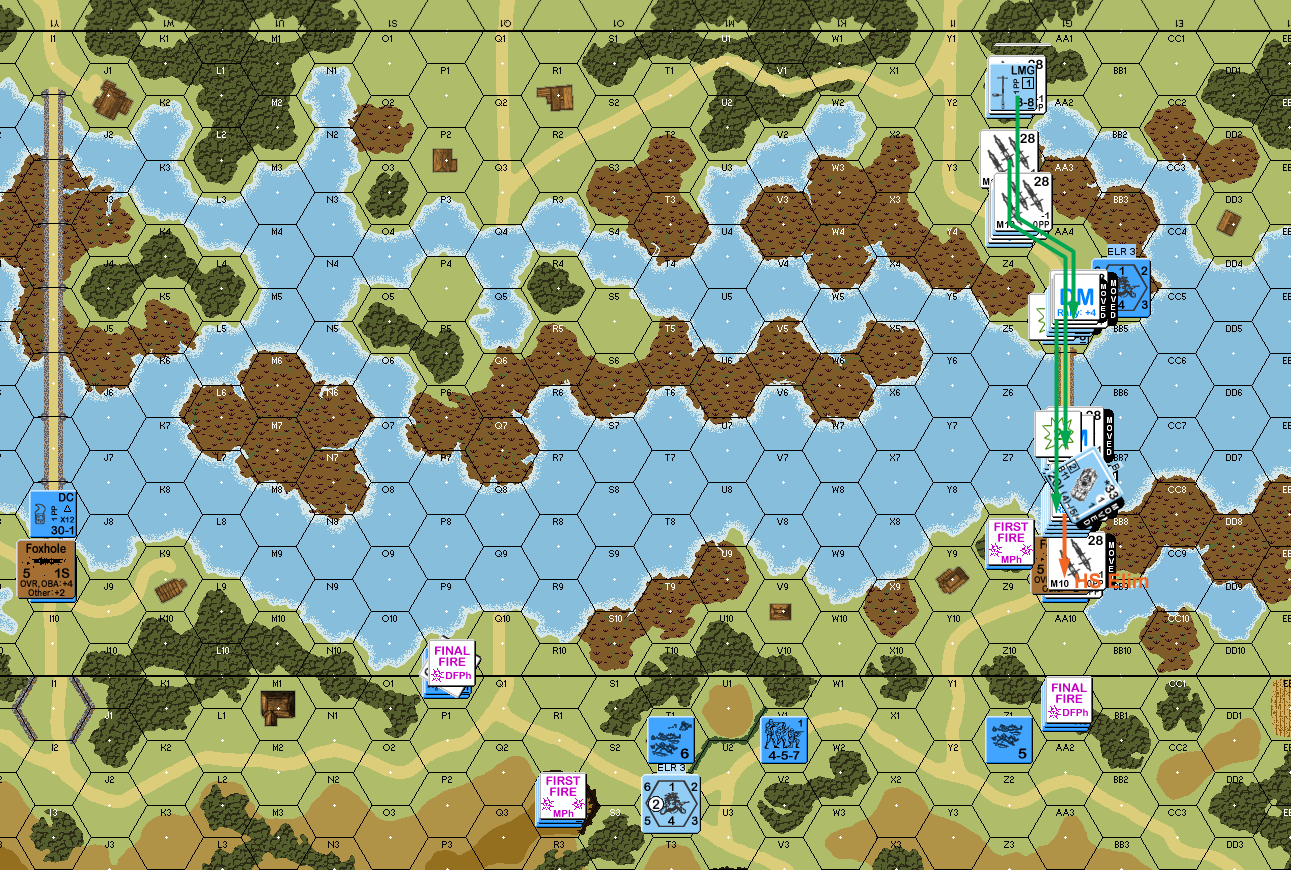
Situation, Turn 2. Later French moves are in darker colors.
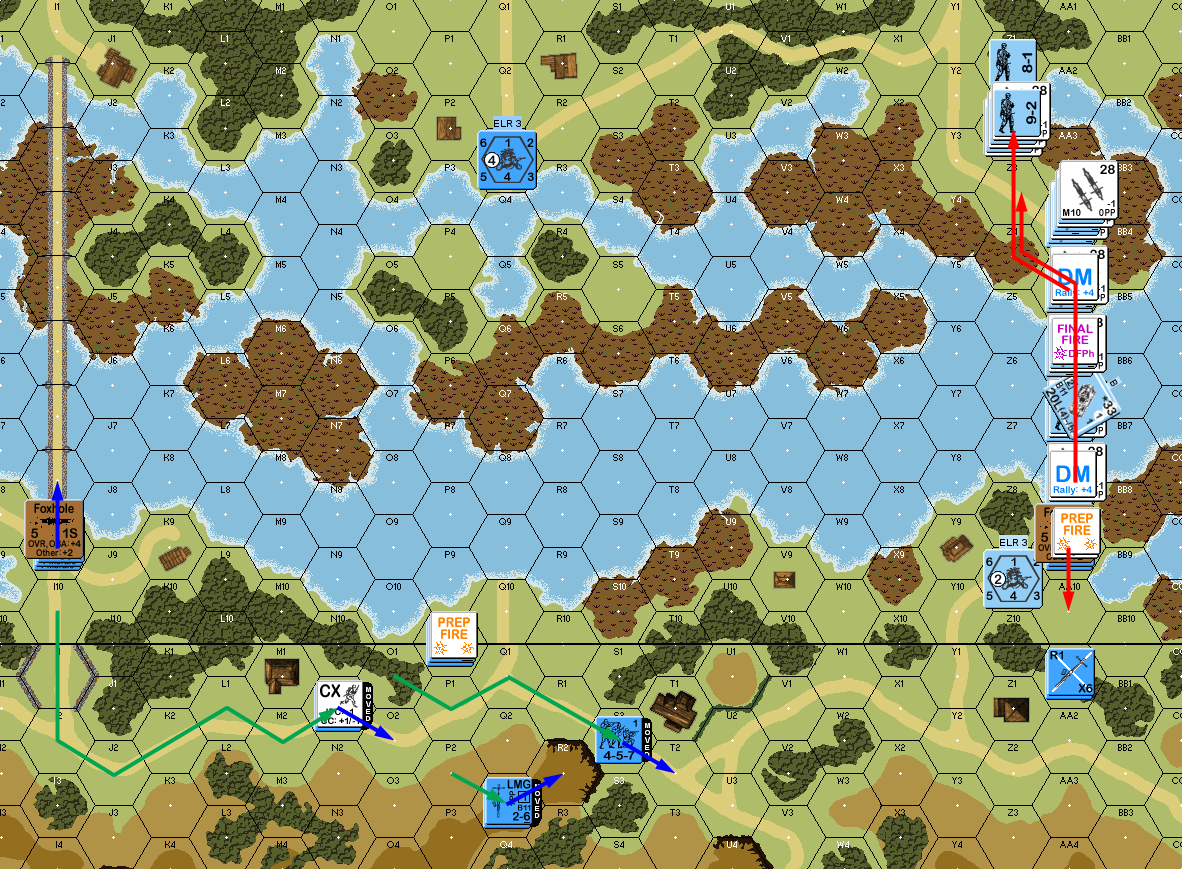
I rallied my one broken HS for my third turn, and waved a sad good-bye to my recalled AC (though he didn’t make it all the way off the map this time). With the way appearing clear, my leading HS set off down the bridge, but a squad+LMG showed up in 2AA1, and put a FL down the length of the bridge. The HS survived the initial shot, but pinned in the second hex. The main leading stack attempted Armored Assault down the bridge, and the LMG malfunctioned as soon as they hit the FL. Then a MMG showed up in 7P10, and broke one of the squads in AA5. The residual in the next hex then pinned the remaining squad, leaving the AC to continue alone into AA7, to provide cover to the leading pinned HS. The MMG broke the next squad I fed forward, and killed the one after before finally losing ROF and letting a squad join the AC. The residual still broke my 8-1 and pinned the squad with him, filling the hex with three squads.
While there was a large flow of broken squads back to where I started, my Advancing Fire did break the squad in 2AA1, making the bridge a lot safer.

Situation, German Turn 3.
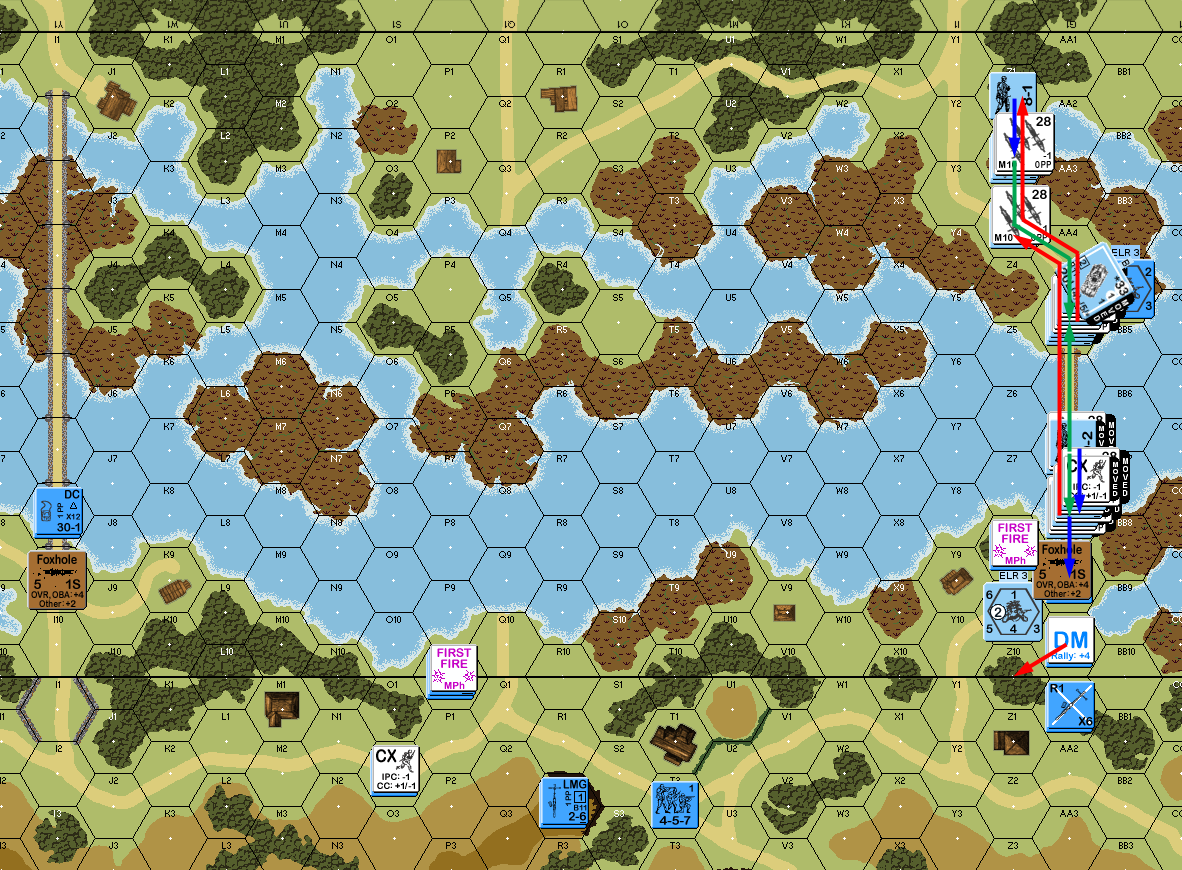
Pierce was unable to rally on his turn, but my 8-1 self-rallied, though my two broken squads stayed such. The leader in 7AA9 recovered the DC from the broken squad and threw it to break my squad that had gotten to the end of the bridge, while the MMG broke my one squad in vulnerable AA5. My fire pinned the 8-0 in AA9, and reduced the squad there to a HS, but also activated the French sniper again, which he relocated to BB4 (and a good thing; I’d rolled the scatter already, and it hit the departing Recalled AC again).
Situation, French Turn 3.
Of the three squads that had gathered in Z2, only the new one (who was still DM) failed to rally for my turn. Not entirely thinking things through, I removed DM on the brokies in the open in Z3, despite the fact that new routs were likely to get to both Z1 and Z2, keeping me from moving up my leaders.
Since I’d seen both DCs, and they weren’t Set already, I knew this was no more than chit 2, and since I’d only seen one MMG, this was probably chit 1, which meant I had one turn left after this, so a lot of my attention was trying to get to Infantry OVR the 8-0 still in AA9. I think I had three attempts at TCs for the OVR in my logs, all of which failed. And only one of which actually even happened as I got shot up trying to advance to that point.
The first HS pinned to fire from a squad that had been HIP in 7Z8 (a fairly obvious position in retrospect, but I don’t think I could have held off firing him that long). The followup squad broke, and then another HS battle hardened to elite from MMG fire, but still failed the TC at the end of the bridge. The next squad through AA5 broke, and the one after was killed on a 2KIA before I got a squad and 9-2 leader through to AA7 (I could have gotten to AA8 but was leery of facing any more fire after the previous performance), and the final squad available broke in AA5. The AC moved back to provide cover in AA5 for the next turn, and the 9-1 Armor Assaulted with him so he could help try to clean up the mess….
I advanced a single HS into AA9 (the only other available unit was a pinned HS), and despite the 2:1 odds, lost them for no effect against the 8-0.
Situation, German Turn 4, leaving out a lot of confusing movement details.
Pierce self-rallied the (malfunctioned) LMG squad for his fourth turn, while I didn’t rally anything. The Z8 squad prepped at my guys adjacent on the bridge, but didn’t do more than pin a HS, but the 2AA1 squad then fired and broke my squad, and sent the HS berserk!
A third squad was now approaching, and would doubtless be in X10 for the last turn, but I squeezed a shot through a Hindrance at him and pinned him. Fire down the bridge was completely ineffective, and I was unable to do more than a PTC to Z8 during Final Fire, but that set off my sniper, and broke the squad that had moved up to T2 this time.
Situation, French Turn 4.
I made two out of four rally attempts for what I already had realized would be my final turn. Thanks to all of the negative modifier leaders, I had 14VP of Infantry GO at this point. They didn’t need to be such at the end of the game, but as long as they couldn’t get to at least 7AA9, they’d never get south of the river. The berserk HS charged into AA9 to Infantry OVR the 8-0, and were promptly eliminated by him.
The 9-1 took the one squad with him and advanced onto the bridge, the MMG not doing more than leaving residual for a change, and took fire from the LMG in 2R2 safely (a long-range ‘2’ that cowered to nothing), but the squad broke to 2AA1’s fire in AA7. Next, the 8-1 and his recovered squad started down the road, and took the residual in AA5 fine, but Sustained Fire from the MMG broke the leader and squad. Finally, the squad with the AC Armored Assaulted up the bridge, and got past all the residual, and SFF from 2AA1, but the squad rolled a ’12’ against a NMC from Z8 to make victory impossible (I had 5VP in leaders in the hex, the AC was worth 5, so as long as one squad was intact, I had a shot at winning).
Situation, end of the assault.
Afterword:
After all the troubles I had on the bridge, I was surprised I could get as close to winning as I did on turn 5. That also demonstrates why I didn’t want to go for the longer, closer bridge, though at least it doesn’t have any approach hexes as dangerously empty as 7AA5. Smoke would have helped, but all the Germans have is a ‘1’ squad smoke exponent.
I think Chit 2 might have done better for me; I really needed an extra turn. Though a second French MMG might have been big trouble; the one he had was bad enough. Despite all the carnage it caused, I think MVP needs to go to the French 8-0 in AA9, who wouldn’t break, wouldn’t leave, and killed two HS in CC. If I had ever successfully gotten into AA9, the dynamic would have presumably changed, as Pierce would have had to start thinking about getting rid of them even after they broke, since they could rout into the mudflats, and still be counted for victory.
Losing the second AC to the sniper early probably hurt the worst. If I’d had both, one could have been doing duty as cover on the bridge while the other provided cover in AA5. Also, it had been present on the last turn, they and the leaders were worth 15 VP alone. As long as they could survive close-range CE shots, and any CC he managed.
The scenario’s nicely different; there’s not a lot of bridge-crossing scenarios, and the variable length and defenders give this one a unique feel along with the possible demolition of the bridges. (I would have started working on blowing the stone bridge as soon as I saw everyone head for the other one.) The two foxholes are one of the stronger balance provisions I’ve seen; I don’t think Pierce could have done it without them. I kind of wonder if one foxhole (to go with the bridge guard) and perhaps another small boost (like turning an 8-0 to 8-1 in all versions) to the French would be better-balanced.
Discussion ¬