
AP75 Gabriel’s Horn
While looking over some of my recent ASL purchases, Patch was struck by some of the scenarios in AP8 featuring the 36th Infantry Division in Italy. So, for our next game we went with “Gabriel’s Horn”, which features a chunk of the division getting overrun by the Germans shortly after the Salerno landings, as they were much more familiar with the terrain and infiltrated the American positions at night.
It’s an interesting setup, using all of board 5a, and the middle half of 60. The Americans have seven squads on the hill of 5a, and another five in the dense hilltop town of 60 (both split between 1st Line and Green). The first force has to set up at levels 2 and 3, while the Germans set up anywhere on 5a at least two hexes away from the Americans. The second force has to be within three hexes of 60Q5, which restricts them to a very dense part of town. Both sections have two MMG and two MTR and two BAZ 43s (which have to be used by a crew, or suffer Non-Qualified use penalties; presumably, they’re brand new, and the crews represent the few people specifically trained on them so far). The Germans have fourteen squads (mostly 1st Line, with some elites), the usual MGs, a couple DCs, and some OB-“?” (which the defending Americans don’t get), and four StuGs (two B, two G) enter on turn 2; and they get 80+mm OBA with an Offboard Observer.
The setup allows the Germans to basically surround and cut to ribbons the main American force (who at least get to set up entrenched), who, with an ELR of 2, will tend to collapse. But the Germans have an ambitious goal: they have 6.5 turns to take Control of all the Level 3 hexes on board 5a (there’s 19 of them), and take 4/7 three-hex buildings on board 60, while doing twice as many CVP to the Americans as they take.
Oh, and for another wrinkle, all the Orchards are in-season, while the woods are Olive Groves, and the brush is Cactus Patches (we assumed that both of those should still be Inherent Terrain, since they normally replace Orchards).
I had the defending Americans, and set up in a line mostly meant to try and support itself on the western half of the main hill, though a final three squads were in the east to keep the Germans from setting up there even as I ignored the very easternmost peak. Board 60 set up with an eye to trying to interdict the valley and slow down German attempts to get up to the town. Both MTRs were manned by a HS each, in a square in R6, while a MMG squad in R7 was ready to spot for them. Patch set up loosely around the poor exposed GIs, with two stacks obviously already in position to head into town once securing the hill was underway.
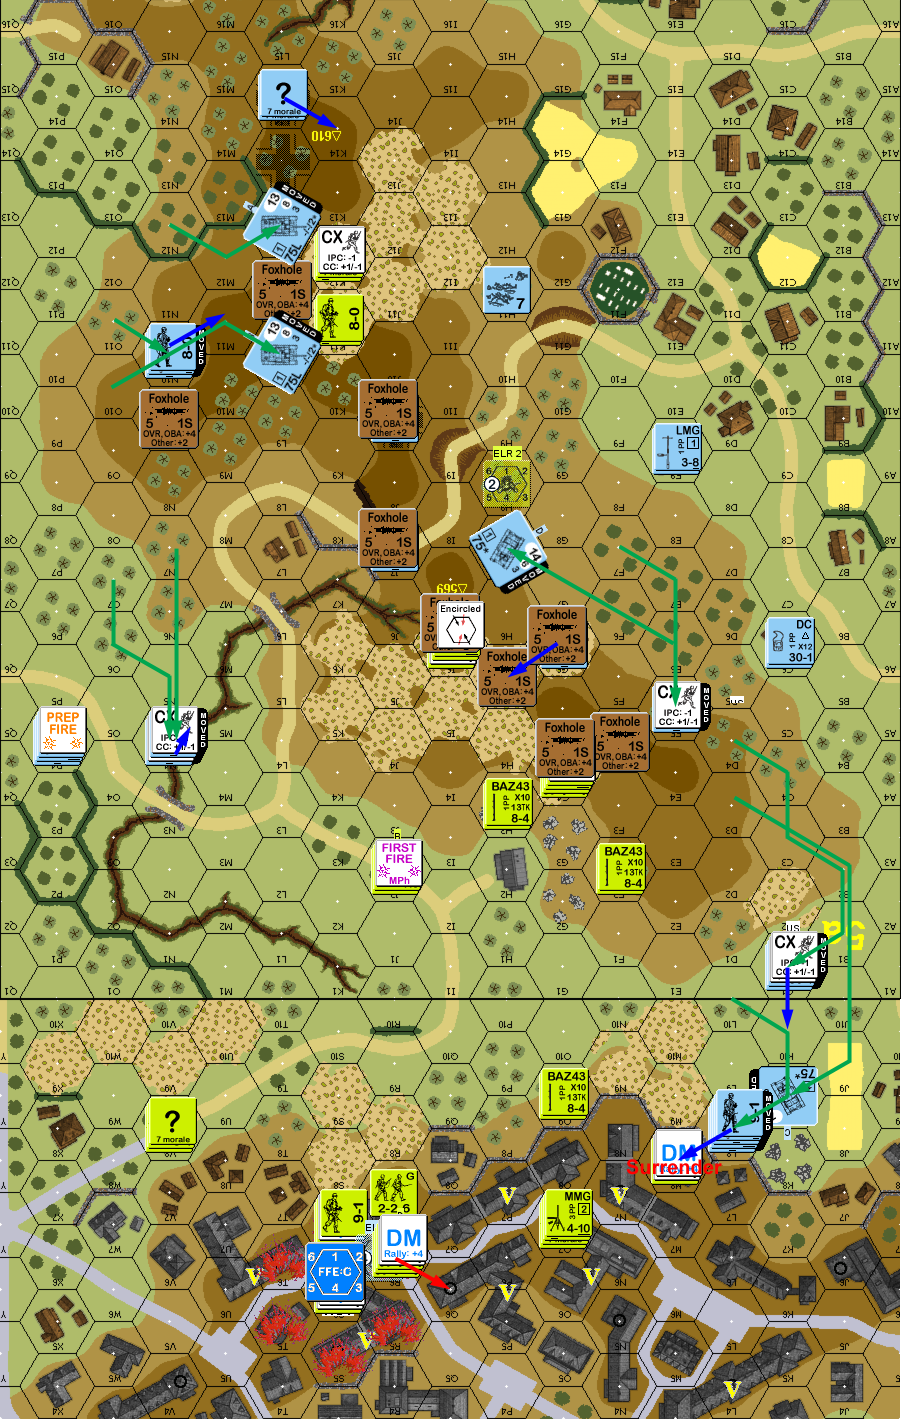
Patch opened with a 16FP shot that only caused a PTC to my hilltop MMG in 5aF4, which had no effect, but that activated his Sniper, who broke one of my MTR HS in 60R6. His third shot hit the same target, and ELRed the squad. The next shot pinned a 8-0 and ELRed the squad in J9. The sixth shot was a ‘2’ on Encircling Fire to wound my 8-1 and Disrupt the other MMG squad. However, that also set off my Sniper, who killed an already-fired 8-1. A pair of ROF shots later, and the BAZ crew in J7 broke.
Patch then went to movement, crawling closer to what was left. In Final Fire, I broke a German squad in H11 who hadn’t fired or moved, and revealed a DC+HS in F6 on a passed 1MC, and my board 60 MMG pinned the leader and squad in P4. Two of my MTRs missed, but one got a solid hit (1MC) H8, which the Germans passed. Advancing Fire pinned my BAZ crew in G6. Overall, both side’s fire rolls were fairly good, and we both felt that it had been a fairly brutal turn.
A HS accepted the surrender of F4, while a different one went in there for CC vs my 7-0, and neither side did anything to the other.
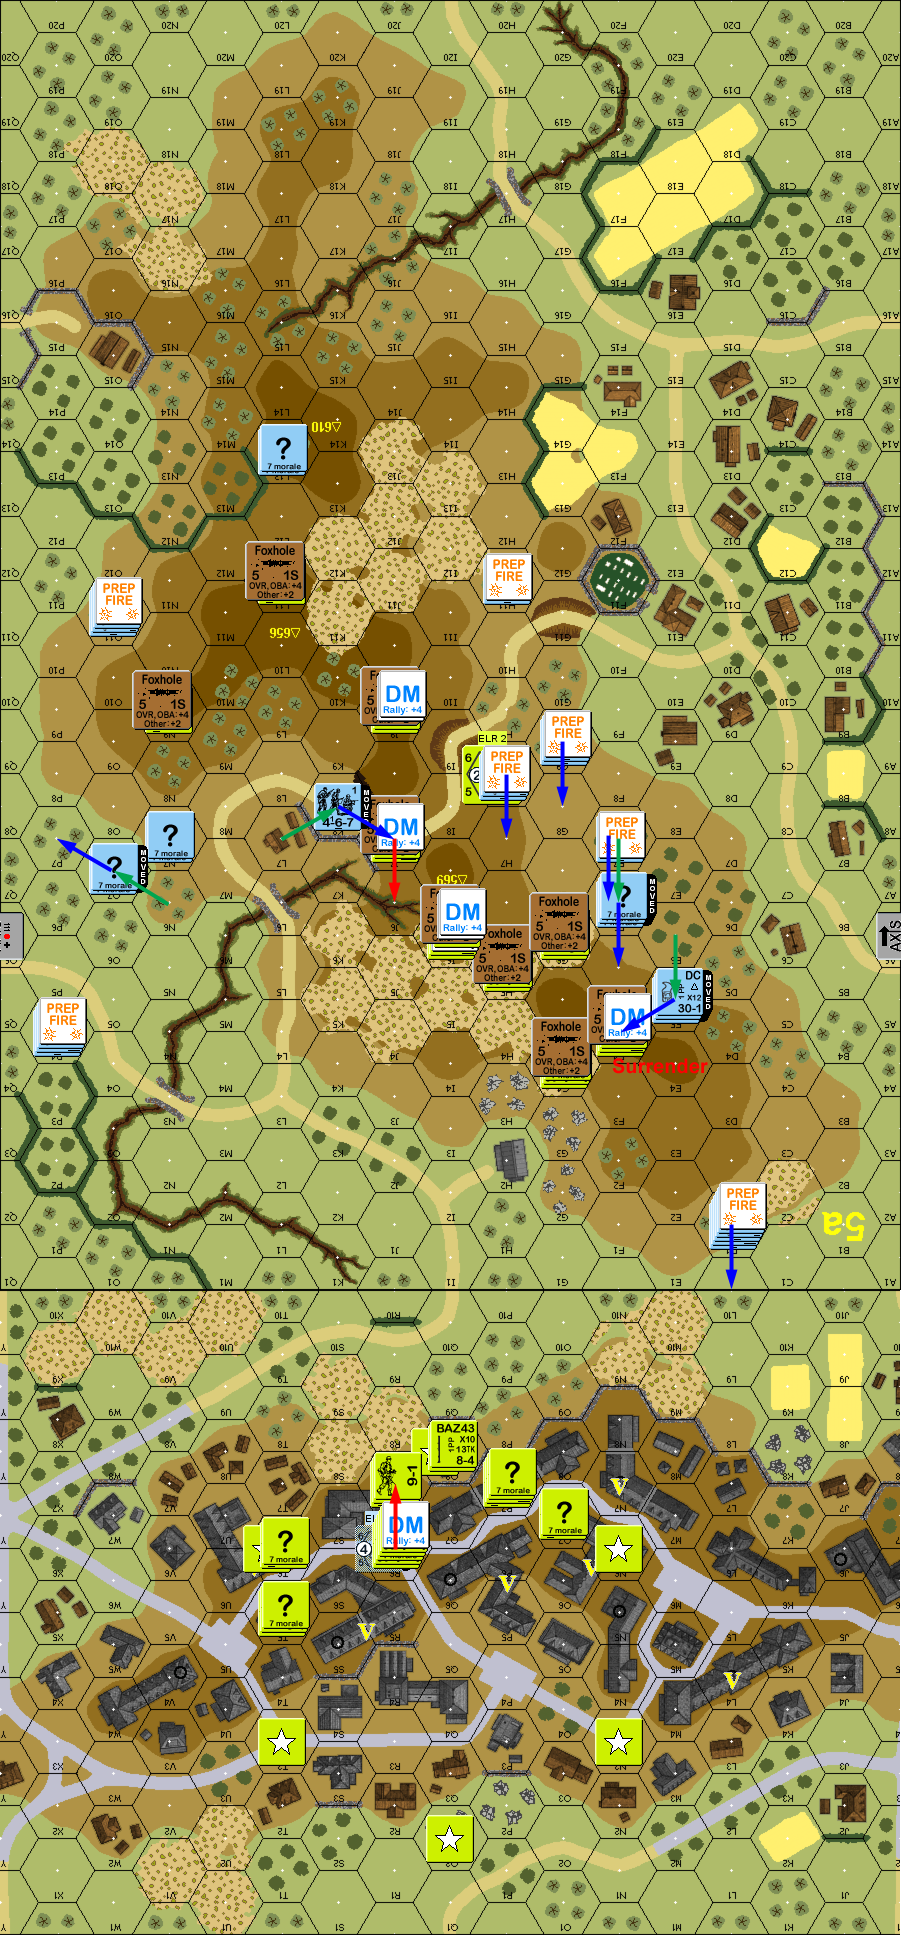
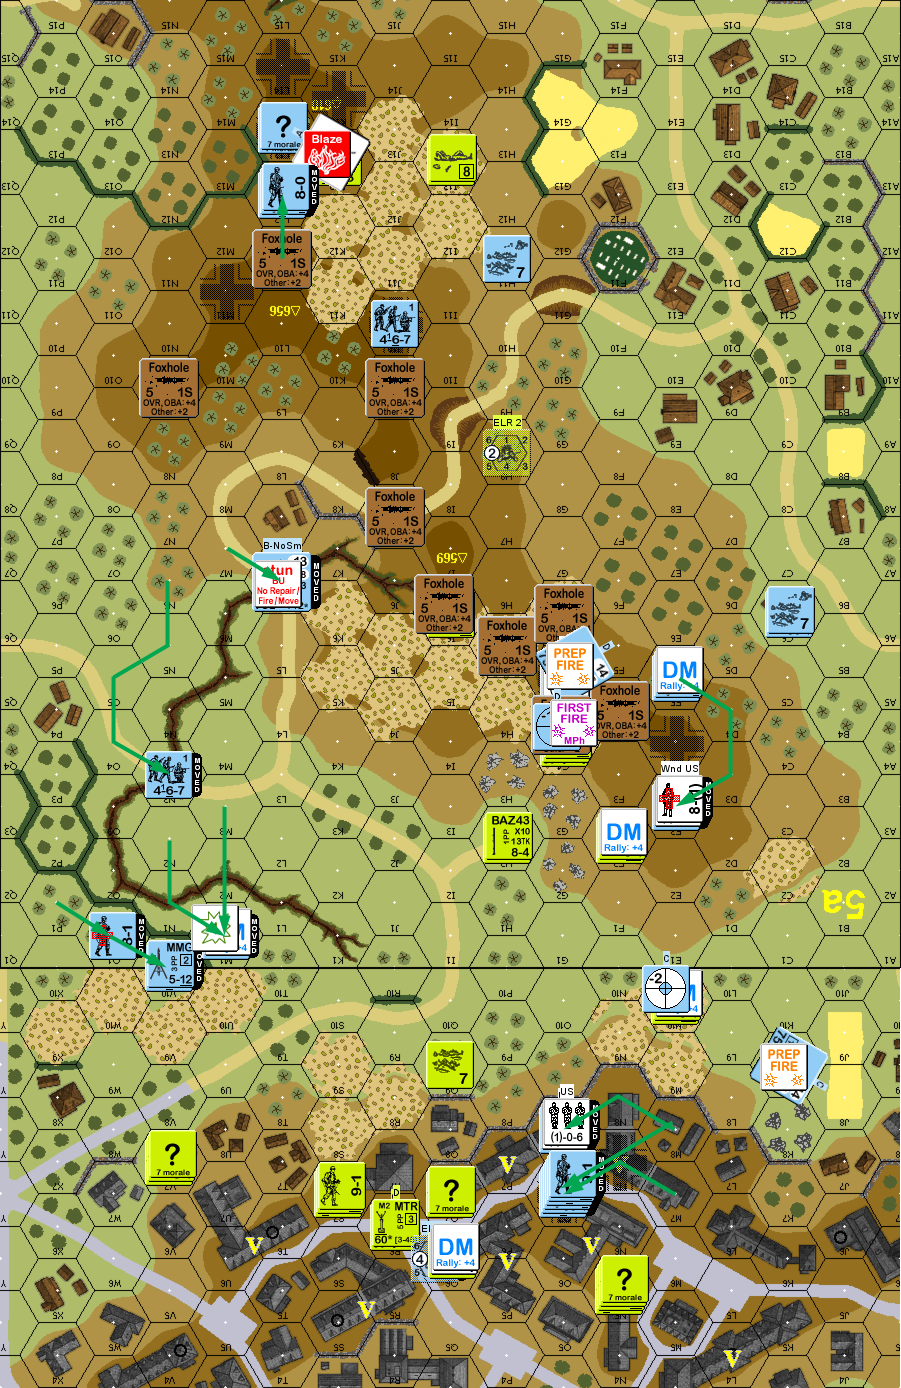
Situation, German Turn 1, showing the full playing area. North is to the left, and the German perimeter markers show where the StuGs are due to come in.
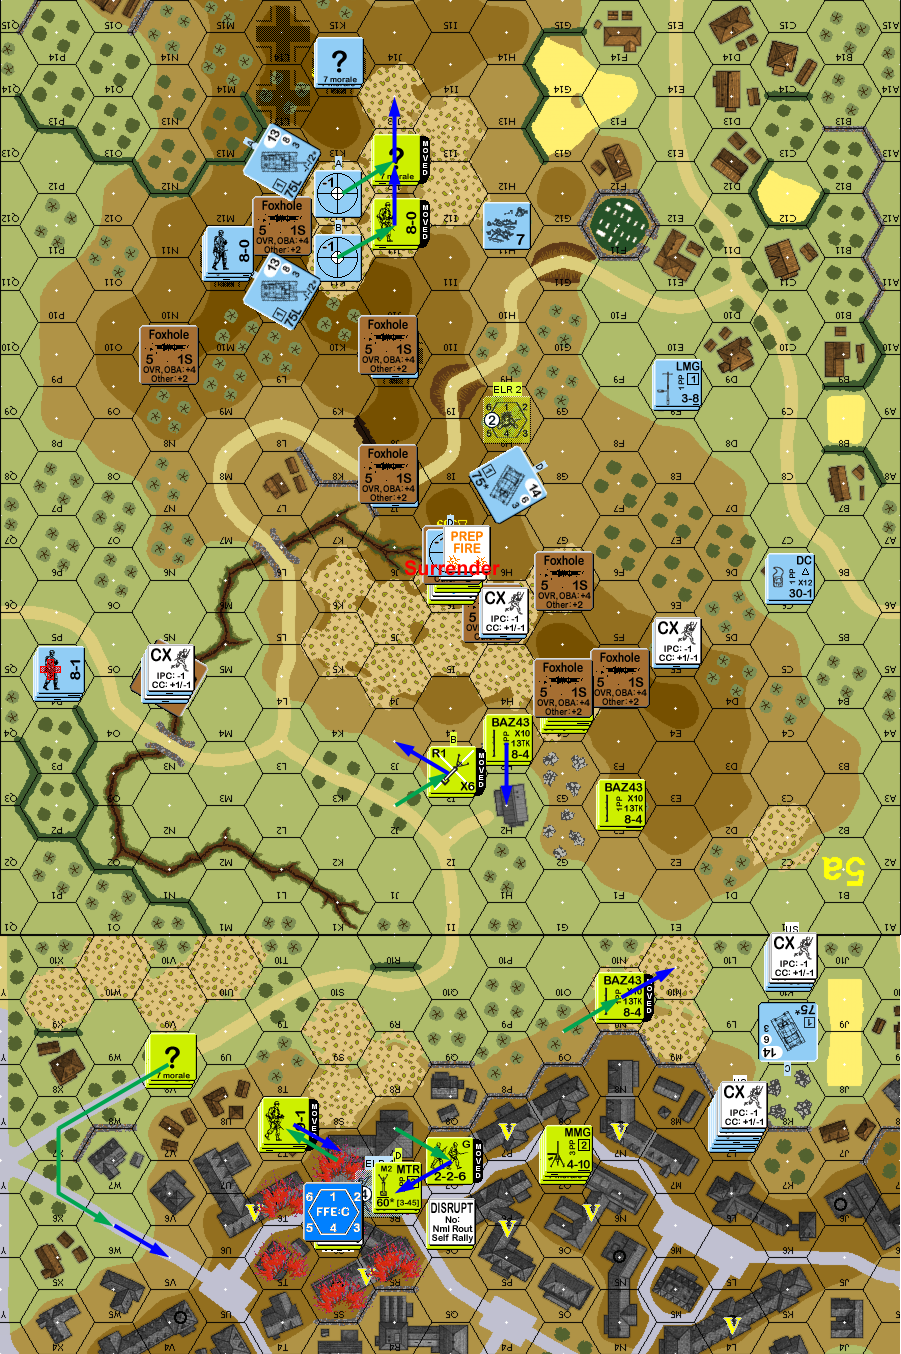
None of my guys rallied for my turn, and rather than try, the wounded, encircled 8-1 in I6 took over the MMG from the disrupted squad. With literally nowhere to go, I had a fair amount of prep fire. The board 60 MMG got a NMC to break the stack in P4, N9 pinned O11, and the encircled MMG broke H7. (The good/bad rolls just kept coming.) Much of the second American force moved out to for a better defense of the approaches to the town, and Patch’s Final Fire broke the BAZ crew in G6, but didn’t have any other effect past re-DMing brokies. My MTR HS in G4 abandoned the MTR and advanced into the Melee with my 7-0, giving me 2:1 odds, and kill the German HS (which, actually, the 7-0 would have managed on his own with a ‘4’).
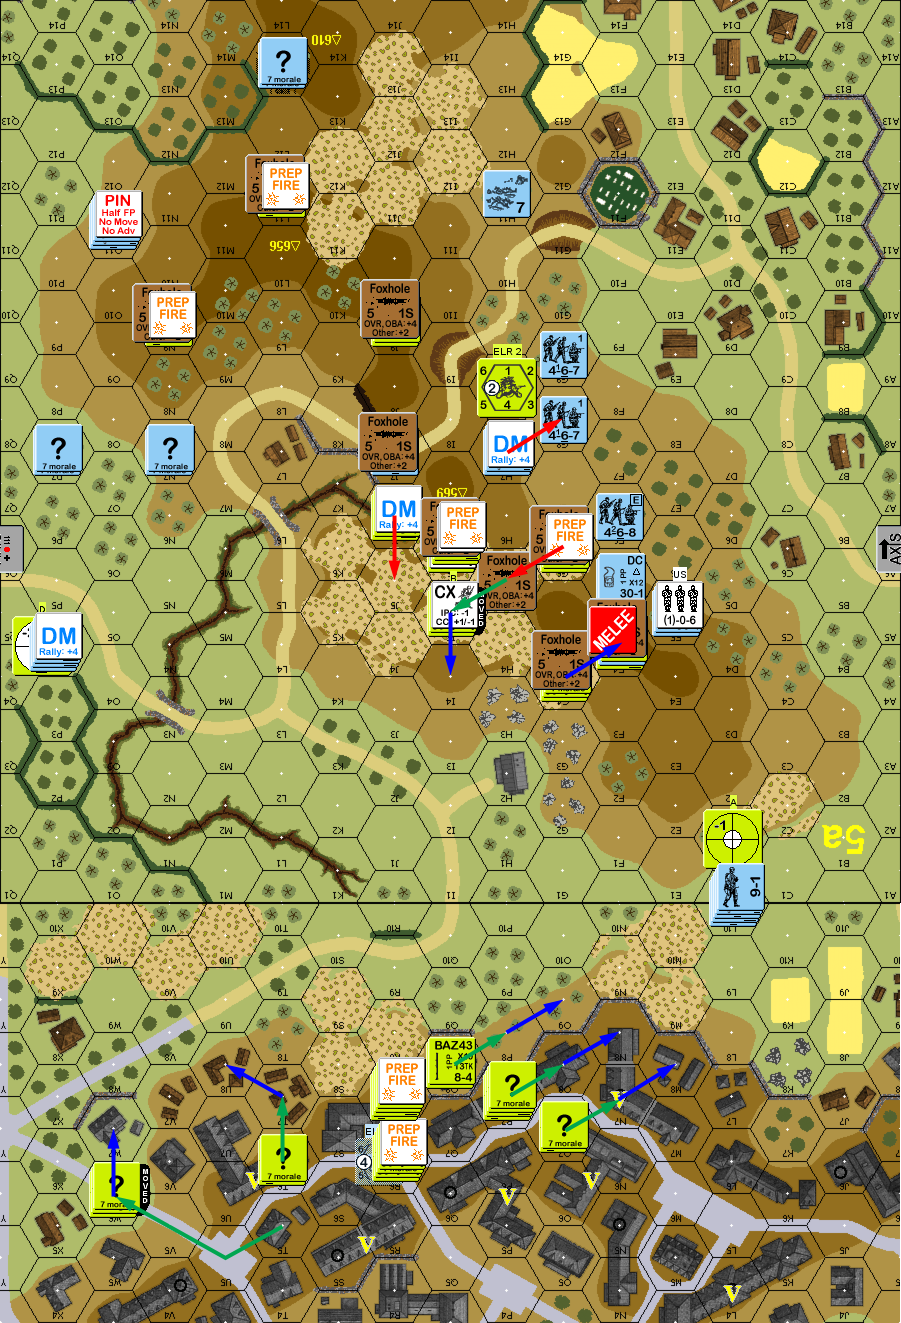
Situation, American Turn 1.
Patch continued having problems for his second turn, when his only result in RPh was to wound his broken 8-1 in P4. I managed to self-rally one BAZ crew, rally the MTR HS in 60R6, and Recovered the MMG in F4. Patch then led off with his OBA this turn (I’m not sure if he just forgot about it during both halves of turn 1, or if this was the plan). He called in the request on 60O9, and it errored over to Q8, which happened to be adjacent to his Pre-Reg hex in R7. The stack in 60L10 got a 1MC on my concealed guys in N8, breaking the squad and ELRing my 8-0, while other fire pinned 5aN9.
And then the StuGs started moving in, and I really started wishing I had more BAZ. However, Patch had a couple squads stuck largely out of the action, with no clear plan for them, and he needed to be getting a move on. The recovered MMG broke his squad in F5, taking immediate pressure off the westernmost peak.
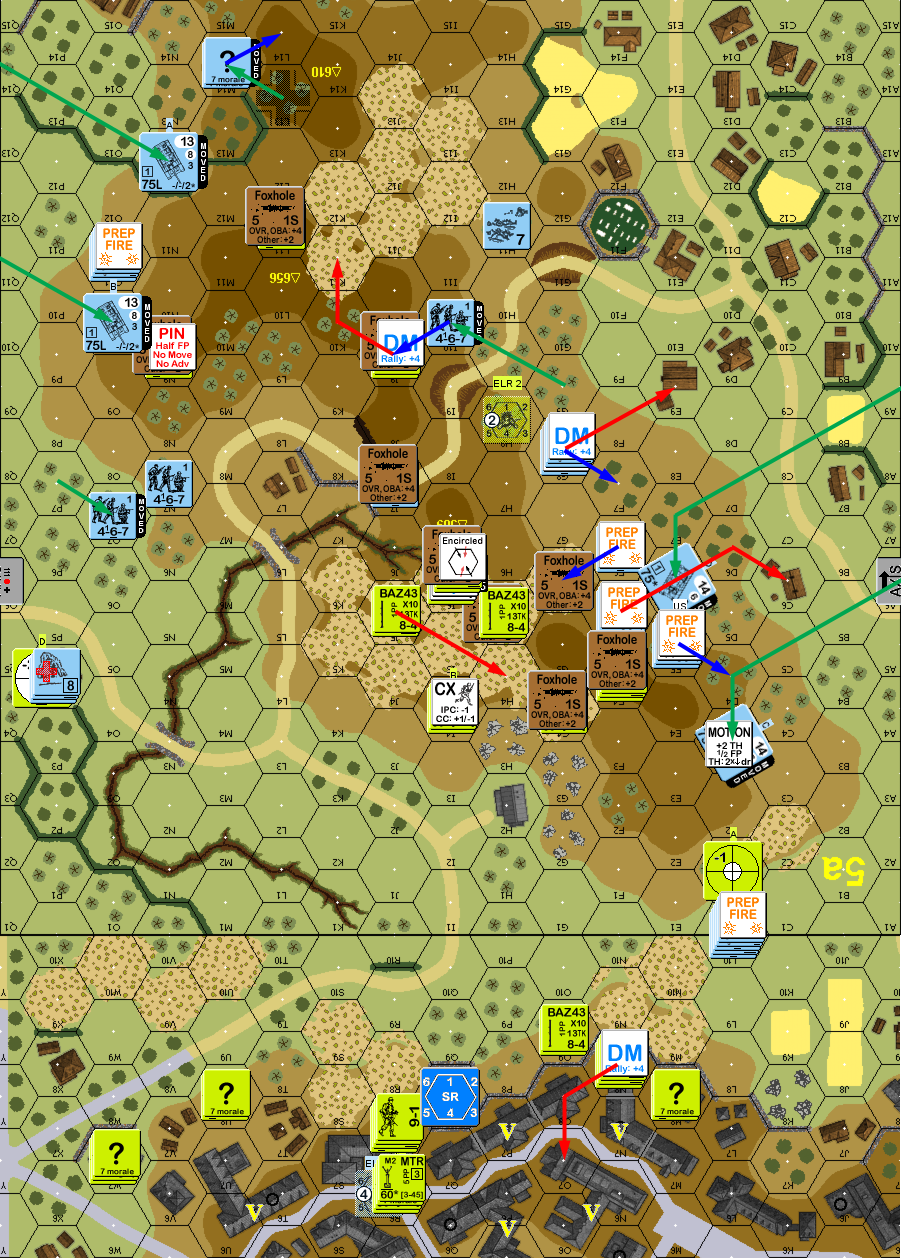
Situation, German Turn 2.
My leader self-rallied on my turn, along with the remaining broken BAZ crew, while Patch failed his only roll: to self-rally the wounded leader in P4. Still not having anywhere to run to, most of my forces prep fired, but didn’t manage to do anything. Seeing the main German 9-1 stack headed for the town, I moved a squad back up the hill for the defense of the area, while my BAZ teams moved west, with one getting a shot at a StuG headed for it (I naturally missed with the APh +5 shot, and didn’t anticipate the fact that he could just change the VCA to head downhill and out of LOS in his DFPh). The OBA was corrected to to 60R9, and and inaccurately converted to FFE in S6, pinning the remaining MTR crew, ELRing the MMG squad, and disrupting the squad I just moved up, though the 9-1 was unaffected.
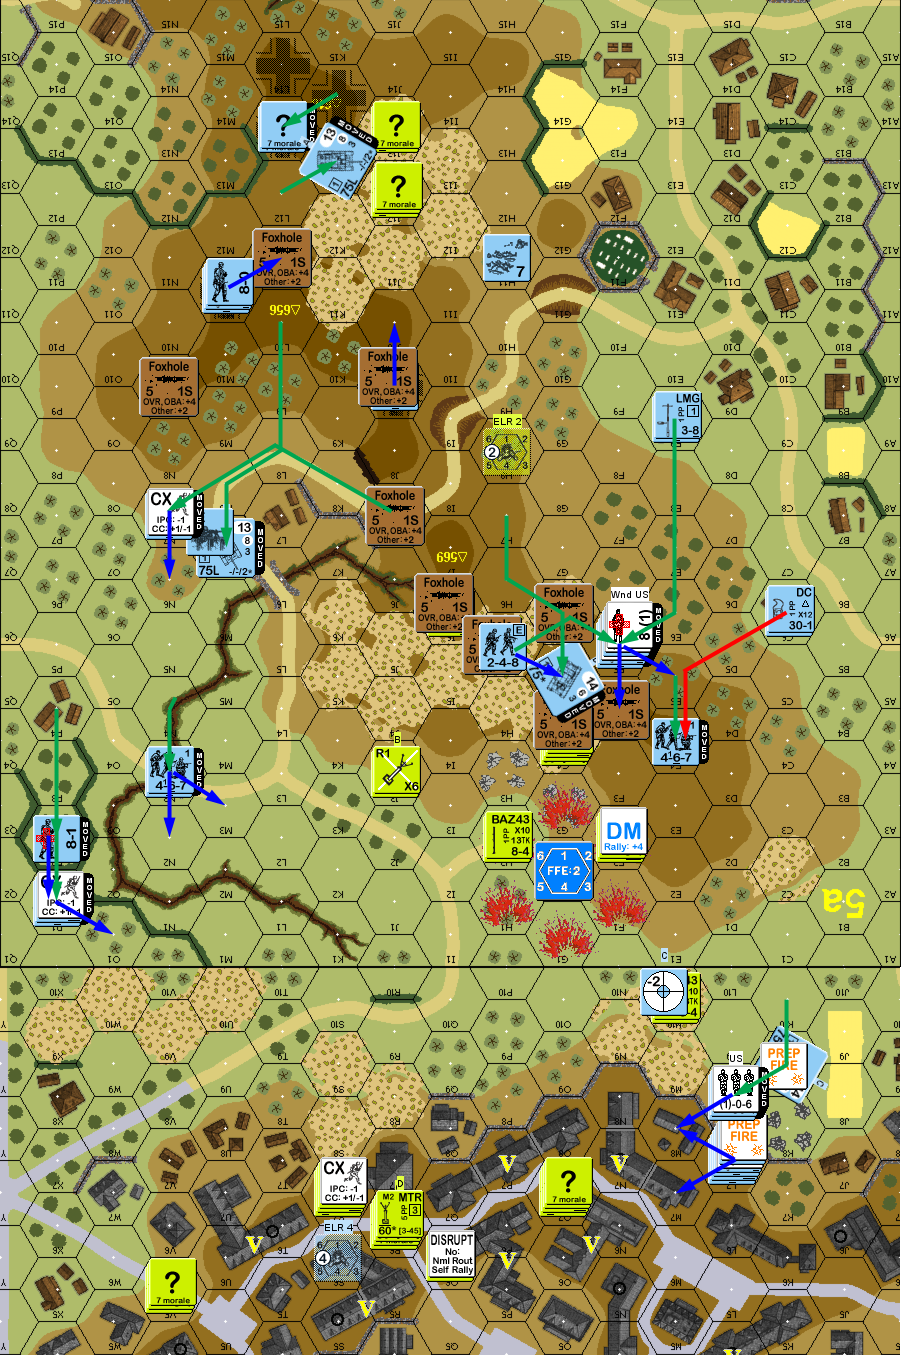
After several shots, he also finally broke/ELRed 5aN9, and the 9-1 stack broke the squad in 60M8 with its first shot, and then disrupted it with a second (HoB on 2MC resulted in Surrender with no one to take it). The squad in 5a11 advanced out of his foxhole into the cactus, hoping to keep the Germans busy running around the east side, and the HS+7-0 in F4 slipped off the western peak with the MMG to the much more sheltered location of G4 (yoinks! …and away).
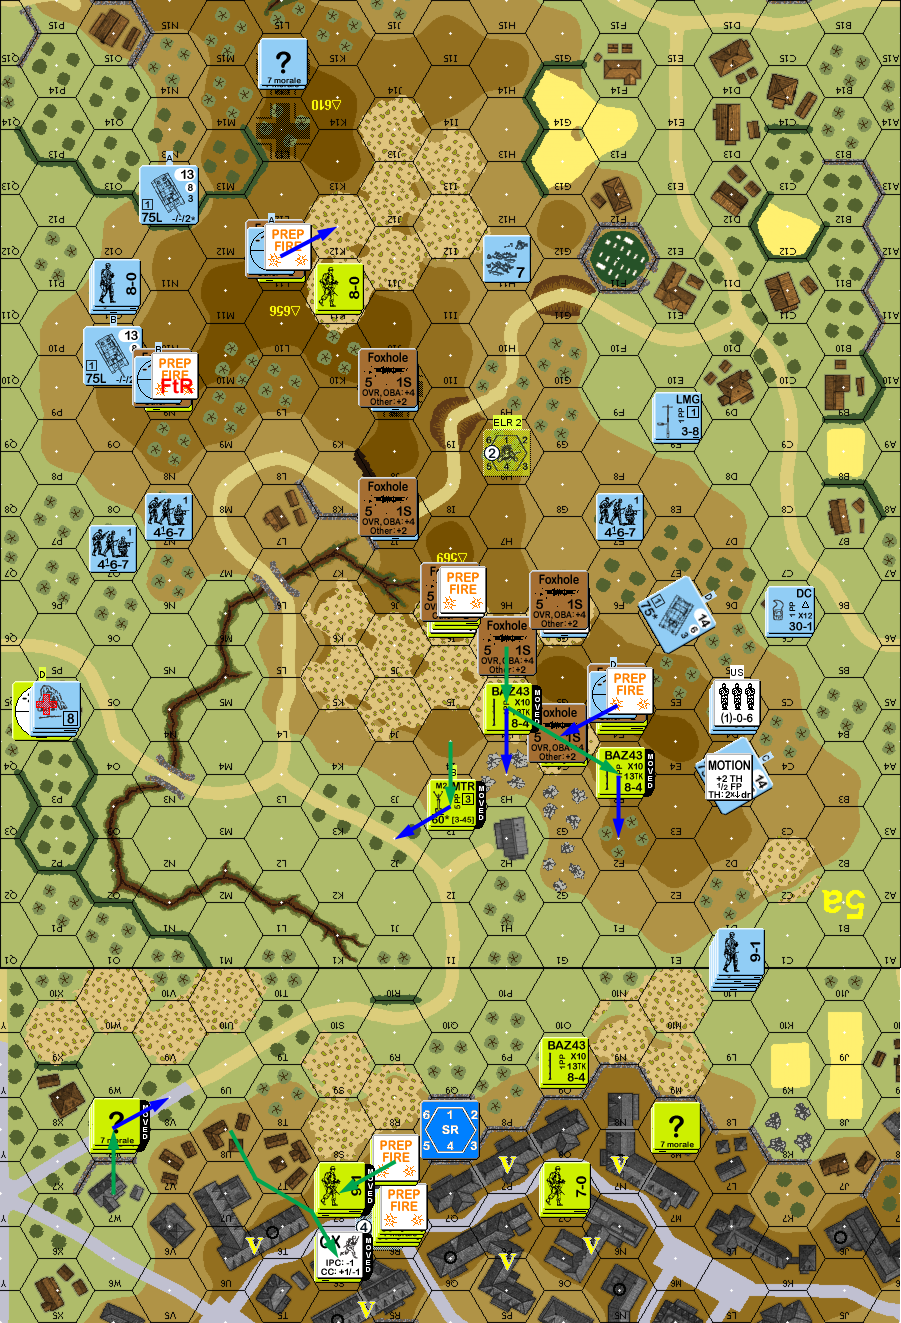
Situation, American Turn 2.
Since I hadn’t managed more than one missed MTR shot at 51P4, Patch finally rallied the leader and squad there, while I managed to rally the squads in 5aK11 and 60O7. The FFE finished without correction, ELRing the MTR HS, and CRing the disrupted squad in S6. The two north-side StuGs move up to my eastern units, while a third moves to get a bead on I6, and the last moves to cover the western side of the hill as the 9-1 stack moves up towards the town, and his guard HS starts following. The two squads that had been milling around N6 run into the gully, and my MTR in J2 malfunctions when I try firing on one of them.
In fact, my fire had no effect on him, though he managed to break the BAZ team in F2 with the 9-1 stack, who also accepted the surrender of M6.
Situation, German Turn 3.
The only RPh activity for my turn 3 was rallying my MMG squad in S7. My BAZ crew that had worked its way down from the town to block the northern approach headed back. The east side squads faded back into the cactus. Patch got battery access again, and put an AR on 5aH3, with the SR coming down on I3. His Final Fire finally broke the wounded leader in 5aI6, and the disrupted squad there set off Patch’s sniper, who finished off the unit in 60S6. The squad was disrupted, and the leader had nowhere to go, so they surrendered.
Situation, American Turn 3.
For Patch’s fourth turn, he self-rallied 5aE9, and my BAZ crew in F2 also self-rallied. He corrected his SR to G3 and converted to FFE, which ended up in G2, nicely shifting away from hindering the MMG in G4, but it did re-break F2. To my surprise, the 9-1 stack fired on 60M10 instead of moving into the town to start securing buildings, and only did a PTC, which they passed. The StuG also fired and IFed on the BAZ crew, and missed. One of the northern StuGs continued following my eastern survivors, but the other wheeled around to get on the road, and face the town. The other one in the center then advanced onto the crest of the western peak, along with a squad at the other end of that peak.
The BAZ in 60M10 hit the StuG facing it, but it only bounced off the front armor. The MMG in 5aG4 managed to break the one squad that had made the peak, though that was still Control of a hex I was unlikely to revisit.
Situation, German Turn 4.
My only (crew self-)rally failed, and the malfunctioned MTR went away for my turn, while Patch reshuffled his prisoners in 60M8. The BAZ in M10 missed this time, and the MMG in G4 had no effect either. The reassembled firebase in the town declared Op Fire to clear the CX on 60S7. I kept my two concealed squads adjacent to his StuG in K13, hoping to get into CC with it, but the StuG managed a hit to break the weaker of the two squads, and pinned the leader with them on a ROF shot. The StuG in G5 got a critical hit to ELR the MMG HS, leading to their surrender, and then broke the HS in J2 with a ROF shot. 60M8 took a shot at my BAZ crew in M10, but malfunctioned a LMG, the StuG facing them pinned them on two hits.
In advance, my Op Fire MMG got a ‘2’ for a 1MC that broke the squad in 5aF4. The ex-MTR HS survived interdiction to get to cover in 60M9, where with some luck they might turn up for a final defense. And my remaining east-side squad in 5aJ13 passed a PAATC to assault the StuG in CC and burned it!
Situation, American Turn 4.
Patch was about ready to call it at that point (with good reason), but decided to stick it out another turn and see if he could get anywhere. He lost a HS on a ’12’ for his turn 5 RPh, but repaired his LMG, while my 7-0 in 5aG4 recovered the MMG left by the surrendering HS. He got a red card on his OBA, and StuG B in M7 turned out to have no Smoke. StuG C got another hit on my BAZ crew in 60M10 and finally broke them.
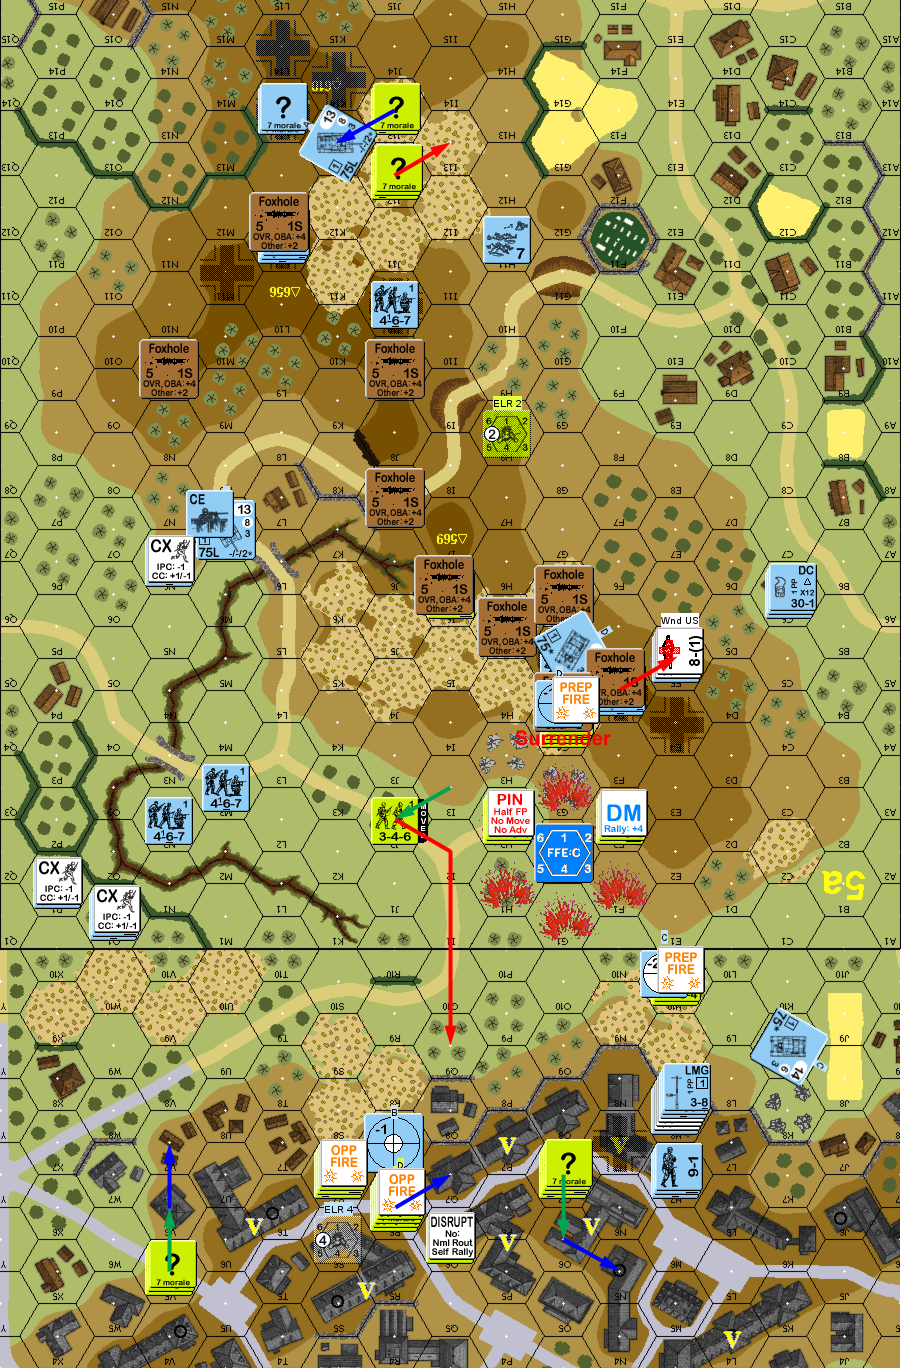
Patch tried hustling his two middle squads towards the town, but had to brave fire from my MMG in 5aG4, and the first one died to a ’12’ on a K/1, while the second one broke on a ROF shot. This did set off his sniper, but he just DMed my disrupted squad in 60Q6. StuG B started up, but Patch forgot to button him back up, and the board 60 MMG managed to stun him on the bridge in 5aL4. In final fire, my squad in K13 fired out of the smoke from the burning StuG and pinned the 8-0 that had moved adjacent, and broke the squad with him.
At that point, Patch conceded. The remaining “?” in L13 was merely a HS, which made it highly unlikely he’d keep any real Control of the easternmost peak, or he wouldn’t have a chance to get the five hexes of the next ridge. And he still needed the next 2-hex ridge. Never mind the chancy situation in the town.
German Turn 5, just before Patch conceded.
Afterword
No matter how well this goes for the Americans, it’s going to be a rough game for them. ELR 2 on ML6 troops is just murder, and Patch probably should have set up to just get a bunch of encirclements on my guys (notably, 5aN7 should have been in M8). Beyond lowering morale, the +1 on outgoing fire is important, and since the foxholes are the safest place to be, the Americans are probably stuck under the encirclement counter.
Also, the Germans just have to be aggressive here. There’s a lot to do, and they have to get on with the business of mopping up the Americans on the hill so they can take Control and have something decent head to the town. Having two squads mill around the N7 area for a couple turns just isn’t something they can afford.
But, Patch was rightly worried about the fact that he had several broken squads scattered around without leadership, and getting anything more broken would be a big problem. I think the Germans need to figure out some way to reserve a couple leaders for ‘cleanup duty’. The fact that my Sniper killed a leader very early made that a lot harder, especially since it was in the middle of where he had most of his broken units. The fact that most of my eastern force was intact for some time really helped, and managing to recover the guys who broke early did a lot to break his grip there. At the same time, the fact that I managed to keep the MMGs in action did a lot as well. Even with just a leader manning them, in this terrain they can be really potent.
It’s a really chaotic scenario, and I’d like to see more of it. It’s not ever going to be a calm ride.
Discussion ¬