
J167 Hart Attack
While looking through the ASL Journal 11 scenarios back in January, Patch saw that J167 “Hart Attack”, featured some Grants, and wanted to have a go at it. We’ve actually used them before (or at least some Lees), but I got to drive them that time, so I took the Germans defending against Allied forces in Tunisia. This is technically a re-release of the early ’90s scenario ASLUG7, but frankly, it’s a completely new scenario from the same designer. The German forces are about the same, the British have been cut down, it’s two turns shorter, and gone from a three-map area with overlays to just needing board 7a. The VCs and SSRs have also gotten a lot simpler. That said, someone could probably talk me into trying it for comparison’s sake.
The Germans have 8 squads and 3 HS of 548 elites, with MGs, a pair of 50mm MTR, an ATR, DC, and a 40mm squeezebore ATG, and then get three Pz IIIs with a 9-1 AL on turn 3. The Allies enter from the west with thirteen British squads (mostly first line, with some elites), good leadership (four leaders with -4 in leadership mods between them), HMG, MMG, a couple 51mm MTR, an ATR, and five American M3 Grants. The Allies have six turns to get 7 VP; getting one VP per building they control (there are seven on the board), one per every other tank they exit off the east side (i.e., 1 for exiting one, 2 for exiting three, 3 for exiting all five), and a VP per German tank they kill. The Tunisian setting means that orchards are olive groves, and hedges are cactus hedges. The Germans are considered Elite for Ammo Depletion (…I think I forgot that), and the British get to use ATMM to represent Gammon bombs.
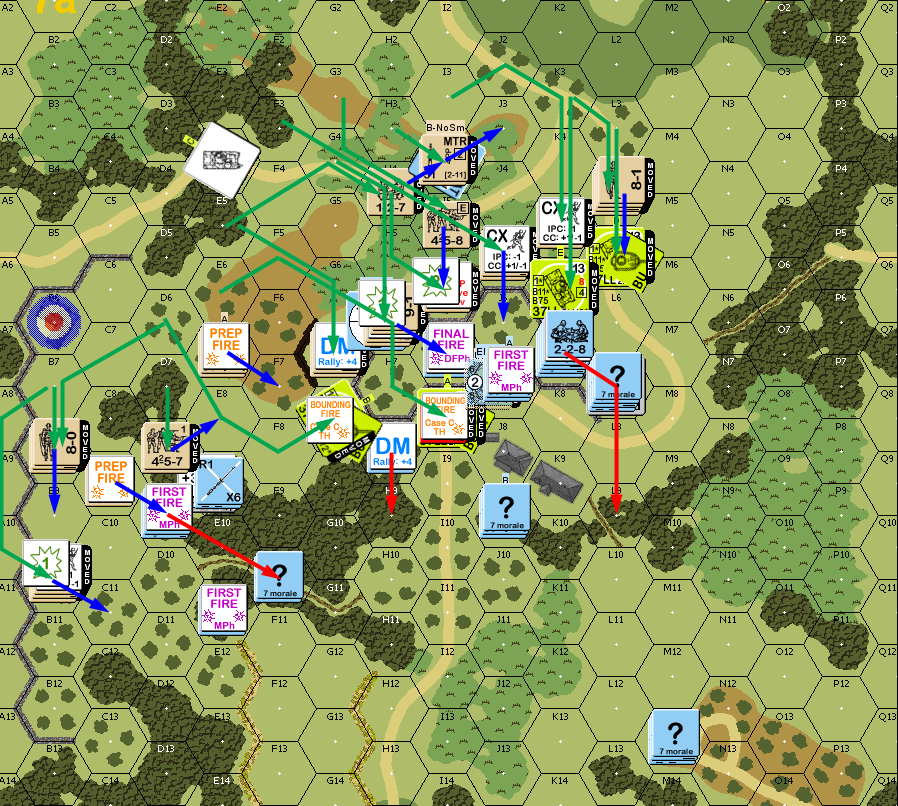
There’s one building at the west edge, and then two widely separated clusters of three buildings on the board. This gives the Allies two general approaches depending on which cluster they want to go for first. One set is tucked way back, and is hard to get at unless it’s the primary target, while the other is much more central (and nearer the odd, ‘close’ building), but is made of stone in fairly dense terrain with walls, olive groves, and a couple hills, and features the only two-hex building in the lot. I set up blocking positions on both western roads, one MMG overlooking the further buildings, the other in the two-hex building, with a MTR adjacent that it could spot for (which was bore-sighted on the hill overlooking the compound). The ATG went on a hill where it could boresight a woods-road that Patch would almost have to use if he went north. I figured if he went south, he’d still come for the final buildings anyway, and I’d push the gun down to where it could trade shots from either side of the walls. The ATR went in the center, where it’d have a chance at an underbelly shot at a tank going over the wall that lines the area; about the only good shot I figured he’d let me have with the thing.
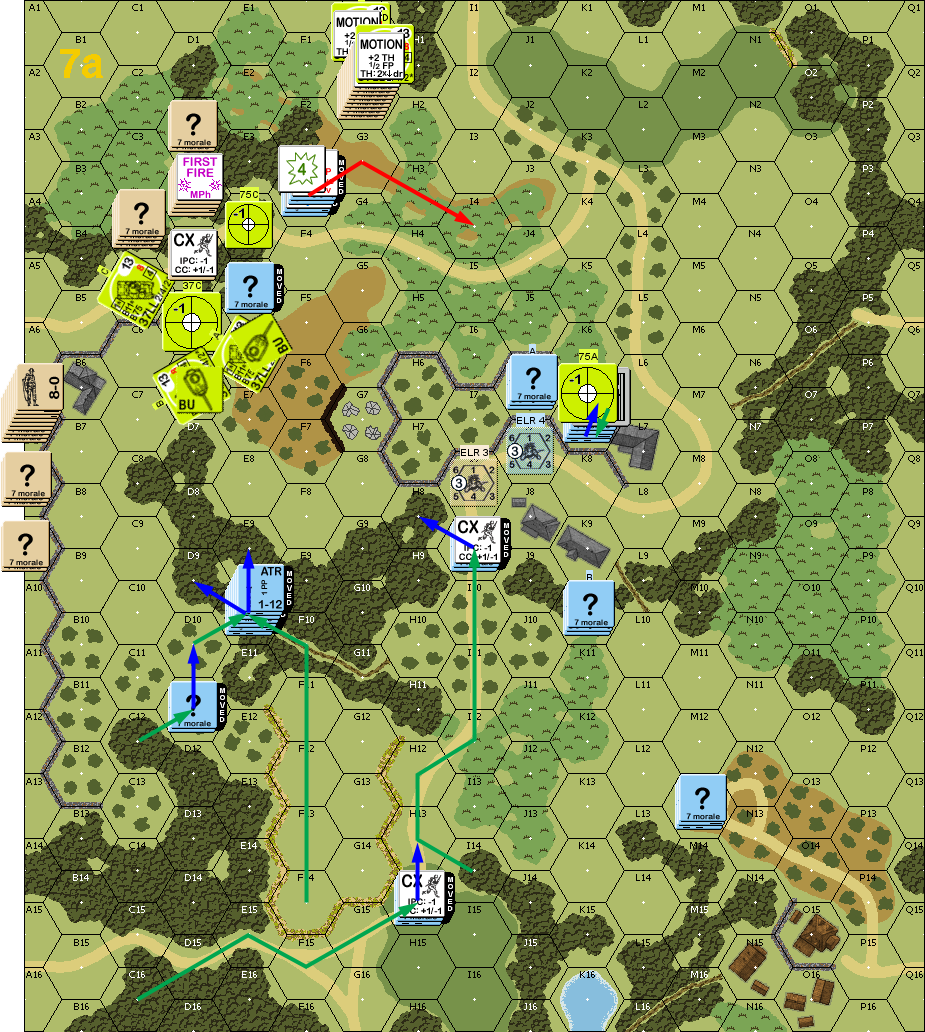
Patch took the northern route. In fact, more northern than I’d figured. I’d kind of mentally shrugged off the most-northern section of the board, which would require going around a fair amount of terrain before getting anywhere. So naturally, half his force went there, and made me wonder if he’d be trying to overrun my ATG before it got a shot at a tank. I didn’t have any fire against most of that, but the rest of his forces lined up at the wall, with a large stack headed for the close building just across the wall, and a lucky shot broke his 9-2 as he entered, and the resulting LLTC pinned the two squads with him. Two of his tanks went over the wall, but my ATR shot went wild (Final 12), while one of them stopped long enough to reduce my forward squad with a BFF K/2, and three of his tanks parked around a concealed HS in D5. His AFPh scattered a number of acquisition markers about, with no other effect, despite a NMC against the squad in E4.
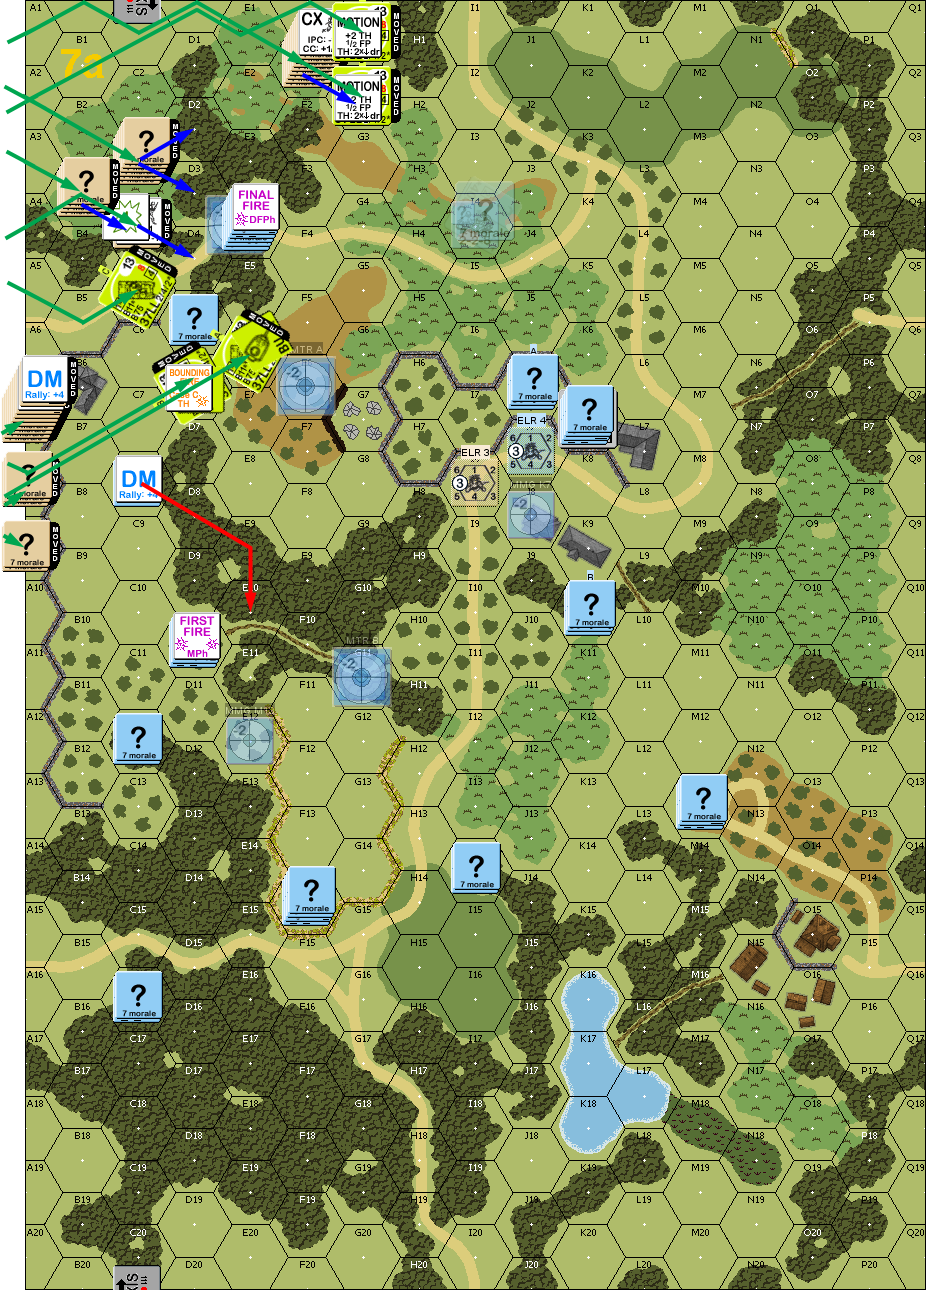
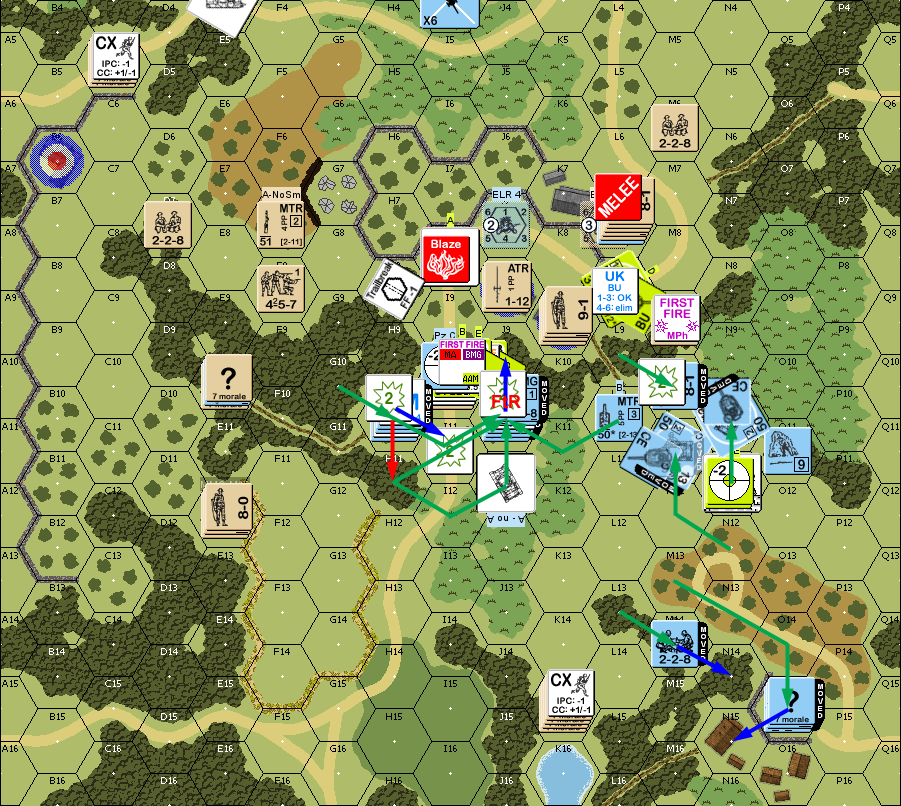
Situation, British Turn 1, showing the full board with my boresighting and ATG.
Nothing happened in my RPh, and I set about moving my south flank up, and pulling out of E4 and D5. The plan with the former was to run through the brush back towards the ATG so it would have some cover while it went to work, but his fire broke the squad in F3 and pinned my 9-1. D5 AMed, but was pinned after a lot of fire in DFPh, which also malfunctioned the SA on a Grant. F3 didn’t have any good choices in RPh, so I eventually self-broke the leader, and had them both head for H1 before seeing the force that way, and then rout along the ridge to end on I4 with the Hidden ATG, and thankfully they both survived Interdiction along the way.
Situation, German Turn 1.
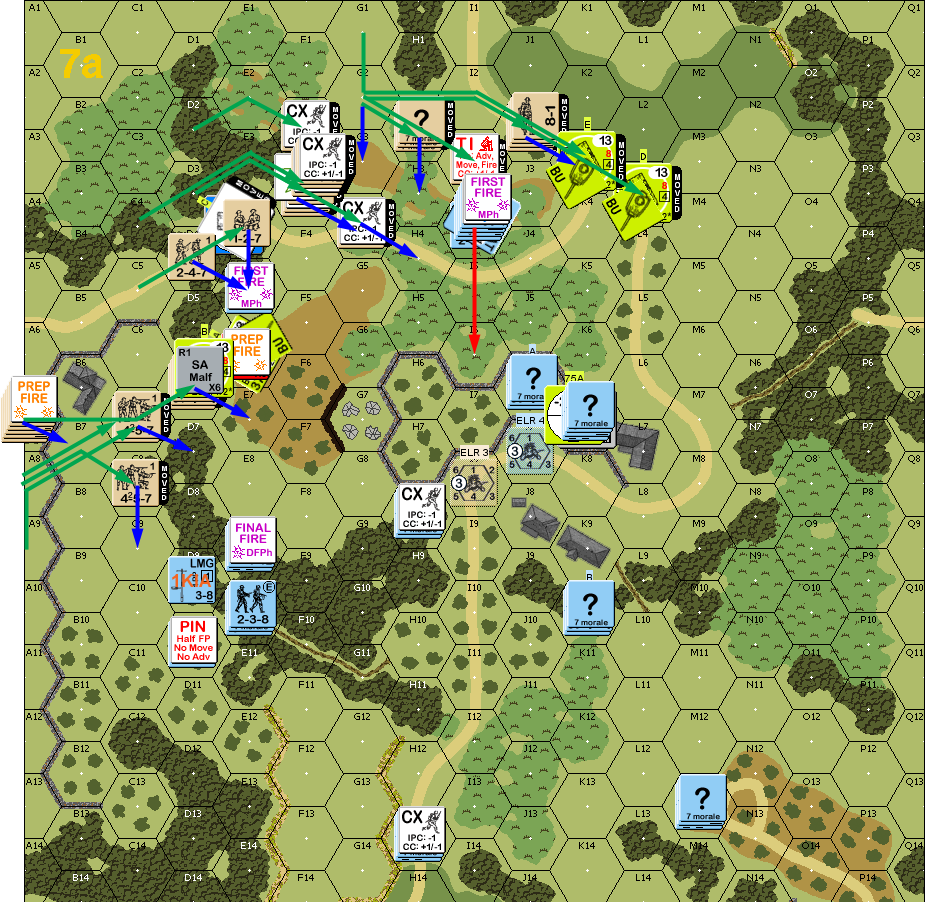
Patch rallied his 9-2 but failed to repair his SA while I got my HS from the first turn back. The bulk of the stack in A7 fired on D9, getting a 1KIA to leave my LMG abandoned in the woods instead of trying to hold off the advance for another turn. A ROF shot then pinned my HS in D10. Meanwhile, the Grant on top of the hill in E6 fired the SA at K7 (miss), and pounded my HS in E5 with everything else, but only malfunctioned the MA. The rest of his southern wing started swinging north around the woods, where the ATR squad took a shot that turned out to be blocked, and cowered (which was a real shame, as it also meant his planned rear shot at Grant “B” was blocked). The Grant in C5 started up, advanced adjacent to my poor HS, stopped, and fired every weapon on the tank at them… and malfunctioned the BMG, CMG, and SA. It then advanced into E4, where the ATG was boresighted, which barely got a hit, knocking out the tank, while the crew bailed out.
Next, a squad and leader tried to move through the area, but my HS managed to pin the squad in F3. A HS moved up and Searched I4, forcing the ATG out of concealment, while most of the rest of the northern flank continued on to the N-S road along the east. To my surprise, the Grant in D6 merely turned itself around without actually changing hexes. AFPh managed to pin the HS in E5, but there was no other effect, despite nearly getting an Improbable Hit against J6 with one of the Grant’s SA. With too many enemies working their way around the ridgeline, I self-broke the ATG crew, and routed the entire mass back towards the cluster of stone buildings. Patch piled his crew and a HS in against my HS in E5, who was Ambushed, then Patch rolled a ‘2’ to kill the HS and generate an 8-0.
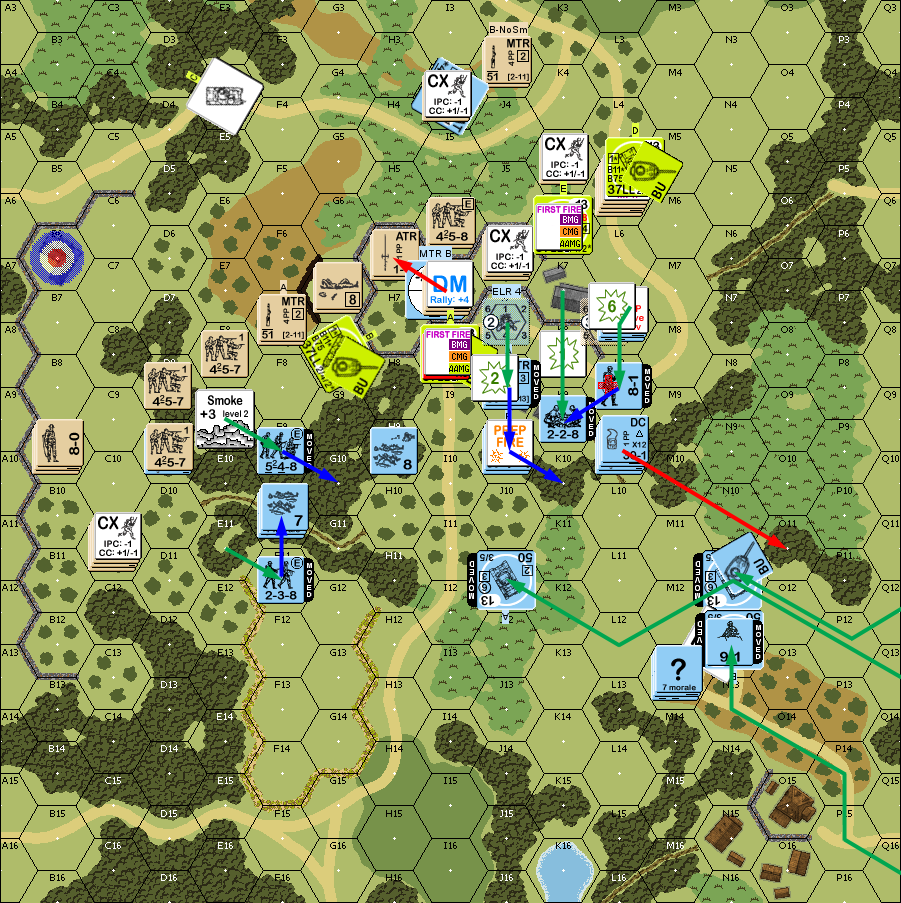
Situation, British Turn 2.
I didn’t manage to rally anything for my turn, but Patch repaired the SA on Grant B. One of the general ideas when setting up, was that the closer cluster of buildings was likely to become the last stand of my defense, and here I was looking at this on turn 2. The southern flank was fairly good, but there was just way too much approaching the main building from the north. I prepped with E9, hoping to do something to the stack in D7, but a ’12’ only malfunctioned the ATR. I considered trying to do something about the stack in G4, but felt the amount of acquisition piling up meant it was best to stay hidden.
Situation, German Turn 2.
The only thing that happened for Patch’s turn 3 RPh was my crew self-rallied (I even missed recovering my LMG). Patch looked at the situation at this point and realized he couldn’t really win. He was about to get the cluster of stone buildings for 4 VPs, but it was next to impossible for him to get to the final three, even assuming I wasn’t in the way. With only four tanks left, he could only get another two VPs that way, and if I just hid my tanks in the SE corner behind the woods and marsh when they entered, he probably couldn’t get them either. I talked him into continuing, and seeing what happened as he did have some ability to get at the final buildings, and if his tanks were willing to just drive by my infantry, he might even be able to swarm me if I came in that corner (and I just couldn’t go for that level of cheese anyway). This does point up the value of heading for the wooden cluster first in this scenario though. Or just going in the center and possibly trying to drive towards both depending on the situation.
One of Patch’s MTRs turned out to have no Smoke, but the other one smoked-in my squad in E9. He also fired on my HS that had failed to pick up the LMG, but did not affect them. He sent a squad up to the wall around the main building, and they pinned to my fire. Next a stack with his 9-1 went in, and I managed to pin one squad with MTR fire. The 8-0 and a HS went over the hill and ended just outside the compound, and a lucky shot broke them both; but Patch’s Sniper went off, reducing my SAN to 2. Meanwhile, his Grants advanced on both flanks, with one cutting off potential routes for some of my forces.
My MTR tried affecting it (likely needing a CH…) but set off Patch’s Sniper, who wounded my 8-1 leader in L7. I also pinned a HS in K5, but Patch’s AFPh killed my HS in I7, and pinned the HS in D9. D9 self-broke in the face of three squads, and headed back down the path to a leader. The broken leader and squad that had made it back to the main building routed out across the road, and the squad was reduced by Interdiction.
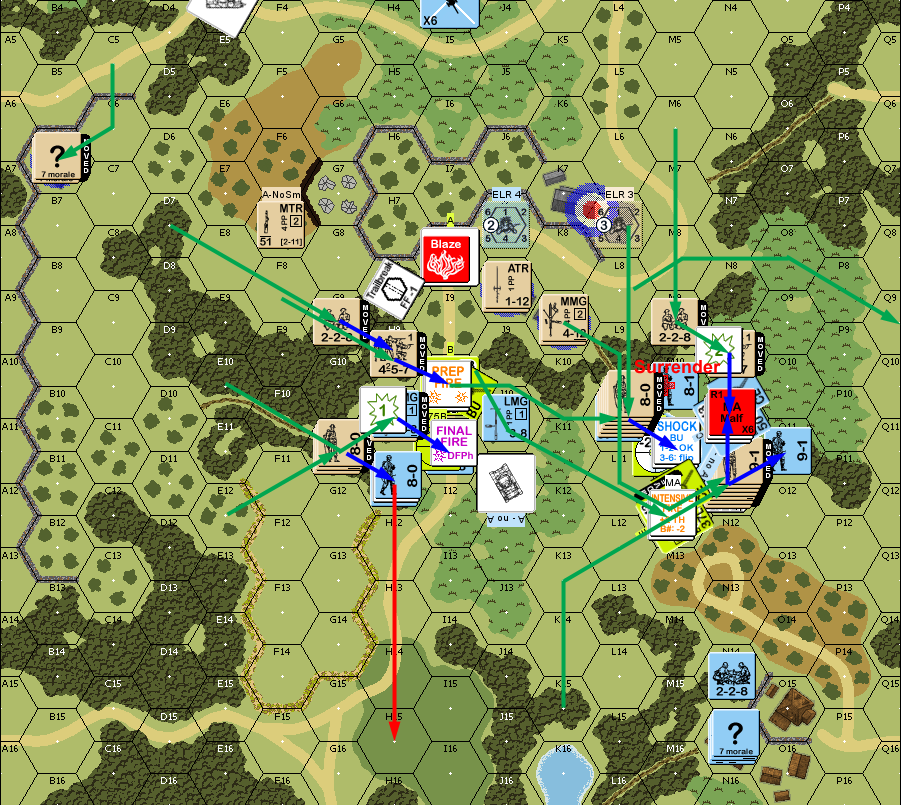
Situation, British Turn 3. Between sessions we forgot that no one had actually entered B6, though that got fixed at the end.
The only result of my turn 3 Rally was eliminating my ATR. Nothing rallied, and Patch’s attempts to recover my LMG and ATG both failed. I switched targets with my MTR, and immediately got a CH, breaking his 9-1 and squad in I7. Several more hits on the hex failed to get any more result. I largely pulled out of the main building, though one squad got pinned as it went downstairs. My reinforcements entered, with with one covering a gap in the woods where Patch might try to exit a tank; one (with the AL) up on the hill, Hull down, and covering the other two; and the third covering the road south towards the remnants of my defenses, and with a view of his forward tank, which had it’s turret pointed away from my Pz III… oh, right. The 75mm SA was pointed right at him. (I managed to forget what I really needed to worry about until he fired in DFPh.) I put all three tanks CE during my APh to improve their TH chances.
Situation, German Turn 3.
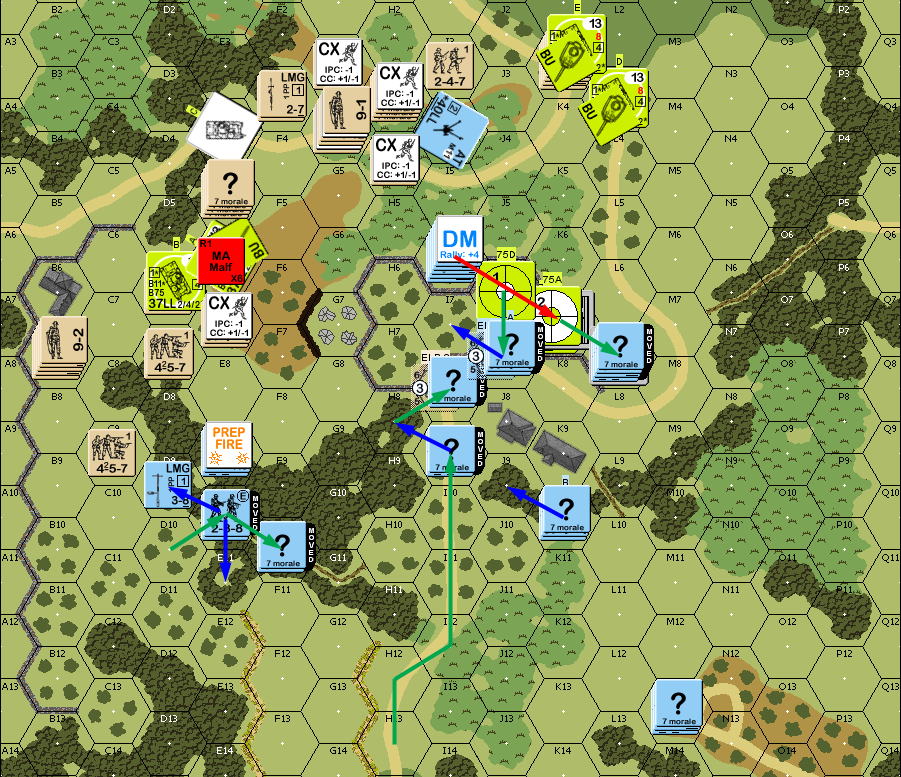
Patch rallied his 8-0 and HS in G7 for his turn 4, and recovered the LMG and ATG this time, but disabled the MA on the Grant in I8. I had put in a HS to protect my rally hex in F10, but the broken HS there got a ‘2’ to go Fanatic and generate a Hero! Meanwhile, my 9-1 finally managed to self-rally in O11 (he’d been broken since bugging out of G4…). The ATG malfunctioned when he fired it at N12, and his second MTR turned out to be out of Smoke, and was unable to affect N12 either. His Grant in I8 bounced a shell off the hull of J11 (Final TK 7…), and missed on an IF shot. He then moved a Grant into the woods in H8, avoiding Bog. The other two Grants moved to the middle of the cluster of buildings, firing as they went, but not having any effect. In fact, both of our rolls were high, with my defensive fire, residual, and a FL having no effect.
This changed in DFPh, when I got a CH against his Grant in I8, burning it. However, that was soon followed by a ’12’ which eliminated my MMG in Sustained Fire. Patch managed to reveal my concealed squad in G10 with a 1MC, but had no other effect. Patch advanced into CC in three places. In G10, his squad and a half Ambushed my squad, but missed. I only attacked the HS, but rolled a ‘2’ to generate an 8-0 as well as knocking out the HS. In J9, there was no Ambush, and he knocked out my MTR and HS for no loss. In L7, he had a squad and a half vs a squad again, there was no Ambush (we both rolled ‘6’…), and I knocked out the HS for no loss.

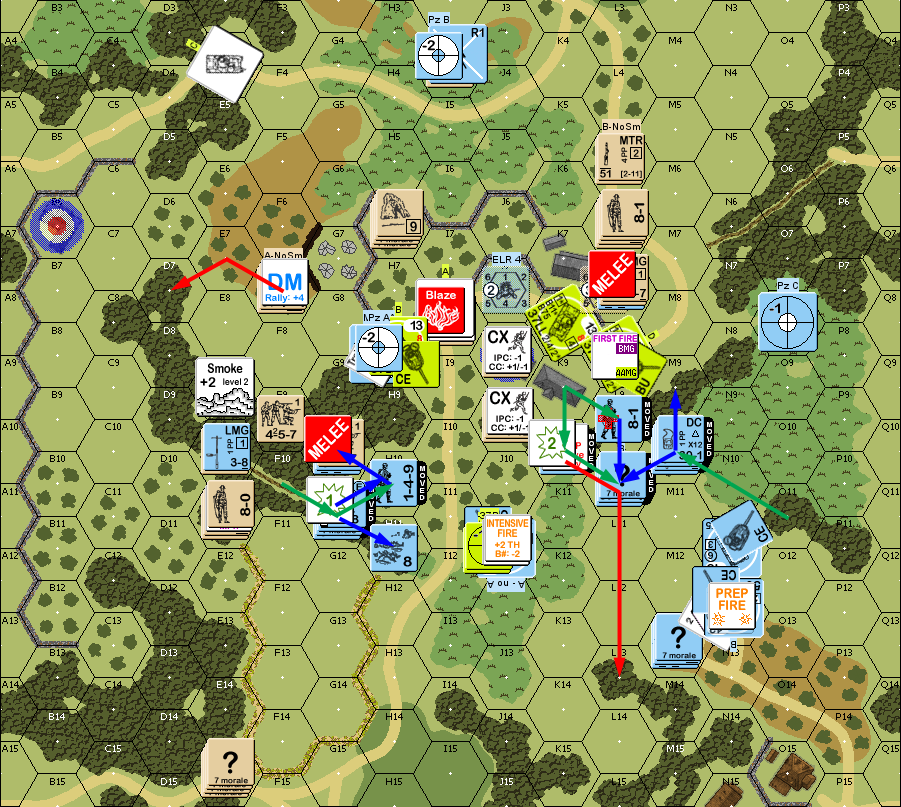
Situation, British Turn 4.
I got the HS in O11 back, but missed on the self-rally in H11, and Patch rallied the squad in H6 while missing on the 9-1 there. Figuring I was already in trouble with both guns on the Grant in H8 acquired in J11, I fired, bouncing two shells off of it after finding I had no APCR (I probably should have just reversed out after failing the APCR, or at least gone for DI). The Pz III on the hill got several shots, breaking the MTR crew in F7, and getting acquisition on I4. Part of my plan was to get my two HS on the east side together to recombine, and drop the MTR for my crew to pick up. However, Patch broke the crew in DFPh, and the squad would end up holding that and a LMG. He then reduced my broken squad in H11, and killed the Pz III in J11 on the second shot (Immobilizing it on the first).
My 9-1 still had the DC, and went to confront a Grant from the side, while my Hero piled into the Melee in G10 to provide 3:2 odds and -1, which finished off his squad for no losses. The Melee in L10 had no result other than Patch rolling a ’12’, but there was just nowhere for my squad to go at that point. The stack in L10 managed to gain “?” despite being in open ground.
Situation, German Turn 4.
Patch rallied his 9-1 for his turn 5, but neither of our crews rallied, nor my HS in H11. Patch malfunctioned his still crewed MTR firing on the 9-1, . To cover his bases, he moved units to block any move back towards B6. His Grant in L8 took a shot at my 9-1 before starting, but couldn’t affect him. The 9-1 threw the DC, and got a turret placement, which shocked it (would have been a kill vs the hull, more’s the pity). The remaining two Grants went through the gap in the center, though they stayed in the olive grove where my hilltop position couldn’t see them; they obviously meant to engage the tank that had been covering a potential exit. However, in DFPh, that tank spun the turret around and got an IF APCR hit to Immobilize the one in I10, and it wasn’t in the VCA of either tank, leaving it to just have to worry about the 37LLs.
My 9-1, his DC gone, looked at the three squads and two leaders adjacent to him, and self-broke to get out. After that, one squad went in where he’d been, while another and one leader reinforced (along with a leader in K7) the Melee in L7. The remainder helped make sure K9 stayed secure. Patch was only able to reduce my squad in Melee, but I had no effect on him, and the odds of surviving a 4:1 next time were slim….
Situation, British Turn 5.
My 9-1 refused an encore for my turn 5, but my crew and the HS in H11 rallied, while Patch rallied his crew, but lost the MTR and his Grant flipped over to “UK”. I preped with the HS in H10, and managed to pin the adjacent squad, which gave me slightly better maneuvering room in the center. Patch’s HMG had finally wandered into my second MMG’s boresight hex, but it was time for them to pull out and move to defend the final cluster of buildings from Patch’s 9-2 stack. At this point, he effectively had 5 VPs (as soon as he actually secured L7), so killing one of my tanks, and exiting one of his would do it (along with some harder-to-manage) variations. So I concentrated on trying to do something about the Grant in Bypass of J9; without it a kill got a lot less likely, and even if L8 recovered, a single exit wouldn’t do it either. Sadly, I hadn’t realized yet that I actually had side hull shots at J9 thanks to VBM arcs, or I might have just tried firing on it during prep. Even an Immobilize would have helped.
I would have liked to maneuver my infantry around the rear of the Grants, but that would have required taking point blank fire from J8, and the MMG, squads, and leader in K9, with nowhere to rout to, so I tried working my way around the fronts of the tanks. But the multitude of weapons on them destroyed me. I lost my fanatic HS to a K/1, a leader and squad broke in H10, and a leader and HS broke in J10. At that point, it probably would have been best to stop, having broken the west-side defense, but I threw in the squad on the east-side as well, though he did make it.
The next trick was trying to save N11; N12 drove down off the hill, but failed on a sD attempt. N11 managed his own smoke and got out of immediate LOS to get rid of the acquisition. One shot missed because of the Smoke, while the other hit, but I passed a possible Shock, and an IF shot missed as it Started.
DFPh turned into a saga, as both Grants tried to get rid of my stack in J10, featuring a Hero and squad. The first 75 shot wounded the broken leader and broke the squad, but the broken HS HoBed to return as a Fanatic and generate a second Hero! (And the existing Hero also got a ‘2’, which of course had no effect on him. Pity it hadn’t been the squad or leader.) The second 75 hit, to wound the leader again, CR the Fanatic HS (’12’…), and wounded one of the Heroes. One CMG did nothing, but the second one wounded the leader a third time. Then an IF shot from a 75 killed the leader (’12’…), killed the wounded leader, and wounded the second one. (Sadly, the squad rolled a ‘3’, just missing another HoB….)
My Pz III in M12 got a side hit on J9, but it failed to penetrate (if I’d had APCR, it would have….). I lost the squad in J10 to FtR, though we realized later he should have surrendered to the squad in I10 (after checking all the possibilities, I was thinking he’d go a hex and then discover himself trapped, but not even that was legal. My Hero tried to finish the job he’d started, and easily Ambushed the Grant (1 – 8), but couldn’t pull it off, and the Grant finished him off with a fatal wound. The Melee in L7 finally finished with the death of my HS for no casualties.
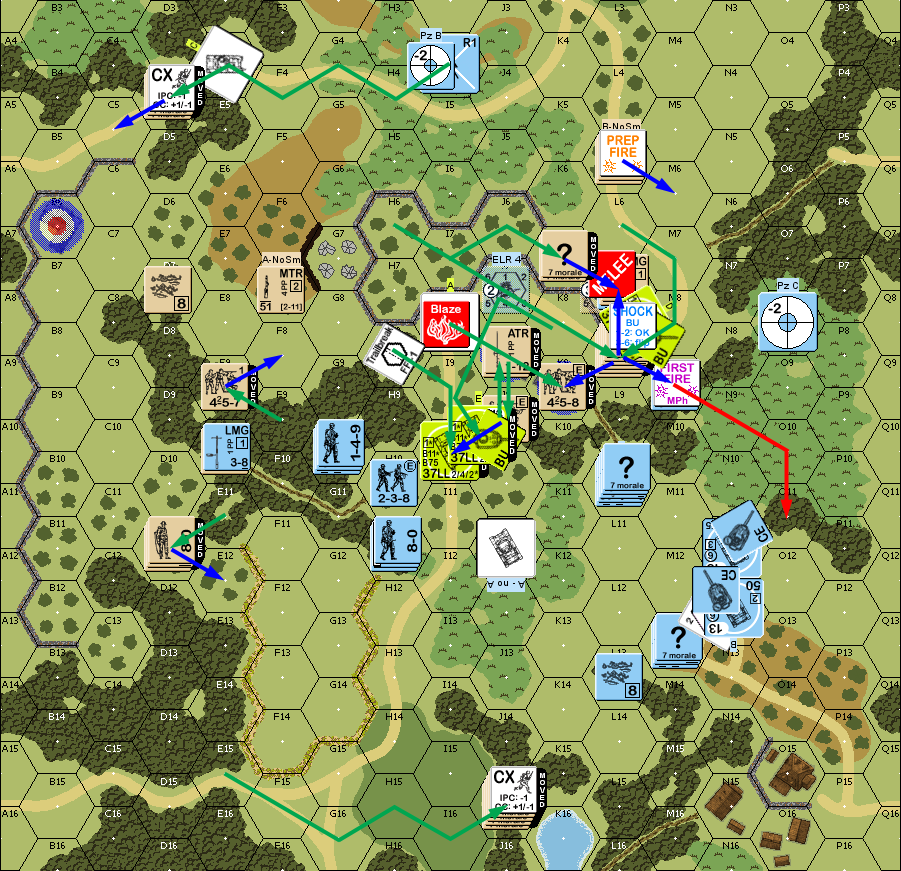
Situation, German Turn 5.
Patch’s Grant recovered from UK for his last turn, and he Deployed two squads, while my 8-0 self-rallied, but wasn’t able to get the squad with him. In Prep, his Immobilized Grant got two hits on M11 on three shots, both of which were possible shock, and the Pz III failed the second one. This really compromised my position, since the idea was to use the MGs on both tanks to try and hold off his infantry for a turn. And then the flood came….
I didn’t have a lot I could do about most of his movement with only two MGs. J9 moved to 1-hex range, and got two hits on my shocked Pz III, shocking it again, and Immobilizing it. L8 exited, and I malfunctioned the MA on my remaining Pz III trying to get it as it left. Both my BMG and CMG shots had no effect, and Patch was able to stun N10 in AFPh, leaving both tanks defenseless. As a final injury, he broke the wounded leader in M10, forcing his surrender. Patch passed all his PAATC, allowing him to put three squads and two leaders on each tank (actually, two squads and two HS in N10). In addition to the tanks, he went after my HS in I11 (killed for no casualties), and the 9-1 in O11 (he missed, and the 9-1 killed the attacking HS). M11 burned on the first try, but he rolled a ’12’ against N10 to reduce a squad before eliminating it on the second attack.
Technically, I had a last turn in which to strike back, but my force was nearly nonexistent, and there was simply no way I was going to take two buildings, since Patch was now at 8 VP.
Situation, British Turn 6.
Afterword:
The main part of my defense actually worked out decently, especially on the center line, which held up until the end, and I don’t think I’d change too much playing this again. The defense of K7 probably needs thought, but it wasn’t supposed to do more than delay if he went right for it, and that worked out. The main problem is how to slow down a north hook like Patch’s. Anything to keep him cautious about approaching I4 would help.
My tank tactics weren’t great the entire time, though I was constrained by the need to try and cover the Q9 exit. The big problem was just throwing in more and more bodies at the Grant in turn 5. I completely wrecked my force, and just didn’t think about the number of separate shots he could take. It appeared to be working for a moment, but that was only because of some HoBs. Pz III A and C probably should have just pulled back instead of trying to fight it out, and forced Patch to charge a more solid force to get the first tank kill and the VP he would need.
But as it was, it was a very exciting game for almost the full duration, and could have easily gone either way.
Discussion ¬