
Block Clearing—Defense
After the smoke cleared, Patch and I decided to give Up Front scenario G another try, with me on the defense. I think we both decided to try out some of the later nationalities this time. I picked the Italians, partially because I knew that they got an ATR and DC in this scenario. Then I read the rules for them and thought maybe it was a bad idea. But, it was a little late for second thoughts, and Patch took the British for his attack. (I’m giving the Fire Strength and all the modifiers that applied to attacks; a ‘C’ refers to a concealment card played on it.)
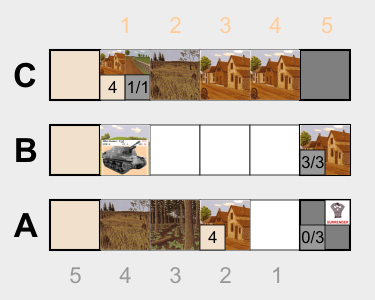
I set up with one big group (seven men) in the middle with the at-start building and the ATR. Group A got both LMGs (which aren’t as good as most LMGs, but don’t need a second crewman either), and five more men. The last four in Group C were some of the best men I had, including the squad leader, and my one Morale 5 man with the DC. My general plan was to try and get into motion early, since ordnance will miss on any red RNC if the target is moving, and then get into cover. I’d try to keep moving to help keep the ordnance less effective, and if I was lucky, I might get into DC range at some point. Patch deployed his Sexton as Group B, where it could offer cover to everyone else, and split his eight-man squad in half, with his one Bren gun in Group A, and neither of us had any further pre-game terrain.
It took a couple turns for either of us to be able to do anything, and then the Sexton opened Fire on my Group A (TH 0) and missed. The next turn, it Fired again (-1C; TH 0) and hit (5) to kill two men outright (including one of the LMGs) and pinned the rest of the group. (This led to a rules question: An Italian Group surrenders if everyone is pinned at the end of a turn. Is that either player turn, or the Italian player turn? We figured the former is way too punishing, since the only remedy for a strong attack is a Hero card, and played that it surrendered at the end of an Italian turn.)
I Rallied 4, and the Sexton Fired on the Group again (TH 0-1), but missed. One of the riflemen grabbed the loose LMG, and my ATR opened Fire on the Sexton (TH 4) but missed. Patch discarded some Wire onto my Group A, and the ATR took another shot at the Sexton (TH 4) and missed again. Group A then Fired on Sexton as well (1) for no effect. Patch’s Group A returned Fire at my A (1 + 1) to pin three men and rout the one man who was still pinned from earlier. My ATR took another shot at the Sexton (TH 4) and missed. Shortly after, I managed to Rally Group A, and the next turn move them off the wire.
Right after that, the Sexton Fired again (TH 0-1), hitting (5 +1) to kill the second LMG gunner and pinning everyone else. I Rallied the three survivors, and the ATR Fired again (TH 4) and missed. The next turn, Group A recovered the second LMG, the ATR Fired again (TH 4) and missed, and Group C finally Moved forward… and instantly ran into a Stream. Group A Fired at the Sexton (1) for no effect, followed by the ATR Firing again (TH 4) and missing. Group C attempted to ford the stream, but didn’t manage it. The Sexton returned Fire at A (TH 0-1), but missed, and then Fired again (TH 0-1) the next turn, and hit (5) to pin all three survivors of the Group. His Group A then Fired at my A (1) as well, but had no effect). I had no Rally cards left, and Group A surrendered.

The ATR Fired again (TH 4) and missed. To my surprise, the Sexton then Moved forward, with no other movement to support it. The ATR tried again, before any move could complete (TH Black 3) and missed. The Sexton then moved onto a Hill, and his Group A Moved forward to join it at Range 1. The ATR took another shot at the Sexton (TH 3) and missed, and Patch’s A halted in some Brush. The ATR Fired again (TH 3) and missed. Patch’s Group C then started moving forward. My Group C Fired on them (1 – 1 + 1), but one of the rifles malfunctioned on the first RNC, reducing the Fire Strength to 0 (actually -1, I forgot the stream, while Patch forgot his cover from adjacent armor, so we were both off one for different reasons), though it still managed to pin one man (and still would have even if we had gotten it right). Patch’s C moved into -3 Buildings and Rallied while I repaired the rifle.
The Sexton then Fired on Group C (TH 0-2) and hit (5 + 1), pinning three men, and killing the fourth. I Rallied All to get the Group going again, and Patch Fired on them again (TH 0-3), malfunctioning the gun. My Group C finally got Moving again, successfully fording the stream. The Sexton failed to repair the gun, while C ducked into some -2 Buildings. The ATR Fired on the Sexton twice more (TH 3), and missed both times. Patch’s Group A Moved forward again, while the Sexton repaired its gun, and I got my C Moving forward again. Patch’s A stopped in some Woods, and the Sexton Fired on my C (TH 0-3), hitting (5 – 2 + 1) to pin my SL and kill another man. Group C ducked into more -2 Buildings (I should have been a card down at the end of this turn, but had forgotten that my SL was in that group by that point). I Rallied my SL, and Patch discarded some Wire on my Group B.
The Sexton switched Fire to Group B (TH 0-1) and hit (5 – 3 +1), pinning 5 men. I Rallied 3, and then Moved off the Wire (illegal with pinned men, but Patch didn’t catch it until slightly later, and I was thinking it analogous to playing terrain while pinned). The ATR Fired (which is when Patch noticed) (TH 3), and missed. The Sexton Fired back (TH 0-2) and hit (5 – 3 + 1), pinning four men and killing one of the pinned ones. I Rallied 2, and the Sexton Fired again (-1C; TH 0-1) and missed, and I Rallied 3 to get the entire Group going again. The Sexton Fired again (-3C; TH 1) and missed (thanks to the Concealment; he nearly had a +2 hit). The ATR returned Fire (TH 3) and missed. The Sexton returned that Fire (TH 0-2) and hit (5 – 3 + 1) to pin three men.
I had been considering moving B onto a Hill to get rid of the Hull Down (not that it had made a difference) and possibly get the rest of the oversized group into range for some Fire cards. Now that the Group was pinned, I Moved C forward instead. Patch discarded a Brush onto them in the hopes I’d reject it, but that was better than two Movement cards, so I took it and Moved up to Range 4. Patch’s C fired on my C (3 – 1 + 1) pinning my SL again (I’d still forgotten that my SL wasn’t the ASL in Group B), and Moved his Group A forward. Group C ducked behind a Wall, while Patch’s A moved into some -3 Buildings.
Patch discarded and then apparently realized that he’d missed a shot against my C, with the DC-toting man at Relative Range 5 and unpinned. Speaking of which, he then Infiltrated Patch’s B with the aid of a Movement card to pass the MC, and then passed the Infiltration check as well (got it wrong, but it would have worked anyway). Thanks to us being unfamiliar with Infiltration, DCs, and CC vs armor, we missed the fact that it the attack against the tank should have gone off right then. My Group B Fired on his A (2 – 2) but got no effect (every RNC was 2 or worse…). I finally Rallied the pinned men in B, and we figured out the goof on CC vs the Sexton, and resolved it (+4) and got no effect.
A Sniper forced the Sexton to Button Up, but they immediately Rallied to become CE again. I Rallied my SL in Group C, and then the Sexton Fired on Group C (-2C; TH 0-3) and hit (5 – 1 + 1 + 3) to kill the man who had been carrying the DC and end the game with my squad broken.
Afterword
In between our two games, I saw multiple references online that this scenario is unbalanced. And I can’t argue with that, since in both cases the attacker didn’t even take losses, though Patch made a decent try at running out the clock after killing the commander of my Sherman in the first game.
I’ve been thinking that splitting my Group A in half and put the other half in D. Either A or D would be at longer range to the Sexton, and the only way he could plow through a large group with that big 88mm gun and its ‘5’ effect would be B in the -3 Building. But doing anything effective would still require being able to maneuver, and not being able to draw any Movement cards for nearly half the first deck kept me from getting to cover, or to a range where the rifles could do anything. The ATR at least allowed me to throw a fair amount of Fire cards downrange, and even needing 4s and 3s to hit, I figure I should have connected at some point. Patch was worried he’d just get picked apart by all the Italians out there, but the lack of Movement played into his long-range strengths.
Getting into DC range added some nice excitement to the end of the game though; neither of us expected me to suddenly make it to RR 5. It’s a pity that I still needed a decent RNC to do anything, and couldn’t connect. Patch would still have easily won (off of VPs if not breaking me), but at least I would have vented my frustrations.
Discussion ¬