
Bloody Rules
Mark came over on Saturday for some FtF gaming, and brought over Bloody April, which he’s been wanting to try out for a while. We knew that it’d be a day of kicking the tires and exercising the systems, as I think both of us went through the rules and had trouble picturing just how it would all work. Sadly, we didn’t anticipate the parts that really gave us trouble.
We decided to try the second scenario (with Mark taking the RFC, who have more to do), which is the first one rated as a ‘Patrol’, or a small scenario, and started the setup with figuring out our AA deployments. Mark used a log sheet to record his three hidden locations, while went for the planning map, so I could see where they were at a glance (two notes: it would have helped if I’d used colored ink to make them stand out, and the map is just too small in 8 1/2×11; I think a version rotated 90-degrees and just showing the middle part, where most of the plotting should need to be done, could be handy). Then we ran into the biggest problem: three of the four German flights listed no planes. This led to over an hour wasted trying to find something that spelled out what to do, to no avail. Two things were found: A pair of tables on the back cover of the rules that allowed for generating the type and number of planes in a Jasta (the German units that didn’t have a proper OoB), but there was no rule number referenced by the charts (all the others do reference their rule), and no mention of them in the rules. And the following sentence in general setup rules of the Playbook: “Plane(s) will list how many and of which type with XxType meaning the player will roll to see how many planes of that type will be used.” Which means that the scenarios should list the specifics, and when they do… you roll to see how many you get? We eventually decided that had to be reversed, and that Mark really should be using what was stated (there’s no rolling method for it anyway), and that I should use the unmentioned charts. It was the only way to get going anyway.
Physical set up was fairly easy, partly aided by the card listing where all the Aerodromes on the map are. Keeping all the details of the various taskings straight took some doing, but that was where we expected to be spending a fair amount of effort. Another problem cropped up a bit later: The specific description of the Patrol types states that the start and end points of the patrol must be designated, the Recon description does not. However, the separate Flight Navigation section mentions that Recon does have to predetermine what hexes they’re photographing, along with the Patrol start/end hexes, so I had to jot down the itinerary for my Recon Flight when that was discovered few turns in (Mark had recorded his along with his patrols, but that was more for his convenience at the time). A final unanswered question: Does a ‘Defensive Scramble’ get to go up any time it wants (it seems ‘yes’), or does an enemy flight have to be spotted before they can respond (which seems reasonable given the name)?
Two of Mark’s flights were entering from off-board at the beginning of the game, and the rest took off the first turn. My recon flight took off, along with my closest ‘defensive’ flight, and my other two took off a few turns later. We voluntarily followed the ‘take off into the wind’ optional rule as it makes a lot of sense. We had generated a 15 MPH wind blowing to the NW at the start of this, so we all took off facing SE, which was good for Mark, as that’s where he was headed, at the southern end of the active trench line (the legal patrol area did not include the very southernmost portion), but bad as he was flying into the wind, and losing half a point of movement each turn (‘drift’ due to wind is 0.5 hexes per 15 MPH). Whereas once my flights got turned around, they started picking up a similar half point of movement from the tail wind, and they started really moving. The maneuver and movement system in the game is pretty good. Going along hexspines is legal, so there’s actually twelve headings that can be used instead of the usual six, and along with altitude markers, flights can pick up -.5 and +.5 markers to represent half hexes that adjust movement. You can only pick up the -.5s from headwinds, but speeds are done in 0.5 increments, so you can have a leftover half hex. In general, turns are meant to be short and fast, and speeds look to top out at about 4 hexes, so you get to see what the enemy is doing develop as your own flights move.
However, there’s a few things here as well. Altitude is marked with markers on each flight (the number of markers starts piling up when there’s clumps of flight nearby), in a ‘Time to Climb’ system that has the same markers meaning different things for different aircraft. In kind of the opposite of the name, the marker means how long the aircraft has been climbing (Time of Climb), as you start at 0, and then climb 1 point each turn (if you want to climb, of course, but we were still clawing for altitude with everybody at the end of the 8 turns we got done), until you hit the maximum value for that aircraft, and trade to 0 in the next ‘altitude band’; the markers are color-coded per altitude band, so you can get some idea of where everyone is at a glance. The data card lists the maximum value for each band for that aircraft as ‘4D’ and the like. The letters are pretty obviously for the band it applies to (‘Deck’), but this is never explicitly stated as a notation method, and its a bit redundant on the data card table (the max value for Deck is 4D, the max for Low is 24L…). Being nitpicky, I’d also appreciate a bald statement that climbing past the max value of a band puts you at +0 of the next band; instead it’s just stated “Flights flying at the lowest level of an altitude band will be marked with Alt Band+0 markers…”.
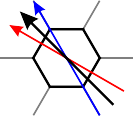 There’s a wind gauge diagram on the map, but there’s just the eight standard Cardinal and Ordinal directions, and they’re presented ‘true’, which means the Ordinals fall midway between the hexspine and alternate-hexspine directions used for maneuvering. So, is a wind blowing NW (black) going along the grid (red), or along the hexside (blue)? We just went with along the grid, but it’s not defined. Also, the Drift rule states “There are 12 possible headings on the map. Five will be with the wind, five will be against the wind and two will be perpendicular and drift in the direction of the wind,” and then goes on to the actual mechanics of drift in those cases. This is actually pretty clear, but a diagram of the twelve directions in relation to the wind direction would be handy for reference, and mentally picturing it in the first place.
As flights drew closer to the trench line, they started coming into observation range. There’s an interesting three-stage detection process, from just moving tracking chits around (which may include dummies), to ones that have been spotted by the ground, to being visually spotted by enemy flights (at which point the actual flight counter is used). Mark started a bit closer, and I started rolling for detection for the last few turns. I rolled horrible. Across maybe four turns, with an average of 3-4 rolls a turn, I detected one flight. For the last couple turns, we had flights in visual range of each other, and Mark spotted one of my flights with one of his, while I failed everything.
For the last turn we had time for, we acted as if I’d actually located one of his flights, as it was the only one that had a shot at combat (his flight had already moved). As it happened, this was Jasta.11, led by the famous Baron von Richthofen, and we got to see the influence of quality difference. Despite the fact that he had me visually identified, he did not engage me, but I engaged him with only an ‘assumed’ detection because of the difference in Aggressiveness Ratings. This is still actual combat with both sides fighting (especially since this was head-on), but I got a good bonus to my roll for surprise, and he got a small penalty. Looking up our actual altitudes turned up another problem, where the tables in the back were mislabled (this has been fixed in the living rules), and we missed the fractional method at the time, which probably would have been fine for us. I had actually gotten to a higher altitude (which, yes, is checked earlier, just to let me try to engage), but while we figured that translated into an Altitude Advantage modifier, weren’t sure, as there’s no definition, and some of the altitude figures break down pretty finely. (Also, calculating this referred to a rule [10.15] that doesn’t exist; or rather, it’s there, but the entire header and rule number is missing so it’s run into 10.14.)
My firepower (a term that was different between the reference cards and rules, but that also got fixed in the living rules) and advantages turned into three ‘shots’ against his flight, while Mark’s squadron wasn’t able to get any. This generated one of his aircraft shot down, and another crippled, with the engine knocked out. Sadly, we didn’t have time left to exercise the gliding rules as the one plane split off and looked for a safe landing. A final bit is that made my ammo depletion roll, sending the flight’s number from 4 to 7. A missed roll would have gotten the number to 10, which is effectively out of ammo! After one pass! A worthwhile lesson for the future. But I got my first kill in the system! Maybe someday I’ll be an ace.
And that is pretty much where we had to pick up. We never even had a random event; Mark kept rolling too high for them. I believe he’s planning on going back to this the next time it’s his pick for one of our games. It actually looks like a good system and game. But this is the least-baked rulebook I’ve seen out of GMT so far.
Discussion ¬