
FB11 Boy Soldier
Patch and I recently wrapped up our latest foray into Festung Budapest: FB11 “Boy Soldier”. Since I’d had the defenders last time, Patch took the Hungarians this time. The Hungarians are defending around the Postal Palace (last seen back in FB7) with nine squads, two 105mm ART, another four squads specifically in the Postal Palace and adjacent building, and the eponymous Hero. He gets HIP and a MMG that goes away as soon as it loses Rate, whereupon he goes berserk. While under Ammo Shortage level 3, they also get 80+mm OBA with three automatic black card draws and a field phone. The Russians have nineteen squads of varying types (including six BVR squads split between 1st line and conscripts), including two assault engineers, a FT and four T-34/85s, at least one of which must survive the scenario. The Russians are trying to take 10 ground level Locations in a line of rowhouses or in the Postal Palace and it’s adjacent building (17 possible Locations overall) in 6.5 turns.
The pre-game rubble knocked down most of the line of buildings in front of the victory areas, and four hexes of the victory rowhouses. Patch placed some extra debris to provide cover for lateral movement from the north to the rowhouses to the center of the map. He devoutly hoped that I wouldn’t do what he expected he couldn’t stop: set up to advance along the north side, which is largely what I did. The rowhouses are 10 hexes all by themselves, but they point directly away from the Russian entry area. The Postal Palace area doesn’t have enough to win with, so I decided my main thrust would start by advancing on the near end of the rowhouses, and my south flank would challenge other area directly, with hopes of getting a couple Locations in there as extra insurance.
Patch’s first shot was a ‘2’, which thankfully Cowered and left no resid, but it still killed my HS. The second shot was ’11’ for Ammo Shortage. The third shot was ‘3’ to kill a full squad. After that the dice settled down a bit, and the most that happened was a pinned squad in O19. Patch called an AR on P17, but a six-hex error put it slightly behind his lines in J14. The bad news was that the second ART turned out to be in P11, and it hit P17 for a 3MC vs my best leader and 4MC vs my FT squad. The squad broke, but the leader HoBed into a 10-2 Hero. I managed to Encircle and Pin the forward HS in N19h1, and after that eliminated his only forward outpost in CC with no trouble.

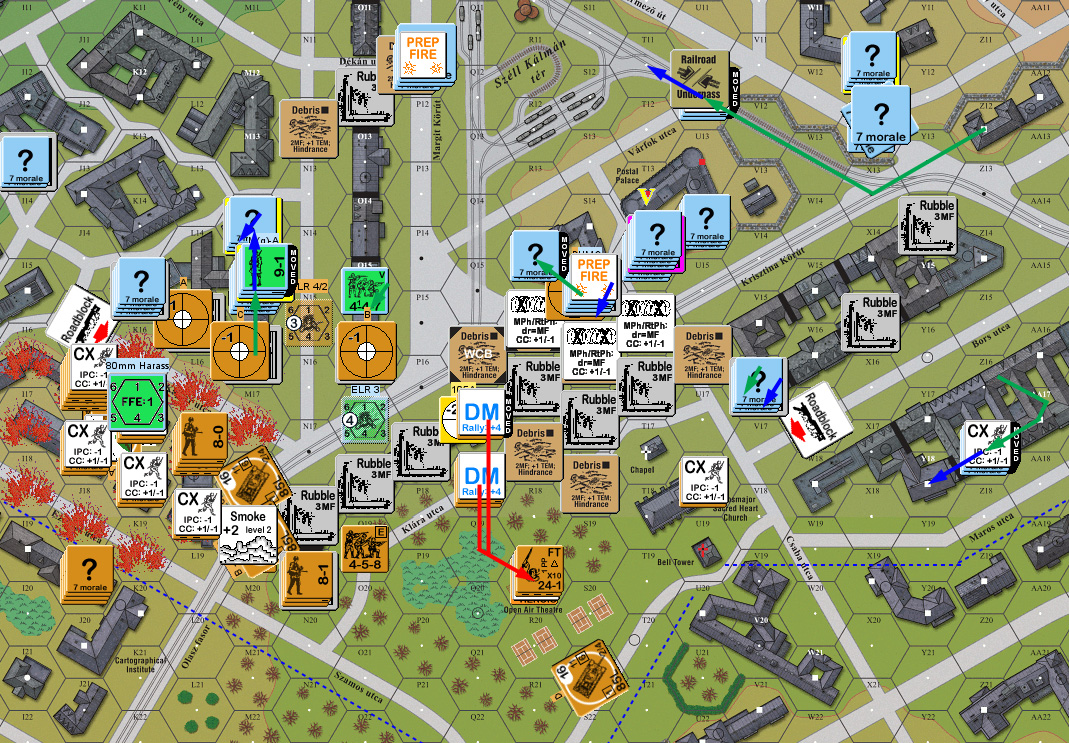
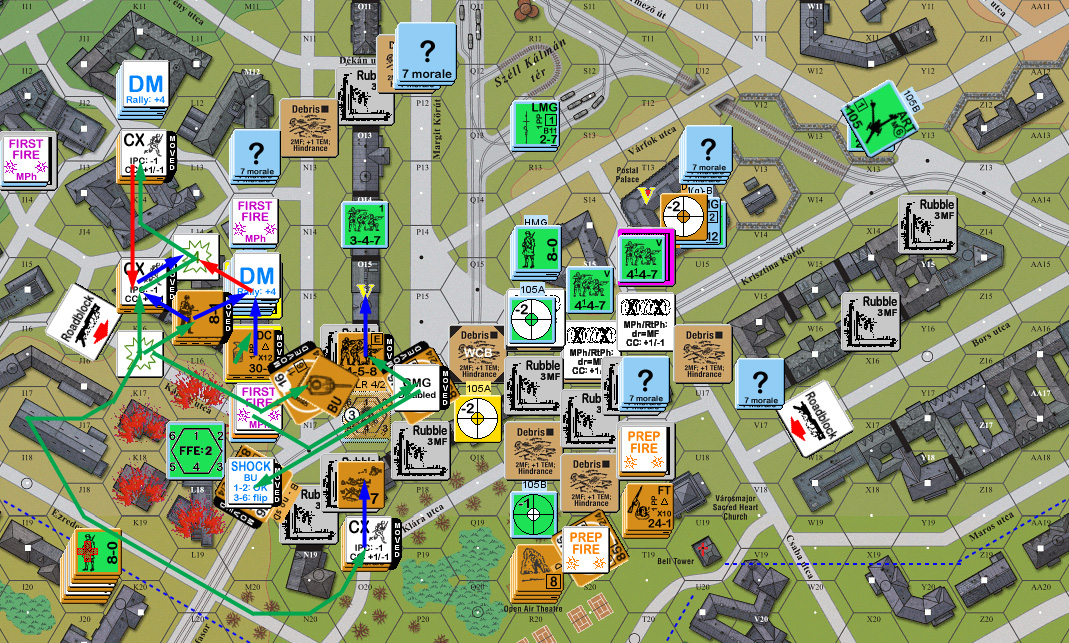
Situation, Russian Turn 1 showing the full playing area. The red hexes are the Russian entry area, and the blue lines are the limit of the Hungarian setup area. North is to the left.
The only RPh activity was my FT squad recovering. Patch accurately corrected his OBA to K17, while starting a Harrassing mission. Despite being centered on a lot of troops, this didn’t have any results, partly due to a lot of high rolls (11s and 12s that I would rather he suffered Ammo Shortage on…). Q17 turned out to be one of the ART’s Boresight hex, and Prep broke and ELRed my squad there, while his HMG did the same to the squad in Q18. Patch started shifting his south-side defenders to the center, and I wasn’t able to do anything other than place more Acquisition.
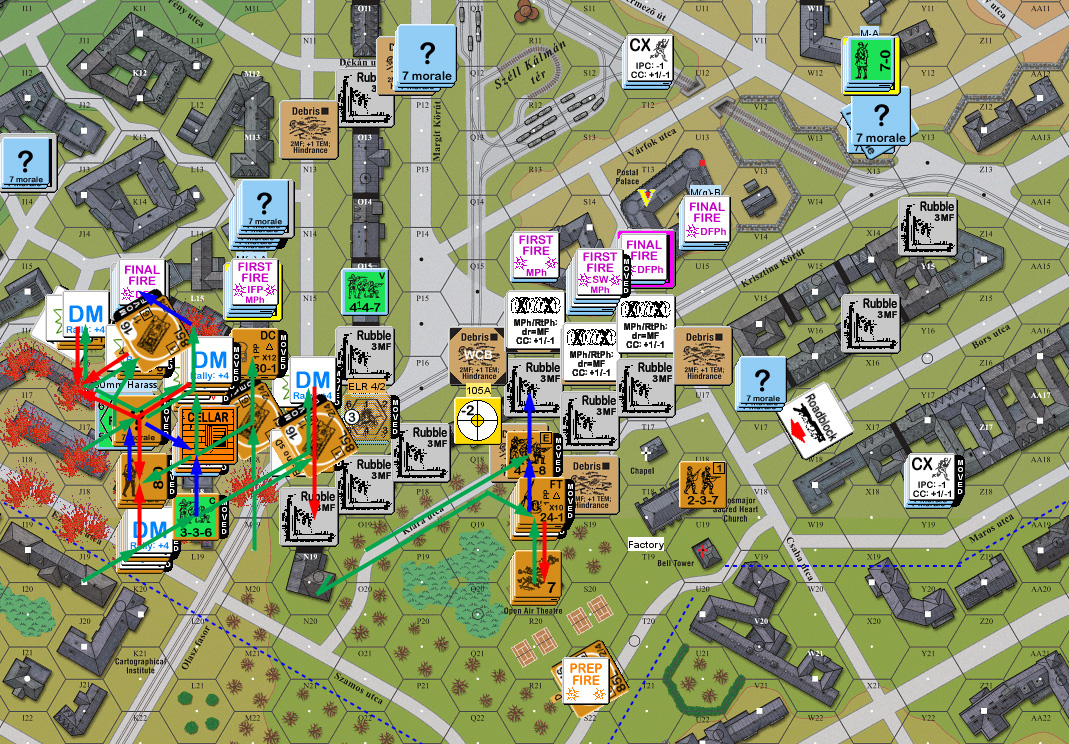
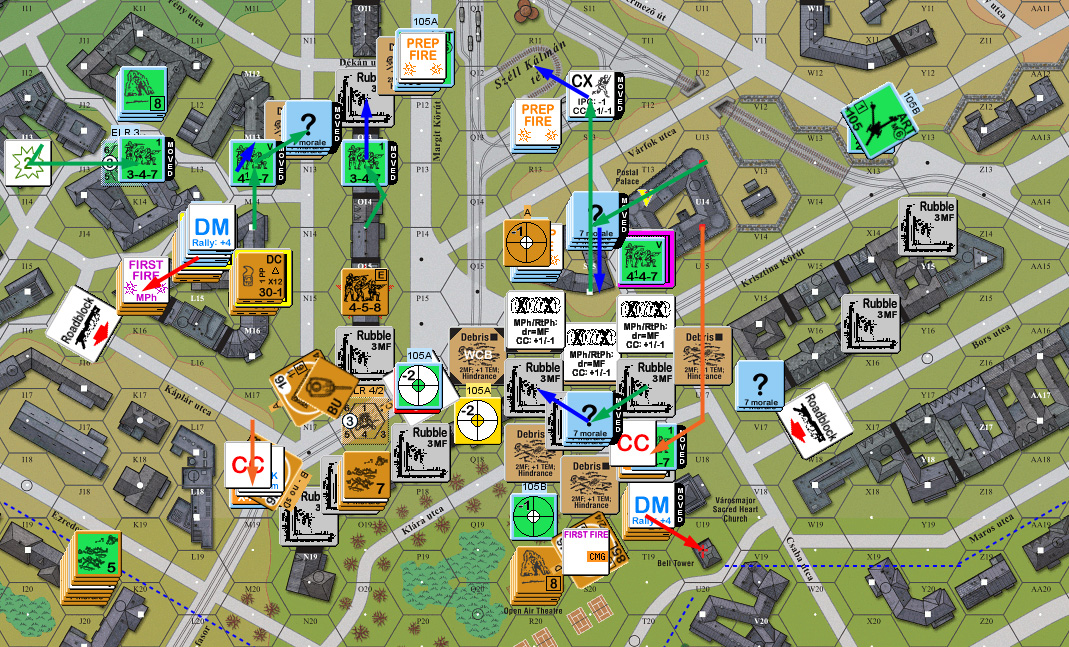
Situation, Hungarian Turn 1.
My two freshly broken squads had fallen back to R19 where the 10-2 was, but did not rally. My southern T-34 got a NMC vs T14, and a pair of “?” at h0 and another 4 at h3 all turned into a single squad at h3. He passed the MC, but activated my Sniper for the only time during the game, which reduced his SAN to a 3. Then the MGs on the tank pinned the leader and HMG squad in S15. My primary goal was to try and push forward in the north, and get in too close for effective OBA while approaching the victory rowhouses before Patch could switch to a regular FFE mission.
Amazingly, since I was having to cross a street covered with 4FP OBA, it did almost no damage. Most rolls were no effect, and the rest of the time I passed the MCs, with the exception of a BVR squad that broke. Sadly, he had plenty of regular defensive fire, and the double jeopardy of that fire broke three squads and my 8-1 and pinned another. To add insult to injury, two of my three BVR conscript squads broke as they tried to move up. Patch also revealed his Hero in L17/c who failed to do any damage, and lost the MMG on the first shot. But, two squads did get across intact.
In the south, the FT squad and 10-2 got hit by a ‘2’ from a 447 shot, killing the former and wounding the latter. The heroic leader tried picking up the FT but died to a K/2 followup. I then sent the force that took N19 to retrieve it, and did so, though my 8-1 pinned in the process.
In DFPh, the OBA still failed to have any effect, and his regular fire only caused Ammo Shortage on one squad (the only Ammo Shortage in a turn that had seen him roll several 11s…). Meanwhile, my T-34 in N17 malfunctioned the MA on a ranging shot.
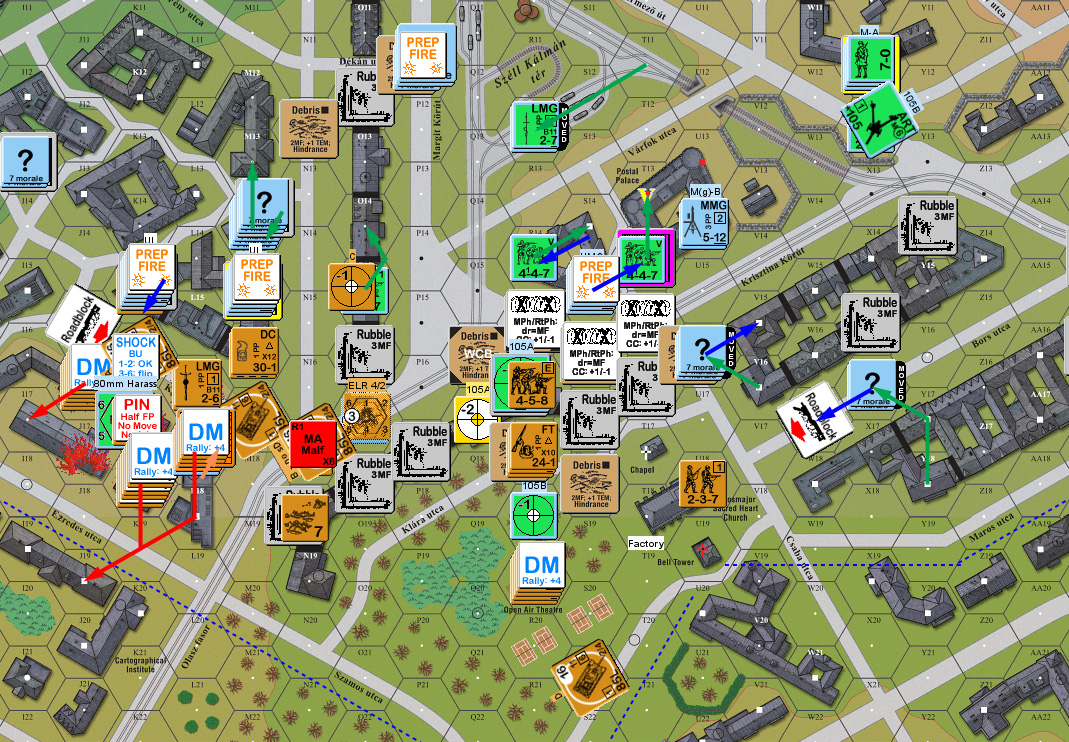
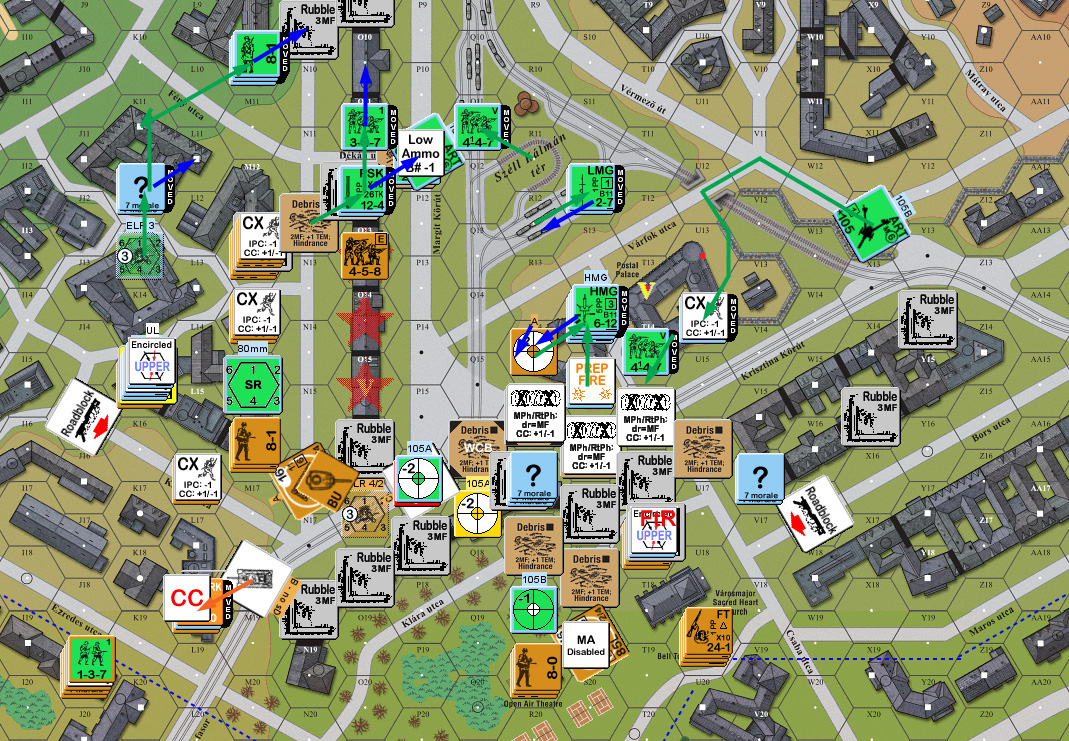
Situation, Russian Turn 2.
Patch still didn’t have anything broken, and I didn’t get anything back for his turn 2. Patch kept the FFE in K17, and switched to a normal FFE Concentration, which shocked a T-34, pinned two leaders, CRed the three broken BVR squads in K18, and broke the two BVR squads in L17 who were set to get his Hero. Amazingly, the one squad out in the open was untouched (12). Movement was confined to more local shifts in position, and shifting a few units out of the way. The only thing my fire did was malfunction the CMG on another tank. I had put the occupants of building L14 into upper-level encirclement, but K15 advanced downstairs and took out the only intact BVR squad in CC for no losses to clear a path.
Situation, Hungarian Turn 2.
N18 self-rallied for my turn, but none of my leaders managed to recover, cutting short any other attempts. K16 recovered from shock, but M17 lost its CMG permanently. The recovered T-34 started breaking things open by breaking the adjacent squad and leader in K15 during Prep, and M17 pinned a squad in R14, while the other two moved up. With only 6.5 of my original 19 squads GO, I couldn’t do much, but I pushed a squad into the wire while the MGs weren’t covering it, and got another squad into the L14 block. One attempt to get into O16 and the line of rowhouses broke, while the other pinned.
Patch corrected his OBA to M17, but it drifted a hex west. It didn’t do anything, and my advance into the Wire absorbed a lot of fire to no effect. However, the FT squad broke again on a 2MC. I advanced back into K15 to put the remaining unit in that building under upper-level encirclement again.
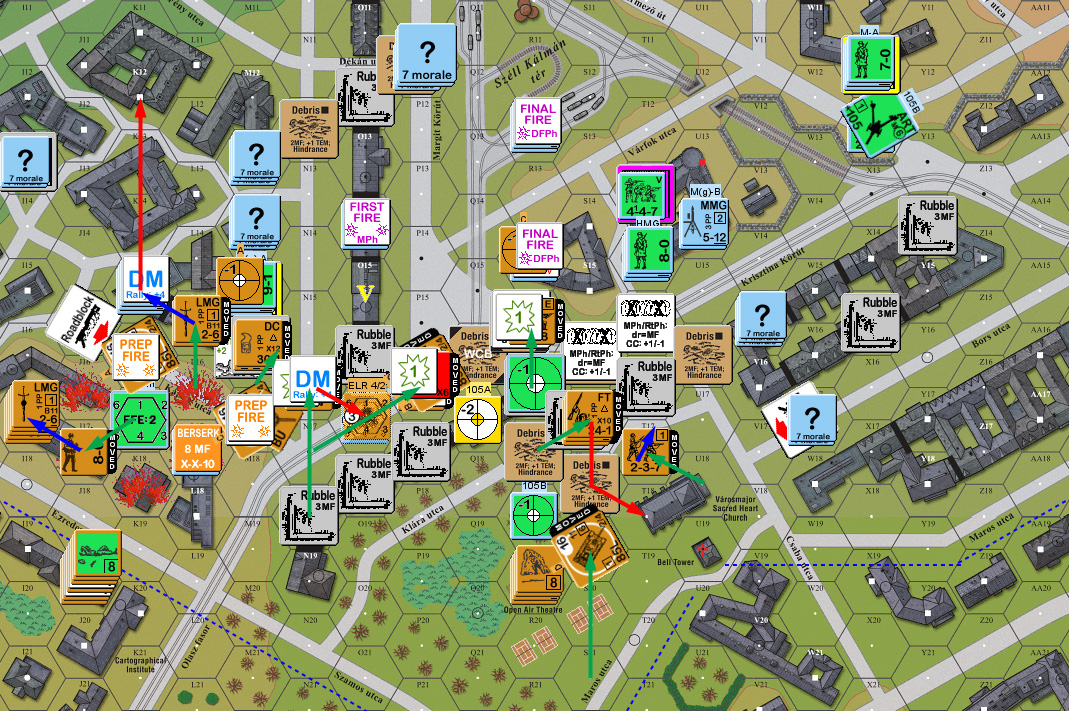
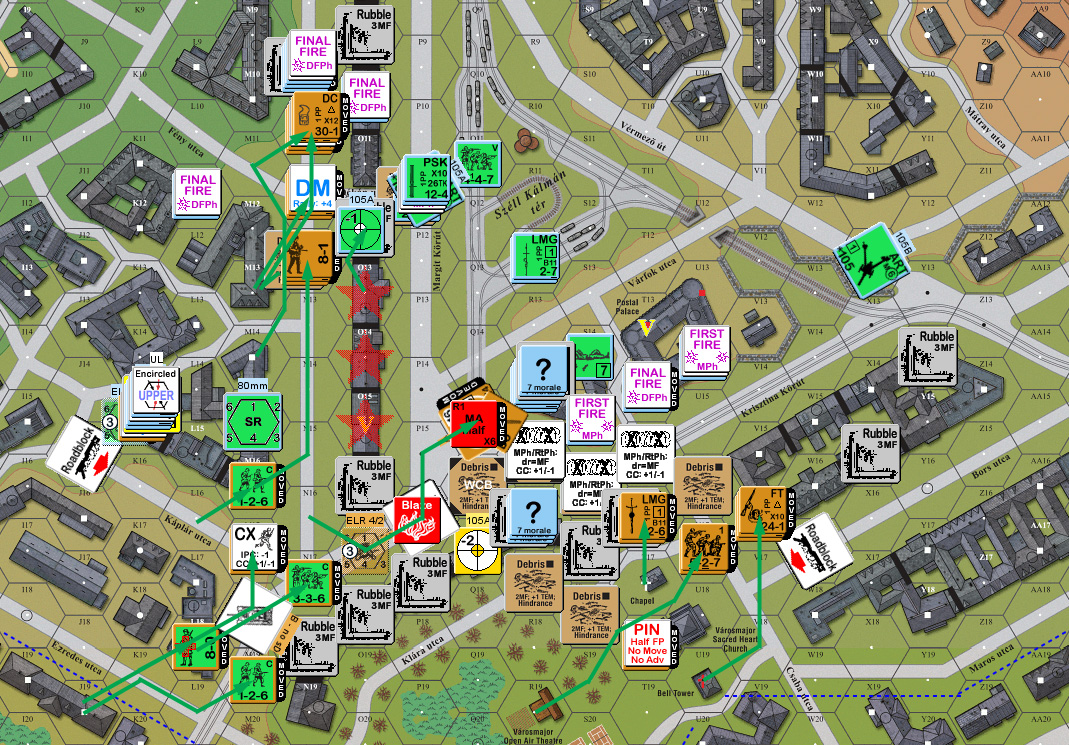
Situation, Russian Turn 3.
My leader and squads on the north edge came back for Patch’s turn, but the BVR leader wounded on a ’12’ (at least he lived). Patch tried correcting his OBA into M17 again, but it went off-course to L17 instead. It did get a ‘3’ on (empty) hex K18, but it did not rubble or start a flame. Sadly the ART in P11 eliminated my squad in R15 (and still didn’t reveal itself).
The Hero charged the adjacent T-34 in the street, while the central defense skulked. Patch’s main reserve in X11 moved north, ending in the open. The tank in M17 the only thing that could see them, and it barely missed on ITT (I wish I’d seen the shot during movement instead of Final Fire, the first one would have hit) while the MGs failed to do anything about the Hero. Meanwhile, the T-34 in K16 finally got a good roll on an IF shot and broke (and ELRed) everything in M15h2 (interestingly, L15 is only a two level rowhouse, so the hillside position of K16 can see over it to the upper level of M15—not intuitive). And the southern T-34 in S19 got a hit on U14 that sent the squad there berserk! (Pity he got to sit there through my next turn.)

Situation, Hungarian Turn 3.
The only thing that came back for my turn was the BVR leader. However, not only did he not rally anyone with him, but P16 disabled its MA, recalling that tank. The squad he’d been escorting moved into the rowhouses, but the tank itself shocked when it entered the OBA under Recall. I was able to advance into the L14 block in force, while one squad went forward to put his brokies under DM. His line turned out to be a little more solid than I’d been hoping, but at least I was getting somewhere again. Patch shifted his OBA to O16, and it errored to P16, where it still didn’t do any damage. Even better, he finally lost a MG when the MMG in U14 rolled a ’12’ (…didn’t think to check RS between that and the berserk squad), and the ART in P11 finally lost concealment as it put acquisition on P16. Advancing Fire featured three ‘3’s, but two of them were misses from moving tanks, and while the third did reduce his broken squad in M15, his Sniper also activated to break K13.
Situation, Russian Turn 4.
Patch didn’t get anything back for his turn, but a BVR half-squad rallied along with the squad that the Sniper broke, and the Recalled T-34 flipped over to Unconfirmed Kill. Having finally cycled through his three automatic black cards, Patch drew a red card to loose battery access. One thing I’d forgotten about the scenario, was that the first hit on a T-34 from an ART is automatically a CH (I’d been thinking I was safe with a net TK of 3 from the front), and P16 blew up as his ART finally connected, though it went under a Low Ammo counter in the process. He had nearly fired at the previous tank in that spot a couple turns earlier, which would have been much better, as I could have used the resulting smoke at that point, that tank later Recalled, and that was the shot that killed my squad in the wire.
Past that, his Prep didn’t do anything to me, but a squad suffered Ammo Shortage. His berserk squad charged my HS in the T17 steeple, overstacking when they arrived. If I’d been smart, I’d have fired as they crossed U17 in the open, but I waited for TPBF, and couldn’t affect them (would have gotten a K/1 too). Now that his group from the south side had arrived in the center, he sent one squad out from there to the tram-line, presumably to help hold, or retake rowhouses now that I had gotten to them.
The Hero tried to take out the UK T-34 but couldn’t manage it, but his berserk squad inT17 took out my HS for no losses.
Situation, Hungarian Turn 4.
For my turn, I got most of my Russians back (just missing the FT squad in U19), and two BVR squads, one of which Battle Hardened to 1st line. The recalled tank died, leaving the berserk Hero not in Melee and still at ML 10, and Patch’s 8-1 and leader rallied in K12. However, his leader in K15h2 took a wound on the self-rally attempt. The T-34 in N16 got a hit on R14, ELRing the leader to a 7-0, but only pinning the HMG squad, and its BMG pinned the squad in N12. Desperate to get the south flank finally moving, I IFed at the steeple, and malfunctioned the MA.
My recovered squad in O18 moved south towards what by now was fairly obviously dummies and a jumping off point for the Postal Palace, but broke to 2MC. The two squads in R19 headed towards the Chapel, but one was broken by defensive fire, along with the 8-1 that was shifting over to rally the FT squad. On the north side, I pushed forward to M21, getting one squad broken in the process. Patch got battery access back, and asked for a spotting round in O14, but it came in way off at I17. K12 malfunctioned its LMG during DFPh. Advancing Fire managed to pin M13h1, which helped me advance in and destroy the squad in CC.

Situation, Russian Turn 5.
Patch didn’t get anything for his rally, but a squad in R19, the squad in M16, and another BVR HS recovered. However, the T-34 in S19 lost it’s MA permanently, going under Recall, and leaving me with a single tank. Mandatory correction of the SR back O14, and it landed in M15 this time. The MMG in the Postal Palace group gave out during Prep, but with the game drawing to a close, the crew abandoned the ART in X12 and entered the Postal Palace, while other units started converging on the end of the rowhouse line.
I broke the squad up in the steeple (overstacked and encircled will do that), but the last T-34 malfed its MA on a ranging shot, putting the last of my support out of action, and inching me closer to an auto-loss. A HIP HS revealed itself in R14h3 to advance downstairs for the final defense. The berserk Hero was finally eliminated in HtH after a flubbed CC roll (’12’; I opted not to Withdraw….).
Situation, Hungarian Turn 5.
My 8-1 in U19 eliminated himself for my Rally (’12’ followed by a ‘6’ wound dr…), but the FT squad managed to self-rally without him. In fact, everything came back, other than the T-34 MA, since I didn’t chance the 1/6 chance of Recalling the tank, while Patch didn’t get anything.
With two turns and six Locations to go, having everything available was needed. The good news is that Patch wouldn’t get a last turn after me, the bad news was that it was too possible for something to pop out on his last turn to take an inconvenient location that I would have to somehow re-take. The south end moved into position to rush the Postal Palace on the last turn, and hopefully pick up a location or two there, if I could get through the DF, unfortunately the remaining leader got pinned on the way.
The north side didn’t go so well, with a backstop unit getting whacked by the Sniper, and two squads breaking and one KIA while trying to advance into range of the final rowhouses. But, one 628 made it through his defensive fire, and with luck could handle the scattered 3FP squads in CC.
However, desperate to cut down on incoming FP during the last turn, I’d moved the last T-34 next to R14, in hopes of limiting the fire of his HMG as I raced for more rowhouses. But in DFPh, the squad hit with a PF and got the win as I had no tanks left. He didn’t even take Backblast.
End of game, Russian Turn 6.
Afterword:
Patch admitted he didn’t think he’d get the tank until his Prep. The odds of him getting a PF were slightly better than I thought. But I had to find ways of keeping him from just shooting everything up.
It should say something that I had four weapon malfunctions (one through IF), while Patch lost three MGs and malfunctioned one while under Ammo Shortage 3. Patch actually rolled lots of ’11’s, which should have reduced his troops to little piles of quivering jelly, but the bulk of them were on his OBA rolls, which made it harder to stop me, but meant that his troops stayed in much better shape until it started catching up to him late in the game.
Also, the fact that all but two hexes of the Q17 building/rowhouse was knocked down made the center area much more open, and meant that my secondary thrust there never got anywhere. A big problem is that my FT never even got into range. And despite the rolls, the OBA was a major problem. The overall record is pro-Hungarian, though there’s not enough plays to really say one way or another. But the Russians have a very tough job, and the balance provision of a Hero isn’t going to do it. I wonder if two automatic black cards might be better.
But, credit also goes to Patch for a very solid defense. He was worried about the north side for good reason; even after he concentrated there it looked more likely than any other route. The rubble and debris and wire in the center and south made them very unattractive propositions. The main thing I don’t agree with is the roadblocks. W17/V17 doesn’t really choke off any important routes (though the cover in W17 isn’t bad), and there’s just no reason to deal with J15/K16. I think that one should have been in M18/M20, since it would have slowed down my first turn a bit.
I truly regret missing out on the Budapest HASL. I was just starting to get back to the game and buying stuff when Festung Budapest was becoming unavailable. Of course, there is always the secondary market, so who knows.
I really enjoy reading your ASL AARs, I think they are as good (and detailed) as anyone does. Thanks for writing them up.
Always glad to hear from someone who enjoys!
In actuality, I almost missed out on FB myself. I had to pay for a root canal about a week after it charged. If it’d been the other way around, I would have dumped it to save money, and I never would have gotten to it outside of preorder. But my finances survived, and I’ve really enjoyed the set, so I’m much more likely to take the hit on the next HASL down the pike….