
J173 Assault on Baerendorf
Patch was over Saturday for our first ASL game in a while. We’d decided to try J173 “Assault on Baerendorf” from the new Journal since it fit in our available time, and used one of the ‘vertical’ boards (1a). The Germans (which I ended up taking) are defending the 1a town with a mix of eight squads, a 75L and JagdPanzer IV. However, despite the nice armor support, there’s a lot of space to cover, and only have two leaders, a 8-0 and 7-0!
The Americans have 5.5 turns to get all Good Order German MMC out of the town, with twelve squads, including three assault engineers and five M4A3 Shermans, ranging from base models to a M4A3(76)W. They can set up in one corner of the area (consisting of a small slice of 1a and part of boards 11 and 38), and can enter some/all of their forces once the scenario starts. The Germans get another three squads and 9-1 in a 251/1 and truck on turn 3.
I let myself get too distracted by all the space out there. Since it’s a short scenario, I didn’t really want Patch to be able to just move through some of the better cover out there for free. But I ended up spreading my defense out too much to be useful. I put the AT Gun out in a lone woods hex in 1aG14, which could see a fair amount of space, though if Patch completely swung through the other side of town, it may never see anything, and it might be too unsupported to do much good. The JgPz went in 11FF8 where it could see the center of the American setup area, and had some decent support.
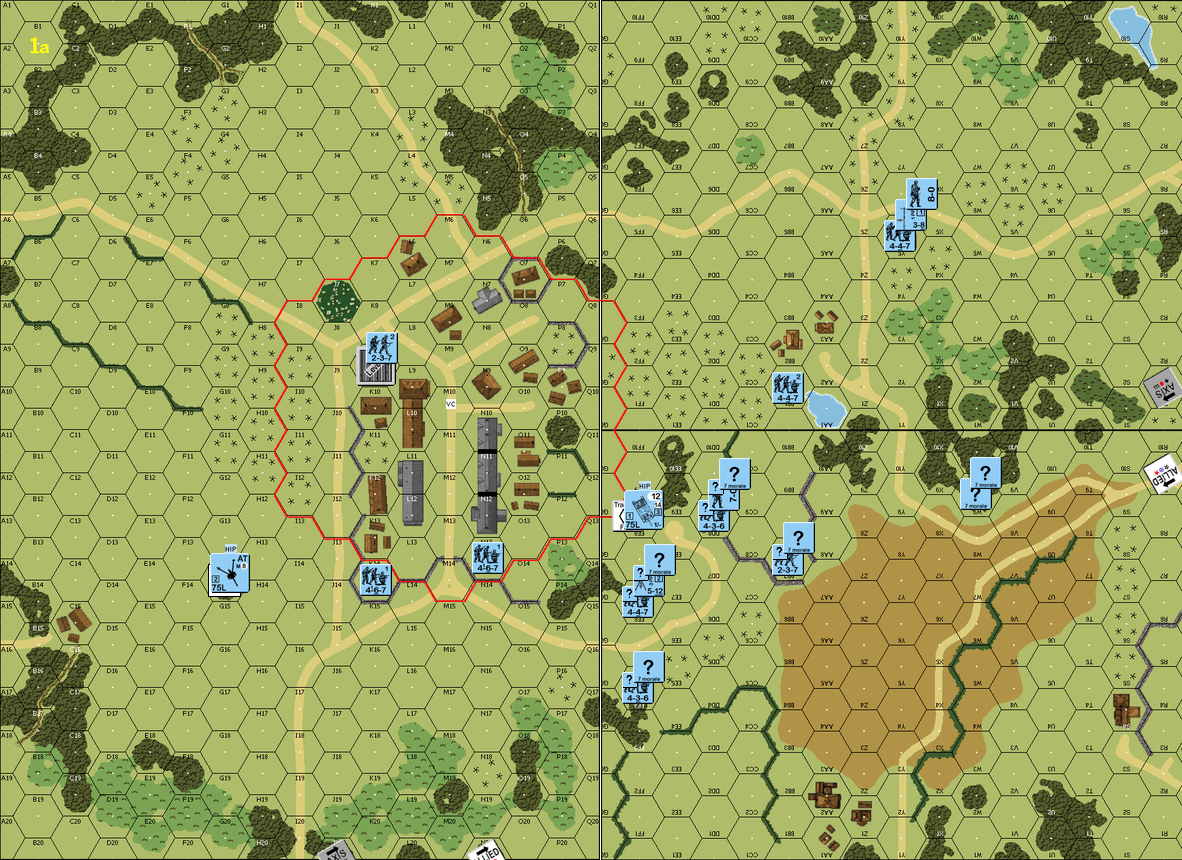
My setup, north is to the left. I didn’t realize that SSR2 allowed free setup concealment to everyone.
Patch lined up almost everything as near the town as he could, but had the two M4A3s enter off to his left (north) with riders. These charged right by my ATG position out of it’s CA, so I let them go. Patch had been worried that it was hidden in the orchards near its actual position, but while more convenient in some ways, there was just too little visible from there for my liking.
Patch quickly broke the up-front conscript squad, but did have to prep a number of units to make sure they didn’t cause havoc during MPh, which slowed him down a little. My turn got off to a very good start when the ATG managed a five-shot rate tear (with the first shot on a ‘1’ ROF due to CA Change). Sadly, part of this was wasted with a Dud and an ’11’ to bounce a shot off a turret. However, I killed the M4A3(76)W, shocked a M4A3(75)W, pinned his best leader, and broke the two squads with him.
Things went downhill from there. Too scattered and too few, Patch pushed me hard over the next couple of turns, and used the sM on his tanks to good effect (Never missed a roll! However, he never got a successful special ammo roll.), and his shocked tank eventually recovered after going to Unconfirmed Kill on his turn 2. The ATG didn’t have many good options, but still managed to take out a M4A3 in the back on a +5 shot through the orchards on my turn 3. If I’d known I’d manage that, I might have sent my reinforcements straight in, but naturally started where they wouldn’t be charging the Shermans directly, and unloaded near the NE edge of the town. As it was, it was tempting to brave the remaining Sherman and see if I could get lucky with unloading and getting a PF shot of in AFPh, but caution won out.
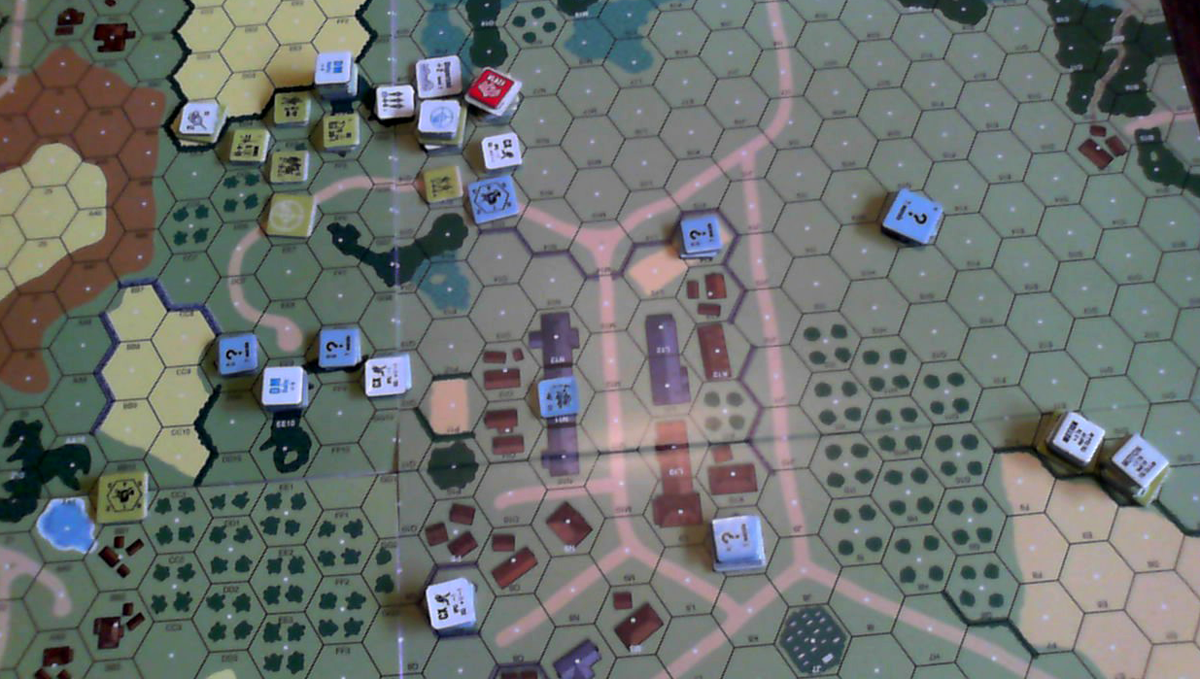
At the time, that back sector was my main hope, especially since I thought I might get into 1aL6, and maybe keep patch off of me. But he got more of his guys into the area, and pushed me further away on his turn 4, and I conceded. It was possible I might do something, but it was getting to be very long odds.

Concession, turn 4.
In general, it’s not a bad scenario, but I had trouble coming to grips with it at first, and certainly needed to set up a much tighter defense. The ATG helped retrieve some of the situation, though the Duds (it had a second one later; of course I also malfunctioned it on an IF shot, and then immediately repaired it) and an no-effect ’11’s kept it from being as important as needed. Turn 2 also fell apart some on me thanks to doubles putting the most important men on Final Fire early. The MMG also never got to do any work thanks to an early break, and I could never recover it. The JgPz never got a chance to shine, but certainly kept the M4A3(75)Ws busy. It was finally killed in CC, since there was just too much going on for it handle, and a PSK squad from the reinforcements couldn’t come up fast enough.
Discussion ¬