
AP17 The Valley of Death
Patch and I returned to ‘regular’ ASL for our next game. I forget our actual decision process, but I think Patch was wanting to see the Italians again. I remembered Few Returned, an action pack of Italian scenarios, most dealing with the Soviet Little Saturn offensive. It also has a good reputation for interesting and different scenarios, and we went with the first one in the pack, AP17 “The Valley of Death”.
The Russians are defending the board 18 hills (two of them are ignored to make it a single ridgeline) with twelve squads (almost half conscripts), a few machine guns, a pair of ATRs, pair of light mortars, an 82mm MTR and a 76mm ART, and have to put at least one squad and foxhole on each hill. The Axis force is nineteen Italian squads (mostly first line with some elites) and two light mortars, with a German 81mm MTR, 20mm AA, Stug IIIG, and a Panzer IIIJ. The Russians have to set up on or adjacent to the hill hexes, and the Axis wins as soon as there’s no Good Order Russian MMCs on the hill hexes if there’s at least one Italian GO on a hill hex. In addition, there is ground snow, and it is snowing at scenario start. As a final twist, the Italians can use Banzai Charges, as long as at least one MMC participates. The scenario has a pro-Russian record, so we took the Italian balance of extending the scenario a turn, to 6.5 turns, though I recall several people saying that the real problem is that the Axis player needs to know what he’s doing.
Patch had the Axis, and generally knows what he’s doing….
It’s a pity no one told his dice.
I set up with the northernmost (18Z7) hill as my main bastion as it has the only level 2 terrain. The two adjacent level two hexes got a 50mm MTR and the 82mm, while the third level 2 hex got the HMG and 8-1. The only other hill with cover is J2, with a wooden building and a woods hex, and that was my secondary command post with a LMG, MMG and the 8-0. The other 50mm was down at the extreme south in C2, and the rest was a line of positions that I hoped could help each other laterally if Patch concentrated on one at a time. The widest gap between the hills is near the center, and I put the ART in N2 facing the road, figuring that sooner or later a tank would cruise through there (and if not, it could cover my second concentration in K3).
Patch set up in roughly three groups, with the PzIII, and two mortars in the north, the other 42mm MTR, StuG, AA, and best leader in the south, and eight squads strung out in the middle.
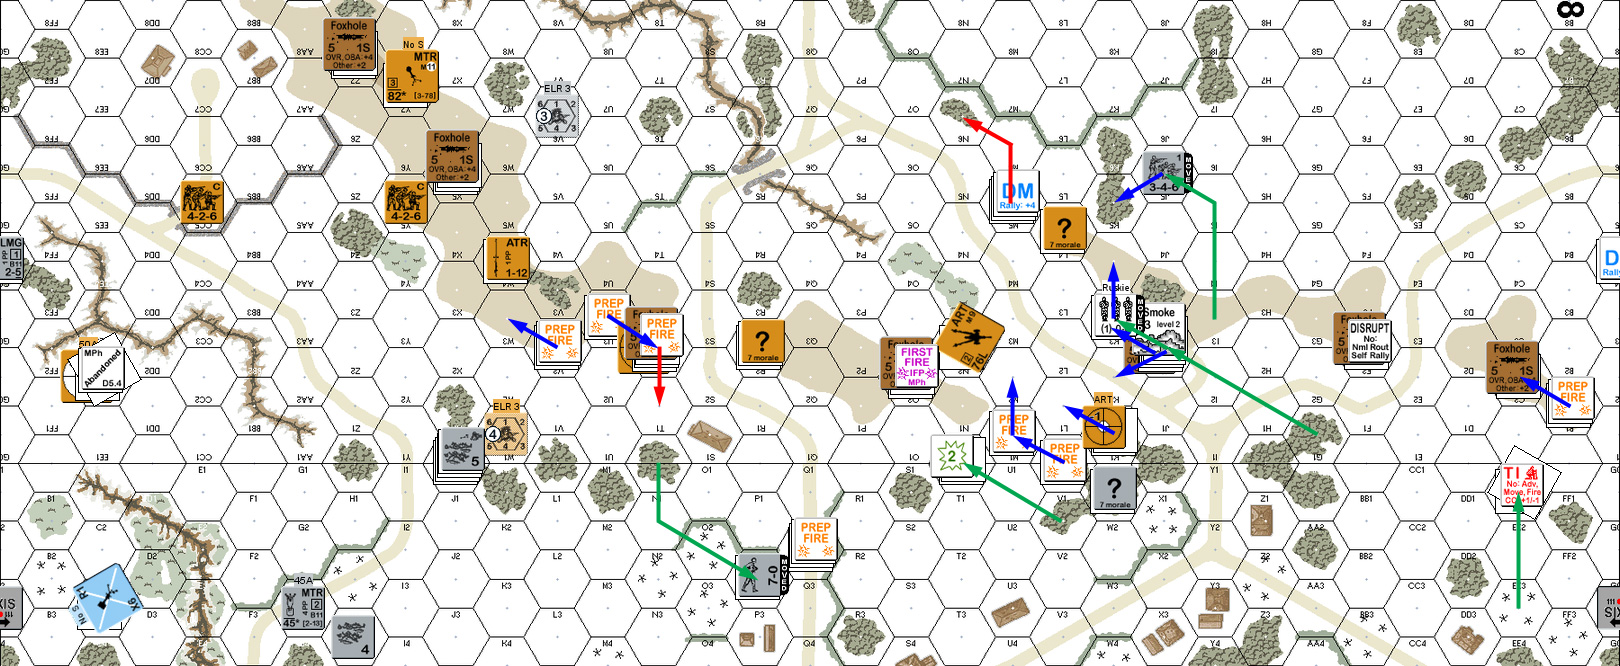
The first thing that happened was the snowfall increased to heavy. The second was that his 82mm turned out to have no smoke rounds, and then malfunctioned when it tried to shell my MTR. On the other hand, his AA gun promptly broke my MTR squad in 18C2. His initial advance was fairly cautious, not going CX with anything except an armored assaulting squad in the north. What little fire I had was ineffective (including a ‘2’ on an ATR shot which of course cowered to nothing).
My DFPh went very well, with a CH from my large MTR against the PzIII which immobilized it and caused the crew to bail out. The second shot was another CH which reduced and broke the squad in the hex, while also breaking the crew.
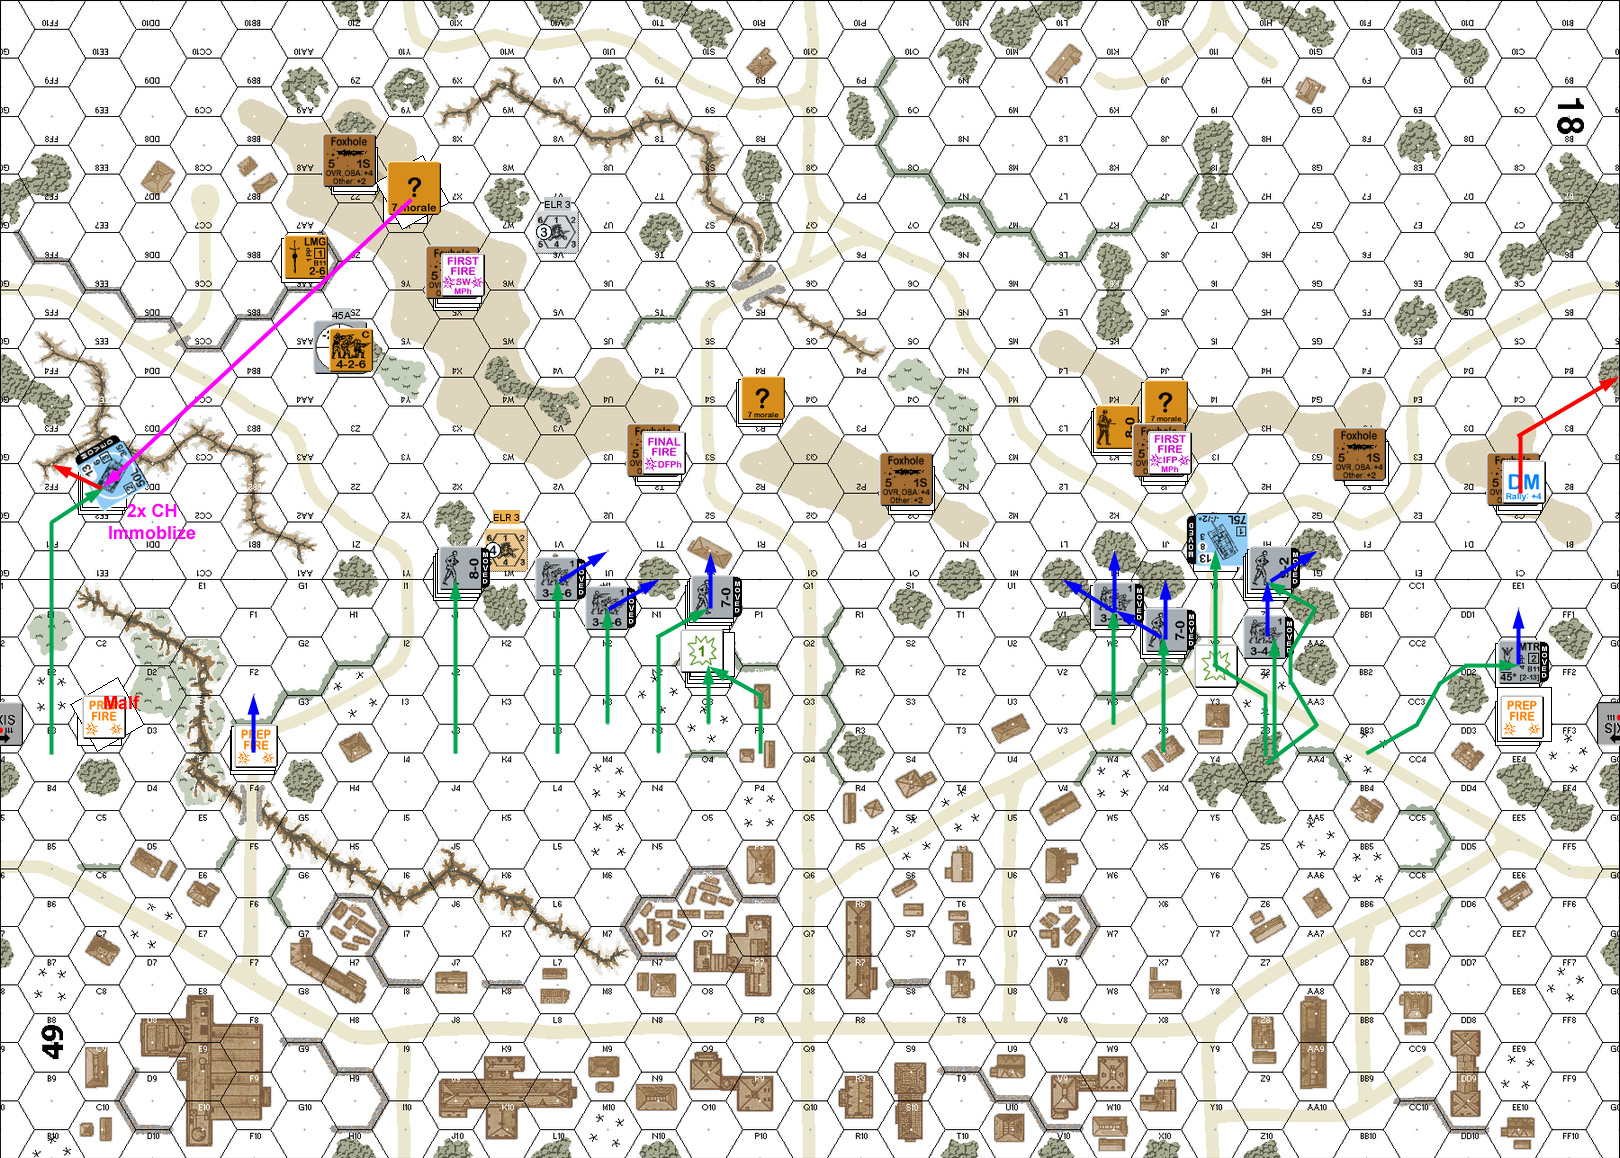
Situation, Axis Turn 1, showing the full board. North is to the left.
For my RPh, the snow stopped, I couldn’t self-rally my one broken unit, and Patch couldn’t get his crew to rally. For my Prep, the 82mm got its third CH in four shots to reduce and break his MTR squad in 49G3. I revealed the ART with a Deliberate Immobilization shot at the StuG (should have just done a regular shot; miss-figured the modifiers) which missed. My other shots cowered and eliminated a LMG (with a shortage of good squads, my LMGs were all in the hands of the conscripts).
With the lack of terrain on the hills, I was generally safer staying put, and didn’t have much movement (which helped the scenario play much faster…). Patch’s fire broke T2 and Disrupted F2 to continue the collapse of each of our left flanks.
Situation, Russian Turn 1.
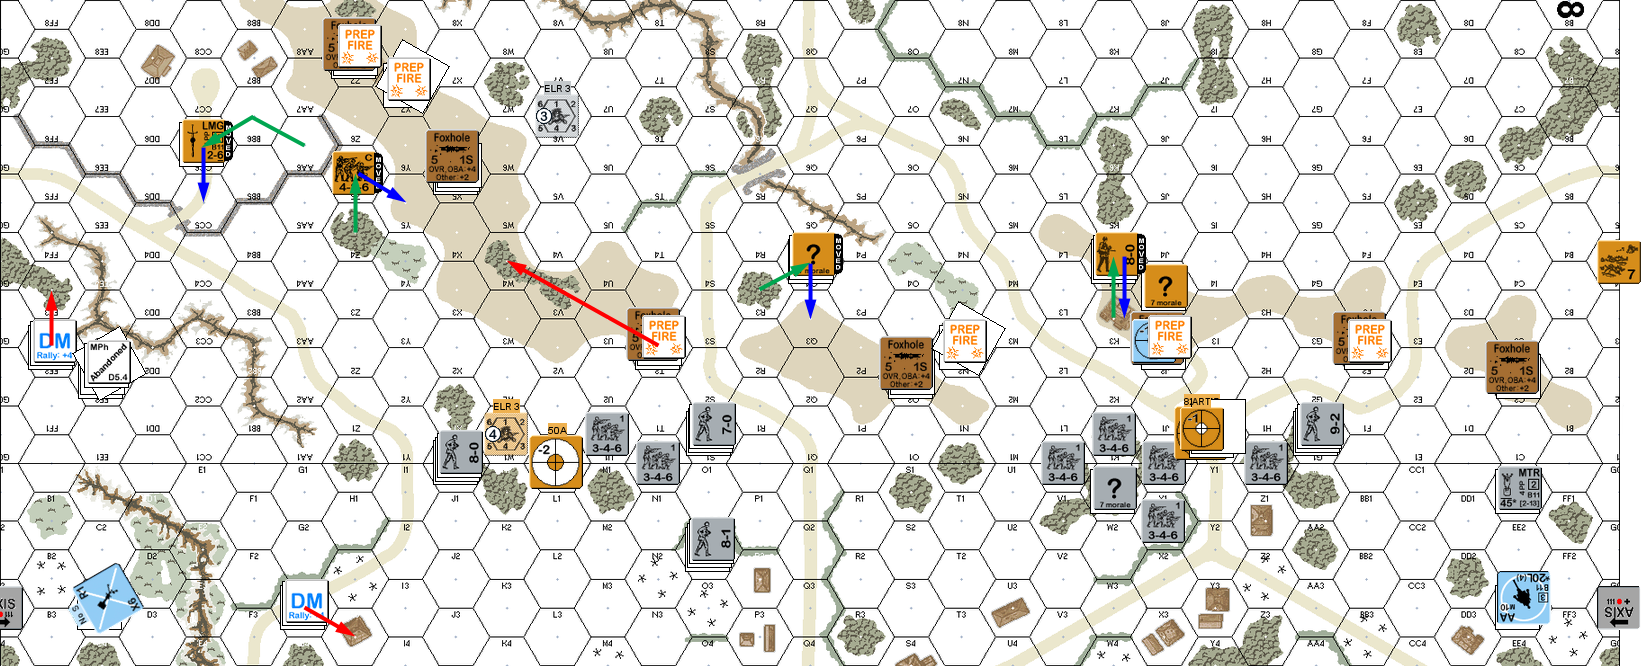
Patch couldn’t repair his MTR on his turn, but his (DM) crew self-rallied! Fire directed by his 9-2 Disrupted the conscripts in J2, giving me further trouble in the south. The StuG fired back at my ART, but malfunctioned the MA, leaving the 20mm AA and a 45mm MRT as his only operational ordnance. Patch’s movement was fairly conservative again, and I couldn’t do much about most of it. It took three tries to get a result against his crew re-entering the PzIII (tying up a MTR and the HMG) but I managed to break them before they could get in. The 82mm pounded X1 and managed to break both squads that Patch had moved up, but I also malfunctioned the LMG in CC5 and the MMG in K3.
Situation, Axis Turn 2.
Nothing good came of my RPh, with snowfall starting up again, and I lost my MMG while Patch’s StuG got recalled. It turned out my MTR didn’t have any smoke rounds either, so the ART covered the retreat of my forces near J2 by putting smoke in there. The rest of Prep pinned a couple units, and broke a squad in 49Q2 (I’ve never understood just what Patch was doing with that group). The major activity was evacuating the J2 hill, which went smoothly, but Patch managed to break the ART crew, and reduce the broken squad in W4 to a HS.
Situation, Russian Turn 2.
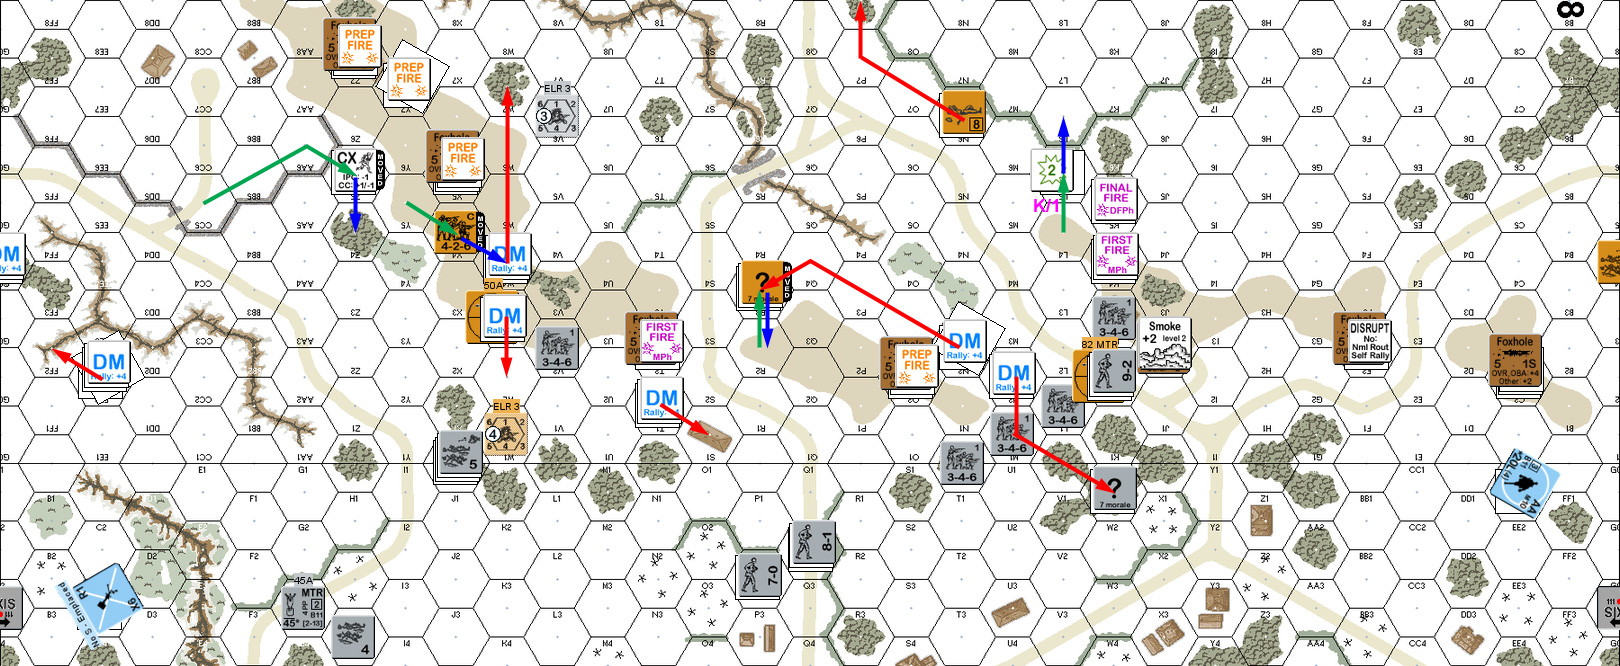
Patch rallied one squad in X0 but still couldn’t repair his MTR, while I lost my LMG. I had stuck the 8-0 and squad out into the gap where he could interfere with Patch’s advance up the board, but Patch’s first shot pinned him and ELRed the squad. Patch broke his remaining 45mm MTR trying to hit O2, and couldn’t get any results despite firing most of his line. During DFPh, my 82mm got its fourth CH of the game on T2, and ELRed the squad that had ducked into my foxhole. The MTR then shifted to facing the south again, and managed another four or five hits on K3, but couldn’t do anything. The HMG managed to break the German MTR crew.
Situation, Axis Turn 3.
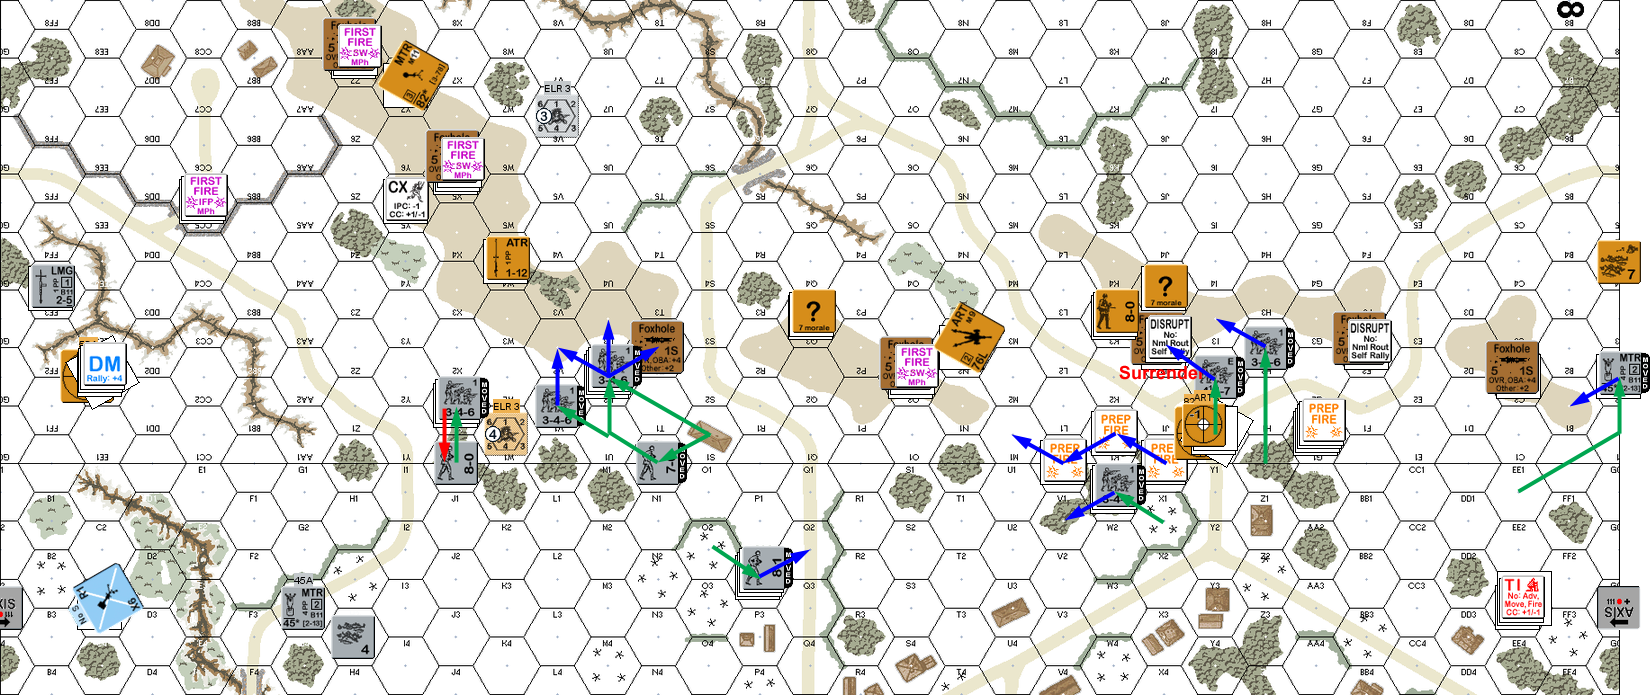
Patch rallied one squad (in 49P2) for my turn, and he grabbed my abandoned 50mm MTR in 18C2 with the same squad that was lugging around his broken 45mm. Again, almost everyone fired in my prep, and the 50mm managed to break his forward squad in W3, and the HMG broke a squad in M2, while O2 malfunctioned its ATR. The still-concealed squad in L4 moved off the hill, and was planning to attack in CC with a 4 vs 3 and concealed advantage, but Patch got a ‘2’, and even with Cowering that was a K/1, though the remaining HS at least passed the 1MC.
Patch malfunctioned the captured MTR on its second shot O2, and only missed the first time because of the smoke in J2. His other shots also failed to get any result, though DMed the increasing number of brokies I had scattered about. I was trying to break up the long line of Italian infantry, but couldn’t get any results either (and no ROF on three ROF 3 weapons). While moving out broken units, I took a few Interdiction shots, but thankfully survived them all.
Situation, Russian Turn 3.
The only result from Patch’s RPh was the loss of his 49C3 MTR crew on a ’12’. During Prep, he finally started getting the breaks he wanted, breaking O2 and the squad in R2 (leaving the 7-0 intact), and leaving me with a grand total of 5 squad-equivalents still in Good Order, only 3.5 of which were currently on hills. Or, a hill.
Patch finally abandoned the AA Gun that had been getting further and further behind the action, and sent the crew racing north. On the north end, he performed a couple of Banzai charges. The first from V2 to W4 failed when the squad broke from my TPBF, but the other from X0 to Z4 worked, and tied up much of my firepower (among other things, I fired the squad in X5 at them, and they cowered to keep the HMG from being able to do anything). His 9-2 and LMG squad charged forward, drawing fire from my 82mm MTR… which malfunctioned!
Final Fire pinned Patch’s squad in K6, keeping them from coming straight after my HS, but his advancing fire in Z4 broke my squad there. RPh was unusual as we saw four squads and a crew surrender, all in different hexes. Sadly, only one of those was Patch’s. The squad that accepted the surrender of R2 then advanced into the hex to engage the 7-0 in CC and killed him.
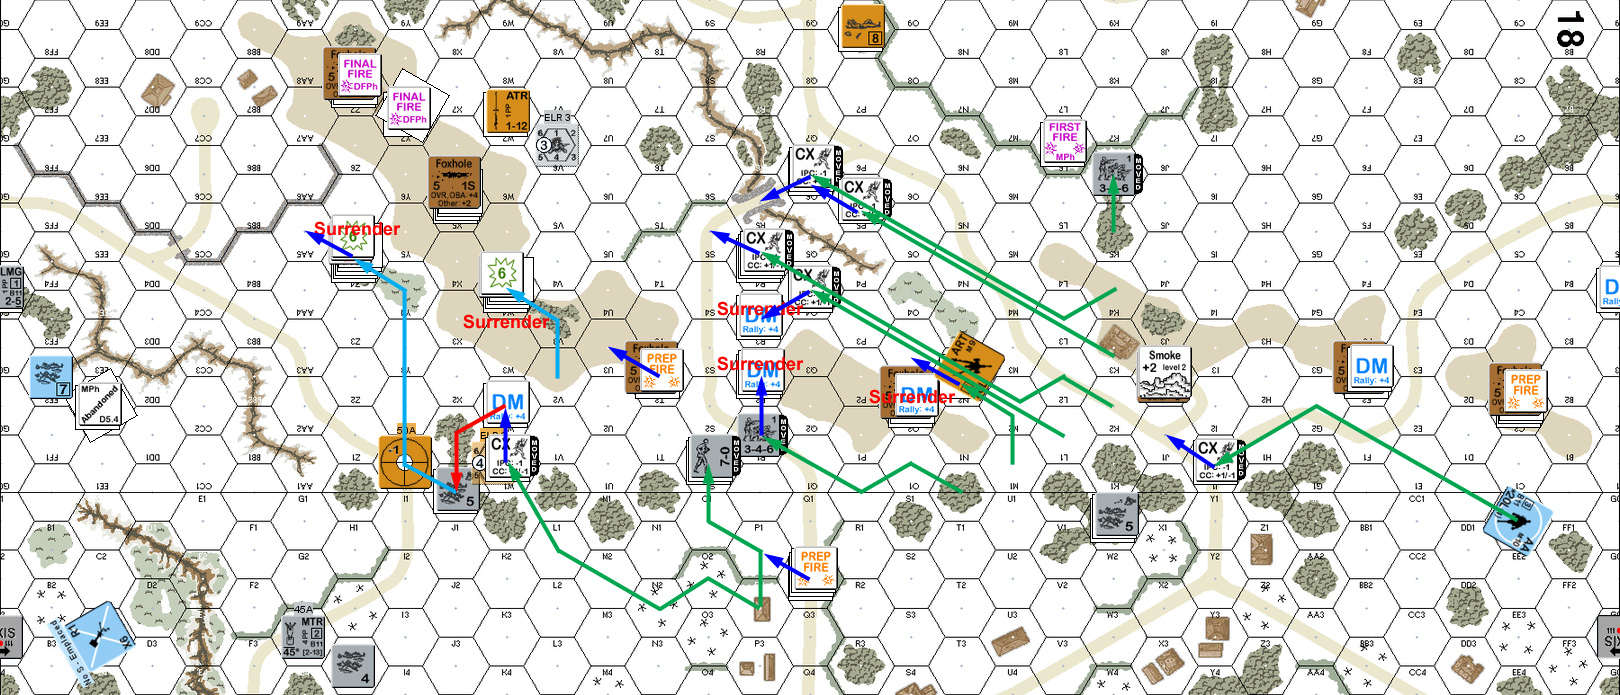
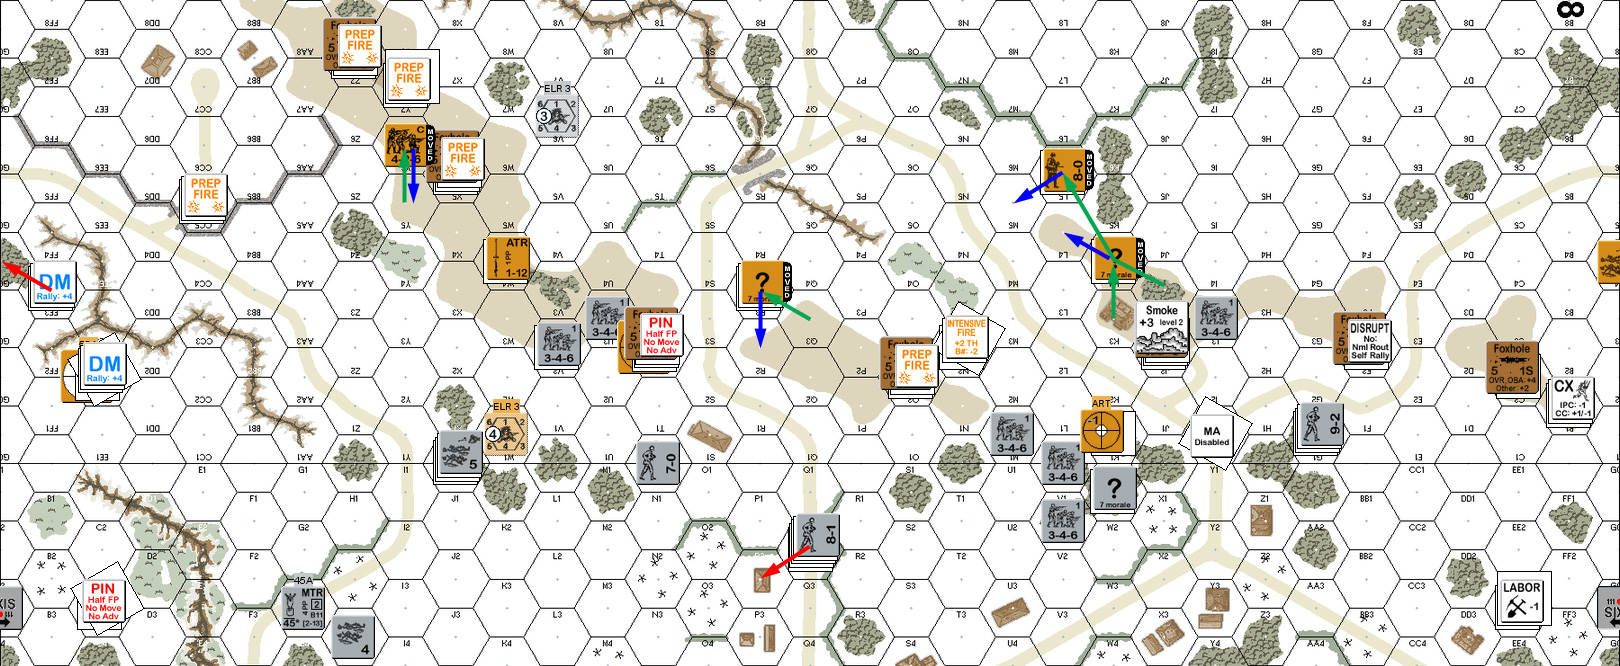
Situation, Axis Turn 4. I didn’t catch that Patch had forgotten that going downslope costs an extra MP until after Q6 had moved.
Patch rallied two squads in my RPh, but I repaired my MTR on the first try, which was a huge bonus. Sadly, it and the small MTR didn’t do anything this turn. The HMG manged to break the squad in R5, and the HMG squad broke the squad in AA5. My HS in L6 didn’t have any great options as trying to get away from the Italian squad adjacent would involve open ground shots at it. A lucky shot from him generated a 1MC, and the Italians rolled a ‘2’. …Being Italian, the HoB result was that they surrendered to my HS. Having preped with everything that was left, there was no movement, and my only advance was for L6 to go into K6. Patch’s fire managed to pin a unit, but that didn’t really affect anything.
On Patch’s turn, his PzIII crew self-rallied, but he lost a HS to a ’12’ in X0. Mostly, Patch spent the turn getting his guys who were still further away caught up with everyone else. My only effective fire was to pin a moving squad after two hexes, which certainly kept it from being a worry for another turn.
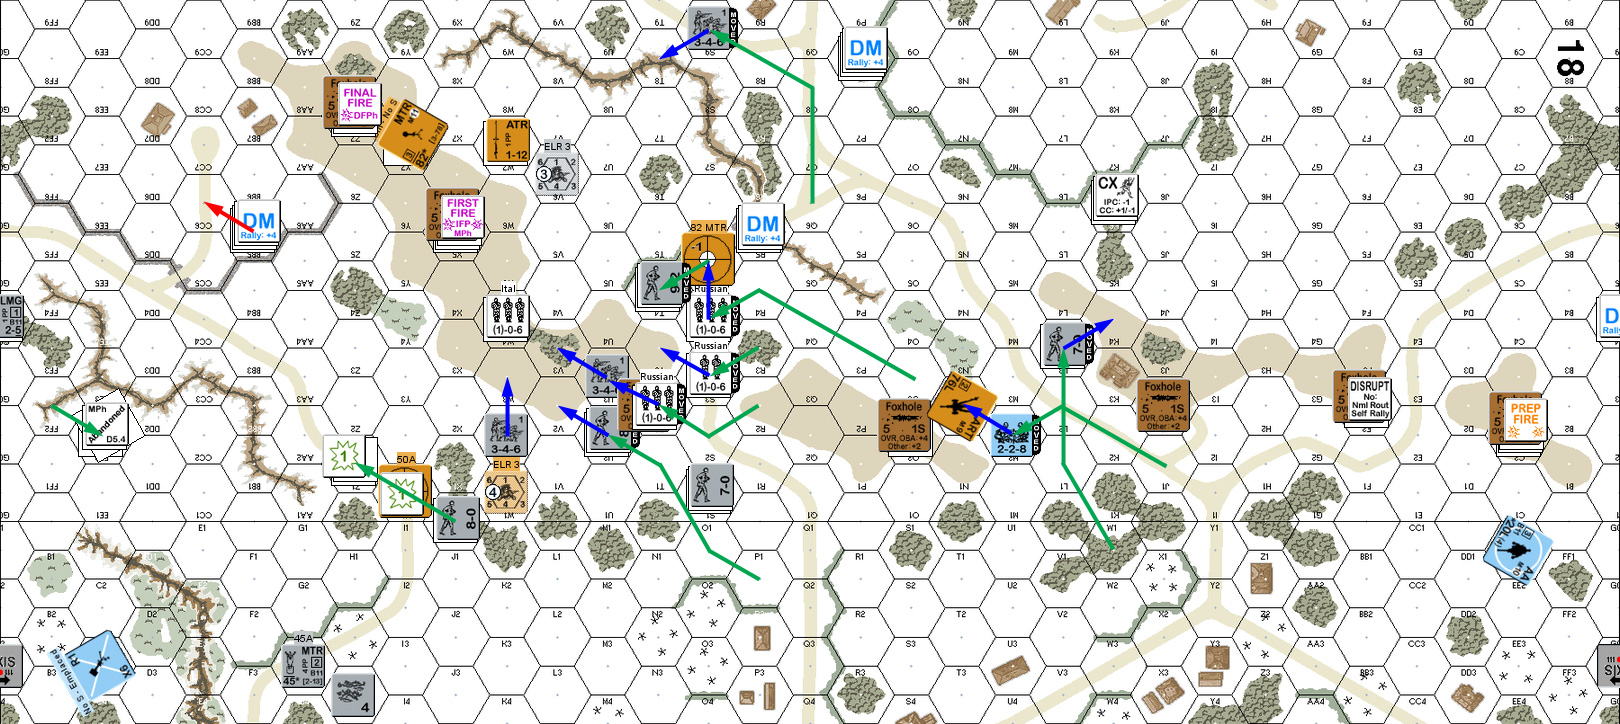
Situation, Axis Turn 5.
The falling snow increased to Heavy for my turn, and Patch recovered my ART with his crew (he had recovered it in a previous turn with a squad who then turned it around before abandoning it to the crew—very clever). Not having much left, I preped with almost everything again, and got no ROF, though I did manage to break the squad in T3. My HS in K6 tried to run south (was going to force him to come after me around G3), but broke to his fire in J5. W4 AMed into X4 to get away from the squads that could see him, two of which were adjacent. Thankfully, he survived Patch’s fire and advanced to Y5. In CCPh, the prisoners in R5 finally passed their TC to escape from their broken guards and eliminated them in combat, giving me a re-armed conscript squad on the bridge.
For Patch’s turn 6, his only result was Disrupting a HS in J0 on a HoB roll, but my 8-0 in P8 finally rallied (Patch had finally been unable to devote a shot to keeping him DM) and brought his squad with him. Patch tried smoking in my HMG with the captured ART, but only eliminated the gun on the IF shot. His vehicle crew re-entered the PzIII, but there was too much going on for me to try and stop it.
With only two turns left, and four positions on the hill to take out Patch rushed forward with everything he had. A Banzai charge at Y5 broke to TPBF, a squad moved through the W4 woods but broke to HMG fire (retained ROF!). His squad in the gully moved out and broke to fire from Z7 (it was unlikely to have any other targets this turn). A Banzai charge from S5 targeted X5, and after two ineffective shots from R5, it took a K/4 from the 82mm MTRs fifth critical hit of the scenario. U3 moved around the woods, and broke to fire from the HMG squad. With everything as tied down as he could get, the 9-2 and squad Banzai charged the HMG, and were eliminated by a 2KIA on the second MF. With only a couple squads left in position (one of which had already moved) Patch conceded at that point.
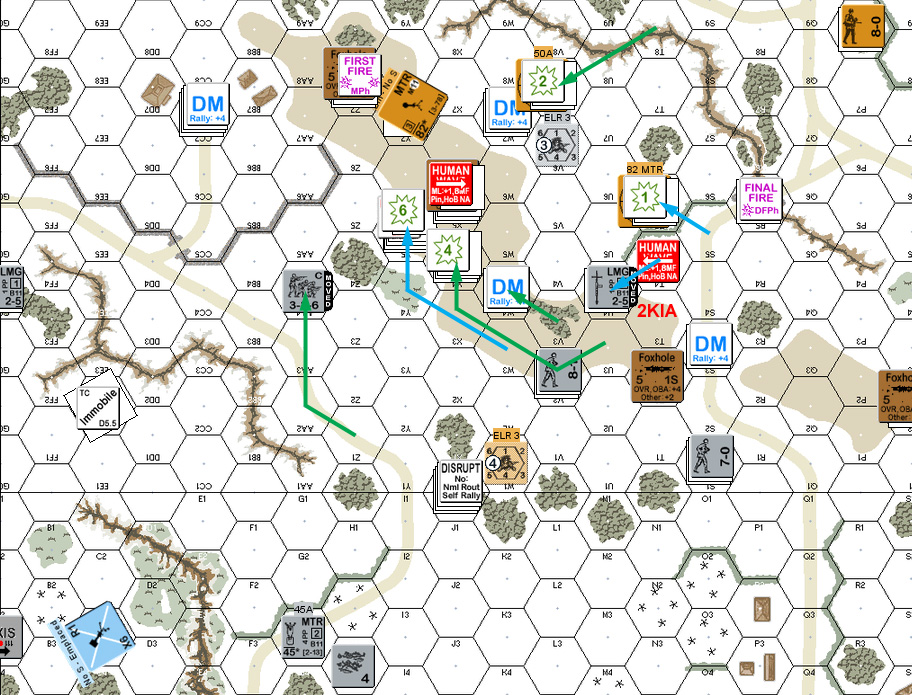
The final moves.
Afterword:
Patch says he got diced. And… yeah. He did. I had forgotten just how many CHs I got with the 82mm MTR. For a couple turns though, it really was looking like it was going to work out for Patch. I only had a handful of survivors, and he didn’t need to take control of the hills or anything. A few good die rolls, and my guys would break, and that would be that.
However, that’s really where the early game bad rolls hurt Patch. He had no long-range firepower left, so he couldn’t make me take the morale checks that I’d been failing all too regularly during the entire game. The quadruple surrender on turn 4 really hurt, and left me with nothing outside my main strongpoint.
I’m still pretty happy with my setup. I’m thinking that the other 50mm MTR needed to be with the other strongpoint around K3, perhaps in J3 and spotted from K3. Patch was thinking of hiding the 82mm in Z8, and using a spotter, but I don’t like the TH penalty for that, and it’s so well hidden there that if something happened to the spotter, both him and the MTR would be out of action.
Patch rolled my SAN (4) a few times, but nothing ever happened. I don’t think I rolled his (3) at all.
Discussion ¬