
FB10 Return of the Black Company
After going up the hill in Tunsia, Patch and I decided to go back to Budapest for our next round of ASL in Europe with FB10 “Return of the Black Company”. Patch didn’t want to have to deal with Ammo Shortage again, so I got the defending Germans.
It’s now Feb 3, and things are getting desperate for the Axis forces. The special rules for lack of food and fuel kick in a day or two after this scenario, but Axis forces are still at Ammo Shortage level 4. Both sides have largely variable forces as they struggle over an area near the Kiralyhgo ter on the SW board (which is an area we haven’t seen before, though it’s not too far from a couple of the ‘big hill’ scenarios). Oddly, both sides have a 5 SAN, but a ‘1’ SAN roll is either treated as a ‘2’ (pin/wound), or it can be used to battle harden your own troops.
The Germans get six SS squads (split between 658 and 468), MGs, a DC, and a few concealment markers. They get a leadership choice between a 9-2 and two 7-0 with a FT and a more mixed set with a HMG and PSK. For me, choice A2 was obvious, since even with the shortage, an HMG would be a big help, and I didn’t want most of my leadership as 7-0s. They have a supplemental infantry choice of 3.5 447 SS squads with a leader and LMG, or 5 Hungarian 347s with two leaders and two MGs. This was a tough choice, and even though I felt short of bodies, I went with B1 as I felt I needed a flexible defense, and I didn’t want to have to worry about keeping the Hungarian units together. There’s a Gun/Vehicle choice, and I went with C2 for an extra M15/42(i), as they are part of the victory conditions and the 105 gun on the Zrinyi II, though a 75mm AT as part of the final defense may have been a better idea. For the fortification choice, I went with D2 for two fortified building Locations and mines instead of wire, even though the fanatic unit that comes with the latter was tempting.
The Russians enter along the west or most of the north side on turn 1, and have a (pre-game) choice between three victory conditions. They can go for 18 CVP, or for a pair of buildings, or for a pair of hexes (and all the hexes adjacent to them). In all cases, the Russians only win if the Axis do not control XX29, and have a functioning M15/42(i) in the hex at the end of the Game Turn. With 5.5 turns, I felt I had to try and slow the Russians down for a couple turns before going to the final defenses, and with such a large entry area, I was worried he’d just find a way around one flank and make good progress on the first turn. I especially gave some thought to entry at the NE extreme and going downhill around the bulk of the level 1 playing area, and straight at one of the option 2 victory buildings from behind.
Pre-game rubble checks did very little (three hexes, one of which fell into the street, but that was well out of the likely area of action), and I ended up positioning my mines for a west entry as there were a couple hexes that seemed inevitable if the Russians were in the area at all. I put my roadblock in YY33/YY34 to block access to the heart of the VC area and provide cover for the AA gun, which went behind it. One fortified building Location went in YY30, next to the German victory hex, and the other in CCC32, one of the hexes the Russians needed for their third option. My Zrinyi II went in AAA32, where it was very hard to get at, but could protect CCC32. The HMG went in YY28h1, where it had some decent LOS down the main north-side street, and could protect against an east-side thrust.
Patch ended up going for a NW corner setup. A lot entered along the west side, but three large stacks were at the west side of the north edge. He had contemplated the main north-south road in the middle of the north edge, but decided it was too vulnerable. He chose A2 (fewer leaders, but with a hero), B2 (more men, no Assault Engineers, and only one FT), and C2 (two T-34/85s instead of four vulnerable SU-76s). His first unit found the mines in ZZ38, but were unharmed by them. Despite some fire from BBB36h1, his entire west force entered without incident.
His first two units from the north edge Searched near my “?” but while the first found a HS+DC, the second rolled poorly and failed to search anything, preserving my Dummies. TT35 threw his DC in DFPh at TT36, breaking one squad and ELRing another while staying unharmed. AFPh broke my squad in BBB36 and revealed the Dummy in VV36 on a PTC. Beyond that, his two T-34/85s got acquisition on the buildings flanking my roadblock, which I considered the anchor of my defense in that direction.
He advanced into the street on the south side, and got his squad out of the mines without incident. There was only one squad left adjacent to TT35, but he was concealed and killed the HS in a successful Ambush.
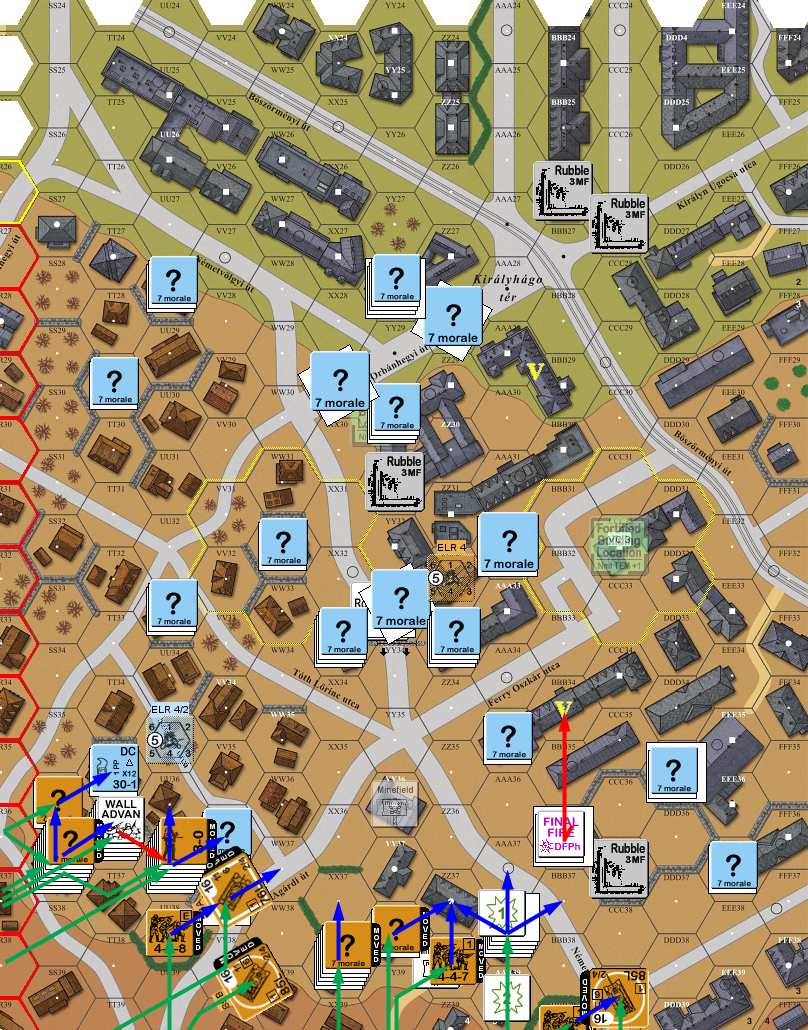
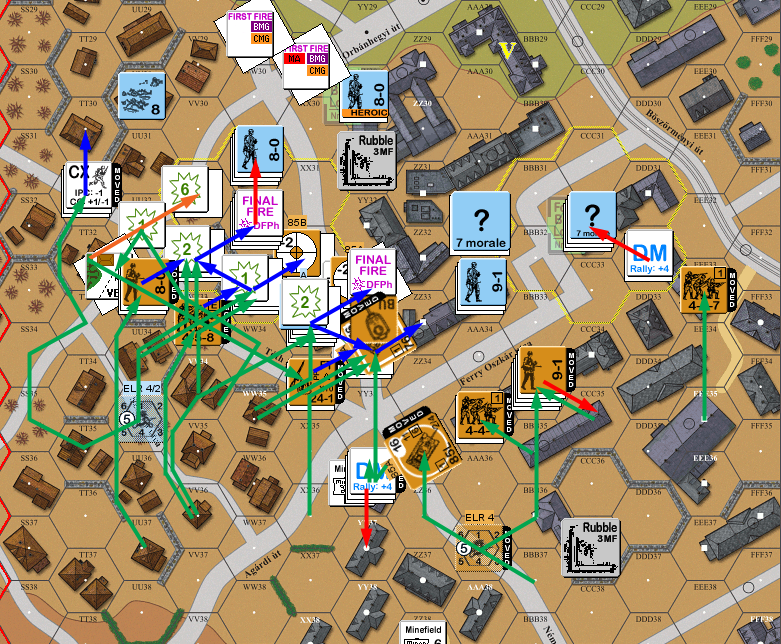
Situation, Russian Turn 1, showing the full playing area, and the hidden parts of my setup. North is to the left; yellow ‘V’s are the second option victory buildings, and the yellow circles are the third option victory areas.
My turn started out well with my broken squad in BBB34 self-rallying. Patch was unable to get his two squads back. My HS in DDD35h1 fired over the rubble at his guys in the street, but couldn’t do anything. I spent my turn drawing the NE part of the line and solidifying things a bit. Patch didn’t have much to shoot at other than my AA Gun, and he pinned the crew there twice. On the north side, I put together a continuous line that I figured would keep some of the heat off for another turn.
Situation, German Turn 1.
Patch CRed his conscripts and didn’t get his good squad back either for his rally. He didn’t bother with any Prep, and started immediately pushing on the south flank. Overall, fire went well for me; I took about twelve shots, kept ROF two or three times, and never suffered from ammo shortage. In addition, I pinned two squads and a leader, and broke another three, one of them ELRing and reducing on a ’12’. On the other hand, another squad in the same group as the last went berserk, and charged into the Location of my northernmost squad, and he was able to Dash two squads across the Nenetvotgyi ut into the under-defended southern flank. He also found the rest of the mines in VV36, which pinned a squad, and a sniper activation of his did a BH on him, turning the squad fanatic and generating a hero.
The good news for Patch was that his entire south force was intact, and the center of the north force was partially pinned, but otherwise fine, it was the edges that that section that broke. Better for him was that his advancing fire was effective, pinning the squad defending against the ‘zerkie in TT32, breaking and ELRing UU33 (made a mistake: we turned him into a pair of HS—SS do go down in quality in FB), breaking the HS in DDD35h1, and eliminating the Dummy in XX33.
Between being pinned, and Patch having a FT Hero next door, I self-broke TT32, who survived Interdiction. Patch advanced two squads onto my concealed CX one in BBB35 (he figured it was a Dummy from the lack of fire earlier). I didn’t attack to preserve “?”, but got nailed by the CC attack anyway.
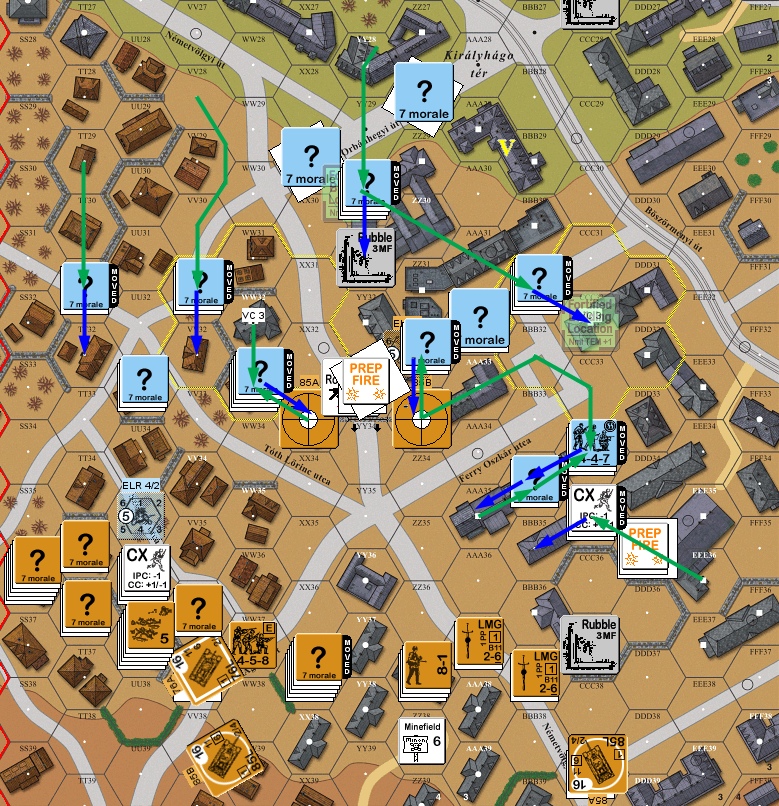
Situation, Russian Turn 2.
My only rally was a self-rally attempt in EEE34, which eliminated the HS on a ’12’. Patch only got his original two brokies back, and the HS got a ‘2’ to HoB back into a 1st Line HS. I’d been pretty happy with my position after turn 1, Patch hadn’t gone too far, and I’d managed to get everyone reoriented easily. Now, I was a lot more worried. I was going to have to back off of a line I’d hoped to keep a little longer, and in the south, I had one squad facing five, with a street Patch could see in back of them.
I started pulling back from VV32-XX33 line, and Dashed a squad to YY13, where it’d join the final defense line. Or tried to. The only thing that could see it was a T-34/85, which got a CH for a 4MC that ELRed the squad (repeated the mistake of breaking to two HSs). He followed that up with another ‘2’ on the BMG/CMG shot for a 3KIA that finished them off. Next, I evacuated BBB34 across the street, with a squad breaking while the leader made it.
DFPh fire was very effective, eliminating my remaining Dummy in AAA35h1 and breaking the intact squad and leader in WW32 while reducing a broken squad. At that point, I should have aborted a move I’d started to shift the HMG from my final defense post in/near YY30 across the street to WW31. But, I wasn’t happy with the LOS in the YY30 area, and I was worried that CCC30 was going to fall easily, so I needed to hold the WW32 area if Patch had gone for VC 3 (which seemed likely). But with just a HS left in the area, that block was just too dangerous.
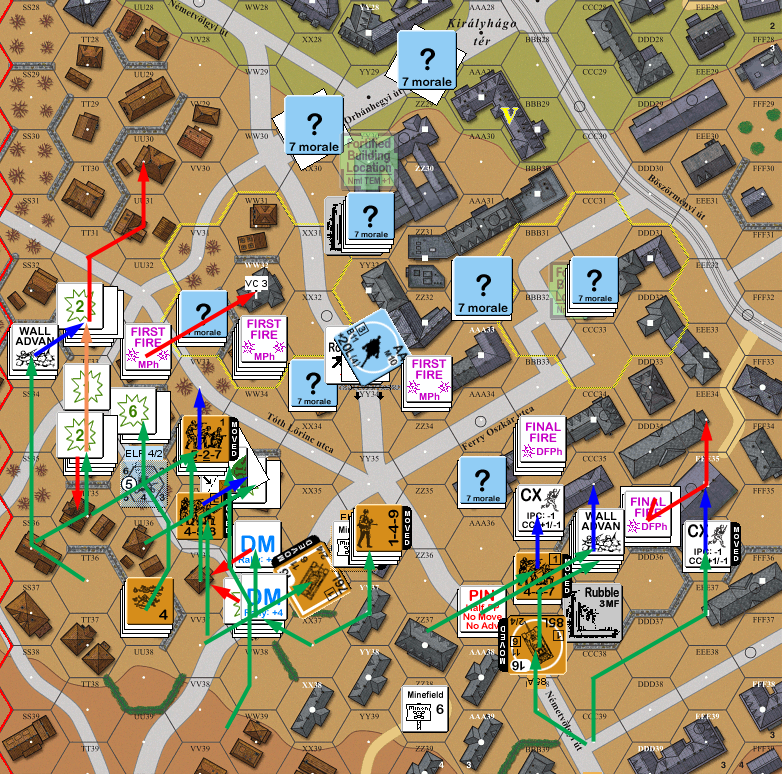
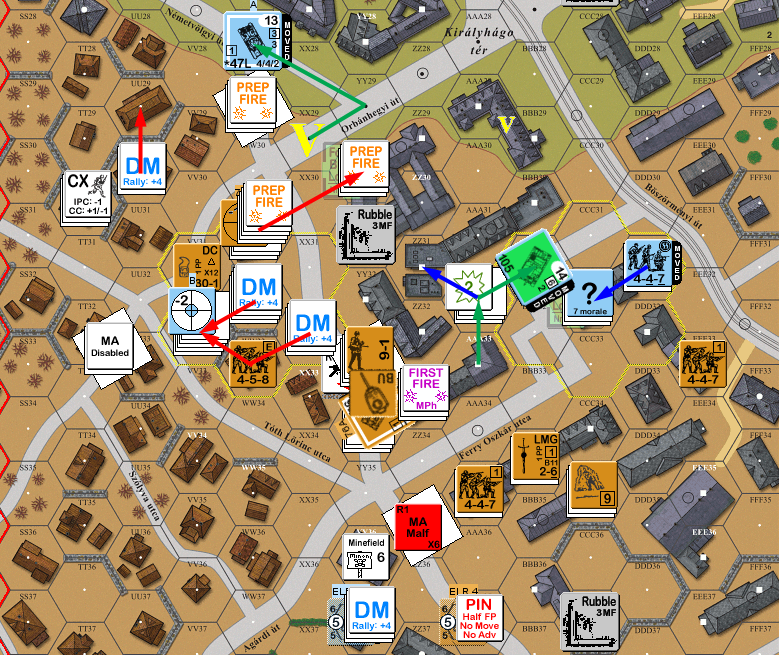
Situation, German Turn 2.
Patch got everything back for his rally, one squad going fanatic in the process (‘2′ followed by ’12’; sadly there was no one in LOS). My HS in WW32 recovered an abandoned LMG, and my leader in YY30 went Heroic on self-rally, but couldn’t bring the HS with him. His ‘zerkie charged WW32, and the M15/42(i) in WW29 managed a K/2 to reduce it to a HS, and the other killed it with a 2MC in the next hex. I nearly malfed my HMG in the process, and did generate a SAN, which ended up promoting his 8-1 in AAA37 to 9-1.
And then things went wrong. Despite firing on everything that moved in the north, my only result was a PTC (which he passed). Now, the only thing bad that happened was the AA malfunctioning (which was fine, I figured the crew wouldn’t be there long one way or another, and I didn’t want Patch using it), but I had counted on breaking up some of his assault. Instead, nothing.
On the south side he mostly contented himself with moving into the BB34 victory building, and getting ready to stare across the Ferry Oszkar utca. His squad in the center (mined) building took a K/2 and broke as he tried to move up.
Final Fire went better, with a couple of NMC, which broke his new 9-1 and a squad in BBB34. Which was helpful against the flood in the south, but didn’t do any good against the immediate emergency. Advancing Fire killed the AA crew on a ’12’ MC, and activated my sniper, which merely pinned his sniper. He pinned a leader and a squad who were in no danger of CC, and… malfunctioned both of the MAs on his T-34/85, just leaving the one T-34/76 fully functional. I self-broke my HS in WW32 before Patch could pile on to him, and hoped I could get lucky in rally.
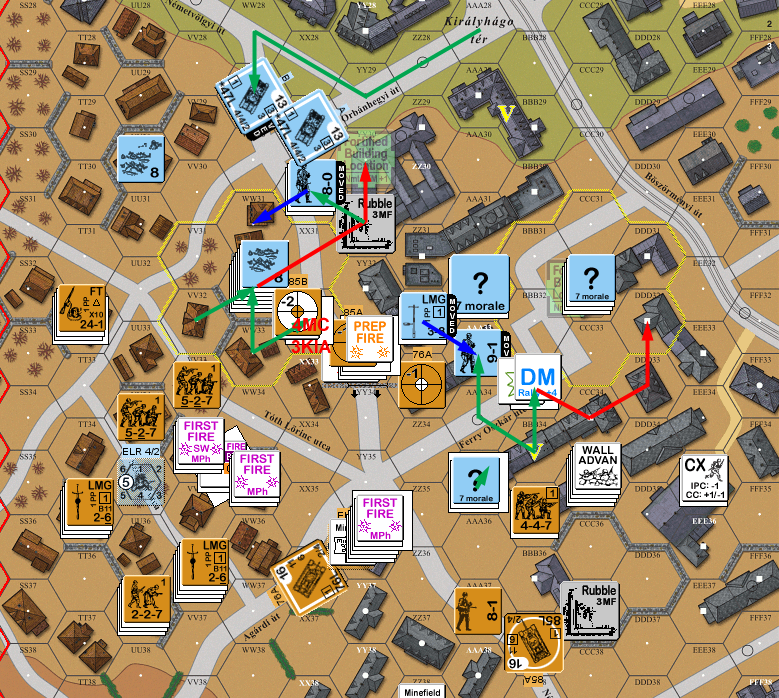
Situation, Russian Turn 3.
I didn’t get that lucky, despite a similarly-DM squad in CCC32 and a HS in YY30 coming back. Patch failed on his one rally, recovered my abandoned LMG in XX32, and disabled the MA on TT32, while rolling a ‘5’ on the other. I’d been starting to contemplate running a tank down the road and parking behind his T-34 in TT33, hoping to get a rear hull hit before he could repair or get infantry to me, but the Recall meant I didn’t need to. Of course, the tank that would have done it got a Low Ammo marker during Prep, and then followed it up with disabling the CMG (’11’ followed by ’12’…).
I contemplated having the HMG crew in WW31 flee, but by this point I figured it was my best chance to do some harm, or it’d be over anyway. It got six attacks off before malfunctioning, and broke his squad in XX32 as well as the 9-1 next door in WW32, but couldn’t affect the squad there.
AAA33 had become a trap, as he could see all the roads next to it, and was adjacent to the one building hex I could shift to. Thankfully, the Zrinyi II was there to offer some cover, and allowed my squad and leader to advance out without breaking before the assault gun shifted location to get a better angle on the nearby Russians. I had the second M15/42(i) back down the slope off of the victory hex so it could expose itself only after I had to worry about a Russian victory.
Patch’s fire naturally concentrated on WW31, and a ’12’ MC reduced my 468 squad to a broken 237, as well wiping out the broken HS there from last turn; a follow up shot broke the 8-0 and finished off the squad. His T-34/76 fired on my still-visible tank, but got a Dud on a hull hit. The only result from my advancing fire was to suffer Ammo Shortage, turning one my SS squads into conscripts.
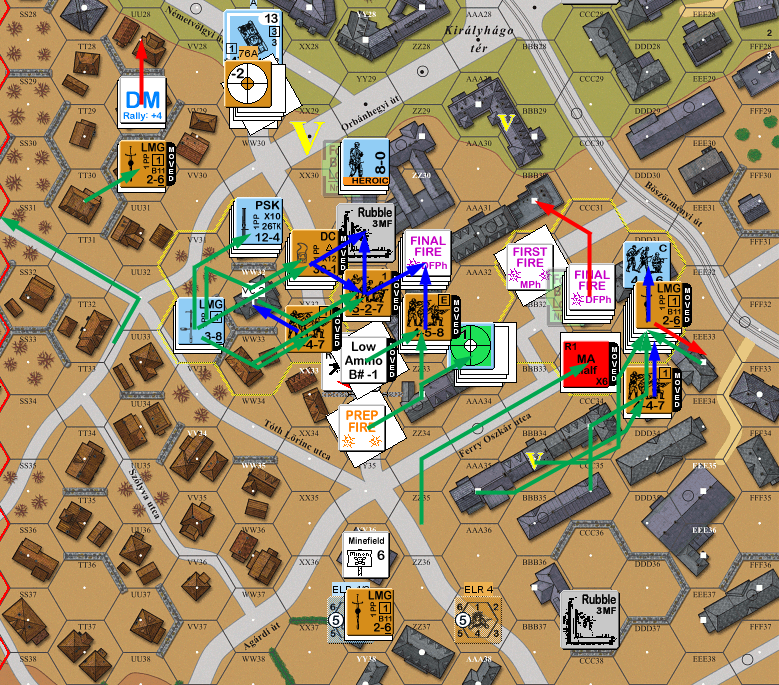
Situation, German Turn 3.
Patch missed his self-rally in YY37, but got his leader and squad back in CCC35, while missing out on the two DM squads that had routed back to VV32. The remaining T-34/85 rolled a ‘5’ for its MA again. The only thing I had was my leader in YY30 who did rally.
The bad luck on tank shells ran out as Patch Immobilized my in-LOS tank during Prep (well, compared to Duds and malfunctions; anything less than a ’10’ from his T-34/76 would have killed it). As usual, my crew panicked and left the tank for the relative insecurity of the street. Patch sent his FT hero up to AAA33h1, giving me a nice dilemma. I was going to have a lot more to worry about than a Hero, but I couldn’t really let a FT be in range 2 of three different targets. I thought of ATT vs the hex, and should have done that, but opted for ITT, momentarily forgetting the TEM, and doing nothing (wouldn’t have hit the hex on ATT anyway).
Patch revealed ZZ31 by searching with a Hero, but lost him on the Search Casualties dr. Part of my plan of ‘fire as often as possible’ came apart on doubles on an unlead attack that kept me from keeping a LMG in reserve. After moving up everything in the WW31-ZZ33 area, the T-34/85 started up Ferry Oszkar utca and turned towards my MMG nest in CCC32. Realizing I was about to be silenced by Target Selection restrictions, I tried for CC Reaction Fire/Street Fighting in the adjacent hex (probably slightly less likely than a PF, but no backblast), got the PAATC, and rolled a ’12’ to merely reduce my squad to a HS. Patch halted in CCC33, his job nearly done for him. They did manage to break an advancing squad later with SFF.
Final Fire from DDD31 managed to break a second squad in DDD32, leaving Patch with a squad and 9-1 to press the assault, and another two squads backing them up. Meanwhile, the only thing I managed to do to the northern flank was pin a single HS in WW31 who’d recovered a PSK. His advancing fire pinned the squad in DDD31, and finally revealed the fortifications in CCC32. He then turned the FT on that location, which got a K/2 to eliminate the HS and wound the 8-1 on a ’12’.
Patch advanced into ZZ31, and got Ambush. With 2:1 odds he declared HtH and wiped me out. In DDD31, I had worse odds for Ambush, but avoided it, but got killed while CRing his squad.
Situation, Russian Turn 4.
At this point, with two full turns to go, I called it. I had an immobile M15/42(i), a functioning M15/42(i), a Zryni II, a broken squad, a broken wounded 8-0, a heroic 8-0, a regular 8-0 and a 348 HS left. The vehicles could help if I had more infantry, but it had just all been wiped out. Patch had gone for the expected VC3, and just needed to finish getting control of the area around CCC32 for the win. If he’d gone for CVP, he was already above what he needed.
Afterword:
It’s a very interesting situation, but I’m not quite sure about the Axis chances here. The dice were odd all game. We seem to have mostly rolled average, but both got zapped by ’12’s all game. Less of that would probably have helped me, but with more average rolls, I figure I should have had another 2-3 incidents of ammo shortage. Between lack of great defensive options and a slightly generous 5.5 turns for the amount of distance to cover, the Russians really have everything they need here.
Patch thinks moving the HMG to WW31 was a mistake, and he’s generally right. The real mistake was probably more thinking that I had to hold the WW31-33 block for another turn when there wasn’t enough to do it with. On the other hand, that leaves fighting to keep near XX29 for three turns (and reduce anti-tank options), and that wasn’t going to happen. All along, I was counting on seeing more Russian squads break than actually did, and I don’t see this going any better without that.
One thing I really should have done was stick with the plan on the M15/42(i)s. One should have always been in XX29, and then the second moves in with the wreck/smoke as cover when it’s disabled. With the 85’s out of the way, that part of the VC was a real problem for Patch. The plan around CCC32 worked fairly well. Things went bad when I let him get a couple extra squads into the area, and early losses hindered me, and the turn 4 collapse had as much to do with his FT as my failed Street Fighting.
I don’t know that I’d be up for playing this again any time soon (I feel a bit bruised), but I’d like to see other people’s plays.
Discussion ¬