
SH126 The Sally
Crossposted from the SFU blog on BGG.
Patch and I decided to turn back to SFB a little while ago, finishing off a project that our group had been stuck on for a while (more on that in a bit). This particular scenario is the third of a set of three in S2 that has Klingons vs the LDR in Y157 (pre-gatlings).
“Captain Kruze had been watching the Hydran border for months, with no activity, when word reached him that the LDR had initiated hostilities. Kruze’s frigate squadron was the northernmost on the Hydran border, and having just left the base at the angle where Klingon, LDR, and Hydran space conjoined, he was in excellent position to sally into LDR space. Kruze intended to raid LDR shipping and avoid a decisive engagement. He found what he thought was a convoy and moved to attack.”
However, Kruze had found an LDR force of armed freighters (three small phaser-armed, and two large disruptor-armed) accompanied by two police ships. It doesn’t look like much, but there’s a lot of weapons in there. The Klingon squadron consists of an F5C, F5, and E4. Both sides cannot disengage at first, with the LDR only being able to disengage at all when both F-ALs are crippled or destroyed, and any Klingon ship only being able to disengage after being crippled.
I had the LDR and decided to load the POLs and F-ALs up on transporter bombs, and started each one with a suicide shuttle armed and ready to go (leaving the three shuttles on the F-ASs for point-defense and group protection if it should come down to that). I started with everything going speed 12, while the Klingons moved in at speed 19. I started in a pretty loose formation, and then tightened it up with sideslips, but Patch split off his F5C about halfway through the first turn. I turned for the larger group, as the F5C’s shields are tougher. A little later, Patch hit with three out of four disruptors to nearly take down a shield on an F-AS (not bad at range 13 with a +1 shift!). The F5C followed up and got one point in (hull…). As he turned away, I volleyed all six disruptors at the E4 and nearly got shield 2 down on four hits. We both followed up with Ph-2 shots, but range and ECM were problems. The F-ASs finally got an internal on the E4 after firing all phasers, and got a lucky R Warp hit.
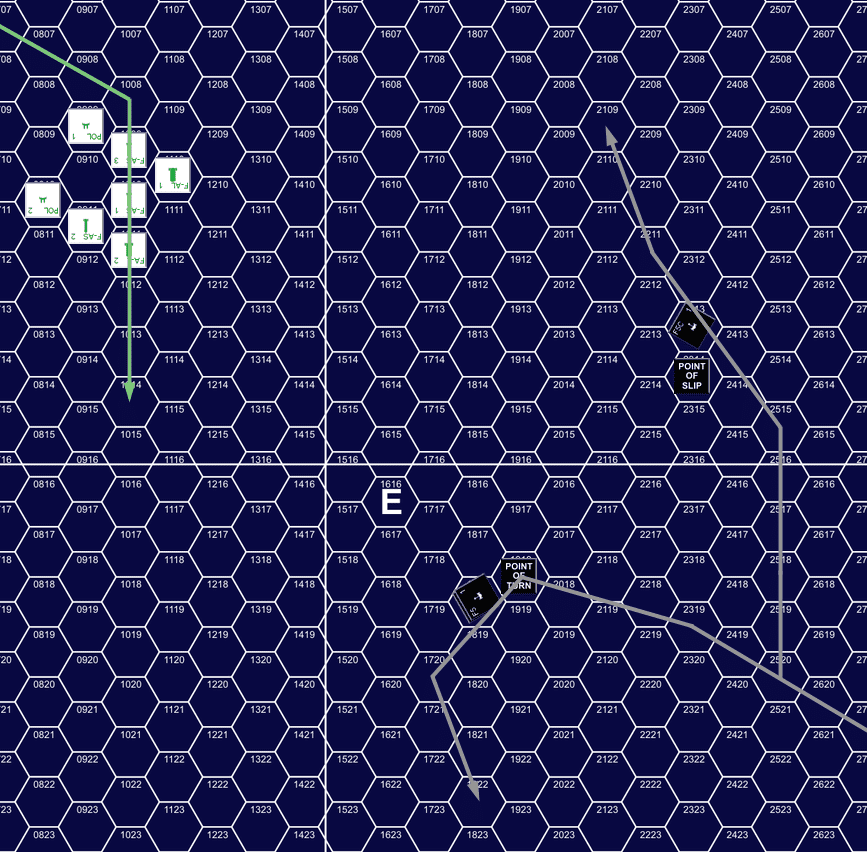
First pass.
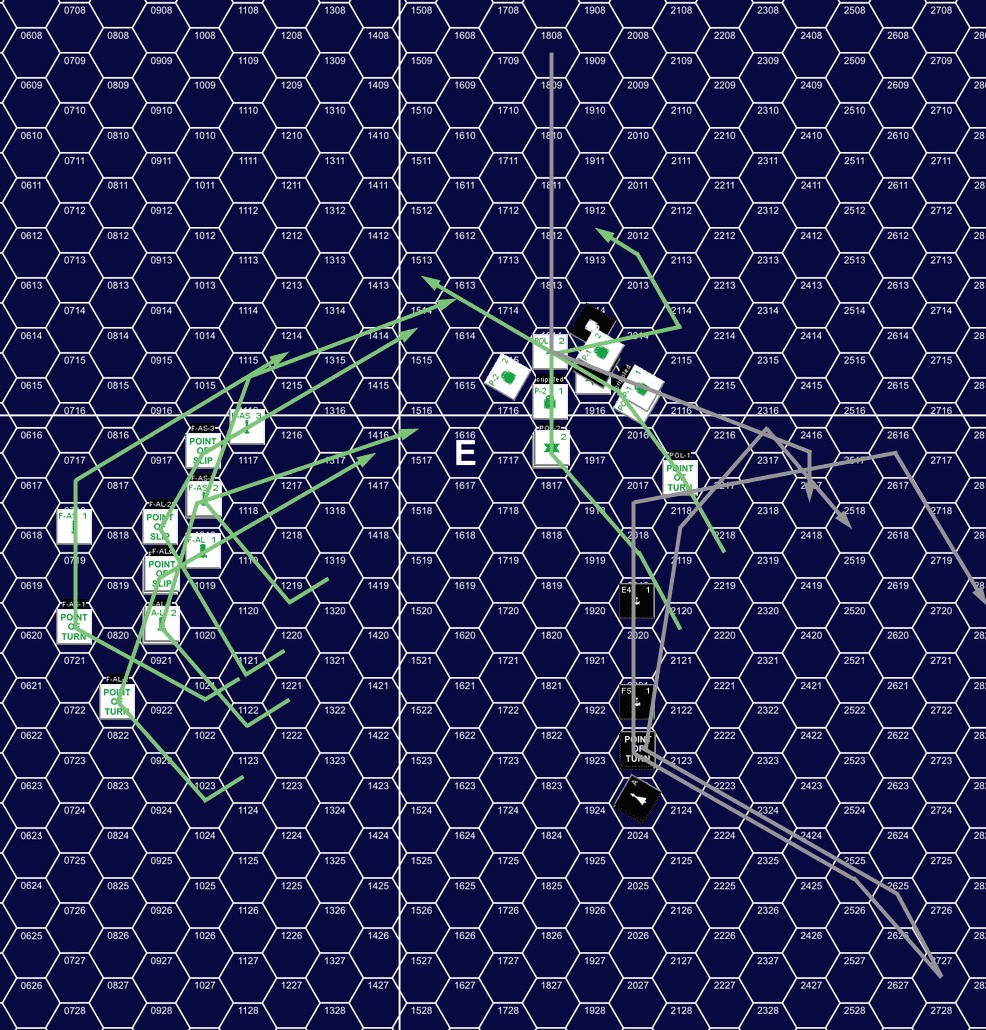
For turn 2, the POLs picked up speed to 18, while the F-ASs slowed a bit to recharge phasers; meanwhile the Klingons dropped down to speed 15. This didn’t go as I had thought. At first I continued pursuit of the F5/E4 group, while the F5C wavered between rejoining them and circling around to my rear. It ended up with my armed freighters more-or-less between the Klingons, and POLs had gotten much further out than I had anticipated (they were trying to get from the rear of the formation to just ahead of it in a pass I figured would happen around impulse 12 or so. They ended up charging at the lone F5C… with everyone else headed away.
I put everything back to speed 12 for turn three, while the F5 went 19, the E4 22, and the F5C maintained speed 15. Impulse 13 got busy as POL-1 and the F5C reached range one. I dropped a couple transporter bombs right beforehand (a few impulses later than I should have, I wanted to be clearing them as the pass happened). The F5C tractored the police ship and launched a drone, while both POLs launched shuttles. The POL nearly took down the front shield while the F5C did 5 internals with decent rolls. The next impulse, the drone hit through the down #1, leaving it with a single phaser and the disruptor.
Turn 3 movement, showing positions at about impulse 18.
The POLs launched their suicide shuttles, and the one from POL-1 traveled down the tractor beam to do 18 points to shield 1. The F5C dropped the tractor just as the F5 came up and put another 6 internals through POL-1’s shield 5, taking out the last phaser. The F-ALs finally got turned around and put two disruptor shots into the rear shield of the F5 at range 10 on impulse 24. A couple impulses later, the F5s cracked shield 3 on POL-2 with the FX phasers, doing 6 internals.
For turn 4, the E4 dropped to speed 16, while the F5s stayed speed 15; POL-2 stayed speed 12, while the armed freighters dropped to 6. POL-1 also dropped to speed 6 and turned off fire control. On impulse 1, I volleyed the four disruptors of the F-ALs at the rear of the F5, and hit with 3 out of 4 for five internals, knocking out a disruptor and one power. Past that, we both circled around; I was using the earlier transporter bombs as a barrier to keep him from picking off the ends of the line while I tried to pull my ships back together (and was partly successful). Mostly, I was trying to get phasers recharged and give POL-1 a chance to patch itself up a little. Mid-turn, I added to the minefield just as Patch nearly took out a shield on F-AL 1 with a range 10-12 disruptor volley. F-AL 2 returned fire and exactly knocked down shield 2 on the E4 with good rolls. Patch then knocked out a shield on F-AL 2 with phasers as he hit range 8 before turning off.
The Klingons maintained speed on turn 5, while everything of mine went 9, except for the F-ALs, which went 8 (1/2 vs 1/3 movement cost…). The E4 had split off late in turn 4, and kept to about range 15 this turn as I continued around the TB barrier opposite of the two F5s. On impulse 22, the F5C was just headed out of arc when F-AL 1 hit with both disruptors, starting the process of knocking down the final intact front shield (#2). F-AL 2 couldn’t swing around in time, and the F5C took out half of F-AS 1s #3 with phaser shots. Around this point, the E4 turned in from the bottom, and the F5s maneuvered for an approach run starting at the beginning of turn 6.
F-AL 2 boosted to speed 10 for turn 6, but otherwise my speeds stayed the same, and POL-1 turned fire control back on, while all the Klingons went speed 15. On impulse 5 Patch fired two disruptors at F-AS 1, hitting with one, and not quite going through shield 3. The next impulse, he followed up with another two (one overloaded) and thankfully missed with both. On impulse 7, he followed up with two phaser, exactly knocking down the shield (after spending a battery…), and I fired a pair of disruptors at the F5C, hitting with one on shield 2. Two impulses later, the F5 did four damage through the downed shield, knocking out a phaser and a power.
The E4 had finally turned in and headed for the rear of my chain, so the two POLs turned to intercept him. At that point, the E4 turned off, and towards the rest of the squadron. POL-2, being nearer, slipped into range 3, boosted ECCM to get a 0 shift and did 10 points to the #6 shield. Then the E4 turned in behind him on impulse 20 and did 14 internals through shield 5, despite missing with one disruptor at range 1. This crippled POL-2, eliminating 6 power, but only got one phaser. The rest of the turn was spent with the Klingons closing in on POL-2, including the E4 who maneuvered to be in formation with the other two, and ended up at ranges 3-4 to it.
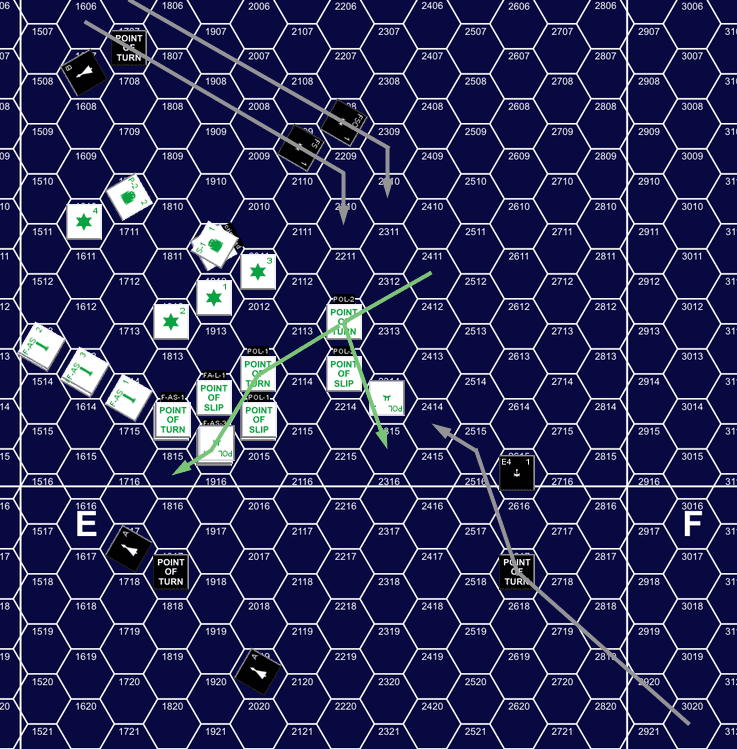
Turn 6, impulse 15; showing Klingon and POL movement from 1-20.
Seeing that POL-2 was about to get pounded, it turned off everything but the shields to run at speed 18, and hopefully end up somewhere safe at the end of the turn. The rest of my ships went speeds varying from 8 to 12, while the Klingons maintained speed 15. Patch decided that rather than destroying the fleeing ship, he needed to turn around and work on the rest of my force. On impulse 19 he volleyed four disruptors at F-AL 2, hitting with three, and nearly knocking down shield #2. The next impulse, he fired a ph-1 at F-AS 1, doing one hull after burning through the one-box shield and a battery. Late in the turn, I started clearing the bottom edge of the tranporter bombs, and turned towards the Klingons, who turned in towards me.
This was interesting, as waiting meant being under firing restrictions at the beginning of the next turn, but ranges were going to get very short this turn. Also, not only were the tranporter bombs right there, limiting maneuver, but there were three drones to deal with. F-AL 2 fired at range three before it could lose weapons, and missed with both disruptors. On impulse 30, we reached range 0 and the F-AL tractored a drone, F-AS 2 attempted to tractor the F5C (defeated, both of us burning batteries), and my three ships on the scene launched shuttles (including a suicide from F-AL 2). Patch fired two phasers at F-AL 2, doing 9 points to shield #1. I knocked down the other two drones, and fired four phasers at range 0 at the F5C, which did three points each, thanks to a +2 shift and no roll under a ‘5’, barely managing to do three internals. The next impulse the suicide shuttle hit the F5C through the down shield, which got a phaser and a disruptor, and reduced the sensor rating to ‘5’. F-AS 2 followed up with another three internals from it’s 360 phaser. On impulse 32 the E4 put two rear phasers into shield #5 on F-AL 2.
At the end of Turn 7.
For turn 8, the E4 accelerated to speed 18, while my ships largely charged weapons and went slow, with POL-2 turning on fire control and going 3, F-AL 1 overloading one disruptor while going 4, and F-AL 2 going 8, while the F-ASs stayed at 9. Patch launched a full complement of four drones on impulse 1 (thankfully not at range 0), and the F5 downfired phasers to cripple the remaining shuttles (he admitted to not thinking it through very well). On impulse 2, the E4 tractored F-AL 2 and the F5 tractored F-AS 3. (That was fun to figure out pseudo-speeds for….) Phaser fire only killed one of the drones.
The remaining three drones hit shields #5 and #6 of F-AS 3 on impulse 3, doing fifteen internals, leaving it with four warp power and no weapons. F-AL 2 fired at the E4, and got 5 internals through shield #4, but while I got a power and a phaser, I couldn’t get at the tractor hit I was hoping for.
On impulse 5, the F5 sideslipped the tractored F-AS 3 into my own mines, which knocked down shields 2 & 3 despite an effective speed of 6. The F5 dropped the tractor as my F-AS 1 fired a phaser through the E4’s down #6, getting another 2 power, but still no tractor. The next impulse, the E4 turned left, and drove F-AL 2 into a third mine, weakening shield #2, and destroying the tractored drone. The E4 dropped tractor. The F5C fired three phasers into F-AL 1, leaving it’s shield #1 at two boxes. POL-2 fired a disruptor and phaser at the F5C as it went by, reducing shield #2 to four boxes.
On impulse 6, my shuttled opened fire, one each on the #4 shields of the F5 and E4 at range 1, while F-AL 1 put both of its disruptors into the E4 at range 2 on shield #2. The F5 took three internals, while both disruptors hit to do 11 to the E4, hitting a disruptor, most of the phasers, and crippling it. Impulse 7, and the F5 put a phaser into F-AL 1, nearly downing shield #3. Impulse 8, F-AL 1 responded with a ph-2 and ph-3 into the F5s down #4, doing 8 internals.
That was almost all of our weapons, and things were quiet while we tried to get our ships straightened out again. POL-1 tried a disruptor shot mid-turn, but missed. On impulse 24, F-AL 2 finally got turned around and fired it’s two disruptors at the F5, doing 6 points to the #5. On impulse 28, the F5s started a turn back towards some of my scattered line, with the E4 following on 31, and my further ships turned to intercept.

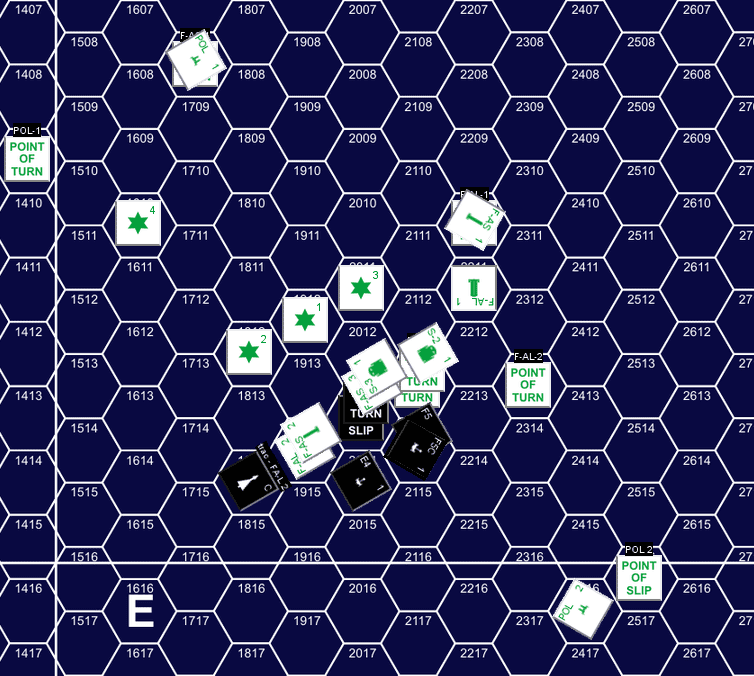
Turn 8 movement, impulses 8-32.
Patch’s speeds dropped down to 9-10 for Turn 9, while mine continued to be low and all over the place, ranging from 6 to 9. On impulse 4, we hit range 4 and opened fire. The F5C missed with it’s overloaded disruptor, but FA-L 2 hit with a standard one, doing 2 internals through the #6, knocking out the two boom phasers. The next impulse, the other disruptor hit for an other four internals. On impulse 8, the FA-Ls remaining in-arc phaser fired at range 3, doing three internals to finish off the RX phasers. On impulse 10, the F5 fired at range 2, missing with the disruptor again, but doing three internals through a seven-point shield with phasers.
And we called the game there. The F5C had no weapons left, the E4 wasn’t much better, and the F5 wasn’t going to carry the fight on it’s own. We assumed I’d be able to cripple the F5 in short order (allowing it to disengage…) but that I wouldn’t be able to prevent it from disengaging. Modified victory points gave the Klingons 102.7 VP (mostly for crippling the two POLs, but 24 points of TBs was probably excessive), and the LDR 118 VP, giving me a Marginal Victory at 115%.
Afterword:
The notes on this scenario describe it as ‘interesting but tedious’, and I can get behind that. This has the ability to drag out far longer than the nine turns it went for us, since it’s not an easy fight for the Klingons. I did my best to lose it early, when I let my POLs get too far away from the big guns of the F-ALs. However, Patch never really concentrated fire on any one target for long, allowing me to keep the POLs in the fight after being crippled.
We’re both concerned about balance, as the LDR has about the same firepower, and a lot more bulk. The Klingons certainly have the better ships, and I think they could have done better with their opportunities here.
Very nice report, as usual 🙂
Your site and reports are the very thing that keep me interested in SFB and one of the only avaliable source of AAR on the WWW. Keep the torch up.
What do you use as an application for the photos ?
Regards,
Ike.
Gah, didn’t see you get caught up in the spam filter there.
SFB images generally come from a personal-use Vassal module I bashed together. Older images are from a fairly simple one that stole as many images from my F&E module as possible. The more recent ones are from a better module that I did using all the vector images I worked up for the 2.0 F&E module, which are easier to rework to get rid of F&E factors, etc.
All the arrows and such are done in Photoshop. The Combat Patrol report a couple years ago was an experiment where I tried doing the arrows in CorelDraw (vector image program) so that I could more easily move things around as I reviewed my log. It had some advantages, but was a lot more work, so I’m sticking with Photoshop. 😛