
FB6 Came Tumbling After
After the desert adventure, Patch and I decided it was time to get back to Festung Budapest. The sixth scenario features a Hungarian countertack up the hill on the SW map. Since I attacked up the hill last time, I took the defending Russians and set up what I called the ‘wet paper bag defense’.
The Russians get 9.5 squads plus a 57mm AT Gun to defend a fairly long front line, with a couple machine guns, a light MTR and a DC thrown in. The Hungarians get 6 first line squads, with another 12 conscript squads entering the first turn with three German JagdPanzer IVs in support, with a goal of getting two GO squads to level 5 hexes in 6.5 turns. Coming up with a Russian defense that had decent coverage was a challenge, but the Axis have bigger problems. Not only do their reinforcements have further to go at a lower speed (thanks to the reduced movement of inexperienced personnel), but the leadership situation is bad (one 7-0 leader for the entire set of twelve squads, and two more for the starting six), and the AFVs are automatically recalled at the start of turn 5. There is ground snow to slow down the advance up the hill, and Axis forces are at Ammunition Shortage level 4 (by far the worst we’ve seen).
Patch noted that the record, while a bit thin, was heavily in the Russian’s favor, so I gave him the Axis balance, which lets one of the AFVs set up with the initial force, instead of entering on turn 1. The main force set up on columns HH and LL, with two squads and the JgPz in between, and the reinforcements scattered from EE to MM with the two remaining AFVs entering on the main roads.
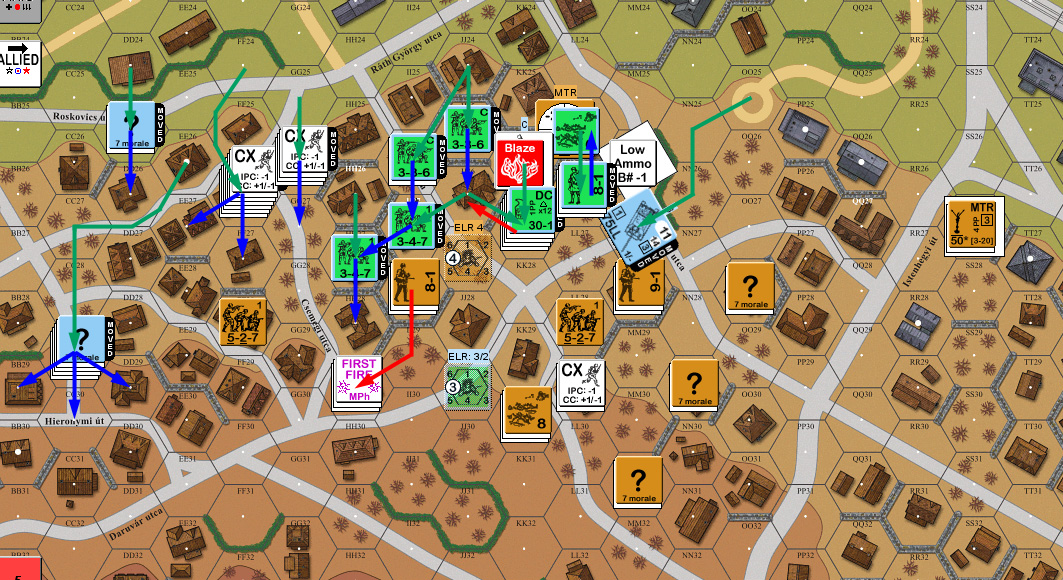
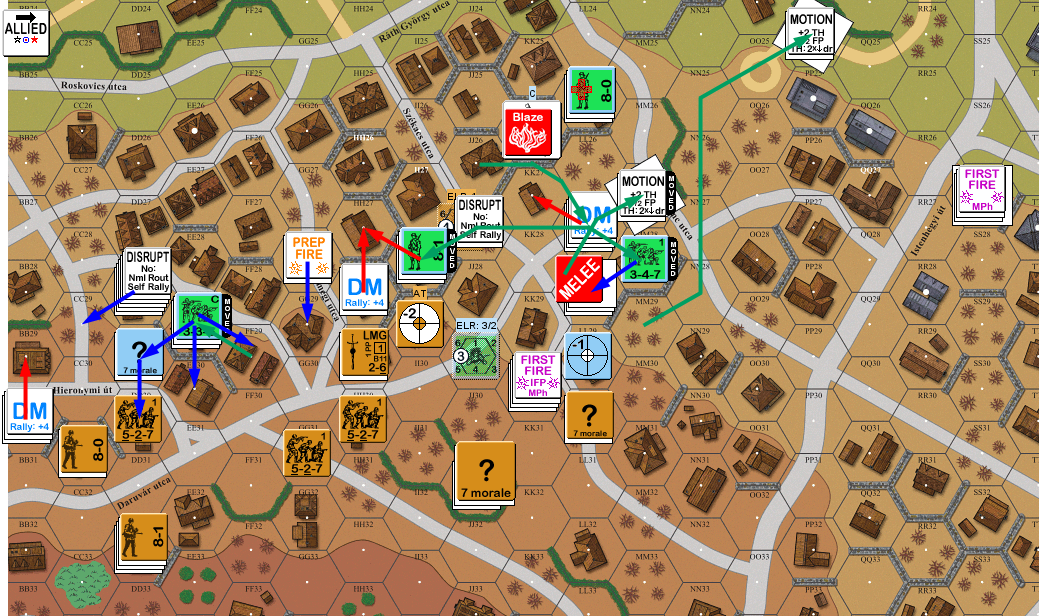
Patch, not liking the options for crossing the street, opened up with a 8 +1 attack from the LL23 stack, and my 458+DC squad barely passed the resulting 1MC. The on-board PzIV moved into II25, locking down my main defensive stack in the area after the squad failed a PAATC to try to Street Fight it (given that it has sN9, that may have been a good thing…).
Rather than stick around for a CC with a couple squads and a leader, or just the sN, my 458 self-broke and routed away, carrying the 8-1 with them.
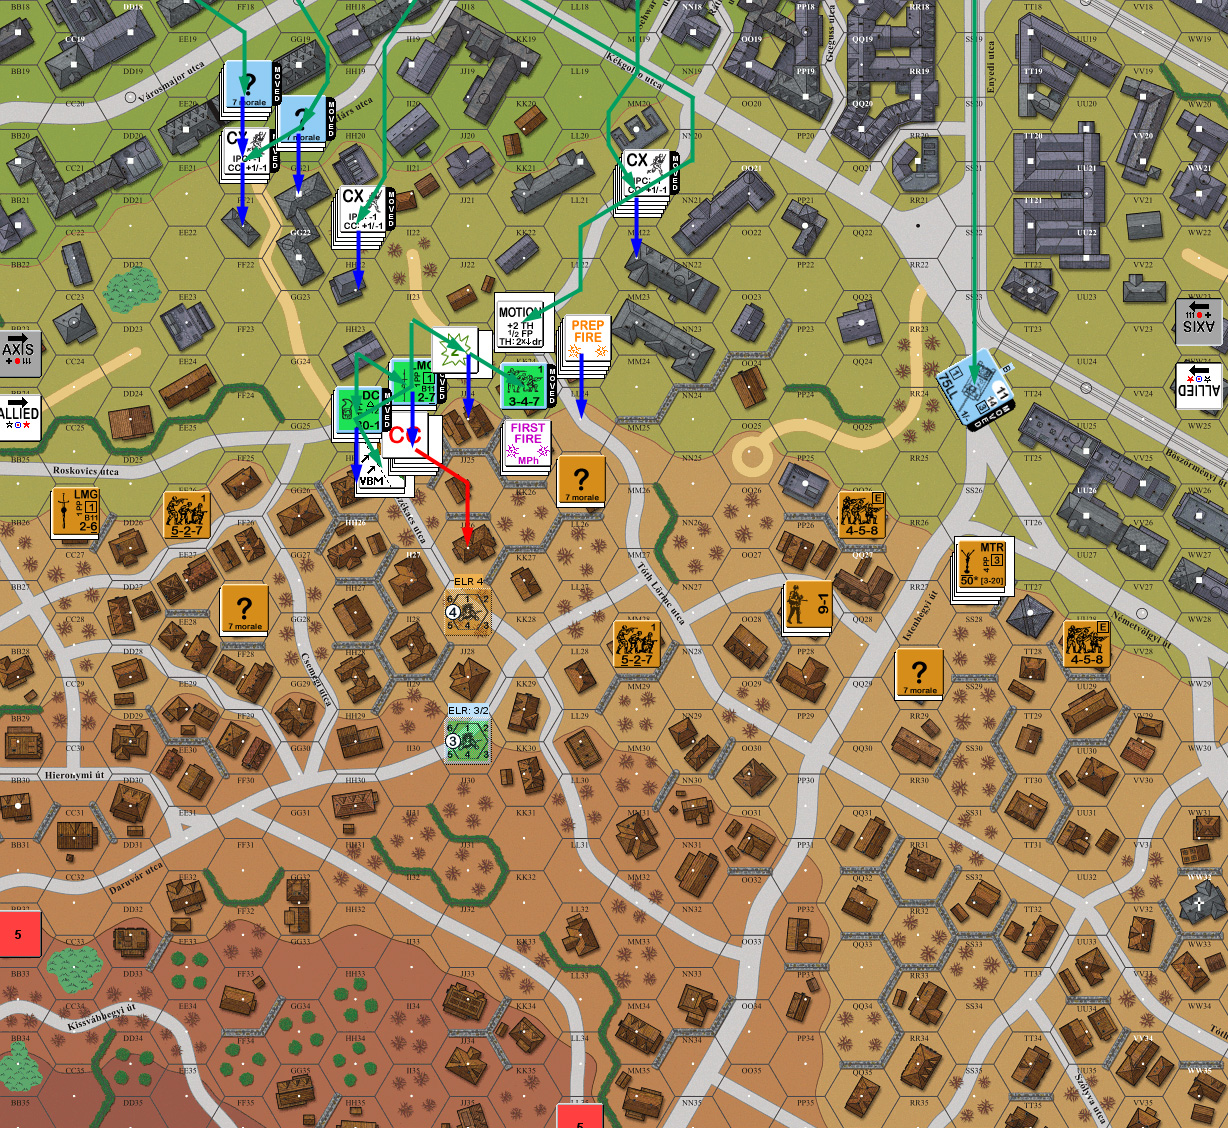
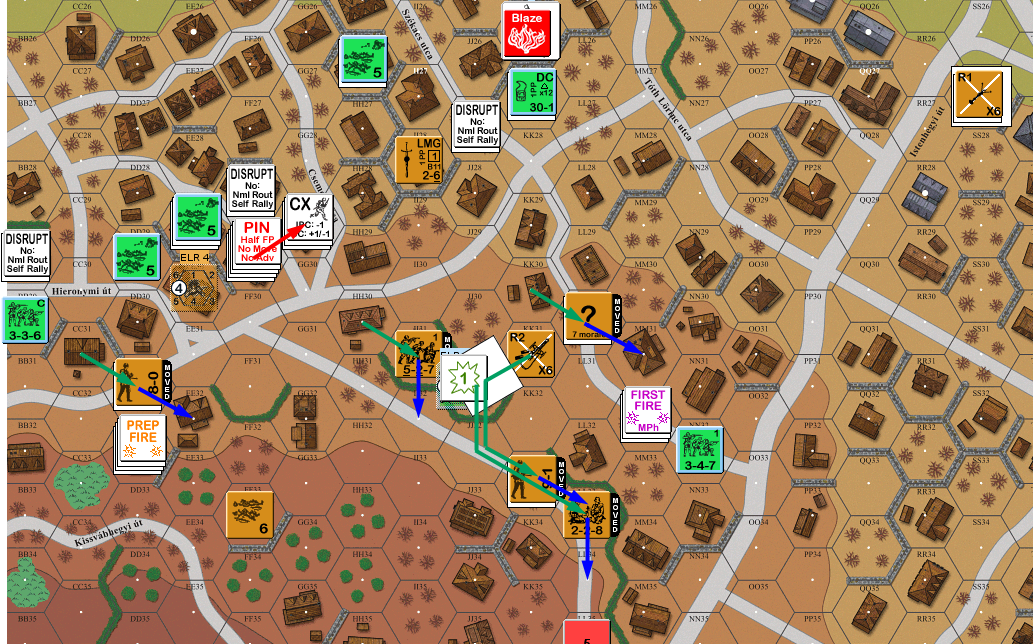
Full map, Axis Turn 1. North is to the left.
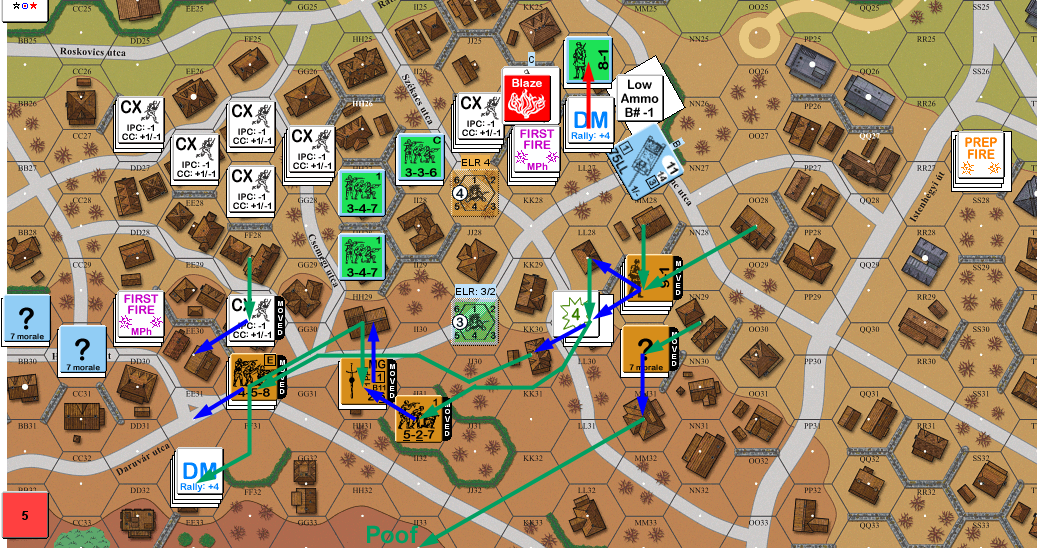
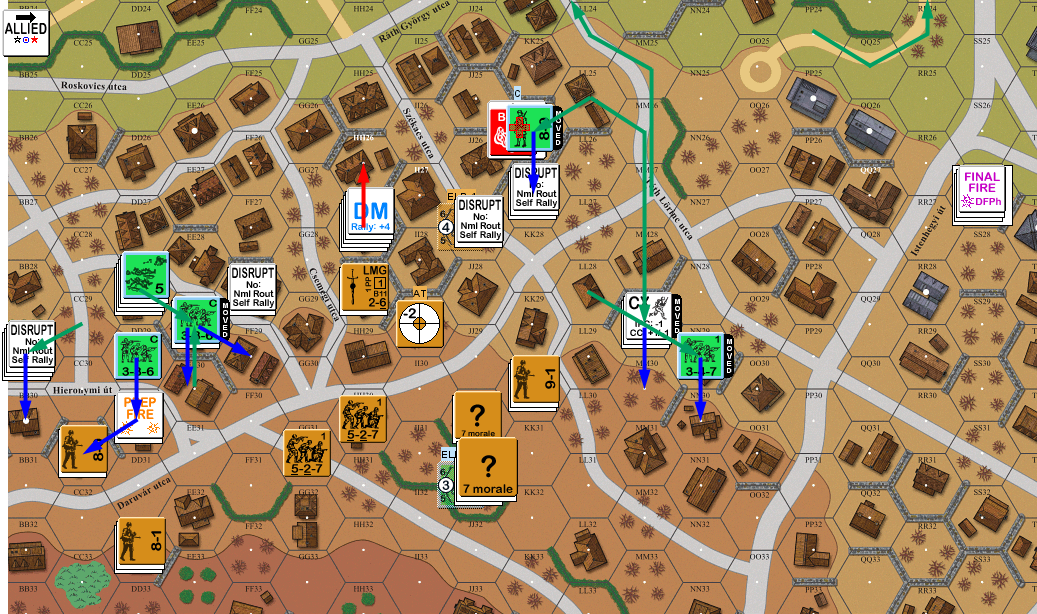
A good roll got me my squad back, but the rooftop MTR failed to get a result in Prep against his JgPz (mostly hoping for a CH), and Patch passed the NMC my 527 in LL25 generated firing adjacent into open ground. I mostly concentrated on pulling in the flanks and trying to make a solid line to stop the advance before it could get too far. The 9-1 and MMG barely shifted in the south, to anchor that while seeking a better field of fire.
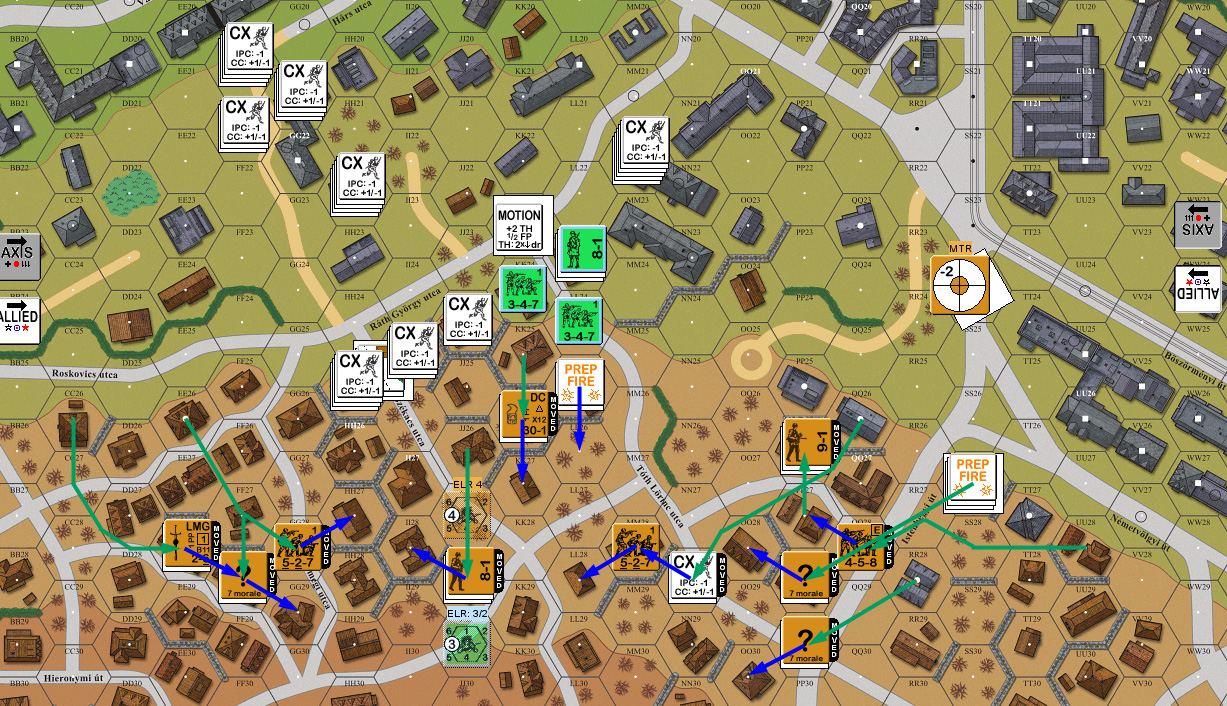
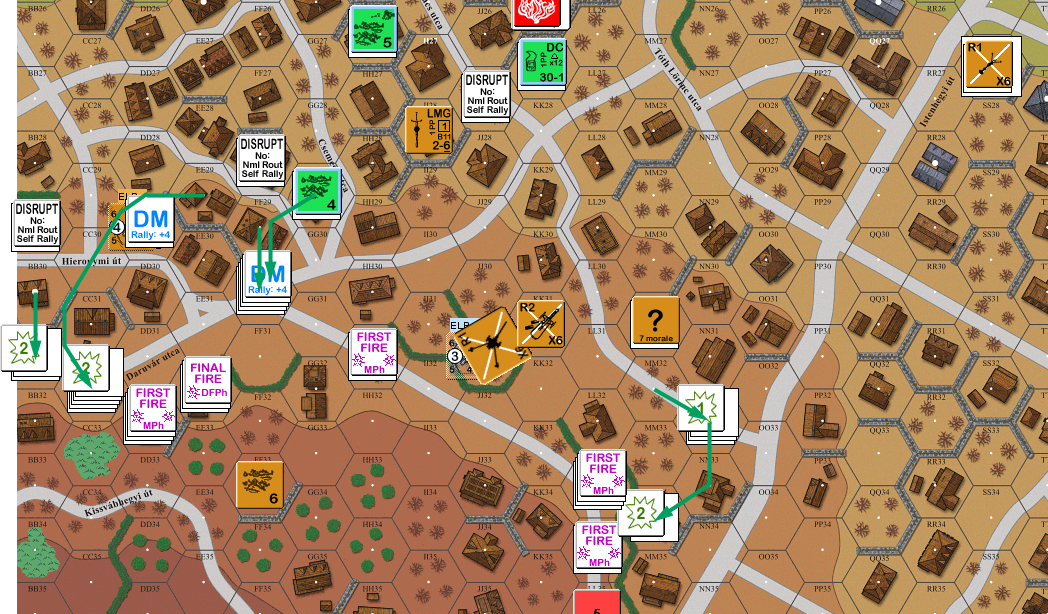
Situation, Russian Turn 1.
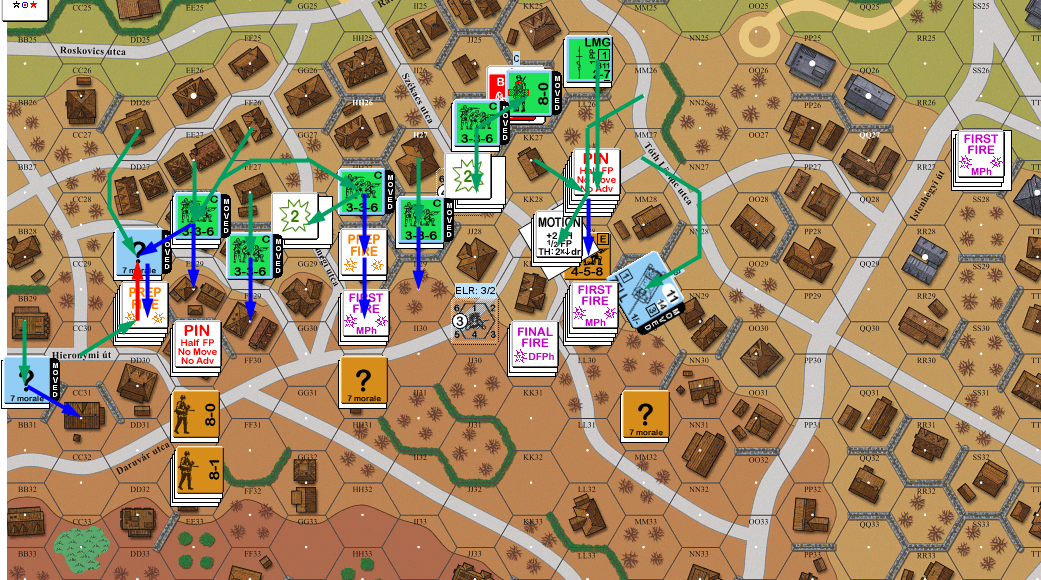
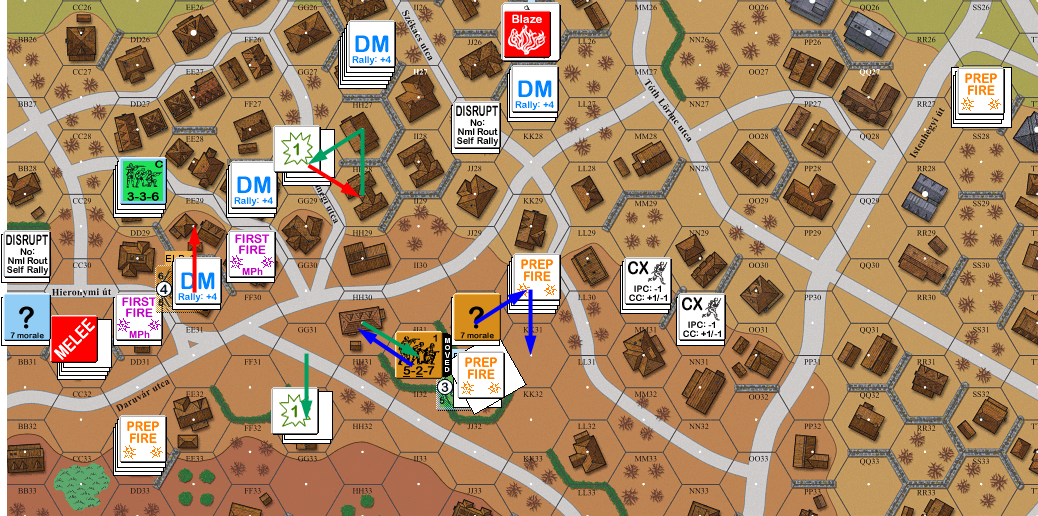
Patch crawled closer on his second turn, coming into contact with the center part of my line. One PzJg faced down the MMG, while another flanked my line behind a wall, and the third advanced behind that same wall.
My DC squad was on the other side of the wall, and, tired of never getting to use my DCs, I decided to try throwing it at the PzJg. I got a ‘2’ (Final 5) for optimal placement vs the Aerial AF (probably skipped it along the ground under it), and burned it. The blast also broke my squad, but that was perfectly fine by me….
I also realized at this point that the fact that my MTR was at level 1.5 (roof of a two-level building) would allow it to see over many of the single-level buildings around (as near as we could tell, anyone want to weigh in on this?), which would allow it to shell the advance with a lot more freedom than I expected. I didn’t actually cause any more damage, but Patch did suffer Ammo Shortage during AFPh to reduce one of his precious 1st Line squads into a conscript.
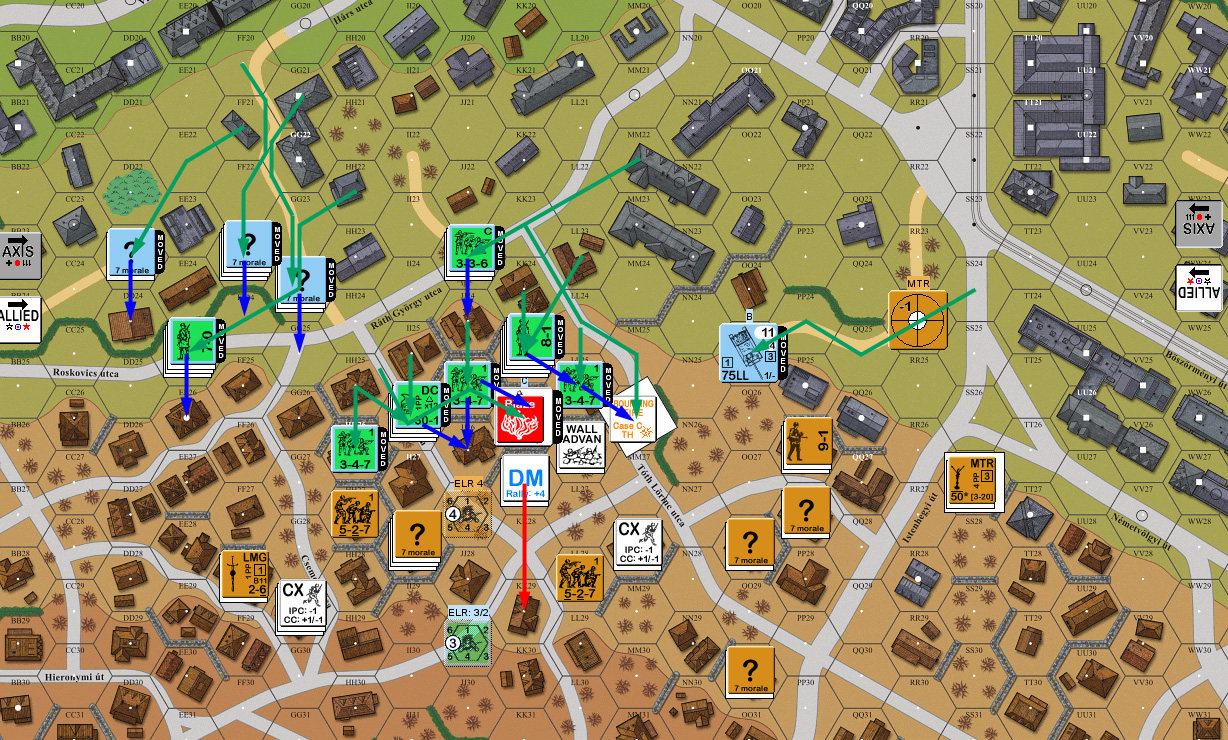
Situation, Axis Turn 2.
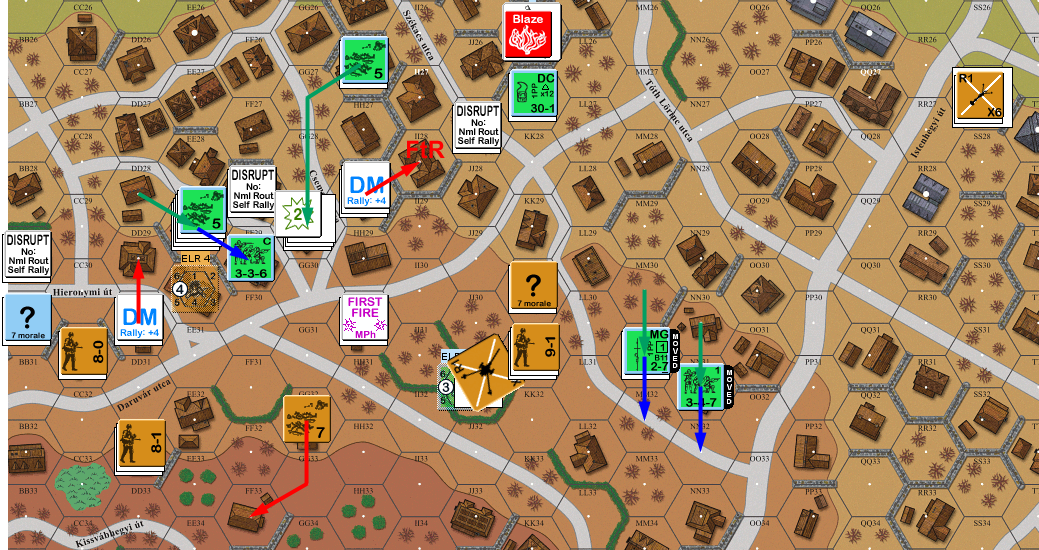
I naturally didn’t manage to self-rally my DC squad for my turn, and Patch tried (and failed) to Deploy his stack of conscripts in EE26. I moved back, continuing to concentrate on my center to stop the main thrust cold, trusting the snow and slow movement of conscripts to give me another turn before I needed to deal with the north. Patch narrowly missed getting the MMG squad, and put one of his remaining PzJg under Low Ammo. He did manage to break a squad in KK29 and killed the broken squad there when I rolled a ’12’ on the 1MC. In turn, I managed to break his squad in MM26.
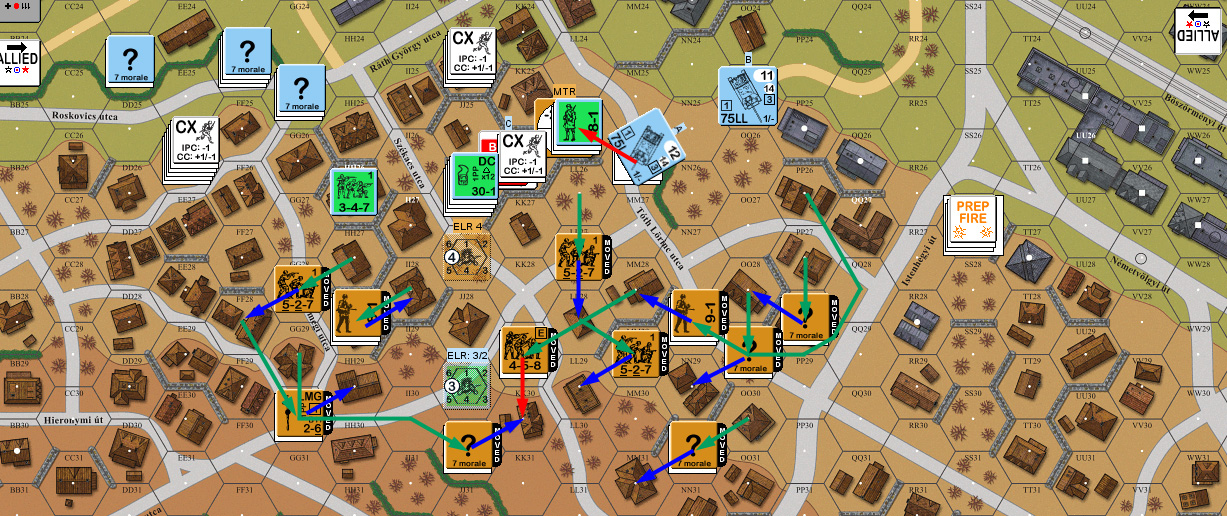
Situation, Russian Turn 2.
Both of us failed to rally our squads for Patch’s RPh, and he failed to Deploy his conscripts again. He immediately showed that I had under-estimated just how far the conscripts could get, and started working them past my flank. I only managed to pin a single squad during movement, but I managed to pin two more squads and break the leader in KK27 during DFPh, which was actually disappointing after the number of PTCs and MCs I generated. In return, Patch pinned the squad in II28, and I ended up self-breaking him rather than face CC with two squads while pinned.
Situation, Axis Turn 3.
I got both of my squads back for my rally, while Patch got his squad in LL25 back, but his 8-0 leader was wounded on a ’12’. My MTR managed to break one of his squads, and then broke on the next shot.
My first move accidentally revealed a Dummy when I forgot that his main force would be able to see it as it crossed a crest line (I was concentrating on the conscripts, who had buildings in the way). My main goal was to get in front of the conscripts, which went well, especially as Patch maintained concealment instead of firing with most of them. He did manage to break my 8-1 on an NMC, though the squad he guided into place was fine.
Situation, Russian Turn 3.
Patch got one of his two squads back for his RPh, while my 8-1 self-rallied. Patch opened up with a couple squads in PFPh, generating a pair of PTCs, and pinning my already CX 527 in EE30. He then maneuvered an extra squad towards that one, while the remaining squad on the north edge inched forward. The low ammo PzJg moved into (motion) bypass of LL27, while the other circled around and threatened my MMG position at close range.
With the south flank as tied down as it was going to get, he attempted a Dash, but the MMG got a 1MC, which promptly left them a quivering Disrupted mass of HS on a ’12’. He then started moving up guys to pile on top of LL27, but I managed to pin the bulk of it (a squad and 8-1) in the hex with a lucky shot from a 527 at long range.
During DFPh, the north advance came apart as the 458 near the current target of the advance broke both squads in DD29, and reduced one of them on a ’12’. Patch’s AFPh didn’t do anything other than put the other PzJg under Low Ammo.
We ended up with two Close Combats, one a CX 347 vs a 458, where I reduced him for no damage, and another 347 vs 458 with the PzJg present. I didn’t quite manage to ambush him, and no damage was done to either side (Patch declined to use the sN, since it hits both sides).
Situation, Axis Turn 4.
I repaired my MTR in rally, and Patch recovered a DC he had dropped during movement and failed to pick up, while failing to rally anyone. The MTR got three shots, and failed to affect anyone on a CH before malfunctioning again. With the PzJgs due to leave next turn, I revealed the ATG in JJ31 and managed an IF hit to break two squads in II29.
With the Melee in HH29 going poorly for him, Patch decided to fire into it, and broke his own HS on a 1MC, while the 458 was unfazed. In return, my AFPh broke his leading squad in CC29. Naturally, I mopped up the HS in CC, but the Melee in LL28 continued with no result.
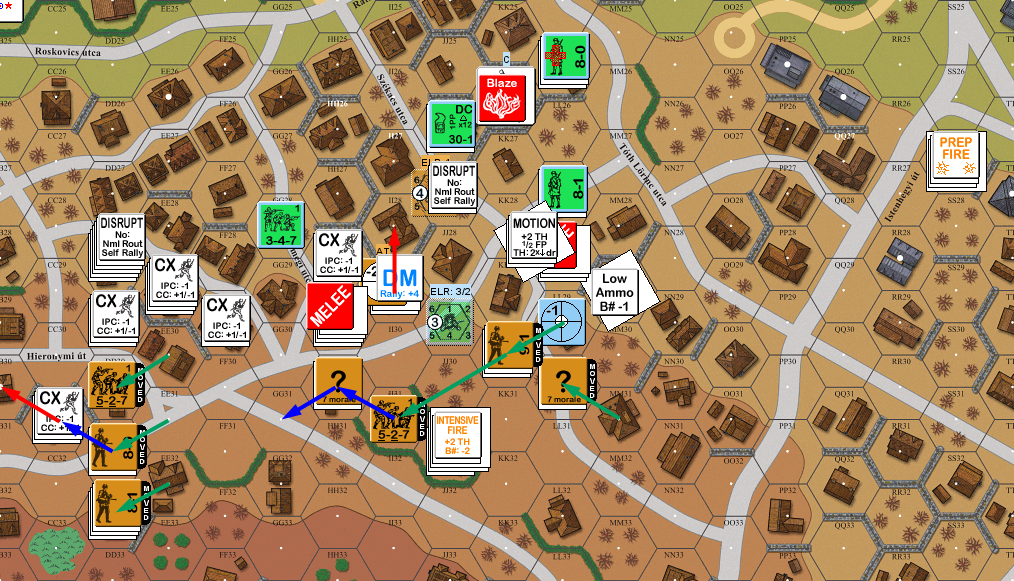
Situation, Russian Turn 4.
Nothing came back for Patch’s RPh; worse (for him) was his one Prep was a ’12’, and he yahtzeed the RS to break a conscript, and reduce a 1st Line to conscripts on Ammo Shortage.
MPh wasn’t any better, the armor was now obligated to leave under Recall, the north end mostly stayed in place and/or skulked, and when Patch attempted to move up and reinforce the Melee still raging in LL28, but I broke one of the two squads as it moved up. The remaining squad moved in, and helped kill my squad, which killed one of his in turn. He also got a squad into CC in DD30 and managed Ambush, and declared HtH, but both sides still missed.
Situation, Axis Turn 5.
Patch rallied his squad still in LL25 on my RPh, but nothing else, and recovered the LMG dropped by the squad I killed in CC, while I was unable to repair the MTR. Since I was in a fairly solid position, I Preped with most of the line, and broke two squads. His Sniper activated during that, and pinned my Gun crew, aborting my thoughts of trying to push it over the hedge to gain a LOS up the road to the north.
The HtH CC ended in tragedy when I muffed my roll again, and the 336 successfully eliminated my 527.

Situation, Russian Turn 5.
Patch managed to get one squad back in his RPh, but eliminated a LMG he had malfunctioned during DFPh, and I still couldn’t get anywhere with the MTR. Patch gathered strength in the north, and the victorious squad pressed on to take on my 458+8-0 in CC. However, he didn’t have concealment to help this time, and I Ambushed him, and reduced him to a HS for no loss.
Situation, Axis Turn 6.
Patch finally had a good RPh on my turn, getting the squad and a half in DD28, and rallying the disrupted squad+DC that had been waiting in KK27. Prep was horrible, with both the AT Gun and MMG malfunctioning. Movement wasn’t any better, as he got some lucky shots. My LMG squad in the center went wandering around re-DMing brokies, and they got hit with a K/1 to break into a HS. He also managed to nail a 527 as it ducked into a building (it was about to go upslope to help hold off the southern force) to break it as well.
On the other hand, my Sniper went off twice for that, and the first time killed his wounded 7-0 in KK27, and the LLMC broke the squad he’d just rallied, and the second time broke a squad in EE29.
Personally, I’d rather have my support weapons and squads, especially as one of the squads the Sniper got was no real threat to reach level 5 in time, but it did at least keep things manageable. At least with a 126 vs a 458 w/leader, the Melee went as expected with me mopping up the HS for no losses.
Situation, Russian Turn 6.
Patch got one squad back in HH26, while I didn’t get any result on any of my repair rolls. Patch tried a shot at CC31 in Prep, but only broke his own squad through Ammo Shortage.
With only one more turn left, Patch carefully gathered his remaining forces, lining up for the big final push. I couldn’t do anything to movement, but I did strip concealment from BB30, and broke the squad in FF29.
Situation, Axis Turn 7.
The only thing that actually happened in RPh, was reducing my squad in FF33 to a HS with a ’12’ self-rally roll. This left me with one last turn to arrange my final defense, with four squads and the AT Gun crew to play with (the HS on the roof of SS27 was too far away to do anything, especially after moving to ground level). I only had one SW still in service (a LMG), but I had all three of my leaders, so most of my troops were going to be immune to cowering as they fired at anything that moved.
The LMG firebase prepped, and broke a HS. I could have wished for more, but anything that cut down on GO units was important at this point. While the biggest concentration was in the north (three squads, plus more that might rally), the biggest threat was to the south. After winning the CC down there, he had two squads (enough for a win) that I had not yet managed to stop, and were trying to make their way around the flank. If I had gotten the MMG or AT Gun back, I would have fired that at them, with decent odds of doing something. As it was, I had to maneuver to keep him from just advancing onto the south flank of the hill, and keep from opening up the center too much, since he could still go in there. My biggest fear was that something would get through in the north, and he could just sacrifice one squad in the south while the other got a free ride.
Situation, Russian Turn 7.
Patch managed to get one more squad back for his final RPh, giving him six to my four and a crew.
Patch basically proceeded from north to south. The just-rallied squad in EE29 went first, working their way adjacent to one of my squads. The one slightly further away fired and managed to break (and ELR) the squad in the street. BB30 assault moved into the street, and the 8-1/458/LMG managed to pin him there. FF30 Dashed, which led to a check to make sure I couldn’t claim WA with EE30 to negate it for him (no, not when there’s TEM terrain in the hex) but the subsequent fired anyway (and would have FPFed at the next hex), and pinned them on a 1MC.
GG30 tried to go through the same hex (no resid from the previous fire) and my 527 in HH31 opened fire to break the leader, which stopped the squad as they dropped to 3MF (going CX would get them adjacent to the hill, but since they’re 3MF conscripts, the 4 MF to get up the hill (1×2 up-slope + 1 snow +1 hedge…) would become impossible in Advance.
NN32 moved up to the base of the hill, and the crew was unable to affect them. MM32 started to move to join them, but my 458+9-1 fired through the orchard and managed to pin them. That was Patch’s last unit, and the game, since he only had one who could get on level 5, and he’d have to win a CC (not to mention surviving my Final Fire).
End of Game, Axis Turn 8.
Afterword:
It’s pretty easy to see why the record is lopsided on this one, it’s very rough on the Hungarians. It might be a fairly even match, but I think it would require good and aggressive use of the PzJgs and their sN to punch a hole for the Hungarians most times.
As it was, it certainly swung back and forth, with Patch taking a pretty hard PMC around turn 3. Conscripts going uphill in snow is just rough, which is why I concentrated on the competent guys first. Getting the PzJg with a lucky DC throw helped, as did the surprisingly useful MTR placement. Patch got some good breaks with CCs that probably went better for him than they should have, and chronic problems with my SW. If he hadn’t gotten zapped twice by my Sniper on turn 6, it could have been a very different endgame. In all, it was pretty interesting to play, and moved fast.
Discussion ¬