
OA25 Side By Side
One of the scenarios in Out of the Attic 2 gave me an immediate ‘I’ve got to see this‘ reaction. OA25 features a defense with a combined French-British-American force in 1942 Tunisia. Patch and I initially slotted it for a FtF day, since it looked somewhat short, but then realized we didn’t have all the boards for it.
So, it became our next PBeM game, with Patch taking the defenders with seven French squads and support weapons including a 37mm infantry gun, three and a half British squads, and two American crews manning a .50-cal and a British 25-pounder. They need to protect a bridge for six and a half turns against fifteen elite German squads with the usual toys, a couple 81mm MTR and two flights of Stukas (one of which shows up on turn two, and the other variably, and the both go away after a single turn).
Patch mostly set up in the central board-12 village, with lighter forces holding both flanks. I set up the bulk of my troops to hit the north side, with some cover towards the center, and then a platoon on the south side to make sure he couldn’t afford to pull out of that flank. The terrain is a bit open, but the MTRs are good smoke generators (especially good ones, the Germans are defined as Elite, which gives s9). Sadly, while I didn’t deplete, I didn’t get any ROF, and only one smoke counter went down between the pair.
Movement went fairly well for me, with minimal fire, and while his French 60mm MTR never exhausted ROF, I passed all the morale checks it caused. Patch’s MMG malfunctioned, but his Brits got a 1KIA result which Yahtzeed to kill a squad and 8-0 and destroy a DC.
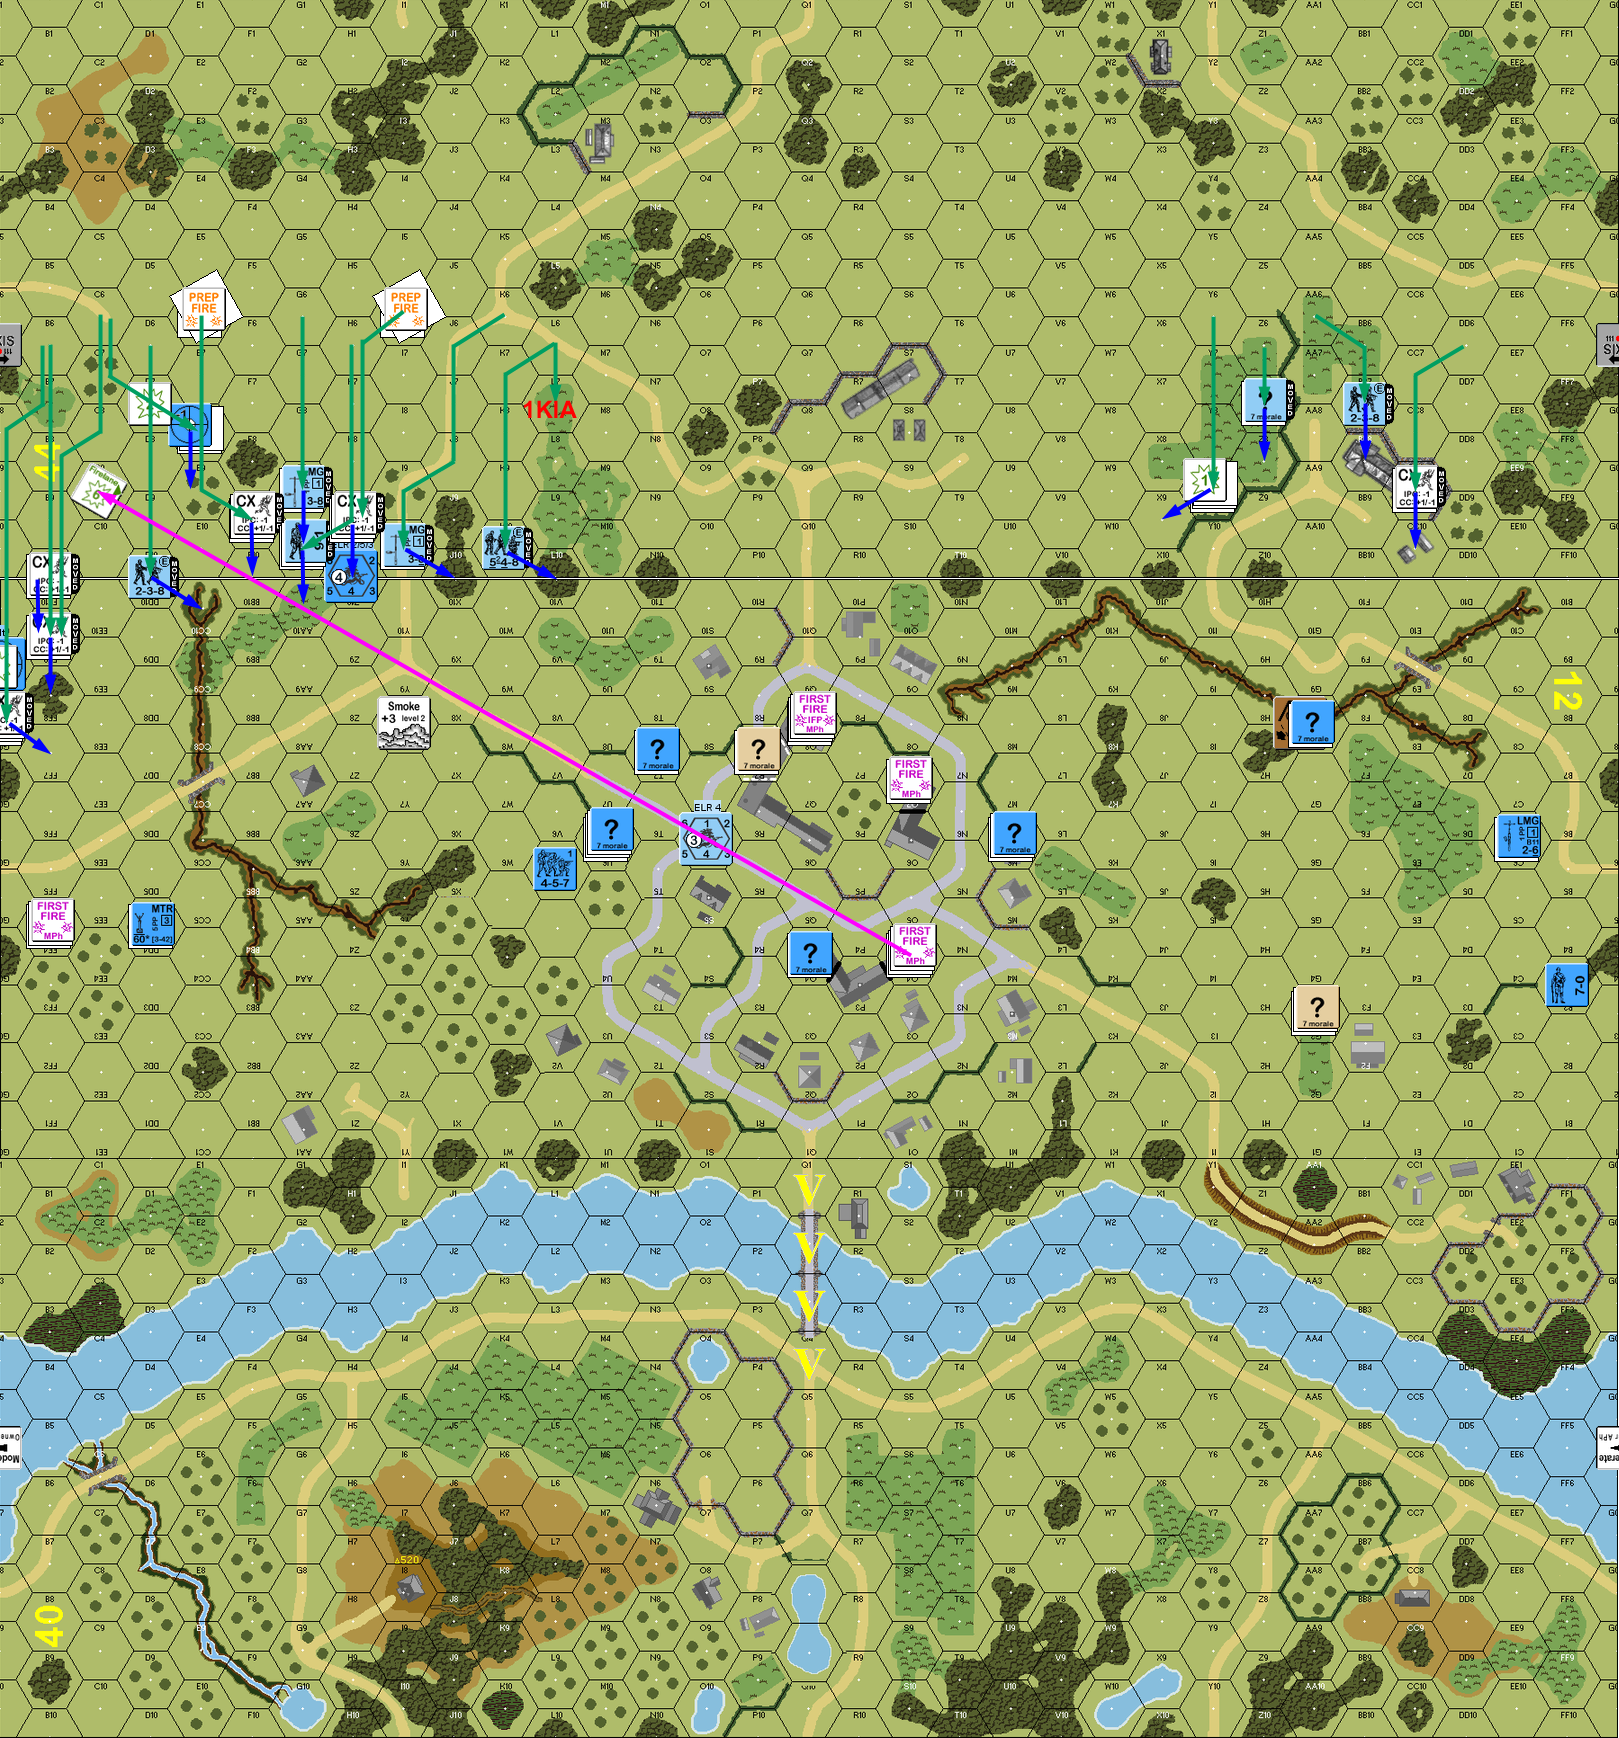
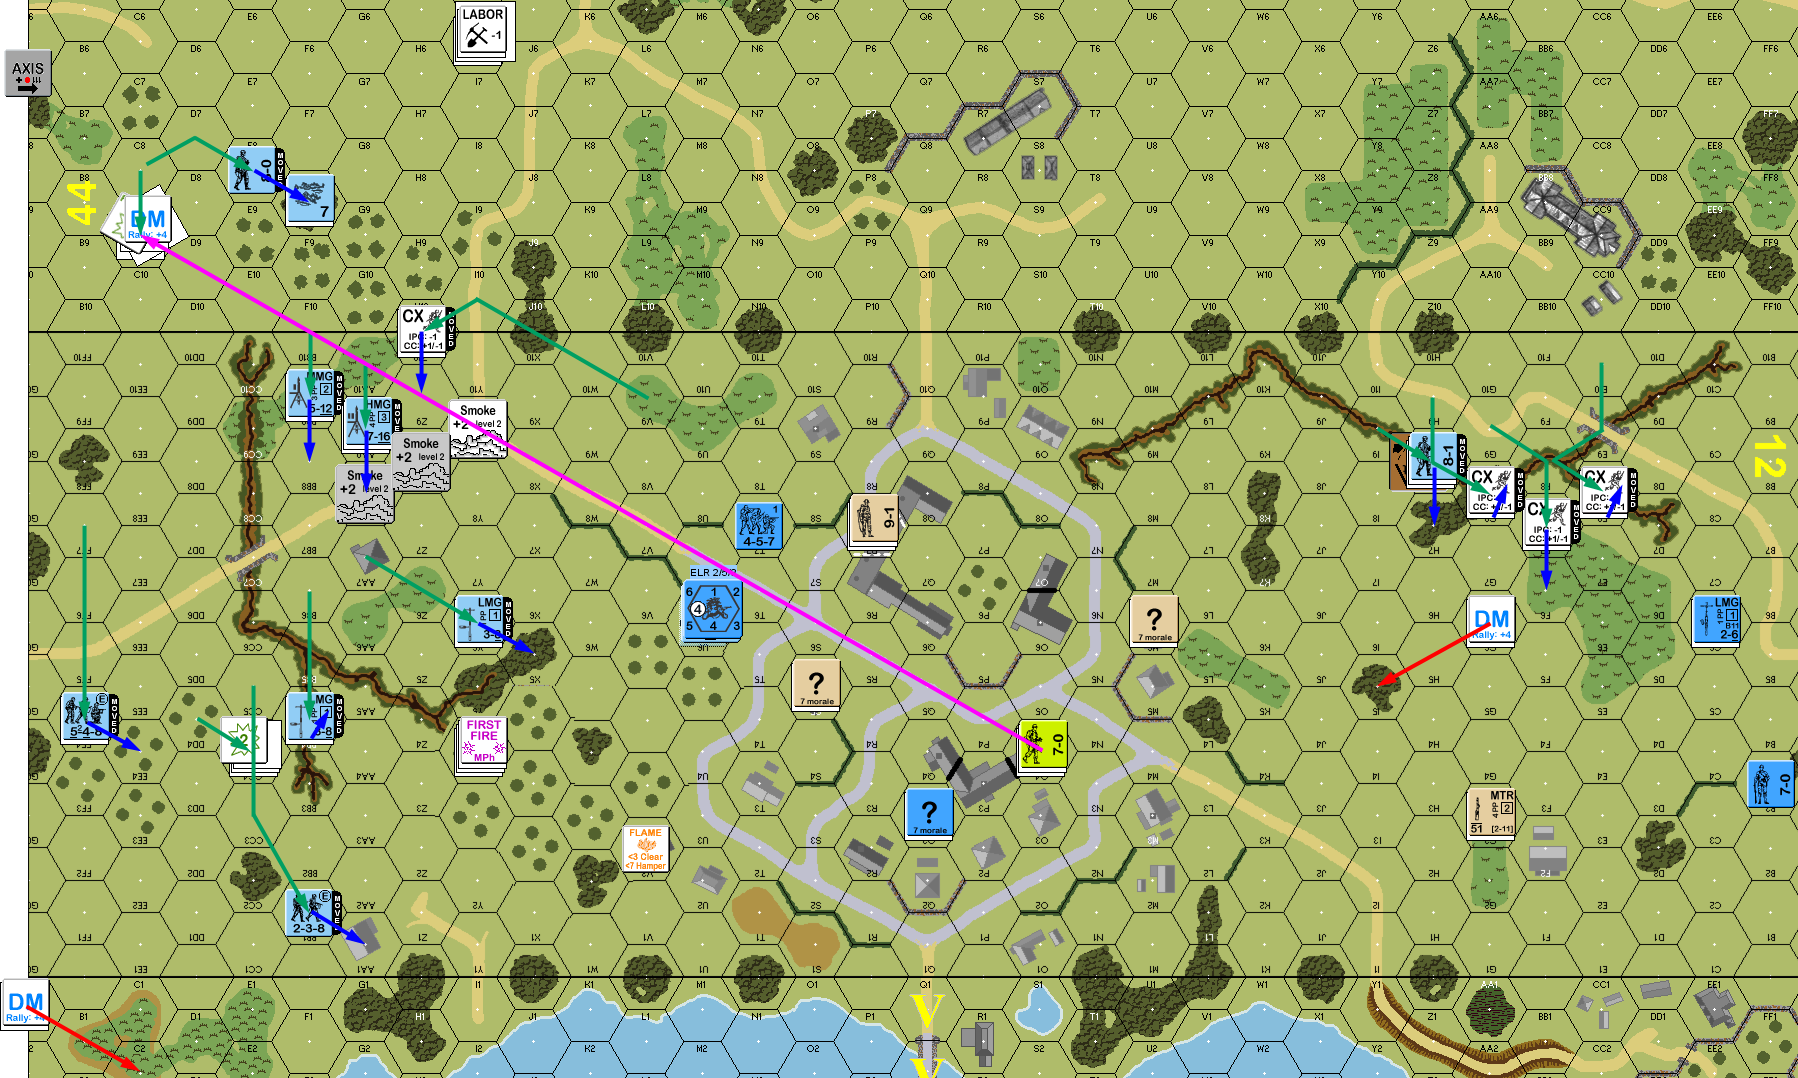
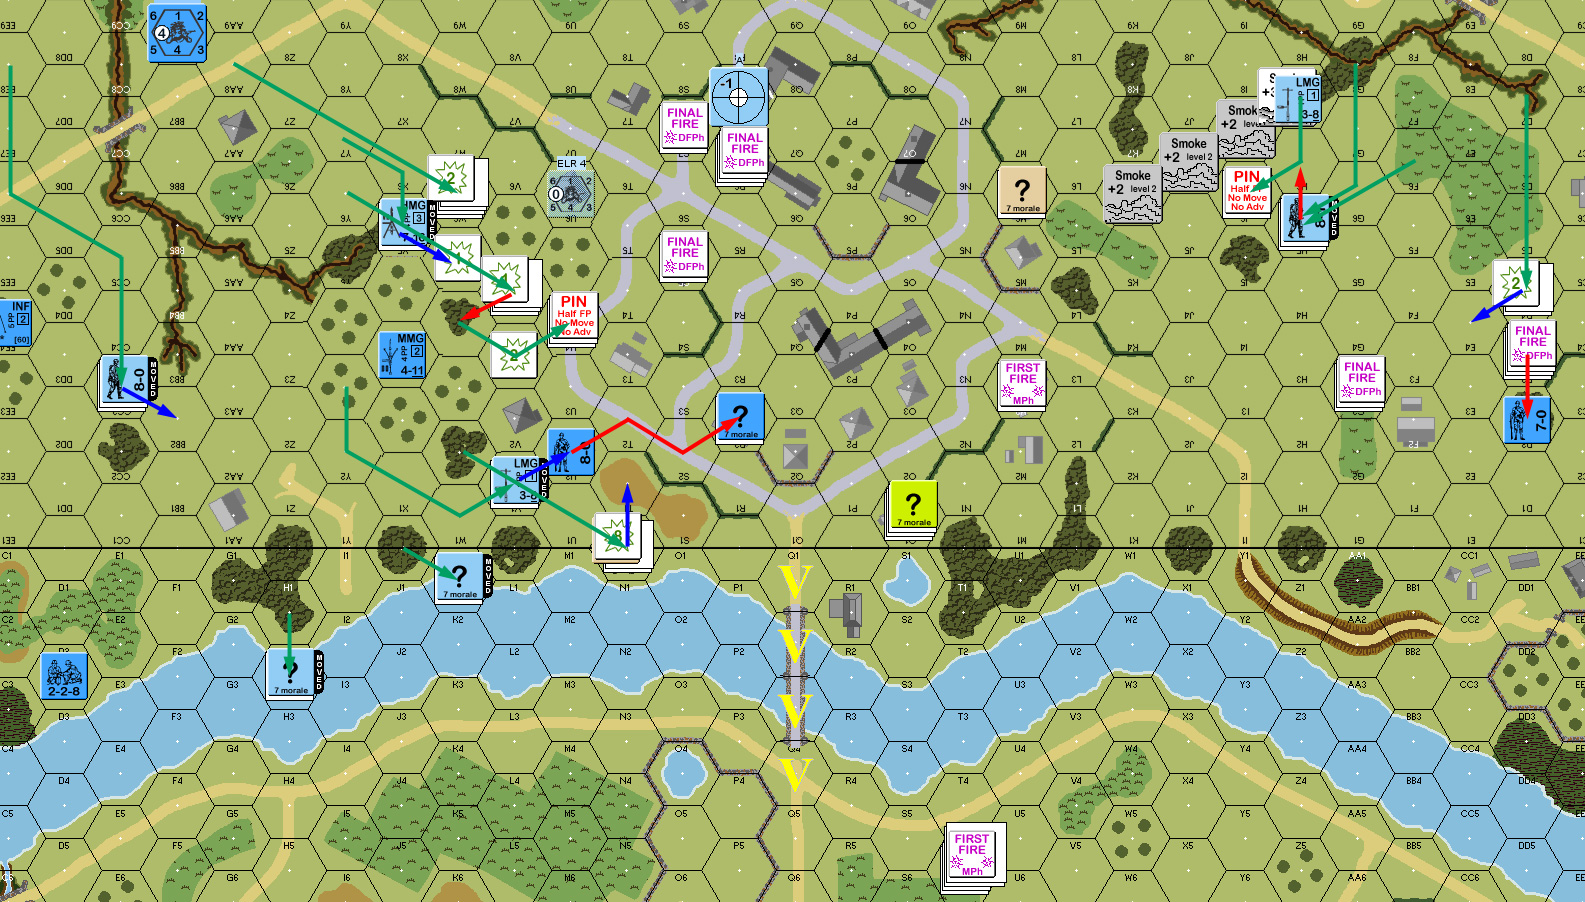
Full map, German Turn 1. North is to the left.
Patch couldn’t get his squad or crew back for rally, and took a few shots during Prep that didn’t do more than PTCs that I passed. The bad news is one of those activated his Sniper, who then eliminated mine.
Patch had a good Prep, killing my 9-1 and breaking the HMG squad with his .50-cal. He moved one squad over from the south end of the village to the north, but mostly concentrated on redeploying the north side to deal with my flanking movement and the fact that I would be coming in on the west side of town. My shots were either blocked, or malfunctioned a LMG. But one of the MTRs managed to break the crew of his 37mm INF.
This left us with the situation that his far left flank was getting into trouble, but half of my leaders were dead, meaning that my force was becoming very brittle.
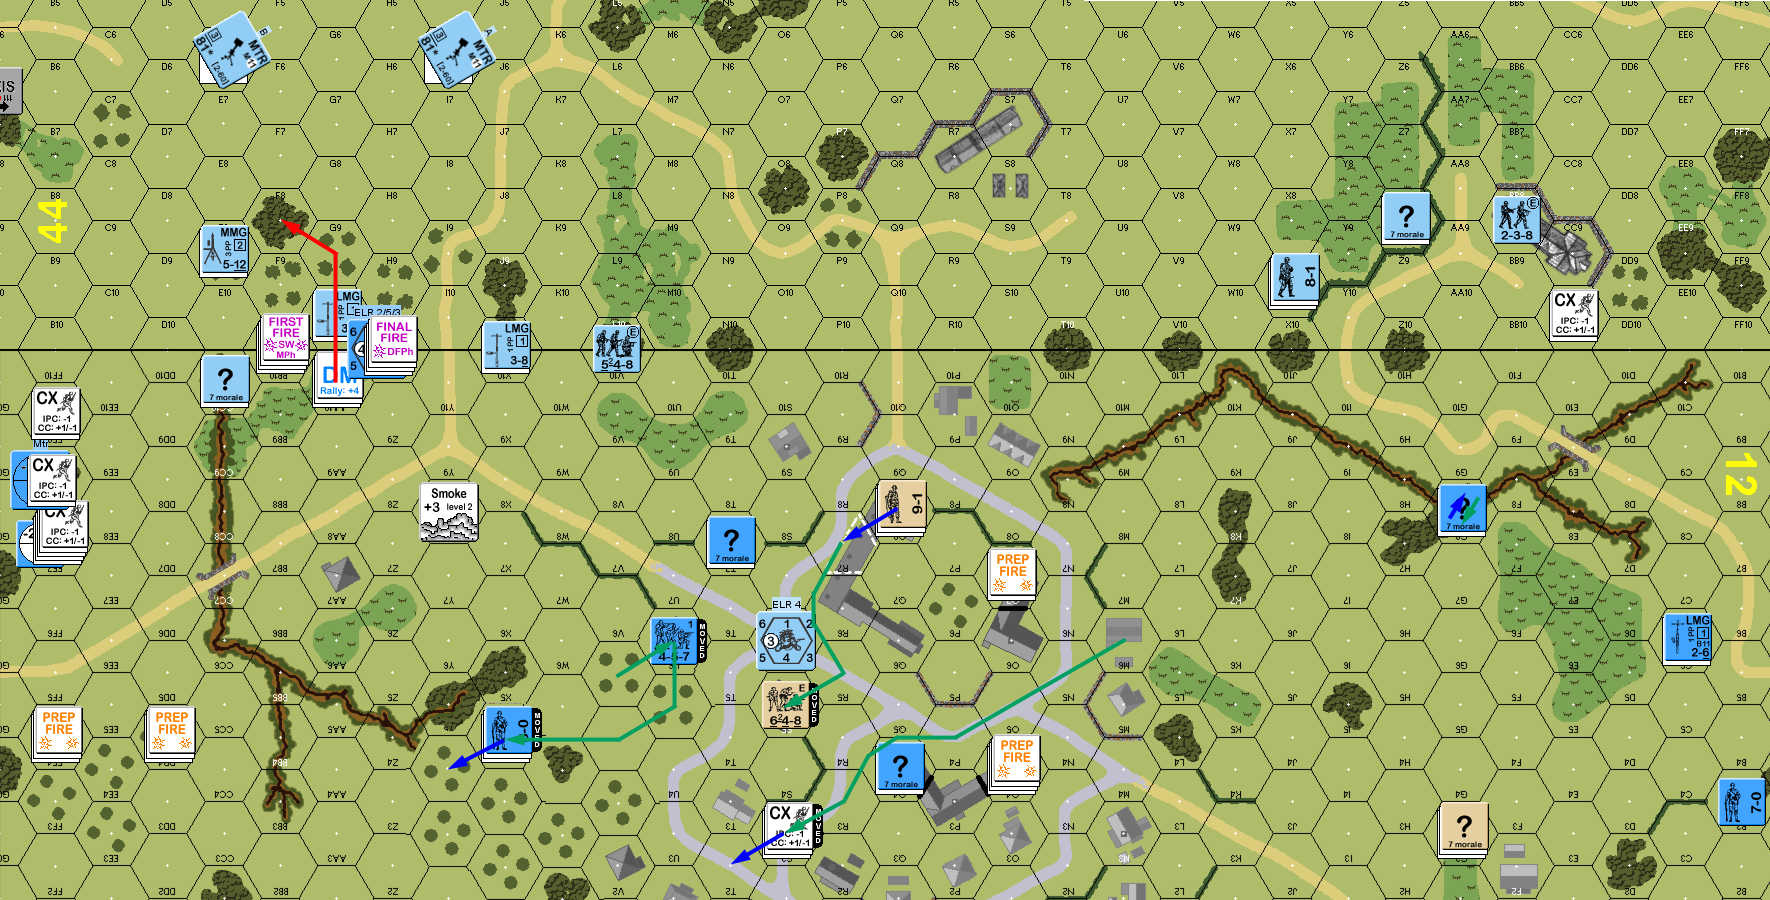
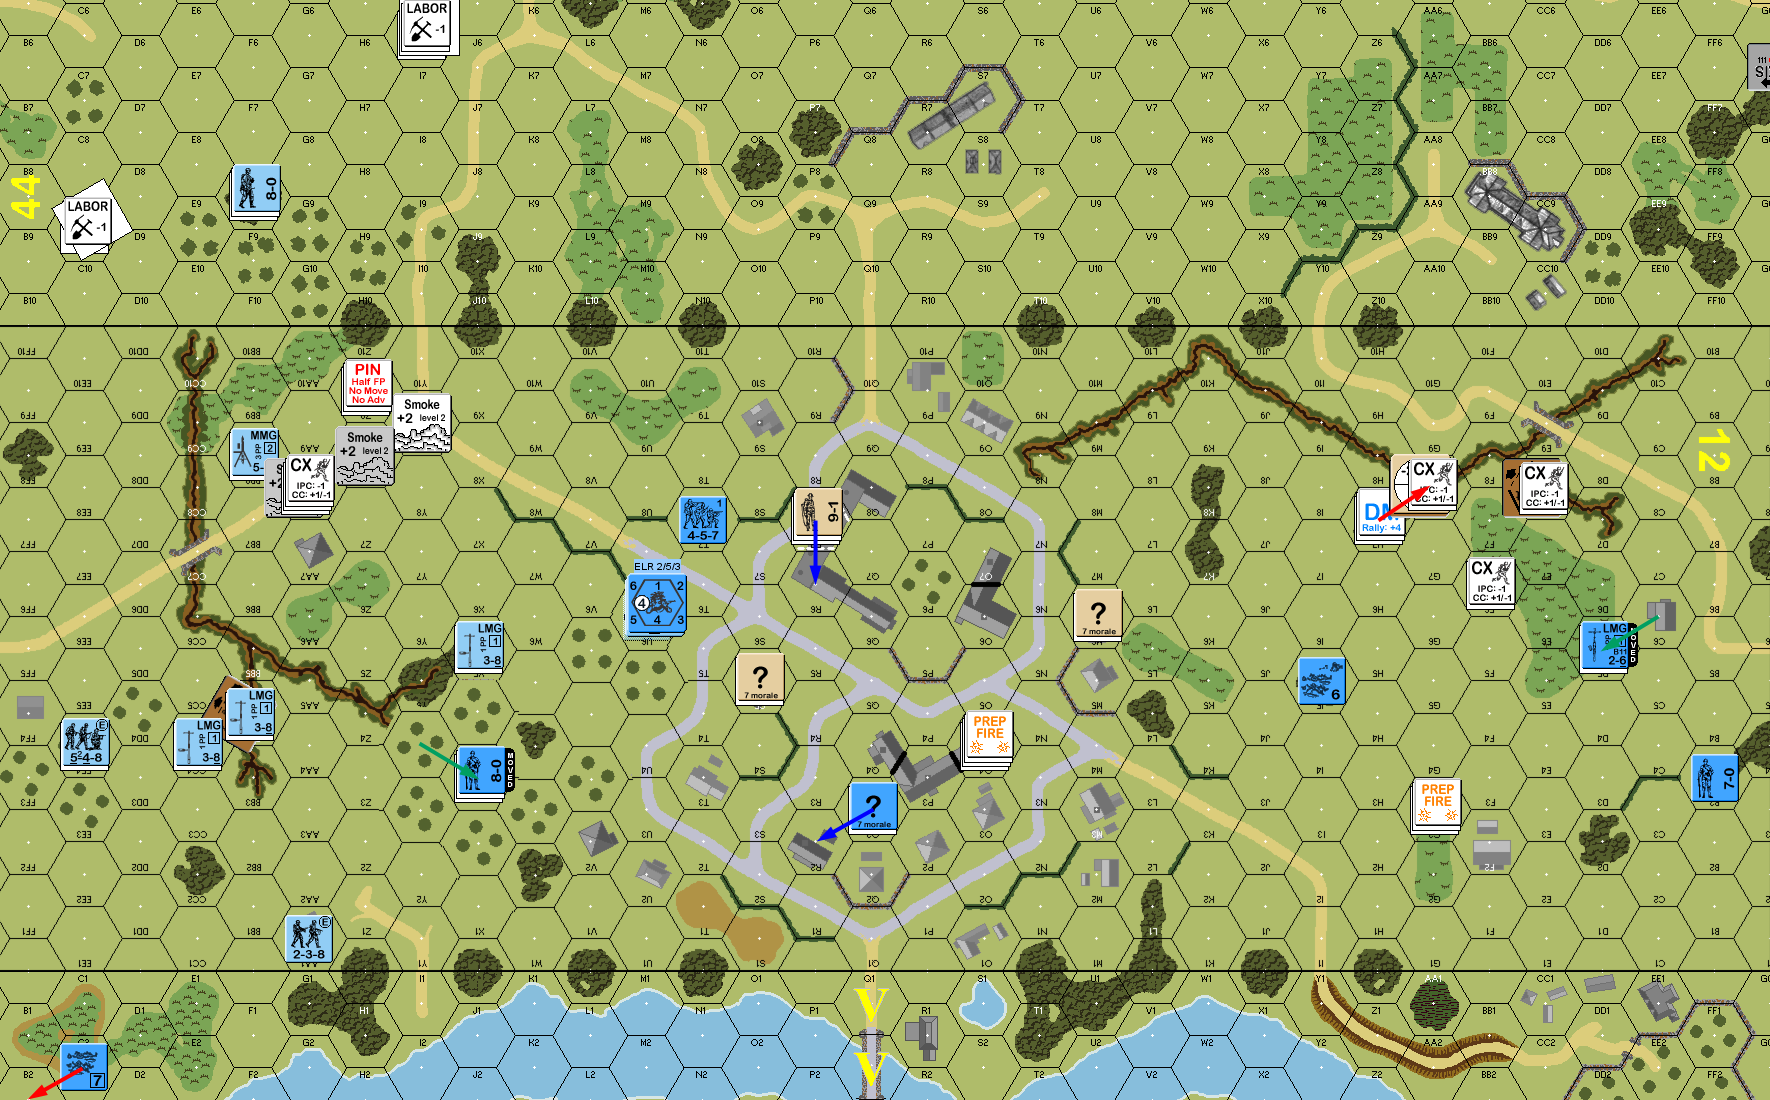
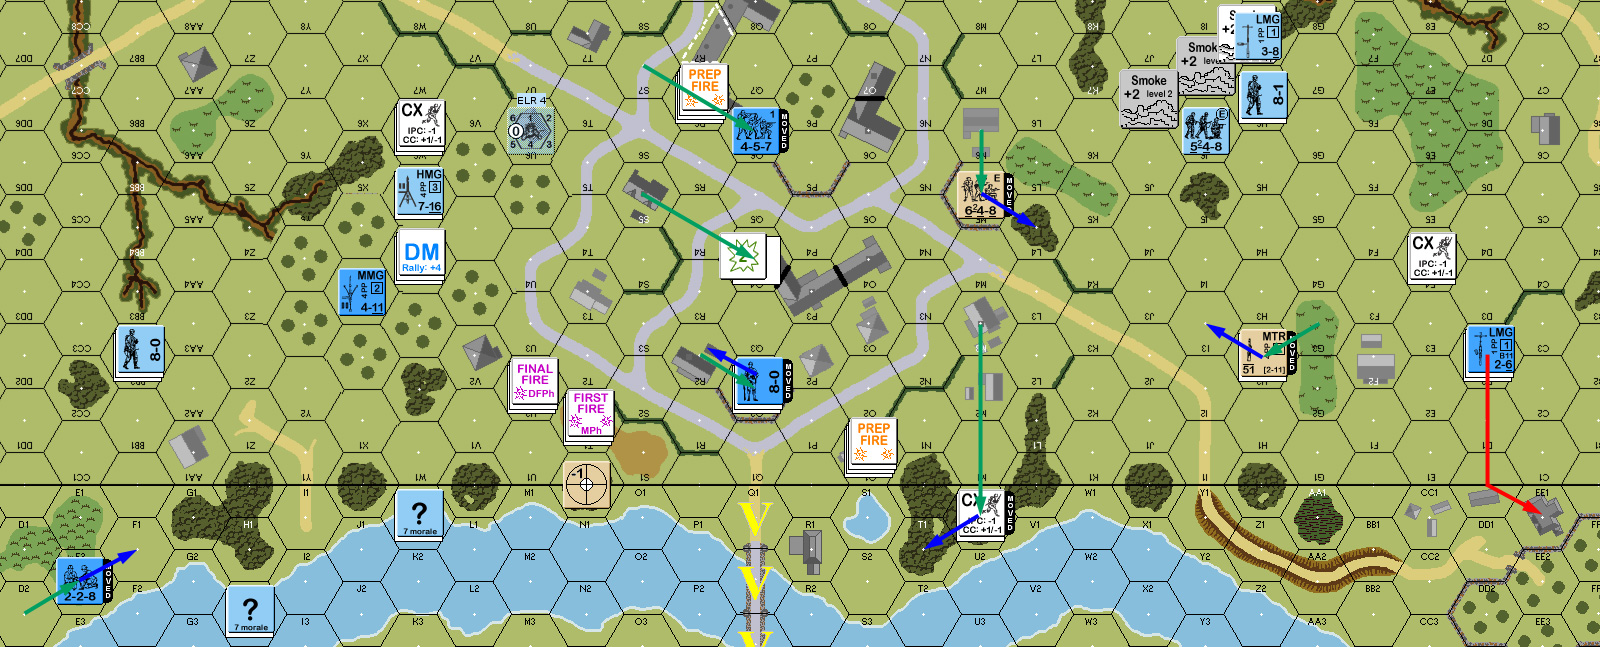
Situation, Allied Turn 1.
For rally, I got my LMG back, but my broken squad was reduced, and Patch repaired his MMG, which had just shifted to the flank of my advance, but thankfully he couldn’t get his crew back. I put down a second hex of smoke (in the HMG’s firelane), and found that was the last smoke round on the next shot. That MTR switched to about the only visible target and double-broke it.
I lead off with a couple of HSs charging his positions, and surprisingly living, though one pinned. In the north I managed to get a squad and a half adjacent to the HS manning his MTR, but another squad was killed by the MMG’s firelane, though that also set off my Sniper, who finished off his broken squad. I ran a squad back from the south end of the main advance to pick up the abandoned HMG, but he broke under fire. DFPh activated Patch’s Sniper, who reduced mine to a ‘2’.
While he had pinned me out of his position in 12G8, I did manage to break the squad there with a shot down the gully. I piled the squad into 12DD4 and killed the defending HS, destroying the 60mm MTR in the process.
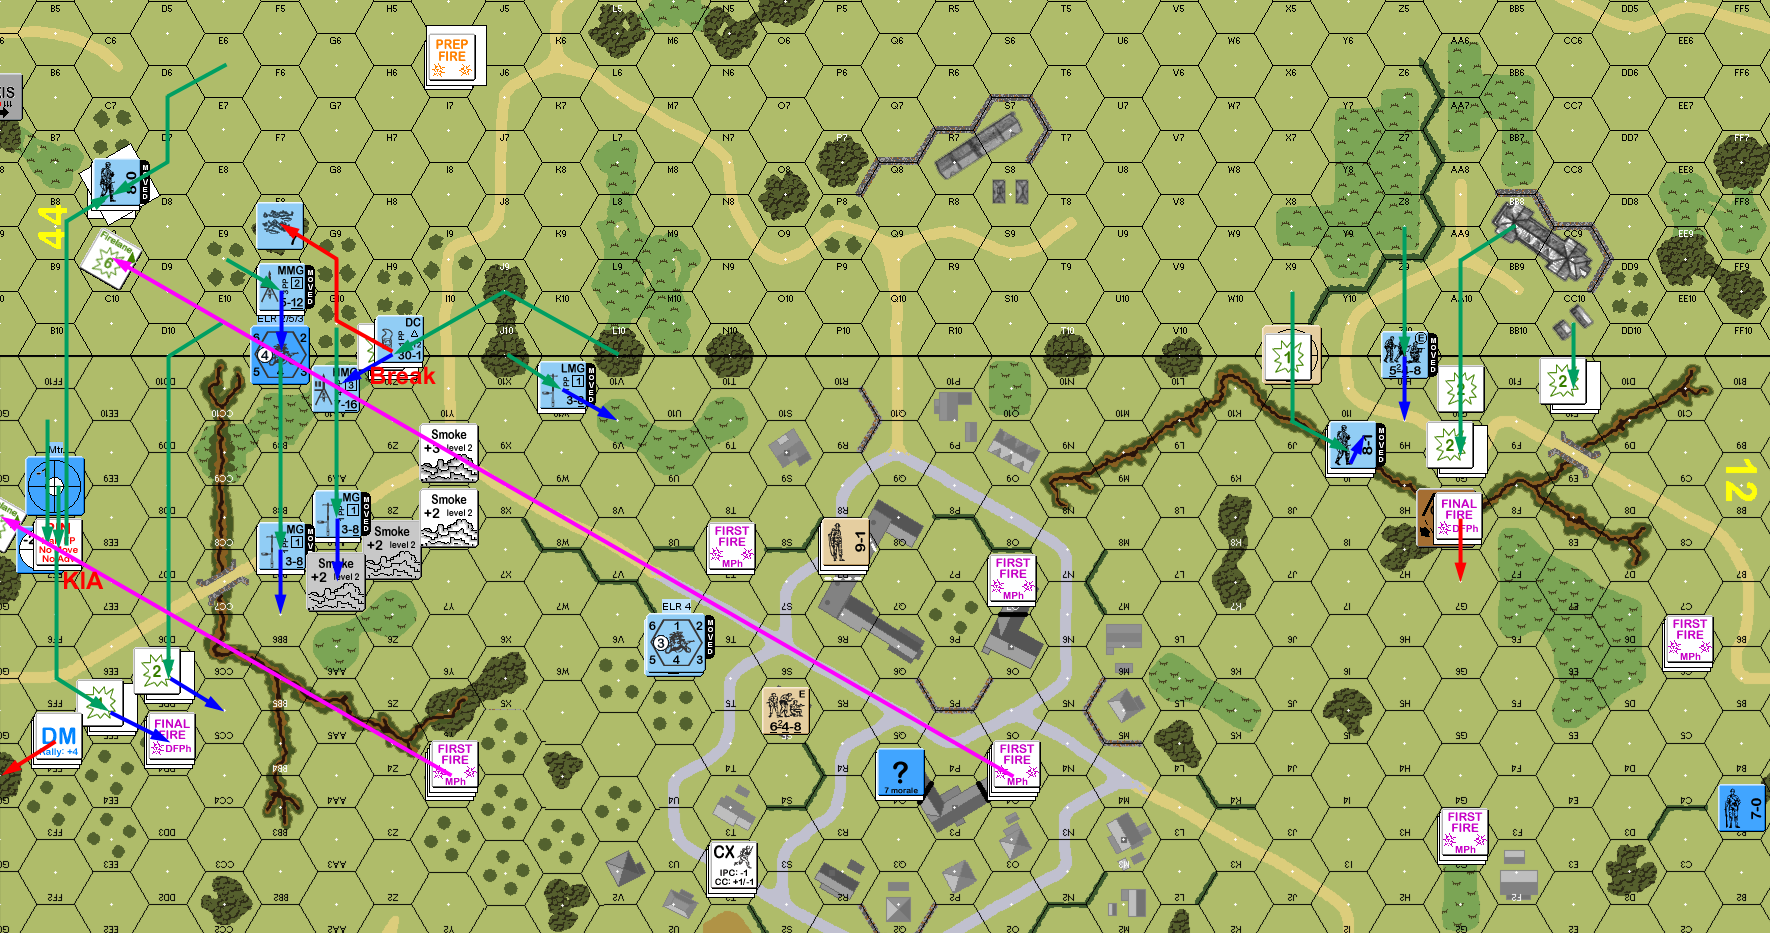
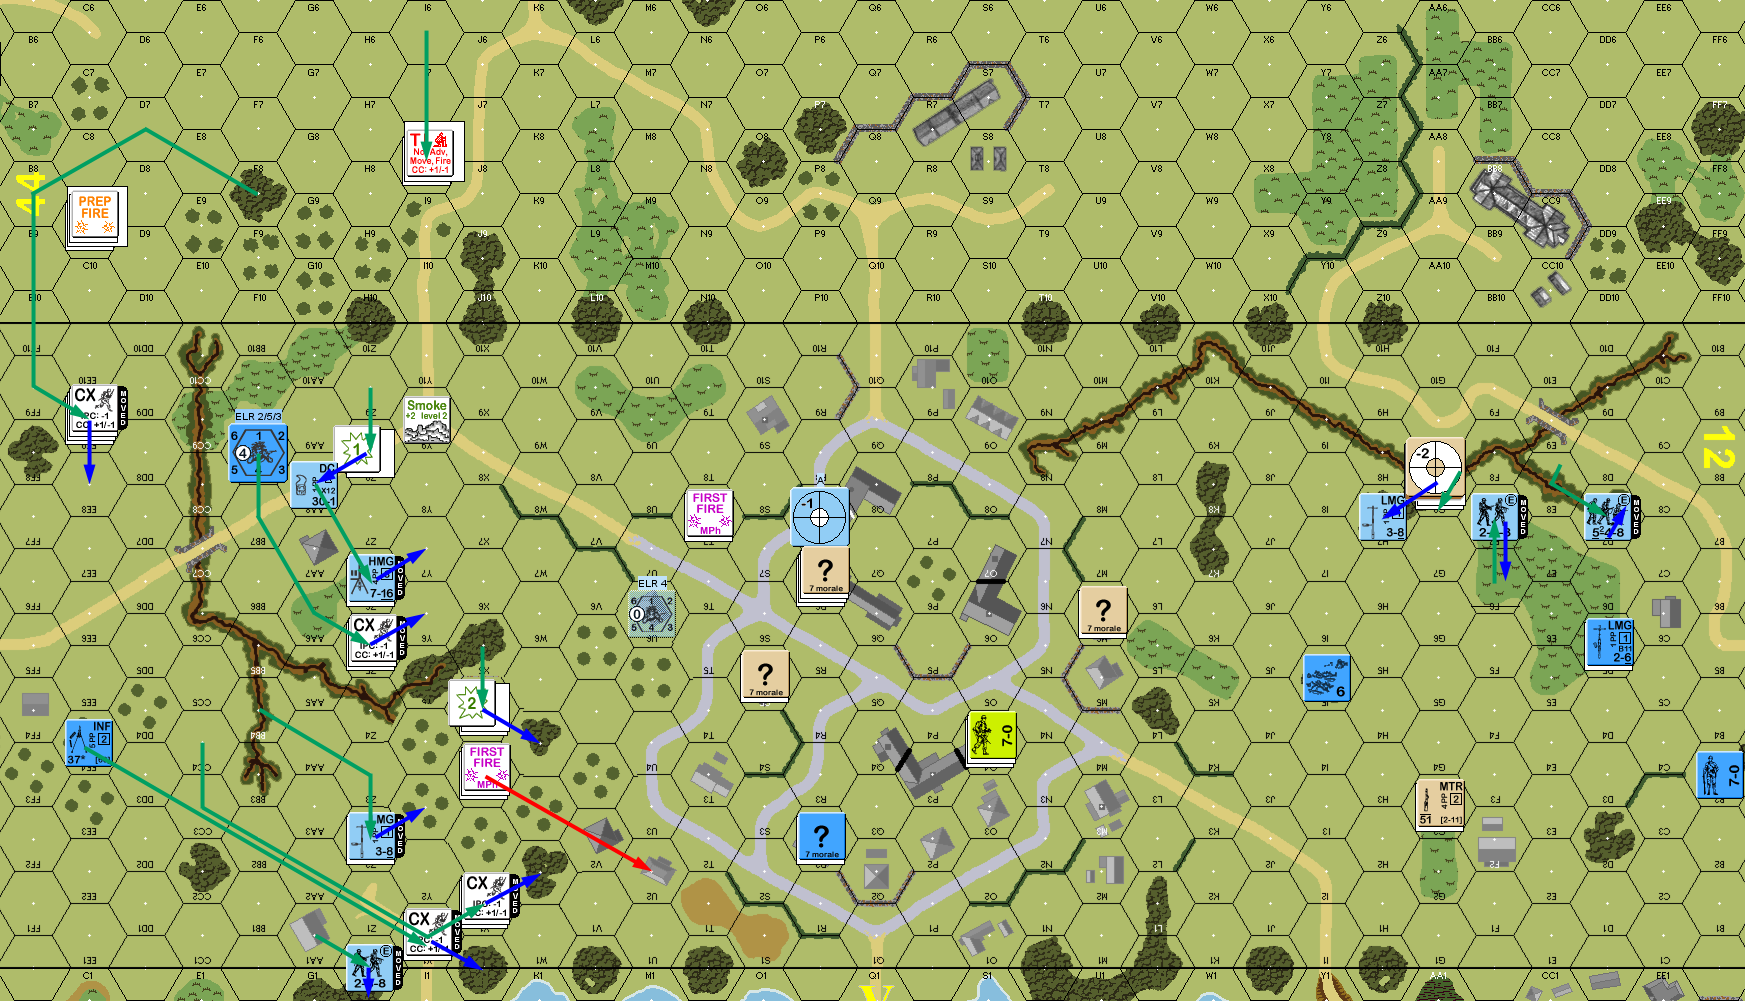
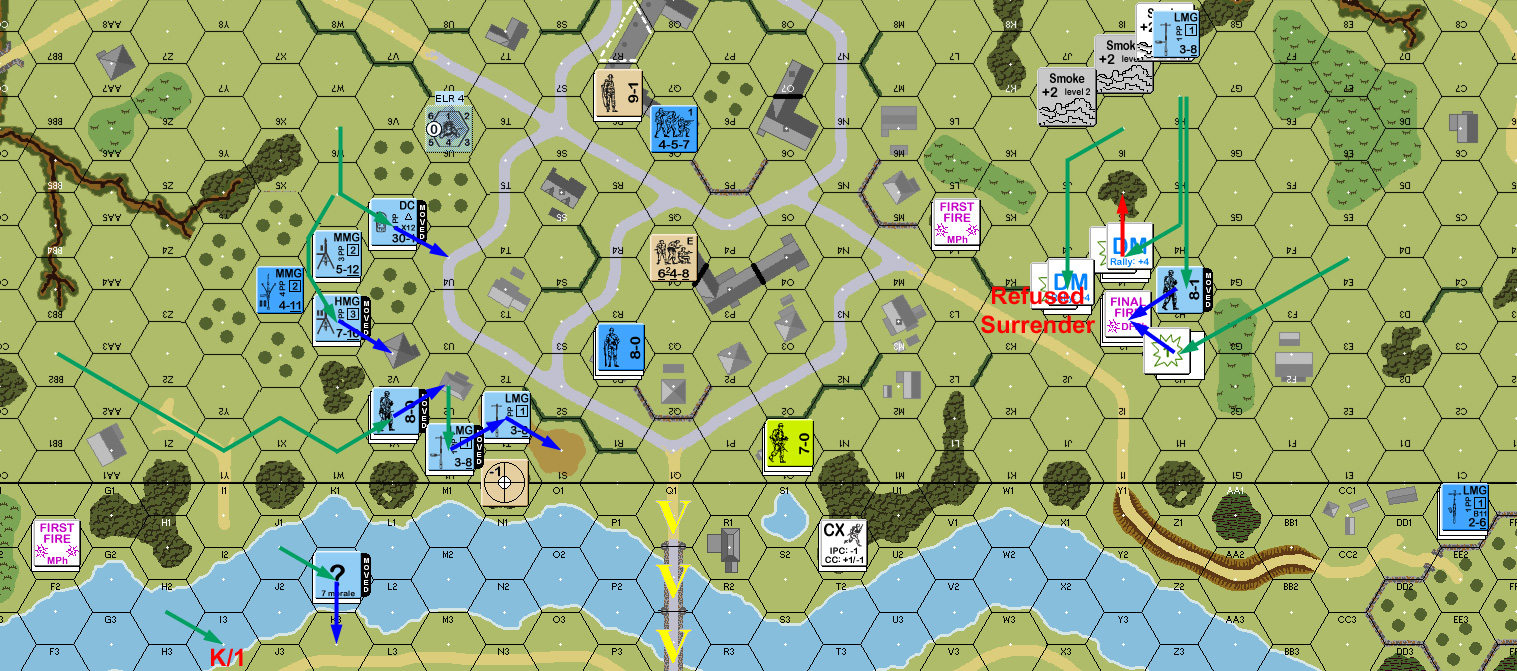
Situation, German Turn 2.
Patch didn’t get either his crew or squad back in rally, and to my surprise took a fair number of shots in Prep, and only shifted a little during movement. He didn’t get anything better than PTC, which I passed, but that activated his Sniper, who promptly eliminated mine. The first flight of three Stukas were available to me this turn, which might explain why he didn’t care to move, but two of them missed their spotting checks, but the third eliminated one the squads that did move and it’s LMG, also starting a Flame in the building, which helped keep Patch’s north-west flank uncertain. I directed a fair amount of fire at his MMG in Y4, but only pinned the HS manning it, and I malfunctioned an LMG in other fire.
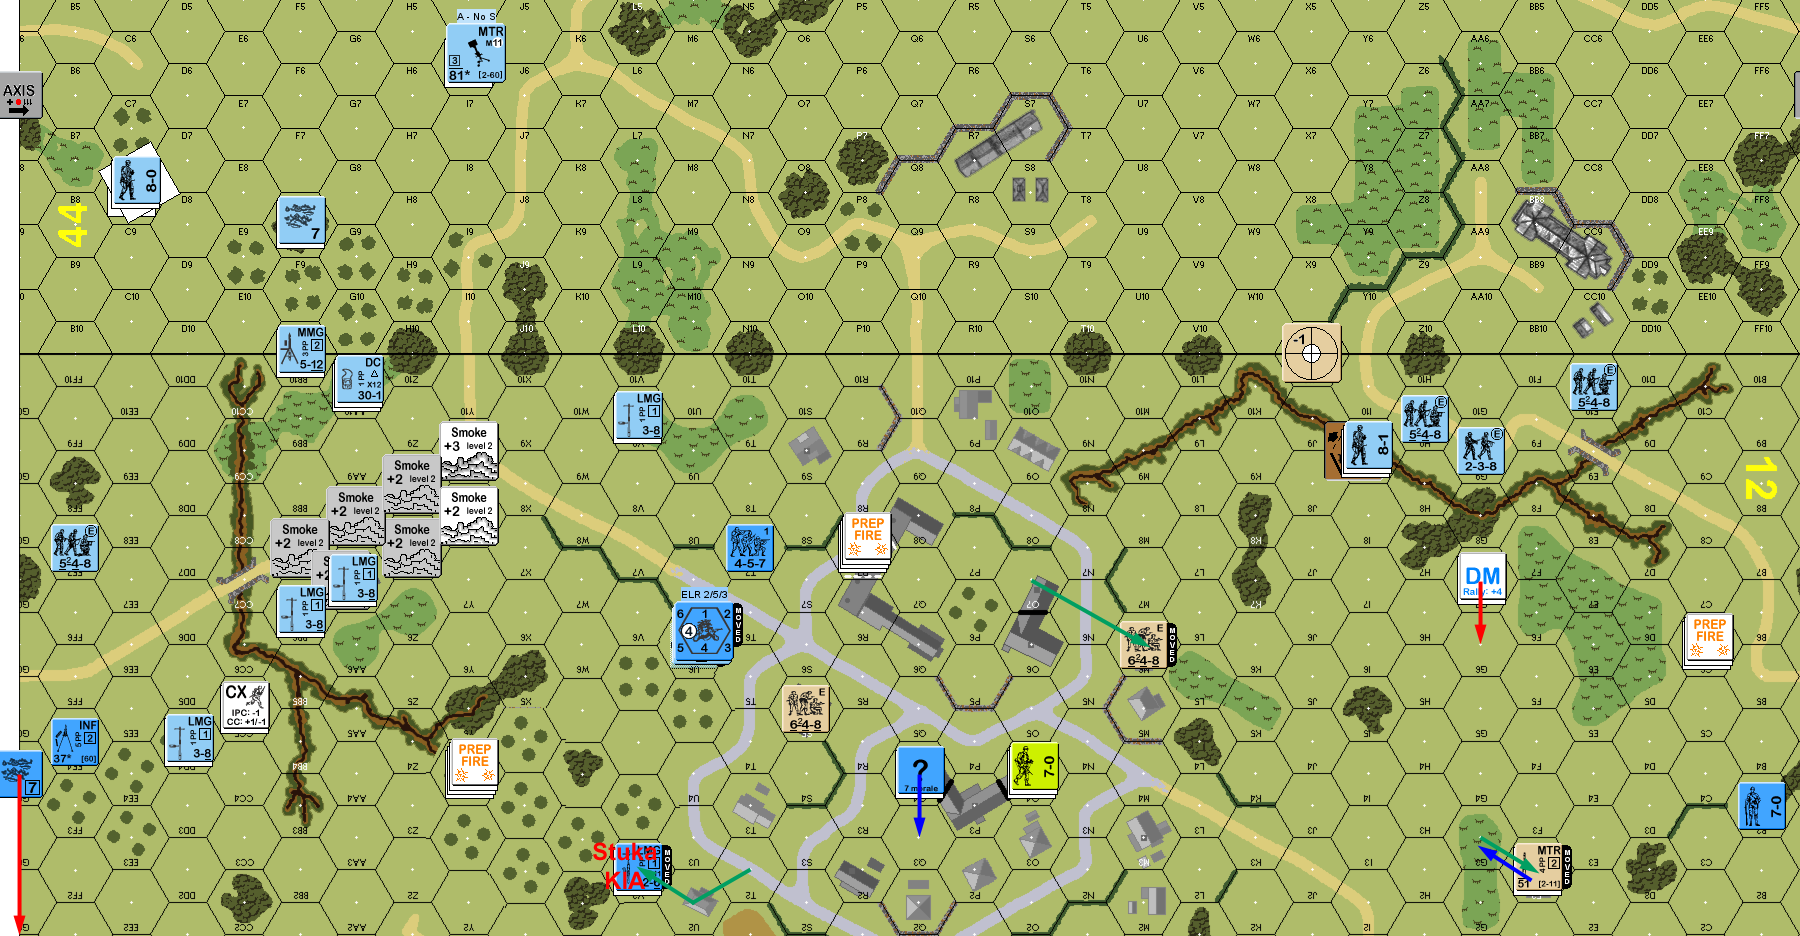
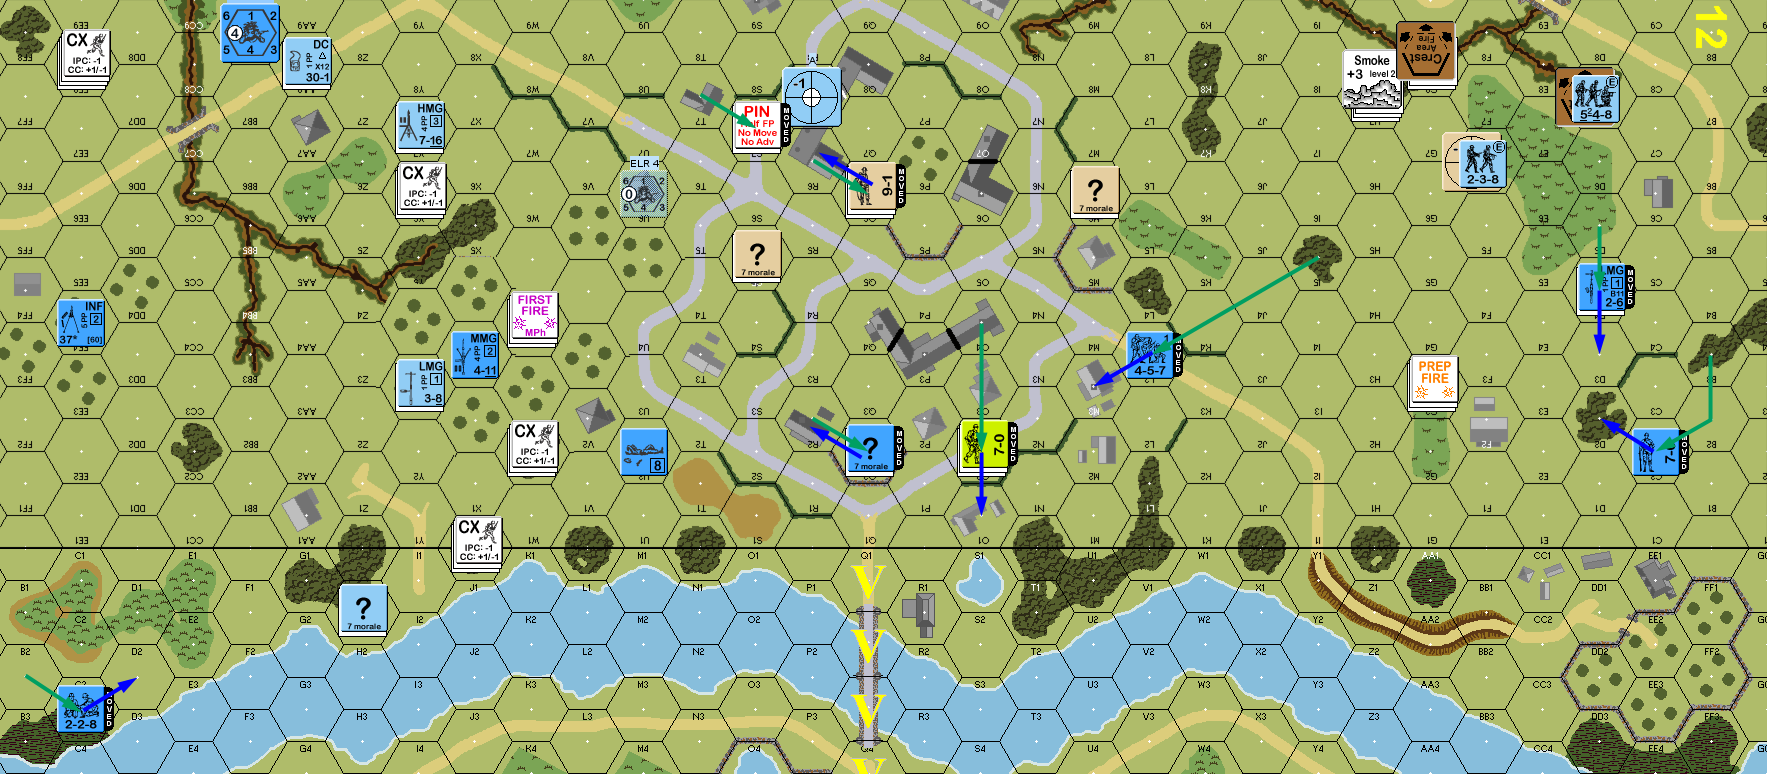
Situation, Allied Turn 2.
The LMG went away permanently on my rally, but I finally remembered to pick up my HMG (seriously overloading the squad who was already carrying a DC). Patch couldn’t self-rally his crew, and my 1st MMC self-rally also failed. Even though the Stukas are only a defensive fire unit, the SSR defined availability by Game Turn, so I checked and found out the second flight would show up immediately (since they don’t stick around in this scenario, waiting a turn or so could have been nice).
I attempted to keep pushing my two MTRs into useful locations, but one didn’t get anywhere, and the crew of the other broke under fire from the .50-cal. I had wanted to really pressure the MMG this turn, but the terrain was a little too rough for me to do more than just threaten to overwhelm it on the next turn.
Situation, German Turn 3.
Patch still didn’t get anything for his rally; now that I finally had a leader at what had turned into my main route point, I rallied the squad, leaving the HS still to recover. I had advanced part of my south-flank force into woods that his British MTR had already targeted in the hopes that 51mm wouldn’t be able to get an effect. A hit and CH killed the squad and broke the 8-1 handling the area, before shifting to G8 and (thankfully) failing to get an effect there on a couple hits.
Patch mostly stayed still again, with the MMG squad retreating to the interior of the olive grove, where he couldn’t be seen from the air. Only one Stuka managed his spotting check again, and this time he rolled a ’12’ for the bomb attack, which meant that all that happened was the automatic Pin on the hapless squad in D5. Meanwhile, fire from the ground managed to pin his leader and double-break the HS manning the MMG in X3, giving me my route towards the bridge.
Situation, Allied Turn 3.
I got everything back for my rally, while Patch’s leader picked up the MMG in X3. I tried having one of the MTRs lay down some new smoke to cover the advance out of the Z9 area, but it missed. Thankfully, one squad was able to help out with some grenades. The MMG failed to stop my advance, and the leader self-broke before I could pile on to him. In the south, I mostly stayed out of sight while trying to reposition a little. Moving forward would be nice, but that flank was mostly there to keep him from redeploying, and was nicely tying up about three squads and two support weapons.
Situation, German Turn 4.
Patch got his crew in 40B2 and squad in I5 back for his rally, though his leader failed to recover. My overloaded squad had dropped the DC last turn, and now the backup squad picked it up, but my attempt to reclaim the LMG on the south flank failed. Patch used his 50mm MTR to smoke H7, but found he was out when he tried to do the same to D7. With that as cover, he finally started shifting troops for the final defense of the bridge. Sadly, this didn’t require covering much distance, and I had no LOS to much of it.
Situation, Allied Turn 4.
Patch rallied his leader as I still failed to recover the spare LMG in H7. I was hoping to advance a bit in the south, and keep him from moving anything more up. But he broke my HS and pinned my squad, keeping me from getting into proper position. I had misunderstood the wading rules (made unwarranted assumptions), but in the end it was slightly better than I had expected, and so put one and a half squads into the river with the idea of running up to take the west end of the bridge, and possibly get Control of the bridge itself, hopefully just leaving the main force to get into 40Q1….
As I moved up to my positions near the bridge, Patch finally revealed the 25-pounder in 40T5 and managed a K/3 on the first shot. Despite a high volume of fire, the only other thing he did was break a MMG squad, and pin a LMG squad that I was hoping to get into the town to try and lock down movement nearer the bridge.
I had managed to get up to the squad at the extreme south of Patch’s line, and broke it with AF, saving me from having to worry about CC with him. I did the same with the 8-0 that had been fleeing in front of my advance, which let it route away again. Considering that he didn’t have an actual negative mod, and the way CC can be a pain (even at 5:1 odds), that was good enough.
Situation, German Turn 5.
The 8-0 promptly rallied for Patch’s turn, though nothing else did. Prep fire wiped out the squad+LMG that had been stranded by a Pin in U4, though Patch’s LMG malfunctioned on the ROF shot. I didn’t have many good shots, and fewer good rolls, only managing to pin one squad while Patch tightened up his defense.
Situation, Allied Turn 5.
With two turns left, I didn’t have a lot of options. There was a lot of firepower on the approaches to the east bridge entrance. The only thing I could see was to have as many units as I could in position to try and force that hex, and with luck get onto the bridge itself. No one was going to be able to make the west bridge entrance other than the units fording the river, and I would just have to hope they could survive the 25-pdr and any long distance fire from the other bank (hopefully they’d be too busy shooting up the push to the east side).
Patch lost his LMG in rally, and I got my HS on the south side, but sadly could not rally my MMG squad. Things went poorly from the start in movement, when Patch’s crew managed to get a K/1 on my wading HS, leaving no backup for that part of the plan. I tried flooding the defensive line in the south, hoping to sneak someone through and get into the M2 area to cause some worry behind his .50-cal crew, but he broke everyone but the guys who couldn’t get that far. The surviving HS and leader took on his MTR HS in CC for no result.
Situation, German Turn 6.
And then Patch’s Prep Fire sealed the game. The .50-cal broke the squad on the far side of the river, and everyone on the S1-T1 hilltop with a nice rate-tear. His next move was to advance his squad in 40T1 to Q1, and I now had no one who could see it. The only thing I’d be able to do is advance into the eastern bridge entrance to contest it in CC.
Afterword:
I figured I was taking some chances with my setup, since I was gambling that my southern force would tie up an approximately equal number of defenders, and keep them from redeploying. That actually worked about right. I also correctly identified the far north as being too weak for a determined push. The flanking force to that, that was supposed to hold down the town failed, I really didn’t have what it took to do that, and then I had the complication of losing two leaders very early. I was lucky that Patch was having trouble breaking my troops.
In fact, at that point, I expected the entire thing to dissolve into a mass of broken squads that I could never rally. Instead, there was a slow attrition of K/ and KIAs. I have to assume that the Stukas are meant to do more than a single KIA and a pin.
However, the plan was somewhat unfocused, and once again, I got defeated by Patch’s ability to redeploy in front of me faster than I could move up. In this case, it was a given, considering the relative distances we were traveling. If I had been thinking more solidly of a river crossing from the beginning, I might have managed to get a slightly larger force across slightly earlier… but that area just isn’t well suited to a dash on the bridge. It’s too open.
Discussion ¬