
Combat Patrol
It’s been entirely too long since our group has managed any Star Fleet Battles, so Patch and I started a game on-line a while ago. Our current play-date is concurrent with the short Gorn-Federation War, so we used the excuse to actually use the Gorns and fast seeking weapons. We tend to prefer battles with more than just one ship per side, so the Gorns got a CA and CL (a good pair), while I came up with a few possibilities for the Feds. Either a CA and DD or CA or CL would about right, BPV-wise, but both the CL and DD are somewhat odd ships. The last possibility was a CC and FF, which would leave quite a gap in sizes, but are both solid Federation ships.
Patch took the Gorns, which left me to choose which set to take, and I settled on the CA+DD. I’ve always like the DD, and I had no compunctions about keeping a couple photon tubes empty to speed it up. We set up in the standard Patrol scenario locations, and rolled randomly for Weapon Status. Zero. That hurt both of us, since Patch was going to need three turns to get his heavy weapons ready, and I didn’t have anything pre-loaded, including overload energy. The CA started warming up a wild weasel and suicide shuttle while the DD just kept up at speed 16. Patch only went speed 8, despite having plenty of power, with the plasmas on the cheap turns and no phasers to arm.
I reduced speed to 12 for the second turn as I struggled to get a pair of photons overloaded, and loaded a second pair as proxes. Patch had ECM up, and I missed through a +2 shift. We began turn 3 at a minimum range of 13, and headed in for our first firing pass. I boosted slightly to speed 14, while the Gorns split at 12 (CA) and CL (15). His extra power and moderate speeds added up to heavier EW than I could afford.
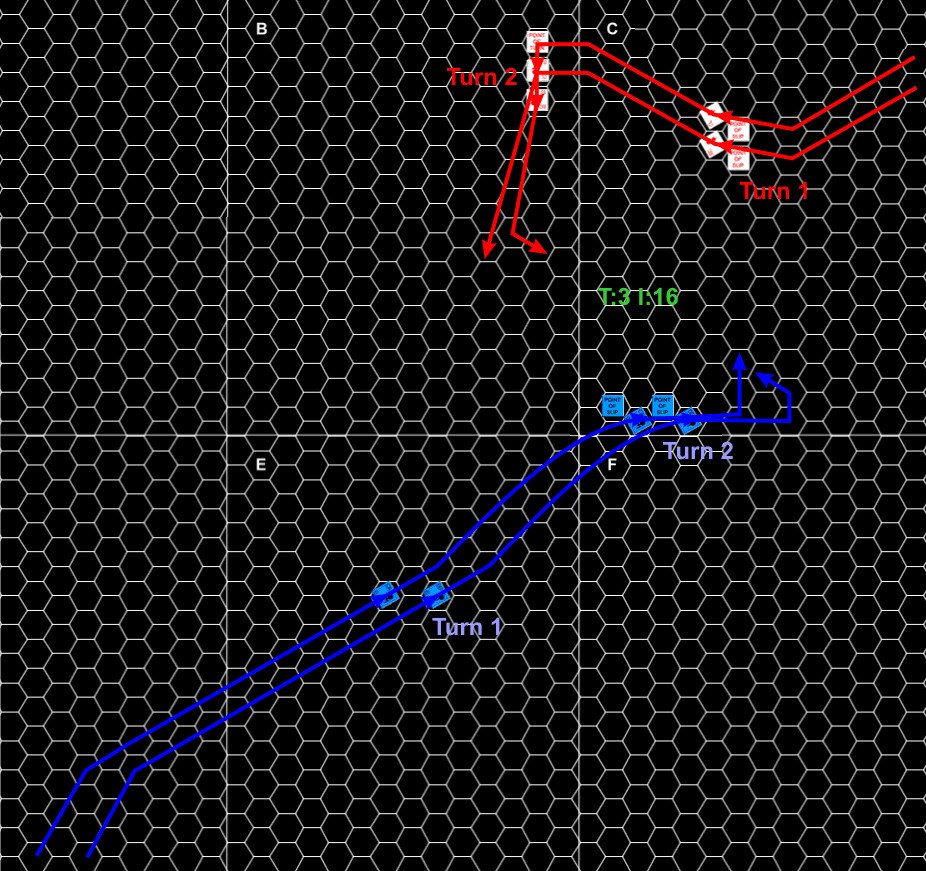
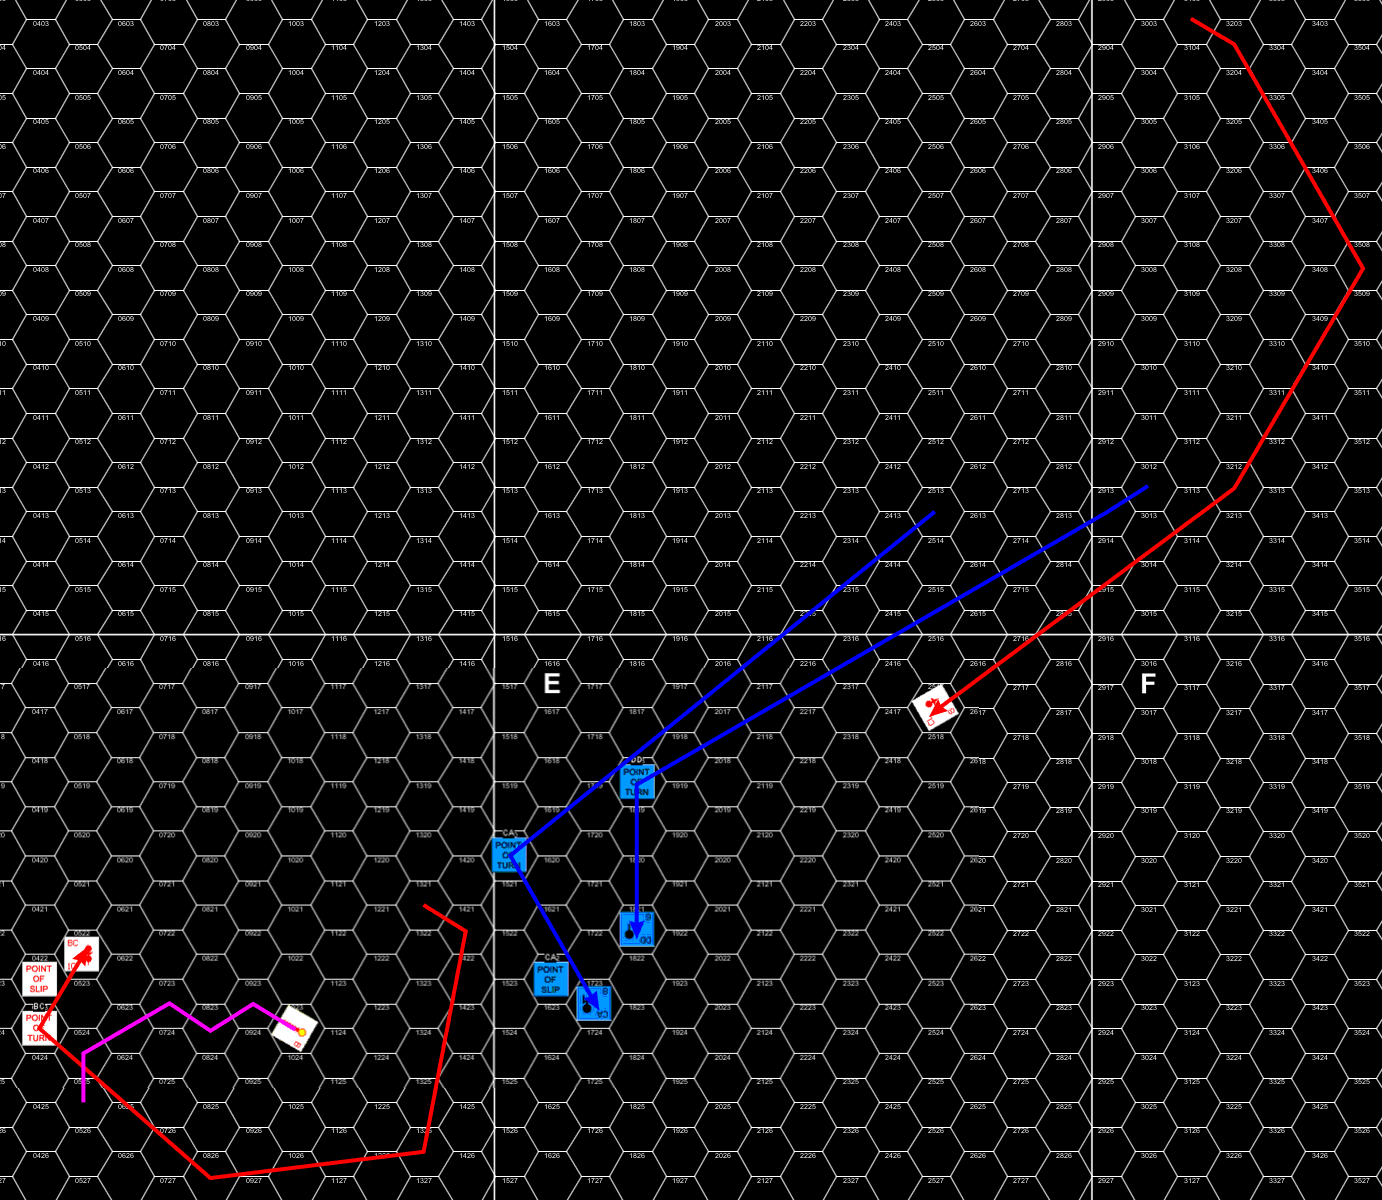
The first two and a half turns.
We circled around each other for the first half, before Patch turned in with the CA and launched a Pl-G from each ship at range 8-10. Patch fired all bearing phasers from his CA at mine, while I boosted ECCM to burn through his ECM, and returned fire with two phasers, a fully-overloaded torpedo, and a nine-point torpedo. Patch had decent rolls to do 16 points to my #6, while I had very good rolls (both photons hit in the 1-3 bracket), and Patch had to blow three batteries to keep a box on the #1 so he could reinforce it next turn.
I then spent most of the rest of the turn running out the plasmas, with the first one doing 3 points on shield #4, and the second one hit #5 for six points a couple impulses later.
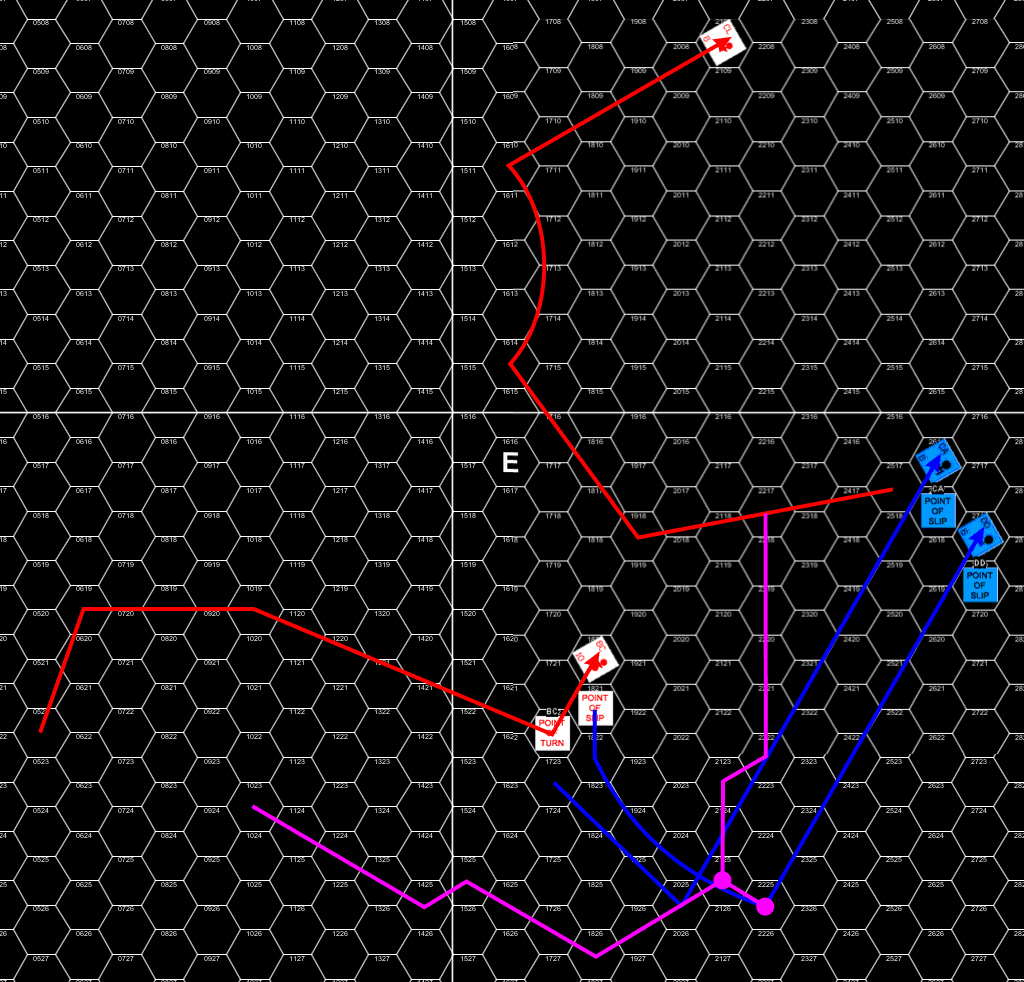
Running out plasmas, end of Turn 3.
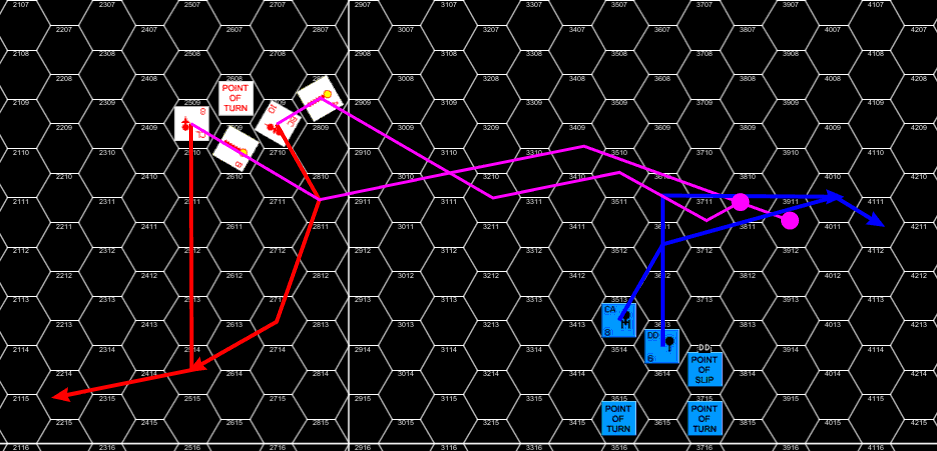
For turn 4, I went back to speed 16, and the Gorns went 15 and 12, much to my surprise. Plasmas don’t take that much energy on off-turns, and he should have good power curves with those ships. Patch ran for distance while I got turned around again, and started pursuit. The Gorns sped up to speed 15 for turn 5, and started jamming, while I maintained speed 16. Patch finished turning to present his right side and launch the two torpedoes on that side near the end of the turn, before turning back off.
Turns 4 and 5.
Patch stayed at speed 15 with 4 ECM running while I strained and got to speed 20 to try and maneuver past the torpedoes. They hit for 6 and 3 on the #2 and #1 shields in mid-turn. I continued to try and find a way to close the range, but Patch presented the left side, took another 9 points off the CA’s #1 at range 12, and launched plasmas before turning off again.
I maintained speed 20 as the second set of torpedoes closed, but the Gorns jumped up to speed 24, killing any thoughts of actually catching him while reloading. The plasmas hit on impulse three for 16 points on the #3, nearly taking it down after phaser fire.

Turns 6 and 7.
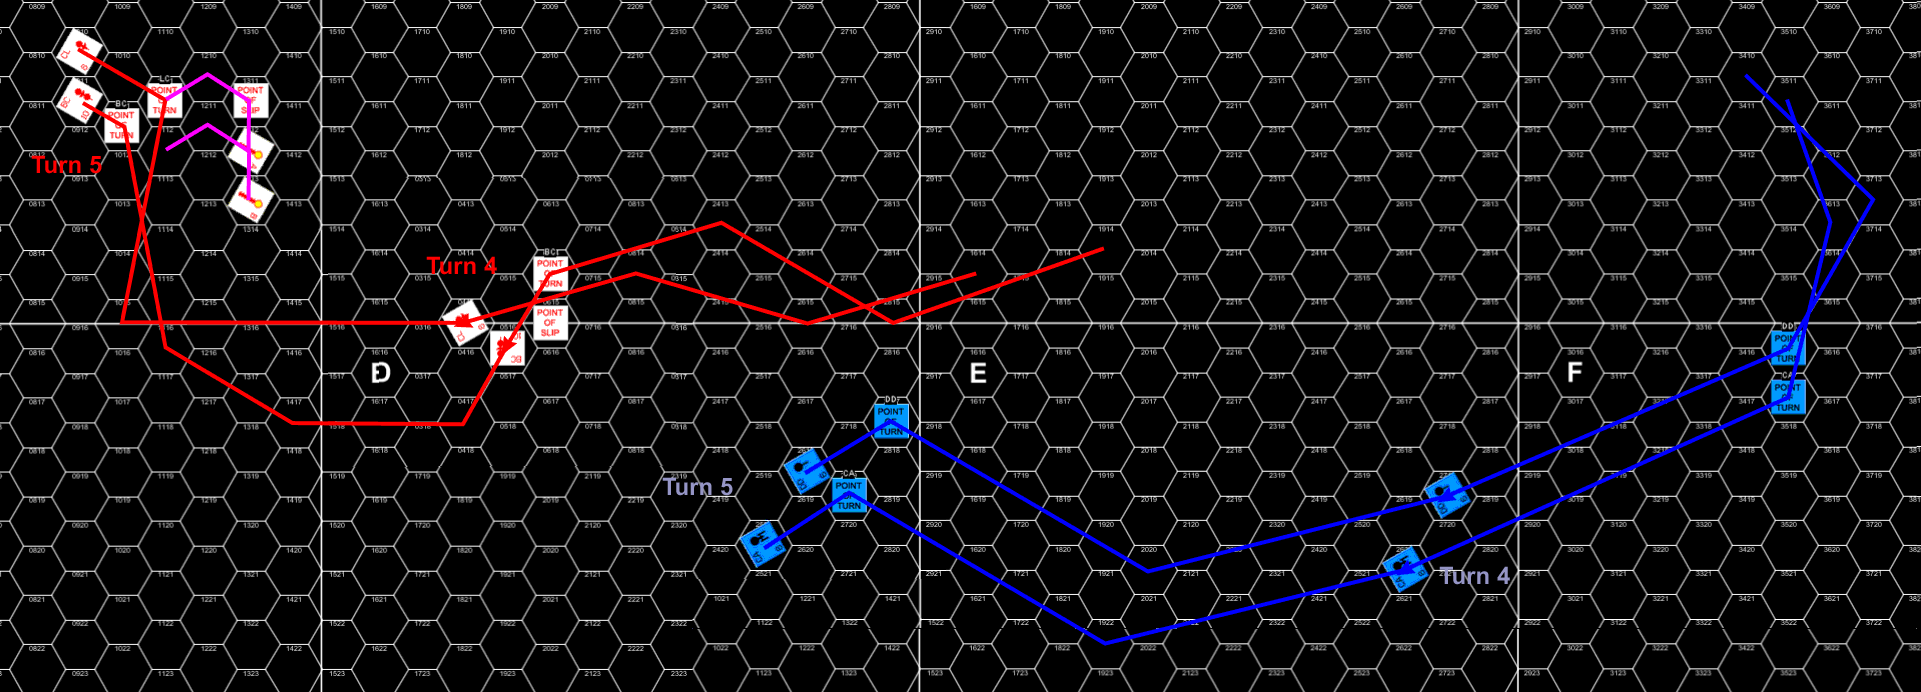
At this point, I figured I had two ways to go. I could push everything into speed, and try to close, mostly by cutting any corners if Patch continued to maneuver, or I could go slow, concentrate on getting everything armed, getting my shields repaired, and try to wear him down with Proxes. I was already behind the curve on the latter strategy, but there was just no way I could catch the Gorn ships with their excellent power, so I cut down to 11 while Patch only went 17.
Patch turned to present the left side, and I angled in to intercept, getting closer than I had figured during planing. Mid-turn Patch fired phasers to ding the front shield of the CA for 4, but the turn ended with him still crossing my centerline. I sped up as much as I could, managing 17 on the CA, but only 15 on the DD, while Patch went 16, and put more power into EW than I could contemplate.
The problem with trying to close presented itself when both left-side Plasmas were launched on impulse 1, and the Gorns turned off. The CA made a sharp turn away while the DD (who had been out of arc) headed for the torpedoes to shoot them up. They eventually hit shield #5, and one turned out to be a Pseudo torpedo while the other hit for 3 points.
Late in the turn Patch again presented his right side, and launched those plasmas before turning off. IDing at four hexes revealed that they were targeting the DD this time….
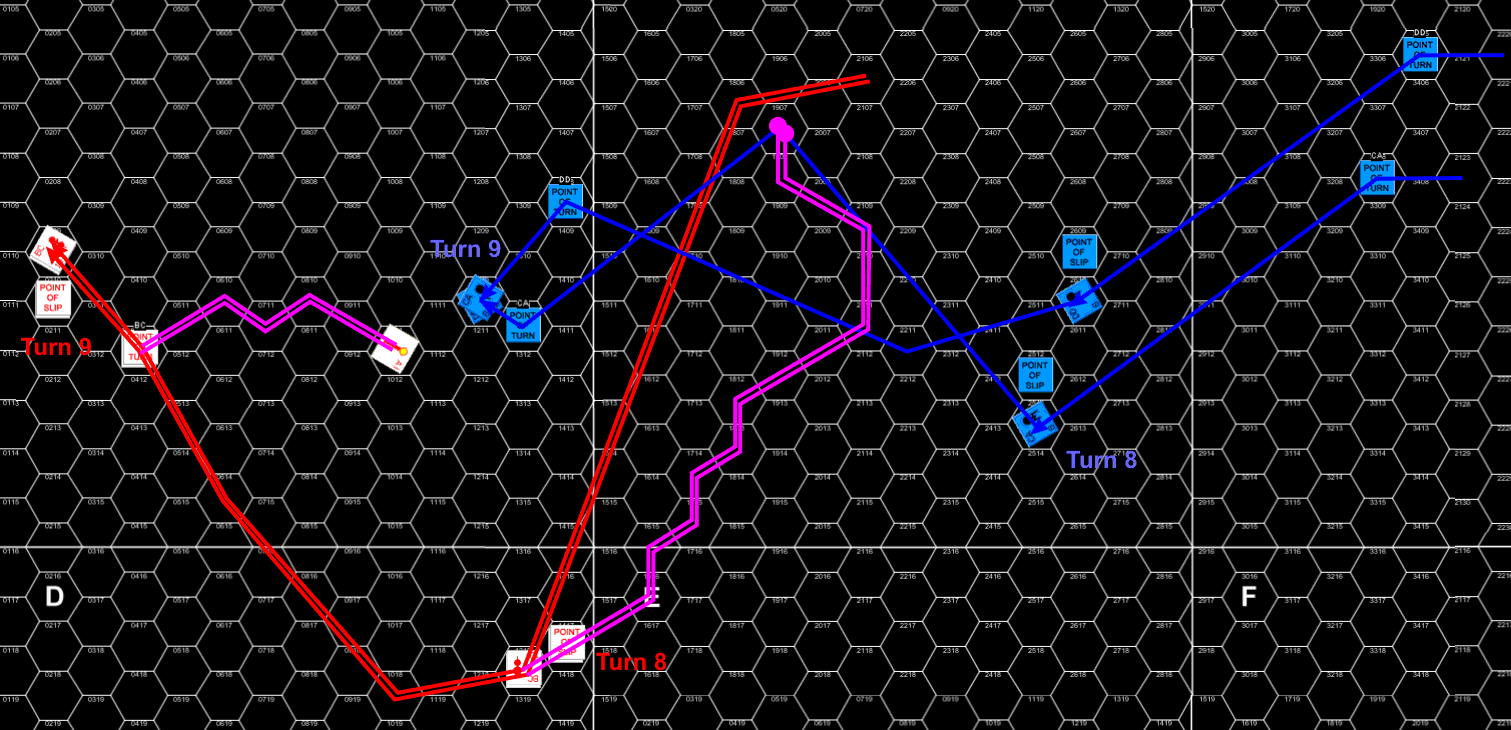
Turns 8 and 9
Sadly, I forgot to record a log for the next week, so I can’t show what happened for the next two turns. The DD dropped to speed 3 to put up reinforcement to take the plasmas on, and switched it’s two standard-load photons to prox fuses to get the G-CA as it moved off again. I had lost track of the fact that I’d just seen a pseudo torpedo, and Patch surprised me with another launch. The CA ended up emergency decelerating to launch a weasel to distract it after getting to fire a full spread of photons (I think they mostly missed).
This finally generated a few internals, and I managed to strip some of the left side phasers, but could not get a ‘torpedo’ hit. And then, with Patch having to actually look at his power situation again, he finally realized that he had not been counting impulse or reactor power.
…beyond the embarrassment, it really did mean that now that I’d hurt him, he really was going to go faster. It also explained several things about why he seemed to be going slower and more conservative than I’d been expecting. It was also a heck of a thing for me to have to account for now that most of the CA’s shields were shredded. To my surprise, the maneuvering around all of this ended up with the two Gorn ships splitting up, and I tried to press on the wounded G-CA.
For turn 12, I was back to speeds 16/15, while the Gorns were only going slightly faster (21/18). Not a lot happened as everyone chased everyone else until near the end of the turn. G-CA opened with a couple phasers at the nearly down shield #1 of my CA, and thankfully missed at range 10. A couple impulses later he launched a plasma right before it could go out of arc, and dinged my shield for 4 points with another couple phasers (had to blow batteries to keep it up).
After a lot of study, I determined that I just couldn’t get range 8, and turned off. The CL managed range 8 to the DD and took down the bulk of its shield #5.
Turn 12
For turn 13, the DD sped up slightly to 17, while the CA maintained 16, and the G-CA slowed down to match it while the CL maintained 21. Early in the turn, the CL launched a plasma and nearly eliminated the DD’s #5 with further phaser fire. The G-CA’s plasma turned out to be a pseudo, and the CL’s hit the DD a few impulses later for 4 on #4. This was followed up by another 5 from phaser fire at the end of the turn.
Turn 13
With the Gorn CA 8 hexes directly behind me, I plotted an HET and speed 4, and hoped the Weasel (and DD) could save me. The DD went 17, hoping to loop around while dodging plasmas, while the G-CA went 16 and the CL 21. I HETed, the G-CA launched a torpedo, and my CA fired everything at range 8 through a +1 shift at a nearly down shield.
The phasers rolled well, doing 14 points, but all four photons missed. Only two went in, dinging hull and a warp engine. The G-CA continued to close, launching shuttles (manned) as it went, and the CL launched a plasma in mid-turn. Shortly after, my CA attached a tractor to his to hold it in place while the DD continued circling around, and point blank phaser fire reduced my #1 to one box. I launched a 10-point suicide shuttle just before it moved to hit his #6.
The DD was having trouble getting around to the G-CA. I fired my two non-overloaded torpedoes at this point with range 4 and a +2 shift, and missed again. Later, I managed a Ph-1 volley at range three to take down the #4 shield, and right afterward the second plasma hit my CA for 11 internals, taking out the right-side phasers.
One the shuttles took out the weak shield of the DD, and at the end of the turn, the G-CA put 9 points into the DD, and the CL put 13 points into my CA. The former took it all on hull (which was almost gone), but the CA was losing power fast.

Turn 14
I won the tractor action between turns to keep the G-CA in place while the DD tried to get the best possible shot. I contemplated a tractor rotation, and should have shifted him forward to 2818, but decided against it at the time. The DD went 13 and the CA 12 (6 with tractor), while the G-CA went 8 (4 tractored) and the CL slowed to 15. On impulse 4, I dropped the tractor to let the G-CA keep in front of the DD while it tried to get a good shot on a down shield, while the shuttles fired through the DD’s down #5 to kill both batteries and a torpedo.
The CL moved and did another 11 internals through the CA’s #3, which missed all the weapon hits, but started chewing up power and batteries. The CAs then traded a volley of three Ph-1 shots, he did 8 internals to kill the shuttle bay, and impulse, while I could only get 2 in. He fired another on the next impulse to do another 6 and killed the facing phaser, while reducing the CA’s power to 16. The CL launched a point-blank plasma torpedo, which turned out to be a psuedo to try and keep the DD from chasing the G-CA.
The DD finally reached firing position and hit with two fully overloaded photons and four Ph-1 for 52 points through a down shield. The CA nearly downed the shield with its last two phasers, and the feedback then caused five internals. The DD was out of padding and started losing the center warp engine, but needless to say, the G-CA was now wrecked.
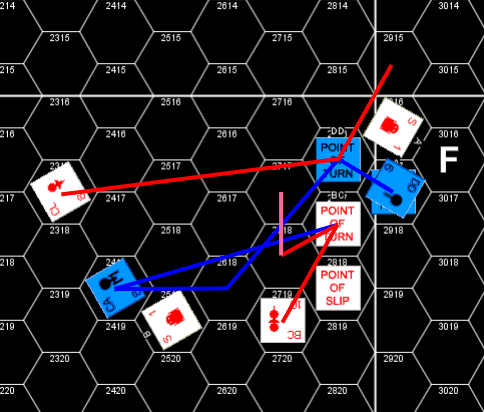
First half of turn 15
With the DD having trouble, and the CL untouched, it was past time to try to go. But the CA couldn’t shake the Gorns, despite plotting for disengagement by acceleration, there was just no chance. Several shots at the start of turn 16 finished off the remnants of the back three shields and took out all power hits (and nearly everything else). I would have done the same with the DD, but he couldn’t accelerate up to speed immediately. The CL managed another plasma torpedo at the fleeing DD which caught it after 13 hexes and did another 12 internals through the nearly down #4.
Patch managed to get boarding parties aboard the CA, but couldn’t do it fast enough (only two transporters on the CL, and none left on the CA), to prevent self-destruction to prevent capture. With the Gorn CA crippled, the DD disengaged and the Fed CA destroyed, this worked out to 145.5 points to 80 for a Tactical Victory for Patch.
Patch complained during much of the fight that he wasn’t sure what he should be doing, but in actuality he did a fair job at the plasma ballet. The weakest pass was the first one, where I gave too much respect to the 20-point Plasma-Gs and should have turned in and tried to nail him in the range 4 bracket.
Failing that, a less aggressive policy where I tried to phaser down torpedoes and wear down shields with proximity torpedoes, and put power into EW instead of movement may have been the way to go. Certainly, if Patch had been operating at full power the entire game, it was probably my only hope.
The final clinch when it came, was a bit sloppy on my part, and the amount of time it took to get the DD around really killed my chances. This was also aided by six out of six misses on the photon torpedoes, helped by the amount of power Patch was able to put into EW.
Can’t think of too much to add (the game went way too long), but I recall that when I split forces, I sent the ships the wrong way and had the cold Plasmas facing you, forcing me to reshuffle to get weapons to bear. I also missed marking down 10 internals on the CA, and thought it was a lot healthier than it was.