
D11 Ripe Pickings
Patch mentioned recently that he wanted to see the Americans in action again. I figured since we were still wanting to do some DASL, and I’ve been trying to go through more of the early scenarios, there should be something in Hedgerow Hell. Looking them over, we decided to give the first scenario from there, “Ripe Pickings”, a try, and Patch picked the Americans. Then I looked on ROAR and noted that the record is 15-49 in the German’s favor….
Hedgerow Hell suffers from the same oversized scenario problem as Streets of Fire, but D11 is small. The Germans have a nearly fixed setup (some minor CA choices can be made) with four Pz IVs and seven elite squads near a roadblock in the middle of three hedgerow-crowded DASL boards. The Americans get to set up a Sherman and four squads in a group nearby, having accidentally arrived in the German’s rear the preceding night. The Americans win by getting 20 CVP (normally 22, but we went with the American balance) in five turns, or by controlling the location of the roadblock at the end of the scenario. The Germans also have the problem of limited movement: they can only move as many MMC+vehicles as double the current turn number.
Patch set up in what has to be one of the more popular sites for the Americans, with a good view of the rear of two of the Pz IVs, and opened up with everything he had. The Sherman burned the Pz IV in H3, and a BAZ shot burned the one in I3. He rolled my SAN a couple of times in that, and as a small favor it went off once to pin a squad that hadn’t fired yet. The rest of his fire was at my squads in H2, but only pinned one of them on a pair of NMCs. Patch buttoned up the Sherman with an active Sniper nearby, but stayed put for my (limited) reaction.
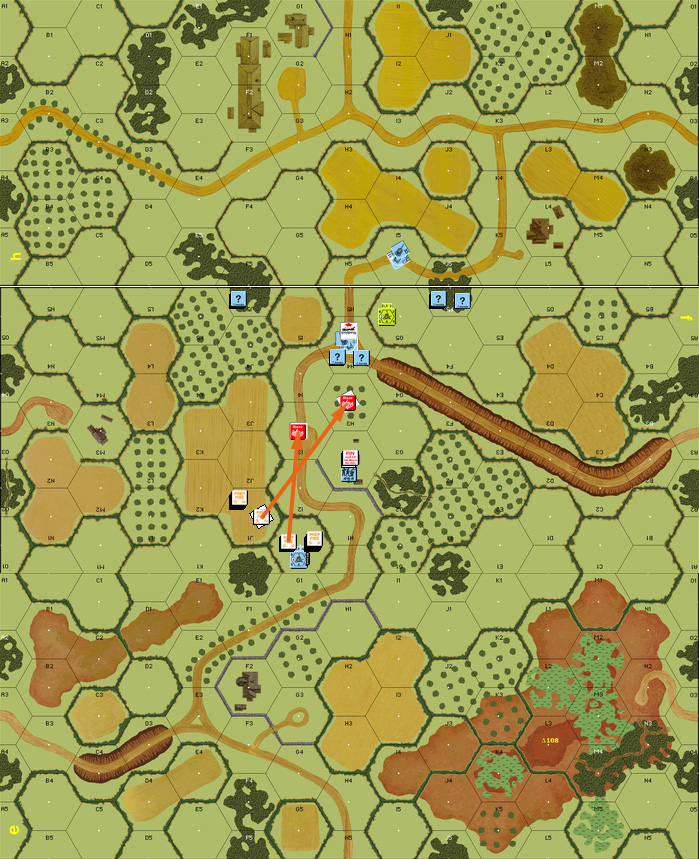
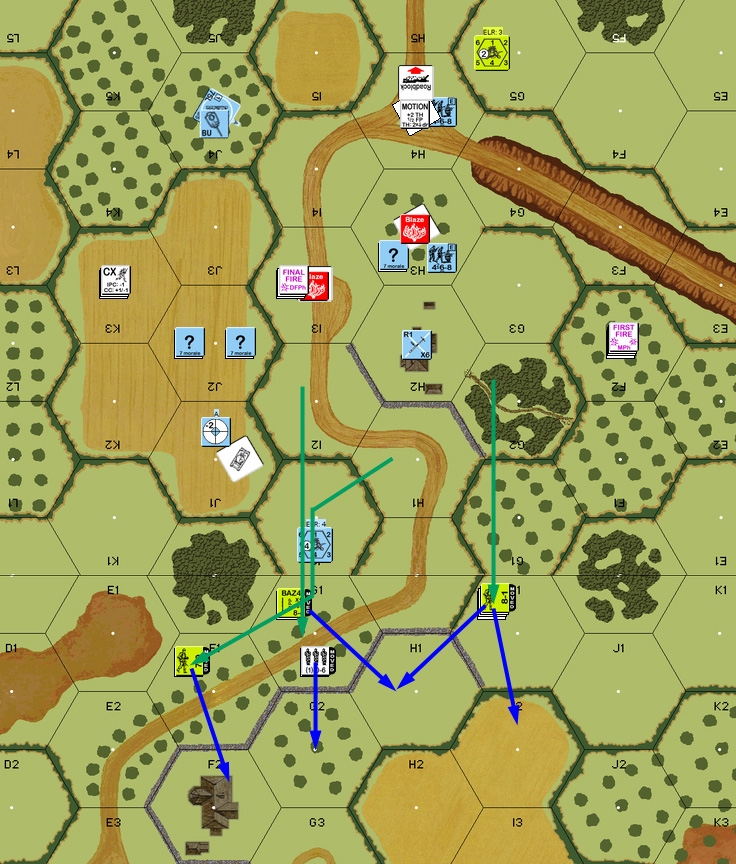
Full scenario map, Turn 1. Plenty of room for a running fight.
With Patch’s units concealed behind bocage and limited movement options, I set H2 to Op Fire in the hopes that I’d have a better target later. I opted to move the LMG squad in J5 to be able to see some of his position without bocage in the way, and one of the surviving Pz IVs moved into the same area to get a bead on the Sherman while enjoying HD from the bocage. Patch opened up with the small arms first, but I passed the 1MC that generated, and the Sherman got a clean miss with its first shot, and then bounced the ROF shots off the bank of the bocage, and missed again with the IF shot. His MMG in the hex also tried a ROF shot, but malfunctioned.
Final Fire managed to pin a squad in H2 again, but one of the BAZ went away, while the only effect of my advancing fire was to malfunction a LMG. An interesting wrinkle that I hadn’t appreciated was that German movement is only restricted in the MPh, allowing me to advance everyone and actually start tightening the net.
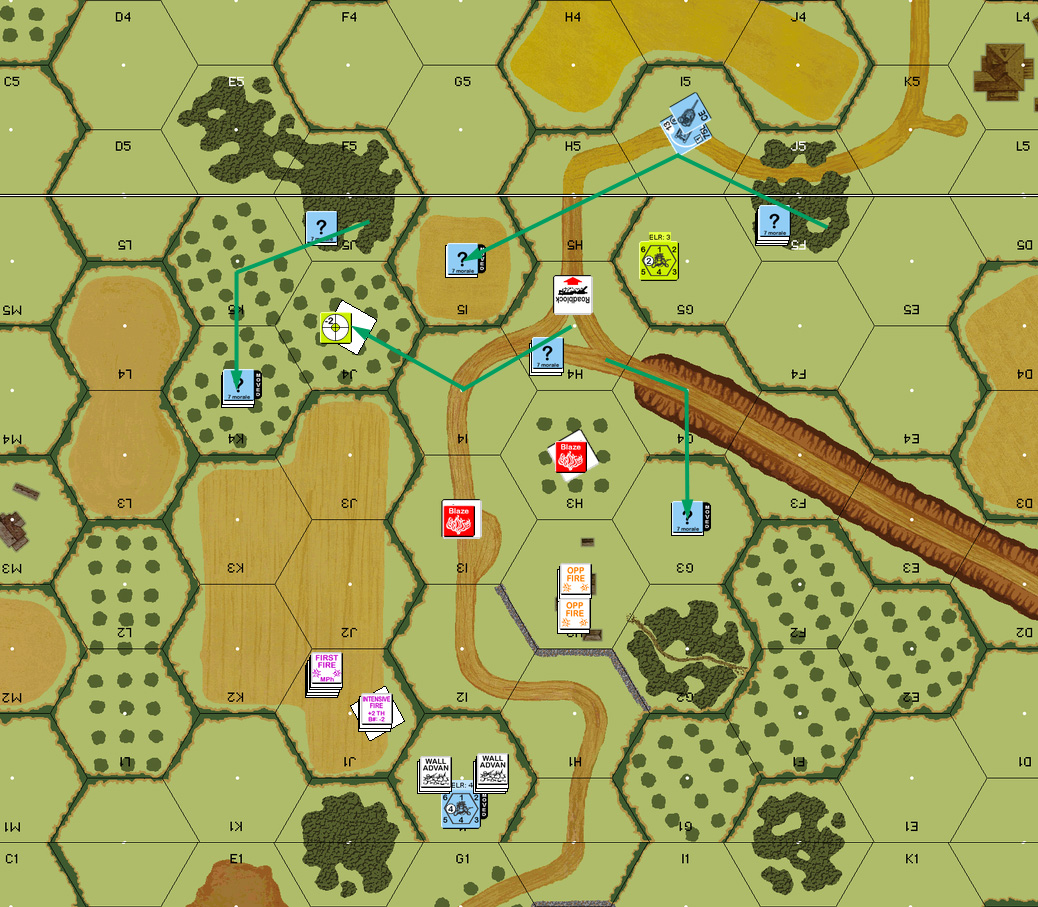
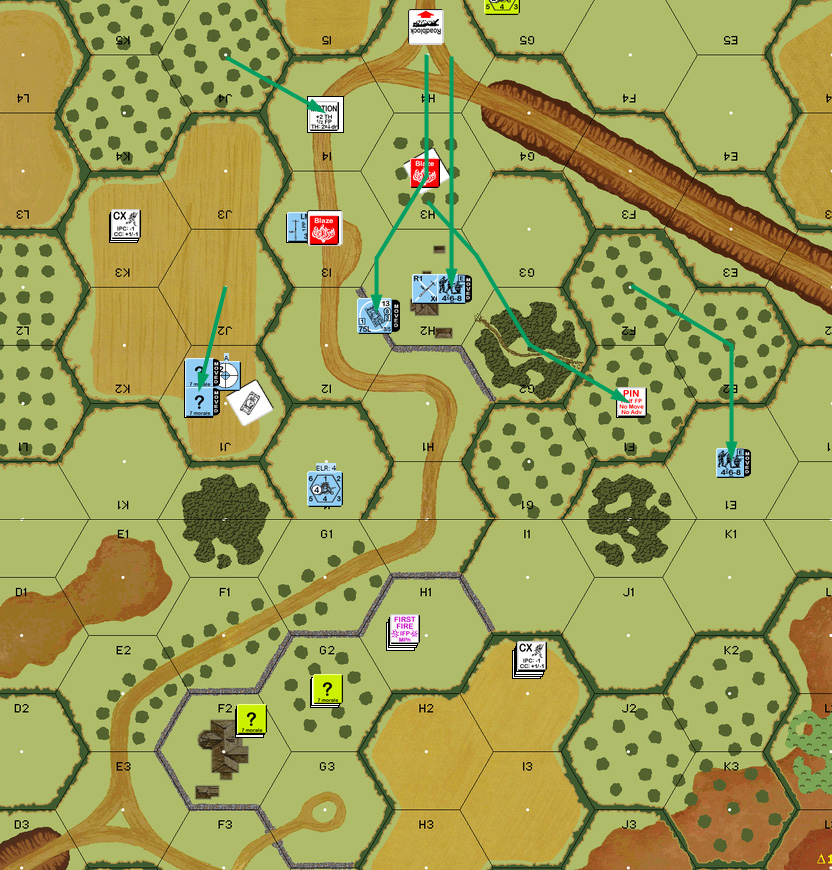
Situation, German Turn 1.
With things not looking so good, Patch decided his best chance was to still try duking it out for another turn, and bounced two more shells off the bocage in front of the Pz IV. At this point, an error in my deployment became evident. I had forgotten the maxim of don’t stack, and he broke both squads in H2 with a NMC. Thanks to the congested terrain, smoke from the wrecks, and lack of other nearby troops, Patch was able to put his two remaining squads on opposite sides of the hex to force their surrender. (He actually spotted this right after moving, and I allowed him to re-do for that. It’s the type of thing you always spot right after doing something else.)
This prompted some rules lookups. The Americans win immediately upon getting 20 CVP, and two Pz IVs + 2 squads of prisoners equals the required 20 CVP… at the end of the game. During the game, the prisoners count single, not double, CVP, so he was still at 16 CVP. And now I needed to figure out how to stop him, and free the prisoners in three and a half turns, without killing the prisoners (since if they die to my fire, they go to being worth double CVP). Oh, and I still have restricted movement options.
I did of course take several shots at him while he did this, but with all the smoke all I could do was get a couple of PTCs, and did pin his squad and leader in G2. But that didn’t really help. And the Pz IV took out the Sherman without any trouble. It didn’t burn, but the crew didn’t survive either. Patch contemplated going after the leader left over in H2, but the Ambush odds weren’t good, and the of chance of getting stuck in Melee would have been disastrous to him.
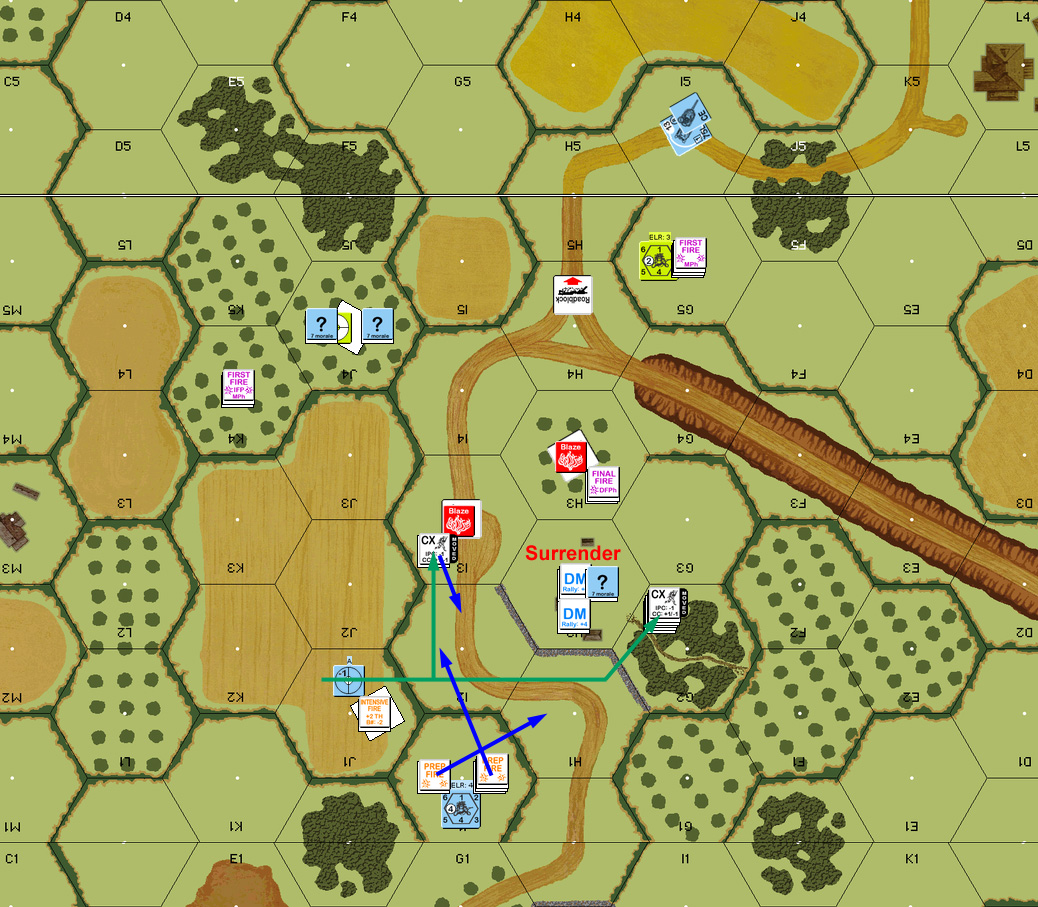
Situation, American Turn 2.
For my second turn I got to move four of my units, and opted to get the distant Pz IV in motion, as well as the LMG squad furthest from the action. The other two moves went to trying to get somewhere, anywhere, with the flanks through the dense terrain.
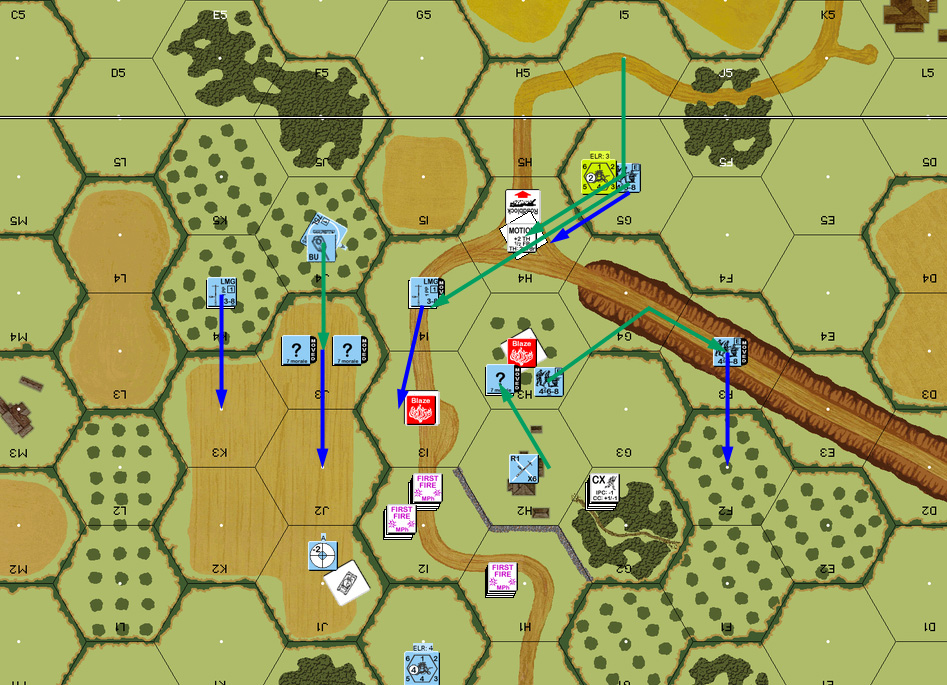
Situation, German Turn 2.
For Patch’s turn, he continued to fail to repair his MMG, and he fell back, playing for time. With the dense bocage terrain, there weren’t very many shots for me to take, and the few there were did nothing. He took shelter in the yard around the house in eF2, with everyone out of line of sight, though his squad and leader not in concealment terrain failed to gain concealment.
Situation, American Turn 3.
I was up to six out of my eight remaining units for movement on my turn 3, but I just couldn’t get anywhere I really wanted to go. Worse, Patch managed to kill my 8-0 leader on a 6 -1 shot that resulted in a K/2. I ended up leaving the squads in K3 and I3 to move up purely by advance, as I was mostly working on the east flank. I wasn’t sure where Patch was going, so I would have liked to have tried to hem in the west as well, but there was just too much bocage in the way, with the open road right in front of his position, if I could get there.
I had hoped to get both tanks parked HD overlooking the current line in fI2 and H2, but with the half-movement cost of bocage, could only get one tank up. It was facing the only remaining BAZ, but he was less than likely to hit a HD target that had just moved, and he was very unlikely to stick around for his next Prep.
So Patch rolled a ‘1,3’ for a turret hit that killed the Pz IV. Even if the crew survived, that was four points for a total of 21 CVP, and the game.
Situation, German Turn 3.
Postcript
It is an interesting little scenario, though I can see why it’s weighted towards the Germans. Without the good fortune of capturing two squads, the Americans will normally have to stay on the offensive, and then the minimal shifting of Advance, plus a few moves is more than enough to put up a potentially very punishing defense.
On the other hand, trying to work against the clock of the prisoner VPs, and mount an attack with the limited movement and dense terrain was more than the Germans could really manage. I had hoped that it was going to come down more to the wire, and both of us were surprised when Patch actually made a 7 +2 TH roll that needed a turret hit.
Discussion ¬