
D8 The Schoolhouse
Patch and I both like DASL, and always mean to play more of the big hex scenarios than we do. Combined with my efforts to actually play more of the early scenarios, we ended up looking over the set from Streets of Fire. Patch suggested a couple, headlining with D8 “The Schoolhouse”, and I agreed, and ended up with the defending Russians. We got started in October 2012, and didn’t finish until January, so get ready for a long tale….
It’s a big scenario. Set during the Battle of Kursk, it’s about three DASL boards in physical scope (all of b and d, and just under half of a and c), the Germans start with twenty-six squads (mostly 467s, but with some elite 468s and and 838s mixed in), a bunch of toys, and four Elefants (PzJg Tigers). The Russians get twenty-three squads (mostly 447s with some 458s) and four smaller AT Guns. They also get fifteen more squads and six KV-1S tanks as variable-entry reinforcements.
This last is actually a fairly nice touch. The entry is the usual ‘roll a die and get under a target number which gets better each turn’ that shows up in a fair number of scenarios. However, the German VP goal (mostly measured in stone building hexes) is equal to three times the turn the reinforcements enter. Also, the scenario ends five turns after the reinforcements arrive (well, ROAR shows the scenario unbalanced towards the Russians, so we used the German balance, which shortens that to four turns). Tying the victory conditions and game end to the reinforcements is something I haven’t seen elsewhere, and I think it’s a very neat idea and needs to be picked up by other designers.
In addition to 1VP for each stone building hex on boards b and d, building bI3 is the titular Schoolhouse, and is worth another 3VP if the Germans can hold both hexes, building bE2 is the Tractor Station, and is worth an extra 5VP for holding all five hexes, and dF3/G3/G4 is the Crossroads, worth 7VP for holding all the building hexes adjacent to it (only two of which are also stone; they’re outlined in yellow in our maps). This is a maximum of 52VP, if the Germans held everything at the game end, out of a maximum needed 27 VP if the reinforcements enter on the last possible turn (9). The terrain is a little less ‘urban’ than normal, since rowhouses don’t exist (and infantry Bypass is allowed along the black bars), and buildings are restricted to two levels (0 and 1), with inherent stairwells for every multi-hex building. Also, hex dL3 is considered to have a ‘water tower’ inside the roundabout which blocks LOS and causes all movement in the hex to be Bypass only, and all infantry in the hex to be occupying a particular vertex.
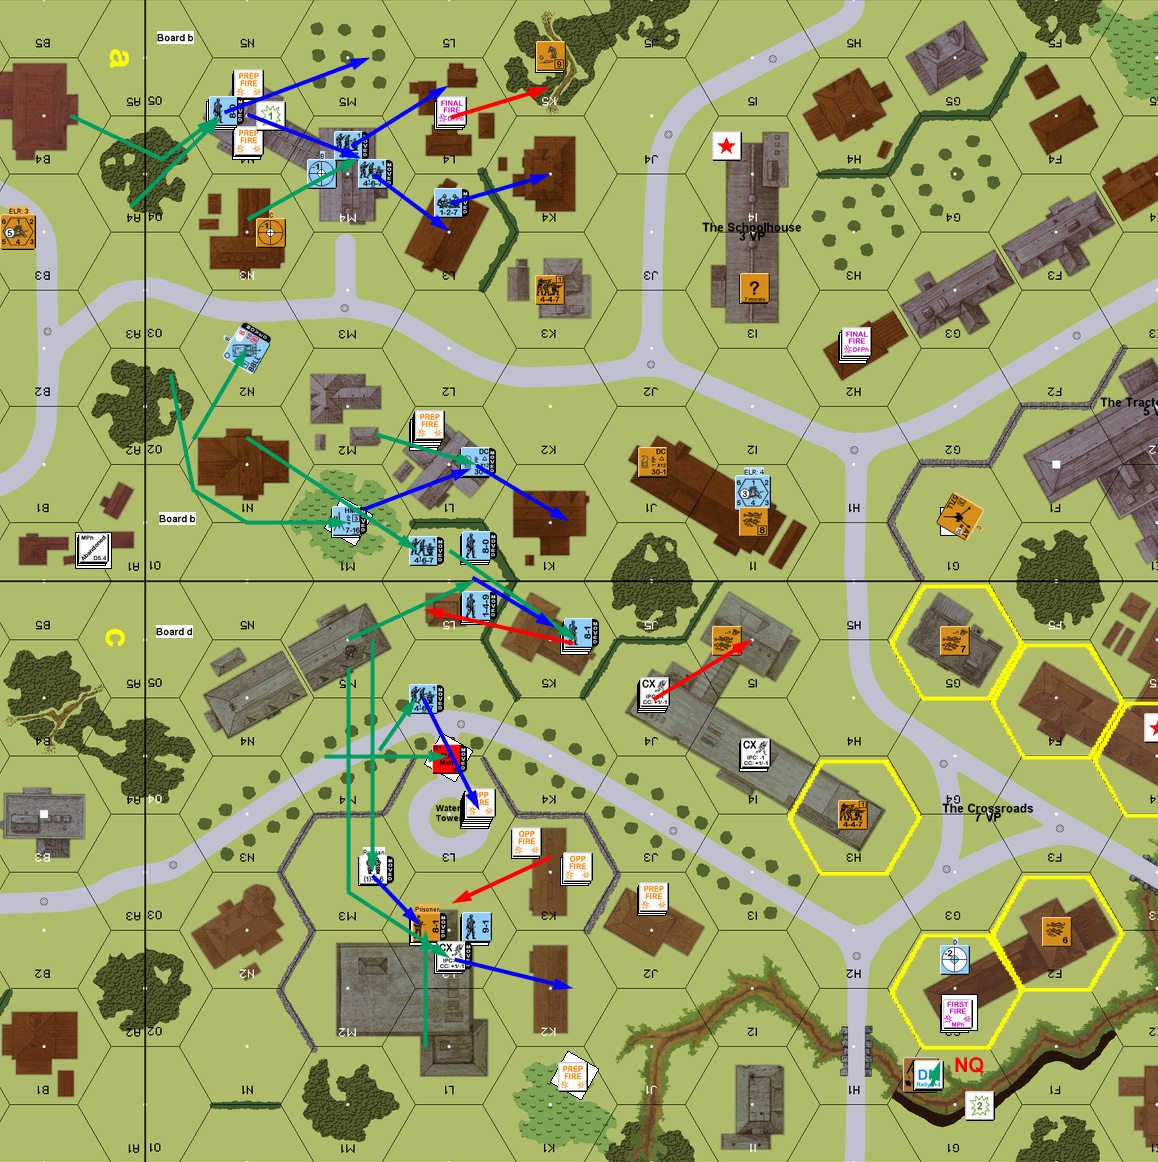
I set up hoping to delay Patch for the first couple turns and fall back (of course), with the final line of defense being the various ‘bonus’ buildings, notably the the Schoolhouse itself, which got two of my fortified building locations, and the Crossroads got my last fortified location. With everyone needed to slow the approach to these locations, I only had one unit in the three fortified locations, and I was a bit worried that a disaster could see Patch get into one for free, and then I’d have to dig him out of the fortified location. Two of the AT guns went in the rear where there was plenty of long LOS down the roads, one went on a flank in the hopes that he’d drive by, and one went in the brush in the center, where it could contest his inevitable advance away from the open roads.
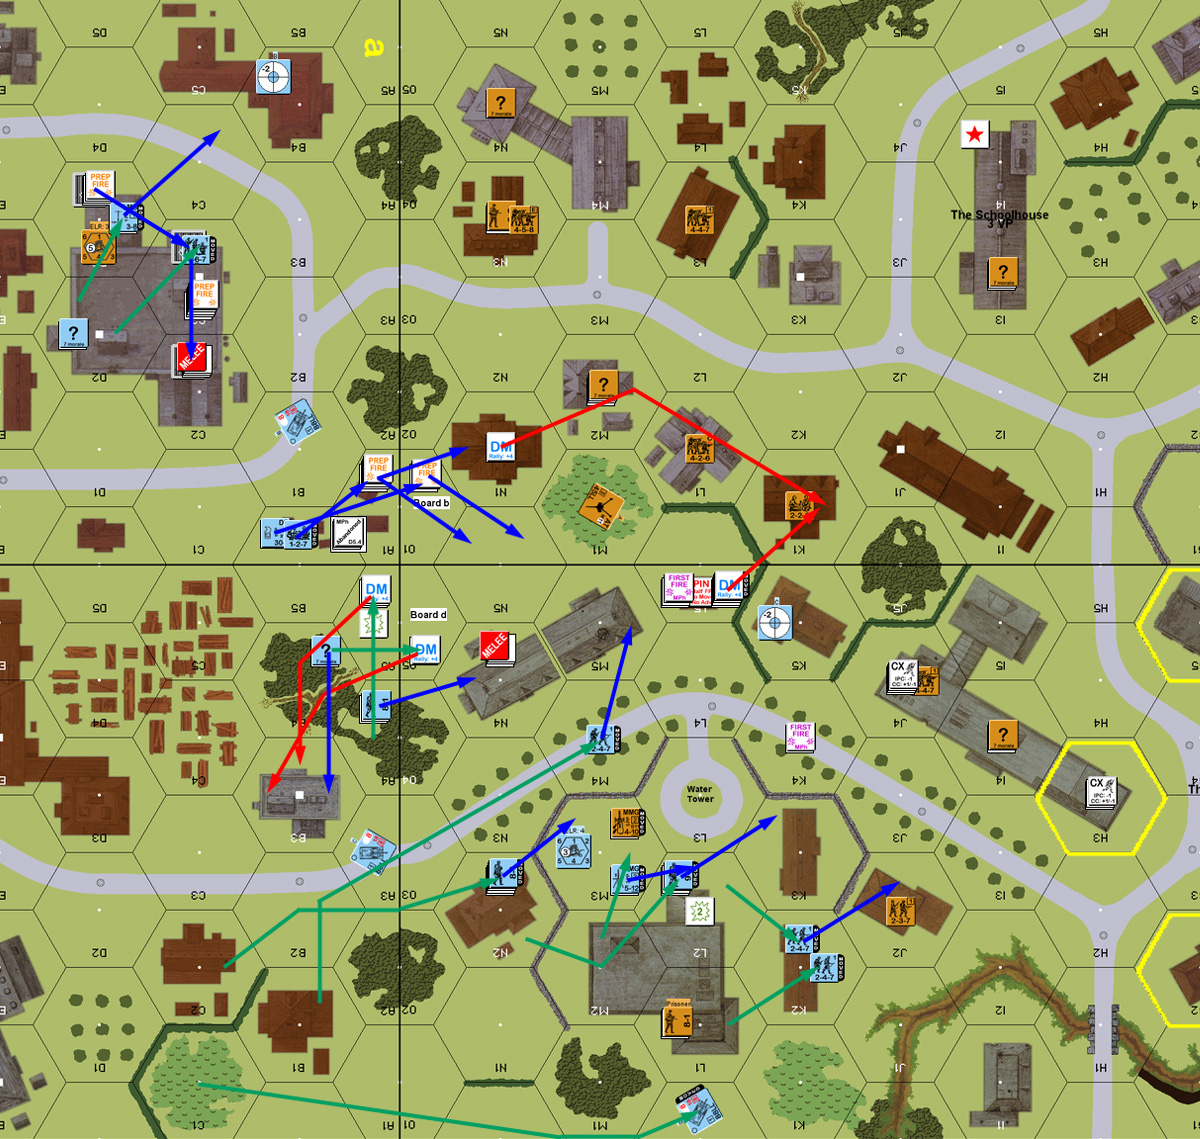
Patch’s first shot revealed my 9-1 and a squad in aA1 on a PTC, and he kept firing on them until they both broke. This had been a worry, but I had hoped the nearer stacks would absorb the shots and let me get off a -1 shot during his MPh. Both of our Snipers were active, with mine breaking a squad in the street, and his pinning one of mine. Thanks to some aggressive movement and searching, Patch revealed a couple of Dummies well before I had hoped, and he escaped any harm from Search Casualties on ‘6’s. Much of my defensive fire was ineffective (Cowering abounded), pinning four units, though I got one HS on a K/1 that activated his Sniper and nearly wounded my 8-1, pinning the squad with him instead.
DFPh was better, though Patch passed a couple of 1MCs in aD3, only for one squad there to pin from my Sniper when it activated later in the phase (we were both two-for-tw0 on Sniper activations this turn), and I managed to break the squad and a half that got into cC4. Patch’s AFPh was much more effective, breaking three squads, and reducing two of them, though he could not manage to break the two squads in aC3, and between that and the pin, he had to avoid going into CC there. In fact, the east flank was proceeding substantially more slowly than the center, or especially the west, where he was already racing onto board d.
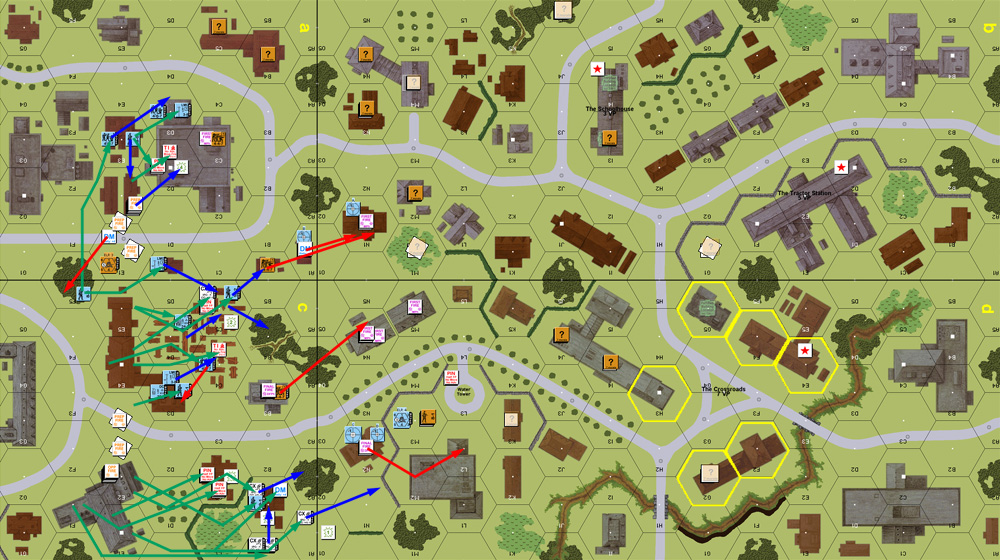
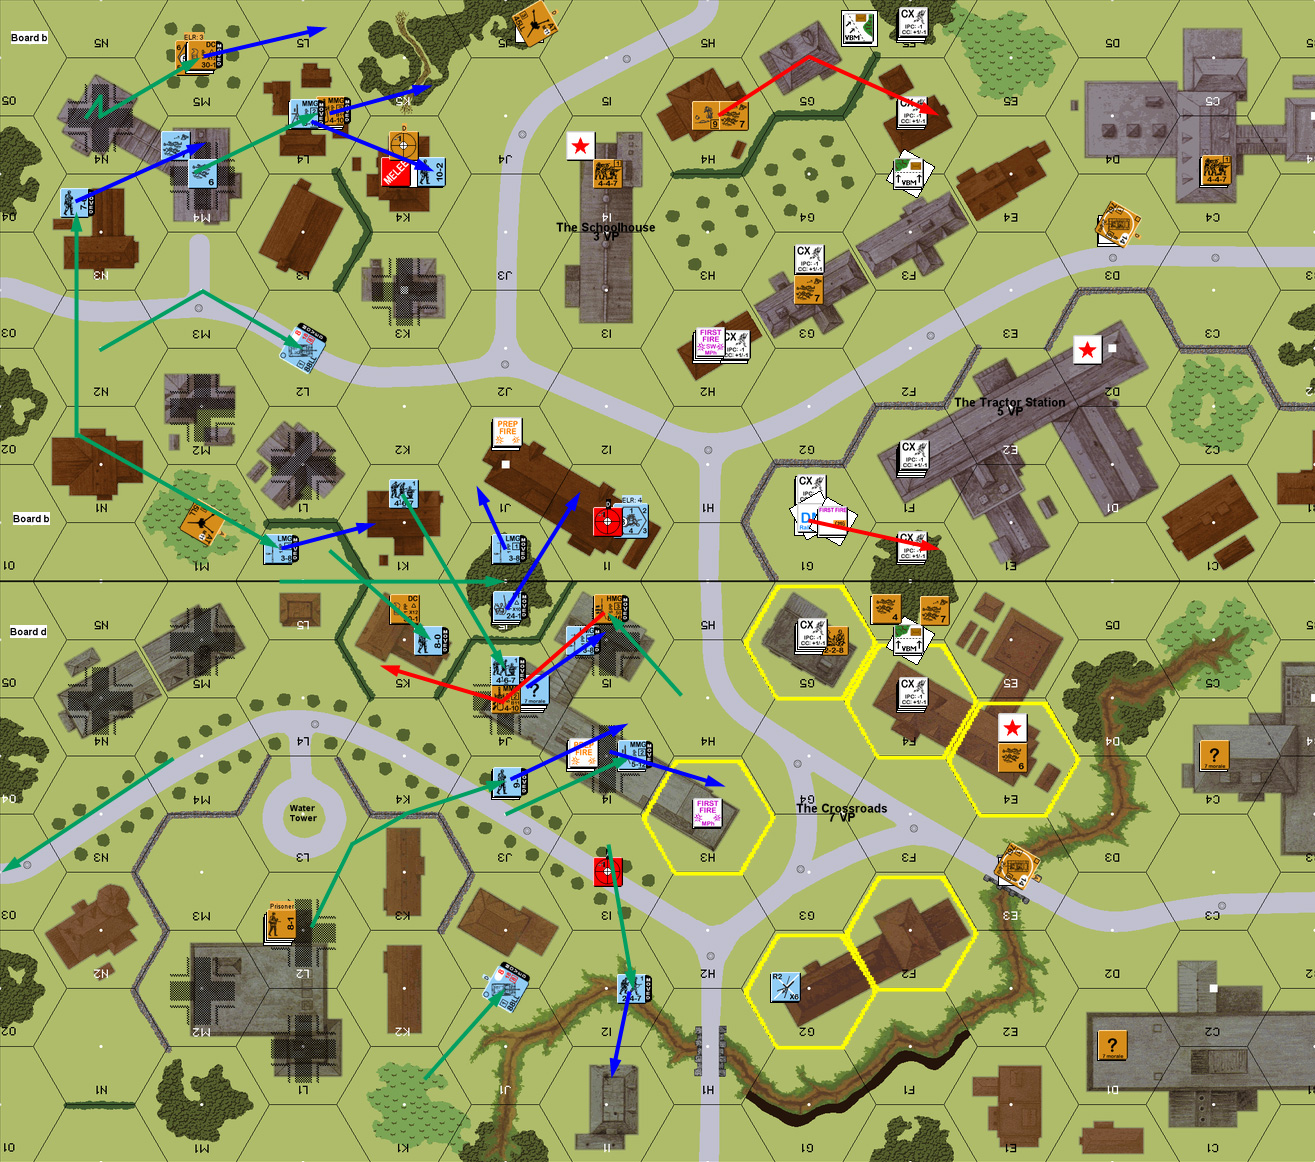
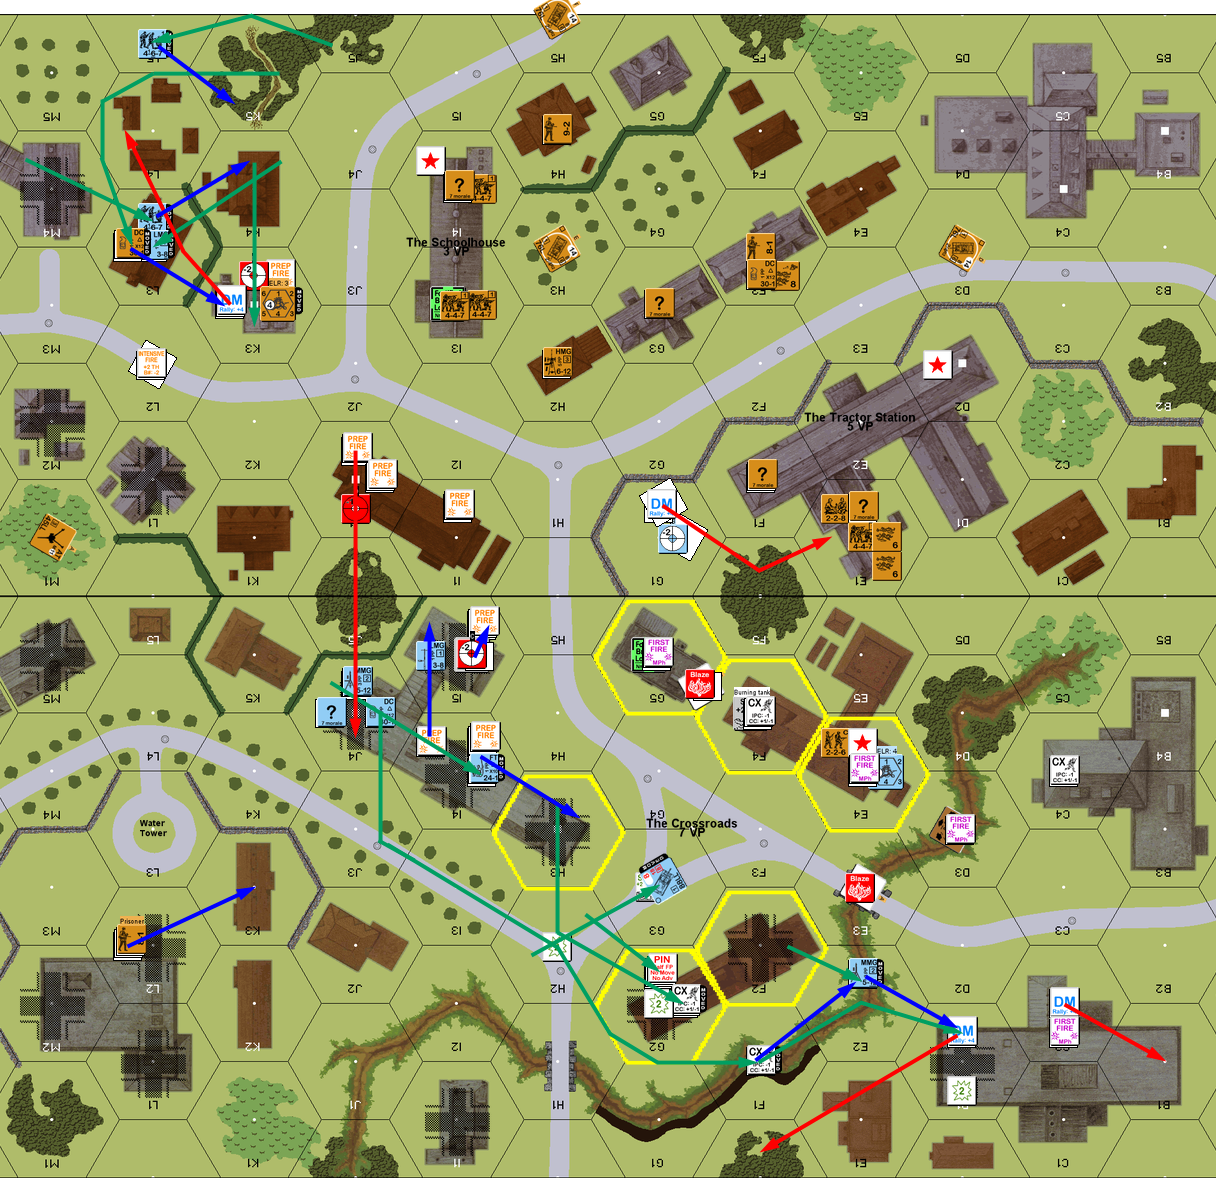
Situation, German Turn 1, showing the full map and my setup. North is to the left.
For my RPh, my 9-1 rallied, but the HS in dL2 died on the self-rally attempt, and one of Patch’s squads reduced. Both my prep and movement were pretty light. My front-line units were dangerously exposed, and I tried pulling back, but there was too much German firepower around. The elite in cB3 tried pulling out but was pinned and broken on successive shots. I didn’t want to sacrifice two squads in building aC3, and parked one upstairs, while the other broke and ELRed Dashing across the street.
DFPh wasn’t any better, as dN4 got hammered with a couple of 2MC results, which double-broke the 7-0 (killing him), reduced a 447 to a HS, ELRed the other 447 (he managed to merely pin to the first shot), and eliminated the broken HS already there.
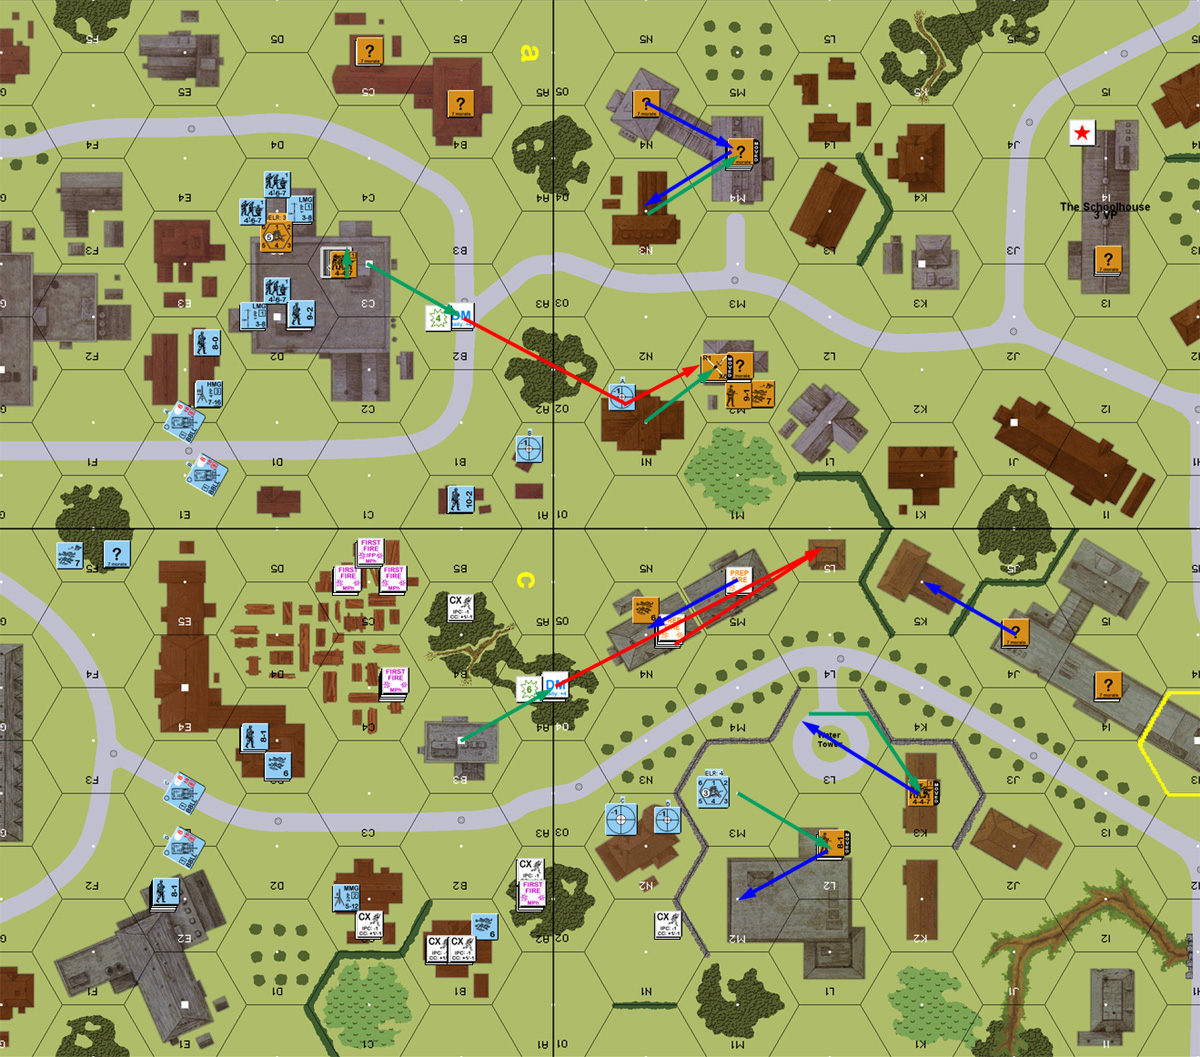
Situation, Russian Turn 1.
Patch missed his self-rally attempt, and lost a HS on a ’12’, but otherwise got a squad and a half back. I got my two non-DM squads in bM2 back, and with the death of the 7-0 had nothing in dL5 to attempt to rally the three broken squads there. He only had one Prep shot, which promptly broke the 8-1 and squad in dM2, which was pretty much the keystone of my west edge defense.
Patch naturally went about securing my new brokies, and sent a HS around the building into K2. I revealed a squad in K3, but was unable to affect him in First or Subsequent First Fire. A second HS immediately went into L1, and a squad into N2, truly surrounding the hex, and I didn’t have anything I could do about it. In the center, Patch pushed slowly forward, and I took a couple shots at his FT squad without being able to get a result. Meanwhile the east didn’t do much beyond a lot of reshuffling in building aC2, putting my single squad under upper level Encirclement, and getting a fair number of units ADJACENT to it. The Elefants all moved up to new positions, though thanks to their slow speed two of them were still in Motion at the end of movement.
My defensive fire didn’t do much, though my MMG+9-2 in bN3 got a 1MC against aC3 that broke one squad. Thankfully, Patch’s Advancing fire was worse, with no results, including not being able to strip concealment in aC3h1, and the fire at that kept him from firing at bM2, which I’d only realized was overstacked during his move. With two concealed stacks across the way and the 9-2 revealed, Patch decided to keep all his firepower available and did not advance into CC with aC3h1.
He did advance into CC in dN4, sending in a squad and 2 HS against my single 447. I decided to get the best odds I could and attacked a single HS, barely killing it while Patch missed his 2:1 attack.
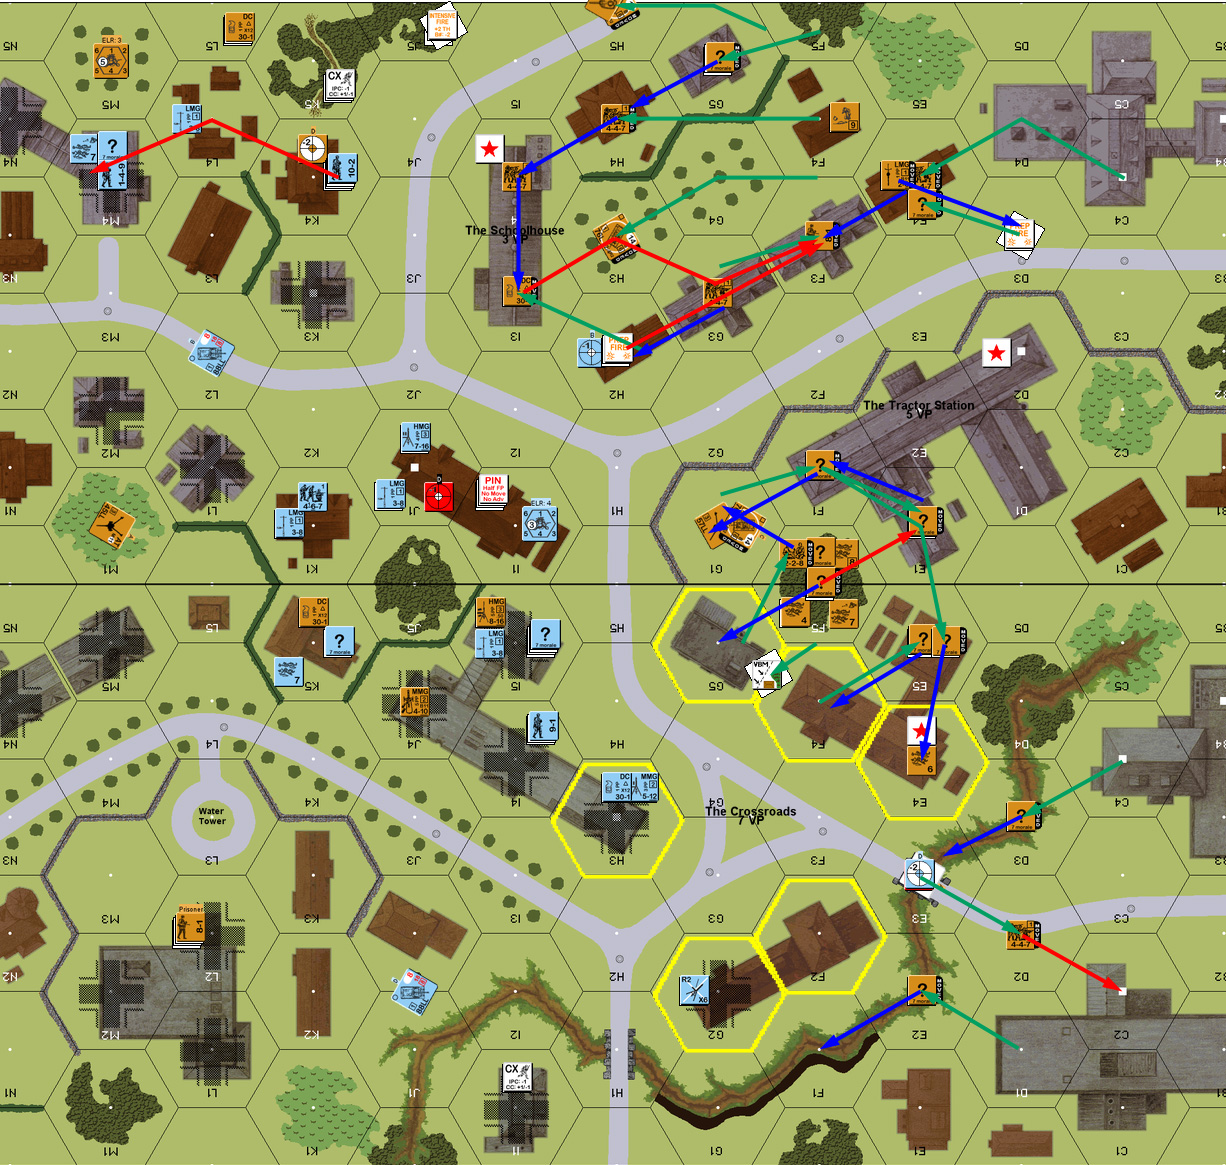
Situation, German Turn 2.
I nearly got my 8-1 back in my rally (missed by one), which, if he’d been able to get the squad as well (7 +2… not horrible odds) would have given me a fighting chance in the west. I took the safe roll for 1st MMC self rally, getting my elite in dL5 back, as well as rallying the final brokie in bM2. Patch recovered the MMG I had had to abandon in dM2, but missed his only rally attempt.
What Patch had not expected was that I had placed an AT Gun in the brush between the buildings in the central area of the board. I figured something worth shooting at would come through there in an effort to avoid the open roads, and now he had given me a side shot at an Elefant about to emerge into that area. After a misreading of the Deliberate Immobilization rules, I fired APCR at his side armor and managed to Immobilize it on a Hull Hit. On two more ROF shots the Gun hit aA1 and managed to pin an 838 despite the 10-2 there.
Other than that, I mostly skulked where I could, and sent a couple squads from the overcrowded bM2 to reinforce the dK5-H3 line. Amazingly enough, Patch’s two big attacks against the squad still concealed in aC3 got no result. On the other hand the 10-2 group easily broke my Gun crew (no surprise, and it was time to bug out anyway). In fact, most of Patch’s DF didn’t do much, though the Elefant on the east side managed a hit to reveal and break my 458 in aB4.
My 8-1 and squad in dL2 was forced to surrender, and I advanced into CC in aC2h1 and dJ2. Despite being concealed (and CX, thanks to the doubled movement cost of being Encircled) I missed Ambush in aC2 and got reduced to a HS while doing nothing in return. I went for HtH CC in dJ2 and easily killed his HS while being reduced to a HS myself (would have gotten him at no cost without the HtH). In the continuing CC in dN4, I killed a HS (leaving a squad still to defeat) while Patch missed me.
Situation, Russian Turn 2.
Patch got all his brokies back (a squad and a half) for his rally, and so did I (including a lucky self-rally on the former AT Gun crew), leaving only a malfunctioned LMG of mine to worry about. I had purposefully pushed a concealed HS forward in my turn, and Patch didn’t disappoint, firing on it with his FT. I figured if he was given a stream of small value targets to fire at, he just might run out of fuel before getting to anything valuable. And if not, at least it wasn’t moving forward that turn. The HS survived that shot, but broke to a follow up.
Most of Patch’s prep went poorly, not getting any results. He did, however, get a NMC against dL5 that broke my leader, disrupted some conscripts, and pinned the remaining squad and a half. Early in his MPh, he started pressing forward in the center, and I broke a squad with fire from a pinned squad, and then immediately broke another with the residual. Other than that, there wasn’t much I could do, and other than the west, there actually wasn’t much movement.
DFPh managed to pin a couple of units, including a HS in dK2, leaving only one to advance into CC with J2. Patch did manage to pile another squad and 8-1 into the Melee in dN4, and another squad into aC2h1. With the high odds, Patch easily won the two continuing Melees, and I wasn’t able to do any damage in return. In dJ2, both of our HS missed the other.
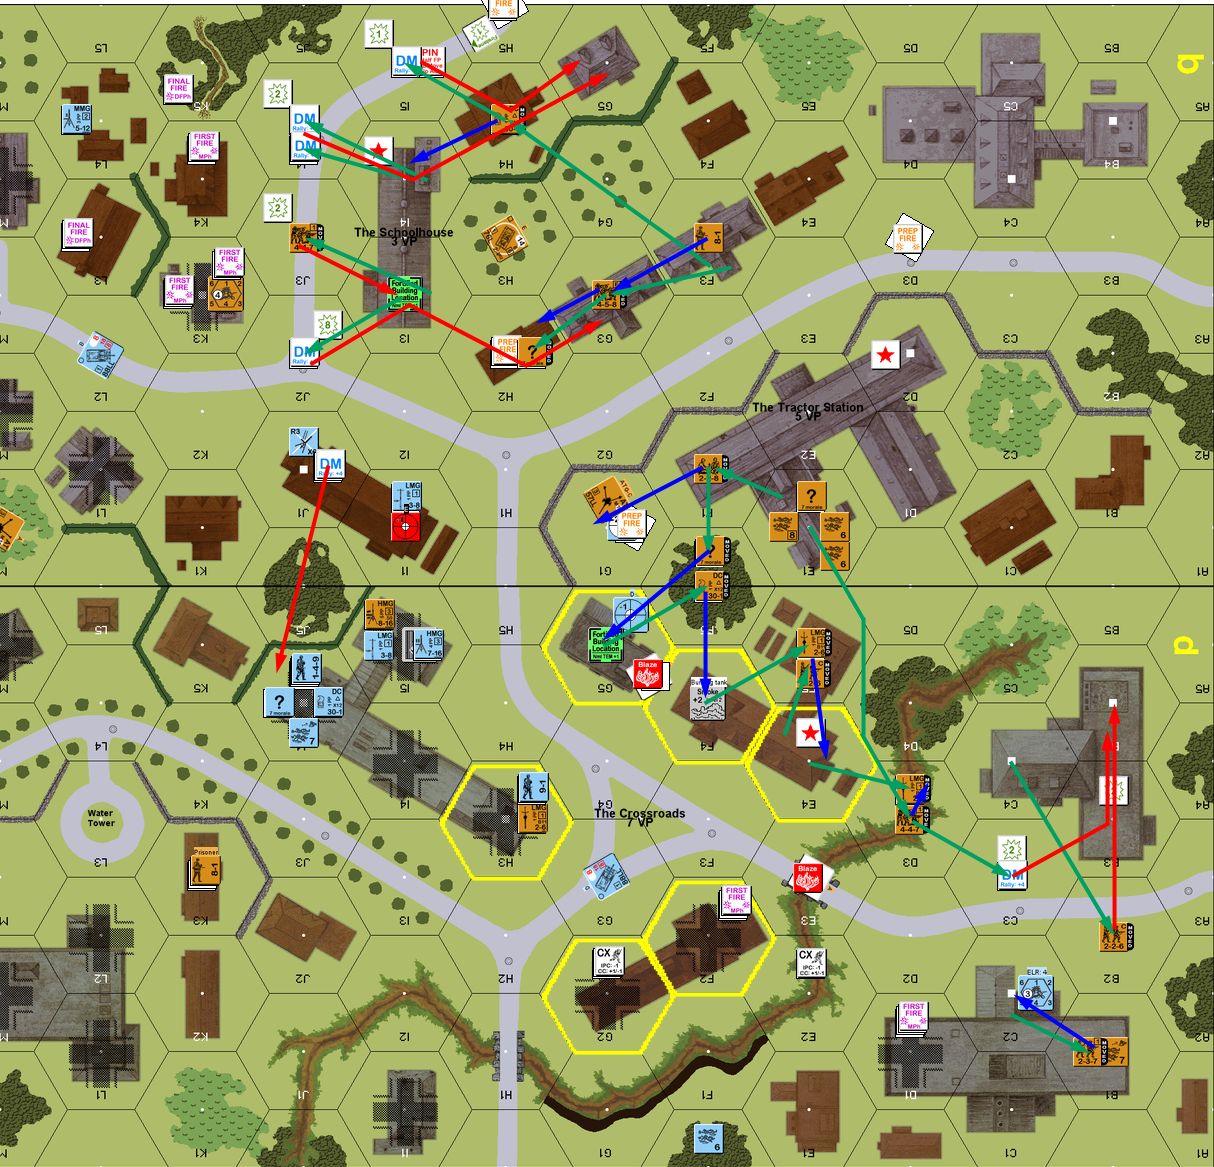
Situation, German Turn 3.
Wind Change came up Gusts for my rally, but since I had no way to generate Smoke, it wasn’t exactly a big deal. With everyone still under DM, neither of us got any result out of our rallies. I was still hard pressed in the center and west, and needed to move back, and form a better line, but a shot at his 10-2 in open ground was very tempting….
My main goal was to shift a couple more units southwest to help man the dK5-H3 line, and then move a couple units into F2/G2 to keep Patch from just outflanking me there and give him more fire to worry about. However, he was able to break both squads that I attempted to send down that way. I also got a squad off the main line, and into the Schoolhouse, anticipating that Patch would be getting to that before too long.
In DFPh, Patch got a couple good shots at my rally point in bK1, eliminating a broken HS, double breaking/eliminating a second HS, and breaking my 458 there. Thankfully, the broken 9-1 passed both MCs, though Patch’s Sniper activated to CR the brokie in dG3. He also got a good shot at bH2, which confirmed no one was there. In CC, our two HSes in dJ2 eliminated each other.
Situation, Russian Turn 3.
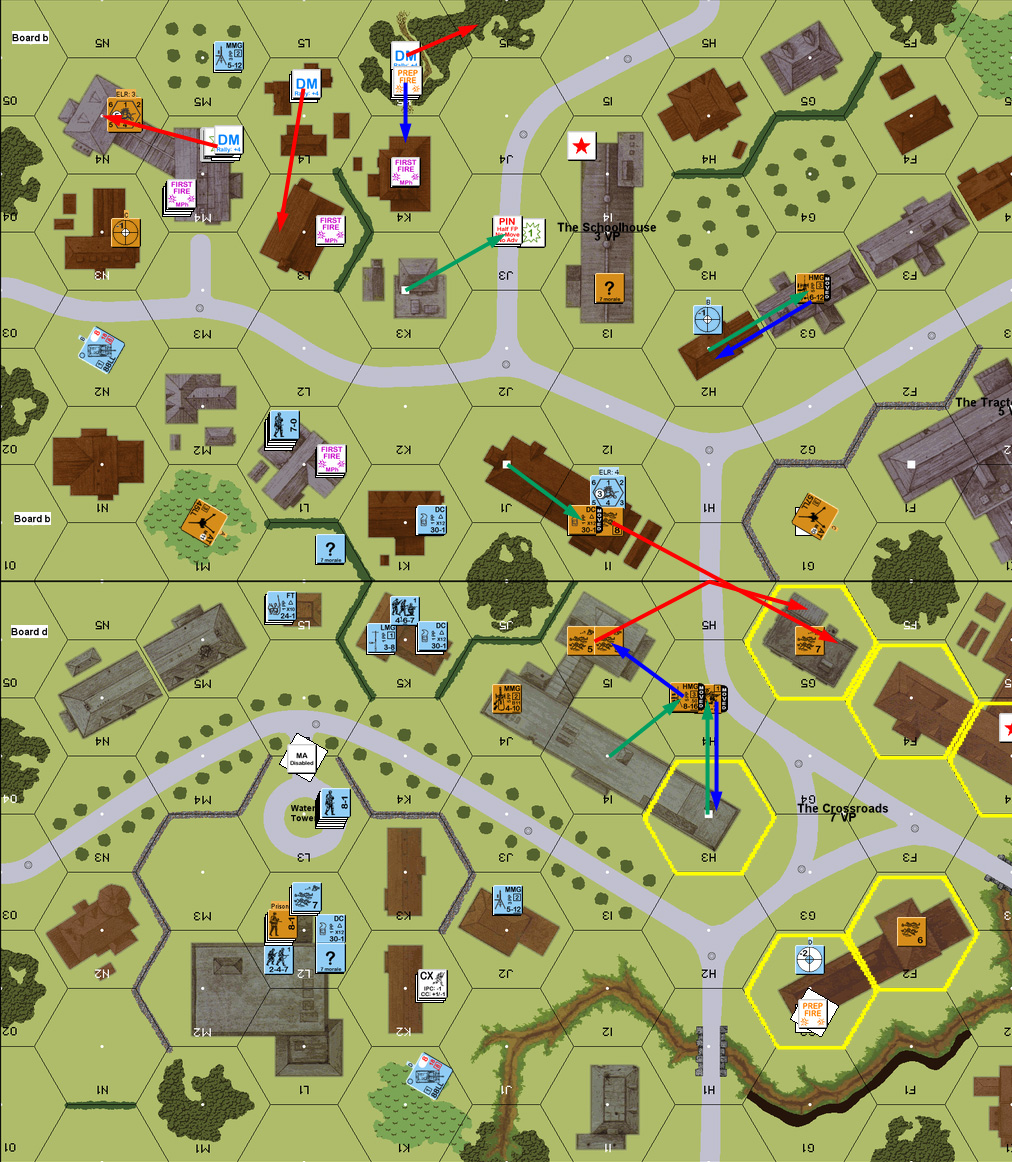
Patch got both of his squads back for his rally, but I missed getting my leader back, which kept me from having anything else to do. He took a couple Prep shots in the west, and surprisingly got no result on a 20 +2 shot at K5. Without anyone in dG2 to stop him (well…) Patch advanced a HS up the gully, while the east-end assault finally got moving. My defensive fire was mostly ineffective, but I did break a squad on a FPF shot (his, not mine, thank you).
In DFPh, I had a concealed squad with DC next to the 10-2. I planned on throwing the DC at him (with me in a stone building and him in brush, I had pretty nice odds on it), but fired the Inherent FP first and Cowered, cancelling that plan. However, the Cower was on a ‘2’ into dL5, which broke a squad, and CRed the one the FPF had broken, leaving only the 8-1 intact there. My .50-cal MG finally got a good shot, breaking Patch’s 9-1, and a squad, while pinning the other. Also, my Sniper activated, which promptly killed his 9-2 in cB3. I then revealed my AT Gun in dG2 for a shot down the road at M5 which activated Patch’s Sniper, which killed my broken 9-1 in bI1, while pinning his HS.
This left me with one leader, and put me in something of a panic. Patch was complaining that he couldn’t break my line, but I had to assume that just about anyone who broke at this point would stay that way permanently. I was going to have to somehow stop a bunch of Germans with a lot of toys and firepower while playing very cautiously until my reinforcements decided to show up. Worse, there was about six squads converging on my last leader’s position, meaning he was about to be very busy, and didn’t really have the ability to shift to another part of the line to take care of already broken units. (And I’d already lost more leaders than were going to show up in my reinforcements….)
To add injury and insult to injury, Patch sent in an 838, 467 and the 10-2 into CC against my squad in bL1. While he did not manage Ambush, he did roll a ‘2’ on his 3:1 attack, killing my squad before it could attack, and generating a 7-0 leader. He also destroyed the malfunctioned LMG and the DC, so at least he didn’t get to capture the latter.
Situation, German Turn 4.
I did not roll the needed ‘1’ for the reinforcements that I could really use about now, so I only had my self-rally attempt, which succeeded in bI1 (this was a mistake, as we didn’t realize that a Sniper attack also DMs all broken units in the hex); Patch only got his 9-1 and a HS back, missing on two squads, but the HS HoBed to turn elite, and generate a Hero.
I mostly skulked, and Patch only took one shot during movement, which broke my crew (which at least could self-rally). Patch’s DFPh was mostly ineffective, and he malfunctioned the MA on the Elefant in dM4, but he did manage to break my conscript squad in dJ5, and generate a pair of 1MCs on bL4. The first broke my leader and MMG squad, with the LLTC pinning the remaining squad, while I managed to roll three straight ‘4’s for the second.
Situation, Russian Turn 4.
Patch got one of two squads back for his rally, as well as picking up one of my LMGs, and getting no result on the MA. I missed both my crew and leader self-rallies (hey, they’re under DM…), but the remaining squad in bL4 managed to recover the MMG (barely).
He concentrated fire on the AT Gun in dG2 for his Prep, but only got a malfunctioned MMG for his trouble. The 10-2 stack took a shot at bJ1, for a PTC that I passed, and he got a NTC on bL4, which I thankfully passed. He then declared Op Fire with dL3 and K3, and proceeded with movement. Patch AMed things up to the MMG, and I held fire until a 8-0 wandered in without AM, and I cowered on the shot, ending their ability to resist the advance. He Dashed his vehicle crew across the street, and my HMG in H2 tried to put down a FL only to find the shot was blocked, and Cowered on the shot.
In the west, Patch did some reorganizing (to consolidate prisoners, and shift an LMG off of a HS), while slowly moving up. The HS in dG1 moved into Crest Status so that he could move into CC without going CX. Regretfully, the crew had to take the FFMO shot to preserve the position, instead of laying down more fire down the street, but at least they broke the HS. In DFPh, the .50-cal did it’s job by breaking both Op Firing units in dK3. The MMG in J4 opened fire on the adjacent stack (including the FT…) in K5, getting a 1MC; the 8-1 rolled a ’12’ for a fatal wound, and the 838 broke.
In return, the remaining Op Fire in L3 broke the MMG squad in J4, and his fire on the east side broke my MMG squad in bL4. Further fire activated my Sniper, who ended up killing Patch’s 8-0 in bN4. Sadly, the three squads with him were unaffected by the LLMC. The crew declared No Quarter in RtPh, as there was no way they weren’t ending up broken/eliminated at some point, and I didn’t want Patch getting his HS back at that point. During CCPh, I revealed my final HIP squad in bM4h1 to prevent him from gaining concealment on the squads downstairs.
Situation, German Turn 5.
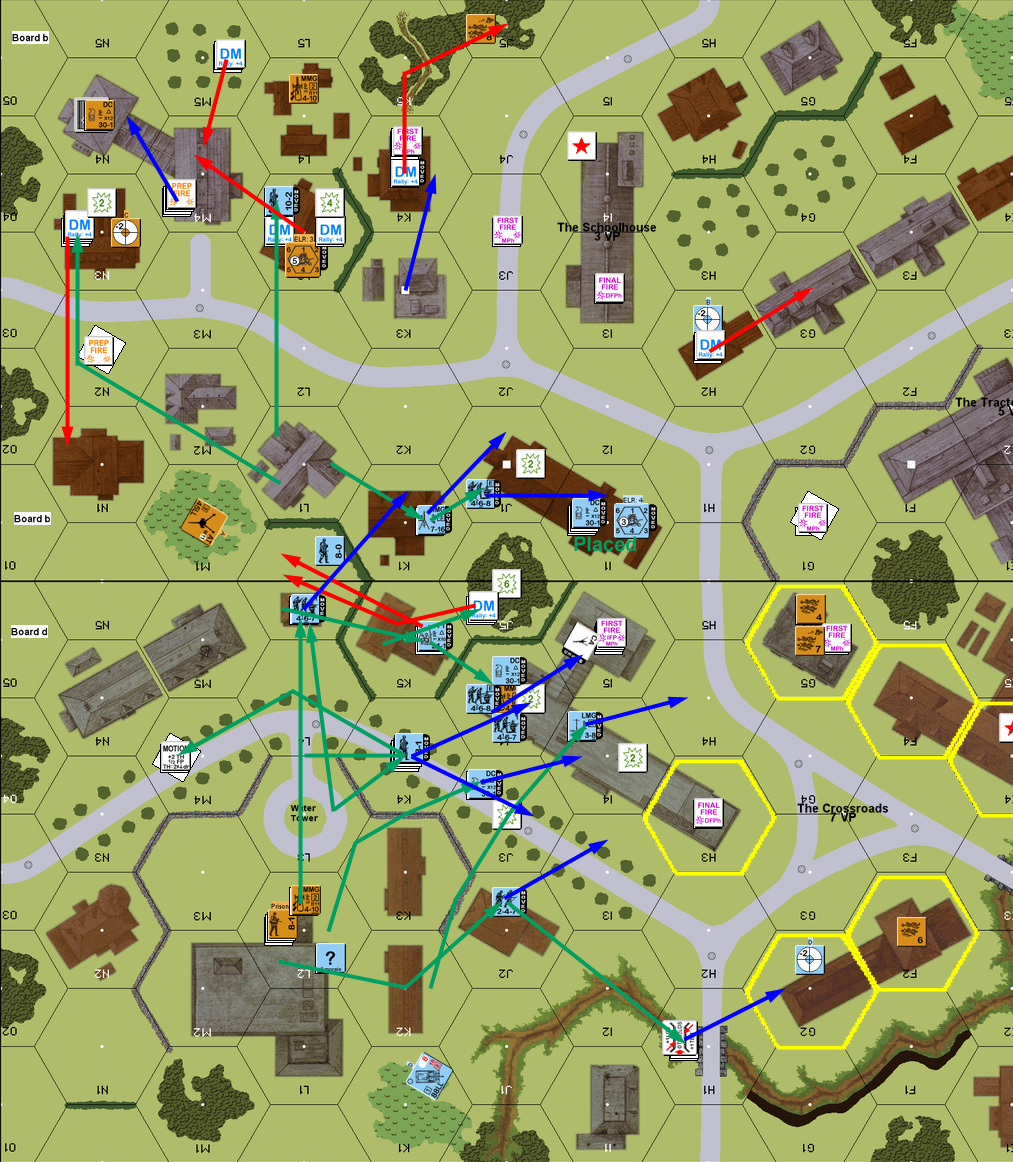
I still didn’t get my reinforcements, and while this meant the VPs Patch was going to need were going up, I was worried that I wouldn’t have anything left at this rate. However, my 9-2 self-rallied, and brought one of the 458s with him. Patch rallied two out of four squads, recovered my MMG in bL4, repaired the one in dJ2, but Recalled the Elefant in dL3.
The 9-2 promptly Prepped at bL4 and broke the squad that had just grabbed the MMG. The AT Gun in bG2 tried a shot at J2, but malfed the Gun. The centerpoint of my movement was my former HIP squad placing a DC on bM4h0. I tried to distract him with a few other moves (which partially worked), but he still just barely managed to break the squad. Part of that also involved a squad getting stranded in the street on a Pin while Dashing to the Schoolhouse.
DFPh did not go any better for me. He reduced both broken squads in dI5 to HS, and scored a CH on the AT Gun in dG2 to eliminate it. The 9-2 and squad moved into K4 against his vehicle crew at 5:1, and easily killed it.
Situation, Russian Turn 5.
Patch got two squads back for rally, missing on two others, my crew self-rallied again, though they were now well out of position. Most of Patch’s eastern force fired on bK4, breaking the 9-2 on a 2MC, but only pinning the squad. His Elefant up there broke my HMG squad in bH2, but activated my Sniper who promptly broke the only German squad in the area who didn’t fire.
Patch started movement with advancing his Hero+DC into dJ4. I would have rather used the full FP of the adjacent squad on something bigger, but I just couldn’t afford to ignore it, and got lucky with a NMC, and the Hero died of a ’12’ (+fatal Wound dr). He managed to send two follow-up squads into the hex without incident, but sent a third squad into J5, which rolled another ’12’ on the 1MC generated by the .50-cal. Then he moved the FT squad up, into two-hex LOS of the .50-cal, but it still had ROF and got a 2MC that he passed. However, in the process, Patch’s Sniper went off, pinning my squad in bI1, and my Sniper went off, which Yahtzeed the two squads in bL3 to break one and CR the other.
Patch decided to retrieve the eastern situation by sending a squad and his 7-0 back around to bN3… where my AT Gun already had acquisition, and it managed to break both units. He then Dashed the 10-2 and an 838 across to L3. I wasn’t able to touch him, but I did question the sanity of sending his 10-2 towards my very active Sniper….
I only had a couple of DFPh shots. The .50-cal broke the FT squad, kept rate, but couldn’t get an effect against J4. I got a NMC against bL3, and naturally couldn’t budge the 10-2. But I forced him to roll, and my Sniper went off again, CRing the squad in M5.
Patch’s Advancing Fire had no effect, even the DC he had placed on bI1 failed to do anything. He did advance into CC in three places. In bK4, the 10-2 and 838 advanced in against my pinned squad and failed Ambush, and then rolled a ’12’; sadly, I was pinned and unable to withdraw, and I couldn’t get him either (’11’ on a 1:6 attack…), leaving his 10-2 stuck in Melee. In bI1, his squad Ambushed my pinned squad and killed it. In dI5, he advanced two squads in against my .50-cal squad, and killed it without me managing anything in return.
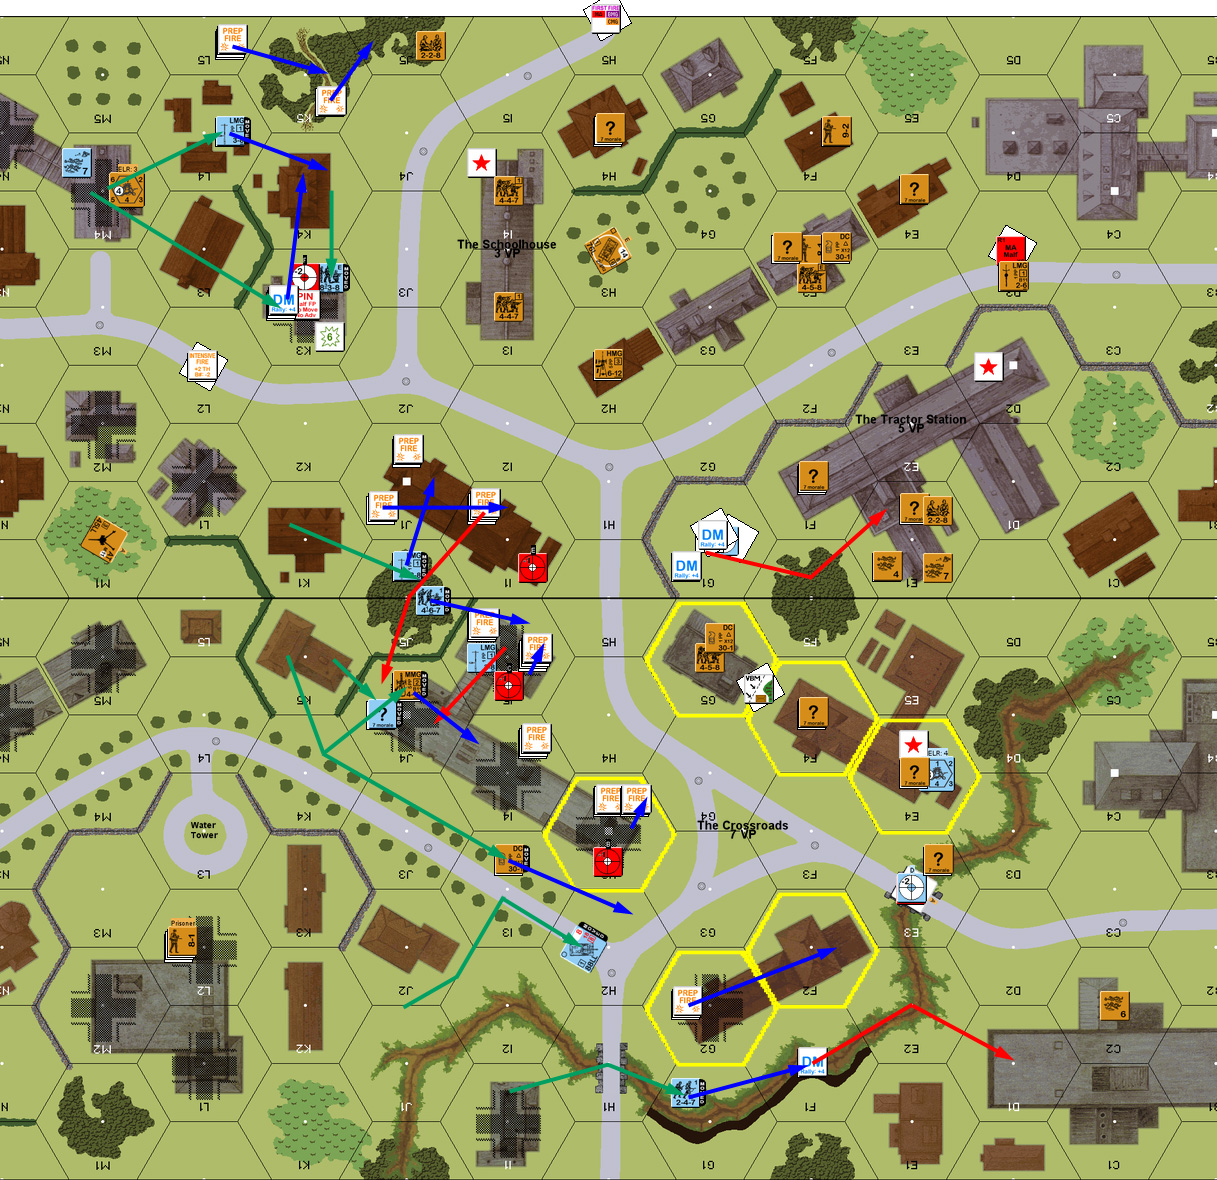
Situation, German Turn 6.
I rolled a ‘2’ on the 3- reinforcement dr, setting the game length at 10 turns, and Patch’s VP goal at 18 (currently at 13). In the aftermath of all the chaos last turn, this may well have been the best possible time for the reinforcements to show up. Any later and Patch may well have recovered while mopping up what was left; any earlier and the VP goal would be much less demanding. My 9-2 missed his self-rally, leaving me with a lot of poor choices. I tried dN4h1 for the 1st MMC self-rally, since he was gone otherwise, but I just wasn’t that lucky. Patch recovered my DC and .50-cal as well as his own DC, but only got one squad back on four rally attempts. Of course, I didn’t have any way to get any of them back under DM….
Even with the reinforcements coming up, the immediate situation was not good in several places, but the AT Gun in bG1 gave me just what I needed, first killing both squads in dI5 (1KIA with a Yahtzeed RS), broke the squad in bI1, turned to engage the HS in the open in dH4, missed while keeping ROF, and then pinned him for its final shot.
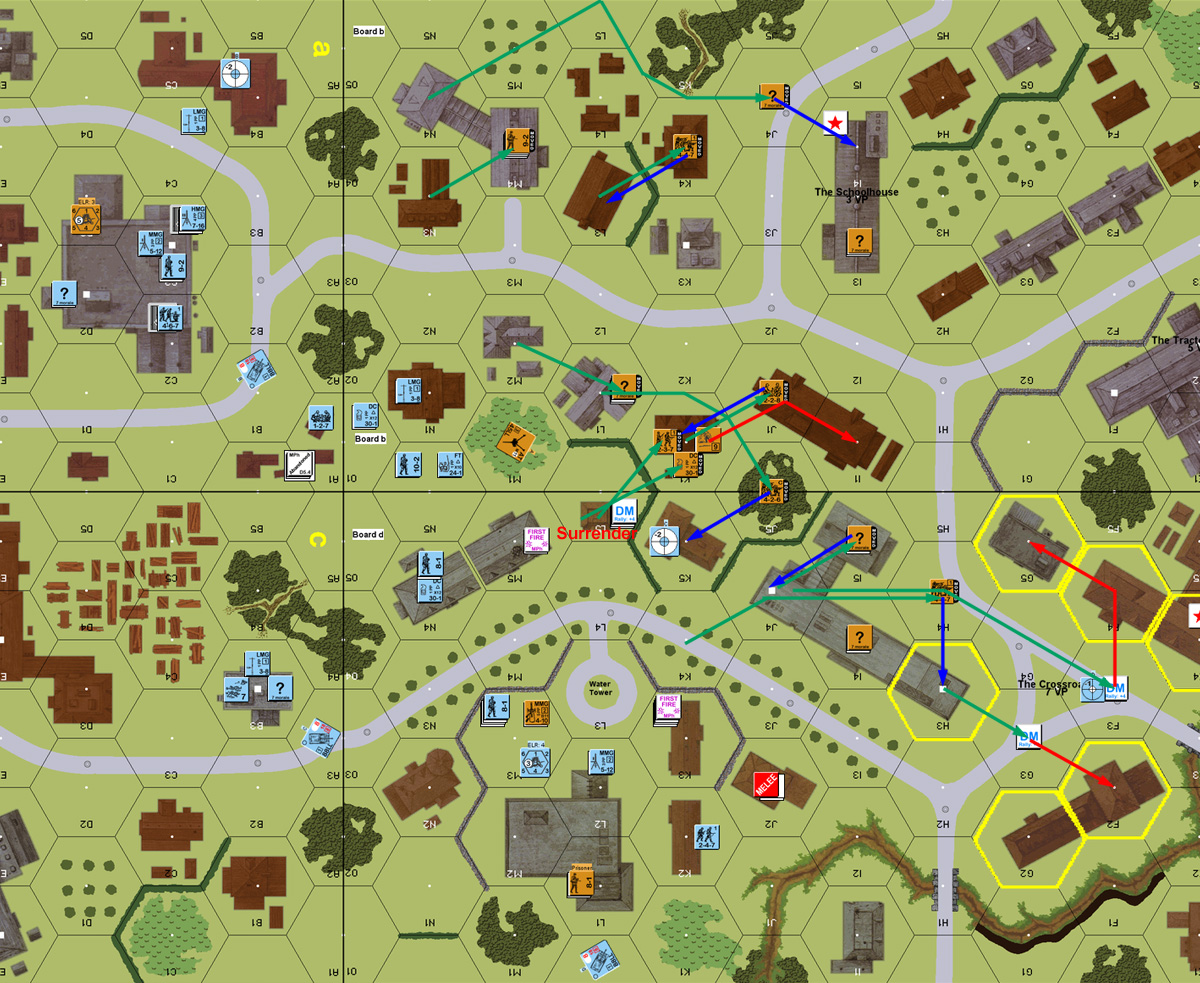
My reinforcements were mostly concentrated on the center, where I was really worried about standing up to the force gathering in building dH3. Most of the rest went east, to stabilize the rapidly crumbling situation there, and make sure Patch did not get into the Schoolhouse. A mere three squads and one tank were tasked to holding the west flank, as Patch didn’t seem to be putting much force in there, and I could hopefully interdict a fair amount of movement in there from my side of the Crossroads. With all the attention I was paying to where my reinforcements were, and where they were going… I forgot to move several units already on the board, and paid the price (though Patch skipped some good shots at my reinforcements, presumably because he wanted to keep my forward troops from escaping unmolested). He broke the squad in bJ3, and eliminated the broken squad in J5 (’12’ on a MC)… and revealed the last HIP AT Gun in that hex.
This last surprised Patch. He had been expecting it in either dI1 or F0. They’re fairly hard places to reach, and could be handy, though I don’t care for the LOS possibilities from F0. My general idea was one AT Gun on each flank, and two in the middle, of course. The only other effect from fire that turn was Patch malfunctioning his MMG in dG2. The CC in bK4 continued, and surprisingly, he only CRed my squad, leaving his 10-2 tied up in CC for his turn.
Situation, Russian Turn 6.
Patch failed to get his MMG back, but his 1st MMC rally got a squad in bM4, his 7-0 + squad in N1 rallied, the FT-toting 838 in dL5 rallied, and the HS there HoBed to 1st Line. Despite getting new leaders to old brokies, I didn’t manage to rally anyone, though a reinforcing squad that made it to bH2 managed to pick up the HMG there.
Patch only had a couple of Prep shots, but broke the crew manning my AT Gun in G1. He apparently considered sending his HS in the street to H5 to ensure they routed away, but I wanted to do that anyway, instead of let them spend the rest of the game under DM. Besides, I had a replacement crew right next door. The HS ended up going into I5 to pick up the .50-cal. Thankfully, my only result of the turn was a hit on that Location that broke the HS. Oh, and I malfunctioned the MA in bD3.
Patch generally moved up slowly, including moving up both of his Elefants up a hex or two, giving them LOS on a KV-1S each. In the east, I was as safe as I was going to get, ensconced behind a wall. However, dE3 was suddenly a lot more exposed than I had been thinking. Especially when Patch pointed out I was looking at the normal 76L AP and APCR TK #s instead of the Russian ones (13 and 14, instead of 17 and 20; against 18 front armor, not even a sure thing with a CH).
Patch advanced a HS into dJ1, giving him another VP, and sent in another squad to the continuing Melee in bK4, finally eliminating my remaining HS, and freeing up his 10-2. He advanced two squads into dH3, which killed my defending squad that I’d forgotten to try to withdraw across the road last turn for no losses and another VP.
Situation, German Turn 7.
I only managed to rally one squad (in bG3) out of several tries for my turn, and couldn’t repair either of my tank malfunctions. Patch recovered my .50-cal again, but failed to repair his MMG, and only made one rally roll out of four (only one of which was under DM), though that one Battle Hardened a HS and generated a Hero.
Prep started better with a CH on bK4 from my AT Gun. RS picked the MMG squad, who promptly broke on a 2MC, but the PTC didn’t phase the 10-2 or 838. A second shot hit for no effect, and then it malfunctioned on a IF shot. I figured this was likely the Gun’s final fire phase, so I wasn’t too worried about that. The HMG in bH2 managed to pin the FT squad, keeping Patch from using that this turn.
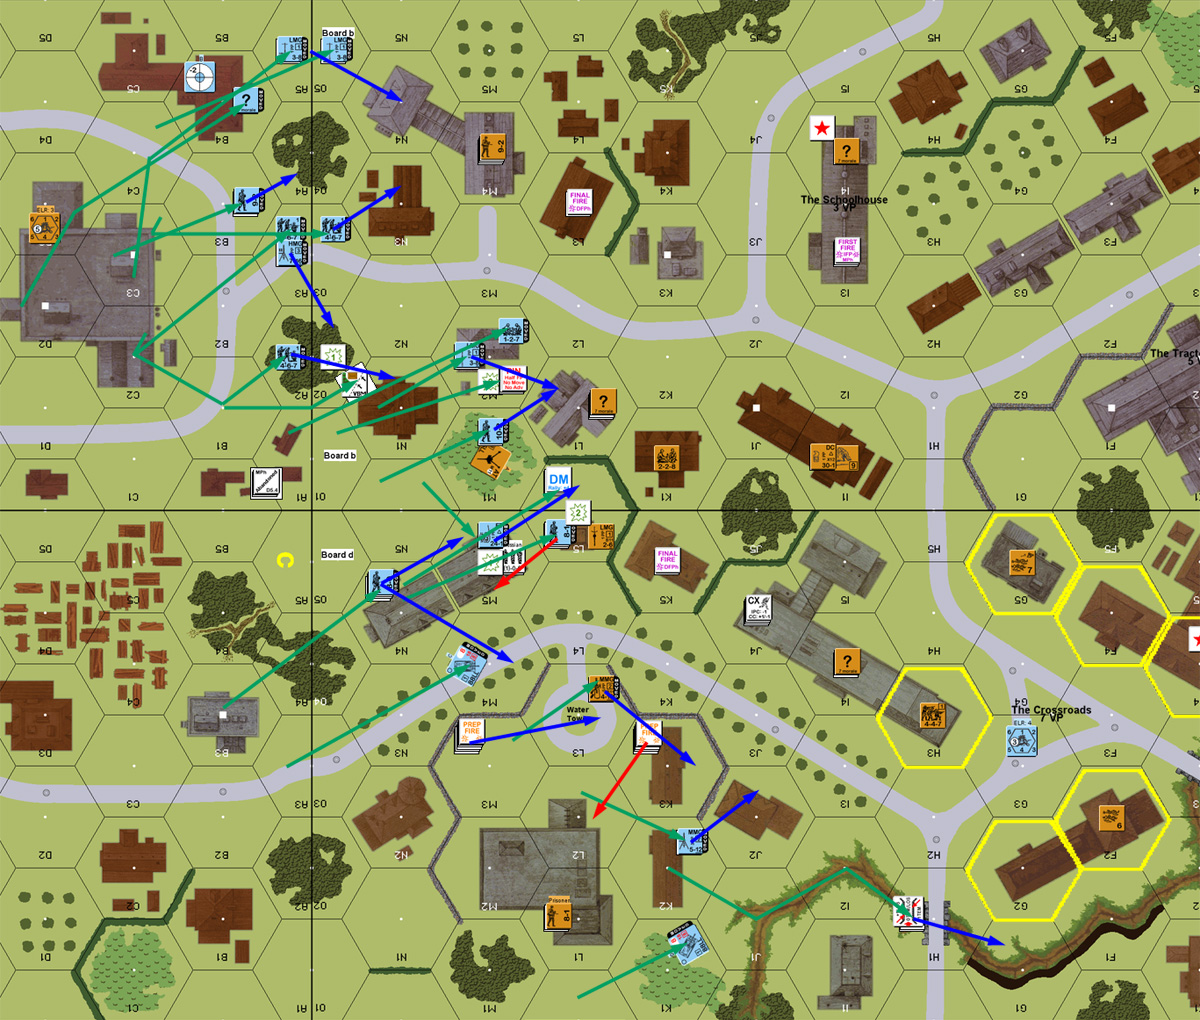
Finding my KV on the bridge to be much more vulnerable than a thought (and a little surprised to realize it had no smoke ammo), I tried for vehicular smoke grenades, and failed, before starting in reverse. The Elefant in bypass of J2 promptly scored a hit and a ‘2’ TK roll to burn it while keeping ROF. The rest of my movement was fairly boring, with the other KVs moving into positions where Patch would have a hard time digging them out, and the last of the reinforcements moving up. I did start moving up in the west, thinking I could try to retake dG2 while the MMG was malfunctioned.
Another poor roll kept Patch from having any effect on the AT crew in bJ5, but he did break I3, and H2, but in the process my Sniper went off and fatally wounded his 7-0, and Patch’s sniper went off and eliminated the broken HS in dE4. Worse for me though, Patch got a successful Sniper Check to reduce my SAN to 4. He also managed to shoot through the smoke of my burning wreck to break the squad that had been with it and had pulled back to D2. To top things off, Patch found a nice LOS from his HS in dI1 to my overstacked rally point in F5 to DM everyone again.
Oh yes, and of course the Elefant in bL2 took a ranging shot at my KV in G1 and bounced it off the wall.
Thankfully, my APh showed that I had managed to back up most of my positions properly, and I was able to make sure that both hexes of the Schoolhouse were occupied as well as the entire south-side of the Crossroads, and sending in a squad to retrieve the HMG in bH2. I also continued the mini-offensive along the gully, not thinking about the fact that the forward squad would get revealed as it was open ground from an ADJACENT location.
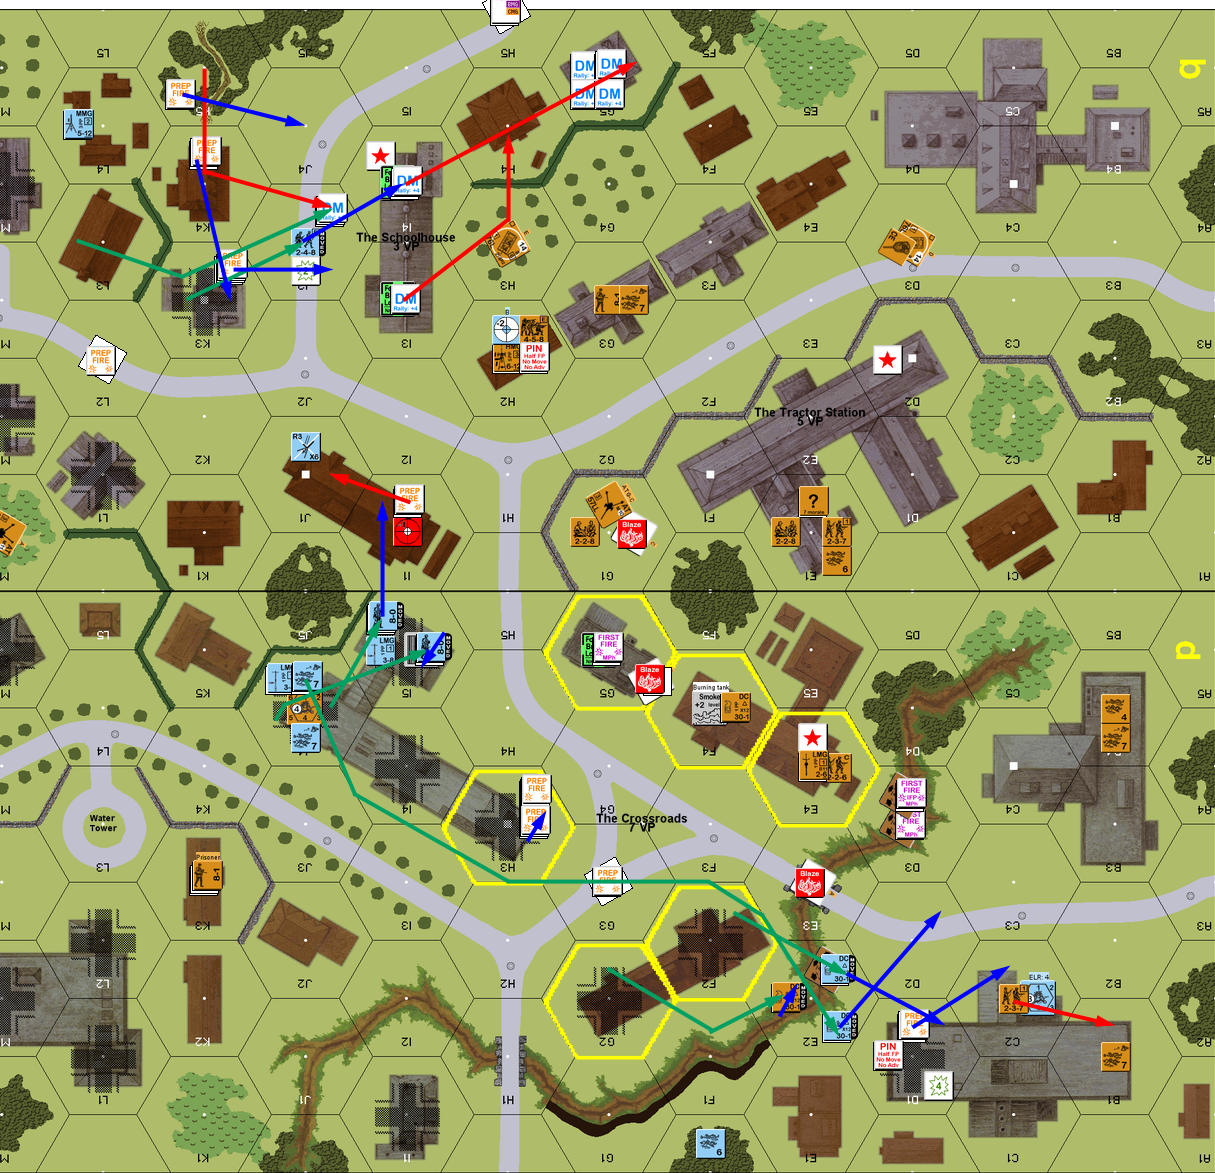
Situation, Russian Turn 7.
Patch got 2.5 out of 3.5 squads back for his rally, but could not repair his MMG. My 9-2 finally self-rallied, but could not get the squad with him to go along, and I only got 1 squad and the crew out of four squads in my two main rally points. The Gun in J1 was eliminated, which just left the crew on the north side of the street, while the MA in bD3 refused to repair.
Patch finally got to use his FT again in Prep, and promptly broke the squad and crew in bG1 with it (and wished he’d targeted the tank after he saw the roll…). The Elefant bounced a second shot and a IF shot off the wall in G1. (I had figured that wall was good for two shots maximum before he got a turret hit.) He also managed to malfunction a HMG and broke my squad in dF1, which made me realize just how over-agressive I had been, since that reduced my far-west defense to a single squad under the bridge in E3, and taking building C1 would be enough to let Patch win. However, there wasn’t going to be any grand charge for that this turn, as most of Patch’s line opened up this Prep, and the solid terrain kept much from happening to me.
Patch moved his 10-2 back up to the front line, along with his Hero and just recovered 467, but the KV in bH5 was able to secure a hit and pinned the 10-2 while wounding the Hero and breaking the squad. The Elefant on the west side moved up to the entrance to the Crossroads, obviously getting ready to kill the KV lurking between F4 and G5. I tried a couple DI shots while it was pointed the wrong way, but couldn’t connect. DFPh went fairly well, as I now had a lot of firepower available in the dense terrain. After several shots, I broke the FT squad in bI1, as well as a leader and squad in dI5. Patch advanced into bJ1 and eliminated the crew in CC for no losses.
Situation, German Turn 8.
I got the HS in dC2 for the 1st MMC rally, giving me someone in the critical building. I also rallied the remaining squads in bF3 and F4, but could only rally a single HS in bE1 while reducing a squad on a ’12’. Thankfully, the MA in D2 repaired. Patch finally repaired the MMG at the Crossroads, but could only rally the FT squad, who was back out of range of anyone.
I had a fair amount of Prep, and broke a couple MG squads in the dI4 building at the cost of a Sniper activation that broke my squad in E4. I didn’t have a lot of movement, but I mostly focused on trying to get a few more units available in the west. Patch got a CH against the KV in dF4/G5 to burn it (Final TK# 46), but only bounced two more shells off the wall in bG1. He also broke both squads in bG3, who were backing up my exposed HMG position, but he didn’t affect H2 itself.
Situation, Russian Turn 8.
Patch’s 1st MMC rally got the 467 that had been abandoned in bM4, but he was only able to rally one squad out of three in dJ4, and could not get his HMG back online. I managed a crew and squad in bE1, missing another two squads there, and the two across the way in F3. Patch fired another two shots at G1 which bounced off the wall (I can’t imagine the wall was in very good shape by this point). Much of his line opened up in Prep again, but the only results were breaking the crew in G1 (again), revealing the fortified Location in I3 and eliminating one of his captured MGs.
Patch laid smoke in dG3 and charged across to G2. I had a shot that didn’t hit the smoke… and Patch passed the resulting 2MC. However, my Sniper activated, killing his 10-2 (his fourth leader kill this game!), which in turn killed the Hero and broke a squad. He then moved his HS out of the gully into dD1 to claim that hex, but my fire managed to break him at that point. The MMG squad AMed into the gully (to advance into the building later), sent another squad around the back into the gully, and then charged in another squad which I managed to pin in G2.
DFPh did not go well. I broke a squad in bJ1, but malfunctioned two MAs, and his 838 in K3 went fanatic and generated another Hero. Patch’s AFPh was no better for him. He only had a couple of shots, and one of them finally eliminated his FT.
Situation, German Turn 9.
Both squads in bF3 rallied, but nothing else happened for me on my RPh. Patch rallied one squad in dJ4, Battle Hardening and generating a Hero in the process, but the other two squads and 8-0 still refused to rally; he also failed to recover the malfunctioned HMG that had been left in bJ1 last turn.
At this point, I figured I had to assume that Patch was going to get all of building dC1 on his final turn, giving him 19 out of 18 VP. This meant that I would have to take back two stone building hexes to win. I was fairly well overrun in the west, and there was too much firepower on both sides in the center for a last ditch assault to be likely to get anywhere. This left the east, where things had continued to slowly go in my favor, and with the latest rallies, I had a decent number of troops. The problem is that there was only one stone building hex available in one turn’s move (accounting for the wall of German troops in the way). If an assault there was going to work at all, I had to do it now, and hope that I could continue on to more stone locations on my turn 10. I went around for quite a while trying to decide to go for it, or play conservative and hope that Patch couldn’t take more than one more hex.
I took a few Prep shots, and managed to break the squad in bJ1, which would make crossing the street he was facing a lot easier. I’m not sure what Patch was thinking as I started trying to find a way through his defensive fire, but it got close. The 9-2 pinned to a FL, but the squad with him made it, and he had to use the big stack in bK3 to stop the squad. Only one squad actually made it through First Fire intact (though there were no K/- or KIAs, to my surprise), and he broke to Final Fire.
Patch’s DFPh scored a CH against G1, finally killing the KV-1S there. It lasted a lot longer than I thought it would under that amount of fire. Worse was when he pinned both squads in H2. I had been counting on one of them to advance into I3 and replace the squads that had just charged out on my ill-fated offensive, and now I was going to be unable to re-garrison the hex. I had managed to successfully move a HS into the street on the east side, but Patch broke him too, dooming my last attempt to get more bodies in there. However, this activated my Sniper, who hit dJ4, and broke the one squad who had rallied there. This became even more critical when I realized that a Sniper attack DMs every broken unit in the hex, making it suddenly a lot less likely that Patch was going to be able to put together another wave for his last turn.
Situation, Russian Turn 9.
And indeed, Patch got no rallies for his turn, also missing on his 1st MMC rally in dF0. I managed to rally a crew and HS in E1, but that was it, the 9-2 didn’t manage to bring himself back from under DM like he had early on. Patch fired a bit more than I was expecting, especially Dd1, who failed to get a result on C2. I was expecting him to maneuver and boot my brokie out of B1. He did however manage to break my squad in bI4, leaving the Schoolhouse garrisoned by a pair of broken units.
With most of J4 still broken, I didn’t need to worry as much about a last-ditch charge across the street at G5, and it was able to fire on bJ3 and break a squad there. I Did have to allow a HS to move up though. Patch actually didn’t have much that could get into building dC1, and I pinned the only squad that made it in. The MMG squad could advance and take one more location, but only one. When I was worried about his advance into the building I hadn’t properly thought about the fact that it cost 4 MP to get from E2 to D1, and it cost 2 more just to get into E2, reducing the options quite a bit.
My DFPh also managed to break bI1. Patch managed to break my HS in C2, leaving no resistance left in that building. Thankfully, there was just no way to take advantage of it. The MMG squad advanced into C2, nicely covering my approach, and the HS moved into I4, giving him 18 VP.
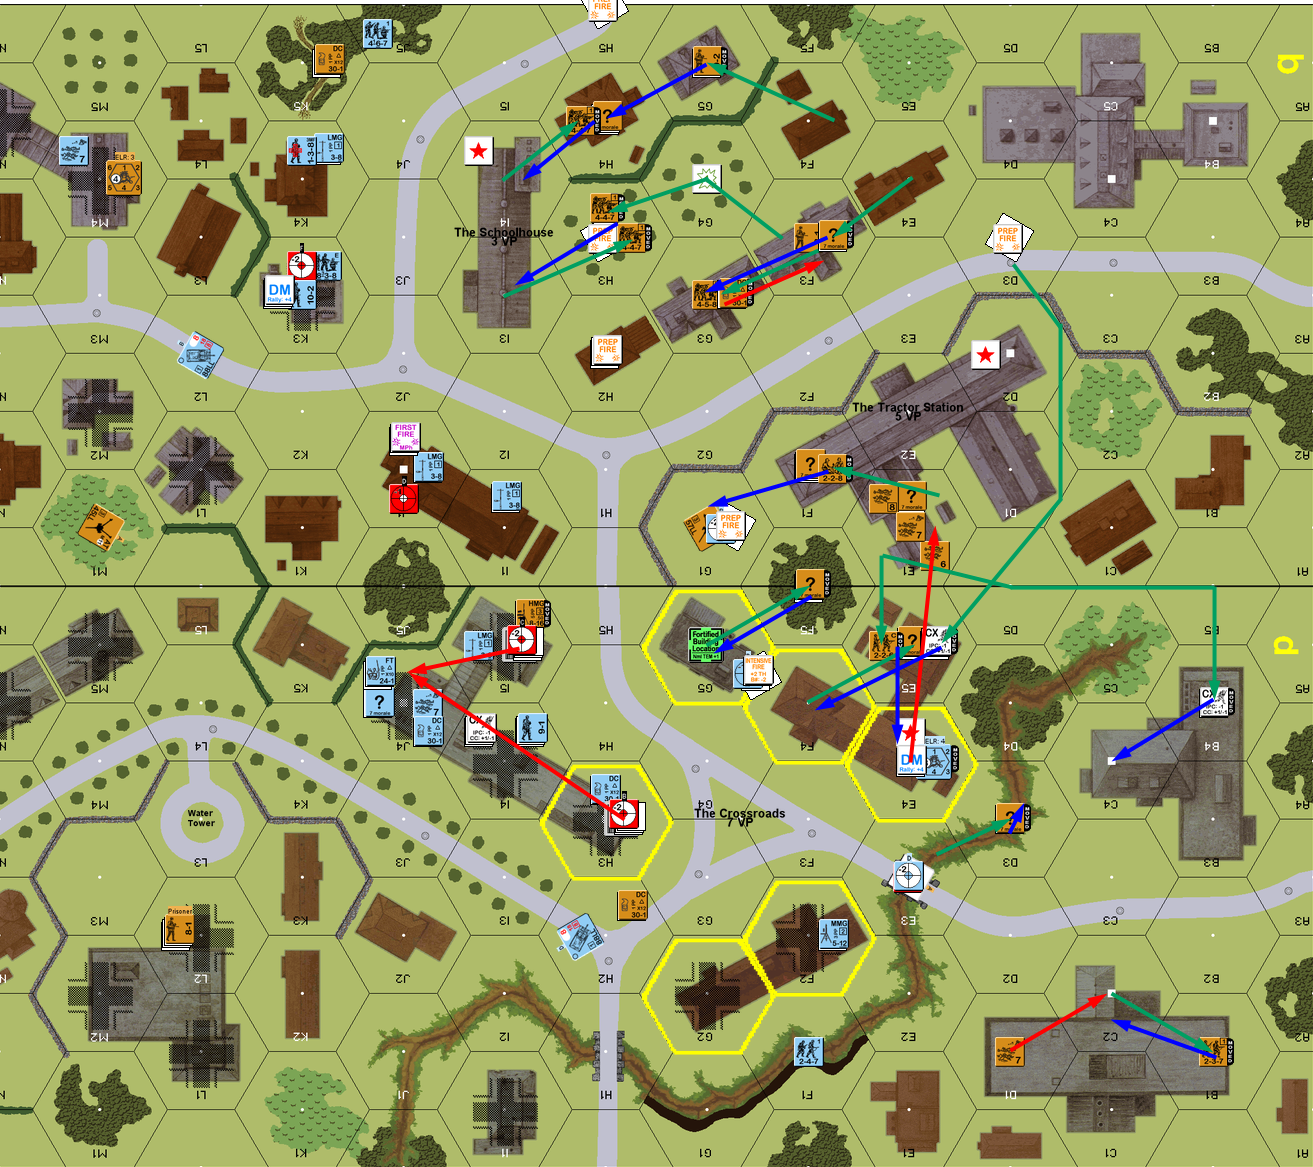
Situation, German Turn 10.
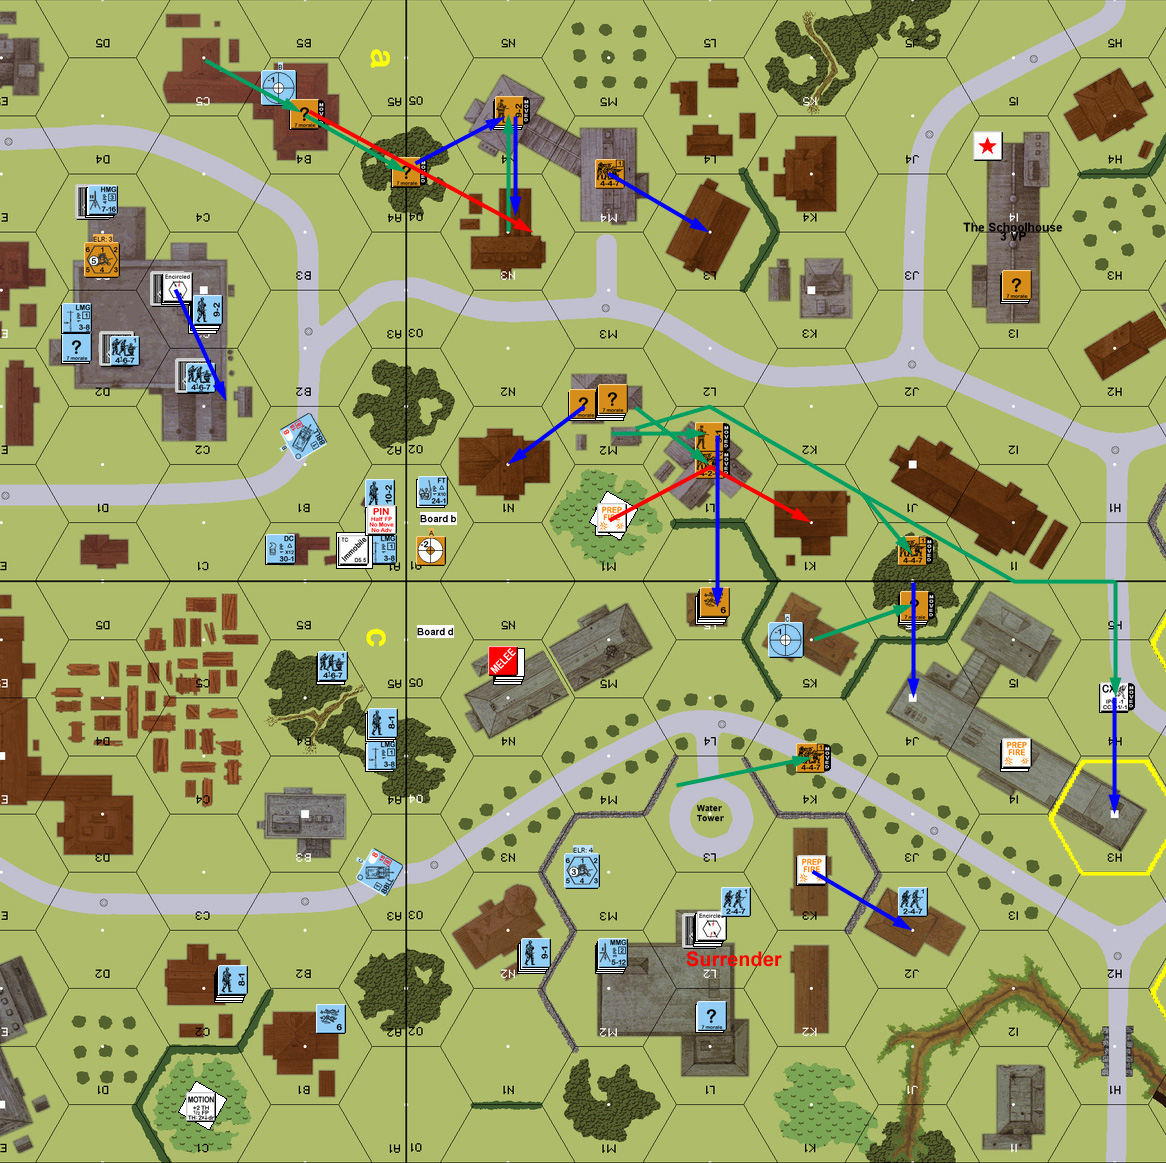
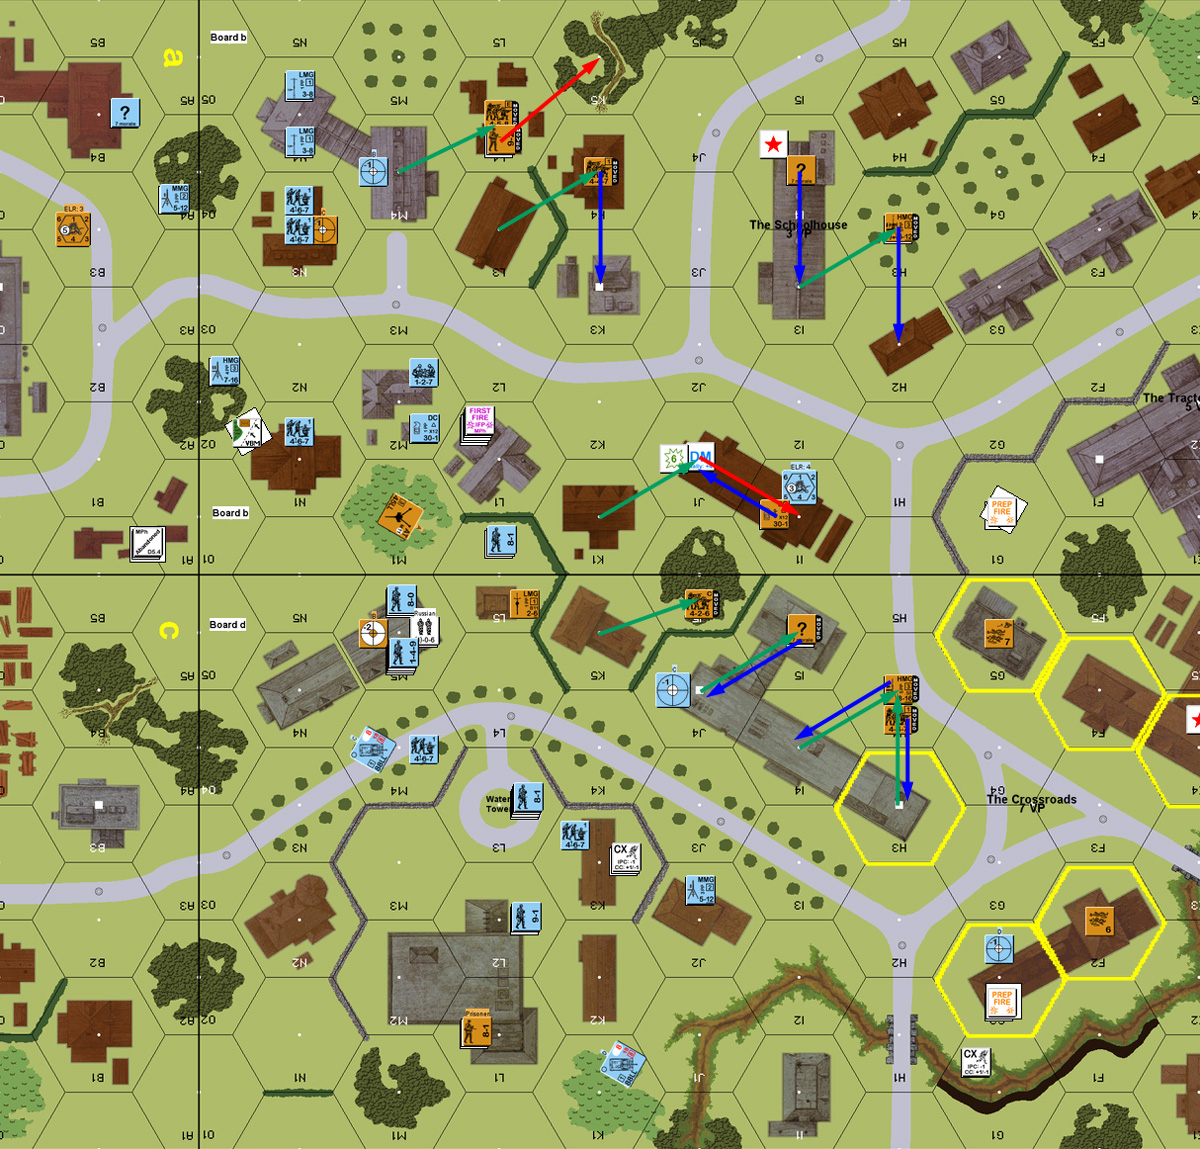
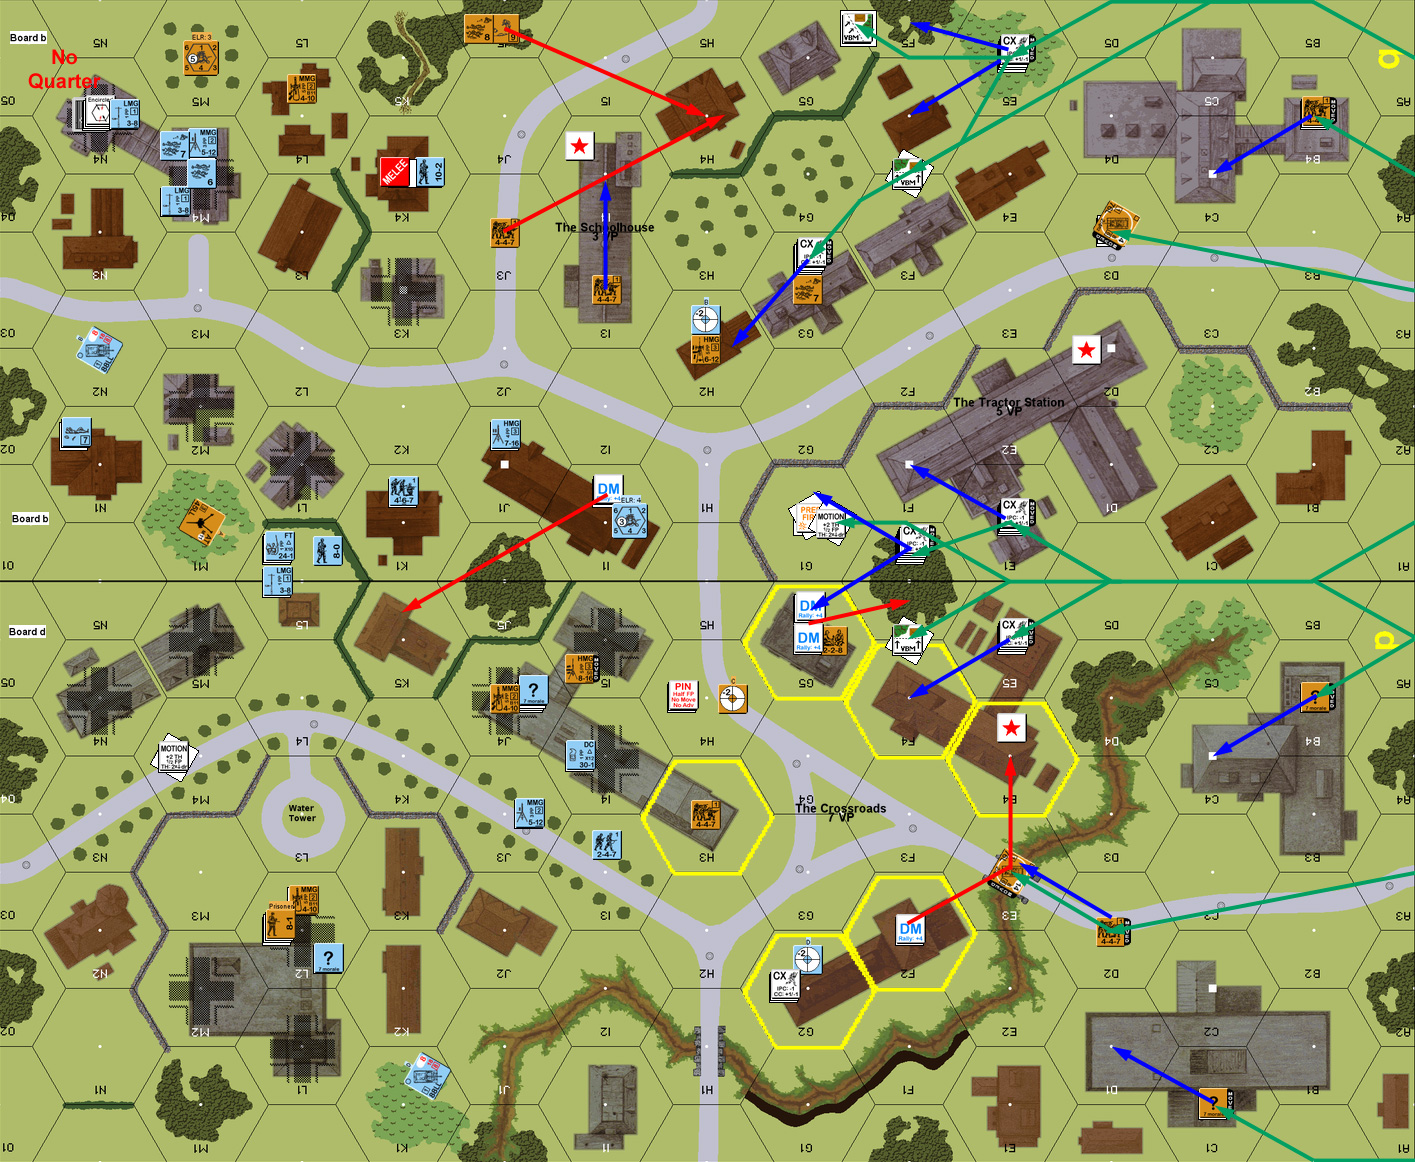
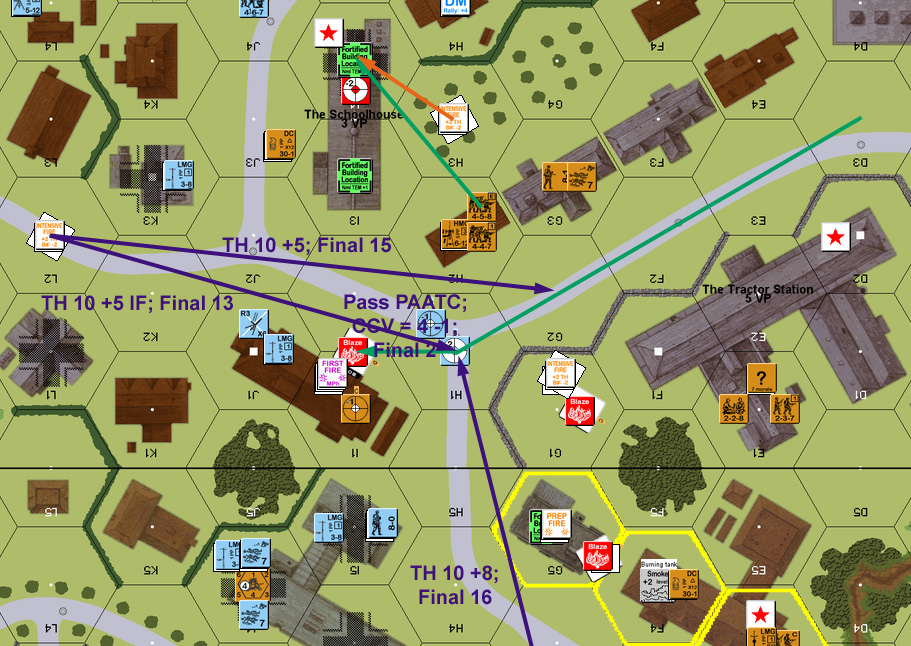
The good news for my final turn was that I had a lot of assets near bI4, and while it was fortified, a HS isn’t sufficient to keep me from advancing in. The big pile in G5 refused to rally, but I did get the squad in G3 back. Patch repaired the MA on his Elefant, which gave him an extra gun that might be able to see the action.
The KV-1S in H3 turned the turret and fired at I4, and hit on the IF shot. Patch promptly rolled a ’12’ for the resulting 2MC, eliminating it. Now all I had to do was get in to take control back for the VP. That basically required crossing H3 intact, and only I1 could see that hex. A few more Prep shots couldn’t affect them, so the KV in D3 started and headed in for Bypass of I1 to lock their fire. The Elefant in L2 opened fire as it entered LOS, and IFed as it continued into H1 and missed again. The other Elefant opened fire at that point, and naturally missed with the +8 TH caused by lack of LOS and having to turn the CA.
And then it continued into I1 and Stopped. Patch used Street Fighting to burn it on a Final ‘2’. However, that was First Fire for the HS there, and now I could just move one of the squads in H2 into H3 and then I4, and he couldn’t fire because there were enemy units closer to his First Fired HS. I hadn’t even thought about that part until it was resolved; I just figured I’d either keep him from firing out of the hex, or hopefully Smoke him in. Patch commented that “This is the best worst feeling I’ve ever had.”
Game over, Germans lose at 17 out of 18 VP.
The final moments, Russian turn 10.
Postscript:
It’s a huge scenario, considering the relative lack of space it covers. But, it was a tense and interesting contest from start to finish, and we both had things to celebrate and curse. Losing three of my four leaders so quickly promised to be a big problem, but events kept conspiring to delay Patch, and my 5 SAN going extremely active on the west side could not have been better timed. A really excellent, if long, scenario, that needs more play.
Discussion ¬