
J137 No Mercy In Burcy
After our short (very short!) foray back to Valor of the Guards, Patch and I decided to switch back to the western front, and try J137 “No Mercy in Burcy” from Journal 9, which I had just gotten, most of a year after it came out. We were both surprised to see that ROAR had it in favor of the Brits so far, since they have to protect a fair amount of ground, and the Germans have a lot of tools with which to do the job. I got the attacking Germans, while Patch figured out a defense for the Germans.
It’s August ’44, and the Brits are defending near Burcy in hedgerow country (about three-quarters of board 55 here) with ten squads, five Shermans, and a mix of LMGs and airborne MTRs, and 80mm OBA. The Germans get nine squads of 838 assault engineers, some MGs, and two flamethrowers, which enter between hexrows G and M on the south side, while another three squads with three halftracks enter anywhere on the south edge on turn 4 of a 5.5 turn scenario. The Germans need to either exit 24 VP off the north edge road hexes, or by controlling two of the three stone buildings on the board.
Patch sent me a view of the actual area, looking down my presumed route of attack, that he looked up in Google Earth:
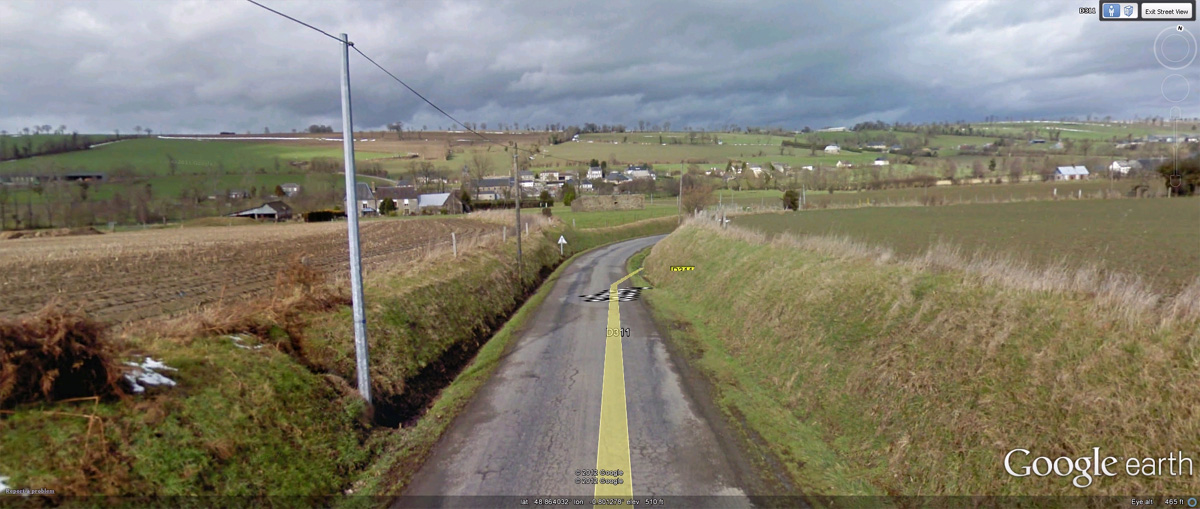
The British set up area is defined by a diagonal down the board that runs right behind one of the major roads on the board and through a gully. One of the stone buildings is off by itself in P8, while another is in H5 with a steeple location (Level 1, but can only take a HS), and the third is outside the main set up area in J3, but is also allowed for the Brits to set up in, and is fortified. Thanks to that diagonal, the west end of the board has a very thin area for the British defense, and Patch set up heavily in that area. I decided to go east, use the FTs to take J3 early, and try to get across/around the gully to either take H5 or work around Patch for the exit.
One of the attractions of the scenario is that it was our first chance to try out the new hedgerow boards that came in Action Pack 5. I haven’t done enough with hedgerows, and nothing else recently, so I had an initial surprise with just how hard it could be to get anywhere…. I also didn’t quite think through my entry correctly, as I started with a HS down the I1 road (well, in the orchards on either side), and Patch fired on it to leave residual for later.
I probably should have been a bit more daring with my first turn entry, but all those tan ‘?’ across the way had me a bit jittery, and staying at the very edge behind the bocage allowed me to keep some of my own concealment. He broke one squad and pinned a HS during movement, and killed a HS during DFPh. His last shot was at the pinned HS, which generated a Hero.
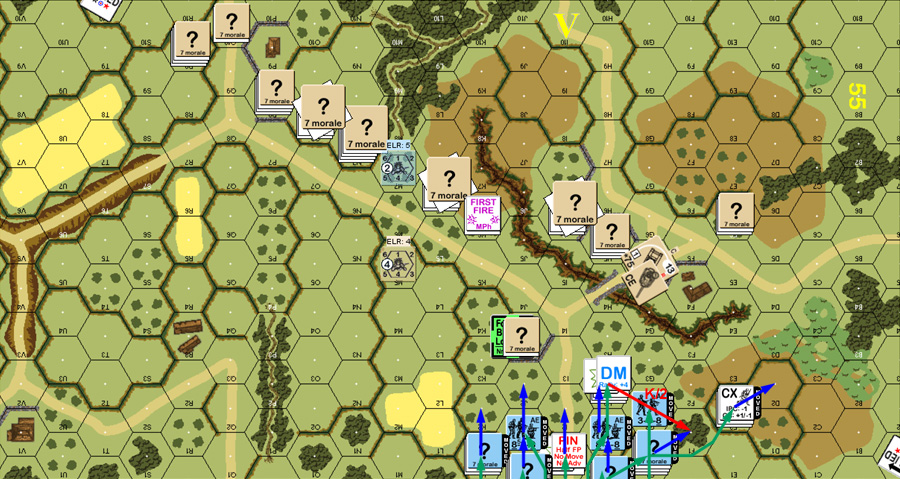
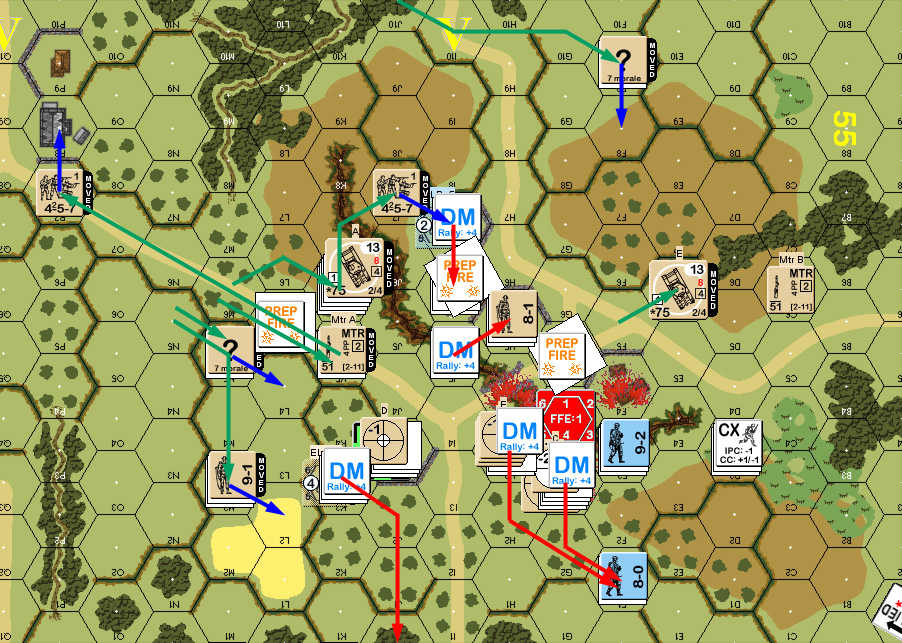
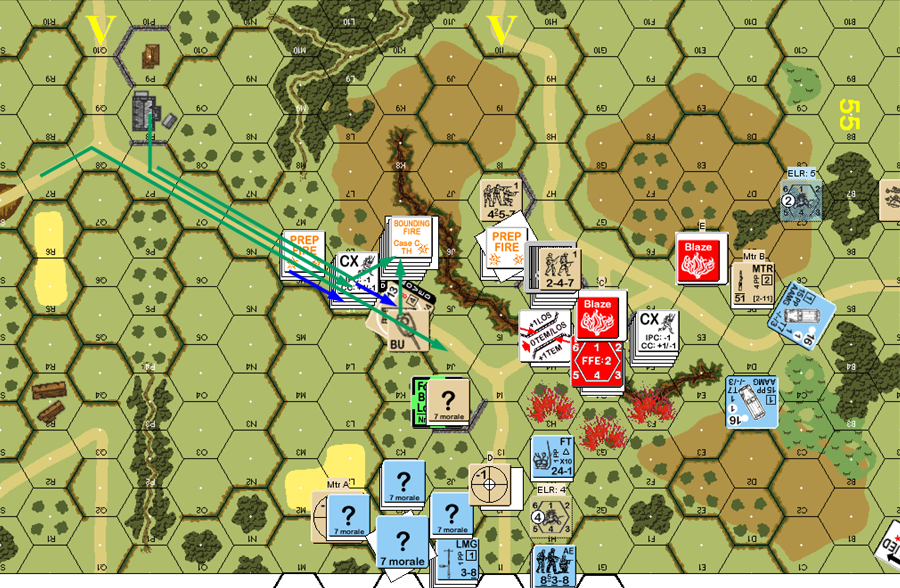
Situation, German Turn 1.
Patch’s rally did nothing, with the only attempt (mine) failing. His prep was a mixed bag, malfunctioning a LMG, nearly malfing two MAs on ’11’s, breaking another squad, and wounding my Hero on a K/2. Naturally, his movement consisted of everything on the west flank moving east at top speed. Thanks to the heavy terrain, I couldn’t see any of it, and I realized that not pushing forward faster was a mistake, as I really needed to be able to put some firepower down the I4-Q8 road. Of course, that would remove all the orchard hindrances from the part of the line that didn’t move, so it would have had a price, and perhaps he would have broken all of it anyway….
My defensive fire managed a PTC against J3, revealing it as a HS. Not enough to keep me from entering for CC, but Patch just wanted to slow me down, and not sacrifice a squad doing it.
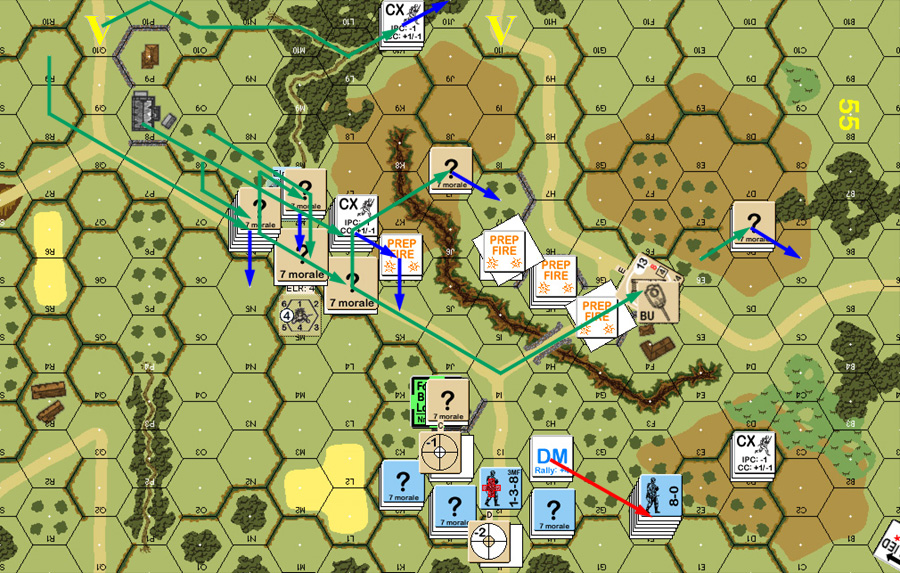
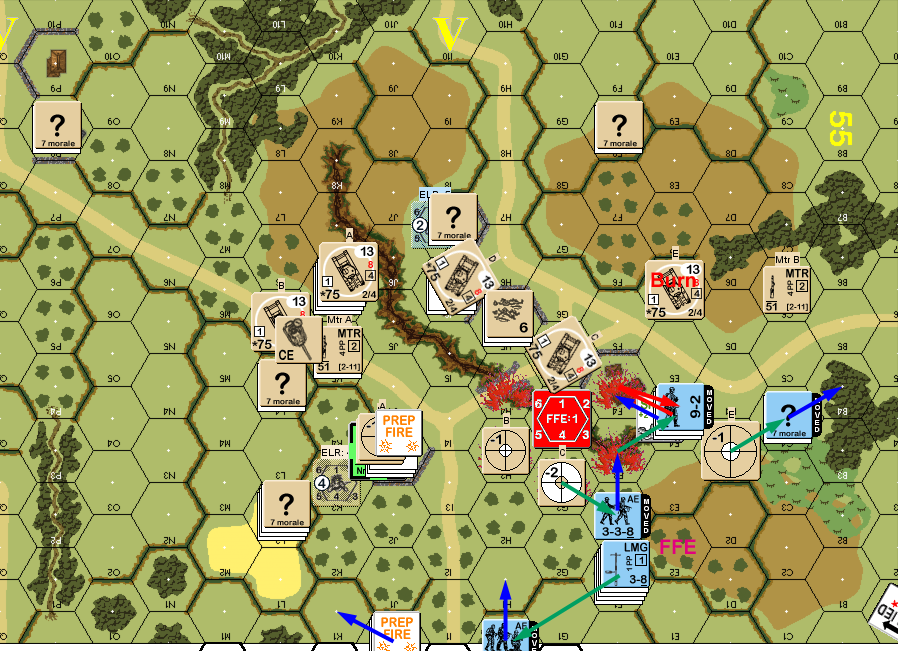
Situation, British Turn 1.
My rally went as expected, the squad that broke the first turn rallied, and the one that broke last turn did not. My prep consisted of the adjacent squad firing at J3 and breaking the HS inside.
Movement started off with a couple moves to try and force the HS to surrender, and then a slow advance as I tried to keep as much concealment as I could, and keep Patch in the dark as to who was where. Patch got radio contact during DFPh, and managed a fairly accurate SR placement (only two hexes off), though it did travel to his side of the gully. His two light MTRs opened up and got several hits, but I managed to pass the MCs he generated. He did manage to hit and eliminate my wounded Hero. Meanwhile my 838 managed a long-range shot that killed the HS manning the MTR in C6.
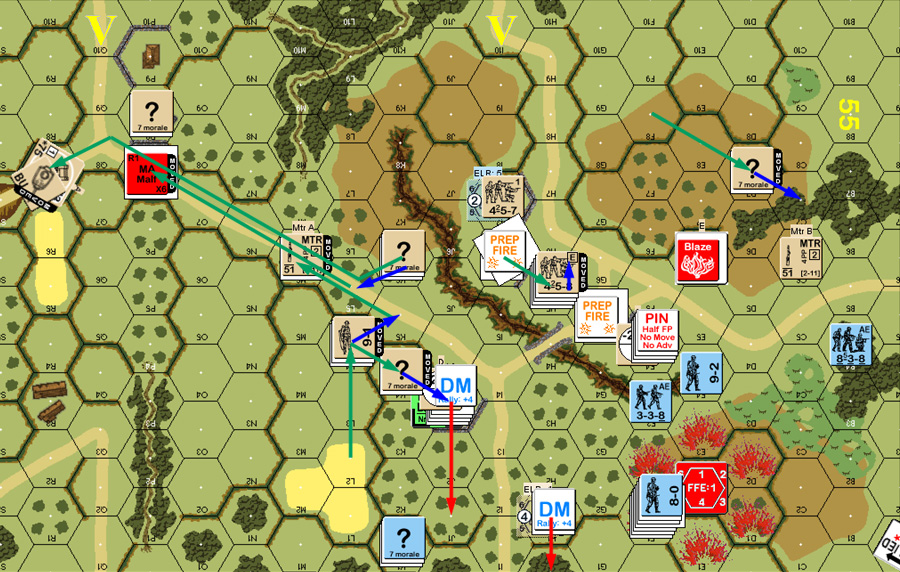
Situation, German Turn 2.
Rally was again standard, Patch didn’t get his DM unit back on a self-rally, I got my last broken squad back. Patch did lose a malfunctioned LMG.
The SR was adjusted and converted to FFE, and with a one-hex drift got it on three hexes worth of my units. This broke a squad, and Pinned my FT in G3 on a K/3. Not too bad for OBA in effectively open terrain. But I rolled his Sniper three times during that, and it went off twice, and killing my 9-1 in K3, and then CRing the squad with him (after it failed the LLMC). Worse, was that was K3, which had the MMG and was going to keep Patch off my flank by scaring him out of the L/M hedgerow area.
The rest of his fire wasn’t as bad, other than a CH from one of the Shermans, which pinned a HS, and broke another HS with my second FT. That set off my Sniper who broke one of his squads.
When Patch sent everything down the road towards me on turn 1, I was a little surprised, since it would be quite possible for my reinforcements to enter back on the west end and race for the P8 stone building, or the exit road, or both. So, I was a little disappointed when he sent a squad back to P8 this turn. His flanking force advanced through the bocage, safely out of site now that my flank had broken to his Sniper. In addition two of his Shermans repositioned, gaining higher ground and trying for (and failing) Hull Down status.
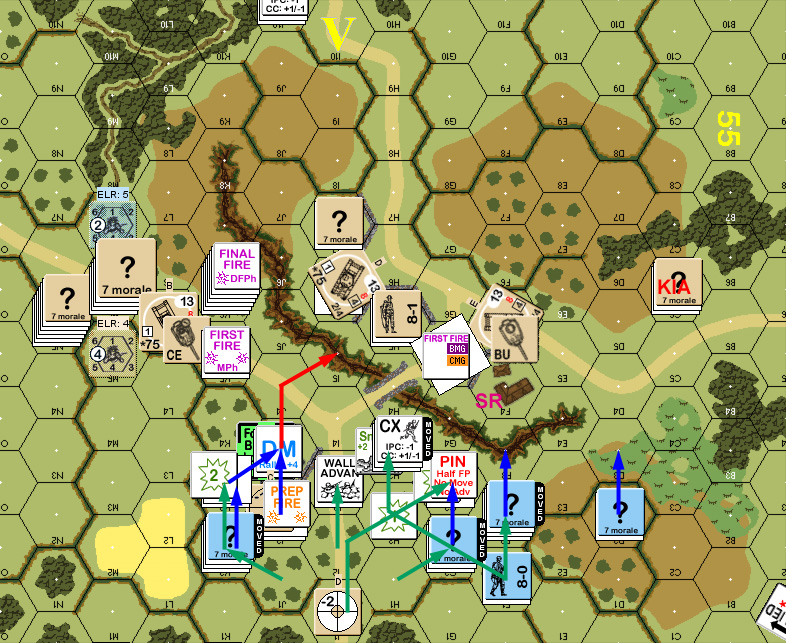
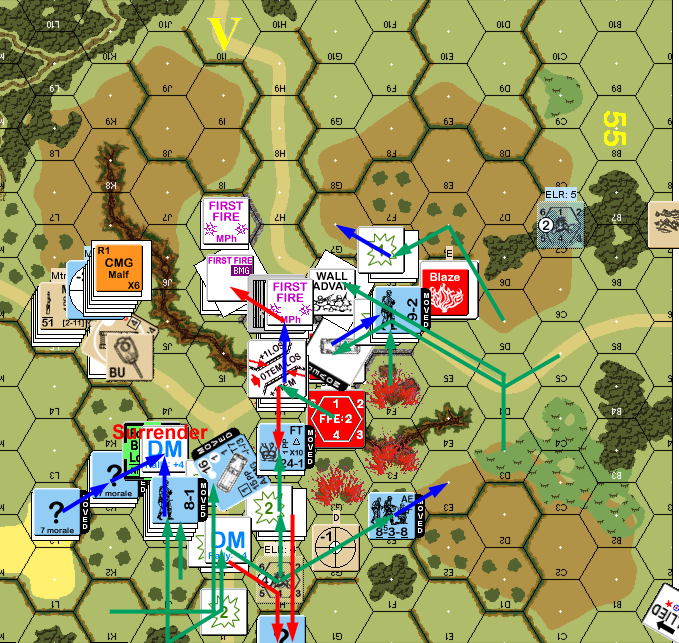
Situation, British Turn 2.
My third turn started with some unexpected luck, as my MMG HS self-rallied on a ‘3’ in J0, giving me a west flank again. Meanwhile, the main rally point in F1 failed to rally anyone.
Movement was slow and cautious. The 9-2 and FT-toting squad crawled out of the FFE to the end of the gully, and into range of the Sherman Patch had parked on E6, while everyone else drifted around, and the just-recovered HS assembled the MMG. Patch shifted the FFE during DFPh, hitting F1, and reducing a squad there. Fire into J3 Encircled it, but couldn’t do more than pin the squads there. Fire into E4 broke the 9-2, but the 838 stood firm. Contemplating my likely move, the Shermans in G5 and L5 tried to acquire F4, but the latter malfunctioned its gun.
Firing a FT two hexes halves the firepower. Firing it two levels up (from -1 gully to +1 hill) also halves it. However, while the long range reduces the FT’s TK number, the height difference has no effect on that table. The 838 rolled a ‘4’ to just barely kill the Sherman up on the hill, and as it turns out, any kill with a FT or MOL will burn a AFV with Red CS.
Ironically, the 9-2 couldn’t see anyone from the gully, so he routed to F2, spotted the adjacent Sherman, and headed for B4, stopping in the gully where he started.
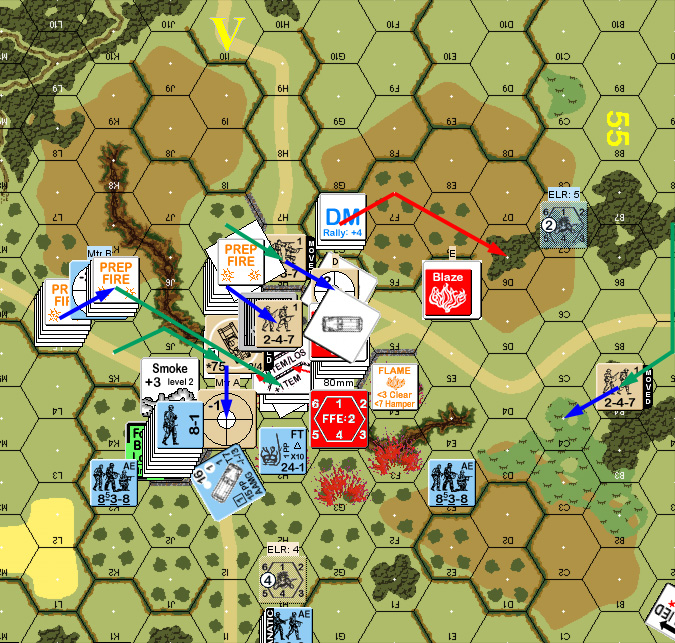
Situation, German Turn 3.
In his rally, Patch got both his squad self-rally, and a HS with a leader back… and my 9-2 rallied (on a ‘3’), and I got Original ‘2’s on both HS in F3, one of which went Berserk, and the other became Fanatic while generating a Hero.
The OBA continued coming down in E2, but could only get a PTC on my stack in F1. The Fanatic FT-toting HS pinned, for all the good it did, though Patch’s Sniper did go off in the process and broke my squad in H1. Adjacent fire at my forward FT squad F4 only pinned it, but Patch did get a hit on J3 with a MA and broke both of my squads in there, and re-took the building. There was a chance he could have captured my two squads in the process, but it would have meant taking a chance or two to do it, and Patch declined.
He also sent a couple Shermans down the road to guard P8 and the nearby road, and backed a couple squads off as back up in case I did come in near there.
Situation, British Turn 3.
With my turn four, I had three turns left to either take two buildings (and P8 was now off the menu), or exit 28 VP (I wasn’t set up for that either). That left re-taking J3 and getting into H5, somehow, so the reinforcements set up scattered from M0 to A0, with the main thrust being back towards J3. All my broken units were away from leaders, so I only had the self-rally roll, and didn’t get him back.
I didn’t have much Prep, but the F4 FT did (barely) take out the adjacent Sherman, giving two bonfires on that flank, blocking up the bridge, and leaving only one Sherman on that flank.
The Berserk HS charged H5, and survived two high-power shots before succumbing to an Original ’12’ on a 1MC. Of course, he didn’t have the MF to get there anyway, and would have been stuck in the gully for the next turn if he’d lived. I sent the Hero up to put a little pressure along that line, but Patch established a FL and then rolled a ‘2’ for a 2KIA that also activated my Sniper, which then broke his squad in C7, breaking his extreme flank open again. I moved my flank squad across and claimed his MTR that was still abandoned from a couple turns ago.
My reinforcements mostly AMed onto the edge near J3. I nearly forgot the final two HTs as they were parked off the bottom of my screen, but took up positions overlooking the H5 area. Patch shifted his FFE to F4, and it drifted to G4, which threatened the HTs less, but gave everyone else more trouble. This broke the FT squad in F4, but the 9-2 and HS in G4 were okay.
Situation, German Turn 4.
Patch rolled Gusts for Wind Change, and CRed on his self-rally attempt in A7. However, my broken FT squad in F4 CRed, keeping the FT out of action for Patch’s turn, and making it harder to get the remaining HS back. I did get all three broken squads along the board edge back, but they were still way out of position to do much about H5, which I only had two turns to take. Thankfully, not only did the OBA fail to do anything more to the units in F4, but the HS in the gully (who didn’t advance to keep from taking an extra OBA attack) generated a Hero.
The units guarding against a west attack went east again. The Sherman with the bad MA climbed onto the hill an Bounding First Fired at the FT in H2, but broke its CMG instead. My FT in H2 managed a 1MC against J3, which broke the squad that Patch had gotten back in there, though they did not rout out.
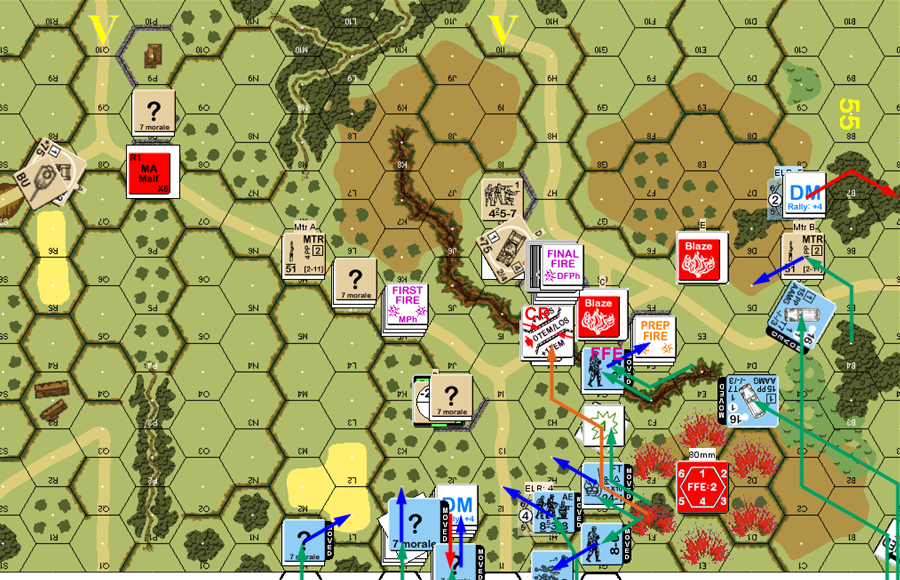
Situation, British Turn 4.
Thankfully, the HS in F4 came back on my turn; since he was the only unit with a good chance of actually clearing British troops out of the victory building, a lot was riding on him.
Much of my turn was focused on trying to keep Patch busy elsewhere so I might have a chance to get in close to H5. I managed to forget one plan to send the closest available squad over the hill and around the gully, but I did manage to send another squad over. But, there was just too much in the way to get anywhere. Defensive fire broke a squad and a half and wounded the Hero, while the OBA killed my Fanatic HS, and broke the HS in the gully, and then killed him during rout.
I also attempted sending a halftrack in to VBM-freeze the two and a half squads in H5 (or likely die in the process), but the only way in was through the OBA, and it died to that (distracted by all the other counters, I had forgotten G5 was an FFE hex…). The crew survived, only to be immediately killed by the OBA.
After all that, FT HS and 9-2 leader broke the two squads in H5 in Advancing Fire, which forced them to rout out. However, all I could occupy the bottom floor with was my wounded hero, but I had to try and keep him out of there for his final turn so that I would only have the steeple location to deal with on my last turn. Not liking how exposed F5 was, I decided to advance the 9-2 and HS back into the FFE where there was some cover for the next turn, and the HS broke.
Situation, German Turn 5.
Patch rolled Gusts again for his Wind Change, and then self-rallied the HS A7 and got one of his two broken squads back in I6. Crucially, I was not able to rally G5, though the squad and HS that routed to H0 both went Fanatic.
Patch eliminated the Hero and the remaining west-flank halftrack with no trouble during his Prep, and then finished it off by reducing my squad near the victory building to a broken HS on a K/2. He started off movement by advancing the Sherman with the bad guns through the gully and parked it underneath the bridge in H4 (and sadly, I was all out of billy goats…). The other Sherman from the west flank joined it in the gully in I5. Between that and advance, Patch formed a formidable gauntlet that made it unlikely for anything to get close to the victory building, much less take two locations in it in one turn. Worse, he forced my broken FT HS to die of FtR, leaving only the 9-2 adjacent to the building.
I only had one worthwhile shot for the turn, which malfed my MMG.
Situation, British Turn 5.
Patch had been avoiding repairing the MA of his Sherman, but attempted it for the final turn, and immediately got it back. I, meanwhile, lost my MMG. I did, thankfully, manage to self-rally the HS that had just routed to D6.
And I looked things over in my prep, and found it was impossible. I had take control of building H5, which meant clearing out both Locations of all his units. To clear the steeple, I either needed to force a Casualty Reduction to hill the HS outright, or kill both squads on the ground level before movement, so I could move in ADJACENT to the steeple location and force a broken HS (and how am I doing that…?) to rout (or in this case, surrender). I only really thought about all this after declaring the FT attack (grabbed by the 9-2) against the ground level, and breaking one of the two squads there. The better solution technically would be to fire on the steeple and hope to get the needed K/- result, but with all the smoke in G5, that still required a ‘2’; or Patch being agreeable and rolling a ’12’ MC.
If the MMG had survived there was also a possibility of a rate-tear managing to double-break the HS in H5h1, reducing things to running the gauntlet and hoping to get into CC with any survivors of H5 (assuming the 9-2 survives DF, the odds aren’t even that bad). Patch actually wrote up a very nice analysis that pointed out some things I missed, but I can’t find it, and I think I’ve missed them again.
Postscript:
It’s an interesting scenario. I’m unsure of the balance, as I think the Germans really have what they need to do this. Patch was certainly afraid of all the FP I could dish out. However, applying those tools is really tough here, not least because the terrain is congested, but light, and there’s just not enough room to really get away from the OBA, which Patch rolled horribly with all game.
The main thing I wanted to do, and allowed myself to get distracted from is sending more troops over the hill and around the gully. What little I did put in there caused no end of trouble (partially due to some very lucky die rolls), and another squad there could have caused some real problems. Of course having a squad to send over, at the rate my ML 8 units were breaking was a problem. Another thing to do would have been to send a reinforcing squad down the P1 path, forcing Patch to leave something behind to make sure I didn’t get P8 by default. Again, affording that would be a problem.
Discussion ¬