
FB19 Waffenbrüderschaft – test run
“…and that’s it. This is the latest ASL scenario I’ve finished.”
And so Patch gets a good die roll to end our current game the day after I said that. One last weekly post:
A little while back, Patch and I volunteered to help playtest further Festung Budapest scenarios. We ended up starting with a Saturday FtF session where neither of us was adequately prepared. In fact, I wasn’t able to get the counters all pulled before Patch arrived. So I left Patch to start planning the Russian defense while I pulled out the Germans.
It is January 25th, and the Germans and Hungarians are counterattacking to take Hill 259 on the outskirts of Buda. This dominates the west edge of the FB maps, rising to level 7 at the top. The scenario is reasonably large, space-wise, being 15 x 26 hexes, covering from level 2 to the top of the hill. In version 4, which we played, the Germans enter in two groups, with six squads, two tanks (Pz IV and Panther), and two halftracks (one with a 20mm AA cannon) in the north of the east edge, nine SS squads (of varying quality), with two halftracks (one is a flamethrower 251/16) entering in the middle, while the Hungarians get nine squads (including three assault engineer squads), and a Zrinyi II assault gun with 9-1 AL in the south, and along part of the south edge.
The Russians have fifteen squads… and six crew-served guns (two 82mm MTR, two 76.2mm ART, and two 122mm ART). Four of the guns have to set up on or near the top of the hill, but everything else gets the run of most of the map. There’s also six hexes of buildings to rubble (with the usual FB chances of creating falling rubble or debris), and the first thing Patch realized was that it was theoretically possible to cut the main German armor off from the rest of the map with the rubble. It would take some falling rubble or debris, but it would force bog checks on the tanks, and be impassible to the two halftracks. I pointed out that A2.5 would allow the vehicles to enter a turn later, having gone around the obstacles (assuming that debris counts, even though A2.5 only mentions Blaze/rubble, but that’s pretty obviously within the intent of the rule, as debris doesn’t exist outside of HASL).
On the other hand, it’s still a way to choke off paths into the rest of the board, and Patch did a modified version of this scheme, leveling buildings to get better LOS into that corner from the hill. He only got falling debris once, scattering it into T27, T28, S29. This left S26 as a VBM path out of the NE corner, and W24 at the edge of the set up area, but I forgot about that when I set up. For the rest, Patch found that despite a fair number of units, he had a lot of area to cover, and went with a ‘shell’ defense that would fall back during the game.
Victory features the common idea (in FB) of the attackers needing to get four out of six objectives. More than half of them feature the top of the hill, with the Axis needed to get 9 buildings at level 5, elim/capture two of the four guns that set up at level 5 or higher, getting three AFV with functioning MA at level 5 or higher, and/or getting two squads up to level 7. The remaining two objectives are to capture all the stone buildings and getting 22 CVP. Ground snow is present (making going up those crest lines even harder…) and the Axis is at Ammo Shortage level 2.
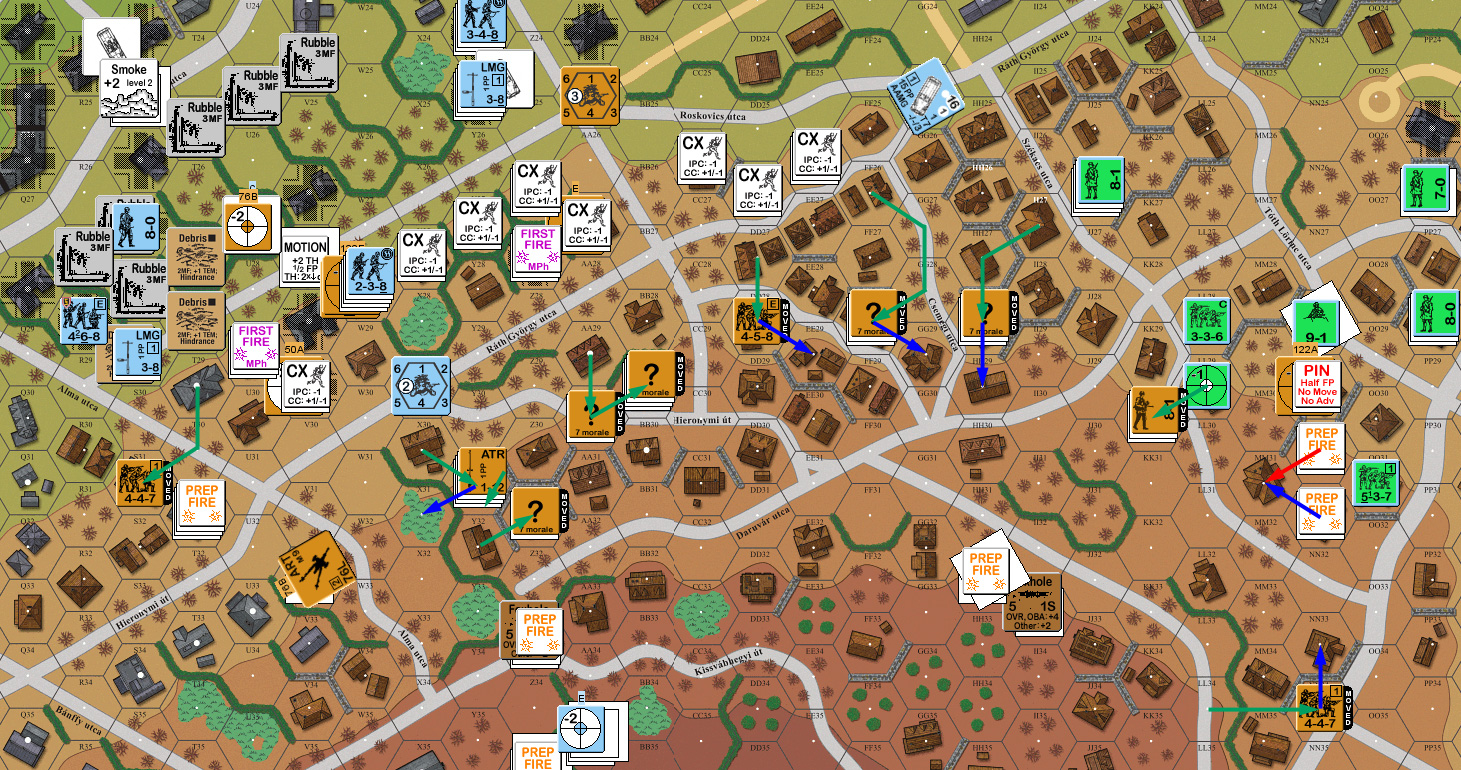
I concentrated the SS troops towards the north end of their area, planning on one big mass mostly aimed at the X27 area. The Hungarians set up entirely along the south edge, planning on concentrating on the three stacks there, and bypassing/flanking two more that were covering the east edge part of the Hungarian set up area.
I started off the game with the southern area, flooding the Russian defenders with Magyar hordes. I managed to press in fairly hard, and keep a concealed reserve, which proved to be somewhat superfluous when his forward stack turned out to be a Dummy. Elsewhere, I was much more cautious with my entry, not liking some of the terrain I had to cross. The FT halftrack parked in AA25, two hexes away from two Russian stacks, and revealed both of them with the FTs, but didn’t manage to do anything to them. And then late in the turn we had our only Sniper activation, which hit the HT and Recalled it.
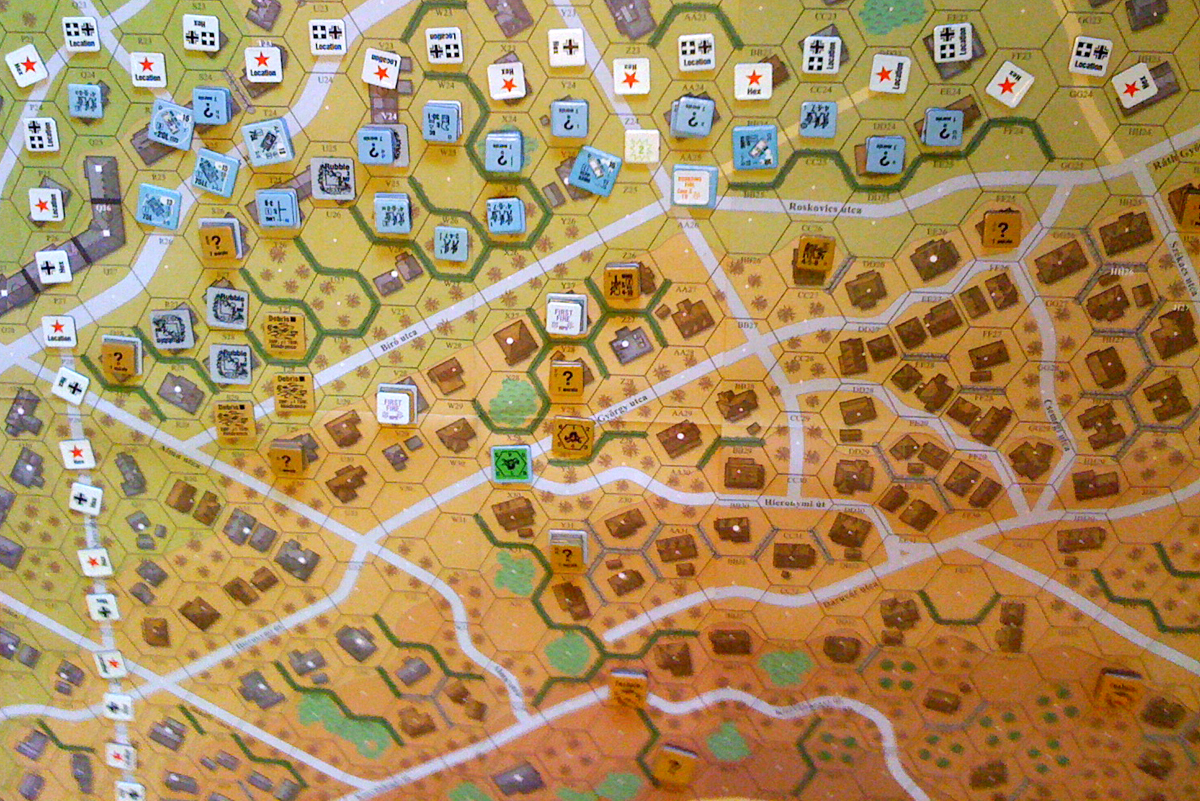
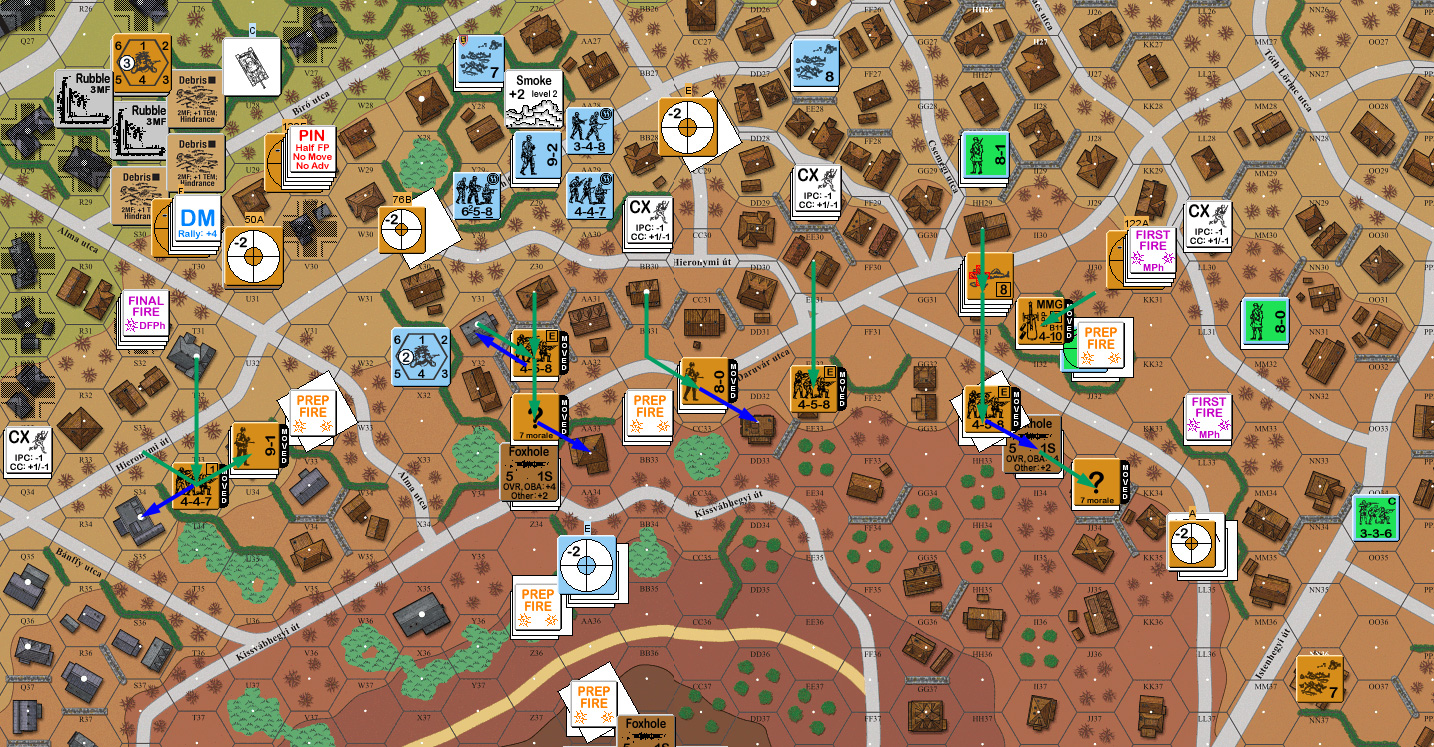
The initial assault, German sector.
Initial assault, Hungarian side.
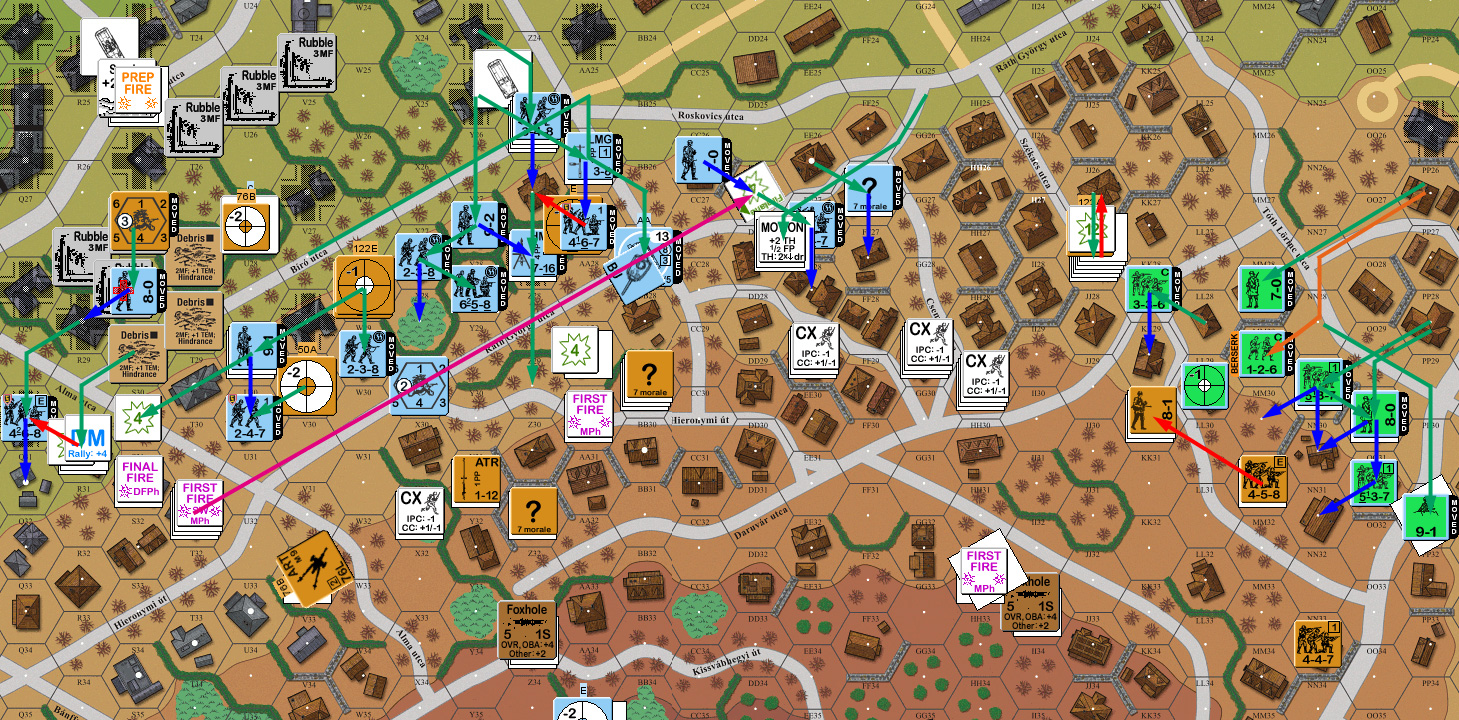
During Patch’s turn, he managed to kill the AA HT with a well placed ATR round (critical hit, no burn, but no crew survival), and managed to Immobilize the Panther with a MTR bombardment. The loss of the two HTs not only deprived me of some very useful vehicles, but pushed the CVP count dangerously high for the first turn of the scenario, as I have a cap of 32 CVP, and the two HTs are nearly a third of that (Recalls score CVP at the instant they happen). The Panther is a little more problematical. It is in LOS of most of the heavy guns, and now has little better to do than shell them in good range for a LL gun—if the crew can resist bailing out any time it takes a hard hit, while also taking a pounding from Patch’s Guns.
My second turn featured a push on the Russian line across the Biro utca (specifically X27-Z26) (he just had too many troops there for it to work), and further hard use of the Hungarians in trying to overrun the Soviet positions (poor dice from Patch allowed me to get a lot of troops in his face).
We had to quit for the day at the end of my turn 2 MPh, but transferred the game over to Vassal, and continued it there. It went slowly for a while, as we were still concentrating on “The Schoolhouse”, and I had trouble at first adjusting to a map that was upside down from how I’d been seeing it.
Patch’s remaining defensive fire did not manage any effect, but the Hungarian squad+leader I’d put together to assault the corner of his defense managed to pin his squad just before going in for CC. Between that and the -1 leader, I got Ambush, and killed them in HtH CC. Elsewhere, the Hungarians got up the level 4 crest line, and the Germans sorted themselves out back on the east side of the Biro utca.
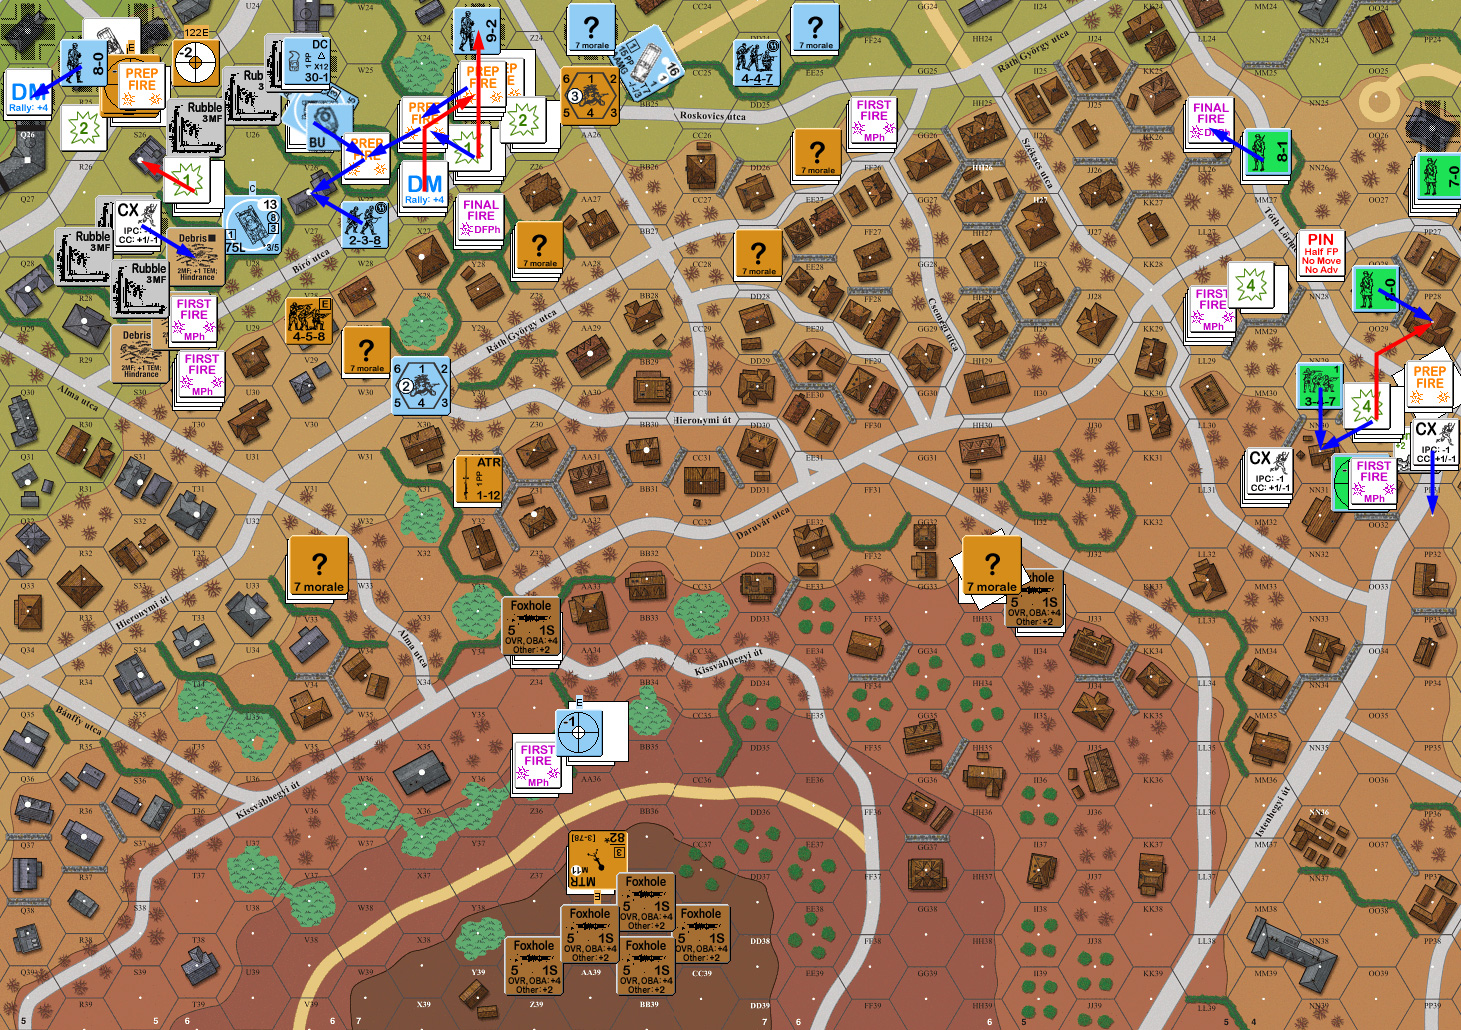
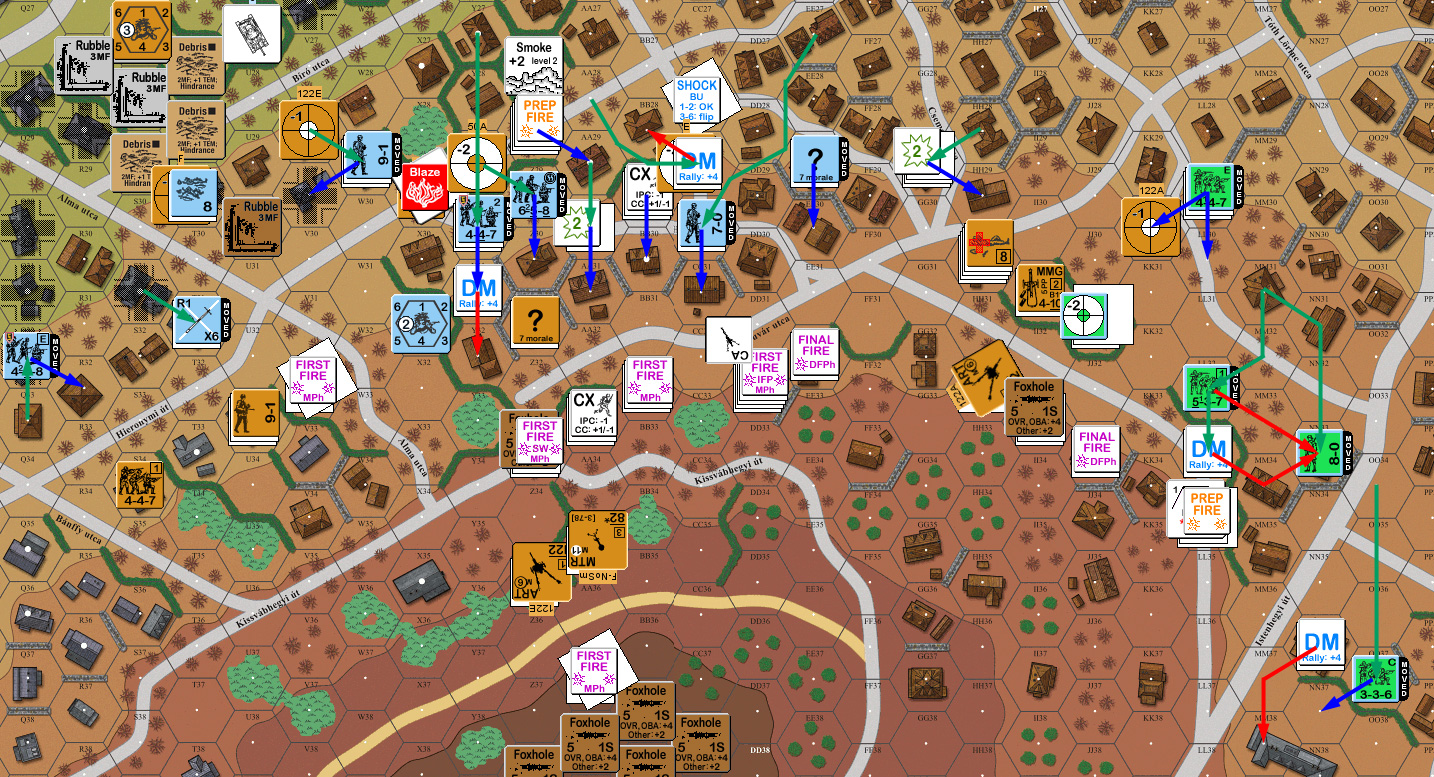
Full mapboard as of initial Vassal setup, showing the later routs and advance.
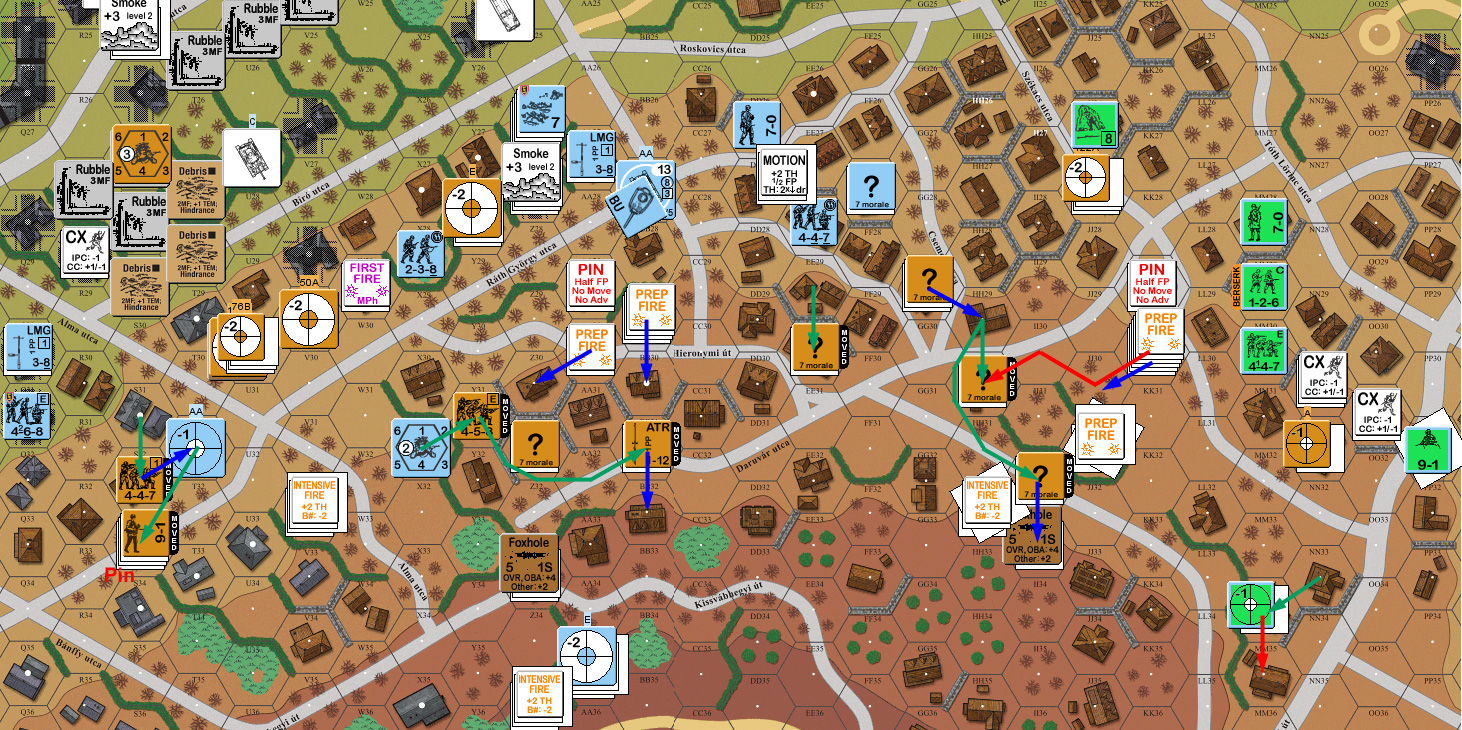
Patch’s only activity was to repair a light MTR in II33. I didn’t manage to rally anyone, even on an easy 9 +1 roll. I did pick up a spare LMG from the Russian corpses in LL25. Patch immediately made the Panther’s life much tougher by Smoking it in. He then got a 76mm APCR hit against a PzIV to kill it. The crew survived, but a second shot from the same Gun got a K/2 to kill them. Over on the south side, his MMG broke the squad that was threatening them. However, he also took another look at the length of the scenario, and decided it was time to pull out for another defense line before I used time and firepower to create a hole.
Movement demonstrated the problems with assaulting the hill. Patch got to sit on the crest line and shoot up my approaching troops, and then fade back behind the crest line on his way to setting up new defenses on the next crest line. Those who did not go that far were still parked on the opposite side of the next street to cross, and gained concealment, since I had been unable to see them. I only had a few valid shots, and none of them could connect. Patch sent in a concealed squad against the Hungarians who had gotten up the hill in NN30, got Ambush (-2 vs +2 for a 0 to 8 Final…), but only reduced the squad in the hex, leaving me with a pair of 1 FP HS who naturally did not manage to do anything in return.
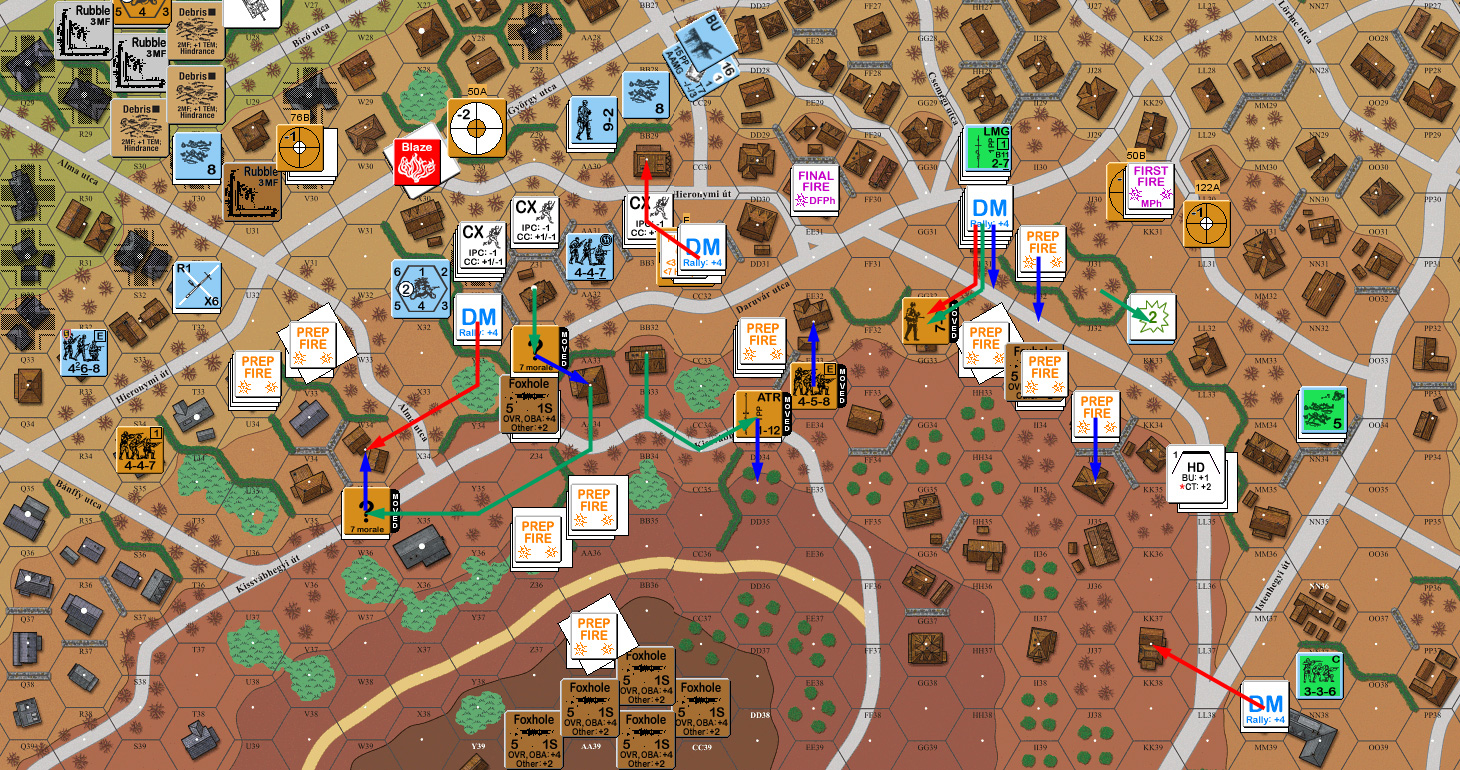
Situation, Soviet Turn 2.
The good news was that the pull back to the next line of defense meant that there was little DM about, and the only German unit who did not rally was a SS squad who rolled a ’12’. On the other hand, I only got one out of four Hungarian squads back, even though only one of them had been under DM. With most everything patched up (…pun not intended), it was time to press forward again, and my only Prep shot was from the Panther, who missed thanks to all the smoke.
Thanks in part to the snow, movement was slow as the Germans starting getting onto level 3 of the hill. Patch’s ATR took out one of the remaining halftracks as it started, and he broke a 658 as it came over the crest, and I had hoped to send a 537 Hungarian squad in to help the CC, but it pinned as it moved up. And he broke a HS during DFPh with his HMG’s second ROF shot. CC went as expected, with Patch finishing off the two HS, while they did nothing. However, I had brought a 537 and 336 adjacent, and the latter and another 336 were threatening the MMG on that flank along with the Zrinyi II, to force it to move and allow the Hungarians to keep moving forward.

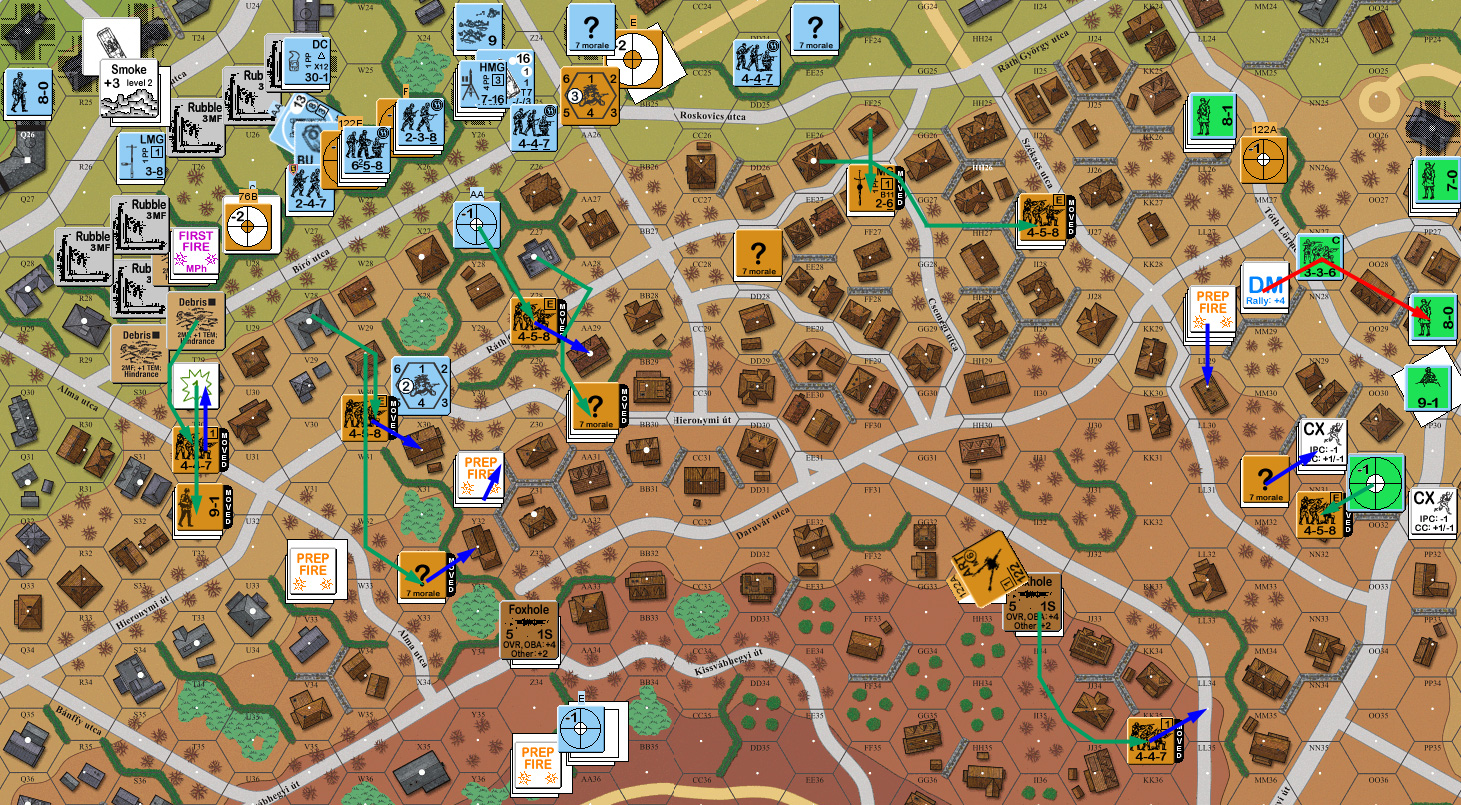
Situation, Axis Turn 3.
Around this point, we finally found out we’d been calculating my CVP cap wrong, and our calculation of Russian CVP went from 30 (out of 33) to 18.
Patch had no activity for his rally, while I got a ‘2’ for my first attempt to generate a… berserk 126 Hungarian conscript HS (+5 to the HoB roll…). The other two Hungarian squads still refused to rally on 6 -1 rolls, but I finally managed to rally the squad and a half stuck in Y24/25, and got both units that broke last turn rallied as well. Patch’s Prep fire did not go well, with the artillery opening up, but not getting more than a single Pin. He also fired his HMG+458 down the length of Rath Gyorgy utca from T31 at DD26 for no result, and the two squads adjacent to my 537 in OO31 failed to get a result against him.
Once again, I had almost no shots during his move, and one hopeful one turned out to be blocked. DFPh was slightly better, as I first pinned then broke and CRed his squad in NN30 on a NMC and ’12’. This did cause the Russian Sniper to activate, who re-broke the HS in Y24. During Advance, he completed pulling the center up to level 4, and things had opened up for the Germans and Hungarians to meet up.
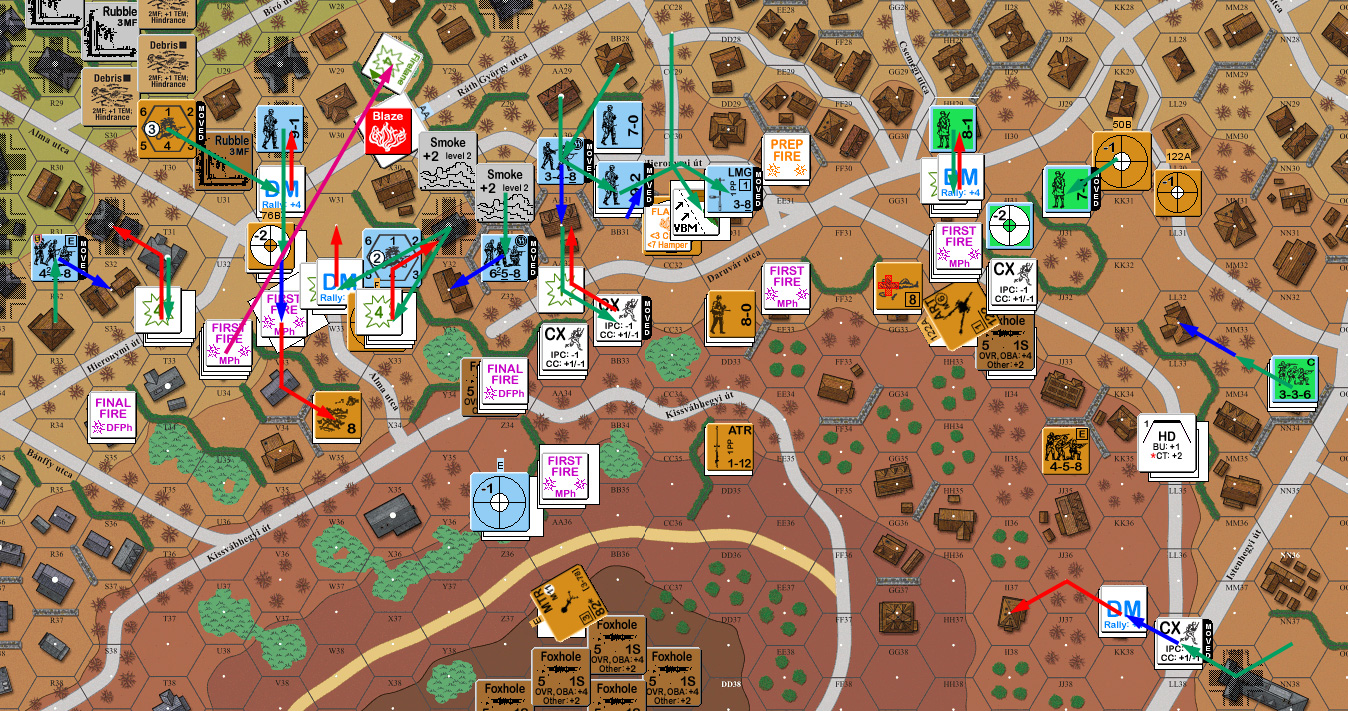
Situation, Russian Turn 3.
The remaining two Hungarian squads rallied for my turn; one on a ‘2’, but there was no Russians in their LOS, so they Battle Hardened to 1st Line instead of going berserk. Also the HS broken by the Sniper rallied again, which meant that I was no longer going to be stuck rallying men at the edge of the board.
I got careless on my first move (after the Berserk charge that couldn’t reach it’s destination), and missed a Gun that could see where I was moving through after checking that the line of infantry couldn’t. I got lucky that the 24FP hit only broke the leader and pinned the squad of the dangerous Hungarian in JJ26 that had been headed to put pressure on the MMG squad. That flank mostly just shifted about, preparing to force Patch to give up more ground to the Hungarians.
Patch’s HMG was lined up at the north end, and put a firelane down the length of the Rath Gyorgy utca. While my initial Dashing unit made it through (activating his Sniper which wounded my 8-0 in the process), I didn’t brave the FL after that. I tried to put some pressure on the north flank, but good rolls cost me a HS and broke a squad to put an end to that. The remaining Pz IV circled around to the south, ending up on the Rath Gyorgy, fairly well protected by buildings, with the turret pointed down the street at the HMG. (If I’d been smart enough to realize just where he was set up last turn, this could have gone a lot faster… but Patch still has to demonstrate these things to me.) The halftrack wound it’s way through the narrow streets to support the southern end of the German advance, though Patch (rightfully!) challenged an offroad bypass to avoid the FL, and I ended up pulling my physical map out to check. Just barely squeaks by on a counter width.
Things continued poorly in DFPh, when one of Patch’s 122mm ART rubbled U30, killing another HS, and of course opening up LOS in there. On the other hand, Hungarian advancing fire broke MM31 and eliminated the already-broken HS there.
Situation, Axis Turn 4.
Neither of us had much activity for Patch’s RPh, nor did any attempt fail. It took two attempts to re-smoke the Panther, when the first MTR missed with its last Smoke round, and then the second wasted a ‘2’ to critically hit with Smoke (better that than the alternative…). It then went on to smoke in my HMG, where the 9-2 had finally caught up to it after helping clear up the brokies from my second turn assault.
Patch fired at me where I’d gotten adjacent in KK29 and AA29, but only managed to pin both of them. His artillery opened up, and used Intensive Fire at a number of targets, but missed or failed to affect my guys, and then he revealed the second 76mm ART in JJ31 which swung around to fire at NN31 and missed. (Looks like it was originally set up to cover JJ29 and LL30; nicely outflanked by this point.) The 9-1 and HMG pulled out of T31, fading back into the orchard-lined roads, but I managed a 1FP +0 shot from my HS in W29 to pin the squad in the street.
I got two results during my DFPh: The first was eliminating my captured Russian LMG, and the second was breaking the squad in MM34 on a NMC, giving Patch problems with his extreme flank, again. Patch pulled back slightly in the center, which surprised me, as I expected to be facing more fire as I tried to cross the Rath Gyorgy utca, and then he’d pull back behind the crest line again.
Situation, Russian Turn 4.
My rally went well, getting all three of my units back, including the MMC self-rally in Q30. Patch only had one rally attempt, but missed it. Prep was minimal, with the Panther missing from inside the smoke, and the crew of the ART in V32 passing a NMC from U30. U30 also missed a PSK at T31; I had wrongly thought that rubble wouldn’t be backblast terrain, but at least I didn’t suffer from that, either.
The charging HS finally reached it’s destination, spotted a new target in HH30, started towards it, and was promptly mowed down by a K/3 from the MMG (which kept Rate, sadly) and squad in JJ30. After a lot of consideration, I finally found a route that worked for the Zrinyi II, where it dashed in front of the 76mm ART (which missed thanks to limited LOS), climbed up to the next level of the hill and turned around, stopping and going Hull Down looking at the Gun, where it took an IF shot that also missed.
I wasn’t liking this continual cycle of slowly climbing up the central part of the hill into the teeth of his defense, and wanted to get pressure back on the flanks. However, all the hedges made lateral movement hard, and he broke one squad that was headed to the north. The Pz IV headed that way to try to deal with the 76mm ART, but I mis-thought what I was doing, and went for a bounding fire shot instead of waiting to get Acq in the AFPh. Even so the odds weren’t all that great for me, but I just couldn’t figure out any better way to deal with the Gun, as long as the crew kept shrugging off the few small-arms attacks I could send its way.
Two MTRs and 122 ART up the hill concentrated on U30, breaking the squad, while the HMG managed to kill a HS when it rolled a ’12’ on a 1MC. However, my Advancing fire broke and wounded the 8-0 directing the MMG in JJ30.
Situation, Axis Turn 5.
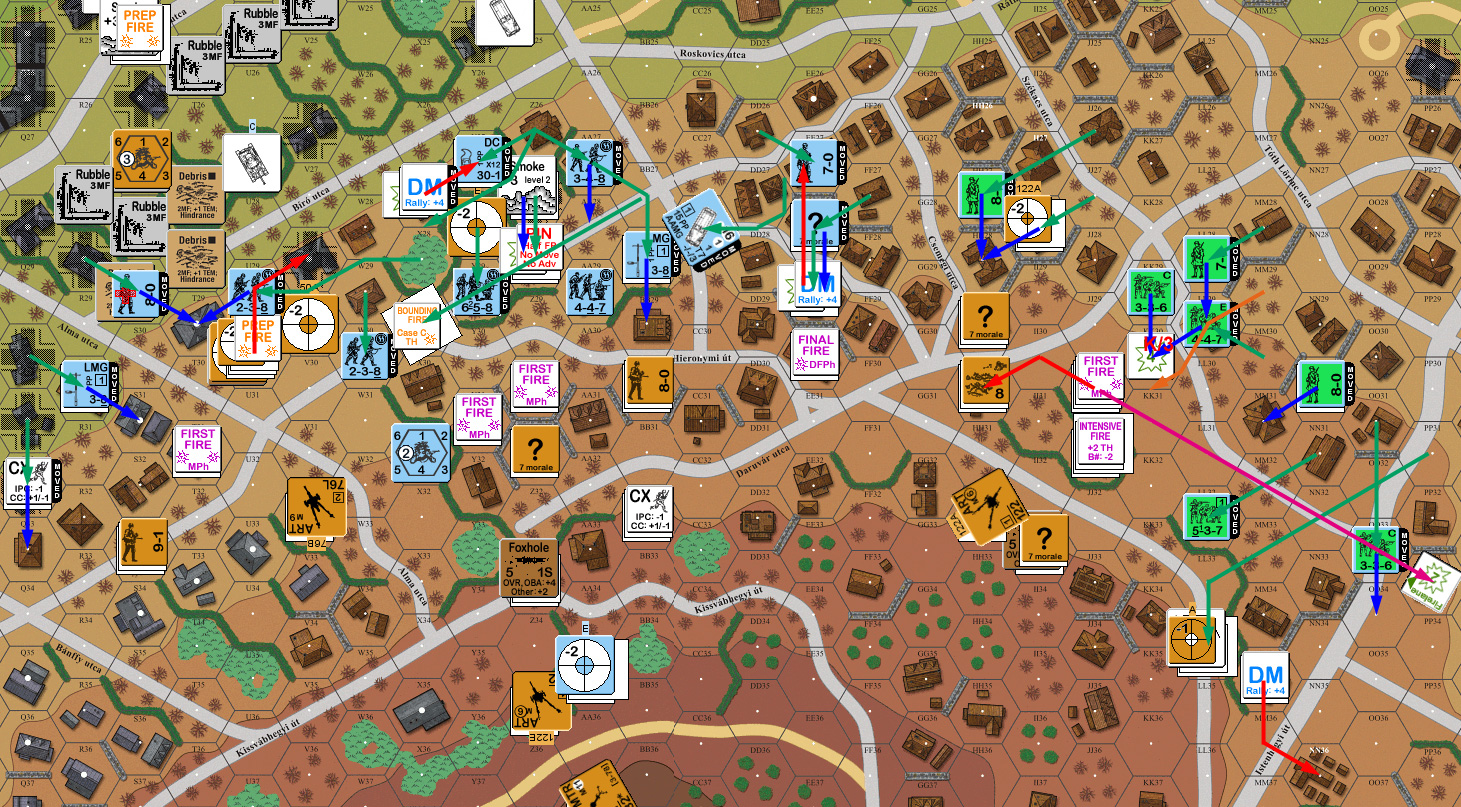
Patch tried to get his south flank back for 1st MMC self-rally, but failed, but did get his squad in HH30 back. I got one out of three squads back, which wasn’t bad with them all under DM. Patch lead off with his efforts to save his two 76mm Guns. In the north, the ART bounced two APCR rounds off the Pz IV (thankfully, he hit the hull both times), and the southern one bounced two shots off the side of the hill, malfunctioning on the IF shot. However, the rest of his Guns wounded my 8-0 a second time, broke the HS with him, and broke the just-rallied PSK squad.
My defensive fire scored no results other than malfunctioning a LMG and putting the Panther under Low Ammo. Patch pulled back, and was now relying more and more on the level 5 crest line for his defense.
Situation, Russian Turn 5.
The PSK squad rallied again (9 broken morale does wonders for that…), and both of the other two squads from last turn rallied, leaving the HS and wounded leader in T29. Patch was unable to repair his Gun, or rally his wounded leader. The Panther malfunctioned its MA in prep, but the HMG broke his squad in Y31.
I was really unhappy with the situation I found the Pz IV in, and messed it up again. I probably should have Smoked the 76mm for Prep, but tried to do that as BFF (not legal, drat), and then started it in reverse to get out of there, when a third APCR round penetrated to burn the tank. I tried starting the halftrack to move it up, but a MTR SHOCKed it. I managed to move up fairly well in the center, but couldn’t do much on the flanks, as there just wasn’t enough available to get out of trouble if things went bad. Patch seemed surprised when I didn’t go after the MMG squad, but there was just too much firepower there, and I was still trying to flank the position.
Worse, the south was falling apart anyway. Patch broke one squad as it tried to advance on the hill, and took out another in DFPh (ELRing to conscript). The only thing between the Russians and the rally point in NN33 was the Zrinyi II. To make it worse, the 537 squad in GG29 suffered Ammo Shortage to reduce to 336 conscripts (and since the 537 had Assault Fire, this really hurt).
Situation, Axis Turn 6.
Patch rolled a ‘2’ for Wind Change, and a breeze started from the northeast. Patch eliminated his Gun, while the Panther repaired its MA and the HT recovered, along with the wounded leader, but the Hungarian section was still in trouble. Patch smoked the Panther again, and got a 1KIA to kill the Hungarian squad in LL30, and broke a squad in CC31 while starting a flame there. Though he did finally realize that one of his light MTRs had been firing illegally. It was entrenched behind a hillside hedge (instead of being at the lower level), which would block LOS for the crew, but neither of us had caught it.
After prepping most of the line, Patch sent the crew of the ex-Gun towards the broken Hungarian squads, but I got a K/2 to kill them. During DFPh the Zrinyi II shelled the MMG squad and missed, but it helped convince them to pull out. Patch could have given me troubles with control of building MM38, but decided to pull the broken squad out in hopes of rallying it someday.
Situation, Russian Turn 6.
I got most of my units back for rally, including the malfunctioned LMG, but only one of the two Hungarian squads (the conscripts, ironically). Patch was unable to get anything on either of his rallies. Prep was limited to one shot, which pinned a LMG squad.
With as much in place as I was going to get, I rushed forward in an effort to take out his northern 76mm, while assaulting the HMG squad (U33) and his brokie (W34). Everything broke, except for the PSK squad, who survived a FL PTC, FL 1MC, and a 4MC Critical Hit from the Gun. Sadly, Patch’s Sniper went off during that and killed my wounded leader. During DFPh, the Gun malfunctioned on IF, his 122mm hit for a 3MC which the squad survived, and Patch’s Sniper went off again to CR the broken squad in T32.
During this I actually got a squad onto level 5 in BB32, but it broke in DFPh. Patch also broke a 337 as it advanced and killed Hungarian elite squad+7-0 during DF, leaving only two unbroken Hungarian squads, one of which was the one out beyond his flank. Other than that, I had kept an eye on what I had where, and was still in good shape defensively, but for the first time, I couldn’t really cycle my brokies to leaders well.
With the Gun out of commission, Patch self-broke the crew and they ran back to his waiting leader.
Situation, German Turn 7.
Patch rallied his squad in W34 and I managed to get two and a half squads back, but wounded a leader on a ’12’ self-rally. Patch’s first shot was the ATR, which burned the halftrack. With the casualties last turn, his CVP had crept up to the point where that put him at 33, and got him the win.
Postscript:
Since we started our playtest, the scenario has seen several revisions. The length has dropped from 9.5 to 7.5 turns (right where Patch got his victory). The CVP limit has dropped from 32 to 30. The Russians have gained a HS (but one squad has been Deployed), a LMG, an ATR and a DC. The Germans have lost both Pz IVs, but gained a Panther, and the Hungarians have lost their armor leader. The initial rubbleing is restricted to level 3 hexes and higher, so the area that Patch knocked down is no longer eligible. And the Russian Guns and SW cannot be eliminated by repair drs.
Personally, I was having a hard time of it with the longer version. It should be possible to go faster than I did, but the attrition would be horrendous. As it was, I had not achieved any of the objectives, and probably would not have gotten anything other than the level 5 buildings if there was no CVP cap. That said, I was having major problems with the nature of the scenario. I never could figure out how to deal with all the artillery that Patch had. Trying to find places to park my vehicles where they couldn’t reach was taking up the bulk of my mental energy for the last half of the game, and I never could find anything as secure as I wanted. At the end of the game, I was starting to make good progress in the center, which was frustrating, since I’d spent the entire time trying to get at the flanks.
Apparently, I’m the only person to actually capture the MM38 building, and it is no longer part of the stone building victory condition.
Patch had some comments when we finished:
“The Soviets are extremely thin. If anything goes wrong in their line they’re screwed. I set up an up-front defense with the intent of getting as many OG shots as I could, falling back steadily. I could not get a good placement with a gun in the center, so left it exposed and held my breath. Rindis never pushed there with armor after the FT ht died until the end. It was definitely a nailbiter for me, as I could not risk losing anyone. The dice were with me, though, and I took out the Panther (immobilized by a Mtr), the SPW251/21, and the FT ht very early. The SS side of the board took casualties and slowed, allowing me to maintain control of the Rath Gyorgy street area longer than I had expected. The defense of V32 (anchored by a 76Art) to CC29 ridge fell quickly, but stiffened at the next ridge where I held to game end.”
“Oddly the Hungarians, despite taking a pasting on turns 1-2, broke my lines. I gambled with some units in the NN31 cluster of buildings and lost (this is where we discovered the CVP error, and I thought I was far closer to game end than I was). When they fell, all of the level 4 hexes to the board edge were open, and James pushed the SP Gun and several squads into the NN33 buildings and the SP Gun to LL34. I lost the 76 Art in JJ31, but a 122 Art in HH32 kept the Hungarian movements limited. I managed to solidify here from JJ33 to HH30, and several key breaks on turns 6-7 really hurt the Hungarians. They could have caused more trouble, but my lines were collapsing, making reinforcement of this flank easier, and I was prepared to push the Hungarians back to avoid the 9 building on Level 5 VC.”
“I used a lot of Smoke on the immobilized Panther and nasty German strongpoints to good effect. James was never able to get smoke into play. He pushed and maneuvered to good effect, but at times when I expected him to push, he didn’t, but he managed to get into a strong position in Y32-EE30 late game. I think the losses he took with the Guns made him a little cautious, and I don’t blame him. The 122s rubbled a building, and the mortars set one on fire. The Mtrs got on several nice rate tears to good effect.”
“The 82mm Mtrs took out 2 halftracks, the ATR 1, and a Sniper the 4th. They are very vulnerable if someone can get a LOS to them. Once they moved into the line, they didn’t last more than a turn.”
“Boresighting rarely came into play. James just didn’t hit the hexes I predicted, or I had more valuable targets elsewhere. I also misunderstood the orchard LOS hindrance rules, and thought I had much better LOS than I did for my Guns, so their placement could have been better. Boresighting wold have been good to deal with some of those LOS issues. Also, though I tried the “let’s close off the SS entry area” tactics with rubble, I think I should have tried to reduce some of those upper level locations, and clear out some LOS obstacles for the Guns on the heights.”
“I like the idea of shortening the game, as the time pressure is sorely needed. I think that would let the Soviets shorten their lines a little (keep pickets up front to keep the Germans honest), and use the difficulty of the snowy hills to slow the advance. A little more Soviet light AT weaponry is also good. I over-committed against the SS, and when the Hungarians were successful I had nothing to really deal with the SP Gun.”
Discussion ¬