
A38 North Bank
Patch and I finally finished up our tour of the A’91 Market Garden scenarios in December 2009…:
Last week me and Patch started the last of the Market-Garden scenarios from Annual ’91. Thankfully, we have the errata from FKaC, since it’s not very balanced in the original.
I’m playing the Germans, who are trying to drive the British away from their remaining foothold near the Arnhem bridge, and the river. I have 7 SS squads, good leadership, two Tiger IIs, and seven turns. The Brits have 4 squads, better leadership, a Hero, a 57mm ATG, and Ammunition shortage. Oh, and thanks to the errata, 8 OB-given ‘?’ (and I enter on turn one, so everyone else gets freebies), and I don’t know who has his 3 PIATs until he uses them. Four AT weapons, none of which can penetrate the front armor, but since I don’t know where they are, a back, or at least flank, shot is probably going to come up sooner or later. At least I know the PIATs can’t be where he isn’t.
Patch set up a loose perimeter at the north edge, with a couple of high observation posts. Not liking the open west terrain for entry, I went for the east half with the hopes of driving a wedge into the 21U6 building area. The Brit 10-3 turned out to be in one of the high posts (of course) and managed to break my 9-2 and a squad shortly after entry, also pinning a second squad. Naturally, the Brit 9-2 was in the other high location (which my eyes seem to have skipped over), who then pinned the 7-0 and a squad.
Thankfully, that was all the mischief he was able to accomplish, while I got a lucky PTC on 21Z8, and revealed it to be dummies.

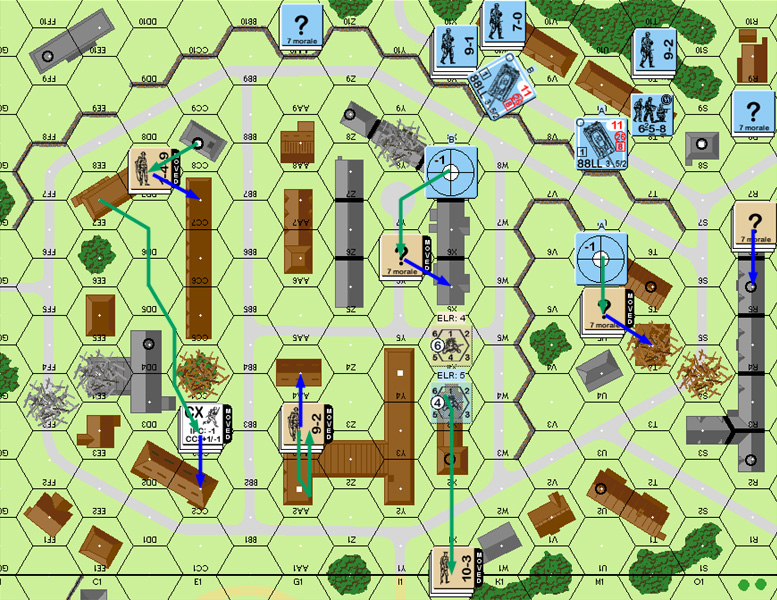
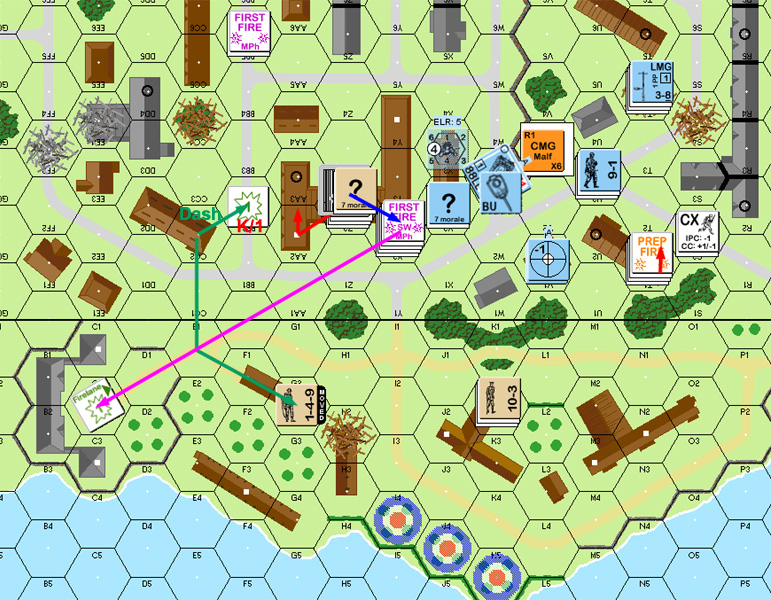
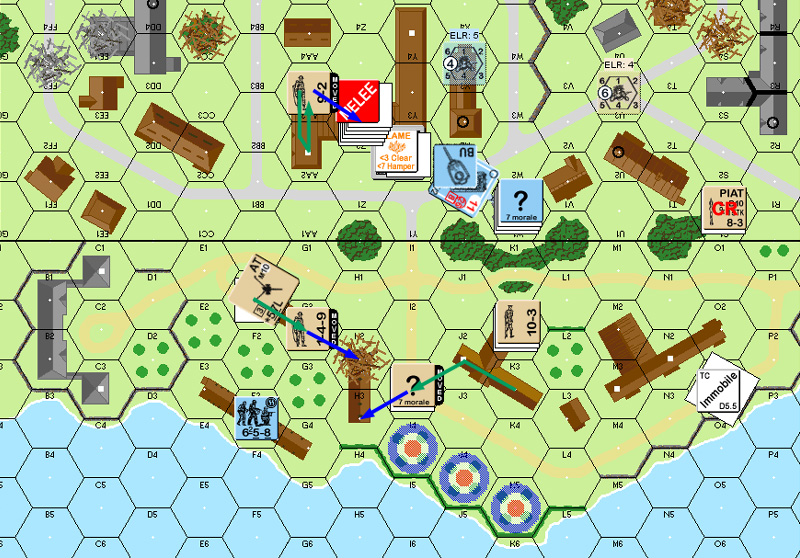
Situation, German Turn 1 DFPh.
Luckily, I rallied the 9-2 and squad on British turn 1. If I’d known that would happen, I’d have kept them on the front line….
Patch pulled back further, and more thoroughly than I initially expected. He’s often very aggressive on the defense, and I was expecting some repositioning to a second line, and some skulking. However, the only thing that stayed in place was R6 on the extreme east edge (other than pulling back one hex in APh).
We also had our first real incident of someone playing with the setup while online. It could still be someone trying to figure out how to use VASL, but still…. Good thing I log everything. Restoring to a good state was easy.
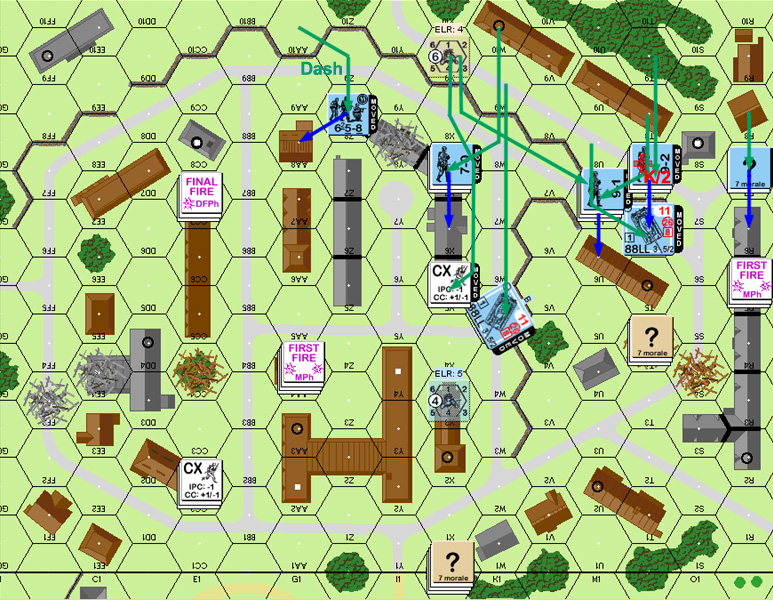
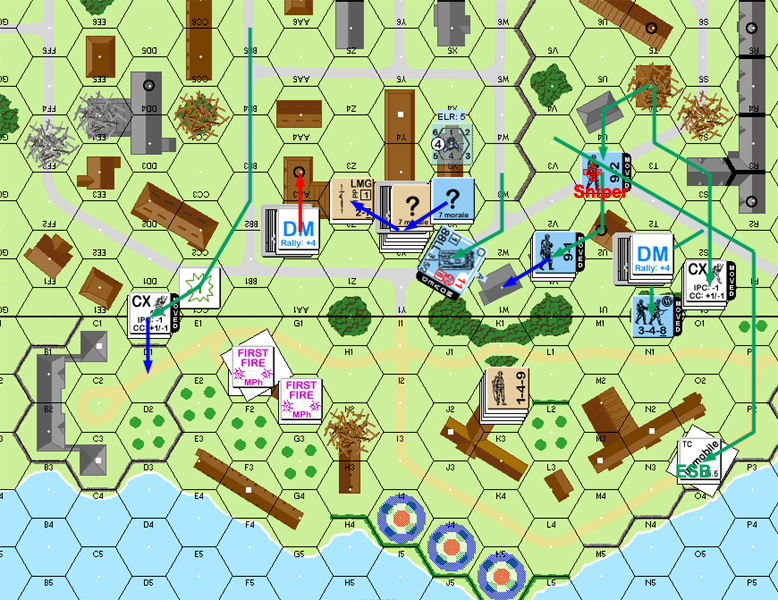
Situation, British Turn 1 DFPh.
Looking at things, I realized that I knew where a fair chunk of Patch’s OB was. In fact, of the three stacks directly in my path, two had to be dummies. By the math, the two in X5 had to be dummies. That left figuring whether R5 or T4 was. Since R5 had stayed in full view of a good chunk of the OB, including a Tiger II with it in CA, I figured that that was probably the dummy, rather than them risking being discovered and cut off. I tested this with a couple moves with good LOS, and decent targets. Specifically, I moved a 7-0 stack at the limit of normal range, presenting him with a 6 -2 shot, which he didn’t take.
After that, I figured that R5 was pretty unlikely. I then sent a single squad into X5 and confirmed that it was dummies. I then AMed R8 into R7, in Open Ground and in LOS of T4, the best shot he was likely to see this turn. The fact that he did not react, nor force ‘?’ loss, worried me, but I figured that Patch wasn’t going to let me off that easily. There was only one way I’d ever know for sure. I moved the 9-2 in T9 up.
Of course, I’d been wrong, and Patch had a 9-1 and 648 in R5. I paid for the wrong guess with a K/2 that Yatsee’d to wound the 9-1 and reduce the squad, though they didn’t break. I moved up a Tiger II to range 2 to lock down his fire while the 9-1 moved up behind to U7. Patch had a PIAT in there (of course), but missed on a DI attempt. My return fire malfunctioned the MA.
T_T
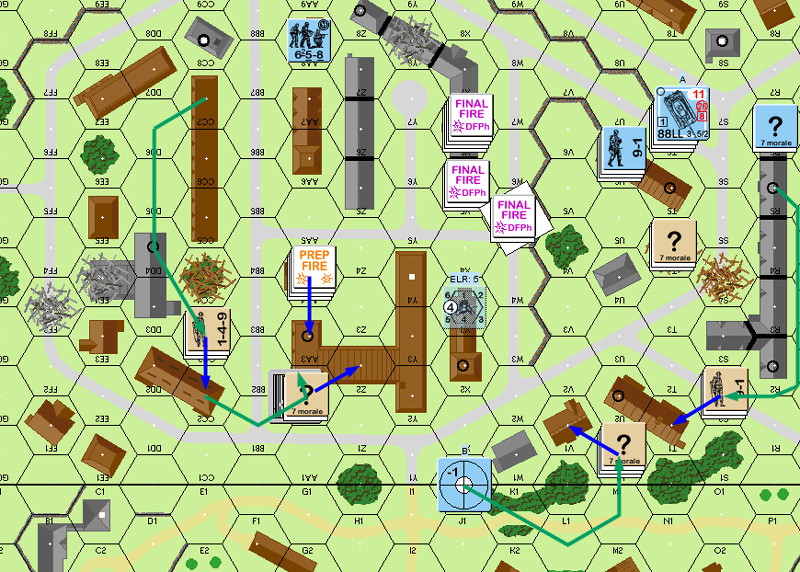
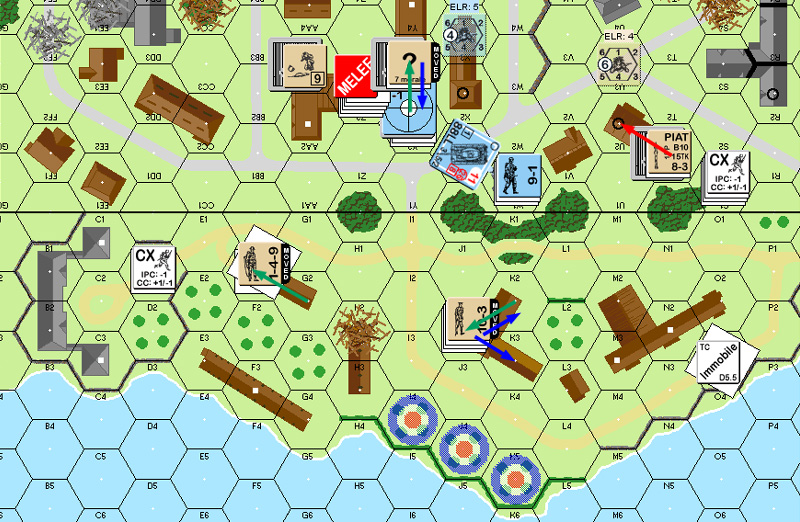
Situation, German Turn 2 DFPh.
UK Set up
“Oh, this isn’t a very happy looking scenario. Outnumbered, facing SS in stone terrain backed by very good leadership, and two King Tigers. This is gonna be tough. Thankfully, the 63-100 Pro-German ROAR rating has been addressed in errata, but I’m not certain how much of an effect it will have. The additional dummies will buy me a turn, and the hidden PIATs are a true asset, but I do like the forum suggestions to shave a turn off the game. Sadly, MMP apparently didn’t.”
“Everything I’ve seen in this campaign thus far has stressed outnumbered defenders and a fallback defense, and in just about every scenario the fall back defense hasn’t gone well. The defense was flanked in Tettau’s Attack, Lash Out, Guards Attack, and Oy Veghel. Obviously, Rindis and I have a lot to learn about this tactic.”
“I need to buy time and force Rindis to move slowly, so I gotta set stuff up front. It’s too soon to say what’s everywhere, but I string units across the front line to limit a turn 1 advance, and I put my best leaders upstairs to see over the wall. The 9-2, LMG, and a 648 go in 21AA2h2, and the 10-3, LMG, and 648 go into 21Z3h1. Though a better spot, I’m not happy about 21Y4h2 as a location as I fear getting nailed when trying to withdraw. If Rindis moves heavily along the east edge, 21S8 can hammer the stairwell or 21Y3. Perhaps I should place more trust in the 10-3, but I sure didn’t do well with one in Hill 621 (broke twice from 4(+1) attacks).”
“I’m thinking Rindis will enter along the west side. Sure, more open for infantry, but there is the wall, and there’s more maneuverability for the Tigers. I’m trying to keep a sharp eye out for retreat paths, but I’ve always had a difficult time thinking 1-2 turns ahead so I’m not sure how my defense will warp as the game progresses. I have hopes that a SAN of 6 will be a real thorn in Rindis’ side.”
German Turn 1
“Rindis comes in heavily to the east. Not what I wanted, but I can react to it. I get fire into T8 and W10, but only break a 9-2 and a squad, and pin others. I suppose a Pin is good, but I’d like to see more flipped counters out there. Both Tigers move along the wall, covering the front units and R6. Rindis pegs Z8 as a dummy in Advancing Fire.”
UK Turn 1
“All the Germans rally. They’re out of position, so no big deal, and I expected them to Rally in German Turn 2 at the latest, so it’s not really affecting this turn. I have some Prep opportunities, with a 4(-1) against a squad in T8 or a 2(+0) against a 9-1 and two squads in X9, but I just do not like the odds of doing anything, and that Tiger in U8 can easily pivot and start targeting me in X3. Hmm… maybe I should have fired the 10-3, and advanced downstairs.”
“At any rate, everyone moved. CC8 skulked, EE7 moved to the backfield as there’s just no one over there, X8 and U6 fall back, and I abandon the upper floors, with the 10-3 moving back to X0 to ensure that, even with a bad Turn 2, I have someone along the board edge close to the victory hexes. R6 stays put, which confused the hell out of Rindis.”
“I’ve not dealt with rowhouses in ages, and I got caught with my pants down in R6. I can’t move out of there without exposing myself to fire at the vertex, and R8 most definitely can see the vertex behind the buildings. I can’t vacate without getting nailed with a FFMO shot. But, as I’m concealed in stone terrain, lifting my concealment isn’t going to be easy. By some quick calcs, even if Rindis fires everyone who can see R6, I have a 54% chance of remaining concealed (and better odds of remaining unbroken). If I move, I lose concealment and face a 6(-1). Um, ow. There’s a bonus here, as Rindis watched my shuffles and decides that, since R6 stayed, it’s a dummy stack. He only fires two units against it to no effect.”
“In Advance, I retreat to R5. For Turn 2 I can cover some of the north/south roads, but not enough of them. Rindis is going to get further ahead than I’d like this turn, but there’s not a lot I can do.”
German Turn 2
“Rindis skips Prep and moves. A dash from AA10 to Z8 meets fire, but I fail to get a result. Rindis moves a 7-0 and squad across the S6-Z9 road, which I ignore. I have my eye on the 9-2 stack. If I’m going to fire, it’s going to be against someone who matters. Rindis gets cute and charges X5, revealing to as a dummy stack. AA5 fires at it, for no effect. R8 advances to R7 and I keep my mouth shut, so Rindis is on the fence about R6, but he goes ahead and moves the 9-2 and squad up into T7 and gets hit with a K/2 for his troubles from a 9-1 and 648 in R6. Both the leader and squad suffer, but the leader survives his wound. Still, knocking back a 9-2 to a wounded 8-1 is BIG at these odds.”
“A Tiger moves up to W5, and a second moves up to T7. I reveal a PIAT in R6 and take a DI shot. It’s equal odds for an effective hit, but a CH hull hit on a non-DI shot is still a 4 TK#, whereas a DI will automatically shut the tank down. I roll a 6 and miss.”
“Rindis focuses attention on R6 in Advancing Fire. I survive a 12(+3) from his infantry, and the Tiger malfunction his MA with a 12. Oh yes. Oh yes! :D”
“Next turn I need to reform a line. Rindis is about where I thought he’d be on turn 2, but he’ll be further ahead on turn 3. That’s going to hurt.”
British turn 2 started very well, with the malfunctioned MA immediately repairing.
Patch preped with AA4, who pinned a squad. He then reshuffled the defenses, trying to block my route south and pulling back the west-edge troops with a new concentration in the 21AA3 building. My fire was ineffective, and broke the CMG on the other Tiger II to boot.
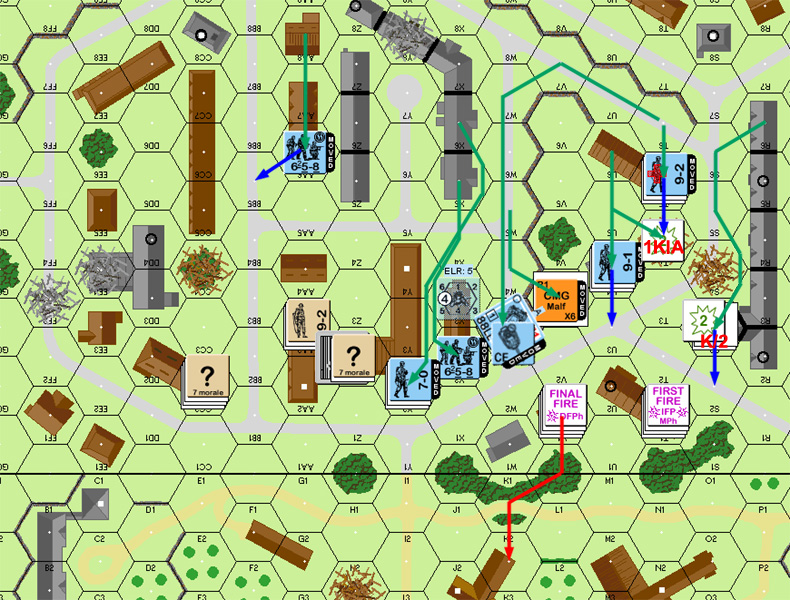
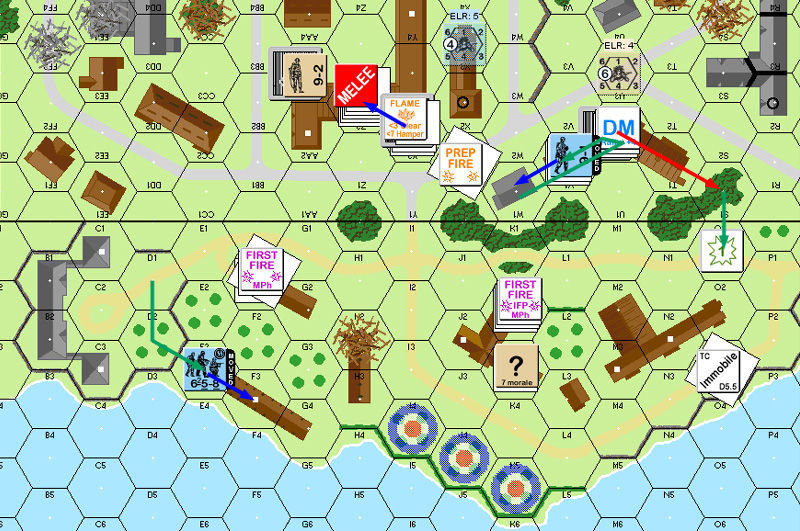
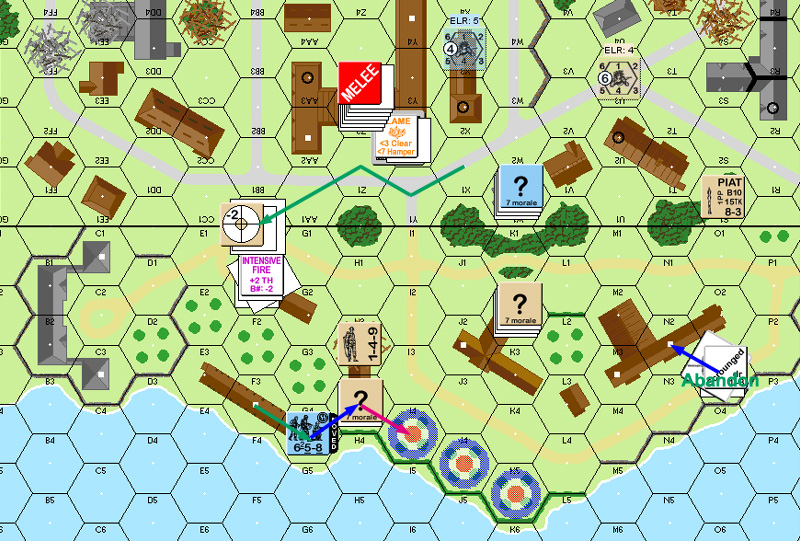
Situation, British Turn 2, end of DFPh.
My turn started off not so good. I pressed down to the street facing the new British positions, where he immediately killed a squad and a half. I moved a Tiger to V3, which at least kept the 10-3 from firing at any anyone else beyond 2 hexes. I keep forgetting about the restrictions on the number of times you can go BU/CE, and the need for the Tiger in T6 to make some time to get out of the dead end, presented him with what will probably be one of the only CE shots he’s going to get. Thankfully, he rolled high on that one. I then moved into X2/Y2 to protect the flank of the advance instead of just letting him take potshots from that building.
In AFPh, I pinned the leader and broke the squad in T1, which he declined to rout. Looking at the amount of firepower across the way (3 squads and both Tiger IIs), he self broke the squad in 21V1 and routed away with the 10-3 to 8K2.
I took advantage of all this by moving up. I figure T1 had less than a 50% chance to rally, and he’ll have to stay under DM as I have a HS adjacent. If he does rally, he can either move off, or take shots from the two guys he doesn’t shoot at. My west flank squad was out of LOS, but can interfere with CC2’s attempt to get back in the fight. Both U3 and Y2 had shots across his path of movement.
Situation, German Turn 3, end of MPh.
UK Turn 2
“Hokay, the King Tiger’s MA came back right away. Not a good start. Would rather have seen a nice Recall there.”
“AA4 Preps against X6 with the hopes of breaking a squad and the 7-0. The leader would be nice, as that would inhibit some Rally (assuming I can break these dang SS). I pull everyone back in movement. CC7 moves back to CC3, and then CC2 (a mistake, I should have gone to BB2, then an advance into BB1 or AA2). 21X0 vacates the sights of a Tiger and moves to V1. With lots of bypass, R5 extricates himself from the rowhouses and heads down to T1. CC2 moves to AA2, then heads upstairs. T4 sits tight. I figure Rindis may fire at it, and I’m hoping for a favorable sniper roll.”
“In Defensive Fire X5 and X6 gang up on AA4, to no effect. The Tiger in W5 takes a potshot with his CMG, and gets a ’12’ for a result. Rindis ignores T4, as I had expected. One can dream.”
German Turn 3
“Rindis does not get his CMG back, a nice, but small, bonus. Everyone moves, and things aren’t that good for me. I should have taken a better look at what Rindis could do in his next turn, and his push down to X2 cuts my forces in half. I roll a k/2 against a squad in S3, and a 1KIA vs a squad in T4, but don’t break anyone else. I get a SubFF shot against a Tiger in W3 with the 10-3, but on a 4(-1) I roll a ‘9’ for no effect.”
“In Advancing Fire Rindis Pins my 9-1 in T1 and breaks the squad. V1 is seriously in trouble, and I’m not sure I can get out without taking a shot from a Tiger. I voluntarily break to my next line of defense in 8K2. I don’t like 21T1’s rout chances. There’s only T0 or S1 as targets, and I can’t get the squad to a blind hex. Plus, with the Pinned leader, I can’t rout with him. Next turn, they can easily be captured. There’s a 41% chance of rallying in place, so I take a chance and leave him behind.”
“21CC2 is now seriously cut off. I just hadn’t realized how open the west board divide is, and I can’t clear out of there without taking a shot or two. Or three, if Rindis is feeling lucky.”
Against my hopes, but with my expectations, the squad in 21T1 rallies on Patch’s turn. The squad in 8K2 doesn’t, but there’s nothing I can do about it this turn, and he’ll be back on anything other than a ’12’ next time. Usually, I have most of my guys scattered about broken at this point in an attack, but that hasn’t happened this time. The combination of high morale, and a low number of defenders really helps.
T1 goes for the squad and 9-1 in the street, and rolls high, with me passing the resulting PTC easily. He moves up the group in AA3, looming menacingly as I wait to see what CC2 is going to do. The Hero goes across to the 8F1 building, passing a MC as I put down a FL. The squad Dashes across the street towards AA3, but dies to a K/1 and a ’12’ on the 1MC.
In DFPh, I hit Z2 with the squad (just the LMG fired on the Hero), and break his 9-2. The squad passes, but then Pins on the LLTC. I fire on T1, and the resulting 1MC kills the leader and reduces the squad when they both roll ’12’s.
I know Patch is failing PMCs at this point. I can’t blame him. (Especially rough, as I had run riot with the dice against him the day before playing C&C:A.)
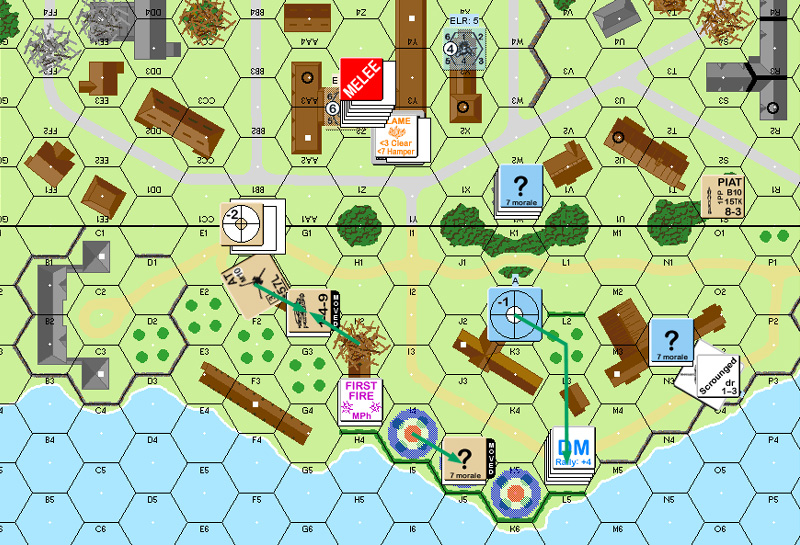
Situation, British Turn 3, end of MPh.
Patch’s luck takes a turn in the other direction, and the squad in 8K2 rolls a ‘2’, going Fanatic, and generating a Hero.
With a 10-3, that’s a -4 mod before anything else. No thanks, not stupid, not expendable, not going in LOS.
With a concealed leader in 21Y2, and a backup squad in X2, I decide to devote myself to getting rid of Z2. There’s a decent chance of a PIAT in there, and I can’t move the Tigers up on that flank without him getting a back shot. I hold back the LMG to put the 9-2 back under DM. While that works, I malf the LMG, and don’t get any result against Z2.
Meanwhile I move the infantry up on both flanks, the 9-1 and one Tiger move to engage his concealed unit in 21Y2h1. The other one moves beyond the flank and into range of the Victory hexes. Two things trip me up here. First, I forget that this is only Turn 4 of 7 (older, longer, scenario, and things are going smoothly). Second, the previous turn makes me overconfident. I declare ESB to try to get an extra hex closer and then stop, and end up Immobilized. I also finally find his ATG (8F1) when the crew fires on a moving unit.
The group in 8K2 promptly vaporizes the only HS in LOS, with a 2KIA. Z2 gets a PTC, which sets off his Sniper, killing my wounded leader.
I move in on Z2. With a concealed leader helping, I’ve got good odds to Ambush, and he’s at 1:2 against me. Indeed, I get Ambush, but fail to connect, as does he, leaving us locked in Melee. I wasn’t entirely happy with the odds on that CC, but I still figure it was the best chance I had of cleaning up that side. The backup squad moves into Y2 in case anything should go wrong.
Situation, German Turn 4, end of MPh.
British Turn 3
“21T1 makes a comeback and rallies, but the 648 in 8K2… doesn’t? Guess the tea hasn’t brewed yet.”
“There’s the opportunity to run with 21T1, but there’s Germans in the open. That’s hard to resist. 21U3 is the biggest threat, and I’m willing to gamble with the 6+3 from S2 assuming I break U3. Unfortunately, I get a NE on the 8(-1) vs U3. Not good news. I assault move the 9-2 and LMG squad into Z2 with the hope of breaking Y2 with a 6(+0) in Advancing fire and stabilizing the center. I also hope to draw some fire from Y2, freeing CC2 to make a run for it, but Y2 is silent.”
“21CC2 needs to get to the backfield. I send the hero first, hoping to draw the most fire, but forgot about firelanes. Rindis only fires the LMG to set the firelane. The Hero makes it to 8G2, but I don’t like the FL odds since the squad is still there as well, so I try a dash to AA3. Rindis gets a k/1 result, but I roll a ’12’ on the MC killing the squad. As happy as I was about the recent German casualty total, this hurts.”
“In Final Fire 21U3 retaliates against T1, scores a 1MC, and the leader rolls a 12, fails the wound roll, the squad also breaks, then fails the LLMC to reduce. Fire from Y2 vs A2 breaks my 9-2. >.< I’m now down 1.5 squads out of only 4.”
“In Rout the 9-2 goes to AA2h1, and T1 goes to T1h1. I don’t sent T1 back, as I’d expect him to be captured next turn. I Advance a concealed 228 with a PIAT (still unknown to Rindis) into 21Y2h1 to try and cover the street in front of the buildings, and offer some interdiction against a Tiger. Sadly, the PIAT elevation prohibitions will work against me.”
German Turn 4
“Better luck in 8K2 this year. I rally the 648 with a ‘2’, sending the squad fanatic and generating a hero. I’m a little ‘meh’ about fanaticism, but I love the hero. I need units to cover frontage, and a 1FP is better than no FP.”
“Rindis tries to hammer Z2, fails, but does get the 9-2 under DM at the expense of an LMG. I guess I should have gone to AA3, dammit.”
“Rindis moves aggressively on the flanks. He’s not used to things going well, and gets a little cocky. A tiger moves around the backfield but immobilizes on an ESB as it tries to stop. Pyrrhic victory there, to be sure. Units flood along S1 to V1, and the second tiger moves to X1. the 658 in 21BB5 goes CX and makes a run to 21DD0. I reveal the ATG crew in 8F1 and fire IFP at it in CC1, miss, and for some reason don’t subFF against DD0.”
“In Final Fire Z2 tags Y2 with 16(+2), fails, but Rindis does generate a ‘1’ SAN result (only the second successful SAN of the game for me) which kills the wounded 9-2 in 21U3. 8K2 fires on the HS in 8N0 with an 8 (-3) and gets a 2KIA. Rindis is now down to 4.5 squads and two leaders.”
“In Rout, my 9-2 falls back to AA3h1. T1h1 stays put.”
“In Advance, Rindis moves into Z2 with a 658 and a concealed 7-0. He ambushes me, but neither of us can kill each other and we go into Melee.”
“Ok, things are bad. I have 2.5 squads left, only one is Good Order, and my right flank is completely open. The immobilized Tiger in 8O3 can see two of the three victory hexes, making that as a last-ditch defense rather difficult. I am horribly out of options to fire on multiple units if Rindis moves up. The good side, 8K2 is a nasty hex and there are still two missing PIATs. Having survived the initial CC, if I can get the 9-2 into there, things will improve.”
For his turn 4, Patch gets nothing, but I repair the malfunctioned CMG. He mostly skulked in movement. I was in a bit of a quandry, I really wanted to do something about his concealed unit up on level 1 of the Y2 building, but he could keep dodging back and forth to dodge Area ACQ, and if the Tiger turned his back, all he needed was two hexes of range for a good PIAT shot.
The CC in Y2 continued with no result
Situation, British Turn 4, end of MPh.
On my turn 6, Patch finally got his 9-2 back. Thankfully, he couldn’t interfere this turn. My Prep paid off, as a burst from the Tiger’s CMG & BMG got a PTC on Y2h1, stripping ‘?’ from the spare crew. A follow-up from the MA hit, and killed the crew with a 1KIA. Follow up rolls did not rubble the hex, nor destroy the PIAT they’d been holding (the fact that it was there made me feel a lot better about the amount of attention I had paid to it) but did start a flame.
I tried to advance on both flanks, but the HS in S1 was hit by a KIA from K2. My 9-1 took a small trip to force his HS with the PIAT under DM. The backup squad went into the CC in Z2. Sadly, Patch managed to CR him, while I continued to miss.
By this point, I figured I had one guy I could get into the Victory area easy. However, the VC says, ‘sole occupation of 8I4, 8J4 and 8K5′, which, as near as we can figure, means I have to be occupying all three at the same time. The other two units are going to be a trick. Part of the problem is figuring where the third PIAT was hiding. It was presumably either with the 10-3 or locked in Melee in 21Z1. Which it actually was was getting more important by the phase….
Situation, German Turn 5, end of MPh.
UK Turn 4
“My 9-2 fails to rally, as does the HS in 21T1h1. Rindis repairs his CMG, dang it, and I lose that edge should I need to CC the vehicle.”
“No Prep, and in movement I tried to reduce odds of Defensive Fire Damage. I considered an AM into 8K1 for a local counterattack, but I don’t trust even the 10-3 to handle a 16(+0) so I AM the 10-3, Hero, LMG, & 649, into 8J2 for a pot shot against 21Y2 in Advancing Fire, and 21Y2h1 skulks to the backfield. Defensive Fire is, as predicted, ineffective, and unfortunately so is my shot against 21Y2. I don’t know why Rindis didn’t pop a shot against 21AA3h1 with 8D2, but I’m thankful to be free of DM for the upcoming Rally. 21Y3h1 advances back into 21Y2h1, because there’s no LOS out of Y3, and I’m gambling on concealment saving my fanny. I feel the need to take a few risks now. The Hero leaves 8J2 to 8K3 to cover the backfield in case someone succeeds in an end run, and the 10-3 and 649 head back to 8K2 to watch the 1 hexrow road. In CC, both Rindis and I are unsuccessful and the melee continues. Honestly, what does it take to roll a 5 or less?”
German Turn 5
“My 9-2 rallies!”
“In 21Y2h1 I gambled, rolled the dice, and watched as the dice jumped off the table and nailed the croupier in the eye, resulting in my ejection from the casino and filing of assault charges. Rindis reveals the 228 with his Tiger’s MGs, then scores a 1KIA when the 88 sends an HE round in the window. No rubble, but the room does start smoldering with a PIAT in the wreckage. Two down.”
“A 348 makes an end run, and the 10-3 and squad nail it on a 6 (-5). 21W1 moves to keep my broken HS in 21U2h1 under DM, but does not otherwise advance. He really can’t until the Tiger moves closer. The 10-3 is lethal against those woods with an 8(-2) against anyone moving south. 8D1 heads down to 8E3, as expected, though I was wondering if he’d AM to 8E2 for a try at the ATG which is why the Hero is in there. In Rout, I send the HS to 21S1, where I think he’ll be safer (ha!). 21Y2 advances into the melee, making it 2:1 against me. However, I CR the incoming squad, so it’s back down to 3:2, and my 9-2 will be joining the fray shortly, making it 1:1 for him, and 1:2(-2) for me!”
“Things are looking bad, but there’s still hope. I have little left, but then, so does Rindis. I really need to win that Melee to have a decent chance. That 10-3 is a problem, but if Rindis wins the melee he can move adjacent, then rush everyone past with me limited by SubFF range restrictions (and with ammo shortage I can’t lay a fire lane to cut off such an attempt). A lucky shot with the ATG or 3rd PIAT on the Tiger would be nice. I wonder where it is…”
Patch, without a lot of resources left, makes excellent use of what he does have on his turn 5. Sadly, I’m thinking of the wrong thing, and I let him go without a shot. Namely, the 9-2 shifts over to the stairwell in 21AA2, goes to the ground floor and then out of LOS in AA3. If I hadn’t blanked on what was going on, I should have made a 8 +0 shot at him in AA2h1 from W1. For some reason I think he has to be headed towards the ATG and Hero, and will need to cross the street, instead of joining the Melee in Z2. (Which is really odd, because I knew the 9-2 was trouble for the Melee when he rallied the previous turn.)
Meanwhile, both British Heroes start shifting around, and I can’t really do much about it. At least my DF from W1 does eliminate the broken HS/PIAT in S1. It’s the wrong problem to solve, but at least it is solved.
For the CC, Patch attacks my squad and attached leader at 1:1 -2 and blows it with a ’12’. I’m at something of a loss. With that -2 leader, he has the edge in the CC, if I withdraw, I fire first, and a 16 +2 might be just what I need. But he has the morale and leadership edge on me even so. If I can keep them in Melee, they don’t matter; if not, I must do something about them, and there may be a PIAT behind me if bring the Tiger to bear. Well, I have to roll low in CC at some point, right?
Not this time: 7 for NE.
Situation, British Turn 5, end of MPh.
Needing mobile units to get into the victory area next turn, the crew in 8O3 Abandons their tank, disabling everything as they go (and failing to scrounge a MG). My squad on the bank contemplates an Infantry OVR of the Hero in H3, but there’s no big rush to get out of the heavy cover. No one else can arrive until next turn anyway. The remaining Tiger maneuvers to get a good LOS on 8K2 and J2. If I can force the 10-2 away from there, the squad and leader in 21W1 has a much better chance of getting to the victory area. Patch misses with the ATG, but nails a DI Intensive Fire shot. I now have no mobile Tigers.
I always tend to overlook the possibility of Deliberate Immobilization.
Worse luck for me, the Hero in H3 gets Ambush and withdraws out to I4. The Melee in Z2 continues with an ’11’ and ’10’.
Situation, German Turn 6, end of MPh.
Patch positioned for the final turn charge, with the 10-3 and Fanatic squad attempting to move into the the victory area. Even if I survived everything, I’d have to take him in CC for the win. However, fire from H3 got a Pin on the leader, and broke the squad. Then the Tiger MA got a hit on G2 where the crew and other Hero had gathered. A RS yahtzee on a K/3 killed both.
That had me breathing a lot easier. The only things left for Patch were the Melee and the Hero in J4. However, there were still two problems. While the Fanatic squad was technically in OG, they were beyond normal range of my crew, and were sheltered by the Orchard from H3 and stayed in place with the leader. And, the Melee finally came to an end. Patch, in desperation, went 1:2 against everything and got a ‘2’, wining the Melee and creating a new 8-0 leader.
Situation, British Turn 6, end of MPh.
Naturally, the Fanatic squad rallied in place with the 10-3’s help.
With four mobile units and the need to occupy three hexes, there wasn’t much for it. The squad in the south moved in and tried to cover with smoke grenades and failed (and got pinned by the Hero for his trouble). The crew moved in, walking around the British, hoping to tie up British fire, and took a 1KIA in K4. And then I CXed the W1 force into Infantry OVR with his Hero. Or tried to, the Hero fired for a 1MC (both passed), and then the 10-3 and squad fired for a K/2, which nailed the HS and pinned the leader.
With too little left to win, that was the end of the game.
Ironically, I probably would have done it if I hadn’t abandoned the Tiger (would have forced his squad to rout). I certainly would have done a lot better if I hadn’t gotten greedy with that ESB in the first place.
UK Turn 5
“No Prep. My 9-2 shuffles downstairs to AA3h0, drawing no fire, to my surprise. I think Rindis thought I was going to cross the street, but there’s far more to be done here than over there. The Hero in 8F1 AMs to G2 to try to cut off the SS squad in F3, and is joined by the second Hero, who maintains concealment in an AM to I3. I maintain the 10-3 stack in K2 to continue covering the 1 hexrow road.”
“In Defensive Fire Rindis kills the broken HS in 21S1. The flame in 21Y2h1 fails to increase to a blaze, and I advance the 9-2 into the melee, and the drama there continues as both Rindis and I continue to fail to kill each other, even with my 1:1 (-2) attempt against his 7-0 and squad. Just how big is this building anyway?”
German Turn 6
“Rindis skips Prep, and AMs his 658 in F3 to G4, and moves the Tiger up to 8F0 to duel with the ATG. I have to change CA to fire and miss, but an IF DI shot nails the tank, the crew passing their TC with a ‘2’. Rindis finally abandons the tank in O3, and fails to bring any MGs with him. Advancing Fire has no effect, the flame continues to smolder, and the 658 in G4 advances to H3, but my Hero ambushes him and I bail to I4. In 21Z2, the melee still goes unresolved. (If you want to see another melee this bad, go look at our Primosole Bridge campaign where I couldn’t kill Italians with 648s.)”
UK Turn 6
“My last turn to set a defensive position. Things are looking pretty good. With the last Tiger gone, Rindis will have to deal with my 10-3 with infantry. If I can get him into K5, that will be tough to crack. I abandoned the ATG and AM the crew to G2, where they are joined with the Hero from H2. I just do not want to remain next to the 658 in H2. I4 AMs to J4, for a possible advance into the 10-3’s hex. The 10-3 stack heads to L4, where fire from the 658 pins(!) the 10-3, and breaks(!!) the 649. Gah! The Tiger takes aim at G2, hits, scores a k/3, and boxcars on the RS DR kills the Hero and crew, revealing the final PIAT. It was with the Hero all along. In Advancing Fire the flame still won’t spread, and I think the Dutch were using sprinkler protection systems long before anyone suspected. With no one in normal range and me not in OG to the 658, (the crew’s advance to N2 saving my fanny), I remain in place with my broken 649. I leave the Hero in J4 for a little buffer. In CC, I go for it all on a 1:2(-2), and roll snakes! An 8-0 is created, but even with a 1:2(+0) I kill the 7-0, 658, and 348. Rindis fires back with a 1:1 and fails. I now have a very nice reserve in the front lines – a 9-2, 648, and LMG that has most of the I road covered. I don’t see how Rindis can pull this one out.”
German Turn 7
“The 10-3 rallies the 649, so there’s firepower everywhere, lead by some very impressive modifiers. Rindis has to rush. 8H3 moved to I4, was Pinned by the Hero in J4, and failed in his smoke placement to J3. The crew in N2 made a run for K5, but dies in K4 on a 12(-5). 21W1 was all that’s left, and makes a go for J4. The Hero fires at J3, CRing the 658, and L4 subFFs, killing the 348 with another k/ result. Rindis concedes.”
Aftermath
“Yow! I so did not think I had this one. The lost of my line when 21T1 fell, losing me the 9-1 and control of the flank had me deeply worried. If Rindis hadn’t gone for ESB and immobilized the Tiger, I would have been in serious trouble, and would have been forced to make a go at it with the 10-3.”
“I kept the PIAT away from the 10-3 and 9-2 and their lovely modifiers as I was keeping them both well back to interdict from upper levels. I wanted the PIATs on the front line where they could intercept Tigers early if the opportunity arose, and so placed them in 21EE9 (149,PIAT), 21CC8 (648,LMG, PIAT), and 21R6 (9-1, 648, LMG, PIAT). I was certain Rindis would come along the west side where there was more room for the Tigers, and so had the ATG in 8F1, facing F0:G1 to cover the BB road. That all went to hell when Rindis entered in the east and I couldn’t redeploy effectively.”
“Rindis’s loss of the 9-2 was a big score for me, and definitely gave me an edge. That, and killing two squads in the Z2 melee, were big scores for me, and the eventual loss of both tanks turned the game around. You need the Tigers to counter the British leadership modifiers, and if you can get the 9-2 and 10-3 in the K2/M2 buildings the woods become very hazardous for an assault path.”
“My SAN of 6 was a dud. It activated only 3 times, killing the wounded 9-2, and Pinning a 658 and a 348 in the Z2 melee, falling far short of the 1 in 3 strike odds ( I figure I was short 3 activations).”
“Despite the win, this still feels pro-German. The Tigers have real killing power against the careless player (killed two crews and a Hero). You need to need to be careful with them, but DI shots with PIATs are still difficult. The early loss of the German 9-2 makes it hard to judge, but the German infantry was very effective, and I was lucky in whittling them down the way I did. Rindis lost about a squad a turn over the game, which made final victory close to impossible to achieve as he didn’t have the units left.”
“I’m hoping this replay of the Arnhem series encourages some other gamers to give it a go, as I’d like to see how others fare.”
IKerensky commented:
“Thanks to both of you for this nice AAR, very interesting, well written and illustrated :)”
No problem, glad to be of service.
I’ll echo Patch’s comments. The two Tiger IIs are a large part of what makes this scenario. They’re immune from some very punishing British leadership modifiers, and if I hadn’t squandered one of them, I would have had this. At least these days I can usually point at what I did wrong, instead of some early games where I could never figure out what I was supposed to do different.
Hard to say what the balance here is. The original version is quite obviously pro-German, and I think that one of the things that went wrong early for Patch is that I got a fairly good handle where his real units were early on, allowing me to ignore a couple of dummy stacks, somewhat negating the OB-given ‘?’ of the revision. With how small the British force is, I’m not sure that this is avoidable. The hidden PIATs is a great SSR, and adds a lot of uncertainty.
An interesting note, is that almost nothing of mine broke in this game. I had two breaks on the first turn, and after that anything that happened was a kill. I’m used to seeing the shattered remnants of my assaults scattered around the board. Of course the steady winnowing down of my force was a major problem. In general though, the initial plan went very well, mostly because it hit Patch where he wasn’t expecting.
CC very rarely goes well for me, and the big (non-)fight this game just drives home the lesson. As a couple of turns long, one-squad-on-one fight, it would be fine enough (no matter which way it went), but it kept going, ate the reserve, and lasted right up to the point where I could no longer do anything about the results.
Reading this was a whole lot more fun than playing it. I was a nervous wreck this game!
Just finished playing this scenario and pulled off a last turn win for the Germans. I really like this scenario but agree it is pro German but not by much especially with a British player who knows what they are doing.
Immobilizing the tanks is crucial as I managed to park my Tiger on a Victory hex who broke two stacks of British units in the second last turn enabling me to scurry across the street. I am playing the British next and plan to use the 10-3 plus crew and hero plus 9-2 as Deliberate immobilization specialists.
With the -3 remembering the +2 for advancing fire, +5 for DI, +2 for motion -2 for target size its a 7 or below at PBR. Even better if you can get an adjacent defensive fire shot. Of course hitting the hull usually ruins your plans.
Ideally you need immobile them well away from the Victory hexes. It is tempting to either place the AT gun in Victory hex I4 or use it for DI attempts around the J1 area. Stopping the 10-3 from covering the final assault is next to impossible so you must have enough squads to deploy to soak up the punishment.
All in all the is great combined arms scenario for beginners and veterans alike. If you took a gamble and put the hero with the 10-3 you would have a formidable -4 DI machine. Finally as the British I would expect the German to strike down the right of he map, it is the shortest route and has the best cover.