
A33 Tettau’s Attack
Continuing our tour of Market-Garden, Patch and I went to the second scenario in June 2009…:
This one may be very short….
Patch and I have played this one FtF before, but I can’t really remember anything of it. But, it’s the second scenario in the A’91 Market-Garden set which we’re going through, so here we are again. I lost last time as the Brits when Patch managed to nail my feet to the floor at get past me. So this time I’m the Germans.
Both of us look at this one and wonder just how the British are supposed to win, with the German advantage in numbers, and 11 turns to exit a mere 3 EVP.
Poor German dice look to help a lot.
I set up with a couple of sacrificial squad and a half groups on either flank. Their main job was to keep him honest as he’d have to make sure both board edges were adequately covered or risk one group getting through and beelining for the exit. The rest clumped near the center, looking to see a way forward. Patch put the 9-2 and MMG in the center of the village at Q4, with a backup force nearby and more off to the north in S7/R6.
His first shot was the MMG at my northern flankers, and broke the MMG on a ’12’.
Past that, he spent time developing his flanks.
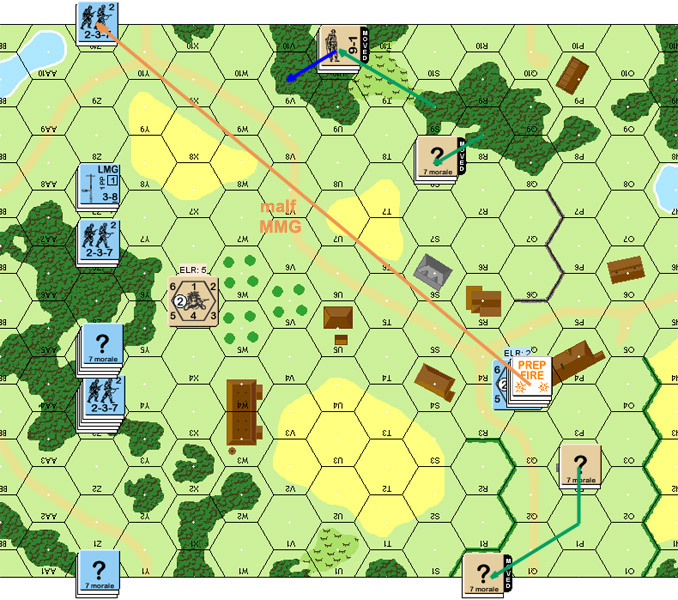
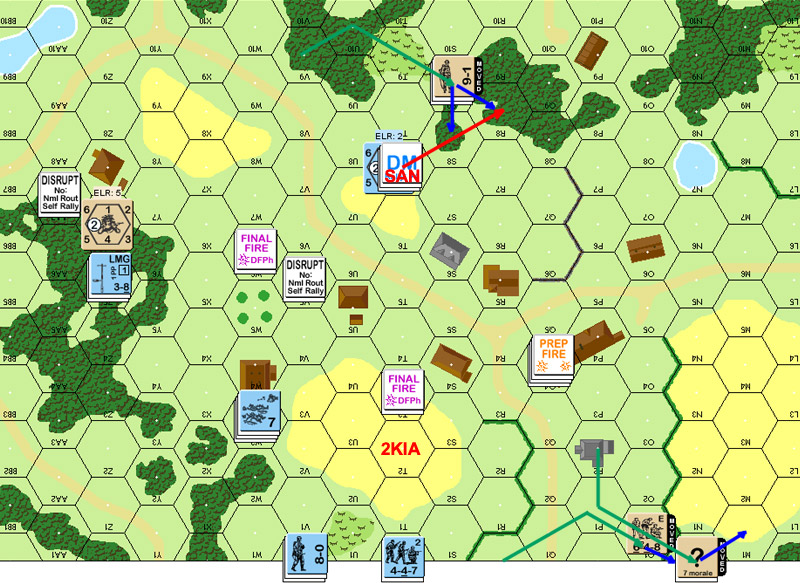
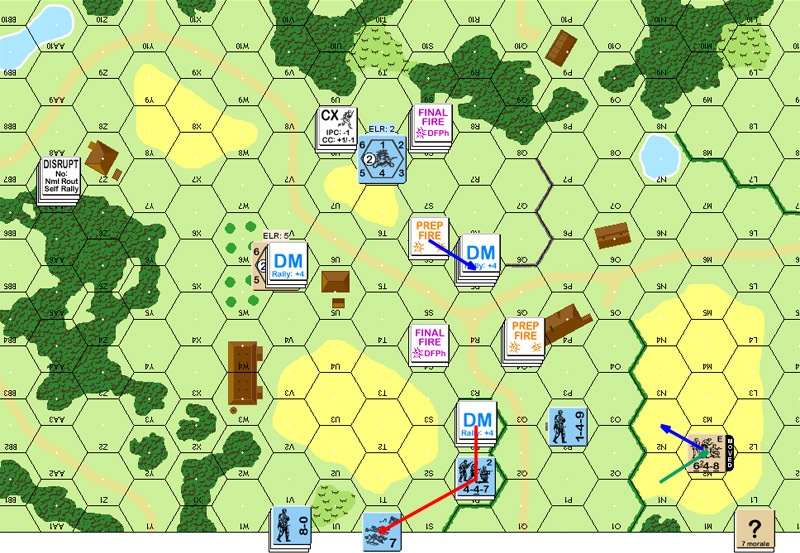
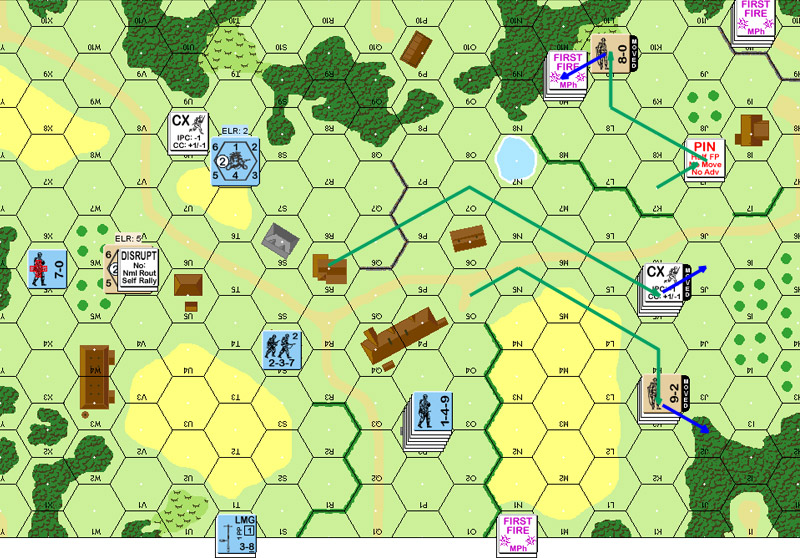
Situation, DFPh, British turn 1.
My movement started out fine, other than a HS eating a 2KIA, but that’s what he’s for. Then Patch nailed the north flank. The squad that started out all the way to the north broke, and being a conscript squad, disrupted. The 7-0, squad and LMG meant to really hold that flank down broke, with the squad being reduced on a ’12’. Then, on a later shot, I rolled a ‘2’, and Patch’s sniper activated and wounded the 7-0.
Holding together that flank could get complicated….
And after surviving the rest of his First Fire, he got a 1KIA in DFPh to kill another squad and it’s LMG.
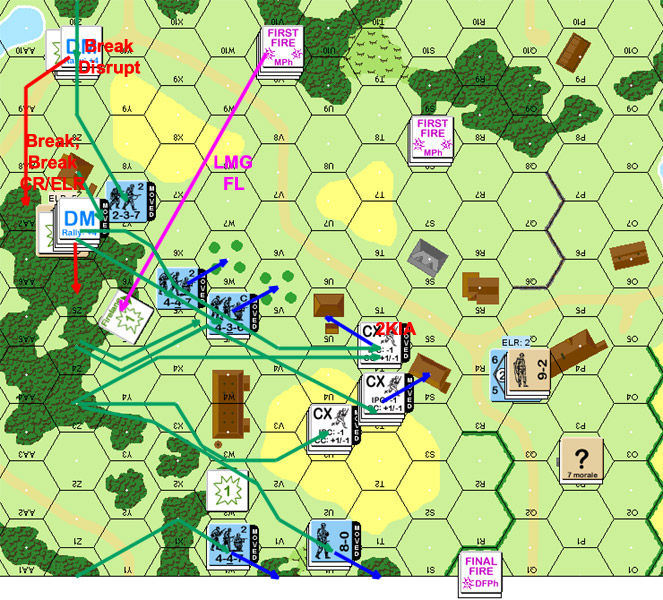
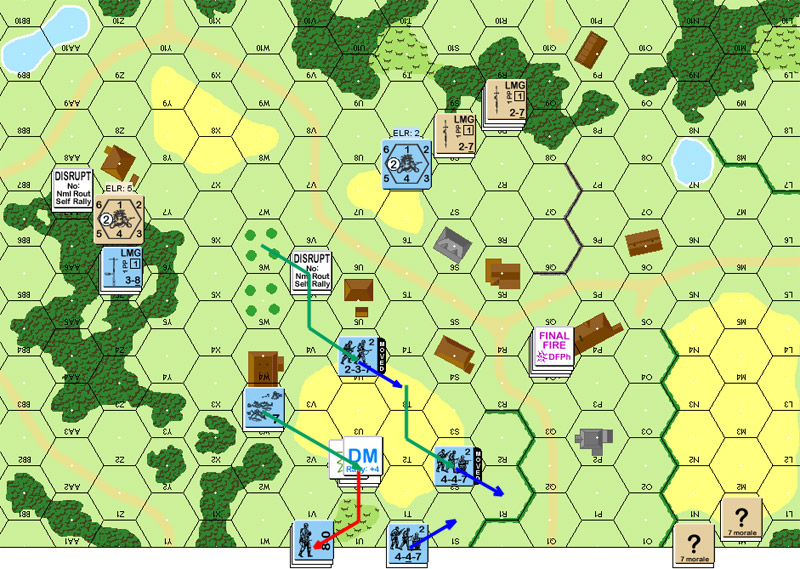
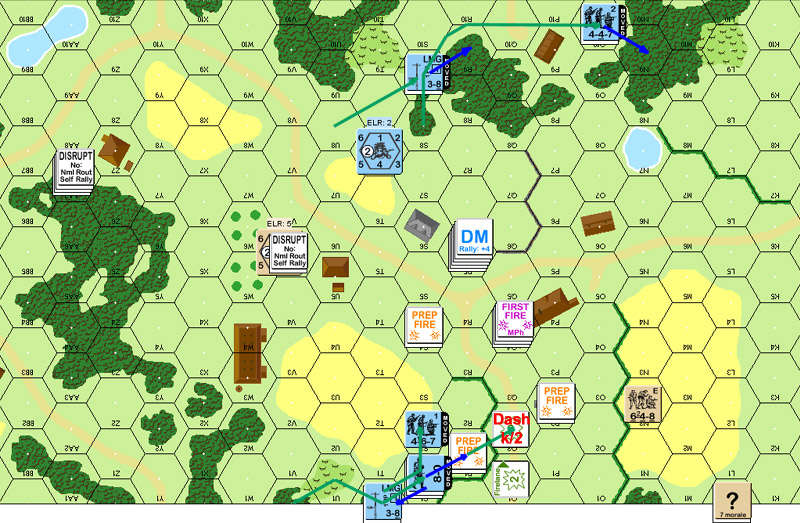
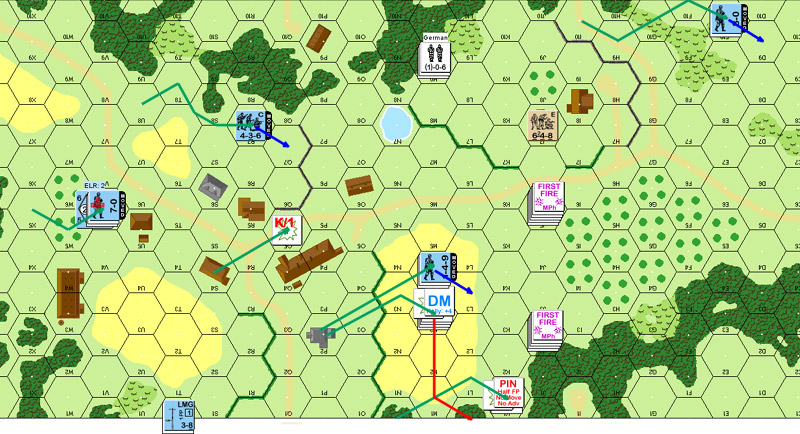
Situation, end of MPh, German turn 1.
The second turn started poorly with Patch getting his MMG back, and went downhill from there. He actually prepped everything he had (except the unit at P2, which has to be his 8-0), and got some sort of result on every shot. My lowest roll was a 5, and my average was 9.75, with three 11s and a 12 in there. At the end of it, I had 2 squads, 2 HS, and my 8-0 intact. The ELR of 2 is being very punishing with quality reductions all over the place, and my 8-1 leader reduced to an 8-0, eliminating the only negative modifier I had.
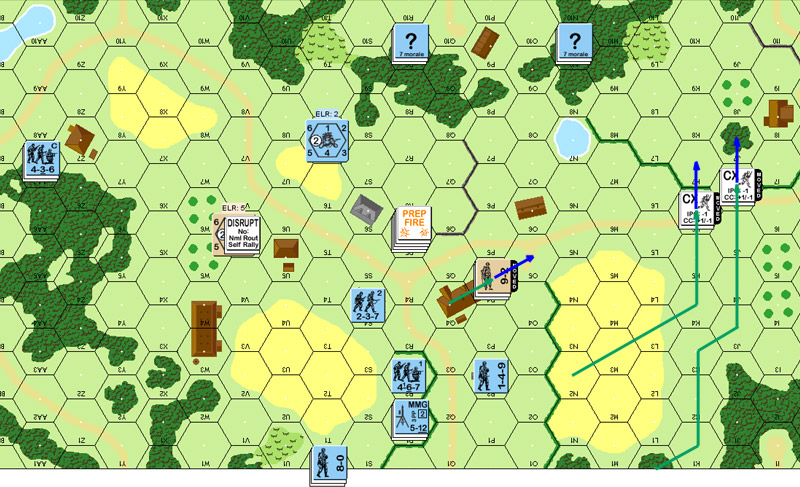
The disaster, British turn 2.
My plan no longer exists….
My turn 2 started no better, with nothing coming back in Rally. I was honestly getting worried that he’d just sweep me off the map. Since his line was quite strong on the north side, the only thing left to do was continue to press the south flank with what I had, while staying out of sight as much as possible.
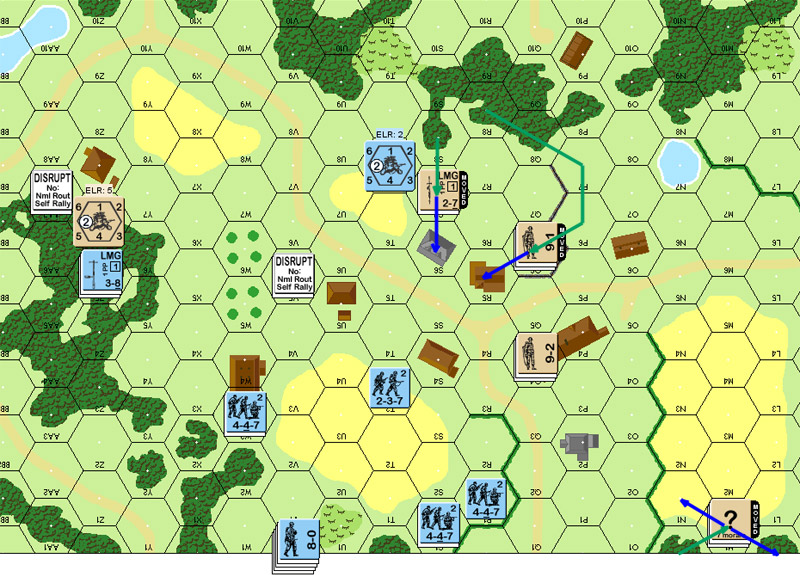
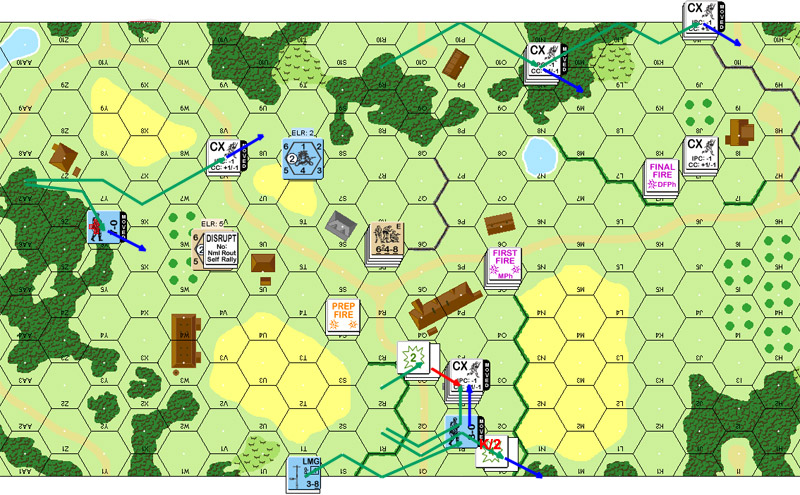
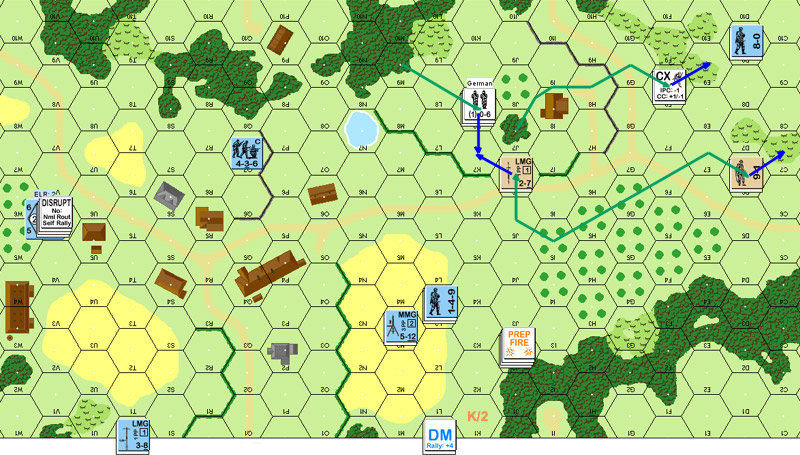
Situation, German Turn 2, DFPh.
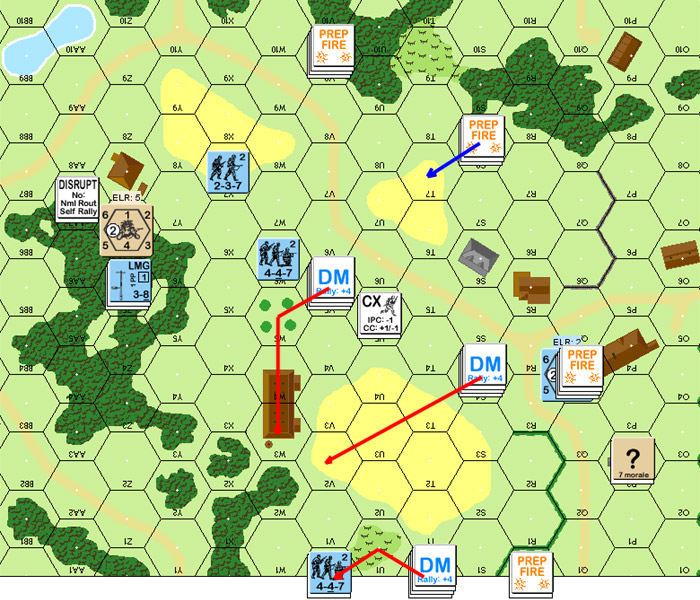
Patch’s next turn didn’t look much better with only my wounded 7-0 in Z5 rallying. He’d zapped me pretty hard last time, and now I had a total 3 1/2 squads to resist with. I was even wondering if he’d try to advance the north flank and try to get into the back field that was full of troops that were refusing to rally, and start causing DM/FtR.
The good news was that while his 9-2/MMG kill stack in Q4 eliminated another HS (on a 2KIA), it activated my Sniper, who promptly broke one of his squads. I was then quite surprised when he abandoned the R0/P2 positions. I was willing to try and overrun that area when I had about three squads to throw in, but now I was worried that I’d never have enough at any one time to take him.
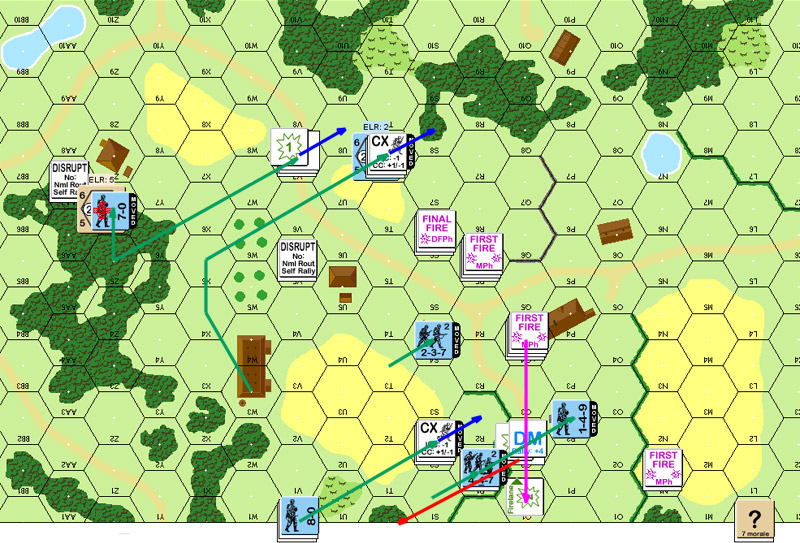
Situation, British Turn 3, DFPh.
On my turn, again most of my rallies failed, but at least the squad with the MMG came back. Of course he promptly broke again as I tried to move him up. At least he was able to rout to a rally point with an unbroken leader.
Situation, German Turn 3, DFPh.
Patch’s turn 4 finally gave me the break I was needing. The conscript HS back in Z5 actually rallied, the leader in W3 finally decided to rally, along with the squad there. That just left the squad and a half in V0. Sadly, Patch’s broken squad also rallied.
Other than that, the turn was very quiet, with no shots being made as Patch reshuffled his northern defense.
Situation, British Turn 4, DFPh.
My fourth turn opened ominously as while the conscript HS with LMG in V0 rallied, the squad with the MMG CRed to a HS.
However, I did have about as much force available as I was going to get. And I had noted that Patch’s defense had pulled away from the actual north edge of the board. Some of my recently-rallied troops were actually in that area. I figured if I could distract his fire with a further push to the south, I just might get them into the hole.
The first thing was to advance a HS into the building at S4. This wasn’t important enough to fire at, but he was a mere two hexes away from the bulk of Patch’s forces. I then raced the recovered HS in Z5 out—my other group had the requisite EVP to win by themselves, and chewing up his firepower was essential. As it was, a squad fired and broke it’s LMG, failing to affect the HS. I then Dashed a squad through the hedges towards the abandoned P2. If he made it, great, it was a stone building and a great thorn in his side (as well as a stepping stone towards exit). If not, he would hopefully attract firepower towards the wrong end of town.
It worked better than I ever expected. Q4 put down a FL, but only caused HoB which hardened them to 1st line and generated a Hero. N1 fired, but got no result. Finally, R5 fired and broke the squad, but didn’t touch the Hero.
That was more than good enough as now everyone had fired. Sadly, I hadn’t been expecting R5 to have fired, and I didn’t rethink my plotted move in time, so I didn’t get quite as far as I could have. At any rate, the final group did take a SFF shot that didn’t do anything.
Situation, German Turn 4, end of MPh.
Even better, Patch permanently lost the LMG in his RPh. He prepped with his northern units, hoping to break the dangerous part of my breakthrough (the squad and 8-0), and failed to get any effect before breaking a HS that had just advanced to the hedge-line with his kill stack.
Personally, I think he would have been better served by moving part of that force back around in front of me to try and stop my advance. Or at least force it to slow down a bunch. Of course, with the squad in S8, and the HS in S4, he could have had a dangerous time getting out of there. The solution would have been to fire with Q4 first (which is still too central to pull out of, and see if he could get some better freedom to move. As it was, he would have only pinned S4, which would still expose him to a 1FP -2 shot. Not an easy situation no matter how you slice it….
He could also have moved the south flank guard up to try and interdict the area I’d be going through, instead of merely skulking, but that would make things chancy in the south, and there’s too much terrain up there.
Things got worse for Patch when a lucky shot from S4 broke the squad in R5. His sniper activated, but only DMed a Disrupted squad.
Situation, British Turn 5, DFPh.
“Gads, there’s a lot to talk about.”
“I’ve done this scenario twice before. Both times were a blowout for the Germans. There’s simply too many units for the Brits to stop, and the Germans exited 3VP well ahead of schedule with little trouble (and I don’t care what ROAR says. This scenario sucks for the Brits). As I have the British this time around, I’m not looking forward to it.”
Set-up
“I’m looking to cut his advance option with fire lanes, as I’m so outnumbered I need to hit as many units as I can. I toy with deploying, but reject it as I think the HS will be too vulnerable. Instead, the 9-1, 648, and LMG go in S9 (to move to V9 to place a FL down the V hexrow), a 648 and LMG go in R8 with a goal of a FL into Y5, the 9-2, 648, and MMG go into Q4 to get a FL down to X0 and cause mayhem in general, and the remaining 648 and 8-0 go down in P2 so they can start concealed. My goal is to try and maintain good FL positions and fall back across the board.”
UK Turn 1
“Opportunity knocks with a nice LOS to units in Z10. I give it a go with the MMG to break some of his units along the northern edge, and lose the MMG in the process. Gah! >.< That’s bad. Other than that, I reshuffle as indicated earlier. The 648 in P2 moves to R0 to cover the wheatfeld.”
German Turn 1
“Here they come.”
“Rindis doesn’t like facing my units in V9 and cuts south, and promptly gets hammered. I break more units in Z6, leaving the north end in a shambles. To the south, absent the MMG still, there’s little I can do for any effect against the units shuffling in the wheatfield, an what I thought was a good LOS was blocked, burning the 9-2’s shot. Overall, not bad.”
UK Turn 2
“With 1.5 German squads down, my MMG back, and my position strong, I think I’m going to hold on a little longer before leapfrogging back. A heck of a decision, as I ravage Rindis’ troops, leaving more unbroken British troops on board than German. Woo! 😀 Since everyone fired, no one moves, and the turn is otherwise quiet. I advance a 648 and LMG into T7 to get a FL down the T column.”
German Turn 2
“Rindis continues shuffling south, and it looks like he’s making a hard attempt to push a path through the village. My fire is largely ineffective.”
UK Turn 3
“Prep fire nails another HS, but my 648 in T7 breaks under a SAN result. I have to move my 9-1 stack over to rally him now, which is annoying to say the least. I pull the 648 in R0 back, as he’s facing a 6(+1) himself, and I don’t want to lose him on a lucky shot. I avoid P2, as it’s too easy to get LOS to the OG hexes if I try to retreat. The biggest problem with defending in the town is it’s too easy to get trapped, and I wish to avoid that. The hedge feels more secure, and I can skulk as well.”
German Turn 3
“More of Rindis’ stuff shuffles south, and I just break the one unit. After the impressive Turn 2 result, I appear to have used up my luck.”
UK Turn 4
“I keep the 9-2 in the village, as he can still interdict the Q hexrow, so Q4 is the best spot for him at the moment. The 9-1 movers to R5 to support, and the 648 and LMG in S8 moves to S6. (This is what’s known as a Big Mistake.) I thought about T6 instead, but decided to take the stone building TEM as Rindis is slowly building up his FP. This movement out of the northern woods will be what costs me this game more than anything else.”
German Turn 4
“Lots of Rindis’ stuff rallies, which is annoying as the numbers are low enough they should have remained broken longer. He uses this opportunity to charge north, and I lack the LOS to do much when I realize just how bad that is for me (and break an LMG trying to stop it). He’s now behind me. Rindis dashes across the Q road into P2, and gets a HoB result which creates a hero and battle hardens a squad (more good news for me). Subsequent fire breaks the squad, but the hero is in an annoying position.”
UK Turn 5
“Decision time. Move or fire? My fears have been realized as I’m getting trapped in the town. I decide to fire and advance out of the R5/S6 buildings, which offers the best odds of survival (and may eliminate the nasty flanking units). I fire to no effect, but I do break a unit in R2. In Defensive Fire, Rindis rolls a ‘2’ on a 2FP +2 attack and breaks the squad in R5. Gah! Now I can’t advance out of those buildings, or I will lose the 648 due to FTR if Rindis continues to be cute. I have a 40% chance of rallying him, so I hope to have things up and running soon.”
“The bad news is since the break happened in Defensive Fire, I can’t react to the loss of the unit. It was a tough call whether or not to move the 648 in N1 to the backfield, but I was worried over how effective the dash into P2 appears, and I’ve not rolled well since Turn 2, so I decided to keep him a turn to support Q4 and leave the northern threat to the 9-1 and his two squads. Now, Rindis can make a run for it. In retrospect, I should have abandoned the broken squad.”
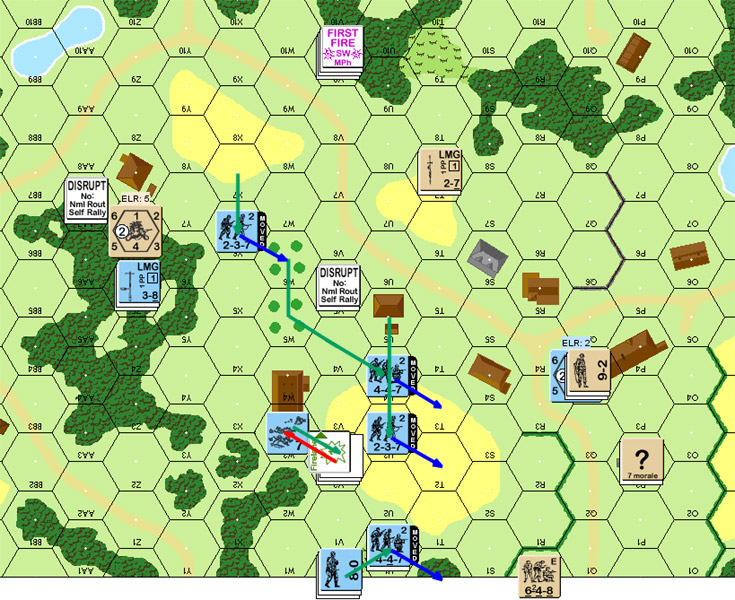
For my turn 5, the squad in T0 self-rallied, and the MMG HS in V0 rallied. Thankfully, the British squad in R5 did not. Naturally, my HS in S4 Prepped to put him under DM again. I also fired the squad in R1 across the way at N2, in case I should get lucky (nope). The Hero in P2, hoping someone else would catch up to him, also took a crack at him, but no luck.
The north-side forces ran through the woods as fast as they could, while a HS attempted a dash in P2, but without success.
Situation, German turn 5, end of MPh.
For turn 6, the only thing that rallied was my disrupted squad in AA7. Not immediately useful, but he could still move faster than the bulk of the fighting was.
The rest of the turn was quiet as the squad and leader covering the southern flank moved north to stop my breakthrough. To my surprise, Q4 didn’t merely skulk, but advanced out of the village into open ground in O5. Of course, I didn’t have much I could hit him with from there….
Situation, British turn 6, AFPh.
Sadly, Patch’s squad in R5 rallied. Not only was this a nice amount of FP to get back, but he’d been unwilling to leave him behind as it represented 1/4 of his manpower.
I continued through the north edge, managing to walk through a 1MC shot to get back into cover. In the south, I pressed forward, collecting more troops in P2, and getting a HS into N0, across the second hedgeline. Patch’s defense was springing several leaks.
Situation, German turn 6, end of MPh.
Patch had to think a bit for his next turn, and it was well worth the time; he put together an excellent plan, making use of the fact that my troops were shredded enough that I couldn’t take too many shots either.
First the 9-2/MMG stack moved around the wheat field and neatly covered the approach on the south flank. Then he moved his 8-0 up next to my trailing conscript HS on the north edge, keeping him from getting more than one shot off at the squad up there. The squad of course, got all the attention, and I just barely managed to pin him in J7, which meant he was blocked from getting any shots off at my victory stack.
In return, they managed to pin the HS in M9. So then the leader advanced into CC with them, for a 1:2 -2 capture attempt, with a 0/+3 chance of Ambush. Thankfully he rolled a 6, and I managed to avoid Ambush. However, it didn’t do much good as they surrendered as soon as he said “Hans hoch!” in a forceful tone.
Situation, British turn 7, DFPh.
Patch added insult to injury when the leader immediately recovered the LMG the HS had been using. I did at least get my broken squad in P2 back.
The bulk of the action was driving my main force through the hedge into the wheatfield, where he managed to break a leader. Meanwhile, the victory stack raced towards the edge, but it was clear that it was going to be all too vulnerable once his troops moved up again.
Situation, German turn 7, end of MPh.
Patch’s eighth turn mostly consisted of me watching as he raced to get shots on my fleeing north-side dash. I, of course, fired on him, but failed to get any real result out of it. He did manage to kill another HS that was sitting in the open during Prep.
Situation, British turn 8, DFPh.
Going into my turn, I was very tense. The 9-2 stack pretty much had me blocked in the south, there wasn’t much else left on the board (in fact I was down to 4 1/2 squads, including 1 1/2 broken ones), and my best shot at victory was going to take two -1 and two -3 shots before getting off board. Not promising, and with how unbalanced we generally consider this scenario, and how good my luck had been (I’d rolled a startling number of 3s during the last few turns), it was going to be really embarrassing to lose this one.
My rally went well, getting my leader in L0 and a HS in T0. Now, if I could only do something with them…. I started out by preping everything I could at J2. If I could get lucky enough, breaking that stack would give me one more real chance to win. A ‘2’ got me a 2MC (sadly, my MMG cowered), which broke the 9-2—but not the squad. Almost. And I didn’t really have the time to keep pounding on him before the rest of his troops came back and shut this attempt down.
So, on to the main event. I split up, moving the 8-0 leader first, which he let go. Against the squad he didn’t roll so well, getting a NMC and PTC, both of which I passed. In the next hex, the SFF generated a 1MC and NE. I barely avoided pinning on the MC, and that was the game.
I think the scenario is fairly interesting, since it must come down to a game of maneuver at one point or another. But despite my near loss here, I just do not understand why the record on ROAR is nearly as even as it is. 3 EVP in 11 turns seems amazingly generous, when one bad break can turn the entire British defense inside out.
At any rate, we’ll be continuing the Market-Garden series. Patch gets to attack this time as the Germans in A34 “Lash Out”.
RobZagnut pointed out:
“Broken units in V5 can’t rout to W4 then W3, because it would bring them closer to the enemy unit in R0.”
Now he tells us….
For once, a rout goof that Patch didn’t catch. He’s usually good at spotting those.
German Turn 5
“Rindis Prep Fired to no effect, then moved to great effect as he flanks my northern line. A HS tries a Dash across the Q column road to join the hero in P2, but dies under an 8 (-4) attack that lays out a firelane. Other German units move into position for the next turn.”
“I was surprised that the 236 + LMG advanced into R9. I had suspected that he would move to R9 instead, blocking the back door in case I decided to run after the flanking units.”
British Turn 6
“I fire at R2 to no effect with the stack in R5, as I want to try and break more of Rindis’ units. The problem I’m facing is I can’t go charging with everything I have to block the northern push, as then I’ll leave a hole that the southern units can exploit, and there’s still 6 turns left in this game. Rindis has all the time in the world to get off the board edge. My plan is to break R2, set up a blocking force in O5, then shuffle into J2 and the O6 area while a squad chases down the norther forces.”
“In movement I haul ass with the units in N2 and L0 to block the northern push. The 9-2 stack moves to O5 so I can lay a firelane down the O column next turn if Rindis pushes that far ahead again.”
German Turn 6
“My broken 648 is back on line, just in time.”
“The HS preps to no effect, and Rindis make a move towards the southern hedge. I CR a squad, but fail to break the HS, who makes it to N0. A squad breaks in Q3, while other units are content to hang out in the P2 area. Rindis Opportunity Fires the Hero, then combines fire with the new units in Advancing Fire, a nice move on his part as I’m in the open in O5. TO the north, where all the excitement is happening, Rindis takes a chance and succeeds in moving in the open in K10, pushing into I10. The 236 & LMG makes it to M9, covering a lot of open ground.”
British Turn 7
“Time to get daring. I had expected K10 to be a stumbling block for Rindis, and now I’m in a bigger hole. Noting that the 236 is CX, 1:2 CC odds doesn’t look so bad and so I throw the leader his way to hopefully draw fire, and maybe even take him out. Rindis doesn’t take the bait, and saves his fire for my 648 that tries to move to I8 (goal of H8 in Advance) and Pins him. Ow!”
“With that plan foiled, the 9-1 stack hauls to K5, and Rindis misses the opportunity of a 1FP (-2) shot in M6 from S4, but does give P2 vs N6 a go but misses. The 9-2 stack heads to J2, with the squad CX. I’m predicting Rindis will head for E10 as it offers the most cover. I will be heading into both the D7 and F8 brush masses next turn to intercept. The 9-2 stack will remain where it is to battle it out.”
“No Ambush in CC, but the leader does manage to capture the conscript hs! 😀 I claim the LMG in Rally.”
German Turn 8
“Rindis moves to E10 as expected. The N0 HS tries a board edge run through K0 and gets Pinned. Other units head through the wheat field, but it fails to offer enough cover and I break a leader. The offending S4 hs gets caught in the open in Q5 and dies on a k/1 result from my LMG in J5.”
British Turn 9
“Three turns left, and there’s still several threats. The first is the hs in K0, which threatens to turn the southern flank. Thankfully it dies under an 8FP (-1) attack. I move a 648 into E9, and the 9-1 and 648 (erred in not moving the damn LMG with this stack) to C7. I think those two are enough to handle the D9 Germans, so my other 648 moves to K7 with my leader to intercept the K column should fate befall my 9-2 stack.”
German Turn 9
“Prep Fire is near disastrous. Rindis fires on J2 and breaks my 9-2, but the 648 survives unscathed. On to movement!”
“Rindis moves his 8-0 first, but I let it go as it has the highest morale factor and I have a better chance of breaking the 447. However, a 6(-2), 6(-1), 2(-2) and 2(-1) fail to break the 447 and he exits for a German win.”
Comments
“This game ended on turn 9, which I think is the longest I’ve had this scenario go after three playings. Every time it’s the same result, with a German leader and squad finding a hole and the Brits just can’t intercept. I’m with Rindis on this one. I have no clue why this one rates in the British favor. I annihilated the German line early in the game, killed over half of his units, and he still pulled this one off. The scenario seems to demand perfect British play for a win, and I just don’t like playing scenarios like that. After three tries, this one is going back in the game box.”
“And congrats to Rindis for the win! It’s been overdue. :)”
burniefox cheered:
“Thanks for the fantastic AAR. I appreciate all the effort you guys put into putting these together, and look forward to the next one!”
“B-“
“Thanks! We do enjoy putting them out for folks to review.”
“We began A34, Lash Out, last night. Things are not going well for the Americans.”
Postscript:
I said it pretty well before: this scenario does have interest, as it has to be a game of maneuver at some point. But, it’s really hard to see how the British are to win this one, since they just don’t have enough to cover everything they have to, and conduct a fall-back defense, and as soon as the Germans get something through, it’s probably all over.
That said, after turn 2 the game was Patch’s to lose, and I still think he should have been aggressive and swept up the Z6 area. It takes a chance on things elsewhere, but he could have made sure that I never got back the troops that ended up exiting.
Also, this is an example why I really like doing the screenshots with all the arrows. This game had a lot of sweeping movement that would be hard to follow without it.
Discussion (2) ¬
The problem with a counterattack like that is it’s not what the scenario is designed around, and with as few units as I have, if it goes wrong I risk throwing the game away as I’ll have too little remaining to stop the German flood. Such a move was simply too big of a gamble in my mind.