
SH129 The Derelict
After finishing off a game of France ’40 Mark and I recently an SFB scenario, which featured far from expert play, but certainly taught some good lessons. We went with “The Derelict” from Module S2, as the more interesting looking of two Romulan scenarios for Y163. USS Hood finds the galactic survey cruiser (an expensive version of the heavy cruiser specially equipped for long-range exploration and survey) USS Marco Polo adrift, the entire crew having been killed by a disease.
Thankfully, a cure had been found just too late to save the crew, and personnel from the Hood are inoculated and moved over to Marco Polo, who start up the warp engines. And then a Romulan KR and K5R show up. Hood is at weapons status II, but Marco Polo is generating three power per engine (standard 15-box ones), which will go up one point per turn. Also, there’s two crew units and four boarding parties on board. This is not the minimum crew requirements, severely limiting what she can do. (There had been a distress call, so Hood has extra crew and boarding parties on board to man the Marco Polo.)
I had the Federation so Mark could try the KRs, and my two ships set up four hexes from each other, while the Romulans come in on the right map edge, which is only fourteen hexes away. Mark set up slightly further, and headed straight for Hood, going 21. Hood went 10, overloading three photons and with a wild weasel ready. Marco Polo was only generating 12 power (three on each engine plus full impulse and APR), and went speed 6. Not having a minimum crew means that one of the two crew units is on the bridge, controlling most primary functions (power generation, movement, shields, EW), and the second can be assigned to a systems box to make that box work. I didn’t have any good ideas for that, but I did energize the phaser capacitors.
The Romulans came in as a stack, and on impulse 10 Hood launched a shuttle as ‘fighter cover’. On 11, the Romulans fired all four plasma torpedoes. This isn’t quite the scary event this becomes later, but eighty points of plasma eight hexes away is more than intimidating enough. Classically, the worry is if they’re real or Memorex, with a smart Romulan probably doing three psuedos and one real (or not; you have to keep the opponent guessing). The really nasty play here is for them to all be real, but aimed at the Marco Polo. She can’t have a weasel ready, the Hood has to worry about them being on her (forcing her to weasel as they go by), and then get a head start on cruising around for the rearming cycle.
We got fairly straightforward tactics here. But I couldn’t know this, and I had some very tight timing as the Romulans came in behind the plasma. On 16, Hood turned in and declared emergency deceleration. On 17 Hood unloaded at range 4, hitting KR RIS Kestral with two 12-point photon torpedoes and another 15 damage on mixed phaser rolls. Only 29 registered, so the front shield held. On 18, the deceleration took effect, and the wild weasel was launched. On 19, the plasma torpedoes hit, and were all real, destroying it, and doing 46 damage, thanks to bad proximity rolls from all the ECM, which turned into 7 collateral damage, 5 of which registered on the #4 shield. Mark then fired the phaser-1s on both ships, but the explosion ECM kept the damage minimal, and the reinforcement from the emergency deceleration handled it all.
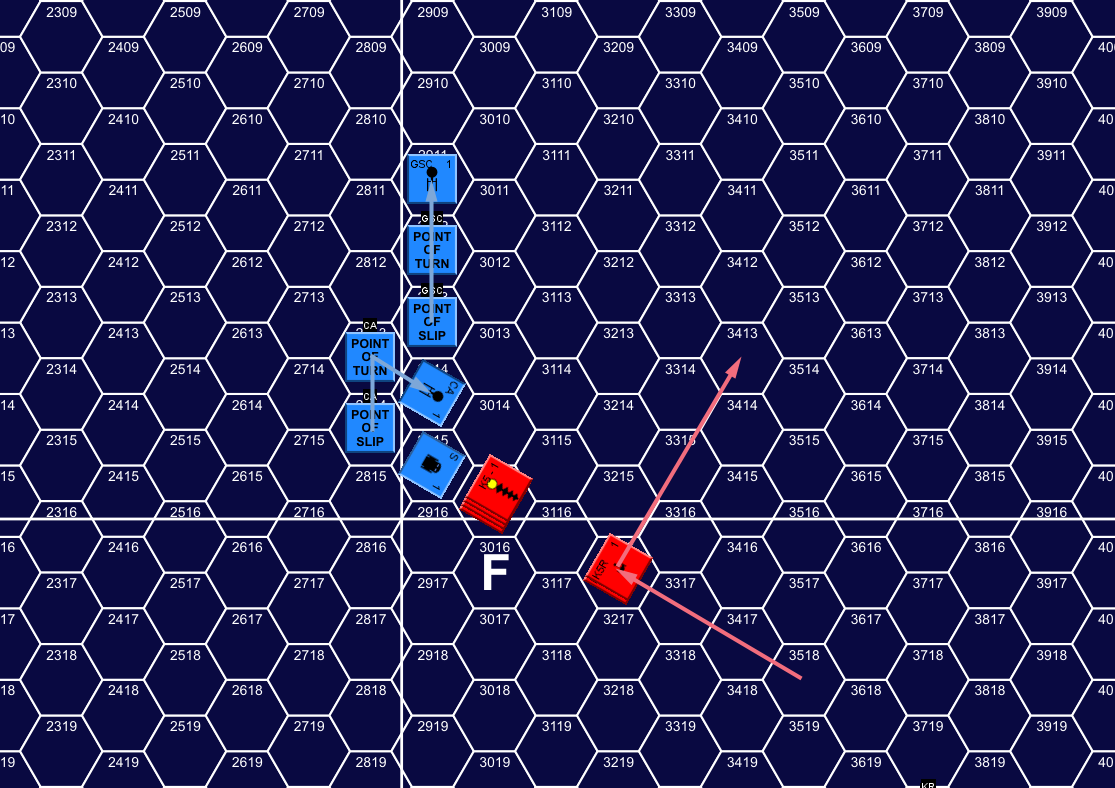
Turn 1, Impulse 17, showing movement from Impulse 12 to 24.
The leftover problem was that Marco Polo was trying to keep distance from the Romulans, and Hood‘s turn towards them ended the two ships at range six from each other, on opposite bearings, and unsatisfied turn modes. Both of my ships went speed 8 on turn 2, putting them at the top of turn mode 2, while the Romulans went 15. I spent the turn trying to come around and get into transporter range, finally managing it on impulse 32, where I promptly transported over more crew and boarding parties at the non-combat rate. Mark circled around, coming in behind the Marco Polo, but merely picked off my shuttle and turned off again.
For turn 3, Marco Polo had a minimum crew, so it was time to arm a wild weasel on her (I could, and probably should have, started on turn two by assigning the second crew unit there) and start charging phasers (one point) with the extra power from the restarting engines. Hood boosted to speed 12, and was concentrating on overloaded photon torpedoes, while the Romulans stayed at 15. They turned in after the Marco Polo again, but Hood came up and they turned away again. I potshotted with two phasers at range 6, but didn’t do any damage.
 Turn 4 saw the Romulans go to speed 21, while Hood went to 18 so she could potentially run out plasma torpedoes. The Romulans stuck together and spent the turn coming around to approach Marco Polo, launching a full spread of plasmas at range 3 on Impulse 31. An exchange of phaser fire at that point did 8 points to Marco Polo‘s #3 (after blowing all six batteries for the rest) and a pair of phasers did 10 damage to Kestral, getting six internals through the weak #1 (two power and one phaser). On 32, Hood fired an overloaded photon torpedo at K5R RIS Shillelah but missed.
The plasmas simplified Marco Polo‘s turn 5 EA. She dropped to speed 4 and turned off fire control, while generating 4 ECM and prepping a second wild weasel. The Romulans slowed to 15 while Hood stayed at 18. Marco Polo launched the first wild weasel on Impulse 2, the plasmas impacted on 3, doing full damage for 9 collateral to the #2 shield (two of which registered). Hood fired two phasers at Shillelah on impulse 4 (range 6), doing 5 damage to the #4. The Romulans turned away, but Hood regained the shield on impulse 11, hitting with a fully-overloaded photon torpedo for twelve internals. The next impulse, two phasers rolled ‘1’s for another eight internals. Hood continued the chase for the rest of the turn, but didn’t fire the remaining photons (only one of which was overloaded).
Afterword
We talked it over, and looked again at the victory conditions. Mark allowed that at this point he’d be leaving. Hood could potentially do more next turn, but wasn’t currently on the down shield, and we didn’t game it out, since the Romulans would be going fast for a disengagement by acceleration.
Technically, this is a Romulan victory, as the scenario uses Standard Victory Conditions, which gives them a 74-point bonus for the BPV difference. He doesn’t get anything else, since he didn’t manage to get internals, but I just get 25% for forcing disengagement (48.25), which works out to a Tactical Victory. Crippling Shillelah (which needed about another four internals) would have scored another ~20 VP, which would make it a draw.
This scenario is something of a special version of a standard CA/KR duel, and our play points up the need for our group to get some more practice in with plasmas. My need to go low and slow told me that I would need wild weasels to survive, which was new for me, and my big worry was that Mark would draw one out, kill it, and then launch real plasmas after the explosion cleared. I know the theory of pseudo-torpedo use, but don’t have a lot of practice with the shell game, and that was needed here. The two special abilities of plasmas, launching after the box has been destroyed and pseudo torpedoes, exist because of fights like this, and you can’t win if you just let the enemy use wild weasels (though, I was already down two shuttles out of four on the CA; the GSC has eight).
The GSC is important, but not capable of doing much at the start. Even though there’s boarding parties already on board, a real attempt to capture it must be considered. It is also a clock on the scenario, as every turn the threat of it gets bigger as the warp engines restart. As of turn 5, Marco Polo was up to 20 power and still struggling to do everything (especially recharge six batteries), but it was getting easier. Once somewhere near full power, two extra photons and the scout channels mean the Romulans can’t win unless they’ve already done a lot of damage.
Discussion ¬