Rindis.com

All my hobbies, all the time
  • Home
  • My Blog
  • Games
  • History

Categories

  • Books (503)
  • Comics (10)
  • Gaming (917)
    • Boardgaming (673)
      • ASL (154)
      • CC:Ancients (83)
      • F&E (78)
        • BvR – The Wind (26)
        • Four Vassal War (9)
        • Konya wa Hurricane (17)
        • Second Wind (5)
      • SFB (78)
    • Computer games (162)
      • MMO (77)
    • Design and Effect (6)
    • RPGs (66)
      • D&D (25)
        • O2 Blade of Vengeance (3)
      • GURPS (32)
  • History (10)
  • Life (82)
    • Conventions (9)
  • News (29)
  • Technology (6)
  • Video (49)
    • Anime (47)
  • Writing (1)

Patreon

Support Rindis.com on Patreon!
Become a patron at Patreon!

Other blogs:

RSS Inside GMT

  • Foxes and Lions (Part 3): Military Matters, Captains, and Condottieri June 12, 2026

RSS Playing at the World

  • Playing at the World 2E V2 Arrives May 5, 2025

RSS Dyson’s Dodecahedron

  • Cyberstyle 8.5 June 13, 2026

RSS Quest for Fun!

  • The Expense Post May 24, 2026

RSS Bruce Heard and New Stories

  • Pain, Exhaustion, and Morale in D&D BECMI June 7, 2026

RSS Chicago Wargamer

  • The 2 Half-Squads - Episode 310: Cruising Through Crucible of Steel January 27, 2023

RSS CRRPG Addict

  • The Search for Freedom: Undistinguished Destruction June 13, 2026
SF&F blogs:

RSS Fantasy Cafe

  • The Leaning Pile of Books May 24, 2026

RSS Lynn’s Book Blog

  • Booking Ahead/Weekly Wrap Up June 14, 2026
ASL blogs:

RSS Sitrep

  • Cardinal ASL Sins March 18, 2026

RSS Hong Kong Wargamer

  • FT114 Yellow Extract After Action Report (AAR) Advanced Squad Leader scenario April 16, 2025

RSS Hex and Violence

  • This still exists? March 25, 2025

RSS Grumble Jones

  • AAR Slides for Schwerpunkt SP96 Husum Hotfoot June 5, 2026

RSS Desperation Morale

  • How to Learn ASL March 16, 2025

RSS Banzai!!

  • October North Texas Gameday October 21, 2019

RSS A Room Without a LOS

  • [Crossing the Moro CG] T=0902 -- Rough start July 18, 2015
GURPS blogs:

RSS Dungeon Fantastic

  • GURPS DF Session 224, Felltower 141 - Second GFS exploration June 15, 2026

RSS Gaming Ballistic

  • B-Scale: Damage That Scales from Tardigrades to Kaiju June 5, 2026

RSS Ravens N’ Pennies

RSS Let’s GURPS

  • Review: GURPS Realm Management March 29, 2021

RSS No School Grognard

  • It came from the GURPS forums: Low-Tech armor and fire damage January 29, 2018

RSS The Collaborative Gamer

  • Thoughts on a Town Adventures System January 18, 2022

RSS Don’t Forget Your Boots

  • GURPS Supers Newport Academy #6: “Old Friends, New Again” June 7, 2026

RSS Orbs and Balrogs

  • Bretwalda - Daggers of Oxenaforda pt.4 - Fallen King May 27, 2017

Clash of Ypres

by Rindis on November 6, 2024 at 12:00 pm
Posted In: Boardgaming

Many years ago now, Mark had me try Clash of Giants with the Galicia scenario from the second game, and I’ve been wanting to get back to it ever since. A bit ago, we started the First Ypres scenario (also from II) on Vassal.

A quick word – the Vassal module is in need of upgrades, since an attempt at marking the separate activation areas was made, and it ended up killing the hex grid. I managed to sort it out for our game. It should also have a supply of one-use markers out for the limited reinforcements and the offensive support markers (we used a grand total of one all game, because we generally forgot all about it).

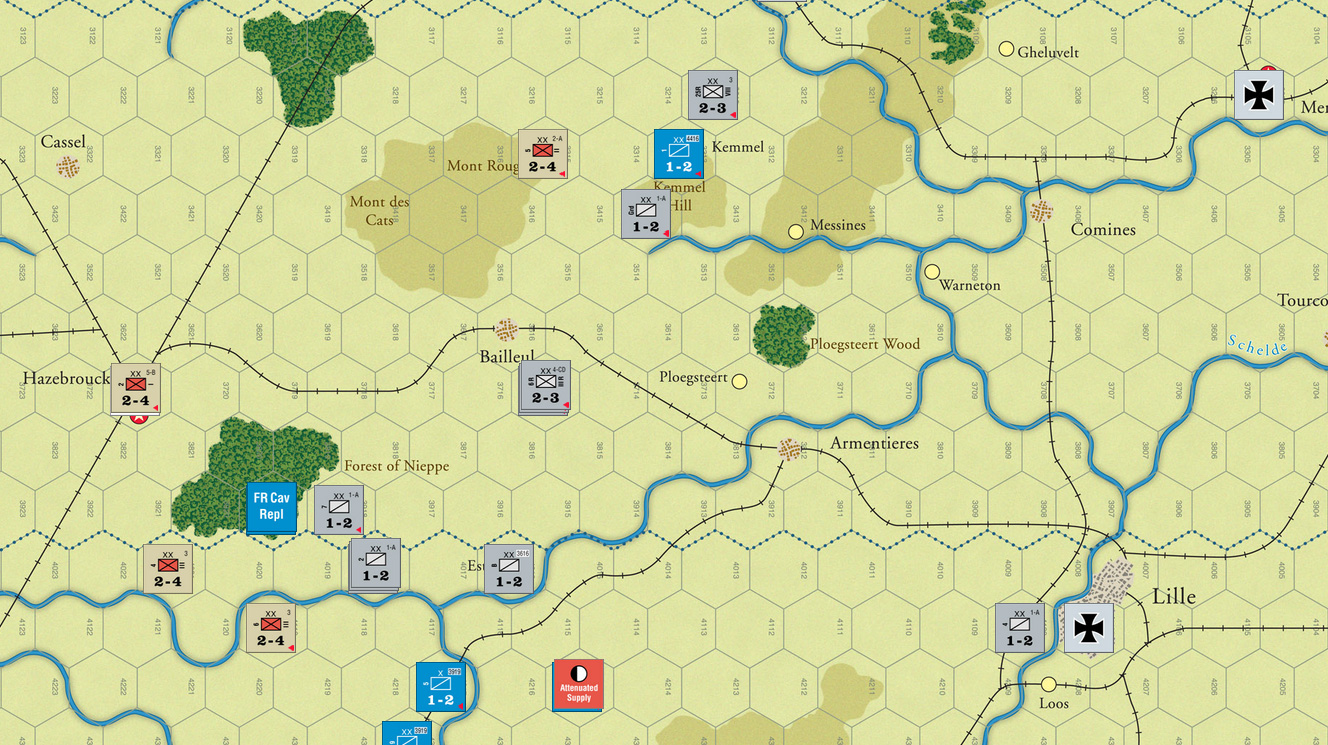
I had the Germans, and after setting up the beginning reinforcements, the first chit draw was for my sector B (Menin and Hazebrouck). A good movement roll (this was a continuing theme) let me take both victory cities, and screen the Forest of Nieppe, which holds two French cavalry divisions at start. Next was Allied A (Bethune/Lille) where Mark kept the infantry back to protect Bethune and La Bassée, but the cavalry dashed forward to take Lille. Then my A went, and I occupied the other half of Lille while maneuvering on his southern flank to force a cavalry retreat from Loos. I had nothing in C (Ypres and Roulers), but Mark moved up to garrison Ypres.

Turn 2 sees the opening up of the northern flank as the Belgian army with British and French units retreat onto the map headed for the region of Nieuport. Meanwhile, the Germans get one division, in an area of their choice, which I put opposite of Roulers. Mark used rail movement to retake Hazebrouck, and I marched through Roulers with an early activation, and also set about forcing the French out of Lille (traded two cavalry divisions for one of his, thanks to poor rolls). British cavalry came in and tried to clear the way to the Forest of Nieppe, but only lost a unit in combat.

The German turn 3 reinforcements helped in ‘A’ (two divisions must come in there), and the French pulled back from Lille. Out near Fournes I swept away a cavalry division, but lost a step on an infantry division. On turn 4, Mark started taking apart my forward cordon near Hazebrouck, rescuing the French trapped there, though another bad roll cost him a step. I started putting a line together in front of the captured victory cities, and managed to take Ypres by surrounding it for a 2-1 attack (taking a step myself in the process). Mark swept back east in the south on turn 5, with me taking lots of cavalry retreats.

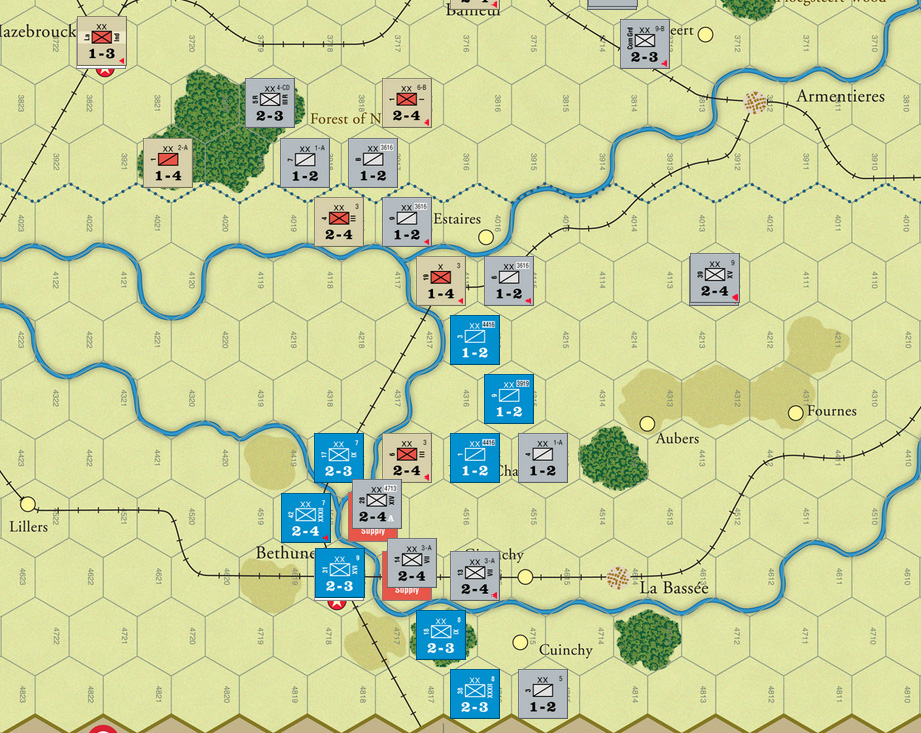
Mark pulled back in the north to defend the river line running SW of Nieuport as the four variable-quality German corps came on in turn 6 (in the end, three of them were TER 3 and one TER 2). Meanwhile, he had more and more to bring to bear just north of Bethune, and that area started turning into a problem for me. At this point, I just shored up my line, but I would have been better advised to fall back to a straighter line, though the main problem was a lack of good defensive terrain back there.

On turn 8, I had a British unit nicely surrounded on Mount Rouge (NE of Hazebrouck), but Mark was causing more and more trouble just south of there (then I shifted unwisely, letting him rescue the unit). The Belgians advanced up to my thin line in the north, and turned me out of Dixmunde. However, their units aren’t very good, and attacks started eroding them quickly.

I finally gave some divisions the direct purpose of securing Bruges from the French battalion that had stayed behind with some of the final large group of German reinforcements on turn 9. Much of the rest was at the south end of ‘B’ to try and shore up that problem. What turned out to be the big problem was the French snuck a cavalry division through a gap to retake Ypres. It would take far too much effort to pry out again. In the south he pried open my line again and pressed eastwards, while the Belgians looked for a better defense in the north.

I took Bruges, and pressed the Belgians, who ended up by holing up around Nieuport. This was a mistake, since all supply comes overland from the board edges, not through presumed ports. It still took a while, but there were no real challenges to the reduction of the Belgian army and that victory city after that. Meanwhile, the center was a confused mass of conflicting attempts at cutting each other off. I had something of an advantage, but I really wanted to be pressing south to rescue my position down there, and this was making it impossible.

In fact, Mark had cut off two of my units in the Forest of Nieppe, and I didn’t have much I could do about it. Worse, he railed his cavalry from Ypres to Menin and then snuck a second cavalry into Ypres. I managed to destroy the first one, but the second held out in Ypres, causing me a step loss. In front of Bethune, Mark destroyed two divisions who didn’t have a valid retreat (a third held on). Worse, my thinning line let him retake Lille the next turn, and knock out the last division on the south edge, with two cavalry divisions now stuck there, who’d been trying to rescue him.

I started cleaning up the center on turn 13, but still managed to lose steps for no progress against Ypres. On 14, the last reinforcements of the game came in to try and retake Lille. They got there, but then the French showed up with more to force a second combat if I wanted to take the city back, and took out my flanking cavalry division in the process. I lost a step on that, but did retake Lille, and got rid of three units in the center, including the cavalry holding Ypres.

Afterword

Mark conceded at that point. The game was dragging out, and I had five of the nine victory locations. I had also reduced the Belgians to three units in that combat phase, so I’d go to six in a couple turns of assaulting Nieuport. (They were going to need to keep rolling ‘1’s to survive.) Since victory is merely having the majority of victory cities, and while Mark might retake Lille, he wouldn’t get at anything else.

The chit draw system with only one combat phase per turn (special for this scenario) is an interesting bit; mostly we waited for things to line up, but especially later on, we were occasionally doing early combats to keep the other side from slipping away first.

Cavalry divisions constantly coming back makes them act like the screens they should be, but you’d think there’d be some exceptions for being cut off and then destroyed. There’s also special rules for cavalry transitioning away from this role as the front solidifies, but that never actually happened in our game. We got close mid-game, but then things broke up again.

My recollection of playing Galicia is of being stymied by poor movement rolls. That was largely not a concern here. I got a lot of 6s and 5s in the beginning portions, so when I had to worry about getting things into position, I had lots of movement to do it with.

My biggest frustration was spending lots of effort cutting off Allied units, but having Mark almost invariably get them back out, one way or another, before the two-turn out of supply could hit. (The real exception to that was the Belgian army, since it was hard to see that Nieuport wasn’t a port for supply to come through without an overland trail.)

Still, it’s a solid simple chit-pull system that works well. The combat being odds-based, but losses purely on unit quality is really interesting. I think my biggest problem there is just at this unit density you don’t see retreats, because that practically requires destroying the defender in the first place.

└ Tags: Clash of Giants, gaming, WWI
 Comment 

Clash of Galicia

by Rindis on June 17, 2013 at 10:39 pm
Posted In: Boardgaming

Mark came over on Saturday, and we played through most of the Galicia scenario in Clash of Giants II. Mark and Jason have played the game (both scenarios) a few times, but this was my first time with it.

Mark felt the Russians had an overall advantage in the scenario, and gave them to me. Which left me to set up first, and try to figure out what I was doing. Not too hard, other than wondering what to do with the masses of cavalry that have limited utility, and with both sides setting up far behind the borders, there was time to sort things out.

Quite a bit of time from my perspective, as it happened. An interesting feature of the game is that it uses a chit draw to activate each army (four on each side for this one), and then roll to see how active it is (how far units can move, and in the early game, if they can attack at all). I never rolled over a 2 during the first two turns (with 6 being best), and so crawled towards the border. The Austrian SE flank also performed poorly, and the lines didn’t even come in contact until about turn 3.

Meanwhile, Mark hit first, and hard in the NW near Kielce on the 4th Army front. Both sides get a pair of offensive chits that improve the odds one column for all combats in a single phase. The Austrians get theirs early, and Mark used the first one  on turn 2 and what was left of the 4th Army was sent reeling back. By the time the second offensive was done on turn 4, there were very few units left in the 4th Army at all, and the line eventually was anchored on Radom. Mark managed to surround it around turn 5 and attacked. In a miracle, both of my units rolled ‘1’s to survive, and the majority of Mark’s units flipped. I managed to re-establish supply the next turn, and held out until turn 8, where Mark turned the flank and was cutting off the position again and approaching Ivangorod.

On the other end of the line, things were different. The initial offensives hurt the center, but not as much, and Mark wasn’t able to do anything about the 8th Army. Around the time the game shifts to the better movement tables, my die luck got better, but I still had problems, rolling four ‘1’s for movement on turn 5, and the first Russian activation of turn 6. Then I rolled three ‘6’s for the rest of the turn. Thankfully, the attack restrictions go away after the first few turns, and despite some very slow movement, there often wasn’t far to go (though it hurt the reinforcements) and I could still attack.

After a short shoving match, I started seriously hurting the east flank, and entered Austrian territory for the first time. The ‘bend’ near Tarnopol took a lot of damage during my first offensive chit, and I pushed him back to Stanislav over the next couple turns. Fighting through all the rivers in that area was difficult, but he couldn’t keep a defense together. Meanwhile, I had some early success on the extreme flank, but got slowed down by losses, and regretted sending as many reinforcements as I did to the other flank (where he probably couldn’t make things any worse than they were).

The Austrians start gaining VPs for places held on turn 4, and got 6 VPs then. He got another 4 to hit his max of 9 VPs on the next turn. I was already pushing him out of his victory locations by then, but it was too little, too late to avoid him hitting his ceiling. The Russians only get VPs for what they hold at the end of the game, and since we couldn’t quite finish, it’s hard to say just what the final score would have been. However, my two offensives never actually broke the line, even after doing a lot of damage to the Austrians. So I don’t think I was going to get a chance to get to the further Russian VPs of taking the passes across the Carpathians, and probably wouldn’t have gotten a chance to try to take Premsyl, so I’m guessing I would have only managed 5 VPs.

Despite some recurring bad luck with the movement dice, I certainly enjoyed the game. It’s a very clever system that takes most of the familiar ground of hex-and-counter systems, and then adds a few twists to get the right feel. Combat is a matter of checking unit quality to see if the involved units lose a step. Higher odds mostly just improve the chances, but the checks are still made. This makes combat become a contest of attrition, with even solid victories resulting in flipped units. However, there’s still a fairly solid feel of maneuver, and the combination of maneuver and attrition is not one often seen.

└ Tags: Clash of Giants, gaming
 Comment 

©2005-2026 Rindis.com | Powered by WordPress with ComicPress | Hosted on Rindis Hobby Den | Subscribe: RSS | Back to Top ↑