
J67 The Lawless Roads
Journal 4 had an article on the British Universal Carrier, and some scenarios featuring them. I managed to talk Patch into one of them, but I’d still like to try the other scenarios. We got going in January 2010…:
After finishing the Market-Garden set, Patch and I are playing one of the early-war scenarios in Journal 4 featuring Carriers. The British are trying to clear a road through a village (no GO Germans on or adjacent to it), but the Germans are already strongly defending the town. In addition to needing to chase the Germans away from the road, the British will lose if more than four of their AFVs are killed (or if four tanks/tankettes are killed).
Given a choice, and remembering Patch’s problems with a similar set of victory conditions in Khopra’s Crossing, I take the defending Germans. They don’t get any vehicles of their own, and the anti-tank capability isn’t great, but the Brits don’t have anything heavier than an A10. Patch will have to be cautious, especially with two 37mm ‘doorknockers’ hidden somewhere.
Board 12 is an unusual mix of terrain for an early board, and there’s a few of the hedgerow overlays in play (though bocage is not in play—a hedge is a hedge here) and I have to spend some time deciding how to defend. The real target is the road itself, but if I concentrate on that, he could easily bypass part of the defense and strike towards the middle or back end, hoping to leave me without fallback positions. So I opt to defend the entire front with an eye towards hustling towards the road if he attacks down it as expected. The four OB-given ‘?’ are used to conceal where the good leaders, MMGs and ATRs are. The MTR doesn’t have any place with a good LOS and end up on the hill in T1 when I forget that Orchards block non-same level LOS.
Patch setup near the road and got to work clearing it immediately. With some concentrated firepower, and a ROF-tear on his MTR, he broke a leader and LMG squad, and pinned another LMG squad. I was able to do far less to his initial advance than I would have liked. The worst part was that he put three squads past the hedgerow between V and W, and got into the first of the stone buildings. I had figured I’d keep him out of there a while longer.
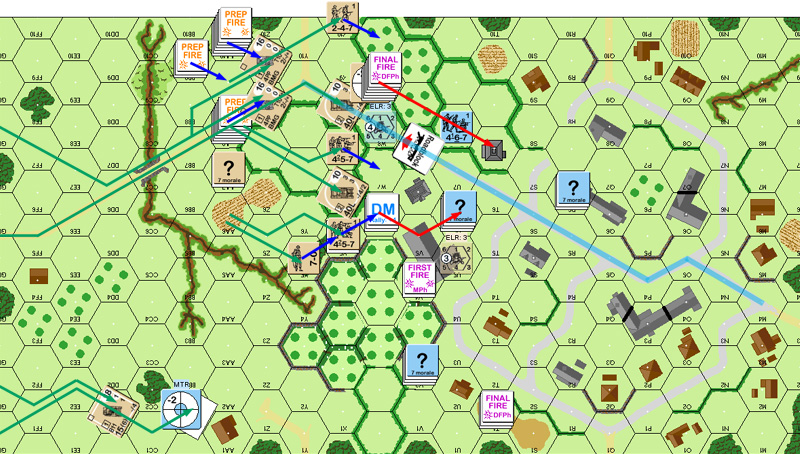
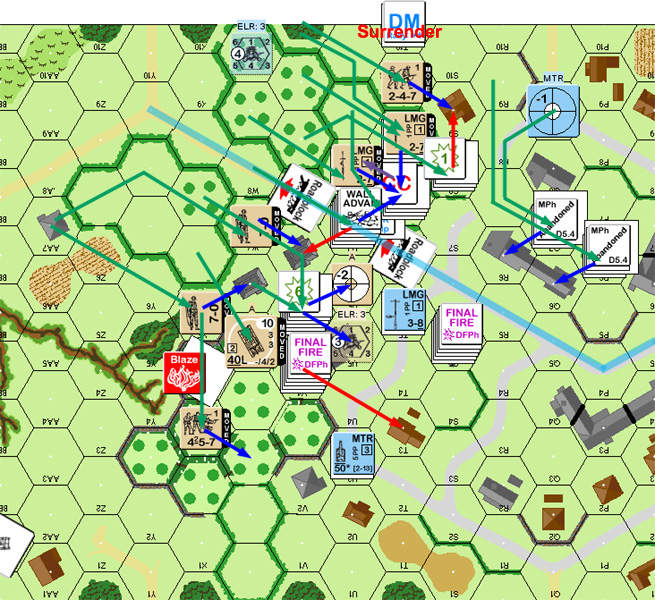
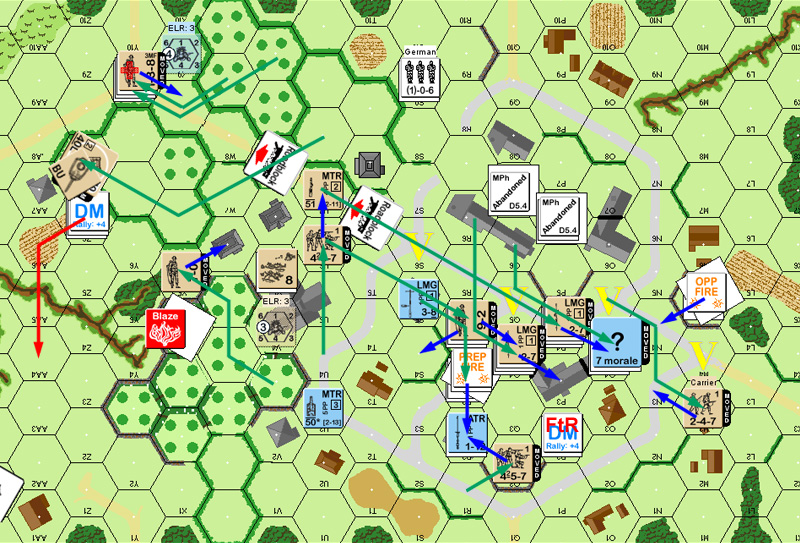
Situation, British Turn 1 DFPh. The blue ribbon is the victory road, note that an SSR turns a graveyard into an orchard and you can still see pieces of it poking through the overlays.
Even with my broken squad having made it back to my 9-1 leader, I got nothing back on my rally. I wasn’t sure how to reorganize my defense. In general, the plan was to shift for more defense in depth along the road, but he had the two Mk VIs crawling along the south edge of the board, and I didn’t want them getting into my rear unopposed. My opening MTR shot on the lead one hit and got a ‘2’ result on the IFT to kill it with no survivors, that simplified things greatly. A shot from U8 broke W7, taking some more pressure off me, and I decided to gamble with a stone building and a -1 leader and stand up to the rest of his breakthrough in W6. A shot from U6 broke one of the two squads there. Things were looking up.
I pulled out of V2, taking a roundabout route to make sure he couldn’t strip concealment. As I moved other forces around, I came up with a sneaky little plan. First, V4 smoked W5. If that hadn’t worked, I’m not sure I would have gone through with it, but with the smoke (only on a ‘1’!), I put the squad in V4 into X4, where he could cause problems for the broken squad in W6, and was adjacent to the British 7-0 in X5. Sadly, I couldn’t get him in Advancing Fire, and he self-broke to rout away before I could go for CC with him.
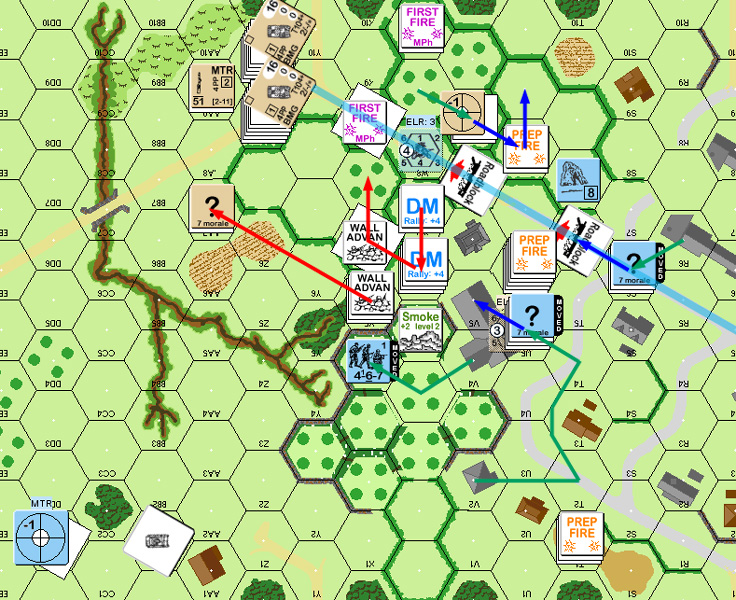
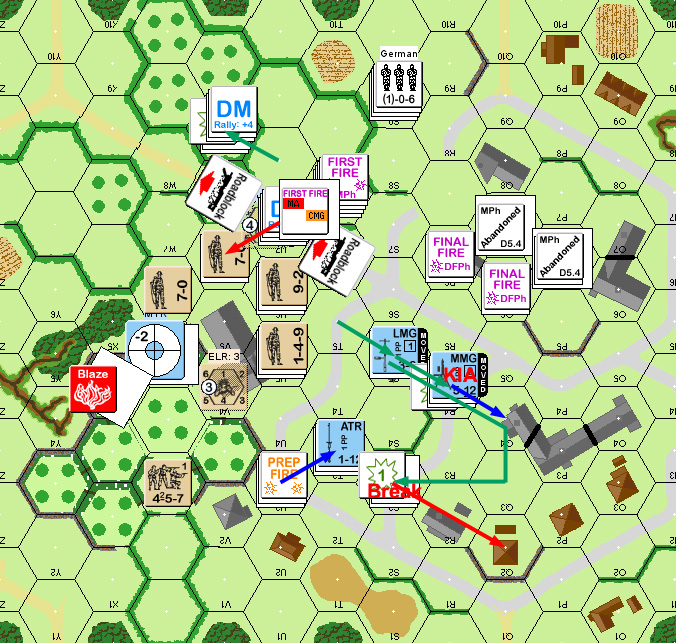
Situation, German Turn 1, end of MPh.
Gunner Scott commented:
“Hi-“
“Thats one hell of a scenario. Been a long time since I played it, but I do remember those little carriers giving the Germans grief as they would race to cut rout paths.”
“Scott”
Dan Lepore added:
“Thanks for posting the AAR. I’ve played this scenario twice and had fun playing it both times. I got to play each side. As the Brits I attack mostly south through the graveyard/orchard and my armour and some infantry going north. I lost that one in the end. I remember have a great time as the Germans, with a pretty tense battle taking place around Q6 building. It looks like it’s going to get interesting. Look forward to seeing more of your AAR.”
UK Set-up
“5.5 turns to battle through a stone village and clear a road. A single HS next to the road can lose it for me, and I can’t lose more than 3 of my tanks/tankettes. Yow! Rindis has excellent AT capability and well equipped infantry. ROAR rates this as close to 50-50, so it must be a decent fight.”
“I decide to push heavily to the north. I’ll send the two tankettes south to clear the mortar off the hill and run around the flank. There’s enough in my starting LOS that I can hammer some front line units and still move. There’s a lot of hedges screening my movement up to the village, but there are also some sneaky LOS that I need to watch for.”
UK Turn 1
“I fail to break the squad in W9, but I do break the leader there and the squad in W6 but fire an awful lot to do that. Several squads move up close to the V5 building, but with my kill stacks marked with Prep Fire counters, I can’t get the firepower I want up there. I do move my tanks up to the front line. I hate the lack of HE, but I can still do some damage here. Although the hedges and walls are bog hazards, I feel it’s remote enough to send them across the hedges. In Turn 2 I hope to get the 8-1 and 9-2 stacks up front and breaking more units. As I deployed a squad to man the mortar, I am moving a HS along the board edge in a flanking maneuver.”
German Turn 1
“Rindis fires his mortar against my little MkIVB and nails it with snakes on the IFT. Ouch! One tankette down! That hurt. Rindis also breaks a squad in W6 and in W7. Getting cute, he then successfully places smoke in W5 with a ‘1’, and runs a 467 around to X4, threatening my backfield and blocking rout paths to the CX 7-0 n X5. Hoo-boy, this isn’t going well. I have damn little firepower up front to deal with any of this. The 7-0 voluntarily breaks and routs to AA6 to avoid getting killed in CC, W6 routs to X7, lacking the ability to reach anywhere else, and W7 has to rout to W6 where he continues not to be happy. Rindis doesn’t advance X4 into X5, and reshuffles his line around U5 to U9.”
“To summarize turn 1, I am in a worse position than I was at the start of the game, and have one turn less to clear the town. Erf.”
For Patch’s second turn, the only thing that comes back in RPh is my 8-1 in T7. Given that he’s alone there, that’s not an immediate benefit. Patch preps with his A10 in X6, doing nothing but re-establishing DM, and then goes on to slice and dice me in movement.
The remaining Mk VI charges into the orchard and overruns my flanking squad there, reducing and ELRing it on a K/3. The good news is that my Sniper activates and breaks his HS in W10. Then the second A10 charges in and overruns my flank squad in U9, breaking it. The most I can do is fire the adjacent LMG looking for a 3 TK DR, but no such luck. Then he moved the two Carriers around that flank, setting up an excellent shooting gallery at the rear of my defenses. The bulk of the British infantry flooded forward, with a big stack going into the hedged-off field in W10 and up to the first roadblock at W8. I had moved up specifically to put pressure on that, but my shot narrowly missed doing anything, while he broke the squad w/ATR there.
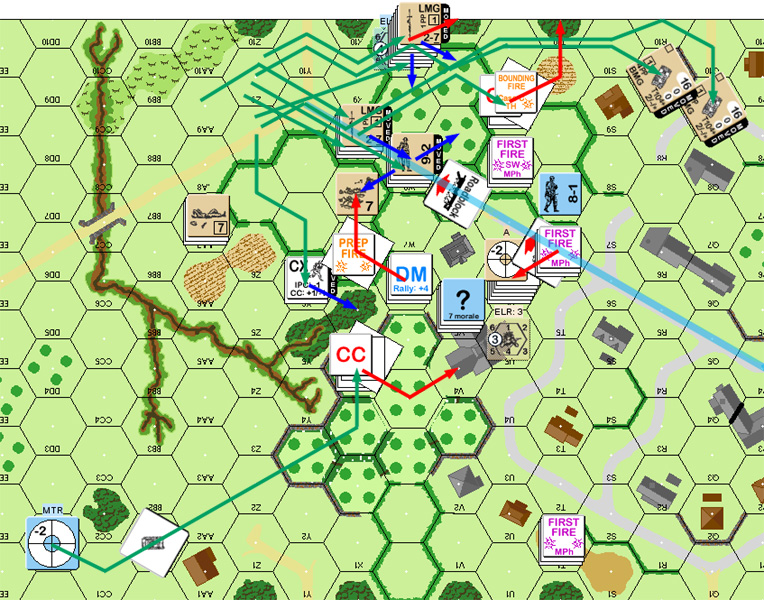
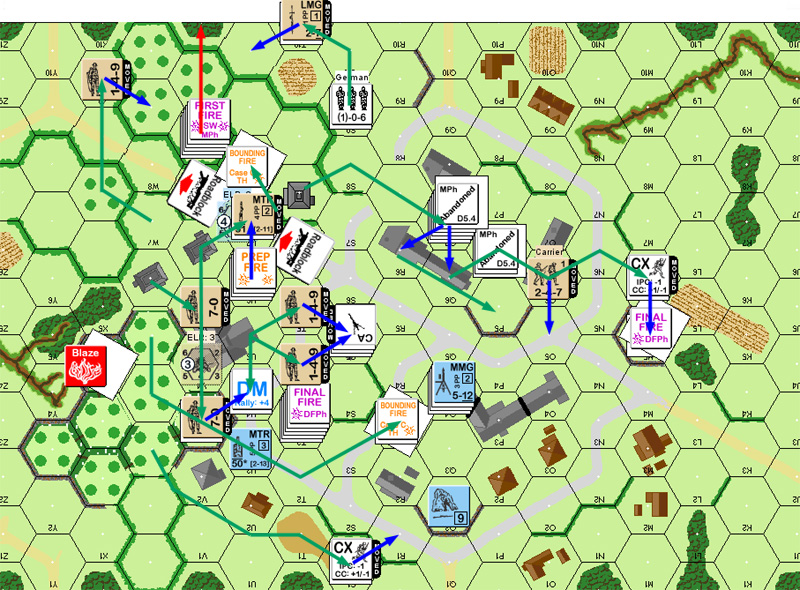
Situation, end of MPh, British Turn 2.
With all this pressure on my front, and Carriers behind me, I was feeling pretty desperate. When the only thing I managed during RPh was to reduce a squad on a ’12’, I didn’t feel any better. Patch got both of his non-DM units back, a 7-0 and a squad in X7.
The first thing was to draw in the flanks. The LMG squad left in U8 pulled back to the stone building and 8-1 immediately behind him, and the MTR crew came down off the hill, so they could advance to U3 where they’d have a line on the Carriers, or might be able to do something in the orchard. After quite a bit of thinking, I finally remembered Dash—after I’d started doing other moves. The concealed set in V5 moved back, attempted Smoke, failed (too much to hope for twice in a row, at least I didn’t get a ‘6’), and moved into V4 to continue trying to resist in that area. Patch fired on both locations, but couldn’t get a result in the stone building. The MMG squad Dashed into S5 with my 9-1 following, Patch not only couldn’t get a result, but he malfed the BMG on one of the Carriers. In the DFPh, he could only get a PTC on already broken units, and malfed the MA of the A10 in X6.
In my AFPh, I got a CH with the ATR in V4, turning his second Mk VI into a Burning Wreck. Two kills down, one to go for an auto-win. There’s still two hidden ATGs—if he doesn’t just flush them out with unopposed infantry. Immediately afterward, I got a ‘2’ with a LMG TH roll against Q9. Pity that doesn’t count as a CH, though I rolled too high even for a doubled TK#. For RPh, I opted to have the squad and a half run across the street in full view of the Carriers so as to join back up with the group in S5. The ATR squad got a ‘2’, and rallied and generated a Hero—stopping in the middle of the street. The LMG HS died to Interdiction. I left the Hero behind to grab the LMG while the squad Advanced into S5.
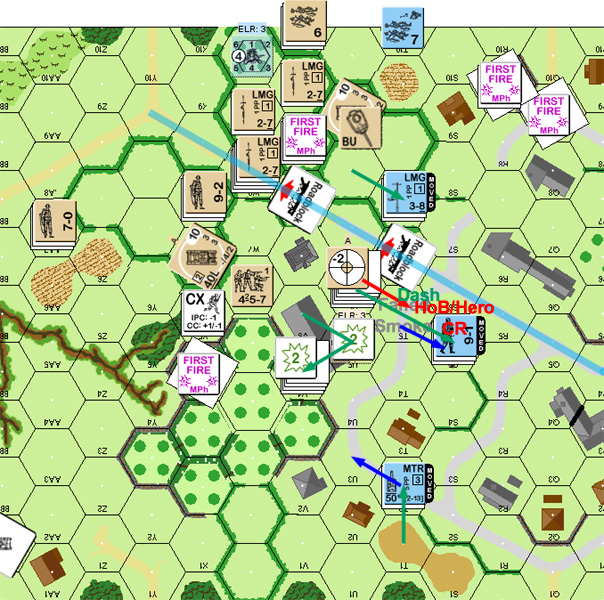
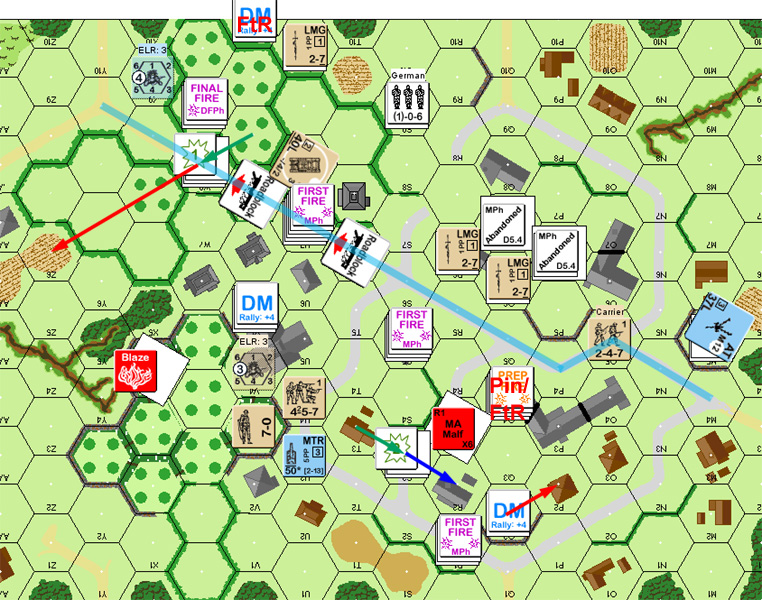
Situation, end of MPh, German Turn 2.
For the record, there were 3 ’12’s and 4 ‘2’s in one Player Turn. There were a good number of ‘3’s and ’11’s too. And more dice-bot shenanigans followed during the rest of the session….
In my AFPh, I got a CH with the ATR in V4, turning his second Mk VI into a Burning Wreck. Two kills down, one to go for an auto-win.
“Actually, taking another look at the VC, you need to knock out all 4 tankettes, or three tankettes and both carriers for an auto win. So if the A13 dies, you just need to nail the other, or take out the two carriers.”
“Hmm… probably should have parked those elsewhere.”
I knew that…. Sheesh, lousy memory. 😛
UK Turn 2
“Ok, Turn 1 didn’t go well. Rindis’ little counterattack has set me back a turn and gotten me horribly out of position. My infantry is just not prepared to deal with the flanking in X4.”
“But my tankette is…”
“I Prep Fire with the A10 in X6 to (unlikely) hurt U6, but at least I keep the HS there under DM. In movement, the hardy MkIVC heads to X4 for an overrun, scoring a k/3 result. My second A10 heads into U9 where it overruns the 467 there, breaking it and threatening U8 and T7. Both Carriers make an end run to interdict the U3/Q9 road (R9 was misplaced, I thought the S7/S8 hedge wasn’t there). With the removal of two squads I’m more free to move my infantry, and I shove several squads up around the V7 roadblock to bring fire to bear against U6. Rindis nearly causes trouble in W8 with a 4(+2) from T6, but I pass the NMC and break the squad there in Advancing Fire. Rindis is able to rout from every location, and I finally get the bulk of my infantry into an effective position.”
German Turn 2
“All my broken units rallied, and none of Rindis’ came back. He wisely skipped Prep Fire and chose to retreat. U8 moves to the stone building in T7, and the mortar comes off the hill to engage my carriers. U6 dashes across the road to S5 successfully, and V5 makes a move for the road, fails in smoke, then moves to V4 for an ATR shot against the tankette in X4. My Defensive Fire is woefully inadequate, and I break both a Carrier’s BMG and the X6 A10’s MA.”
“In Advancing Fire, Rindis nails the tankette with a CH and it burns on a 3. T7 fires its LMG against the Carrier in T9 on the VTT and rolls a ‘2’, but fails to kill it. Rout is also exciting as U5 makes a run to S5. The squad rolls a ‘2’ on it’s Interdiction NMC and springs a hero, but the following HS dies. V4 stays put in Advance, and the Mtr moves to U3.”
“All in all, a good turn. I hate the loss of the tankette, but I did claim a squad equivalent this turn, and I have units in the rear. Unfortunately, there’s a lot of road still to clear, and the mystery of the two ATGs remains.”
So far, when it’s my turn, I figure I’ve got things under control, and then when Patch moves he knocks all the props out from my plan. In this case, British turn 3 begins poorly for me when he gets his only broken units back (1 1/2 squads). There’s a lot of Brits out there, and they’ve been just washing over my positions in a tidal wave. Worse, the malfed MA on the A10 came back. I didn’t necessarily want to see a Recall (doesn’t count for victory), but I’d like to see a little more uncertainty. The only rally attempt I’ve got is a HS in V4, and nothin’ doin’. The Hero in T5 does recover the LMG in the street.
Patch skips Prep and immediately starts flooding the zone. He moves a HS up to where it will capture my broken squad in T10, and then starts up an A10 to Bypass freeze T7. The LMG in T7 fires on the way in to no effect, the ATR in S5 fires and the A10 fails its TC on a Possible Shock. Reaction CC takes quite a bit of time as it sends both of us diving into the rulebook for a while. And it fails (10).
Next, he floods into V5, obviously wanting CC vs the single intact squad and 8-0 there. I fire into a stack to two squads and 9-2; the 9-2 passes the resulting 1MC on a ‘3’, and both squads roll ‘2’s to Battle Harden and generate Heroes. Nothing else manages to have an effect on what is now a very dangerous stack. He also builds quite a wall of men around T7, though I do break the one squad that moves into S8 where the S5 group has an easier time getting at them. He moved both Carriers into the empty middle of the P5 block and abandons them. I do wonder what his thoughts on the placement of my ATGs are.
My Hero fires on the stack he’s built up in U7, and activates Patch’s Sniper, which promptly kills the 8-0 in V4, which causes the squad to break. The good news is that they can get away clean. The bad news is that I really need a leader over there now. I had been hoping to bleed troops off in that direction trying to keep me from getting back to the road. Now with no leader and only the MTR HS unbroken, it’s not likely to be a big problem for him. At least I broke one of the squads at the second roadblock. Patch fires on the surrounded stack in T7, but only malfs a LMG for his trouble.
Patch piles three squads and an 8-1 into T7, making it fairly sure that I’m going to lose that group as well. I briefly ponder going for broke and attacking everyone at 1:4 -1 (need a ‘4’ for CR…). Sanity prevails and I attack the squad and leader combo at 1:1. Since he has a vehicle parked there as well, I get the first attack and promptly roll a ‘2’. Should have gone for broke. As it is, I eliminate the squad and leader, generate a 7-0 leader, and sneak out the back door. Just where to go presents a problem. My first instinct is to go into the street at S7, where I could move into hard cover before he can fire… except there’s now a Carrier HS in the way. S8 has cover against everything except the HS S9, but there’s nowhere to go until CCPh, and I won’t live that long next to the angry firebase in T7. So, the only choice is U8, where I can sneak into the hedged-off orchard and cause him to have to split his attention in another direction to clear the road.
Situation, beginning of British Turn 3 DFPh.
By the way, that’s 3 ‘2’s and a ’12’ in a single Player Turn. Not too bad, but the first two ‘2’s happened in the same online session as before, so we were still reeling from the first set.
UK Turn 3
“No point in Prep Firing. I can get broken units back under DM via movement. First up is the HS in V10, which moves to T9 to capture the squad there, and maybe draw fire. Next, I do my first real sleaze move and move the A10 into bypass in T7 to freeze the units in there. However, an ATR shot shocks the tank, forcing it to stop and suddenly I’m facing horrible odds for CC Reaction Fire. Thankfully, Rindis fails, and I throw three squads adjacent. I move the 9-2 stack adjacent to V4, Rindis fires, and both my squads Battle Harden and generate Heroes. Yeah, there are far too many 2’s in this game. As more units move up a low odds shot from Rindis activates my Sniper which kills the 8-0 in V4, and the remaining units there break under the LLMC. My carriers move to P6/Q7 and unload, so they can advance into the Q6 building and cut off S5.”
“In Advancing Fire I target T7, and only malfunction an LMG for my troubles. V4 routs to safety, and I capture T10. I advance into T7, and split the 9-2 and abundant Hero stack to avoid a bad DR from Rindis to U5 and U6.”
“In T7 there’s no Ambush, but Rindis rolls a ‘2’ on his attack on my 8-1 and squad, killing them and permitting a successful withdrawal into U8. Damn! I hate CC. I never seem to do well in it.”
“Ok, this turn went poorly. I”m in a bit better position, but Rindis is now moving behind my lines, and I’ll have to chase him down. And the ATG locations are still unknown, with only three turns remaining for me. I have a guess as to where they are located. We’ll have to see if I’m correct. I really need to nail S5, though.”
From Nutrageous:
“Hi, this is the designer speaking. I’m glad to see that you guys are having fun with the scenario. I will be interested to see how it turns out, as the initial British momentum seems to have slowed down.”
“Sadly, my momentum never really developed o.o”
Nutrageous:
“It looked like you did ok on the first turn. Don’t give up!”
Patch does not give up easily. Which is good since I have a decent record of snatching defeat from the jaws of victory.
Right now, Patch has the problem that the clock is ticking down, he has two directions to go in, and he still hasn’t seen either ATG. On the other hand, my troops are being reduced mercilessly, so I’m getting closer and closer to complete collapse, and I’m concerned about what the ATGs can do at this point. It’s probably going to be really close.
German turn 3 started with very poor news. The Shocked A10 recovered. The only roll I had was a MMC self-rally in T3, which failed. The death of my 8-0 covering that flank is definitely being felt. My MTR gets two shots off at the A10 in W5, including a CH, but fails to get an effect.
I attempt to ease away from the Brits, but it goes horribly wrong. The squad in U8 AMs in V8, and Patch unleashes a 12FP +1 attack on them. They and the following 7-0 are fine, but the 8-1 breaks on the 4FP residual. The good news is that my Sniper breaks his MTR HS in U7. Then I dash my MMG squad across R4, moving back deeper into the town. Patch rolls a ‘2’, killing the squad. That puts me into a real bind, I need that MMG. I send the ATR squad after them to recover the MMG. Since they make it fine, I decide to send the 9-1 on a circuitous route to S3; from there he can advance into T3, where I have a broken squad and a half without DM, or Patch can fire on them, which will allow them to rout away to R2, and the 9-1 and advance there. But, while he can’t fire on me in most of the route, the A10 managed to break him in S3. I’m still convinced that that was my best move, but it sure didn’t work out.
Worse, in DFPh, he killed the 8-1 V8 and the LLTC pinned the squad. The plan there had been to advance into W8, where I’d have the extra cover of the roadblock. This robbed me of my negative modifier, and kept me from getting in position. At least he malfunctioned the MA on W5 again.
Situation, end of German Turn 3 MPh.
For Patch’s turn 4, everything of his came back in rally, and he generated a third Hero on a HoB roll. My 9-1 failed to rally. The only good news is that he didn’t repair the MA on his tank. Patch only Prepped with one stack, but that broke my 7-0. The squad made it, but I no longer had any intact leaders.
Patch’s first move was to send a squad around my south flank, which I probably really needed to stop, but I was too worried by the mass of units that were obviously about to swarm over T3 and S5. Sadly, that probably wasn’t my biggest mistake. That was my fire from S5. I hadn’t realized that firing a SW forfeits a crew/HS/Hero’s Inherent FP for the rest of Defensive Fire. I rarely give SW to HS, so it doesn’t come up. Also, I worried about the wrong units, forgot about range limitations on SFF for a moment and picked the wrong CA for the MG after the first shot. (though, thinking about it now, that entire thing was a mistake, MG CA only applies to MMG/HMG, not LMG. sigh) So the entire defense pretty much fell apart as soon as Patch breathed on it heavily. All 1 1/2 squads + Hero.
I did break a squad. I got five different TK shots on his A10s (including two ROF shots from the LMG in V8). Despite close range and rear facing shots (Final TK# 4 on four of them, about as good as it’s going to get), I could not roll below a ‘6’. Very frustrating. Patch also sent a Carrier HS off with the obvious intention of moving into M6 and M5, and sweeping them. After some hesitation, I revealed the ATG in M5 to take a -2 shot at him. I figure it was slightly better odds than trying to get him CC. Didn’t work anyway.
Then during AFPh, his HS got a MC on my Crew, who promptly rolled a ’12’. One ATG gone without even a fight. T3, surrounded, had two broken HS (one recently reduced on a MC) that had to surrender. With only a Hero actually adjacent, he rejected the surrender, invoking NQ. His two Heroes piled onto the one I had in S5, Ambushing and killing him.
I’d considered my position to be pretty darn poor going into this turn. This pretty much rendered things next to hopeless, especially with another two British turns to go. There’s only so many useful places the remaining ATG can be, and my only hope for having a GO unit next to the road at this rate is some absolutely amazing die rolls. While this game has seen more than it’s fair share of those, they’ve been spread around.
Situation, end of British Turn 4 MPh
German Turn 3
“This week has begun with me hammered by the flu, so I’m looking and feeling my very best as I type this out.”
“The turn starts off with the Shocked A10 recovering (nice – most of my Shocks go the distance), and Rindis fails to self rally in S3.”
“In Prep, RIndis unleashes his mortar against the A1 in W5, but gets NE results even with a Critical Hit. In Movement, Rindis tries hard to reestablish his line and move forces further west. The 7-0 and squad in U8 AM to V8, and survive the 12(+1) I throw their way. However, the 8-1 breaks on the 4FP residual, but his Sniper is activated, breaking my Mtr HS in U7. The MMG squad in S5 dashes to Q4, but dies in the street when I roll a ‘2’ on a 2(-2). A second squad moves across and grabs the MMG, and the 9-1 makes a circuitous route to get back to T3, but breaks on a long shot from the A10 in T7. The Hero in T5 pulls back to S5, making that hex a tough one to crack.”
“In Final Fire the 9-2 stack hits V8, killing the 8-1 and pinning the squad. The A10 i nW5 fires on the Mtr HS in U3, and breaks the MA once again. Rindis routs clear, and forms little strongpoints in T3, S5, and Q4.”
“The biggest bonus for me this turn is the killing of the squad in R4. I’m annoyed he recovered the MMG, but now there are only 2.5 squads and the two ATGs lurking about. Since I’ve not seen them yet, my guess is they’re in M3 and M5. If they were up front, I’d expect them to have engaged the A10 in T7. SO that leaves O4 and Q4 out of the running, and if it was in Q8 it would have engaged the two carriers, but the drawback there is the Gun is away from the victory area. I think the Guns are closer than that, and I’m discounting someplace like O1 for that reason.”
UK Turn 4
“Everything comes back in Rally (except the A10’s MA), and I generate a third Hero. Hrm… lots of 2’s in this game. Just thought I’d mention it again.”
“Three turns left, two hidden units to find, and lots of places to explore and Germans to kill. I fire the 9-2 stack at V8 hoping to eliminate the backfield threat, but only break the 7-0. In Movement I AM both Heroes into adjacent road hexes, threatening an Advance onto the German Hero in S5. W3 makes a board edge run to S1 with the goal of blocking routs from T3, and putting Q2 under DM when I advance into R1. The A10 in T7 reverses, turns, and fires on V8, surviving several MG TK attempts in the process. I move the second A10 with the malfunctioned MA into R3, surviving a Street Fighting attempt from the HS in T3. My new third Hero circles around the troublesome Germans in V8, and I move aggressively east with the two Carrier HS, and I find a Gun in M5 when he fires on me in N6. Joy! Less joy is had when the squad I AM into U4 to tackle the HS in Y3 breaks.”
“Advancing Fire produces an amazing result when my CX HS in M6 fires on the ATG crew with a 2(+3). Need snakes to do anything, so why not? Naturally, I roll a 2 for a NMC, and Rindis retaliates by rolling a 12, killing the crew. Yow! I had not planned on Advancing into Close Combat with the CX counter, so the elimination of the crew this early is a huge plus. The game has taken a real shift in my favor. Both broken units in T3 die for FTR, and both Heroes advance onto the German Hero, killing him. I advance a 457 and LMG into Q6 and R6 each, so now I can bring Q4 under encirclement from R1, R3, R6, Q6, and O5.”
“I was a little stupid this turn with the A10, as I now have an ATR to my rear, and one in front. Hopefully he will survive and inflict a little damage to R3 and take out the last big German strong point. I’m still thinking that the second Gun is in M3. Sadly, I lack the FP to reveal it in German Turn 4, so I may have to find it through movement.”
For my turn, there wasn’t a whole lot I could do. Both my leaders were broken, but nothing else was after the surrender of T3. Of course, it gets worse when the 9-1 rolls a ’12’, wounding him. The HS in T3 picks up the abandoned ATR, there is a nearby tank to hunt. Patch fails to find the LMG in S5, but the Carrier crew mans the ATG.
With the odds of living much longer pretty low in any case, I decided to prep Q4 in the hopes getting moderately lucky. Nope. The ATR bounced off the adjacent A10, and the MMG rolled high for no effect and no rate against his HS in the street. As I moved, he opened up with everything, and broke the west squad as they moved into W8. During DFPh, he got Encircling fire on Q4, and then broke it, leaving me with a single HS and a still HIP Gun crew. To make things worse, Q4 had to rout out of a rowhouse, and the Interdiction pinned him in the origin hex, causing FtR.
Situation, end of German Turn 4 MPh.
For Patch’s turn 4, I was pretty close to a spectator. He had been speculating that the second ATG was in M3, and was a bit surprised when it didn’t turn up there. It didn’t take him long to find it in O4, which was one of the few reasonable places left. It was there to shoot down the victory street and cover the second roadblock of course. By the plan, I should have fired on the A10 with it when it bypassed T7, but with the excitement of the MG and ATR shots from closer in, I didn’t think about it. Once he was done, R3 fired on the two Heroes closing in for the CC kill, and wounded one of them (twice, actually, he rolled a ’12’, but passed the wound dr). And the ATG fired on the adjacent squad and a half, hoping to cut down the odds while maintaining concealment. A ‘6,1’ blew the concealment, ROF but hit, only for NE on an ’11’, and then the Gun went away on an IF ’12’. Patch’s advancing fire did nothing other than malfunction the ATG he’d captured.
I should have Low Crawled my remaining squad away, in the hopes of a final lucky self rally where he’d still be close enough to reach the road. Instead he melted away on a pair of Interdiction rolls. For CC my HS in R2 did well, killing a squad and two Heroes on a ‘2’. Sadly, they killed the HS anyway. Both sides missed in O4, leaving me going into my final turn with only one unit in existence, and he was in Melee. And he promptly died in my CCPh, clinching Patch’s victory.
Situation, end of British Turn 5 MPh.
German Turn 4
“The 9-1 rolls boxcars on his self-rally, wounding him, and the HS in T3 grabs the ATR. I do hope I’m not about to lose a tank. My Heroes fail to find the LMG in S5, but my HS does grab onto the ATG. Non-qualified unit trying to fire a captured gun? +4 TH, B8+? This should be sooo effective.”
“Rindis fires on the A10 with the ATR in Q4 to no effect, and also fires on the HS in O5. I thought the HS in T3 would also take a shot, but instead he assault moves into S3. The squad to the west tries to escape fromV8, but soaks up a lot of fire and finally breaks in W8. Q4 goes under when I Encircle it with fire from R3 and O5, then hit it with 12FP from Q6/R6. I pivot the ATG and fire at M3. Miss! In Rout, Q4 tries to escape to P3, but I Pin him in Interdiction, and be dies for FtR. To the west, W7 runs to Z6. T3 then advances to R2.”
UK Turn 5
“Two turns left to find the ATG, which I’m certain is in M3. Rindis fails to rally the wounded 9-1, and I fail to rally the squad in V5 that I forgot to lift DM off of last turn.”
“I Prep Fire the A10 in R3 against R2, primarily to rotate the front CA against the ATR. Really, it doesn’t matter (3AF all around), but it’s habit. I Opp Fire the ATG to fire against M3. In Movement, my HS in O5 moves to M3 and finds… no one? Crap! Crap crap crap crappity crap. I’ve not been in O4 (likely) or P3 (unlikely), and if it was in Q4 my earlier fire should have revealed it. If not in those hexes, he must be away from the road, which leaved a lot more open. I move a squad from Q6 into O4, and he bounces off the ATG. Woot!”
“R1 Assault Moves into Q2, and I move both heroes into R3, one at a time, nd Rindis nails one with a 1MC and I roll a 12, but live. I CX the HS in U7 to P4, and my thoughts are to build a firebase in Q4 if I can’t get into CC this turn. The 9-2 stack moves into R4, R6 moves to Q4, and U4 moves up to U6 with the goal of grabbing the mortar in case I need to Smoke O4. (Keeping the HS in U7 would have been a better move, but I thought of this too late.) To the west, I move to drive the broken squad further from the road so he can’t counterattack on a lucky Self Rally DR. I move the A10 into Z7, and I form a small firebase in Y9. A 7-0 moves into X5 to keep the squad from routing towards the town.”
“Rindis fires the ATG against the units in P4 to no effect, I lose the ATG when I fire on O4, and I can’t break the crew or the HS in Advancing Fire. The wounded 9-1 dies for FtR, and the squad to the west dies on multiple Interdiction DRs. It’s down to the HS and crew.”
“I jump on the HS with both Heroes and a squad, but I move one squad from R4 into S4 in case Rindis survives this CC, as he has before. I jump into O4 with a squad, and pile into the adjacent hexes. In CC, I kill the HS, but Rindis kills both Heroes and the squad when he rolls a ‘2’. The ATG crew is held in melee.”
German Turn 5
“I decline to fire into the melee, so we zip right along to CC where I kill the crew, eliminating the last German unit on the board and sealing a UK win.”
Conclusions
“Yow. I did not think I had this one. Rindis’ counterattack on turn 1 was a real setback for me. I lost my firepower strength up front, and I was out of position to try and hurt Rindis with any of my strong leaders. The loss of a tankette that early also hurt. My plan with them was to drive the mortar off the hill, then take the hill and cut off maneuver paths in the town. Losing one that easily made me perhaps over cautious about the mortar, so I abandoned that plan.”
“The overruns on turn 2 were a big help, killing a HS and breaking two units. That helped free up my movement to flank the line with my carriers and interdict the U3/Q10 road. This certainly wasn’t a turning point for me, but it did boost my morale and give me some hope for a win. Which I quickly lost as Rindis spawns a Hero in S5 and burns my tankette in X4.”
“Turn 3 was the big turn around for me, as I generate two Heroes and a Sniper kills the German 8-0 in V4, and the squad and HS break under the LLMC. Rindis cannot afford to lose two combat units like that, and his southern flank effectively folds. There’s no longer the combat strength to hold a lone and prevent me from enveloping the down, and from there it’s just a matter of find the ATGs and not losing 3 more tanks.”
“The A10 in T7 was certainly exposed to the ATG in O4, which is why I was certain O4 was vacant. I don’t know why Rindis didn’t fire at the tank, as he certainly needed the up front firepower with the Guns. I’m thinking that having both Guns in the backfield is a mistake, as you just can’t let the British armor have freedom of movement. And if one ATG is forward, the British player is certainly going to wonder if the second ATG is up front as well.”
“An interesting scenario to be sure, spoiled somewhat by an incredible number of 2’s on both sides for such a short game. There were 4 heroes generated, at least 3 CHs, two CC DRs, and several rolls on the IFT. I’d love to see a breakdown of rolls for the game. Just chance, or a problem with the game? Can’t say one way or the other, but it certainly was frustrating for the both of us.”
I’ll admit I was concerned from the beginning of the game. As in the truism, the plan did not survive contact with the enemy. The Germans have some good equipment, but I didn’t really anticipate the fact that the British had enough firepower to smash nearly any position they chose and still have a good number of troops to move with. The initial plan was to try and delay the British with clearing out the ‘cells’ of hedges near the road for the first couple turns, while the stone buildings held him up in the center. Instead, squads broke immediately, eliminating that line of defense well ahead of schedule.
As it was part of a fall back defense, this didn’t invalidate the entire plan at one go, and the fighting in/near T7 was hair raising but much closer to what I had in mind. The V7/W8 and T6/U7 setup of the roadblocks was part of the initial (cell-defense) plan, and if I had it to do over, that is the one thing that I would definitely change. Right now, I’d go for a R5/S6 setup of the second roadblock, though cutting off one of the side roads from the VC road is also a good possibility.
I had a few things go spectacularly right for me (both tankette kills, but especially the initial MTR-kill, and the CC in T7, but a bunch of low-odds things went wrong. Both OVRs on turn two being successful put me in a bind that I never completely got out of, though I’d say one was the logical price of my daring unsupported counterattack into X4. Losing the squad Dashing through R4 hurt, but can’t be considered entirely unexpected. The real painful event of the game was the 9-1 breaking in S3 on turn 3. That should have lead to me getting that flank back under control, but instead put a too-precious leader out of the game, and led to the loss of two squads with no way to save them.
Part of the initial plan was to offer the T6/U7 roadblock as a tempting HD location for a tank, and the ATG in O4 would try to use ROF to get the turret hit. Patch was too smart for anything like that, but technically fell for it anyway when he VBMed T7 before realizing just how exposed he was getting. Sadly, in my utter focus on the front area, and the need to decide when and if it was worth spending precious DFF shots at this threat, my focus on the ATG being reserved for U7 blinded me to the one clear shot I’d get. That was probably my biggest gaffe right there.
That leaves the question of where to put the two ATGs. I think O4 is generally correct for one of them. It’s got a nice ‘shooting gallery’ down the road (which a smart British player will avoid, but it can be best to keep him honest), good field of fire across the main road, which the Brits are going to need to clear at some point, and of course, is adjacent to the VC road. The second one is tougher. I’d like to set up with a mind to keeping an eye on the U3-Q9 road, which will need to be crossed at some point; but there’s no location under cover that has good LOS to the road. R6 might be as good as that gets, though onerous NT CA changes in a building would be all too common. It would certainly have discomfited Patch’s charge with the Carriers.
Discussion ¬